Your garden might be thriving with greenery, but sometimes all that lush foliage can start to look a little well, monotonous.
When every corner is the same shade of green, it’s easy for your outdoor space to lose a bit of its personality. That’s where DIY garden stakes come in as they’re the perfect way to shake things up and inject some fun, color, and creativity into your yard.
From quirky faces to whimsical flowers and repurposed crafts, these playful additions bring instant charm to even the simplest garden bed.
Whether you’re looking to add a pop of color, some visual movement, or just a smile each time you step outside, these 23 DIY garden stake ideas will liven things up beautifully.
#1. Beaded Whimsy Rain Tree Stake
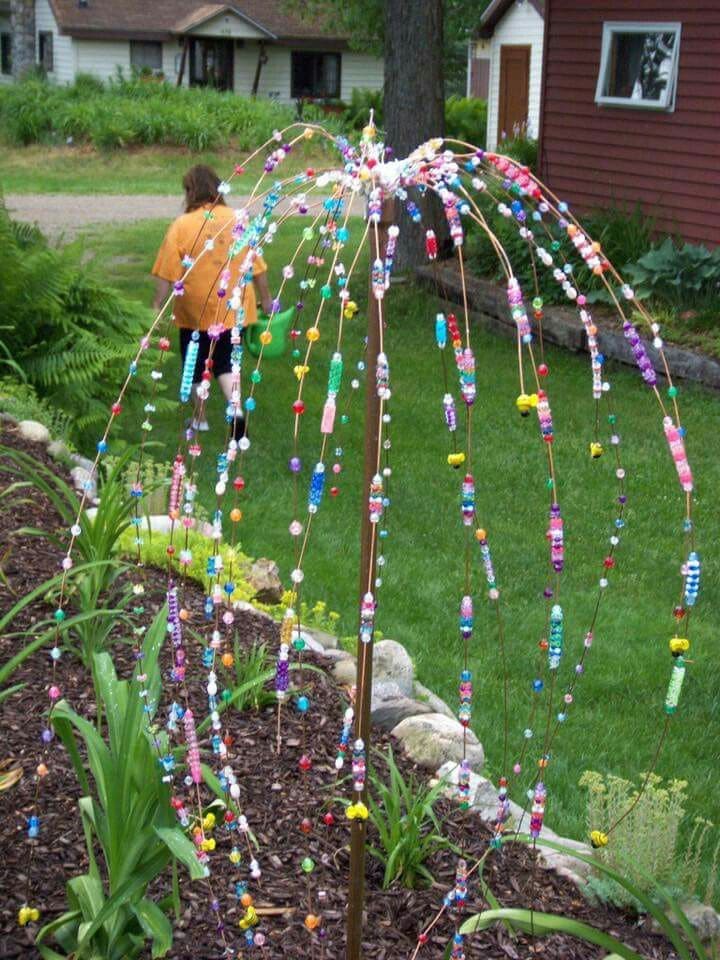
This sparkling beaded garden tree turns your flowerbed into a whimsical dreamscape. With its cascading wire branches adorned in vibrant plastic and glass beads, it catches sunlight and dances in the wind like a magical rain shower.
Moreover, it brings a childlike wonder to the garden, one of those joyful details that makes people stop and smile. This DIY piece is especially fun to craft with kids or as a meditative project for slow afternoons.
Materials Needed
- 1 metal garden stake
- Flexible copper or steel wire (medium gauge)
- 200-250 colorful plastic beads
- Hot glue or crimp beads (optional)
- Wire cutters and pliers
Step-by-step Guide
Step 1: Cut wire strands approximately 2-3 feet long and string on colorful beads in patterns or random combinations.
Step 2: Secure beads in place by twisting the wire ends or using glue/crimp beads at intervals to prevent sliding.
Step 3: Attach the beaded wires to the top of your garden stake, fanning them outward to mimic weeping branches.
Step 4: Finally, place your stake in a flowerbed or pot and gently shape the wires into flowing arcs.
#2. Whimsical Beaded Garden Markers

Like tiny guardians of your garden, these vibrant beaded stakes catch the light and lift the spirit. Each one tells a different story like dragonflies, dreamcatchers, sparkling globes, strung together with a colorful mix of glass beads and charms.
Specially, they’re not just decorative; they feel magical, like they’ve wandered in from a fairy tale. Best of all, you can customize them endlessly to match the mood of your garden or season.
Materials Needed
- 4-6 metal stakes (8-12 inches long)
- 40-60 assorted glass and acrylic beads per stake (8mm-14mm size)
- Decorative charms and pendants (e.g., dragonflies, moons, hearts)
- Jewelry wire or E6000 adhesive
- Rubber end caps
Step-by-step Guide
Step 1: Lay out a bead design pattern by arranging colors and charm placements on a flat surface first.
Step 2: Slide beads and decorative pieces onto your metal stake, leaving enough space at the top for a large focal bead.
Step 3: Add a rubber cap or apply strong adhesive to secure the final bead and keep everything in place.
Step 4: Gently press the stake into potted soil or flower beds where it can shine without crowding plants.
#3. Whimsical Painted Bird Garden Stakes

Colorful and full of charm, these painted bird garden stakes are like storybook characters who flew right into your flower pots. Their triangular bodies, big eyes, and cone-shaped beaks make them playful and wonderfully odd.
Additionally, you can mix and match hues, patterns, and even expressions, each one becomes its own little garden guardian. Perfect for adding a lighthearted touch near your porch or patio blooms, these birds bring smiles wherever they perch.
Materials Needed
- Flat metal or wood pieces cut into simple shapes (approx. 4-6″ tall per bird)
- Bright acrylic paints in assorted colors
- Fine-tipped paintbrushes
- Googly eyes (1″-1.5″)
- Metal garden stakes (24″-30″ tall)
- Outdoor clear sealant spray
- Strong adhesive
Step-by-step Guide
Step 1: Sketch and cut out bird shapes like triangles for bodies, circles for heads, and small cones or triangles for beaks.
Step 2: Paint each piece in your favorite bold, sunny colors and add dotted or zigzag accents. Once dry, glue on the eyes and attach all the parts together.
Step 3: Affix your finished birds to garden stakes and coat them with sealant for weather protection.
#4. Broomstick People Garden Stakes

If your garden could use a little more laughter, these broomstick people are your answer. Each one is packed with personality such as glasses, earrings, lipstick, even a mustache and they stand like cheerful greeters among the greenery.
Plus, this project lets you repurpose old brooms and household odds and ends into expressive faces that brighten your yard and mood alike. It’s quirky, charming, and a great conversation starter for anyone walking by.
Materials Needed
- 3 old brooms (standard 12″-14″ heads)
- 3 wooden garden stakes (about 4 feet tall)
- Googly eyes, craft foam, buttons, or beads
- Scraps of fabric, ribbon, yarn, or old costume pieces
- Hot glue gun
- Spray sealant
Step-by-step Guide
Step 1: Insert or securely attach the broom heads to the top of each wooden stake.
Step 2: Design faces using your craft supplies. You get creative with hair using yarn or spray-dyed broom bristles.
Step 3: Add accessories like bows, scarves, hats, or earrings. Then secure everything well using hot glue.
Step 4: Finally, spray the finished characters with a clear sealant to protect them from rain or sun exposure.
#5. Funny Clay Chicken Garden Stakes

These quirky little hens peeking through your plants will instantly make your herb pots or flower beds feel more alive. Their tilted heads and textured feathers give off a curious, slightly nosy vibe like they’ve been gossiping behind the rosemary.
Moreover, it’s the kind of whimsy that brings a bit of barnyard magic to your green space without making a peep. They’re especially fun tucked among lavender or parsley, where their expressions feel even more animated.
Materials Needed
- Air-dry clay
- Toothpicks and sculpting tools
- Acrylic paints (cream, red, orange, black)
- Small bamboo skewers (6″-8″)
- Clear outdoor sealant spray
Step-by-step Guide
Step 1: Sculpt cone-shaped chicken bodies, adding beaks, combs, and small details like eyes and feathers.
Step 2: Let the clay dry completely or bake as directed. Then paint each piece with acrylics, letting their personalities shine through the brushstrokes.
Step 3: Seal the painted chickens with a clear outdoor sealant to protect them from moisture.
Step 4: Attach the chickens securely to wooden skewers and nestle them into your garden.
Tip: You can try positioning them at slightly different angles so they look like they’re mid-cluck or whispering secrets between the herbs.
#6. Upcycled Tin Can Planter Pole

You can see this clever garden pole makes use of everyday tin cans and a sturdy bamboo stake to create vertical greenery in small spaces. Each can acts as a mini planter, ideal for herbs, flowers, or ornamental grass.
The reflective metal adds a modern touch while giving your garden a more vertical dynamic. It’s a fantastic solution if you’re short on ground space but still want some lush life at eye level.
Materials Needed
- 1 thick bamboo stake (about 3″-4″ diameter, 3-4 ft tall)
- 5-7 cleaned tin cans (standard 14-15 oz size)
- Metal screws
- Drill
- Potting soil and small plants
- Optional: Rust-resistant spray paint
Step-by-step Guide
Step 1: Drill drainage holes in the bottom of each tin can, then paint them if desired and let dry.
Step 2: Secure each can to the bamboo pole using a drill and screws. You should space them out vertically in a staggered fashion.
Step 3: Push the bamboo stake deep into the soil so it’s firmly anchored.
Step 4: Finally, fill each can with potting soil and add your chosen plants or herbs.
#7. Colorful Screw Dandelion Garden Stakes

Sometimes the most ordinary things hold unexpected beauty. These playful garden stakes are crafted from painted screws arranged in dandelion-like bursts, bringing a whimsical, modern flair to your flower beds or planters.
Their vibrant colors, ranging from cheerful yellow to striking cobalt, catch the sunlight and turn even the quietest corners into a celebration of creativity. They’re quirky, lightweight, and surprisingly easy to make.
Bonus, kids and adults alike can enjoy the process, and you’ll love how they pop against green foliage or gravel beds. Best of all, they’re weather-resistant and reusable season after season.
Materials Needed
- 30-50 various sizes of screws per dandelion
- Styrofoam balls (1.5″-3″ diameter)
- Acrylic spray paint in assorted colors
- Metal garden stakes
- Drill
- Hot glue gun (optional)
Step-by-step Guide
Step 1: Paint each screw in your chosen colors and allow them to dry thoroughly. Bright, bold tones work best for outdoor pop.
Step 2: Carefully poke small holes into your foam ball using a drill or awl, then insert the screws in a uniform, radiating pattern.
Step 3: Paint your garden stake or dowel green or any color that blends naturally with your setting.
Step 4: Push the dowel firmly into the foam base or hot glue it in for stronger support.
Tip: For a shimmering effect, you should dust the screws with fine glitter before the paint dries, or use metallic spray for an industrial-chic twist.
#8. Painted Bug Totem with Bottle Cap Pebble Holders

Interesting, this delightful bug totem feels like something straight out of a whimsical storybook. Painted in bright colors and wrapped in playful patterns, it features tiny ladybug accents and little bottle cap shelves that cradle special pebbles or treasures.
Furthermore, nestled among your garden beds or beside a sunny window, it’s an uplifting piece that invites curiosity and a sense of childlike wonder. It’s not just decor, it’s a conversation starter, a bug playground, and a mini pedestal for nature’s tiniest keepsakes.
Materials Needed
- 1 sturdy wooden stake (approx. 1.5″ thick, 4-5 feet long)
- Acrylic paint in various bright colors
- 10-12 small plastic bottle caps
- Paint pens
- Hot glue
- Small painted pebbles
- Mini plastic or wood ladybugs (optional)
Step-by-step Guide
Step 1: Sand and clean the wooden stake to prep for painting. Paint colorful blocks, stripes, or faces down the length of the pole.
Step 2: Glue bottle caps to the pole, spacing them out vertically. Then tilt some slightly for added visual interest.
Step 3: Add little painted rocks inside the caps or keep them empty as bird snack holders.
Step 4: Attach your bug accents (like tiny ladybugs) to give it a lively and animated look.
#9. Recycled Faucet Handle Mushrooms

What about giving your garden beds a pop of quirky charm with these whimsical mushrooms made from old faucet handles? Each one sits like a colorful surprise among the greenery, catching the sunlight with a hint of vintage flair.
Also, the mix of rusty textures and bright hues creates a playful balance that feels both rustic and enchanted. It’s a creative way to reuse metal pieces that might otherwise be tossed and the result looks like something from a tiny fairy village.
Materials Needed
- Old metal faucet handles (approx. 2″-4″ diameter)
- Garden stakes (12″-24″ long)
- Outdoor spray paint in assorted colors
- Metal primer (optional)
- Heavy-duty glue
- Clear coat sealant spray
Step-by-step Guide
Step 1: Clean all faucet handles and stakes thoroughly. Then sand lightly if needed to remove rust or flaking paint.
Step 2: Spray paint the handles in fun, vibrant shades. Let dry and apply a second coat for full coverage.
Step 3: Spray each with a clear sealant for added durability outdoors.
Step 4: Now, you attach each handle to the top of a metal rod using a strong metal adhesive. Then allow to fully cure before staking them in the ground.
#10. Whimsical Faucet Handle Flowers

How about bringing a burst of industrial charm into your garden with these playful faucet handle flowers? Each bloom is made from brightly painted vintage spigot handles, giving off a retro vibe with an artsy twist.
Clustered in a pot or flower bed, they add height, color, and texture without needing water or sun. They’re low-maintenance, weatherproof, and bring quirky character to any outdoor space.
Materials Needed
- Old metal faucet handles (variety of shapes)
- Spray paint
- Stiff metal stakes (green-painted preferred)
- Epoxy
- Decorative buttons
Step-by-step Guide
Step 1: Clean and dry all faucet handles thoroughly before painting them with vibrant colors.
Step 2: Glue decorative buttons or washers to the center of each handle for a more detailed flower look.
Step 3: Attach the painted faucet handles to the tops of your stakes using epoxy or strong adhesive.
Step 4: Now, place them in a planter or garden bed at varying heights for a whimsical layered effect.
#11. Colorful Plastic Flower Ring Stakes

These cheerful ring-shaped garden stakes are a celebration of color and texture. Made with vibrant pieces of upcycled plastic, they catch the sunlight in delightful ways like little stained-glass windows for your plants.
The best part is that each one feels like a burst of energy rising from the earth, brightening even the dullest corners of your yard. They’re not just decor; they’re tiny odes to creative reuse and vibrant garden spirit.
Materials Needed
- Clear plastic bottles (various colors)
- Wire wreath frame (8″-10″ diameter or heart shape)
- Garden stakes (around 24″)
- Hot glue or UV-resistant adhesive
- Scissors
Step-by-step Guide
Step 1: Cut the plastic into small petal- or shard-like pieces using scissors. You can try mixing transparent and opaque pieces for depth.
Step 2: Attach the plastic shapes around the wreath frame using hot glue, overlapping slightly for fullness.
Step 3: Once the entire ring is covered, glue the frame securely to a garden stake.
Step 4: Place the stake in a sunny spot where light can pass through, it will shimmer beautifully throughout the day.
Tip: If you want more movement, leave a few pieces loosely attached so they rustle gently in the breeze.
#12. Painted Bottle Cap Garden Stakes

These sweet and simple garden stakes add a splash of color and personality to your herb pots and flowerbeds. Made from upcycled bottle caps, each stake is hand-painted with cheerful icons like a red mushroom or flower and mounted on a wooden stick.
They’re especially perfect for helping little ones learn about gardening or just to brighten your daily watering routine. Playful, low-cost, and full of charm, they invite smiles from anyone who passes by.
Materials Needed
- Clean metal bottle caps (1″-1.5″ diameter)
- Wooden craft sticks (6″-8″ long)
- Acrylic paints and fine brushes
- Clear outdoor sealant spray
- Strong glue or epoxy
Step-by-step Guide
Step 1: Paint each bottle cap with a base coat and let it dry fully. You can also add whimsical designs like flowers, veggies, bugs and allow paint to dry again.
Step 2: Spray caps with an outdoor sealant to protect your artwork from moisture and fading.
Step 3: Glue each cap securely to the top of a wooden stick and allow it to dry completely before using.
Step 4: Finally, stick them gently into potted herbs or garden beds to label or decorate your plants.
#13. Vintage Glass Insulator Stakes

These tall, glowing garden stakes bring antique charm to any flower bed. Using vintage glass insulators once used on power lines, this idea turns forgotten relics into glowing garden sculptures. Their soft teal hue looks magical among the greenery, especially when sunlight hits them just right.
Furthermore, they’re wonderfully nostalgic and surprisingly elegant, perfect for adding quiet beauty and vertical interest in shady corners or wildflower patches.
Materials Needed
- Glass electrical insulators (typically 3″-5″ tall)
- Metal rods (around 36-48″, depending on desired height)
- Strong epoxy (optional)
- Rubber washers
Step-by-step Guide
Step 1: Clean the glass insulators thoroughly with warm soapy water and dry them completely.
Step 2: Insert one end of each rod into the ground securely. Then leave at least 10-12″ buried for sturdy support.
Step 3: Gently place each insulator on top of the rod. You can add a dab of epoxy or rubber washer underneath if needed to hold it snugly.
Step 4: Position them in clusters of varying heights to create a glowing field effect among your plants.
#14. Vintage Cobalt Bottle Garden Totem

If your garden has a quiet corner that feels a little too plain, this striking bottle stake project adds elegance with minimal effort. Upcycled cobalt blue bottles stand tall like sentinels, perched on rusted metal stakes that lend an earthy, sculptural charm.
Also, the rich glass catches light beautifully, especially at golden hour. It’s the kind of piece that doesn’t shout for attention but draws you in with timeless, antique allure. Perfect for those who love rustic decor or want to blend garden art into their landscape with intention.
Materials Needed
- 5-7 glass bottles (cobalt blue, green, or amber work best)
- Sturdy metal stakes
- Hammer
- Gloves and safety glasses
- Optional: Rust-resistant spray clear coat
Step-by-step Guide
Step 1: Choose your display area, preferably near a fence or tucked into foliage to give it a framed, secret-garden feel.
Step 2: Drive each metal stake securely into the ground, spacing them at varying heights for visual interest.
Step 3: Slide each glass bottle upside down over the top of the stakes. You have to ensure they sit firmly and won’t slide off.
Step 4: Optionally seal with a clear coat to preserve the look of the metal and prevent flaking.
#15. Color Burst Metal Ring Garden Sculpture

There’s something magical about how sunlight hits these colorful rings, casting vibrant shadows that dance on your garden floor. Made from upcycled metal washers or cut-out discs, this sculpture mimics the joyous energy of wind spinners without needing to move.
Especially, each ring is painted in bold, overlapping hues, bringing life to even the quietest garden corners. This piece doesn’t just decorate, t energizes your outdoor space with a splash of artistic whimsy.
Materials Needed
- Various sizes of metal washers (2″-8″ diameter)
- Rust-proof garden stakes (3-4 feet tall)
- Outdoor spray paint in vibrant shades
- Strong epoxy
- Clear weatherproof sealant spray
- Optional: spiraled wire accents
Step-by-step Guide
Step 1: Clean and dry all metal parts. Then sand any sharp edges smooth.
Step 2: Paint each ring in a different color, using layers and blending for a fun, textured look. Now you seal with a clear coat to protect against rust and fading.
Step 3: Attach rings to metal stakes using adhesive or welding. You can arrange them at different heights and angles for movement and depth.
#16. Romantic Heart-Shaped Garden Stakes

If your garden needs a little love, these heart-shaped stakes are the perfect way to add charm and joy. Whether you’re decorating for Valentine’s Day or just want to make your flowers feel extra adored, these bright, open hearts create an inviting and playful vibe.
Bonus, their clean shapes and fun color combinations add a touch of whimsy without overpowering your space. You can set them among flowerpots, herb beds, or even indoor planters for a sweet surprise that warms the eyes and heart.
Materials Needed
- Thin plywood (cut into 8″-10″ heart shapes)
- Acrylic paint in red, pink, and white
- Garden stakes (24″-30″)
- Sandpaper and craft glue
- Outdoor sealer (optional)
Step-by-step Guide
Step 1: Trace and cut out open heart shapes from plywood or foam board. You should sand edges for a smooth finish.
Step 2: Paint each heart using different colors or patterns. Try polka dots, checks, or color blocks for variety.
Step 3: Once dry, glue or staple each heart onto a wooden dowel.
Step 4: Seal with an outdoor spray if placing them outside, then insert into pots or garden beds.
#17. Tin Can Bees and Ladybugs Garden Stake

Your veggie patch just got a whole lot cuter. These happy little bees and one cheerful ladybug made from painted tin cans bring loads of personality to your greens. Their googly eyes and tiny wings feel like they’re mid-buzz, ready to spread joy instead of pollen.
Of course, you don’t need to be a pro to pull this off, just a few recycled cans, some imagination, and a bright afternoon. It’s the kind of project that makes your plants smile back at you.
Materials Needed
- 3-4 empty tin cans (3″-4″ wide)
- Yellow, black, and red spray
- White plastic
- Bottle caps (optional)
- Rope (approx. 6-8″ each)
- Small red beads
- Wooden garden stakes
- Hot glue gun
Step-by-step Guide
Step 1: Paint the cans with bold stripes like yellow and black for bees, red with dots for ladybugs. Let dry thoroughly.
Step 2: Cut out simple wing shapes from your white plastic and glue them to the top-back of each can.
Step 3: Attach pipe cleaner legs underneath, adding beads for little playful feet.
Step 4: Finally, you just glue on bottle caps or googly eyes for expressive faces, and mount the cans securely onto garden stakes.
#18. Whimsical Bottle People Garden Stakes

These funky flower stakes are made from upcycled metal sink strainers and buttons, creating an artsy bouquet that never wilts. Each petal has a dotted texture that catches the light beautifully, while the vibrant button centers give the flowers their quirky personality.
Planted in pots or beds, these are perfect conversation starters and add charm in the most unexpected places. They’re a great way to reuse old kitchen parts in a joyful, decorative way.
Materials Needed
- Old metal sink strainers (approx. 3-4 inch diameter)
- Assorted colorful buttons (1-1.5 inch)
- Wooden garden stakes (12-24 inches long)
- Heavy-duty glue
- Drill (optional) or strong adhesive
Step-by-step Guide
Step 1: Clean your metal strainers and flatten them if needed. Then slight bends give the petals more depth.
Step 2: Attach one or two buttons to the center of each strainer using heavy-duty glue or small screws.
Step 3: Use adhesive or drill small holes to secure the strainers to the tops of your wooden stakes.
Step 4: You just arrange them in a pot, garden bed, or along your walkway for a burst of recycled cheer.
#19. Metal Strainer Flower Stakes

#20. Playful Painted Veggie Stakes
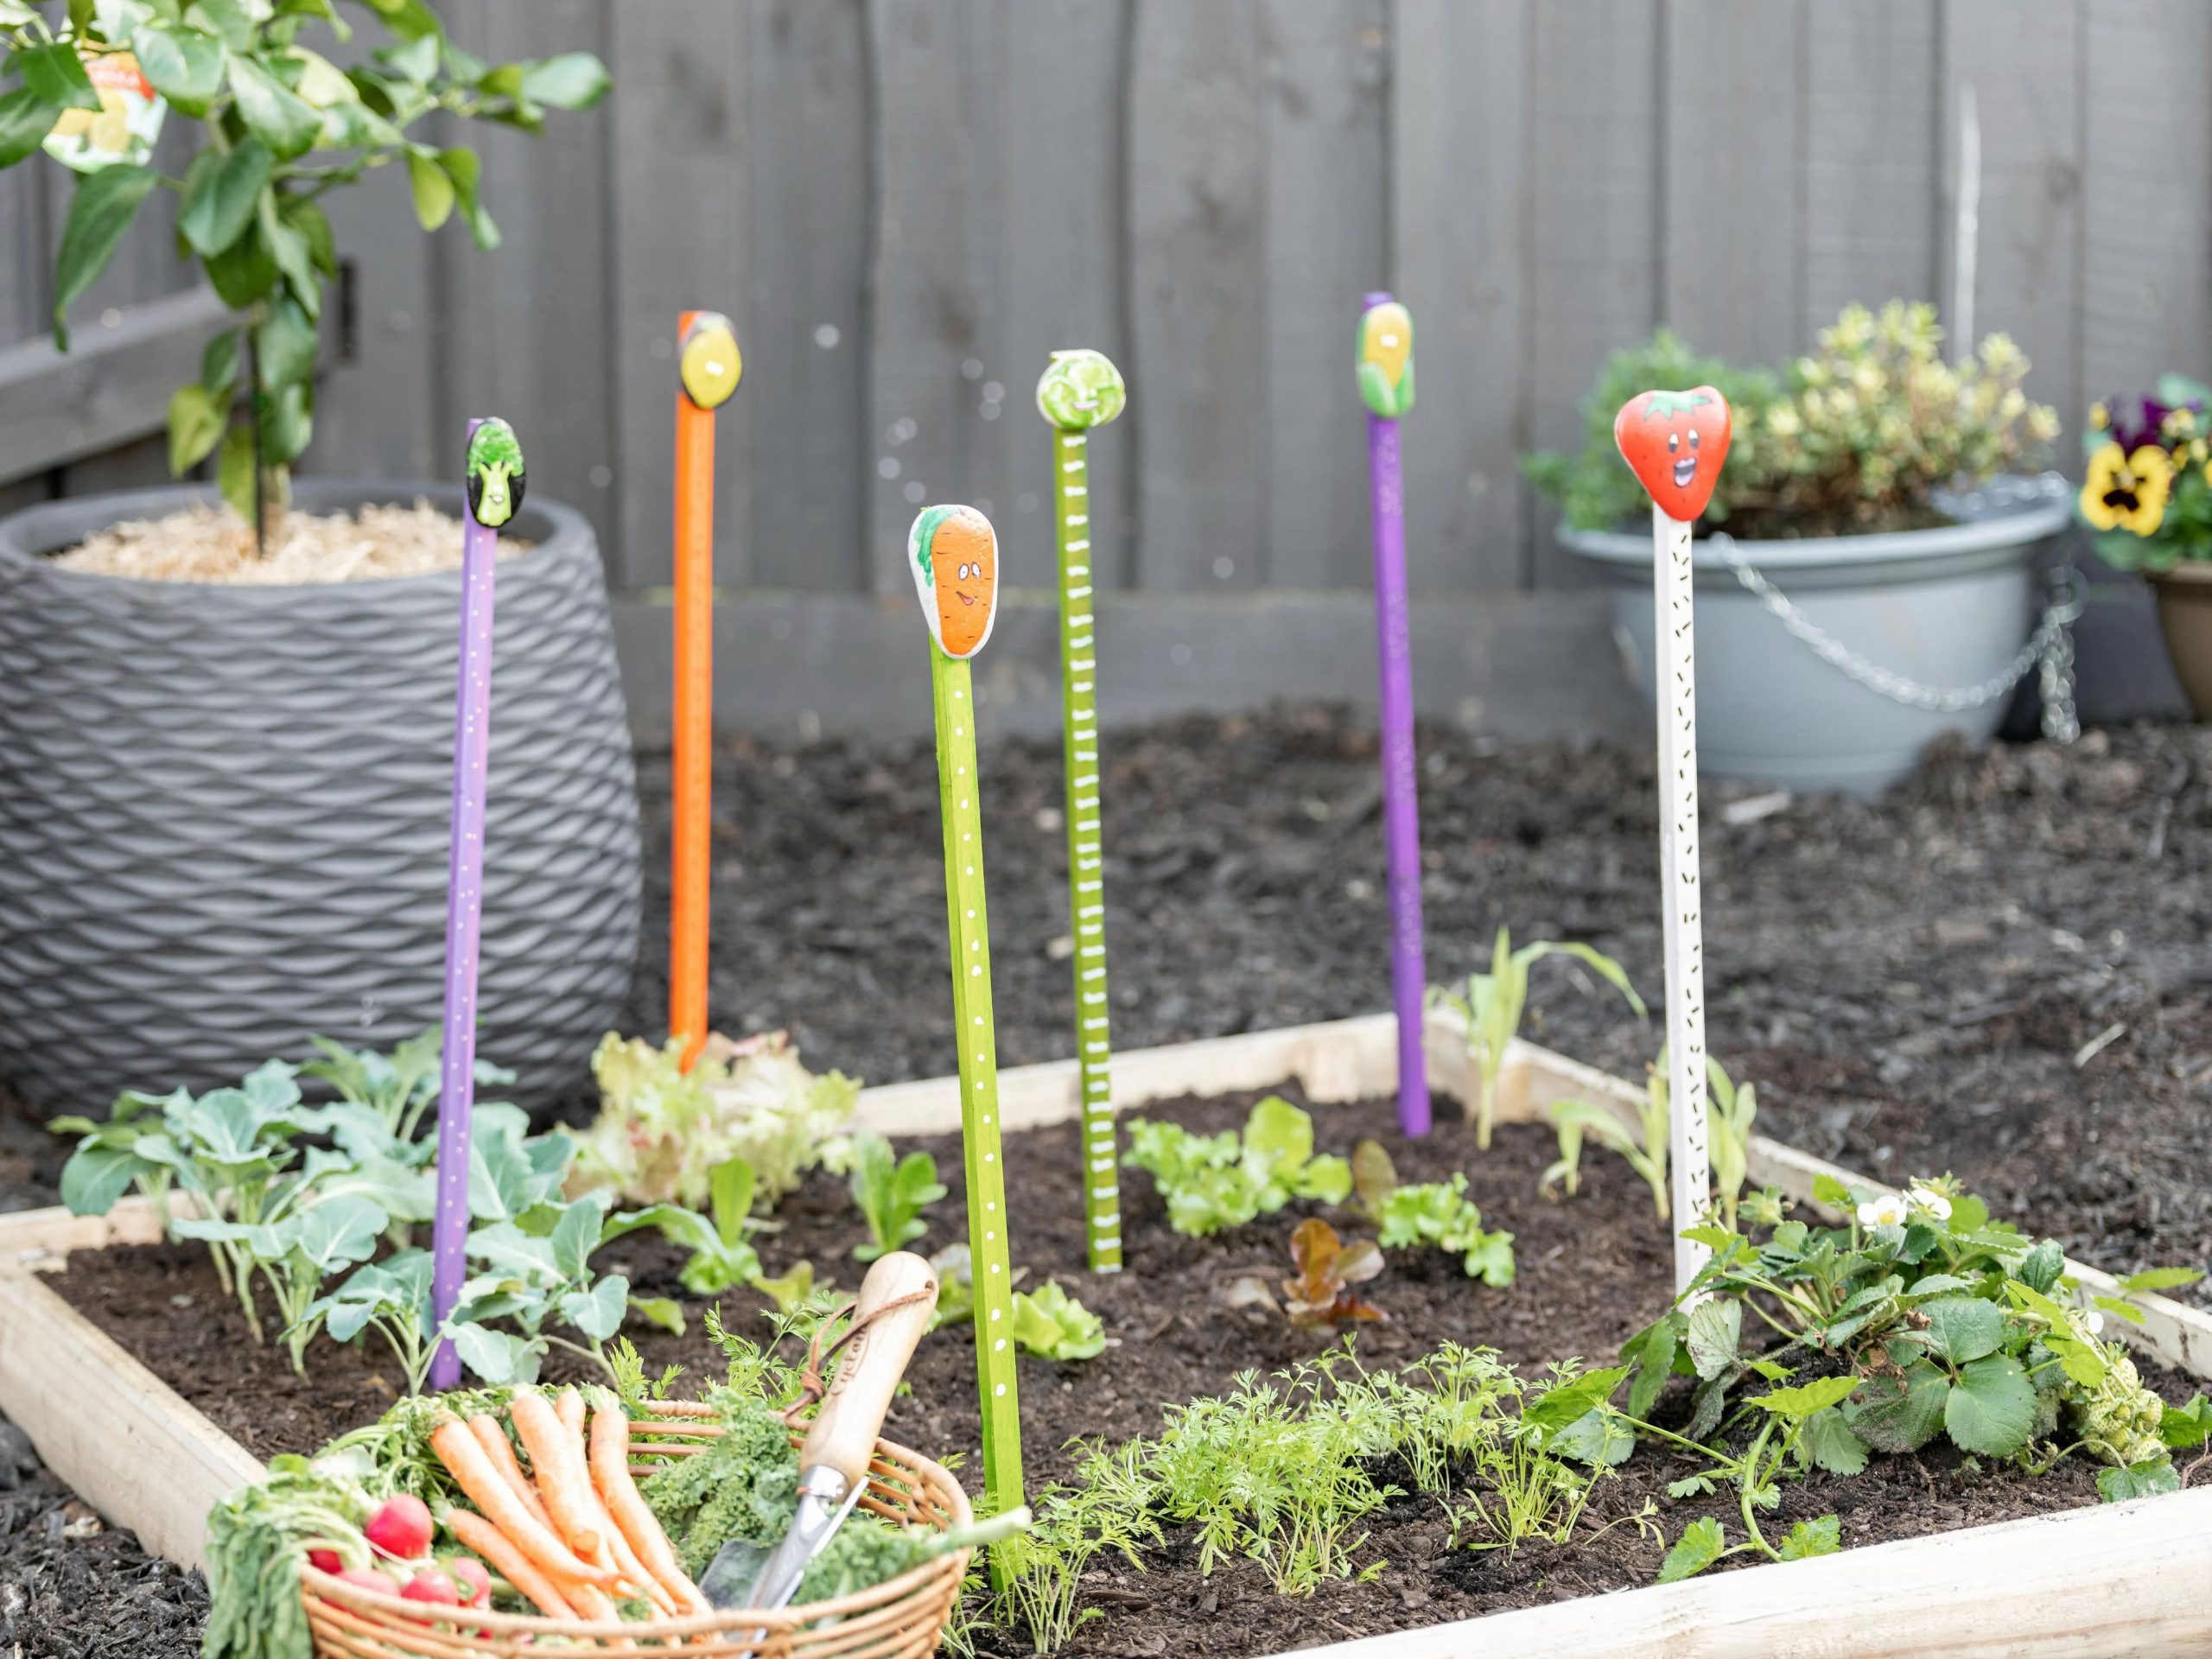
Why not bring your veggie patch to life with these cheerful painted markers that feel like characters straight out of a children’s storybook. Each wooden stake is topped with a hand-painted rock shaped and colored to look like smiling veggies and you can think tomatoes, carrots, corn, and more.
Not only do they help keep your crops organized, but they also add personality to your garden beds. This is the kind of project that makes gardening feel magical, especially for kids.
Materials Needed
- 6-8 smooth river rocks (1.5″-3″ in size)
- Wooden stakes (3-4 ft tall)
- Acrylic paint in bright veggie colors
- Paint pens
- Outdoor sealant spray
- Strong glue suitable
Step-by-step Guide
Step 1: Clean your rocks and paint them to resemble vegetables, adding faces or patterns for a whimsical twist.
Step 2: Once dry, seal the painted rocks with a protective outdoor spray to help them weather the seasons.
Step 3: Paint the wooden stakes in bright matching colors and allow them to dry.
Step 4: Finally, attach each rock securely to the top of a stake with strong adhesive.
Tip: If planting rows of similar vegetables, you can write the veggie names down the side of the stake for added clarity.
#21. Rustic Metal Garden Blooms

Amazingly, these weathered steel flowers are a bold and beautiful way to bring blooms into your garden that never wilt. Each one is sculpted with layered metal petals that mimic the texture of real blossoms, creating a strong contrast against greenery or mulch.
Plus, they look like something out of an old barnyard dream. You can group them together for a show-stopping focal point or plant them individually among your perennials for a surprise glint of metal in the sun.
Materials Needed
- Galvanized metal sheets (1-2 feet square per flower)
- Sturdy metal stakes (3-5 feet long)
- Metal snips
- Welding kit
- Protective gloves and safety goggles
- Optional: Outdoor spray paint
Step-by-step Guide
Step 1: Sketch petal shapes onto your metal sheets and carefully cut them out using tin snips. You should vary petal lengths for a layered look.
Step 2: Curve each petal slightly by hand or using a wooden dowel for dimension. Then assemble petals in concentric circles, overlapping as you go.
Step 3: Weld or glue each petal to a central metal base. You now attach the flower head securely to the top of your metal stake or rebar rod.
Step 4: Finish with optional paint or patina, then place into your soil with the flower angled slightly for a natural stance.
#22. Woodland Owl Garden Stake

There’s something quietly magical about this hand-built owl perched in your garden. Made from rustic scraps, weathered wood, bark, seed pods, wire, and stones, this little creature looks like it wandered in from a forest fairytale.
Furthermore, its watchful eyes, made from tree branch slices, give it a curious personality that adds character and charm. This stake is less about perfection and more about personality, blending art and nature in the most delightful way.
Materials Needed
- Wooden board (approx. 2.5″-4″ wide and 16″-24″ tall)
- Tree bark, small stones, pine cones, or seed pods
- Two 2-inch wood slices
- Rusty wire
- Old nails, washers, or metal tokens
- Garden stake (24″-30″)
- Hot glue gun
Step-by-step Guide
Step 1: Choose a rustic wood plank for the owl’s body. Then sand edges lightly if needed but leave most of the natural wear.
Step 2: Attach bark or stone along one side as the owl’s wing. You should use wood glue or a hot glue gun to hold materials in place.
Step 3: Create the owl’s face with two circular wood slices for eyes, then add bark or seed pods for the beak and ears.
Step 4: Embellish with wire, twine, or nails as desired for whiskers or eyebrows. You mount the owl to a sturdy garden stake and press into soil.
#23. Horseshoe Bee Garden Stake

Wow, this quirky bee made from painted horseshoes brings a delightful buzz to your garden decor. With curved wings and a bright yellow body, it’s an eye-catching way to repurpose metal into something cheerful and creative.
Also, the iron accents give it a sturdy, weatherproof feel, making it a perfect choice for outdoor display year-round. It’s playful, industrial, and a little rustic all at once, perfect for bee lovers and metalwork fans alike.
Materials Needed
- 2 horseshoes (approx. 5 inches each) and 2 horseshoes (approx. 6 inches each)
- 1 piece of rebar (about 6-8 inches long)
- Green garden stake (approx. 24-30 inches)
- Yellow and black spray paint
- Strong adhesive
- 2 short wires
Step-by-step Guide
Step 1: Clean and sand the horseshoes, then paint two yellow for the body and two black for the wings.
Step 2: Once dry, align and glue (or weld) the yellow horseshoes in a vertical position, slightly overlapping.
Step 3: Attach the black horseshoes on each side as wings. Now you need to secure with glue or tack welds.
Step 4: Add the metal rebar or thick wire across the yellow body for a striped look.
Step 5: Finally, glue the antennae at the top, then mount your bee to the stake and place it in your garden.
