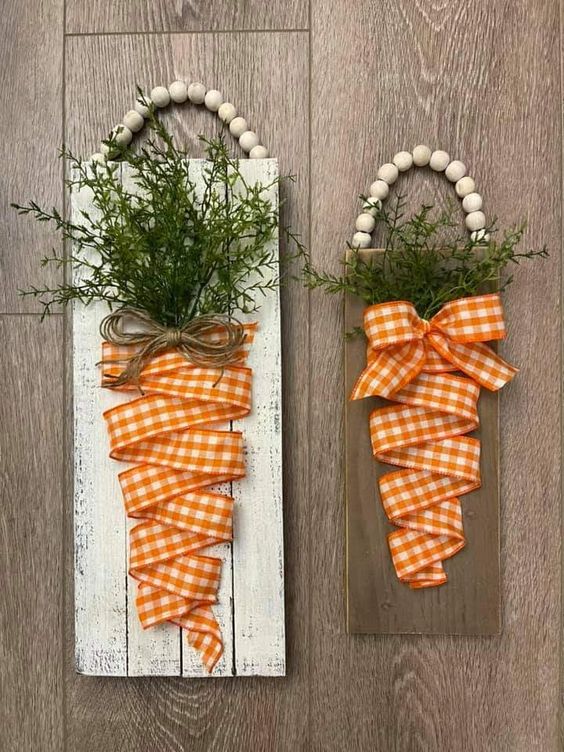
Creating ribbon crafts is a fun and easy way to add a personal touch to gifts, decorations, or even your home. With just a few materials, you can make beautiful bows, flowers, or other creative designs.
In this guide, we’ll show you simple steps to make your own ribbon craft DIY. Whether you’re new to crafting or already love making things, this is a fun project anyone can enjoy! Let’s get started.

Materials
- Scrap Wood
- Dollar Tree Gingham Ribbon
- Dollar Tree Flowers
- Spray Bottle With Water
- Acrylic Paint in brown
- Hot Glue Gun
- Chip Brush
Instructions
1. Mix the Paint
Pour a little brown acrylic paint onto a paper plate. Spray some water on it using a spray bottle. Mix the paint and keep adding water until it looks thin, like a stain.
2. Paint the Wood
Use the chip brush to paint the wood with the watery paint. Once it’s covered, use a baby wipe to gently wipe off some paint. This will let some of the natural wood show through. Let it dry.
3. Glue the Ribbon
Add a little hot glue to the end of the gingham ribbon and stick it to the wood. Keep adding glue and place the ribbon in a zigzag pattern to make a carrot shape. Press the ribbon onto the glue.
4. Make the Bow
Tie the ribbon into a simple bow, like how you tie shoelaces. Glue the bow to the top of the carrot shape.
5. Add the Leaves
Pull the green leaves off the flowers. Tuck them under the top of the ribbon carrot until it looks full. You don’t need glue for this.
6. Add Decorations
For a little extra touch, stick a small embellishment, like a button, in the middle of the bow.
Now you have a cute, handmade ribbon craft that you can display as part of your decor!
