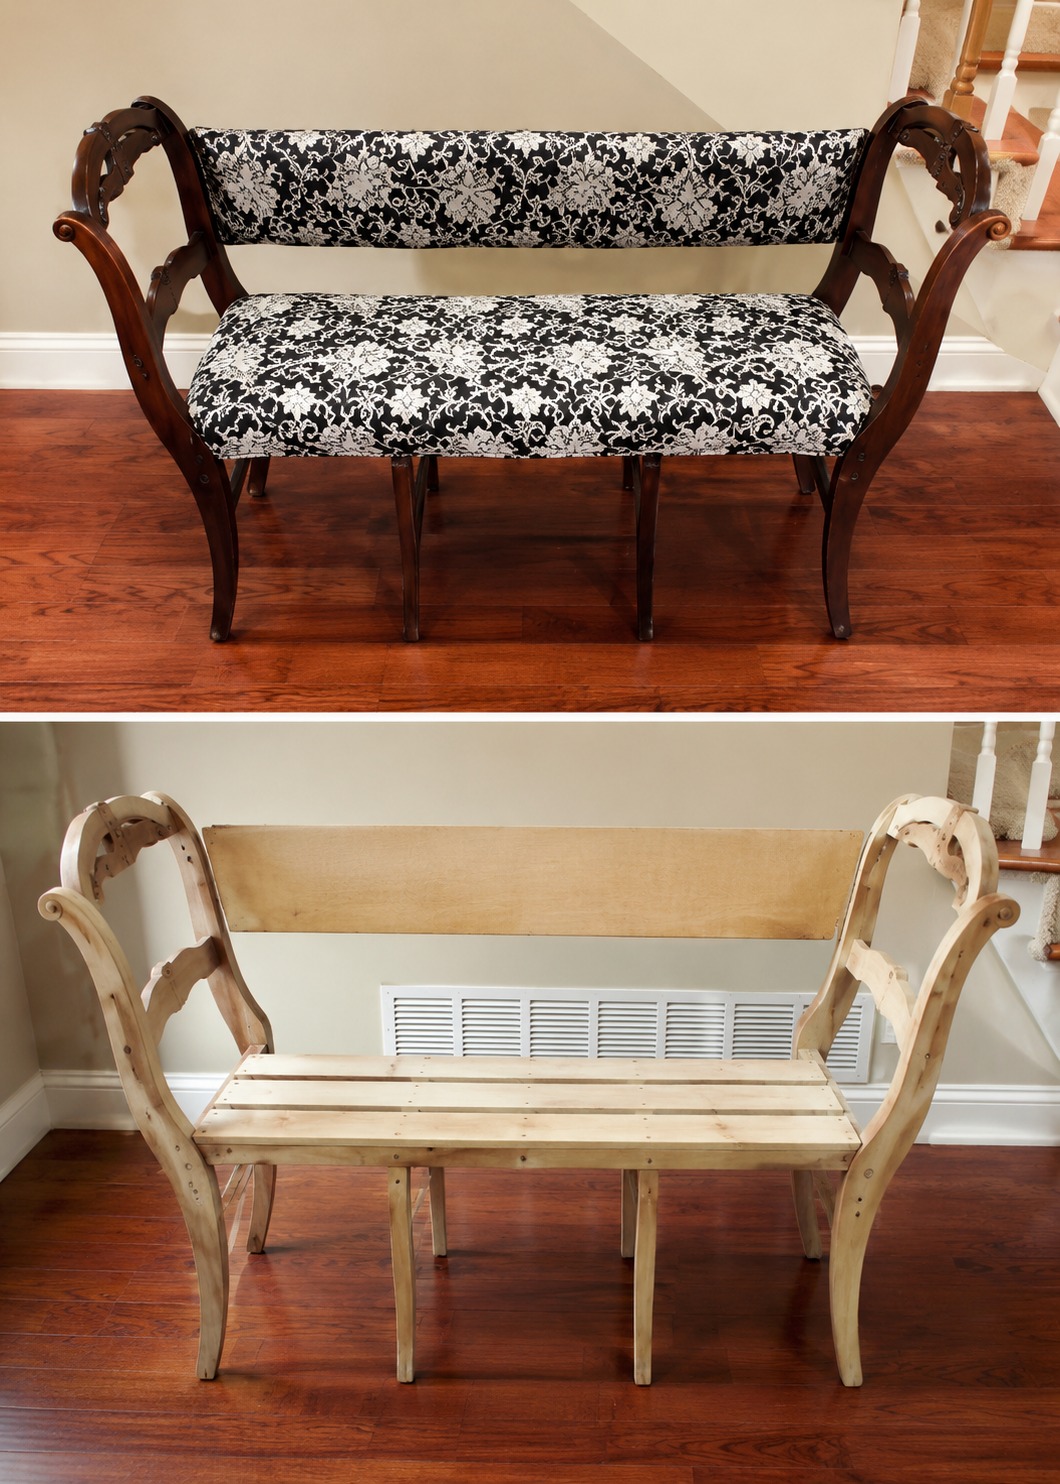
A worn wooden bench can become a charming upholstered settee with the right fabric, padding. This project is perfect if you have an old bench frame with graceful arms but a plain or unfinished seat.
What You’ll Need
* Old wooden bench frame
* Sandpaper, medium and fine grit
* Wood stain or paint
* Paintbrush or foam brush
* Clear protective finish
* Plywood or wooden slats for the seat base
* Upholstery foam
* Batting
* Upholstery fabric
* Staple gun and staples
* Screws and screwdriver
* Measuring tape
* Fabric scissors
* Spray adhesive, optional
* Drill, if needed
Step-by-Step Guide
Step 1: Clean and Check the Bench Frame
Start by wiping down the entire bench frame with a damp cloth. Remove dust, old grime, and any loose debris around the arms, legs, and back rail.
Check the joints carefully. If the frame wobbles, tighten screws or add wood glue where needed. A sturdy base matters because the finished settee will need to hold weight safely.
Step 2: Sand the Wood
Sand the frame using medium-grit sandpaper first, especially if the old finish is rough or uneven. Pay attention to curved arms, carved details, and the legs.
After that, use fine-grit sandpaper to smooth the surface. This small step makes the finish look more refined and helps stain or paint sit beautifully on the wood.
Step 3: Stain or Paint the Frame
Choose a finish that matches the look you want. A rich brown stain gives the bench an antique, traditional feeling, while paint can make it look fresh, cottage-inspired, or modern.
Apply the stain or paint in thin layers. Let each coat dry before adding the next one. Once you are happy with the color, seal the frame with a clear protective finish so it lasts longer.
Step 4: Build or Repair the Seat Base
Measure the inside seat area from side to side and front to back. Cut plywood or wooden slats to fit across the seat frame.
Secure the wood with screws, making sure the base is even and strong. This part will sit under the cushion, so it does not need to look decorative, but it does need to feel stable.
Step 5: Add Foam to the Seat
Cut upholstery foam to match the size of the seat base. A thicker foam will make the bench more comfortable, especially if you plan to use it often.
Place the foam on top of the wooden seat base. You can use spray adhesive to keep it from shifting, though this is optional if the batting and fabric will hold everything tightly.
Step 6: Wrap the Seat With Batting
Lay a piece of batting over the foam, leaving extra material around all sides. Batting softens the edges and gives the cushion a smoother, fuller shape.
Pull the batting underneath the seat base and staple it in place. Work from the center outward, alternating sides so the padding stays even and does not bunch up.
Step 7: Cover the Seat With Fabric
Place your upholstery fabric face down on a clean surface. Set the padded seat upside down on top of it.
Pull the fabric tightly over the edges and staple it underneath the seat. Start with the middle of each side, then move toward the corners. Fold the corners neatly, almost like wrapping a gift, and staple them securely.
Step 8: Make the Backrest Panel
Measure the long wooden back area of the bench. Cut a piece of foam and batting to fit the backrest.
Cover it with the same fabric used for the seat. Pull the fabric tight and staple it on the back side where it will be hidden. Keep the pattern straight, especially if you are using floral, striped, or geometric fabric.
Step 9: Attach the Upholstered Backrest
Position the upholstered backrest against the wooden back rail. Make sure it sits straight and lines up evenly with the arms.
Attach it using screws from the back side, if the bench design allows. For a lighter decorative panel, strong upholstery tacks or hidden brackets may also work. The goal is to keep it secure without damaging the front fabric.
Step 10: Reattach or Secure the Seat Cushion
Place the upholstered seat cushion back onto the bench frame. Screw it from underneath if you want a permanent hold.
For easier cleaning later, you can leave the cushion removable, but only if it sits firmly and does not slide around when someone sits down.
Step 11: Check the Finish and Details
Look over the whole piece. Trim any loose fabric threads, press down raised staples, and check that the arms and legs feel solid.
A final wipe on the wooden frame helps remove dust from the upholstery process. This is also a good time to add small felt pads under the legs to protect your floor.
Final Result
You now have a graceful upholstered settee made from an old wooden bench frame. The curved arms keep the vintage character, while the soft fabric seat and backrest make it feel polished and inviting.
For the best look, choose a fabric that contrasts with the wood. Dark wood with light fabric feels classic, while painted wood with patterned upholstery creates a brighter, more playful piece.