Plants bring so much life into a space, but figuring out how to hang them beautifully can feel like a puzzle. These DIY plant hanger ideas make it easy to turn any corner, porch, or window into a fresh and vibrant nook.
Each project takes little time, most are quick enough to finish in one afternoon, and they’re perfect even if you’ve never crafted anything before.
You won’t need expensive tools or supplies either. With just a few common materials, maybe some leftover fabric, scrap wood, or a few old T-shirts, you can create hangers that feel custom and stylish.
Use them to display your favorite greenery or gift them to someone who loves plants as much as you do. Once you make one, it’s hard to stop.
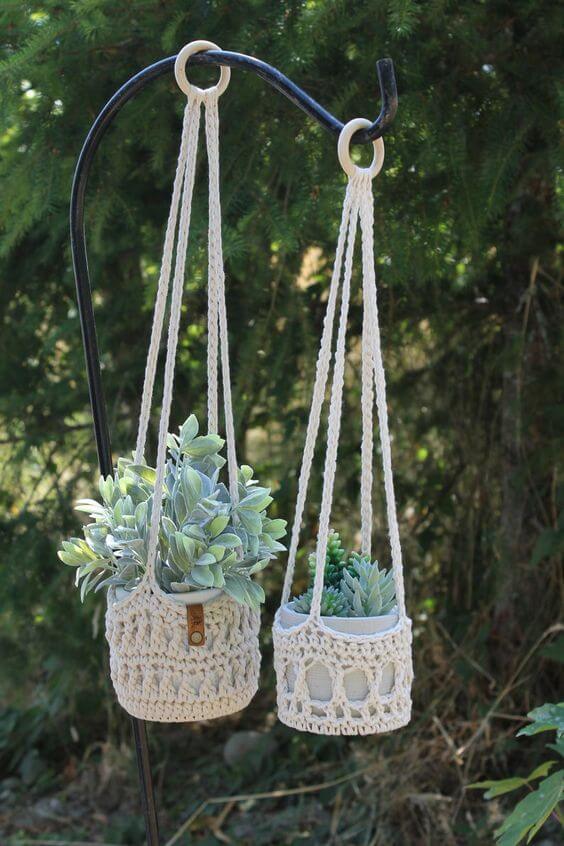
#1 Crochet Plant Hanger
 Source: Etsy
This cozy crochet plant hanger brings a soft, handmade touch to any space. Made from thick cotton yarn, it securely holds small pots while adding texture and charm. Its natural color blends easily with both rustic and modern settings.
You can hang it from a hook, rod, or tree branch to elevate your favorite succulents or trailing greens. It’s a relaxing project and a simple way to show off plants with style.
Materials Needed
- Thick cotton yarn (approx. 5mm diameter)
- Crochet hook (size 6-8mm)
- Wood or metal ring (2–3 inches)
- Scissors
- Small plant pot (4–6 inches wide)
Step-by-step Guide
Step 1: Start by making a loop on the ring and chain your base using single or double crochet, depending on your pattern.
Step 2: Create a circular base or a net-style bottom to support the pot. This gives structure to the hanger.
Step 3: Crochet upward chains or strands, joining them at intervals to form the side netting.
Step 4: When the hanger reaches the desired length, knot or weave the strands together and trim any excess yarn.
Step 5: Insert your pot, check balance, and hang it securely in a bright spot.
Tip: Use soft, flexible yarn for ease and comfort while crafting, and test the weight with an empty pot before adding soil or plants.
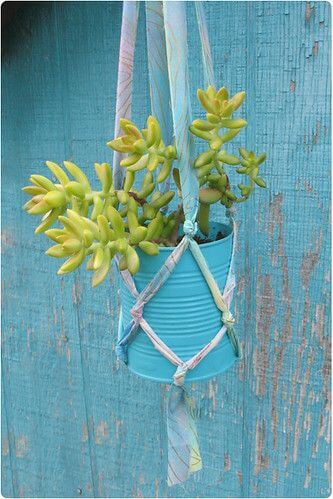
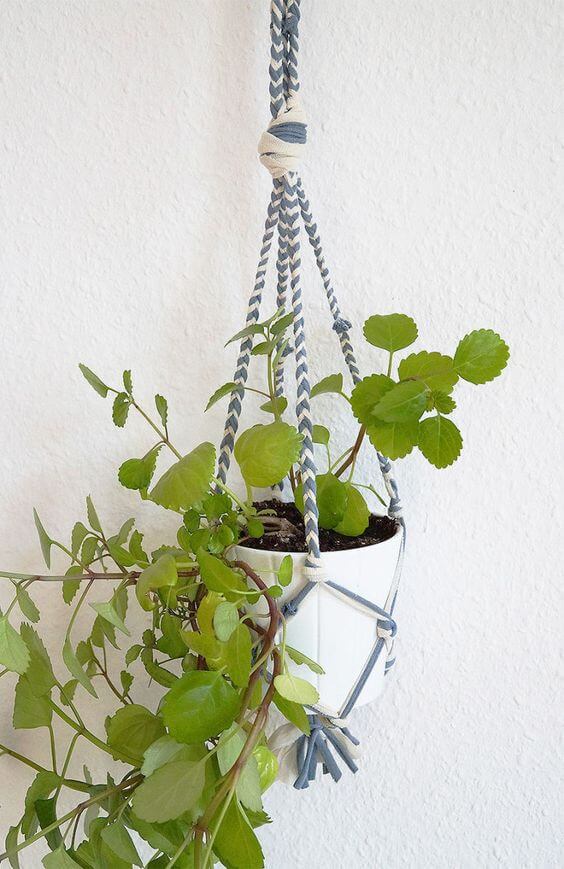
#2 DIY Plant Hanger From Fabric Strips
 Source: Flickr
Created using soft, upcycled fabric strips and a painted can, it’s a joyful nod to resourceful decorating. The knotted design holds the pot securely while adding a hint of boho flair, especially when paired with lively succulents.
Hang it against a bold wall to make the colors pop even more.
Materials Needed
- Old T-shirt or fabric strips (at least 1 inch wide, 4 pieces around 36 inches long)
- Empty tin can or lightweight pot (4–5 inches in diameter)
- Scissors
- Spray paint (optional, for can)
- Succulent or small potted plant
Step-by-step Guide
Step 1: Paint the tin can in your favorite color and let it dry completely.
Step 2: Cut your fabric strips and group them evenly. Tie them together at one end with a secure knot.
Step 3: Separate the strips into pairs and tie simple knots to form the basket’s netting.
Step 4: Once the net is large enough to cradle your pot, knot all the ends together above it for hanging.
Step 5: Place your pot inside and hang it from a sturdy hook or branch.
Tip: Choose bright or tie-dye fabric for a pop of color that looks especially cheerful near fences or shed walls.
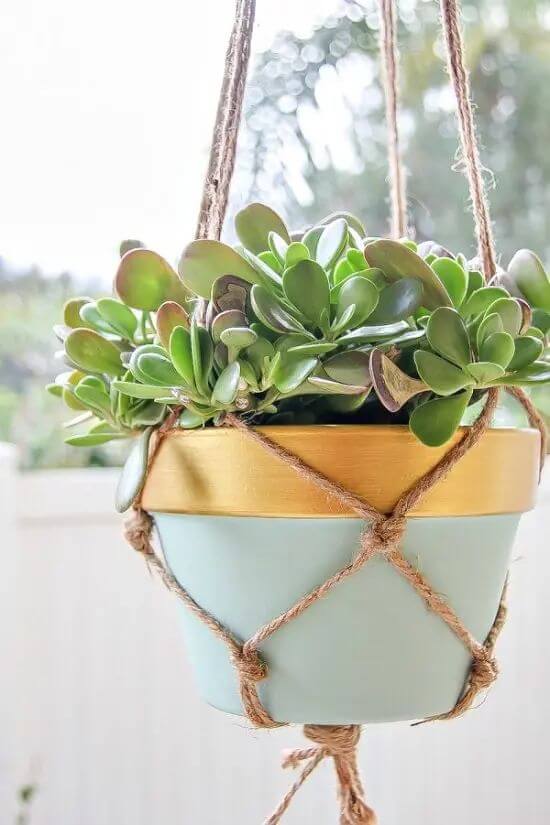
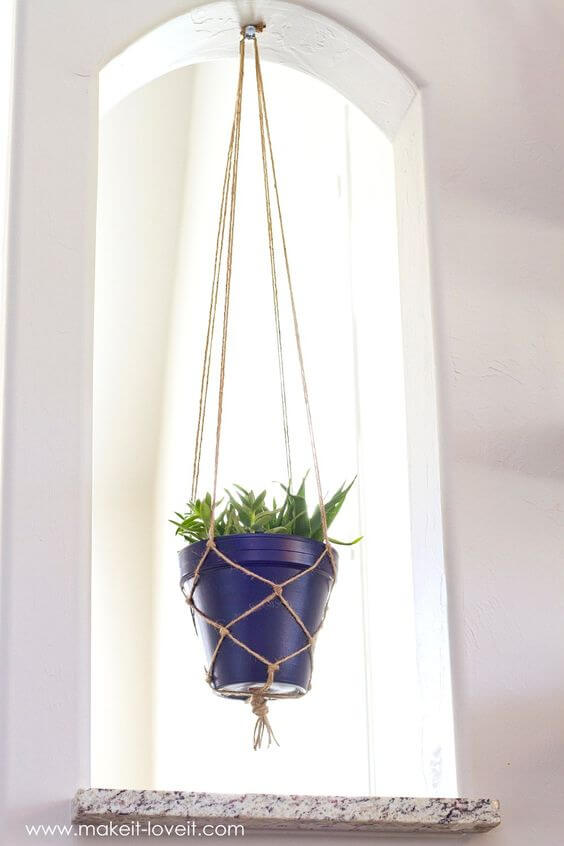
#3 Rope Plant Hanger
 Source: Balconygardenweb
Made with natural jute or hemp rope, it brings a rustic and grounded charm to any space, whether indoors or on a covered patio.
The light, golden-banded pot elevates the look with a subtle touch of glam, perfectly balancing earthy texture and refined style.
This is a quick project that feels homemade without looking messy or rushed. Ideal for showcasing full succulents, it gives your plant the spotlight it deserves with an effortlessly clean design.
Materials Needed
- Jute or hemp rope (4 strands, 36–48 inches each)
- Ceramic pot with wide lip (6–8 inches in diameter)
- Scissors
- Measuring tape
- Optional: gold or metallic paint for pot detailing
Step-by-step Guide
Step 1: Cut the rope into equal lengths and knot them together at one end to form the base of the hanger.
Step 2: Divide the strands into pairs and tie knots a few inches up to begin the cradle structure.
Step 3: Continue tying pairs together, spacing them evenly, until the net forms a strong basket shape.
Step 4: Insert the pot and adjust the ropes to support it evenly, then knot the strands together at the top for hanging.
Step 5: Add your favorite plant and display it where the light filters in beautifully.
Tip: For extra style, dip the rim of your pot in metallic paint before hanging—it’s an easy way to create a polished finish.
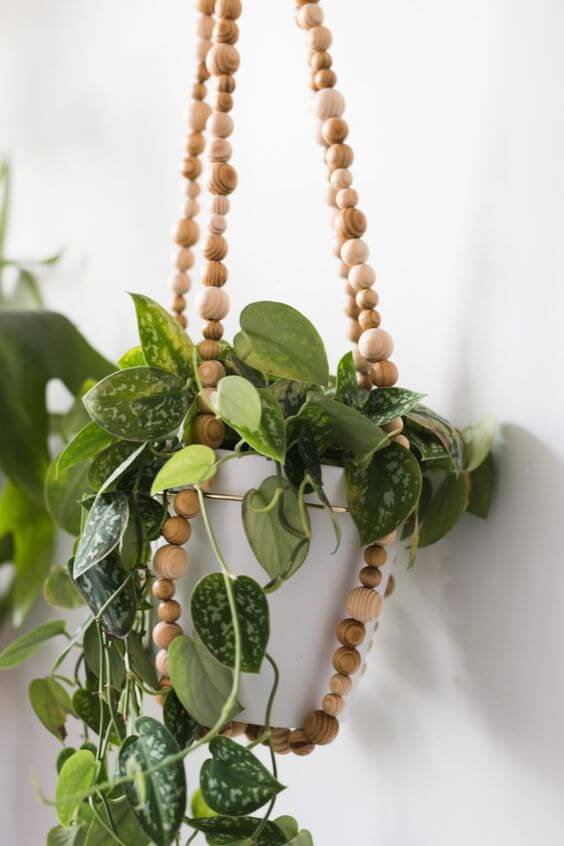
#4 DIY Beaded Plant Hanger
 Source: Vintagerevivals
This beaded plant hanger adds a dose of earthy elegance with a playful, textural twist. Natural wooden beads line the strands from top to bottom, creating a striking frame around your plant.
The look is lightweight but eye-catching, perfect for brightening up a corner with minimal effort. It feels modern yet handmade, offering a balance that suits both cozy and contemporary spaces.
You can switch up bead sizes or even paint them for a pop of color.
Materials Needed
- Wooden craft beads (variety of sizes, about 40–60 total)
- Strong cord or twine (4 strands, 36–48 inches each)
- White ceramic pot (5–7 inches tall)
- Metal ring or hoop for hanging
- Scissors
Step-by-step Guide
Step 1: Cut your cords and thread the wooden beads onto each one, mixing sizes as you go for added texture.
Step 2: Tie the cords onto the metal hoop, then evenly space them and secure knots just below the bottom beads to create a basket-like base.
Step 3: Fit your pot inside the beaded hanger and adjust for balance.
Step 4: Once positioned securely, tie a final knot at the bottom to keep the pot in place.
Step 5: Hang near a sunny window and let your trailing plants spill beautifully down the sides.
Tip: Try alternating bead colors or adding a few painted ones for a custom look that matches your decor.
#5 DIY Hanging Leather Planter
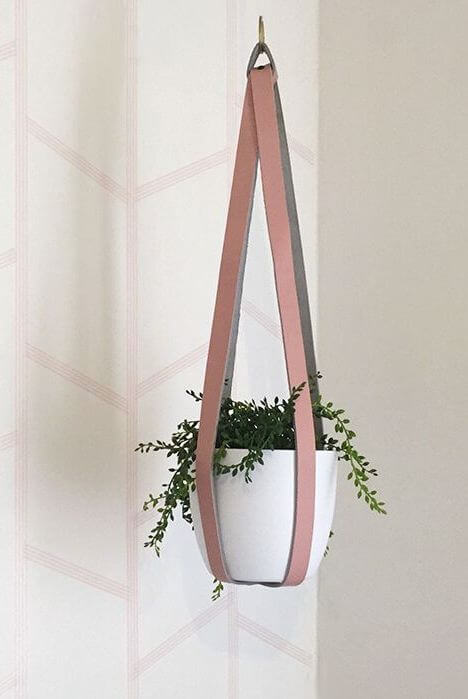 Source: Unknown
Sleek leather straps cradle the planter like a modern sling, bringing soft texture and elevated style to your indoor greenery. It’s ideal for those who crave clean lines with just a hint of rustic charm.
The soft blush and taupe tones work beautifully in neutral or Scandinavian-inspired spaces. It feels sophisticated, but the assembly couldn’t be easier.
Materials Needed
- Two leather straps or belts (each 1–1.5 inches wide, 24–30 inches long)
- White ceramic pot (5–7 inches in diameter)
- Metal ring for hanging
- Strong adhesive or rivets (optional for securing straps)
- Hole punch (if attaching with rivets)
Step-by-step Guide
Step 1: Loop each leather strap evenly under the base of the planter, crossing them at the bottom to form a secure cradle.
Step 2: Pull the ends upward and meet them at the top to gauge balance and pot alignment.
Step 3: Attach the strap ends to a metal ring using adhesive or rivets for added hold.
Step 4: Hang the planter on a wall hook or ceiling mount and adjust the straps if needed for level display.
Step 5: Add your favorite trailing plant and enjoy the sculptural beauty it brings to your room.
Tip: For a vegan-friendly version, use faux leather or sturdy canvas straps with a matte finish.
#6 DIY Boho Hanging Planter Made From Wood Charger, Beads, And Rope
 Source: Hunker
This boho-inspired hanging planter feels earthy, free-spirited, and quietly stunning. A wooden charger base gives your plant a flat stage to rest on, while chunky beads strung along rope add charming texture and warmth.
The mix of natural materials instantly creates a cozy, handcrafted vibe that’s right at home in any room filled with sunlight and soul. It’s especially perfect for trailing plants like maranta or pothos that love to spill gracefully over the edge.
Materials Needed
- 1 wooden charger plate (10–12 inches in diameter)
- Natural rope or jute (about 3–4 lengths, each 36 inches long)
- Wooden craft beads (20–30 pieces)
- Scissors
- Drill (to make holes in the charger)
- Small potted plant
Step-by-step Guide
Step 1: Drill four evenly spaced holes near the edge of the charger plate.
Step 2: Thread a rope through each hole and tie a knot underneath to secure it in place.
Step 3: String beads along each rope strand, leaving space at the top for hanging.
Step 4: Gather the four strands at the top and tie them together, creating a sturdy loop for hanging.
Step 5: Place your plant pot in the center of the charger and adjust the ropes for balance.
Tip: Choose unfinished wood for a more organic look or stain the charger for a richer tone.
#7 DIY Macrame Plant Hanger
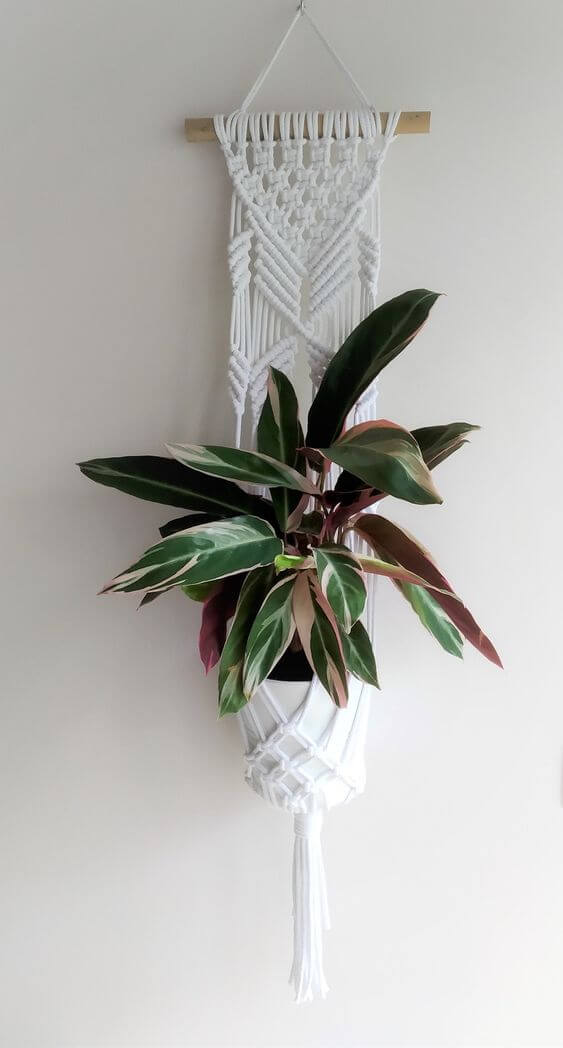 Source: Etsy
This macrame plant hanger is a true blend of art and function, turning a plain wall into a small green oasis. The layered knotwork adds intricate texture, while the clean white cotton gives it a fresh, minimal look.
Suspended from a smooth wooden dowel, this piece feels more like boho wall art than a simple planter holder. It elevates the visual rhythm of any room and brings a gentle, organic softness to your space.
Materials Needed
- Macrame cord (about 100 feet, depending on design)
- Wooden dowel or ring (8–12 inches)
- Scissors
- Measuring tape
- Comb (for fringe, optional)
- Small plant pot (fits securely inside knots)
Step-by-step Guide
Step 1: Cut several equal-length cords based on your design and loop them over the dowel using a lark’s head knot.
Step 2: Begin knotting your design from top down, incorporating square knots, spiral knots, or alternating patterns.
Step 3: Form a cradle near the bottom using tighter knotting to support the pot.
Step 4: Tie all cords together beneath the pot, trimming and fraying the ends if desired.
Step 5: Insert your plant and hang the piece on a strong wall hook or curtain rod.
Tip: Use colorful cords or dyed cotton for a pop of personality in your design.
#8 DIY Rope and Wood Hanging Planter
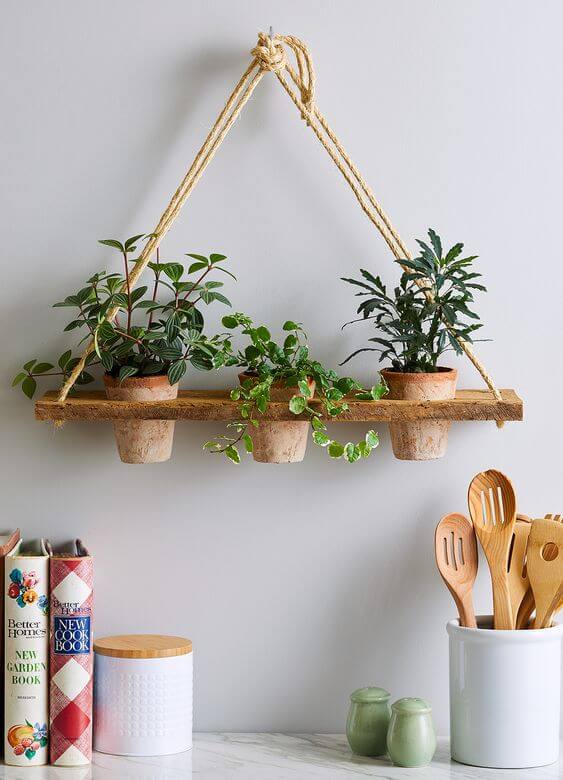 Source: Bhg
A thick wooden plank, aged to natural perfection, anchors three terracotta pots in neatly cut circles. Thick jute rope supports the shelf with a simple knot, making this design easy to hang near windows or in the kitchen.
It’s both a space-saver and a conversation starter, ideal for herbs or trailing houseplants that add a bit of green charm to indoor walls.
Materials Needed
- 1 wooden plank (at least 3 feet long, 1 inch thick)
- 3 terracotta pots (4–5 inch diameter)
- Jute rope (two 5-foot lengths)
- Drill with hole saw (to cut planter holes)
- Sandpaper
- Ceiling hook or wall anchor
Step-by-step Guide
Step 1: Measure and mark evenly spaced spots for the planter holes on the plank.
Step 2: Use a hole saw to cut out holes slightly smaller than the top of the pots for a snug fit.
Step 3: Sand the edges of the holes and the board surface for a smooth finish.
Step 4: Drill two holes at either end of the plank for threading the rope.
Step 5: Thread the rope through, tie secure knots, and hang from a strong wall hook.
Tip: Use a weathered wood board or stain it for a vintage farmhouse look.
#9 DIY Cement Triangle Hanging Planter
 Source: Prettylifegirls
The pointed cones, speckled with gilded gold leaf, create a sculptural effect that draws attention without overwhelming your space. Their geometric shape feels bold and minimalist, perfect for small succulents or trailing greens.
Lightweight rope keeps the hangers simple, letting the concrete texture and shimmer steal the show. Hang them in pairs or groups for a gallery-style statement.
Materials Needed
- Quick-set cement or concrete mix (about 2 lbs)
- Cardboard or plastic cone molds (7–8 inches tall)
- Gold leaf sheets or gold paint
- Rope or thick twine (3 lengths per hanger)
- Plastic cups or containers (for mixing)
- Drill (to add hanger holes if needed)
Step-by-step Guide
Step 1: Mix cement according to instructions and pour into cone molds.
Step 2: Insert a stick or straw to create a central hole for the plant while it sets.
Step 3: Once dry, gently remove from molds and sand the edges smooth.
Step 4: Apply gold leaf or gold paint randomly across the surface for accent.
Step 5: Drill small holes near the rim, thread rope through, and tie for secure hanging.
Tip: These planters dry quickly, so prep your materials before mixing the cement.
#10 DIY Macrame Cactus Planters
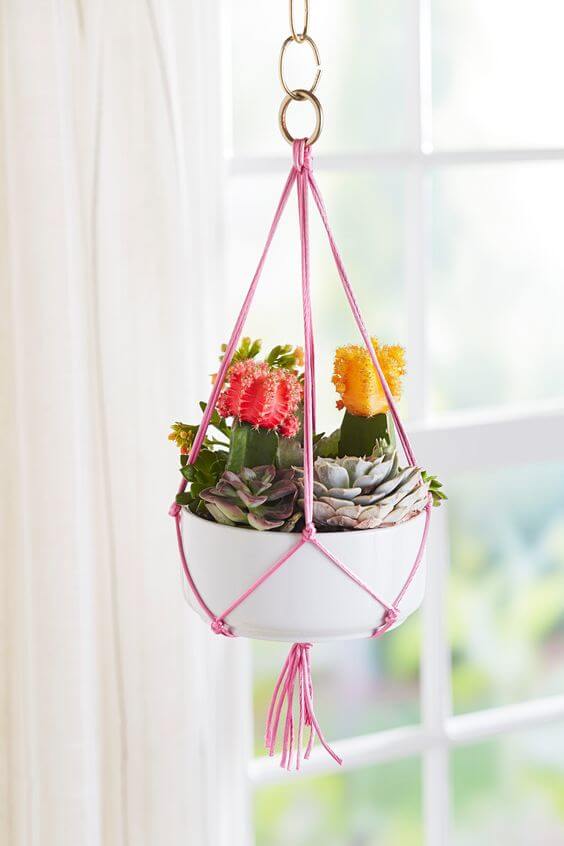 Source: Bhg
This cheerful hanging planter brings a burst of sunshine indoors with its vibrant pink cord and playful cactus mix. The sleek white bowl adds a clean, modern contrast, while the simple macramé knots cradle the planter with ease.
It’s a lightweight yet sturdy setup, ideal for showcasing colorful succulents or moon cacti. Hanging near a window, it catches light beautifully and lifts the mood of any space. A perfect project for beginners craving color and creativity.
Materials Needed
- Small ceramic bowl (6–8 inch diameter)
- Bright nylon or cotton cord (approx. 12 feet total)
- Small cacti or succulents
- Soil and pebbles for drainage
- Metal ring for hanging
- Scissors and ruler
Step-by-step Guide
Step 1: Cut cord into four equal lengths and knot them together at one end.
Step 2: Slip the knot through the metal ring and pull the strands tight to secure.
Step 3: Divide and knot strands to create a cradle for your planter, adjusting fit as needed.
Step 4: Insert the bowl and tie a final knot beneath it to keep it snug.
Step 5: Fill the planter with cactus soil, your favorite mini succulents or cacti, and top with pebbles.
Tip: Using colorful cord can turn a simple macramé into a bold focal point—experiment with color combos!
#11 Hanging Votive Planter
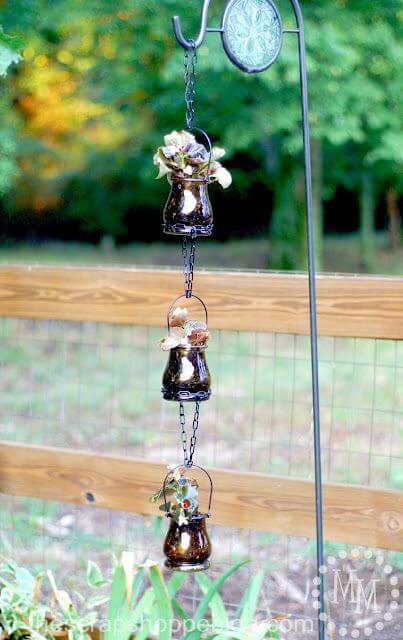 Source: Thescrapshoppeblog
This cascading garden accent turns simple votive holders into an enchanting vertical planter. Suspended from a shepherd’s hook, each votive cradles a small succulent or trailing vine, giving the illusion of a floating garden.
The dark glass contrasts beautifully with green foliage, while the tiered design saves space and adds movement. Light enough to sway in the breeze, but sturdy enough to showcase your plants in style.
Materials Needed
- 3–4 small glass votive holders with handles
- Sturdy chain (approx. 3–4 feet)
- S-hooks or split rings
- Shepherd’s hook or hanging post
- Mini succulents or small plants
- Potting soil and small stones
Step-by-step Guide
Step 1: Fill each votive holder with small stones at the bottom and potting soil above.
Step 2: Gently plant your succulents or small trailing plants inside each holder.
Step 3: Use S-hooks to attach each votive to a segment of chain, spacing them evenly.
Step 4: Secure the top of the chain to your shepherd’s hook or overhead support.
Step 5: Adjust spacing if needed, and ensure each votive is balanced and secure.
Tip: Use colored glass or solar fairy lights along the chain for extra evening sparkle.
#12 DIY Hanging Herb Garden
 Source: Publix
Fresh herbs right at your fingertips and a pop of vertical charm, this hanging garden does both beautifully. Glass jars with painted bottoms bring a playful, modern look, while twine keeps things rustic and grounded.
Suspended against a bright wall, the greenery practically glows, creating a sunny, inviting space even in the smallest kitchens or balconies.
You get function and flair all in one clever design. Perfect for basil, mint, or oregano, whichever herb you reach for most.
Materials Needed
- 3–5 glass jars (mason jars or recycled jars)
- Acrylic paint (optional for color blocking)
- Twine or jute rope (3 ft per jar)
- Small pebbles for drainage
- Potting soil
- Herb plants like basil, mint, and oregano
- Hook or curtain rod for hanging
Step-by-step Guide
Step 1: Paint the bottoms of your jars and let them dry completely.
Step 2: Add a layer of small pebbles to each jar for drainage.
Step 3: Fill with potting soil and plant your herbs securely inside.
Step 4: Cut and tie twine around the neck of each jar, creating a sturdy hanger with even support.
Step 5: Hang from a wall-mounted hook, ceiling beam, or tension rod in a sunny spot.
Tip: Snip herbs directly from the jars for cooking—they grow back quickly with regular trimming.
#13 DIY Hanging Rain Gutter Planter
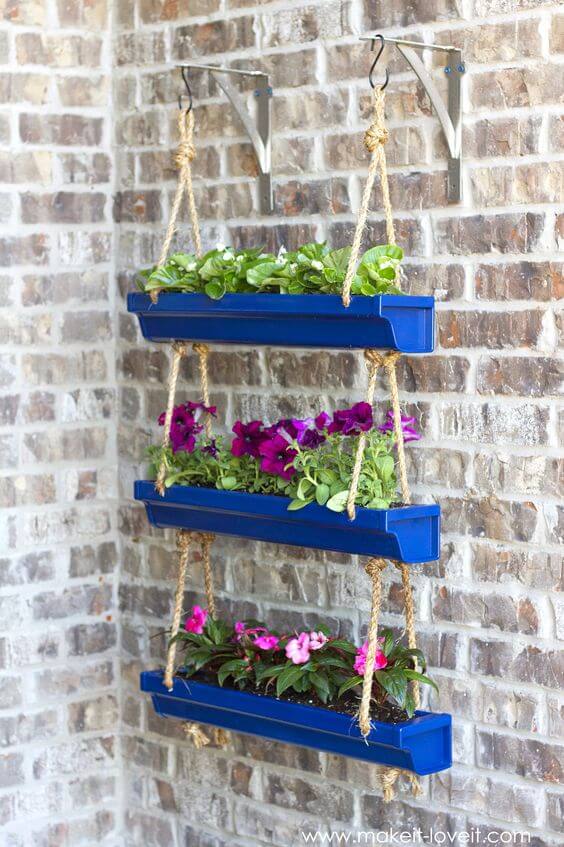 Source: Makeitloveit
This vibrant three-tiered rain gutter planter adds instant life to your patio or balcony wall. Each row bursts with color, offering space for flowers, herbs, or even trailing vines.
It’s a brilliant way to upcycle inexpensive materials while creating a vertical garden that saves space and turns heads. The bold blue finish contrasts beautifully with the natural jute rope and rustic brick backdrop.
Materials Needed
- 3 sections of vinyl rain gutter (about 3 ft each)
- 2 metal wall brackets or strong hooks
- 8–10 ft of thick jute rope
- Spray paint (optional, any color)
- Drill with bit
- Potting soil
- Plants or flowers of your choice
- Gutter end caps (optional)
Step-by-step Guide
Step 1: Spray paint your gutters if desired and let them dry completely.
Step 2: Drill holes at each corner of all three gutter pieces for threading the rope.
Step 3: Thread the rope through the holes, knotting securely under each tier to hold the weight.
Step 4: Attach metal brackets or hooks to the wall and tie the top ends of the rope to hang the planter.
Step 5: Fill each gutter with potting soil and add your favorite flowers or greenery.
Tip: Make small drainage holes at the bottom of each gutter to prevent root rot.
#14 Gold Dipped Hanging Planter
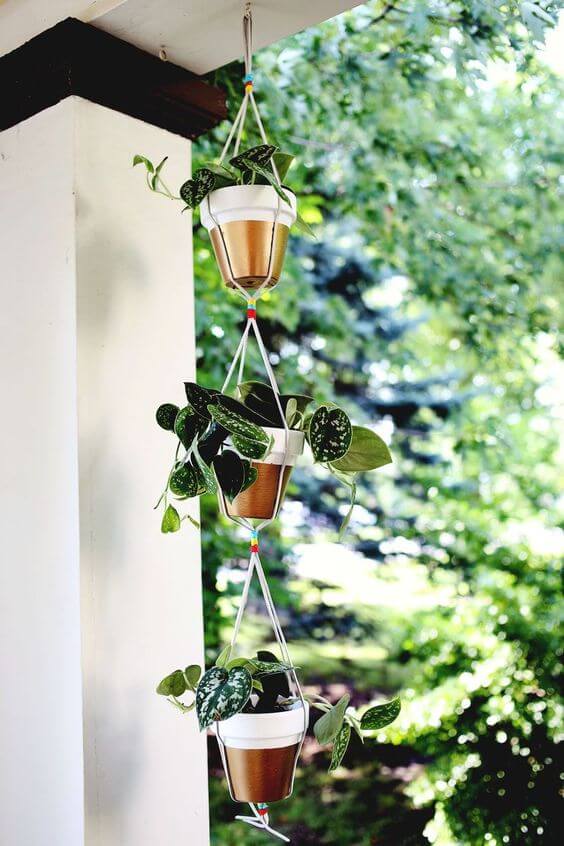 Source: Thespruce
The combination of crisp white and metallic gold pots suspended with clean white cord makes for a bold, stylish statement.
Stacked vertically, these planters are ideal for trailing plants like pothos or philodendron, adding graceful greenery without taking up any floor space. A few colorful beads between tiers subtly add charm and playfulness.
Materials Needed
- 3 small terra cotta or plastic pots
- White and gold spray paint
- Painter’s tape
- Strong white cord or twine (6–8 ft)
- Colorful beads (optional)
- Metal hook for hanging
- Potting soil and vining plants
Step-by-step Guide
Step 1: Tape off each pot and spray-paint the lower half gold, then the upper part white. Let them dry fully.
Step 2: Cut equal lengths of cord and tie them securely around each pot, forming a cradle for support.
Step 3: Stack the planters vertically, tying knots between each layer and adding beads for extra flair if you like.
Step 4: Attach the top cord to a hook and make sure everything hangs evenly.
Step 5: Fill the planters with soil and your chosen greenery.
Tip: Choose lightweight pots to reduce strain on the cord and hook.
#15 Old T-Shirt Plant Hanger
 Source: Goodhousekeeping
Turn your worn-out t-shirts into something useful and charming like this upcycled plant hanger. Made with strips of soft fabric, the braided cords provide a cozy, homemade vibe while still offering plenty of support for your favorite potted plant.
It brings a splash of personality to any wall without requiring much effort or money. The subtle stretch and texture of the material give it a relaxed look that fits effortlessly in both modern and rustic spaces.
Materials Needed
- 1–2 old cotton t-shirts (preferably stretchy)
- Scissors
- Measuring tape or ruler
- Medium-sized plant pot (6–8 inches)
- Hook or ceiling anchor
Step-by-step Guide
Step 1: Cut the t-shirts into long, even strips about 1–2 inches wide.
Step 2: Stretch the strips to curl the fabric into cords, then braid or knot them together into equal lengths.
Step 3: Gather the cords and tie them together at one end, forming the top loop for hanging.
Step 4: Space out and knot the cords to create holders that will support the pot’s base and sides.
Step 5: Insert the pot into the hanger and adjust the knots as needed for balance, then hang securely.
Tip: Choose t-shirts with different colors or patterns to give your hanger extra character.
#16 Simple Rope Plant Hanger
 Source: Makeitloveit
This minimal rope plant hanger proves you don’t need fancy knots or colorful cord to make a stunning display. Its rustic simplicity allows the plant and pot to shine while adding natural charm to your window, porch, or hallway.
The loosely knotted twine forms a cradle that’s both supportive and subtle, making it a versatile accent for any space. Whether you’re showing off herbs or succulents, this hanger brings effortless greenery into your everyday view.
Materials Needed
- Natural jute or sisal rope (four 6-foot pieces)
- Scissors
- Measuring tape
- Plant pot (6–8 inches wide)
- Ceiling hook or hanging bracket
Step-by-step Guide
Step 1: Cut four equal lengths of rope and knot them together at one end to create a base for the pot.
Step 2: Divide the strands into pairs and tie a knot about 6 inches up each pair to form the bottom cradle.
Step 3: Tie adjacent cords together 3–4 inches above the last knot to form a net-like structure for holding the pot.
Step 4: Place your plant pot inside the cradle and gather all the cords above it.
Step 5: Tie the ends into a loop for hanging and secure it to your hook or bracket.
Tip: Use a thicker rope for heavier pots or add extra knots for stability and style.
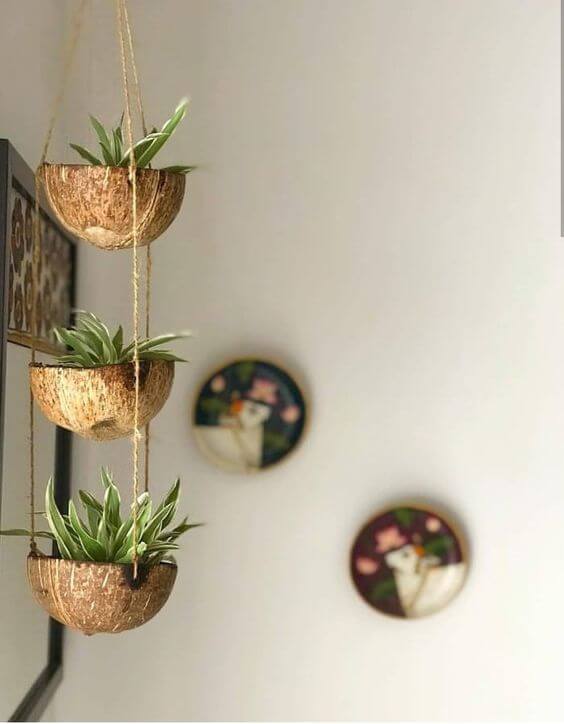
#17 Coconut Hanging Planter
 Source: Homedit
This coconut hanging planter brings a warm, tropical vibe into your space with its natural texture and charming, earthy look.
The halved coconut shells serve as tiny planters for succulents or herbs, stacked vertically with rustic rope that gives the whole piece a breezy, handmade character.
It’s a clever way to reuse organic materials and add greenery without crowding your surfaces. Perfect near windows or cozy corners, this display creates visual height and keeps your plants stylishly suspended.
Materials Needed
- 3 halved coconut shells (cleaned and hollowed)
- Natural jute rope (8–10 feet)
- Hand drill or screwdriver (for making holes)
- Small plants or succulents
- Potting soil
Step-by-step Guide
Step 1: Drill three evenly spaced holes near the edge of each coconut shell.
Step 2: Cut three long rope pieces and tie knots under each shell to keep them level.
Step 3: Thread the rope through each shell, spacing them about 6–8 inches apart vertically.
Step 4: Tie all three ropes together at the top to form a hanging loop.
Step 5: Fill each coconut shell with a bit of soil and place your chosen plants inside.
Tip: Add a tiny drainage hole to the bottom of each shell if using real plants.
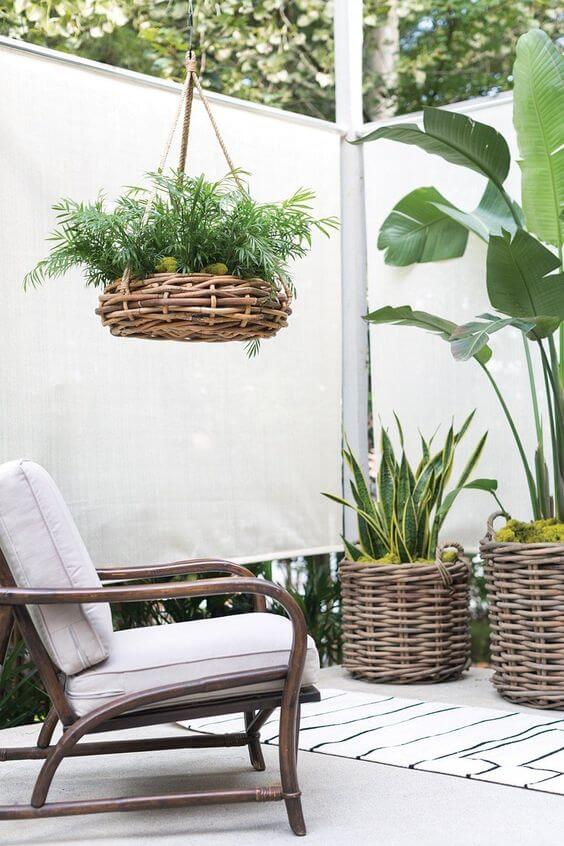
#18 Woven Hanging Planters
 Source: Amphoraglam
The thick basket weave creates a warm, grounded feeling while elevating your plants at eye level for a relaxed yet refined look.
Its generous width gives your greenery space to spill and soften the edges, making it a cozy, breezy accent against modern or tropical backdrops. The sturdy rope ensures it stays balanced while swaying gently in the breeze.
This planter is a simple but impactful way to bring softness and height to your outdoor retreat.
Materials Needed
- Woven basket with wide base (12–16 inches)
- Strong rope or jute (3 pieces, 3–4 feet each)
- Metal ring or hook
- Plastic liner or shallow plant tray
- Potting soil and plants of choice
Step-by-step Guide
Step 1: Attach three equal lengths of rope evenly spaced around the rim of the basket using knots or a hot glue gun.
Step 2: Bring the ropes together and tie them securely through a metal ring to create the hanging loop.
Step 3: Insert a plastic liner or tray inside the basket to protect it from water damage.
Step 4: Add potting soil and arrange your plants—ferns or trailing vines work beautifully.
Step 5: Hang your finished planter from a ceiling hook or a pergola beam where it gets good light.
Tip: Choose lightweight soil and avoid overwatering to keep the basket from sagging.
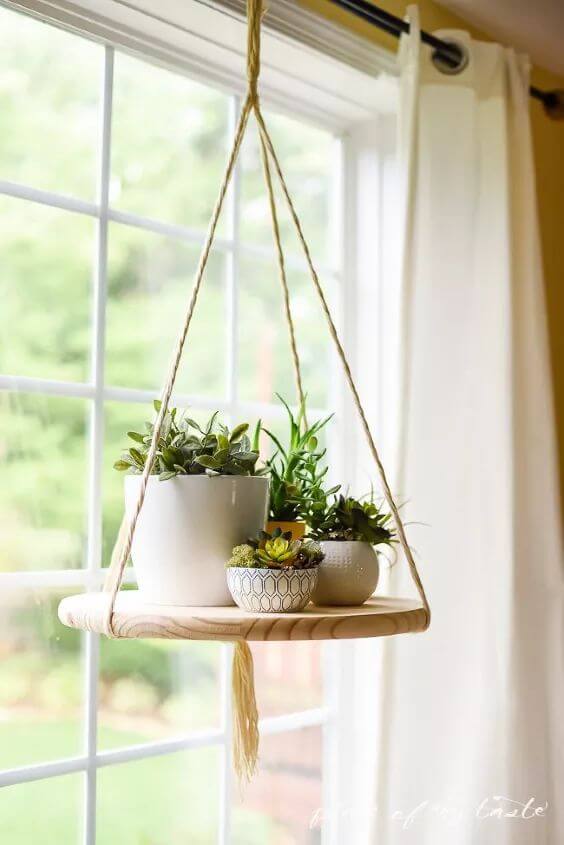
#19 DIY Floating Shelf
 Source: Bo-ha
This airy floating shelf adds a light and modern touch to your space while giving your favorite plants a perfect place to shine.
The natural wood base balances beautifully against the soft rope, creating a peaceful display that looks stunning near any sunlit window. It’s ideal for showing off small potted succulents or herbs without taking up valuable surface space.
With just a few materials and a little balance, you can craft a minimalist planter that feels both fresh and charming. Let your greenery float effortlessly in your room with this eye-catching feature.
Materials Needed
- Wooden round board (10–12 inches in diameter, 1-inch thick)
- Natural rope (3 pieces, 3–4 feet each)
- Drill with bit (¼ inch)
- Ceiling hook
- Small planters (3–4 pieces, lightweight)
Step-by-step Guide
Step 1: Drill three evenly spaced holes near the edge of the wooden board.
Step 2: Thread each rope through a hole and tie a secure knot underneath to hold the board.
Step 3: Gather the three ropes at the top and tie them together in a knot to form a hanger.
Step 4: Screw a hook into the ceiling and hang your shelf, adjusting for balance.
Step 5: Place lightweight planters or decor items on the shelf for a floating garden look.
Tip: Keep the weight distributed evenly to prevent tilting or shifting over time.
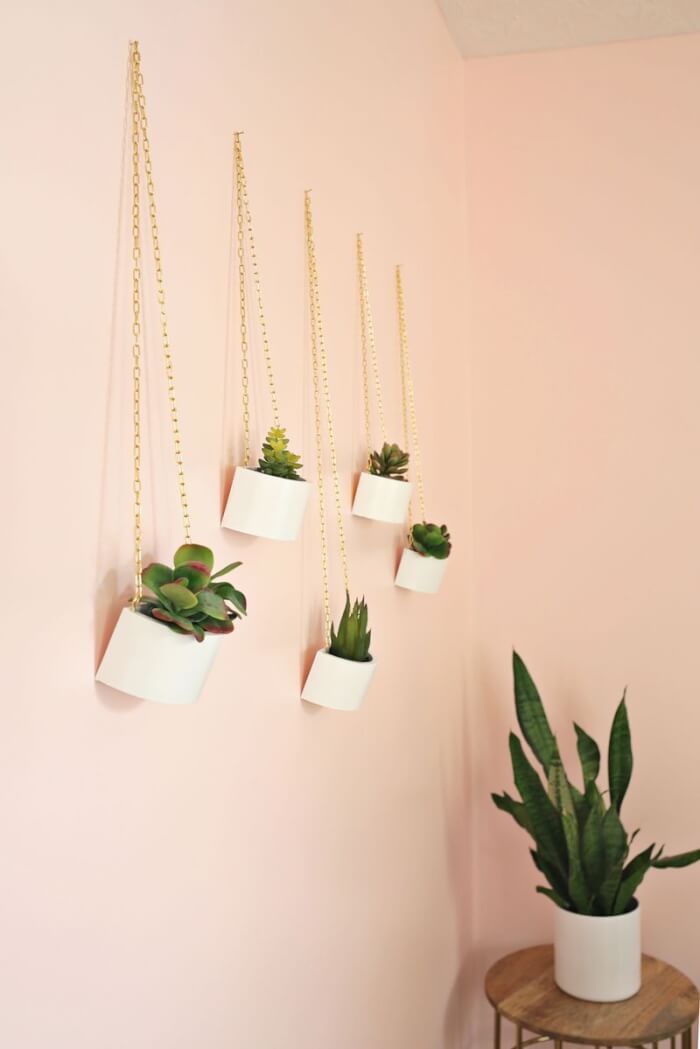
#20 Simple Rope Plant Hanger
Source: Homedit
Perfect for small spaces and bare walls, this stylish wall-mounted planter display brings modern elegance and life to your interior. The sleek white pots contrast beautifully with the gold hanging chains, creating a clean, gallery-like feel.
Whether you’re showcasing succulents or faux greenery, the staggered arrangement adds depth and movement to the room.
You can customize the chain lengths for visual balance, making it a creative way to add vertical greenery without taking up floor space.
Materials Needed
- Small ceramic or plastic pots (5 pieces, around 3–4 inches wide)
- Gold or brass chain (5 pieces, various lengths: 12–24 inches)
- Wall hooks or ceiling screw hooks (5 pieces)
- Wall anchors (if hanging from drywall)
- Small succulents or faux plants
Step-by-step Guide
Step 1: Decide on your pot arrangement and mark where each hook will go on the wall.
Step 2: Install wall hooks or anchors where marked, making sure they are securely attached.
Step 3: Attach a length of chain to each pot handle or wrap it around securely.
Step 4: Hang each pot from its chain on the installed hooks, adjusting for desired height.
Step 5: Add your succulents or faux greenery to complete the vertical garden look.
Tip: Use different chain lengths for a cascading, designer-inspired aesthetic.