
A recycled glass plate patio table is a beautiful way to turn old serving plates, bowls, and glass dishes into a one-of-a-kind outdoor furniture piece. The layered glass patterns catch the light, while the round tabletop gives your porch, garden corner, or balcony a handmade artistic touch.
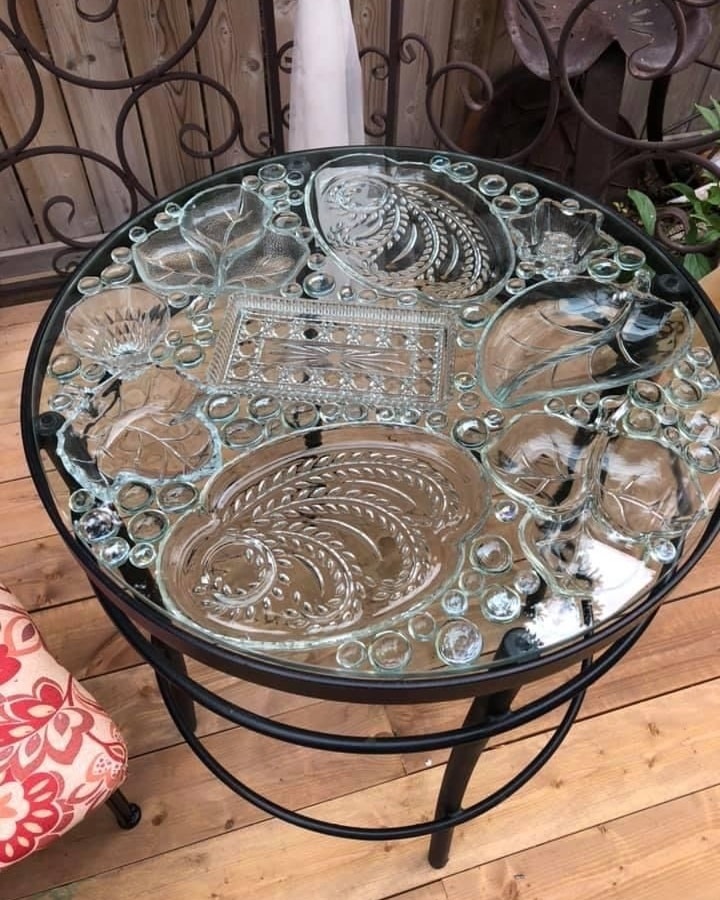
Materials Needed
- Round metal table frame
- Round clear glass tabletop
- Old glass plates, bowls, saucers, or serving dishes
- Small glass gems, marbles, or flat vase fillers
- Clear outdoor-safe silicone adhesive or strong glass glue
- Glass cleaner
- Soft cloth
- Painter’s tape
- Gloves
- Optional: clear waterproof sealant
Step-by-Step Guide
Step 1: Choose a Strong Table Base
Start with a sturdy round metal table frame that can safely hold the weight of glass dishes. A black metal base works especially well because it gives the finished piece a clean border and makes the clear glass details stand out. Make sure the frame is level, stable, and not rusty. If the frame looks old, clean it first and repaint it with outdoor metal spray paint before adding the tabletop.
Step 2: Clean the Glass Tabletop
Place the round glass tabletop on a flat, protected surface. Clean both sides with glass cleaner and dry it with a soft cloth. Any dust, grease, or fingerprints can stop the adhesive from bonding well. This step may feel simple, but it makes a big difference in the final look. Clear glass needs to stay bright and polished so the recycled plate patterns can shine through beautifully.
Step 3: Arrange the Plates Before Gluing
Lay your old glass plates, bowls, and saucers on top of the round glass tabletop. Mix different sizes, textures, and patterns to create a balanced design. Larger plates look nice near the center, while smaller saucers and glass gems can fill the spaces around them. Do not glue anything yet. Move each piece around until the design feels full but not crowded. Leave a little space between pieces so the tabletop still looks elegant and easy to clean.
Step 4: Add Small Glass Gems Around the Design
Once the main dishes are in place, use small glass gems, flat marbles, or vase fillers to decorate the empty gaps. These small pieces help connect the larger plates and create a mosaic-style effect. Try placing them around the edges, between plates, and near the center for extra sparkle. A gentle, irregular pattern often looks more natural than a perfectly even layout.
Step 5: Glue Each Glass Piece Carefully
After you like the layout, lift one piece at a time and apply clear outdoor-safe silicone adhesive underneath it. Press it gently back into place. Continue until every plate, saucer, and glass gem is attached. Use painter’s tape if any pieces slide while drying. Avoid using too much glue, since extra adhesive can squeeze out and look messy through the clear glass. Let the table cure according to the glue instructions, usually 24 to 48 hours.
Step 6: Seal and Place the Table Outdoors
When the adhesive is fully dry, check that every piece is firmly attached. Wipe away any smudges and apply a clear waterproof sealant around the edges if the table will stay outside. Place the finished tabletop onto the metal frame and test its stability before use. This table works beautifully as a patio coffee table, garden accent table, or decorative porch piece for holding drinks, candles, plants, or seasonal decor.