Old table lamps can become charming solar garden lights with only a few simple changes. Instead of throwing away outdated or broken lamps, you can reuse the decorative bases and turn them into outdoor lighting for a patio, walkway, or flower bed.
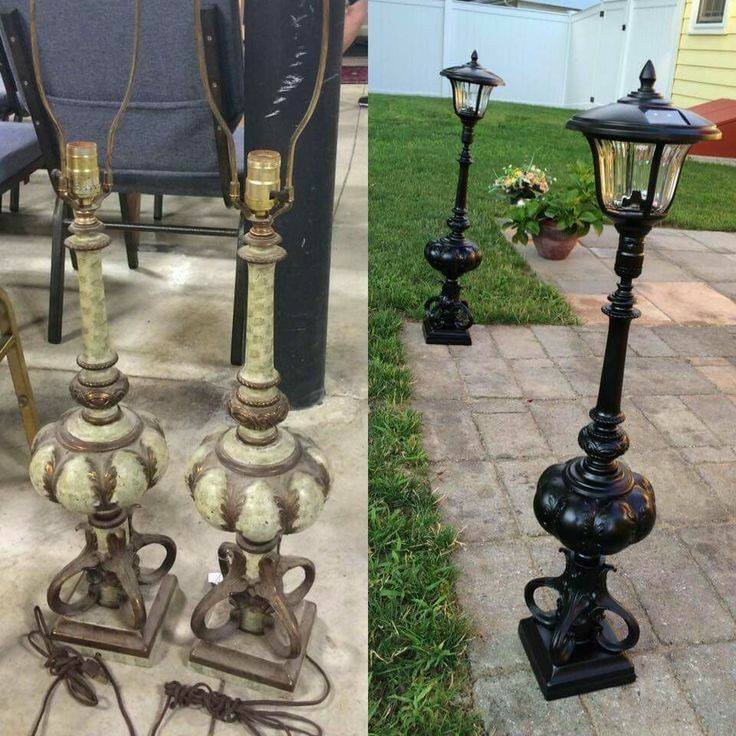
Step-by-Step Guide: DIY Solar Garden Lights From Old Lamps
Step 1: Choose the Right Old Lamp Bases
Start with two old table lamps that have strong, heavy bases. Metal, ceramic, resin, or carved wooden lamp bases can all work, but the best choice is something tall and decorative enough to look like a small garden lamp post.
Remove the lampshades, bulbs, cords, sockets, and any electrical parts. Since this project uses solar lights, you do not need the original wiring. Keep only the base and the center pole if they are sturdy.
Step 2: Clean and Prepare the Lamps
Wipe the entire lamp base with a damp cloth to remove dust, grease, and old residue. For detailed areas, use an old toothbrush to clean small grooves and carved sections.
Let the lamp dry fully before painting. If the surface is glossy, lightly sand it with fine-grit sandpaper so the paint sticks better. This small preparation step makes the final finish look smoother and more durable.
Step 3: Secure the Base for Outdoor Use
Check whether the lamp base feels stable enough to stand outdoors. If it feels too light, add weight inside the bottom area if possible. Small stones, concrete filler, or a metal plate can help prevent tipping.
For extra strength, tighten any loose screws or joints. Outdoor lights deal with wind, rain, and movement, so the structure needs to feel firm before you continue.
Step 4: Paint the Lamp Base
Use outdoor spray paint to give the lamp a fresh, weather-resistant finish. Black paint creates a classic lantern look, while bronze, white, or deep green can also look beautiful in a garden setting.
Apply thin coats instead of one thick layer. Let each coat dry before adding the next one. Make sure to cover the base, pole, and decorative details evenly. After painting, allow the lamp to cure fully according to the paint instructions.
Step 5: Attach the Solar Lantern Top
Remove the top section from a solar garden lantern or buy a solar lantern head that fits the lamp pole. Place it on top of the old lamp base and check the balance.
If the solar top does not fit perfectly, use a strong outdoor adhesive, epoxy, or a small mounting adapter to secure it. The solar panel must face upward so it can charge during the day. Avoid covering the panel with glue or paint.
Step 6: Place the Finished Solar Lamp in the Garden
Choose a sunny spot along a walkway, patio edge, flower bed, or garden path. The solar panel needs several hours of direct sunlight each day for the light to glow well at night.
Place the finished lamp on a flat surface such as paving stones, gravel, or a firm garden base. Once charged, it will add soft evening light and a vintage touch to your outdoor space. For a more polished look, create a pair and place them on both sides of a path or seating area.