For a clean, clutter-free home, look no further. Our expert advice will guide you to transform every corner of your house, from bustling bedrooms and kitchens to compact closets and cabinets. We also cover notorious clutter hotspots like desks and shelves. Whether you choose to tackle your entire home at once or progress gradually, remember, decluttering isn’t a green light to hoard more! Our compilation of top-tier home organization hacks will get you there.
Handling Wires
Tangled cables causing household havoc? Try neatly arranging them under your furniture and tables to eliminate the mess.
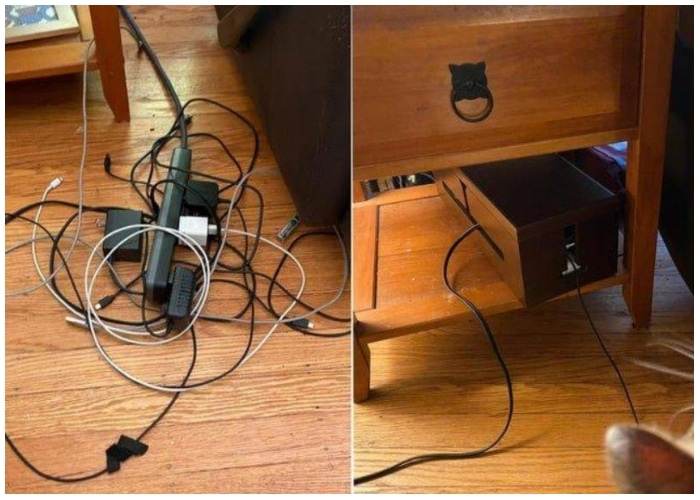
Alternatively, secure your unruly wires with small rubber bands and stash them in a wooden box or even a repurposed shoebox. To prevent any electrical mishaps, ensure the box is insulated. If you don’t have an insulated box on hand, line it with woolen fabric before storing your cords and multi-plugs. Safety first, always!
Hanging DIY Hidden Jewellery Organizer to Save Space
Tired of detangling necklaces from your drawer? A wall-mounted hidden jewelry holder is your answer. Simply open the door, pick your necklace, and say goodbye to tangles! The best part? You can craft your own jewelry organizer to suit your personal style and décor.
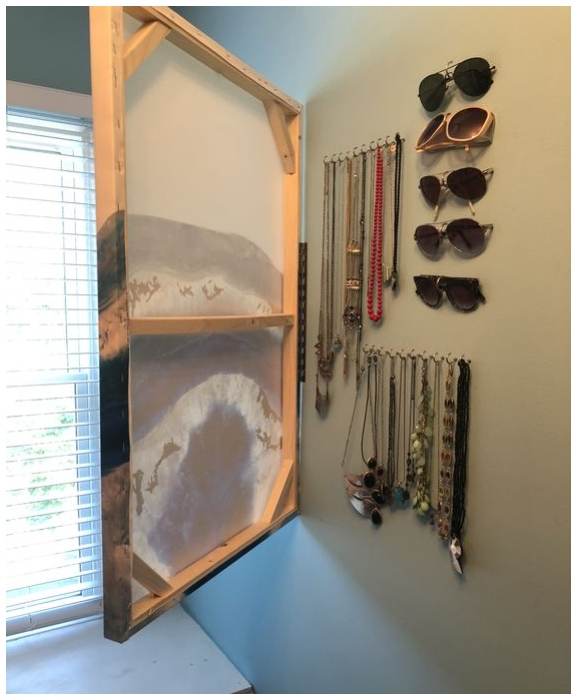
Whether you use spare frame materials or a ready-made one, just ensure it has ample side support and enough backspace for screwing on hinges. Then, construct a base box to hold your jewelry and mount it on the wall. For an artistic touch, consider adding a few pieces of art for a captivating wall display.
DIY Drawer Organizer
Keep in mind, larger drawers demand more organizers. So, when crafting or purchasing drawer organizers, this is a key consideration.
Store-bought variants are usually acrylic or cotton-based, but you can make your own using recycled cardboard wrapped in scrap fabric. Although not waterproof, these homemade organizers allow for highly precise compartments, keeping your drawer items neatly sorted. Plus, they add a pop of color and freshness every time you open your drawer.
Install a long tension rod across the shower to hang the shower caddy
Boost your shower storage with a tension rod and S hooks. This setup not only holds all your essentials but also promotes airflow between hangers – neat, isn’t it?
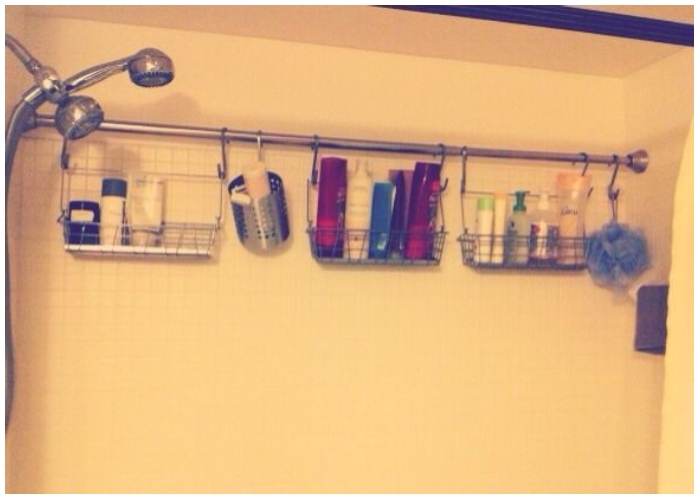
What’s really impressive about these tools is their versatility. They simplify cleaning and double as a shower rack for holding delicate items such as shampoo bottles and washcloths. This practical addition makes organizing a breeze.
Extra Storage InYour Bathroom Using Curtain Rods
This is a superb fix for a petite bathroom short on shelves. Simply purchase two shower curtain rods from your local hardware store and install them parallel to each other, leaving a bit of space in between.
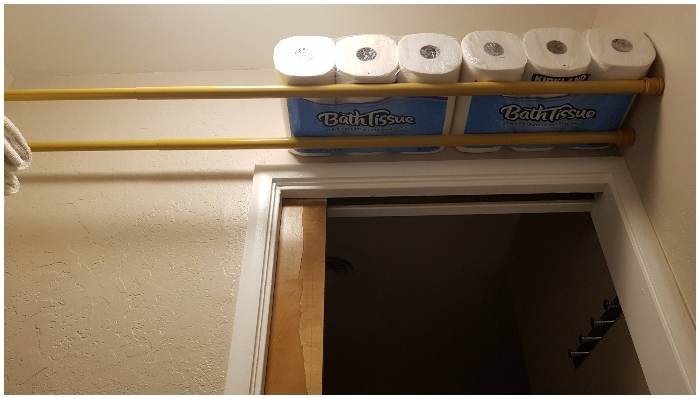
This extra room is perfect for various storage needs – from toilet paper rolls to trendy baskets brimming with bathroom essentials. It’s also a fantastic addition to your laundry room.
Magnetic Spice Rack
Magnets can be the unsung heroes in your daily life’s challenges. If your kitchen lacks drawers or cabinets for storing spices, consider installing a magnetic board on your kitchen wall.
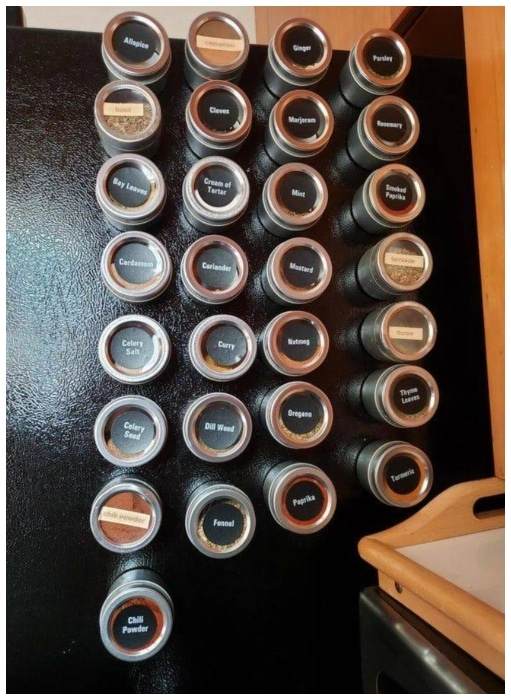
Alternatively, you can mount several small magnets directly onto the wall in place of a magnetic board. As long as your spice boxes have metal lids, you can easily attach them to the magnetic board or units, creating an accessible and stylish kitchen storage solution.
A Solution for Cans
If you’re struggling with can storage, instead of stuffing your cabinets and drawers, consider a soda dispenser rack. They aren’t just for soda – they can efficiently store various canned goods while maintaining them at an optimal room temperature.
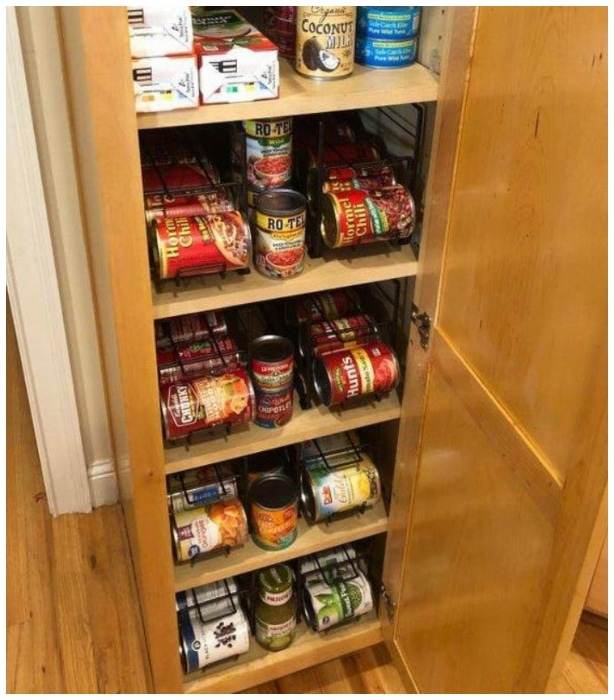
This clever solution keeps all your cans tidy and well-arranged. It’s an ingenious way to repurpose a soda dispenser for can storage.
Use Curtains To Conceal Laundry
Consider enhancing your hallway laundry nook or open closet with a curtain panel. It’s a simple way to keep your washer and dryer out of sight, contributing to a cleaner, more appealing look, and hiding the entire laundry zone.
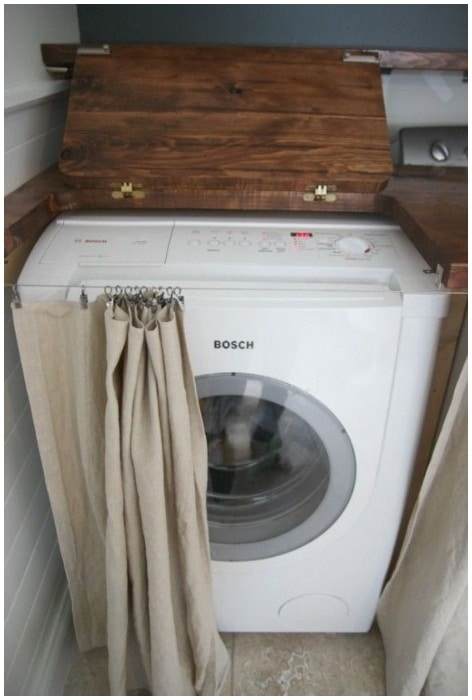
While it may not necessarily dampen noise, a curtain panel is still a valuable addition. If you’re looking for alternatives, consider installing shiplap for a rustic, farmhouse appeal that adds charm to your space.
Vanity Hamper Cabinet
A vanity hamper cabinet is a specialized storage unit designed to discreetly store dirty laundry. It’s typically a slim, tall cabinet featuring a pull-out hamper or basket at the base for dirty clothes. Some may offer added storage, such as shelves or drawers, for other household items. Crafted from wood or composite materials, these cabinets provide both functionality and elegance to bathrooms or bedrooms.
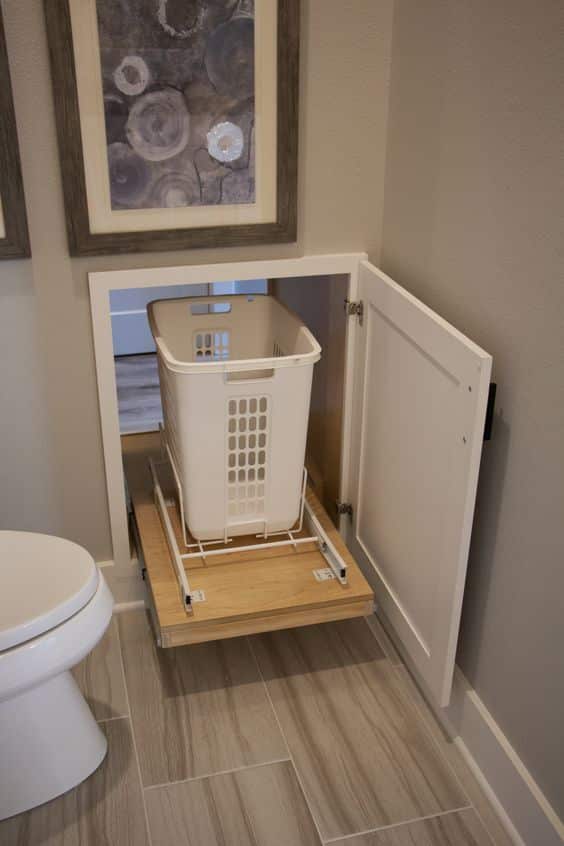
These cabinets offer an excellent solution for concealing laundry mess, particularly in smaller spaces where traditional hampers might be too bulky. By adding a vanity hamper cabinet to your room, you effortlessly hide laundry while maintaining its accessibility. Plus, the extra storage can be utilized for organizing other items, like towels, linens, or toiletries, fostering a tidy, well-arranged living space.
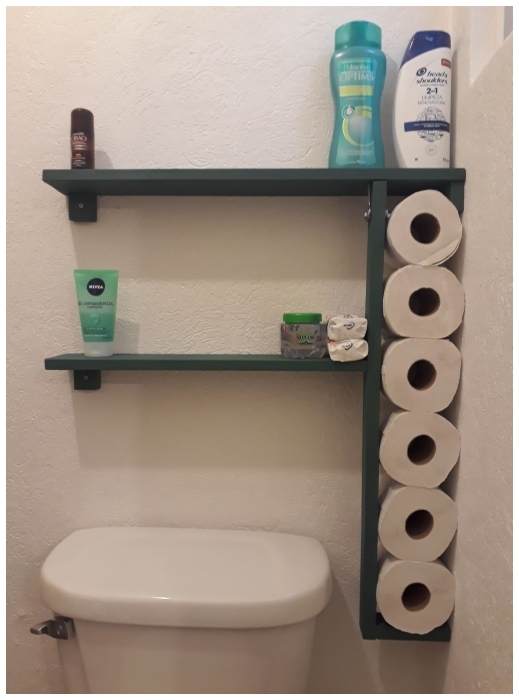
Over the Toilet Storage
Making the most out of your bathroom space is crucial, and the area above the toilet often goes unnoticed. Introducing over-the-toilet storage can turn your bathroom into a more efficient, stylish haven. There’s a multitude of options, from shelving units to wall-mounted cabinets, ready to transform this often-wasted space.
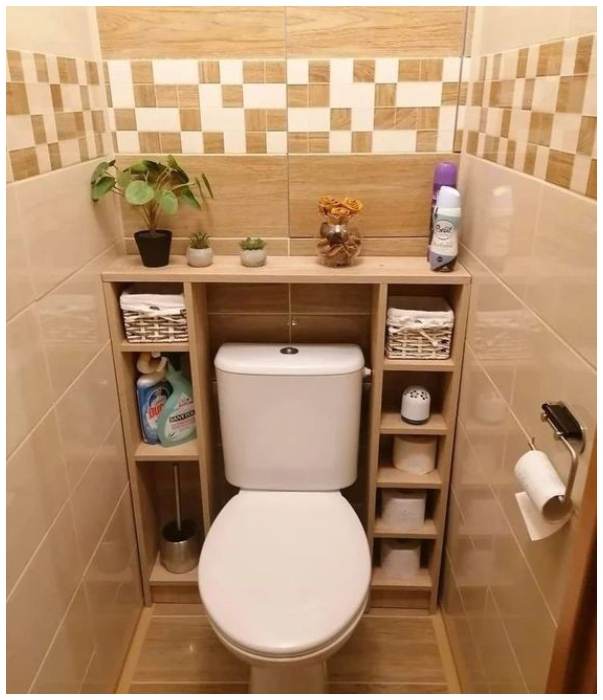
Consider a DIY shelf over the toilet – an economical, simple way to boost storage while making your bathroom feel more spacious. So don’t disregard the potential of the area above your toilet – explore these storage solutions to truly maximize your bathroom’s functionality.
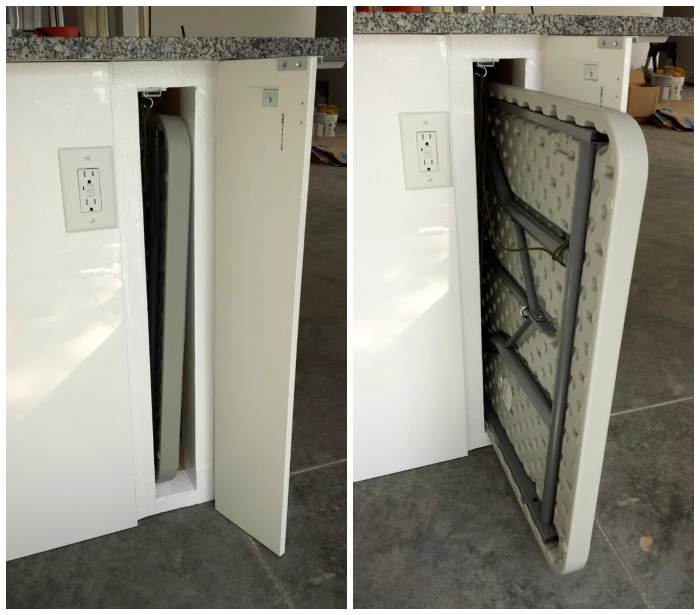
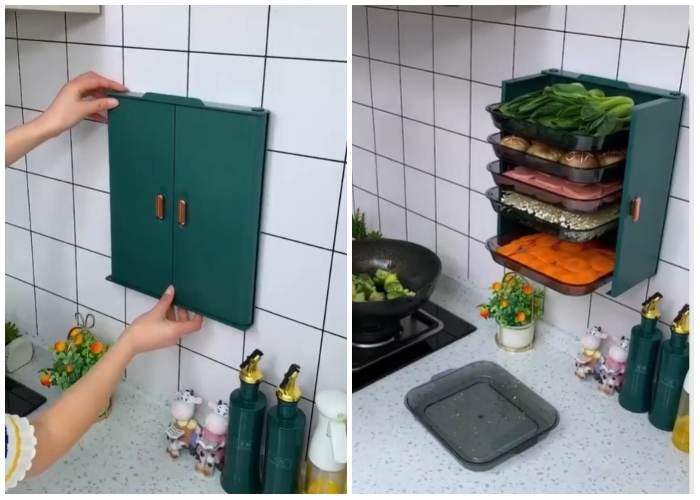
A Little More Storage Under the Bathtub
If you’re seeking a cost-effective way to declutter your bathroom, consider utilizing the space between your bathtub and wall. A creative idea is to replace the standard panel with hinged doors, which can be easily removed for maintenance. These doors can efficiently hide cleaning supplies or oversized shampoo bottles that don’t fit in your medicine cabinet.
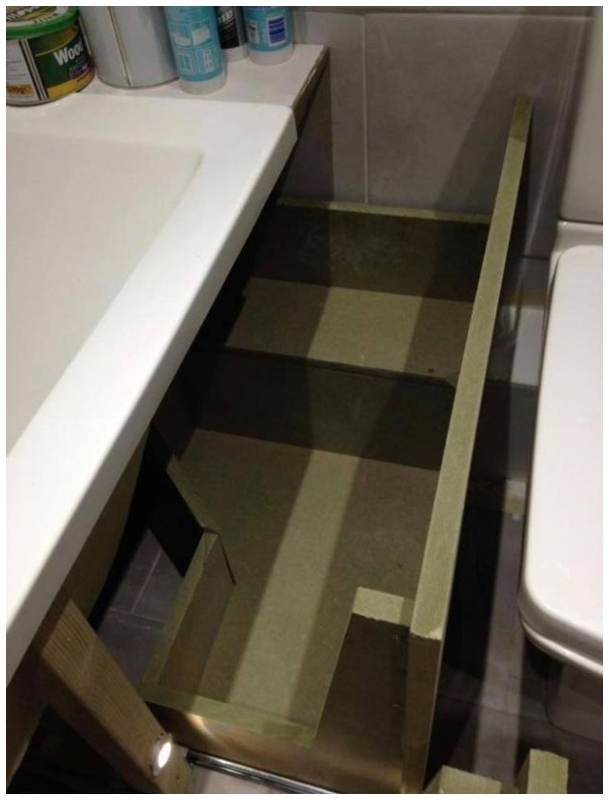
To increase their lifespan, consider a professional coating to resist the bathroom’s high humidity. Alternatively, you could install wire baskets in this area. Repurposed from single-tier spice racks, these baskets offer an affordable and handy storage solution that fits snugly within the door’s width.
Curtain Closet Door
Doors may hide closet clutter effectively, but they can often appear bland and occupy precious space. Consider closet curtains as a chic and flexible alternative. These offer a tasteful way to conceal clutter and can be readily swapped for a fresh look.
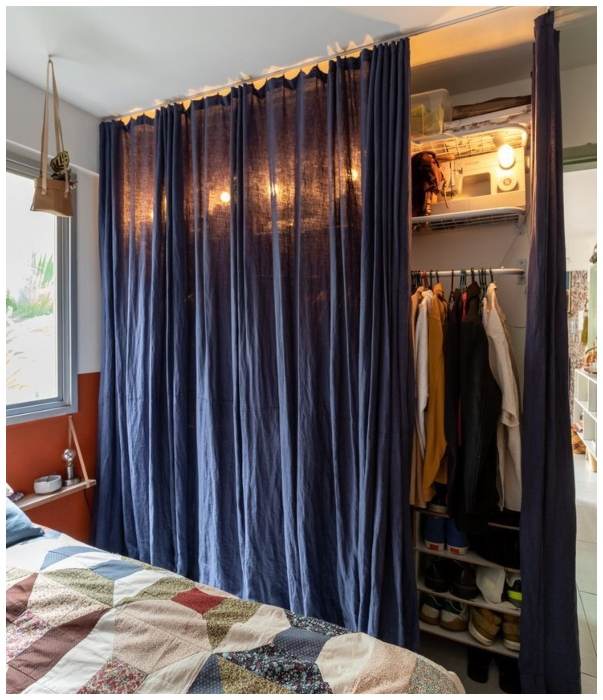
With an array of fabrics to choose from, including vibrant patterns or subtle hues, you can craft the ideal aesthetic for your area. Closet curtains don’t just conceal your possessions – they inject style and intrigue into your space.
Under-Cabinet Cutlery Storage Solution
For a savvy space-saving trick in your kitchen, think about utilizing the area beneath your cabinets. An under-cabinet drawer, for instance, can effectively organize your cutlery. It installs beneath your upper cabinets and operates like a standard drawer, tilting down for convenient access to your spoons, forks, and knives.
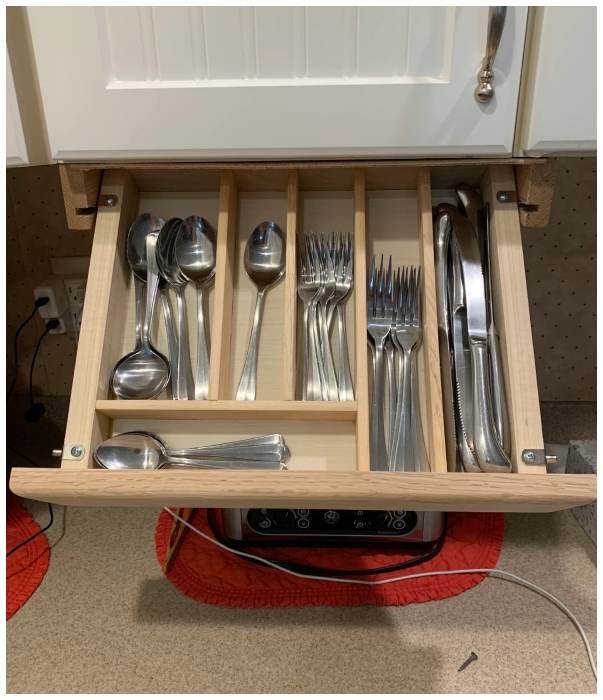
Such a cutlery drawer not only keeps your silverware neatly arranged but also liberates space in your regular drawers, helping create a more orderly kitchen.
Attach a small plastic laundry basket made from waterproof sticky hooks
Tired of the bathroom clutter? These smart strategies can put an end to the disorder. Utilize sticky hooks to keep loose items in place and promote air circulation. You can even add water-resistant covers for added protection.
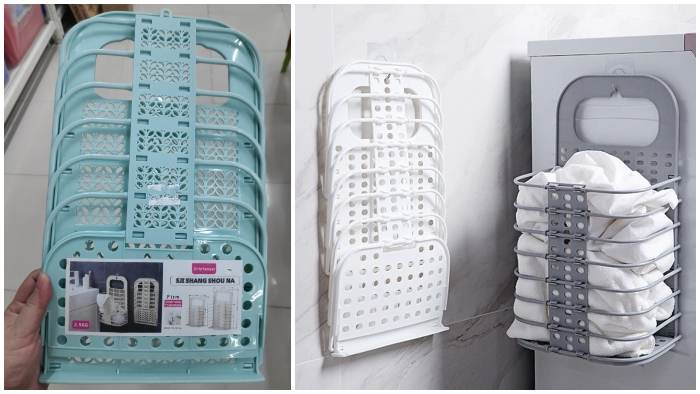
This method elegantly organizes bath toys without the risk of water damage. Plus, these hooks are a breeze to remove when needed. With waterproof hooks, everything stays organized and damage-free.
Another Solution for Cans
If the previous idea didn’t quite appeal to you, this one might just do the trick. This organizer takes a bit more elbow grease to assemble as it involves connecting two smaller pieces of wood to a larger one, but the end result is worth it.
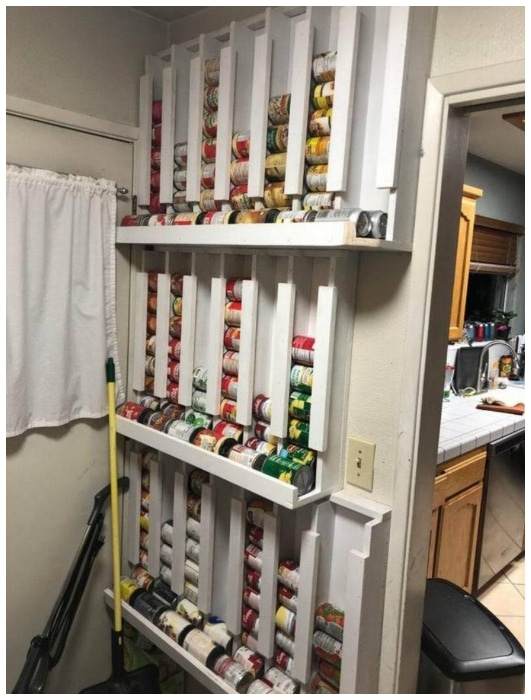
The process involves stacking the cans to roll down between the two attached wooden lattices. While this might be a DIY challenge, you can always hire a professional if it’s beyond your skill set. Keep in mind, though, this can be quite an investment due to the complex nature of the setup.
Wall Hanging: A Simple Space-Saver
A fast and straightforward space-clearing method is to hang items such as foldable chairs, dusting brushes, and brooms on the wall.
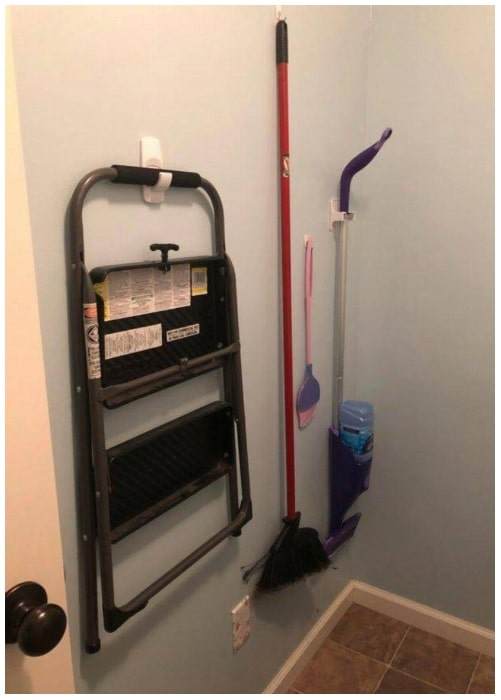
Consider drilling holes in your wall to install hooks or pegs. If drilling isn’t your strong suit, a professional can help at a reasonable cost. Once the hooks or pegs are secured, you can hang various items. This not only frees up floor space but also contributes to a more organized home.
Repurpose Shoe Organizer into a Paper Towel Holder
An old shoe organizer can find new life as a holder for your rolls and paper towels. Perfect for a side closet or a room, it’s an innovative way to utilize storage.
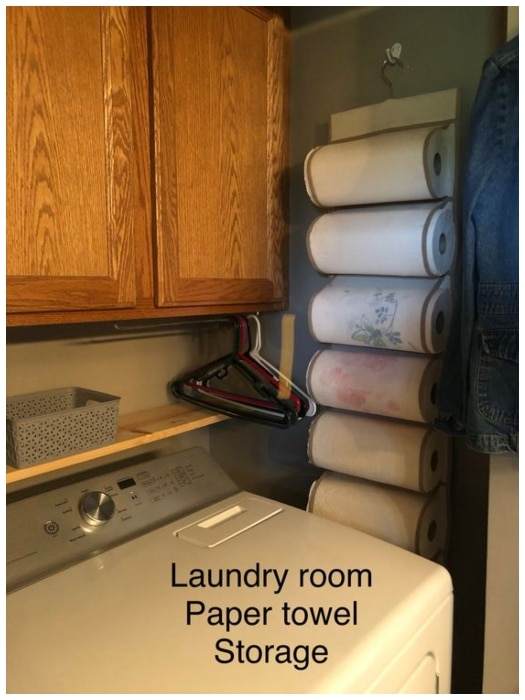
Hanging them vertically opens up more shelf space. Attach these shoe bags to the rod using velcro for an easy fix. You’ll be surprised by the ample storage provided by a centrally hanging bag.
Set Up a Kid-Friendly Charging Station
Consider creating a dedicated charging station for your kids’ devices. With many options available, find one that suits your needs. An 8-tier wall organizer comes highly recommended for housing iPads, Fire tablets, and Nintendo DS systems, along with headphones and other devices. It even includes hooks at the bottom for convenient cable storage.
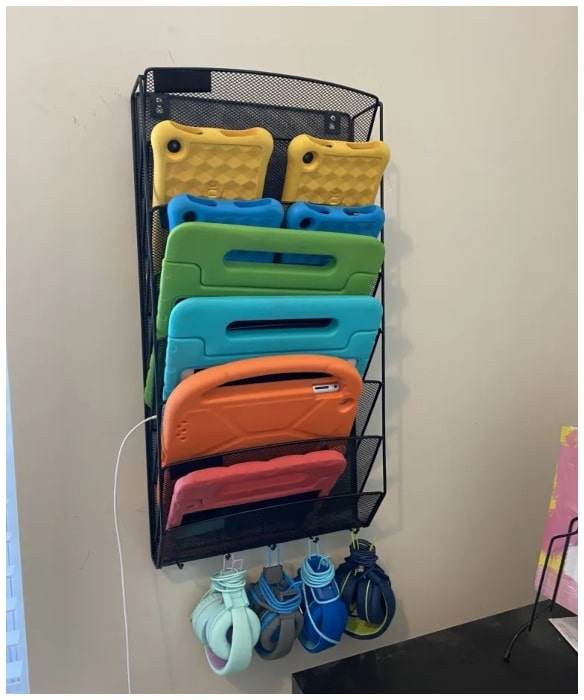
Despite its durability, this organizer occupies minimal counter space. For enhanced stability, especially with multiple kids around, replace the screws with wall anchors. You might also want to invest in a power strip or longer lightning cables for better organization and to ensure all devices can be charged simultaneously.
Craft Your Own Hidden Outdoor Storage
Yearning for a clutter-free yard with concealed storage? It’s time to make this a reality with the ingenious “hidden design” approach, often seen in many foreign gardens. Create your hidden utility storage beneath your garden deck.

Materials Needed: Plywood sheets (choose your preferred thickness), Pressure-treated 2x4s, Screws, Hinges, Handles, Drill, Saw, Level, Tape measure, Plastic baskets in different sizes, Paint (optional)
Step-by-Step Guide:
- Spot an appropriate area under your deck. Take precise measurements of the space and decide on the dimensions for the storage door and interior.
- With the measurements in hand, cut your plywood to form the door and interior of the storage space. Trim the 2x4s to construct a frame for the door.
- Construct the door frame using the cut 2x4s. Attach the plywood to the frame using screws. If you want, cut a hole to fit the handle and install it.
- Affix the door using hinges. Ensure it swings open and shut smoothly. If there’s any sticking, sand down the edges for a better fit.
- Position your plastic baskets inside the storage area. Arrange your tools, supplies, and other items neatly into the baskets.
With this guide, you’re one step closer to a neat and tidy yard.
Streamlining Your Cookware
Arranging pots and pans in an orderly fashion often presents a challenge, mainly because these items tend to be large and bulky.
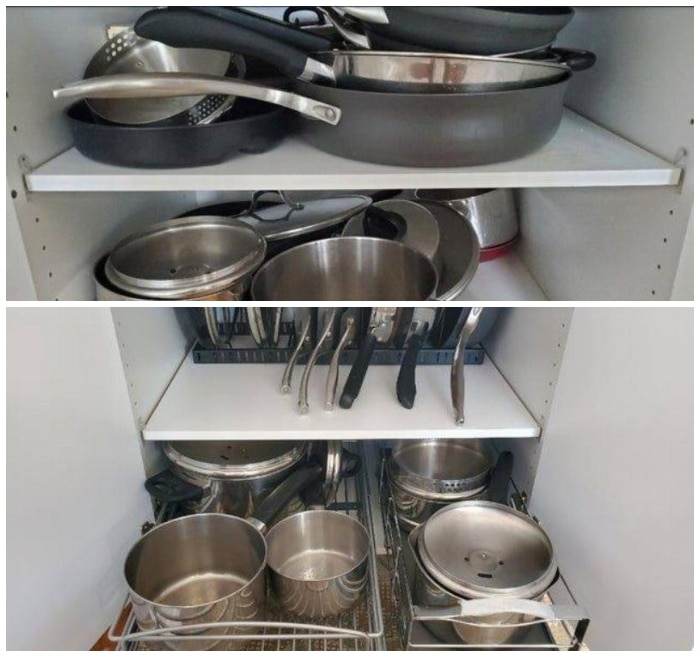
Implementing storage solutions like large baskets and drying racks could be the key to tackling this issue. Segregate various types of pots based on their size and function. Nest smaller pots inside larger ones to maximize storage efficiency. This approach not only streamlines your cookware storage but also makes your kitchen space much more manageable.
DIY Decorative Electrical Box Cover
Imagine the excitement of transforming a simple frame and three vibrant 5″x7″ images into an extraordinary display, all with the help of clear tape. But this creative endeavor is not just about aesthetics; it’s about utility too. The question arises: how can we ensure easy access to the breaker box during emergencies? Fear not, for we have a solution.
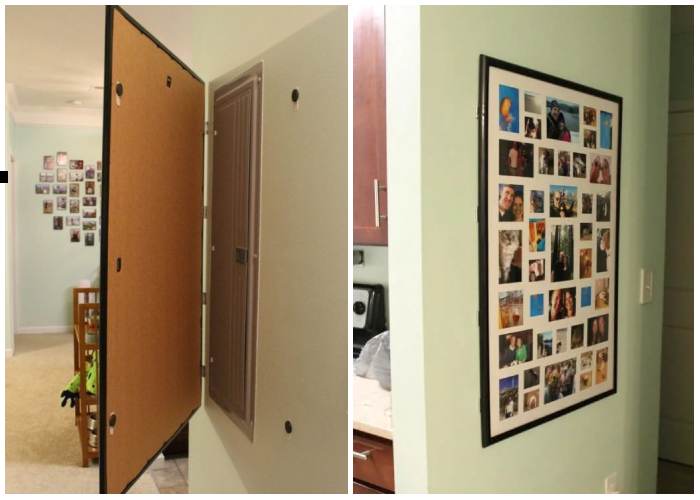
Armed with a pair of petite hinges from Lowes, and swapping the provided screws for shorter ones, we begin our journey. Attaching the hinges to the frame requires precision in alignment – a small misstep, perhaps, but DIY thrives on learning and overcoming. Holding your masterpiece against the wall, start by securing the top and bottom hinges. Voila! Your creation gracefully hangs in place.
With this ingenious DIY cover, your electrical box becomes an artistic focal point while maintaining its accessibility.
Revamp Your Cabinet with a Sleek, Pull-Out Trash Can Transformation
When seeking ways to make your kitchen more inviting and spacious, exploring unconventional options can lead to remarkable results. One such innovative solution involves transforming a cabinet into a sleek pull-out trash can. By repurposing an old upper cabinet and creating a tilting door secured with chains, we’ve crafted a functional and stylish storage solution.
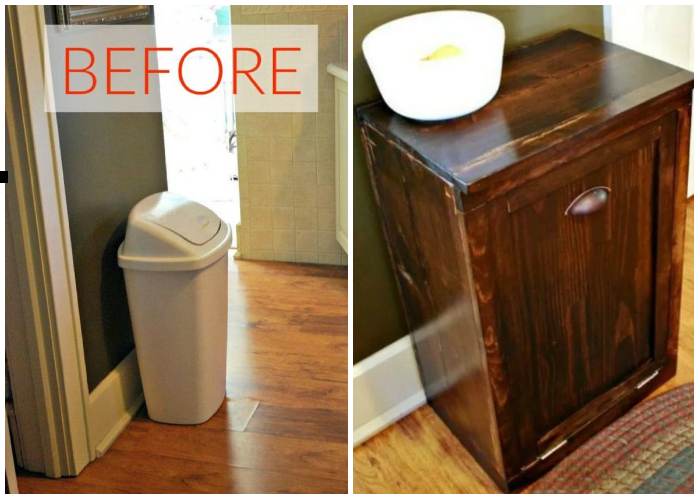
If your exposed trash bin is disrupting your kitchen’s aesthetic, consider incorporating a custom pull-out trash can extension into your countertop setup. This clever addition not only conceals your trash in an appealing manner but also optimizes your kitchen’s square footage, providing you with a cleaner and more expansive cooking space.
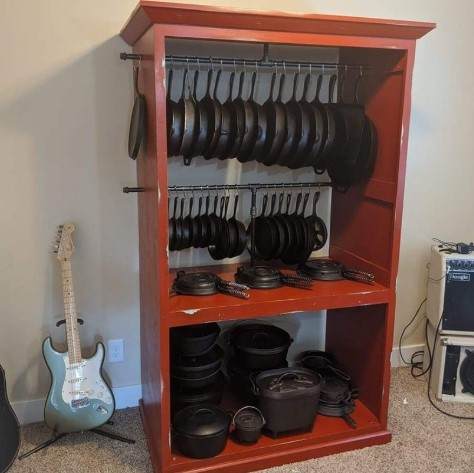
Transform Your Old Cabinet into a Stunning Showcase for Cast Iron Cookware
Materials Needed:
- Old cabinet (preferably made of solid wood)
- Medium and fine-grit sandpaper
- Wood stain or paint (in your desired shade)
- Paintbrushes or foam brushes
- Clear protective finish (such as polyurethane)
- Heavy-duty hooks or brackets (capable of supporting cast iron)
- Screwdriver or drill
- Tape measure
- Level
- Pencil
Step-by-Step Guide:
- Begin by thoroughly sanding the cabinet with medium-grit sandpaper to remove any existing paint or varnish and create a rough surface for the new paint or stain to adhere to.
- Follow the manufacturer’s instructions to apply your chosen wood stain or paint color to the cabinet using a paintbrush or foam brush.
- Once the stain or paint has dried completely, apply a coat of clear protective finish, like polyurethane, to safeguard the wood.
- Determine the placement of your hooks or brackets, ensuring they are evenly spaced and level. Mark these locations with a pencil, then secure the hooks or brackets to the cabinet using a screwdriver or drill, ensuring they are sturdy enough to support your cast iron cookware.
- Once the hooks or brackets are securely installed, start arranging your cast iron cookware for display. Hang larger items like skillets or Dutch ovens on the hooks or brackets, while smaller pieces can be placed on the cabinet shelves or its surface.
With this DIY project, your old cabinet will be transformed into a captivating showcase for your cherished cast iron cookware.
Transform Laundry Day with a Convenient DIY Roll-up Drying Rack
Laundry day can be a breeze with this ingenious roll-up drying rack that saves space in your home. Here’s what you’ll need to get started:
- Sturdy curtain rod or dowel spanning the desired drying area
- Lightweight nylon rope or strong, flexible cord
- Secure hooks or brackets for holding the rod or dowel
- Clothespins or clips for hanging laundry
- Pulley system or cleat to secure the rope when the rack is rolled up
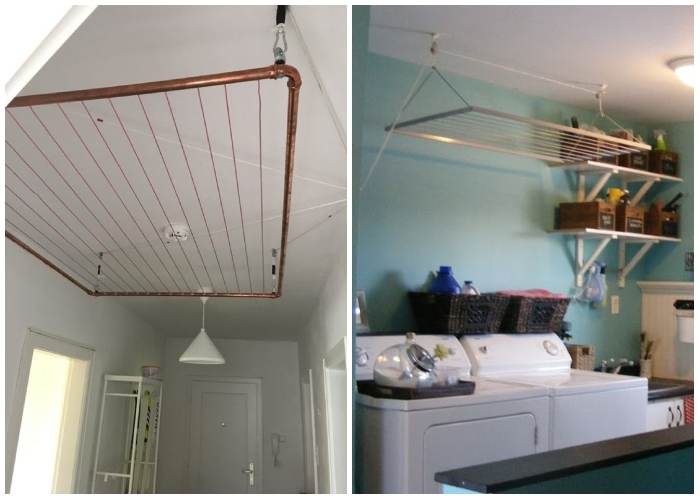
Start by installing the hooks or brackets securely on both sides of your chosen drying area, ensuring they are level. Place the drying rack onto the hooks, ensuring it can bear the weight of wet laundry. Tie one end of the nylon rope or cord to the drying rack and thread it through a pulley system or wrap it around a wall-mounted cleat. This allows you to effortlessly roll up the drying rack once your clothes are hung. Attach clothespins or clips to the rope or cord, evenly spacing them to accommodate your laundry. When it’s time to hang your clothes, simply roll down the drying rack by pulling on the rope or cord.
With this DIY roll-up drying rack, laundry day becomes more efficient and space-saving, making your life easier.
Create a Functional Kitchen Island with Storage for Two 5-Foot Tables
To begin, follow the manufacturer’s instructions to assemble the two KALLAX shelving units. Attach wheels to each unit, using two stoppers and two without. Using a jigsaw, cut two countertop pieces, ensuring each side measures approximately 4.7 x 4.9 inches (12cm – 12.5cm). The final dimensions of the countertop should be 25 inches x 35 inches (63.5cm x 89cm).
Apply edge banding using a warm iron to conceal the cut edge. Spread silicone glue on the top surface of the KALLAX and carefully affix the countertop. For added stability, screw a few screws from underneath the KALLAX up toward the countertop. Lastly, attach a door magnet to the bottom edge of one countertop and a metal corner to the edge of the other unit. Repeat the process on the opposite side.
With this DIY project, you’ll create a versatile kitchen island with ample storage space, perfect for two 5-foot tables.
Upgrade Your Pedestal Sink with a Stylish Curved Shelving Unit
If you own a pedestal sink, you might find it lacking in storage space and visual appeal. But fret not! There’s a solution to transform your sink into a stylish storage haven. Introducing a sleek, curved shelving unit designed to perfectly fit underneath your pedestal sink.
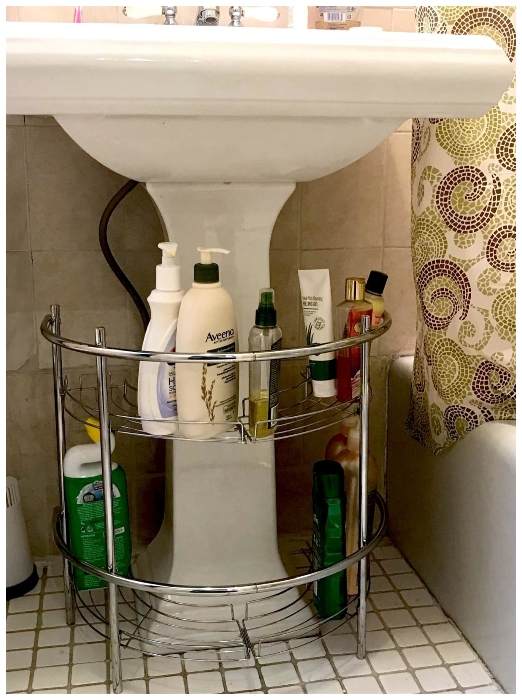
This innovative shelving unit provides ample space for storing items like sponges and hand towels, adding functionality and style to your sink area. Don’t wait any longer – seize the opportunity to elevate your pedestal sink with this must-have curved shelf.
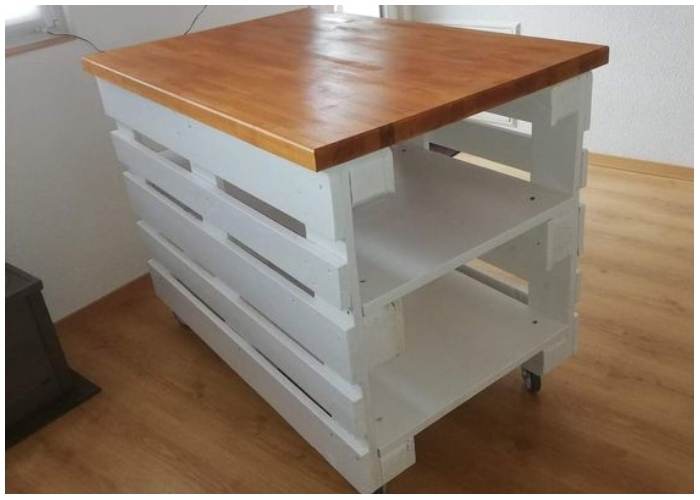
Create a DIY Kitchen Island Using Wooden Pallets
A kitchen island is a fantastic addition to enhance counter space and storage in your kitchen, and it can be easily crafted using wooden pallets. Here’s a step-by-step guide to help you make your own kitchen island using pallets:
Materials:
- 3 wooden pallets
- Measuring tape
- Saw
- Sandpaper
- Wood glue
- 4 caster wheels
- Screws
- Wood filler
- Paint or stain
- Polyurethane
- Screw gun
Steps:
- Measure and Cut: Determine the desired length and width for your kitchen island, then cut the pallets accordingly using a saw. Smooth out any rough edges with sandpaper.
- Assemble the Pallets: Apply wood glue and secure the pallets together using screws to create a sturdy base for your kitchen island.
- Attach Caster Wheels: Mount four caster wheels to the bottom of the pallets, making it easier to move the island around when needed.
- Fill Gaps and Imperfections: Fill any gaps or imperfections in the pallets using wood filler. Once dry, sand the surface smooth.
- Paint or Stain: Apply a coat of paint or stain to the pallets, ensuring they match the overall aesthetic of your kitchen. Finish with a layer of polyurethane to protect the surface.
- Add Countertop: Incorporate a piece of countertop material, such as granite, marble, or laminate, to complete the look of your kitchen island.
Utilize the shelves of your newly crafted kitchen island to store pots, pans, cooking utensils, and other kitchen essentials, maximizing functionality and organization.
With these steps, you can transform wooden pallets into a practical and visually appealing kitchen island that suits your needs and style.
Building a Console Table: Step-by-Step Guide
To construct a console table, follow these step-by-step instructions:
- Leg Assembly: Cut four pieces of wood, each measuring 24 inches, for the table legs. Keep in mind that due to the width of the saw blade, one piece may be slightly shorter, around 23 7/8 inches. Align and connect the legs by adding a long rail at the top, ensuring it is level and positioned with the 24-inch leg.
- Connecting the Sides: Utilize a Kreg Jig or similar tool to join the two shorter boards that will support the bottom shelf, completing two sides of the console table.
- Lower Shelf Creation: Lay two 1 x 4 boards flat across the piece to save on cost. However, if the boards do not completely fill the 16-inch space, place a 1 x 12-inch board on top of the attached 1 x 4s to create a solid lower shelf.
- Top Construction: Utilize the remaining 1 x 12-inch board from building the end pieces. Affix the board to the top of the console table, leaving a desired hole or gap in the center.
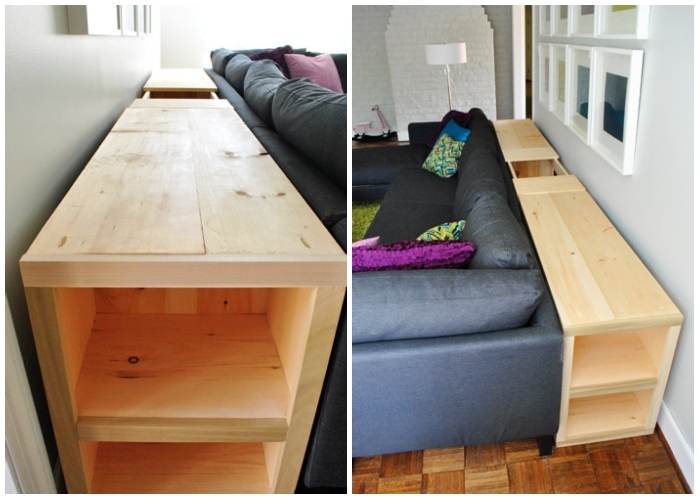
By following these steps, you can build a console table with sturdy legs, a functional lower shelf, and a distinctive top surface. Customize the dimensions and finishes to match your personal style and home decor. Enjoy your newly created console table!
Create a Functional Wall-mounted Kitchen Prep Station
Optimize your kitchen space and simplify meal preparation with this DIY Wall-mounted Kitchen Prep Station. Here’s what you’ll need and the steps to follow:
Materials:
- 1×12 inch wood board
- Wood screws
- Wall-mounting brackets
- Drill
- Measuring tape
- Pencil
- Sandpaper
Instructions:
- Cut the 1×12 inch wood board to your desired length for the kitchen prep station.
- Use sandpaper to smooth any rough edges or surfaces of the board.
- Attach the wall-mounting brackets to the back of the board using wood screws and a drill.
- Measure and mark the wall where you intend to mount the board, ensuring it is level.
- Hang the board on the wall using the mounting brackets, and securely fasten it with screws into wall studs.
- Customize your kitchen prep station by adding hooks, shelves, or other accessories to the board.
- Enjoy your newly created wall-mounted kitchen prep station, designed to streamline meal preparation and conserve valuable counter space.
With this functional and space-saving solution, you’ll have a convenient and organized area for prepping meals in your kitchen. Get creative with how you personalize your kitchen prep station to suit your specific needs and enjoy the benefits of an efficient and stylish workspace.
Create a DIY Moisture-Resistant Bathroom Shelf
Elevate the functionality and aesthetics of your bathroom with this DIY Moisture-Resistant Bathroom Shelf. Here’s what you’ll need and the steps to follow:
Materials:
- 1×12 inch wood board
- Wood screws
- Finishing material (e.g., polyurethane or waterproof paint)
- Drill
- Measuring tape
- Pencil
- Sandpaper
Instructions:
- Cut the 1×12 inch wood board to your desired length and width for the bathroom shelf.
- Use sandpaper to smooth any rough edges or surfaces of the board.
- Apply a moisture-resistant finishing material, such as polyurethane or waterproof paint, to protect the board from moisture damage.
- Measure and mark the wall where you want to mount the shelf, ensuring it is level.
- Attach the shelf to the wall using wood screws and a drill, securely fastening it in place.
- Arrange items such as towels, toiletries, or decorative pieces on the shelf to personalize and enhance its functionality.
- Enjoy your newly created moisture-resistant bathroom shelf, designed to keep your bathroom essentials dry while adding a stylish touch to the space.
By following these steps, you’ll have a practical and durable bathroom shelf that resists moisture and provides a convenient storage solution. Customize the shelf to fit your specific needs and enjoy a clutter-free and visually appealing bathroom.
Upgrade Your Kitchen Cabinets with Under Shelf Wire Racks
Revamping your kitchen cabinets has never been easier with the ingenious solution of Under Shelf Wire Racks. The journey begins by simply acquiring a few wire racks for your cabinets. Once you hook them into position, prepare to be amazed by the instant transformation they bring.
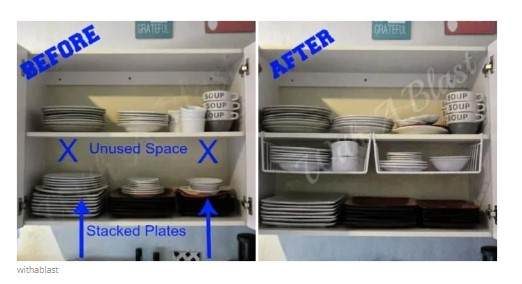
Embrace the convenience and affordability of these adaptable wire racks as you elevate your kitchen organization skills. Give them a try and unlock the true potential of your kitchen cabinets. With Under Shelf Wire Racks, your kitchen will become a haven of efficiency and order.
Create the Ultimate DIY Rolling Cart for Laundry Room Storage+
Transform your often-overlooked laundry area into a functional and well-organized space with a customized rolling cart. Here’s what you’ll need and the steps to follow:
Materials:
- 2 wire grids
- 1 wire shelf or a piece of wood cut to size
- Cable ties or metal clips (if using a wire shelf)
- 4 caster wheels
- Drill or gimlet
- Measuring tape
- Pencil or marker
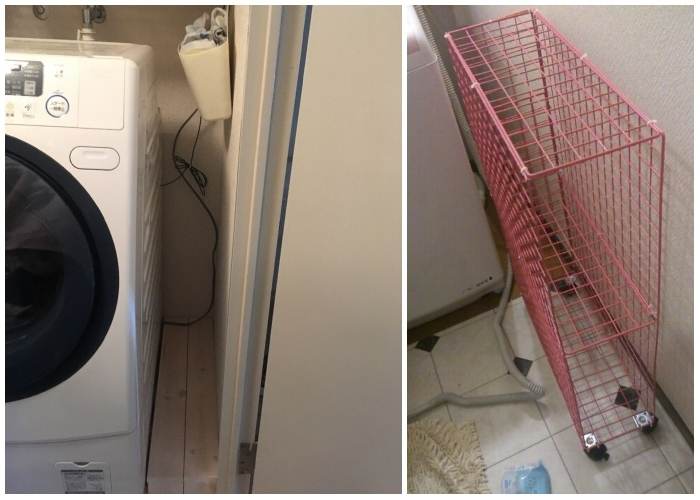
Step 1: Measure the distance between your washing machine and the wall, as well as the height of the washing machine. Based on these dimensions, select wire grids and a wire shelf or piece of wood that fit the available space.
Step 2: Position the wire shelf or piece of wood in the center of the two wire grids, ensuring alignment with the edges. If using a wire shelf, securely fasten it to the grids using cable ties or metal clips. For a wooden shelf, drill pilot holes through the grids into the wood, then use screws to firmly attach it. Verify that the shelf is securely connected to both wire grids.
Step 3: Create small holes at the bottom corners of each wire grid using a drill or gimlet. Attach a caster wheel to each hole, ensuring a tight and secure fit.
Congratulations! You’ve now created your very own DIY rolling cart, providing enhanced storage and organization in your laundry room. Enjoy the convenience and versatility of your newly assembled cart as you streamline your laundry routine.
Optimize Your Kitchen Space with Multiple Levels
When it comes to storing utensils and pots in your kitchen, organization is key. One effective solution is to create multiple levels within your kitchen storage area. By organizing items based on size or type, you can streamline your kitchen workflow.
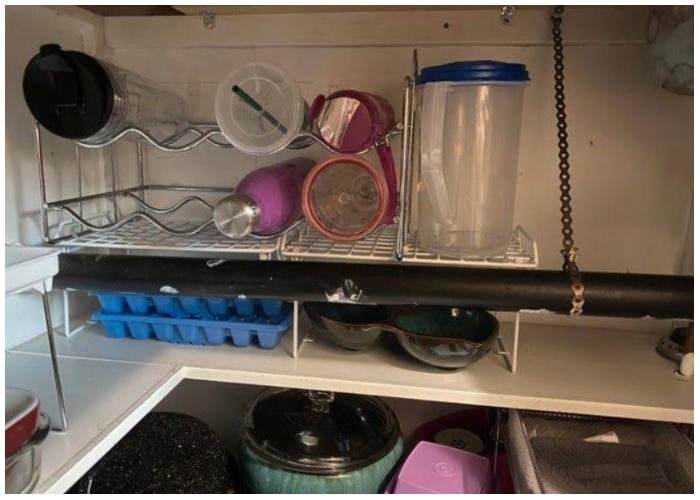
For instance, dedicate one level for cups and another for bottles. By assigning specific levels for different items, you can easily locate what you need without the hassle of rummaging through cluttered cabinets. After using an item, be sure to return it to its designated spot to maintain order and efficiency.
Implementing multiple levels in your kitchen storage is an effective way to keep things organized and maximize your available space. Embrace this hack and enjoy a more streamlined and functional kitchen environment.
Introduce a Lazy Susan to Your Bathroom Counter for Easy Organization
Tired of digging through cluttered bathroom cabinets in search of your essentials? A practical solution is to incorporate a lazy susan onto your bathroom counter. This rotating tray will revolutionize your organization game, making it effortless to locate items in a snap. 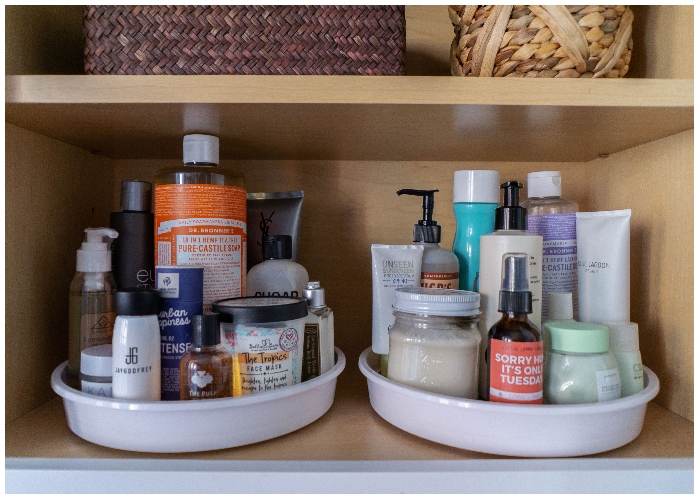
Ensure that the lazy susan you choose has a lip to prevent small items from slipping off as it spins. This feature adds an extra layer of convenience and prevents any potential mess. When arranging taller bottles, you have flexibility in positioning them either at the edge or in the center of the spin tray, depending on their height. This allows for easy visibility and accessibility to all bottle sizes and tall jars, eliminating any confusion or sliding mishaps.
Vertical Cabinets for a Modern Kitchen
Embrace the latest kitchen trend of utilizing vertical cabinets for a sleek and stylish setup. Say goodbye to the cluttered corners of your kitchen by positioning culinary equipment such as chopping boards and baking dishes vertically. Not only does this arrangement enhance the aesthetic appeal of your kitchen, but it also saves valuable counter space.
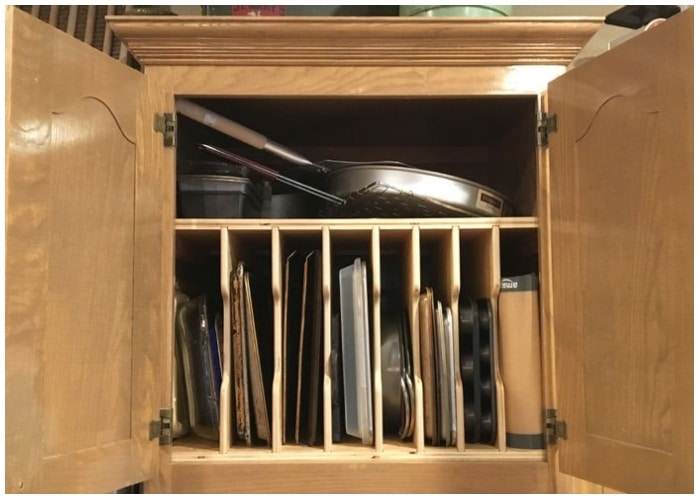
By storing these items vertically, they take up less room while remaining easily accessible and manageable. This setup not only maximizes functionality but also adds a touch of elegance to your kitchen. Install vertical cabinets within your kitchen cabinet to create a clean and organized space that showcases the beauty of your culinary tools.
Eco-Friendly Storage: Lidless Acrylic Containers
If you’re seeking an eco-friendly alternative to plastic containers, consider lidless acrylic containers for your toiletries and more. These containers offer a waterproof solution, ensuring the safety of your items without the risk of water damage. From hair sprays to face masks, you can store a variety of products worry-free.
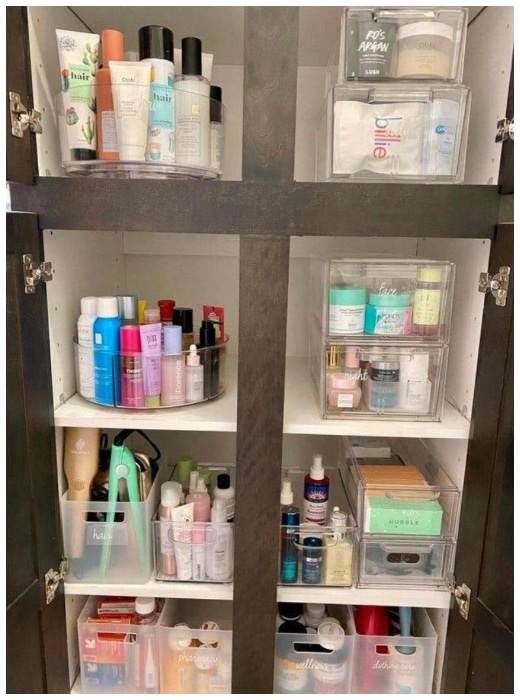
The lidless design makes accessing your items a breeze, providing convenience and ease of use. Not only are these containers ideal for bathroom organization, but they can also be versatile enough to store kitchen items. Make a sustainable choice by opting for lidless acrylic containers and reduce your reliance on plastic while keeping your belongings organized and protected.
Maximize Your Laundry Space with Wall-Mounted Dryers
Tired of cluttered drying racks taking up valuable floor space? Say goodbye to untidy rooms and embrace a more organized solution with wall-mounted dryers. By attaching a few drying hangers directly to the wall, you can optimize your laundry area while maintaining a clean and tidy look.
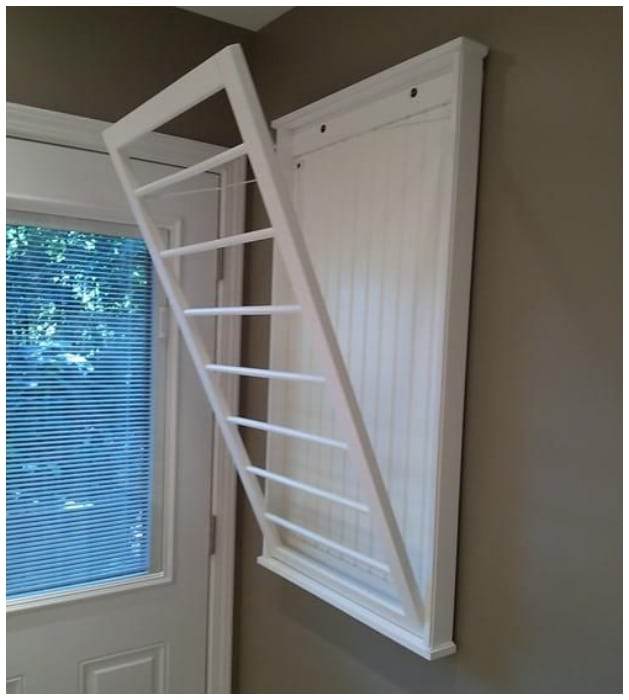
When not in use, simply roll up the drying hangers to keep them neatly out of the way. This clever hack not only creates additional drying space but also makes use of the ample wall area available. Enjoy the benefits of utilizing your walls for drying, allowing for better air circulation and even a touch of natural sunlight. Make the most of your laundry space with this practical and efficient solution.
Maximize Cabinet Space with a Tension Rod and S-Hooks
Say goodbye to the inconvenience of constantly opening and closing cabinet doors. Install an S-hook on each door and utilize a tension rod that spans across to create a practical storage solution. Hang spray bottles, towels, or other items in one convenient location within your cabinet.
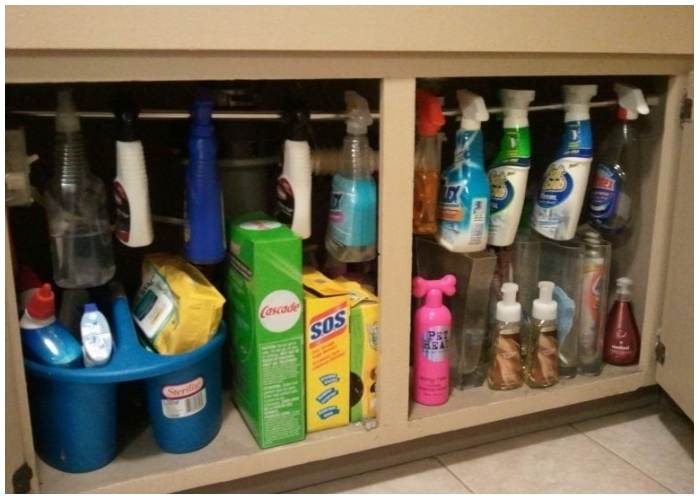
This versatile hack offers flexibility and a multitude of options. Whether you need to store makeup, cleaning bottles, or simply want to make the most of the unused space in a bathroom vanity cabinet, this solution is perfect. Enjoy easy access to your items and optimize your cabinet space with the help of a tension rod and S-hooks.
Organize Your Dessert Station with Divided Drawers
Kitchen drawers often become a chaotic mess when items are haphazardly thrown inside. It’s like a Bermuda triangle where various baking tools and ingredients mysteriously vanish. But fear not! By dividing your drawers into sections, you can create an organized and efficient dessert station.
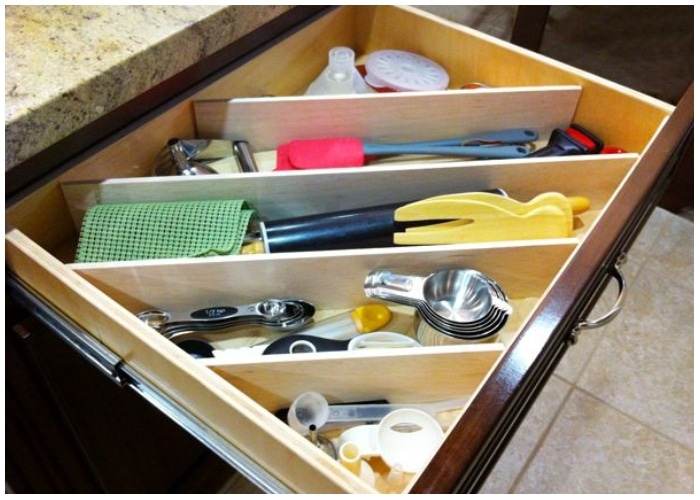
Grouping related items together in designated sections allows for easier access and a clear overview of your supplies. Store frequently used baking equipment alongside a variety of garnishes like sugar, chocolate sprinkles, and decorative candies for enhancing your sweet creations. With this organized setup, you’ll be able to find exactly what you need in a snap, making your dessert-making process a breeze. Say goodbye to cluttered drawers and hello to a well-organized dessert station.
Under Cabinet Storage Rack
Maximize your kitchen space and keep your utensils organized with an under-cabinet storage rack. This simple DIY project takes up minimal space and ensures that your kitchen tools are easily accessible.
Start by cutting a square shape from plywood, ensuring it matches the size of your desired rack. Use a template or pegboard to mark equally spaced holes on the plywood. Pre-drill holes slightly smaller than the width of the hooks you’ll be using. Screw the hooks into the pre-drilled holes.
Next, attach the storage rack to the underside of your kitchen cabinet using screws. Make sure it is securely fastened. Now, you can hang your utensils on the hooks of the storage rack, keeping them within reach and neatly organized.
With this under-cabinet storage rack, you’ll save valuable counter space and have your utensils conveniently accessible for your culinary adventures. Enjoy a more efficient and organized kitchen setup!
Fabric Boxes
Fabric boxes are a versatile storage solution that can be used to organize and store various items, including clothing. These boxes are specifically designed to fit inside your closet, helping you keep your wardrobe neatly organized.

Aside from their practicality, fabric boxes also offer aesthetic appeal. With a wide range of colors and patterns available, they can add a decorative touch to your room. Whether you prefer a pop of vibrant color or a subtle and elegant design, fabric boxes allow you to personalize your storage space while keeping everything neatly tucked away.
Choose fabric boxes as a stylish and functional storage solution that complements your room decor and keeps your belongings organized and easily accessible.
Introducing an Intelligent Solution for Mats
Discover the versatility of silicone mats and racks, designed to serve a multitude of purposes. Whether you’re baking up a storm or safeguarding your tables, these mats are a reliable choice. But what about storing them efficiently?
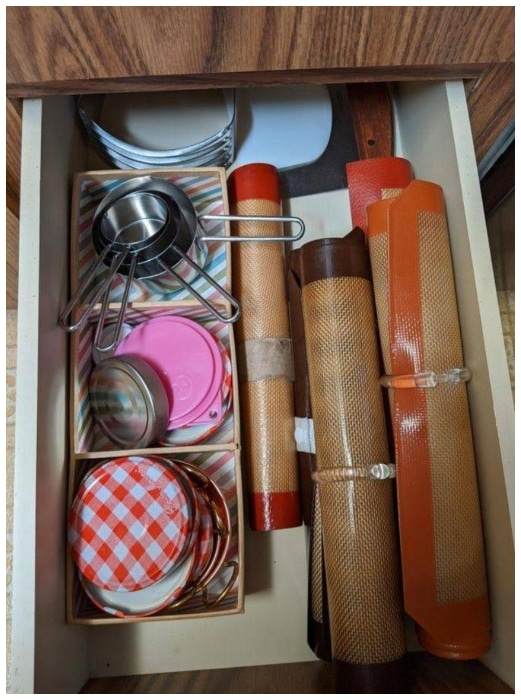
Say goodbye to clutter with our smart storage solution. Simply roll up your mats and effortlessly tuck them away in your drawer. Take it a step further by neatly organizing them using shower rings. Alternatively, elastic rubber bands and small ropes can also do the trick, providing practical storage options while saving precious space.
Embark on a Journey through Memories
Don’t settle for a mundane cabinet. Transform it into a captivating treasure trove of nostalgia. Say goodbye to the dull ambiance by adorning the cabinet door with cherished photographs.
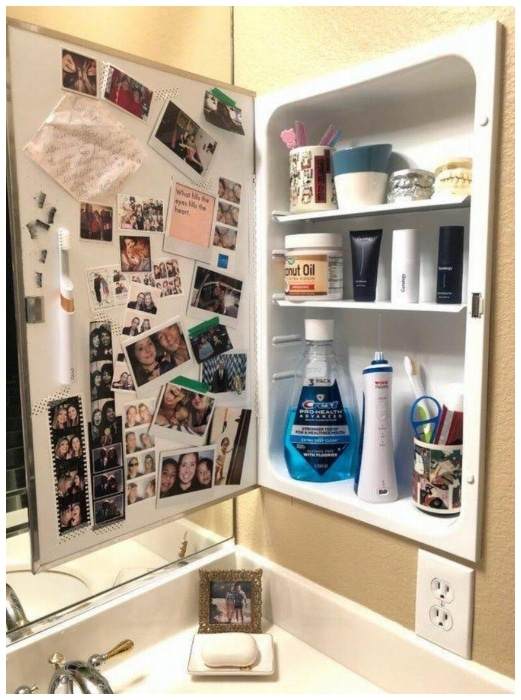
Immerse yourself in the sea of memories with just a glance. Each photo becomes a portal to relive special moments whenever you desire. And for those who adore the retro vibe, here’s a delightful fact: attaching photographs to cabinets was all the rage back in the 1990s.
Unleash the power of personalization and embark on a captivating trip down memory lane
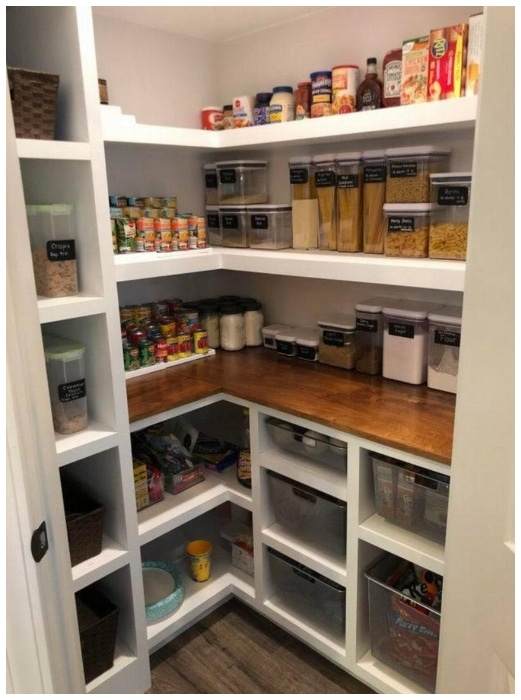
Efficient Pantry Setup Made Simple
Say goodbye to endless searching and hello to a well-organized pantry. By implementing smart organization techniques, you’ll save valuable time and effortlessly find the ingredients you need.
Here’s how to set up your pantry for maximum convenience:
- Embrace the Power of Item Coding: Utilize any item coding system that works for you. This clever strategy allows for quick and easy retrieval of items, eliminating the need for rummaging through shelves.
- Categorize Dry Goods: Keep all your dry goods in one designated area. This consolidation ensures that essential ingredients are readily accessible. Consider using clear containers or labeled bins for a visually appealing and organized look.
- Prioritize Accessibility: Arrange frequently used items within easy reach. Place them on lower shelves or at eye level for effortless grabbing. Reserve higher shelves for less frequently used items to optimize space.
- Banish Unsightly Packaging: Remove unsightly packaging for a cleaner, more streamlined appearance. Transferring items to clear containers or labeled jars not only enhances visual appeal but also maximizes storage capacity.
By implementing these simple steps, you’ll create a pantry that is both visually pleasing and highly functional, allowing you to make the most of your storage space. Get ready to experience a stress-free and efficient pantry setup.
Efficient Garage Organization
Maintaining a well-organized garage is crucial. While garages are primarily used for parking cars, they often serve as storage spaces as well.
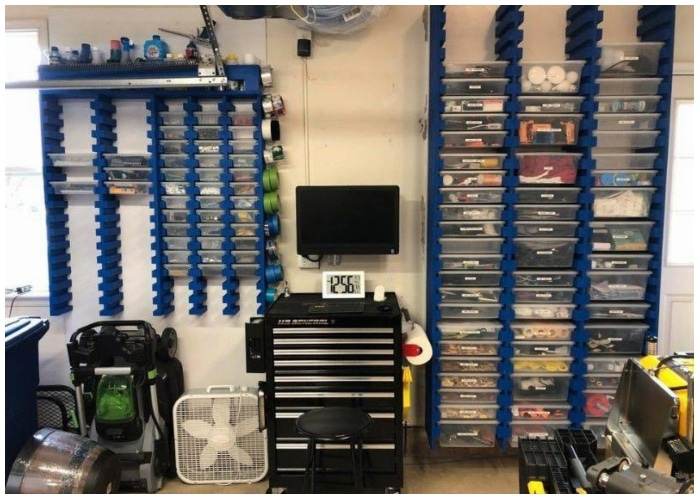
Unfortunately, many individuals neglect the organization of their garages, leading to frustrating searches for specific items. However, this issue can be easily addressed by employing racks, baskets, and small boxes to store tools in their designated spots. By implementing these simple storage solutions, you can save valuable time and effortlessly locate what you need in your garage.
Versatile Closet Solutions
In the absence of closets in modern small houses, there’s a practical solution: create your own! Installing a DIY closet is a breeze. Begin by affixing rectangular wooden bases to your walls, effectively transforming them into functional shelves. Complement this setup with a shoe rack and clothing rack, creating an aesthetically pleasing and fully functional makeshift closet.
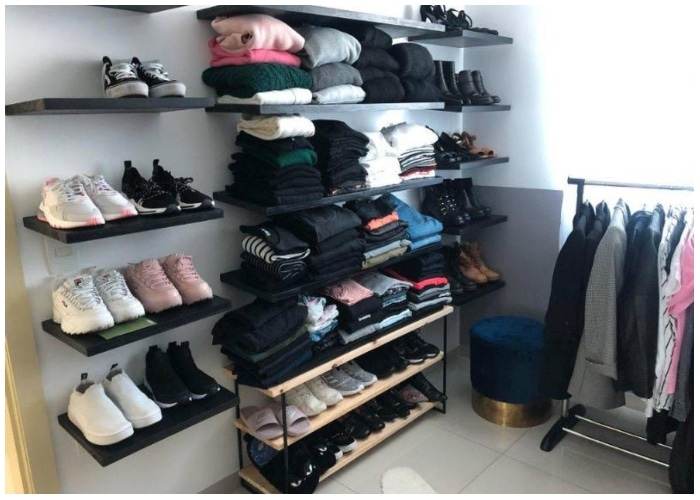
The beauty of this arrangement lies in its versatility. You have the freedom to relocate the shelves effortlessly, adapting them to different areas of your home. Furthermore, the racks require no installation and can be easily moved without any hassle.
With these simple yet effective closet alternatives, you can optimize space in your home while maintaining a stylish and organized living environment.
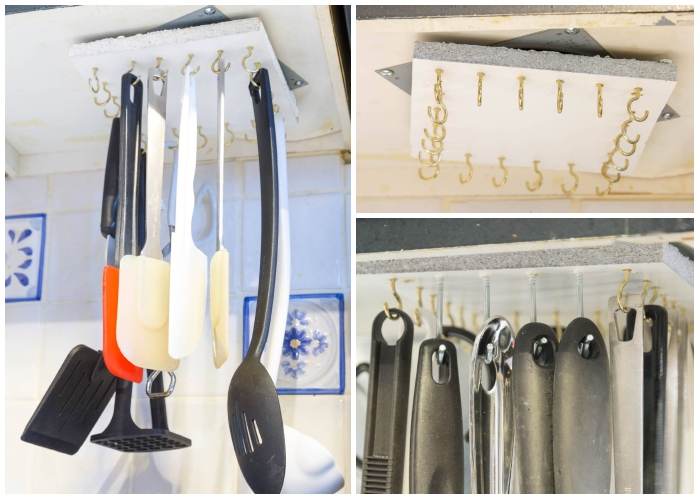
Efficient Baking Equipment Storage
Baking enthusiasts often struggle with the challenge of organizing their measuring cups and mixers, leading to frustrating searches for the right tools. If you find yourself in a similar predicament, here’s a practical solution: construct a wooden lattice with elongated hangers.
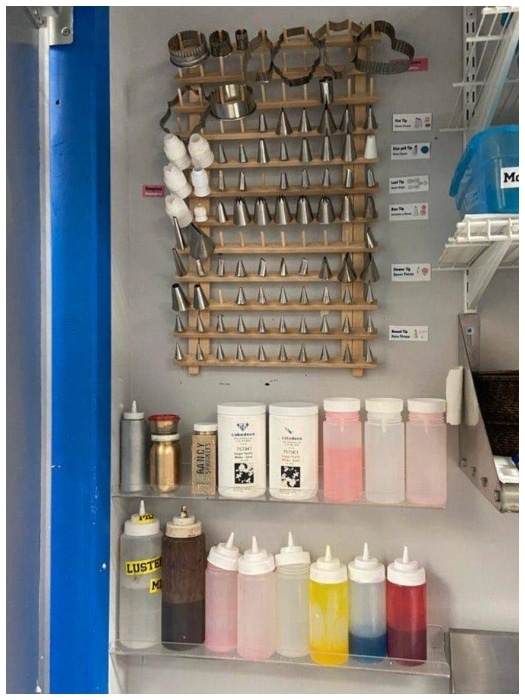
This ingenious setup not only adds a stylish touch to your space but also keeps all your baking equipment conveniently within reach. With everything hung in front of you, there’s no need to waste precious time searching for the right tool.
By implementing this efficient storage solution, you can enhance your baking experience and spend more time doing what you love—creating delicious treats—without the hassle of disorganized utensils.
Smart Organization for Your Bookshelf
When it comes to organizing books on a shelf, there’s a multitude of creative techniques to choose from. One particularly popular method is coding your books by color, which not only adds visual appeal but is also easily decipherable, even for children.
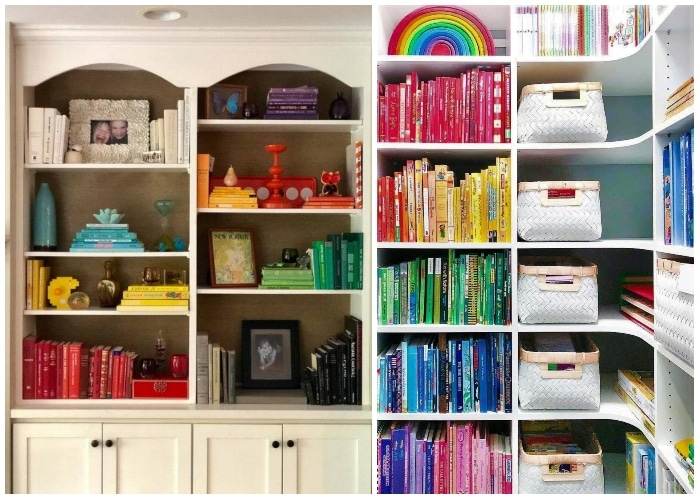
If color-coding doesn’t suit your taste, another option is to arrange your bookshelf based on the first letter of each book’s title. This method, commonly employed by libraries, exudes a professional vibe. However, it’s worth noting that this approach is best suited for individuals with a substantial book collection due to the potential complexity involved.
Space-Saving Wardrobe Solution
When space is limited, a free-standing wardrobe, hutch, or closet proves to be an exceptional alternative. Its versatility allows you to store it conveniently in your bathroom or any other area for easy and quick access. With a touch of creativity, you can transform an underutilized space into something functional by harnessing its ample storage capacity.
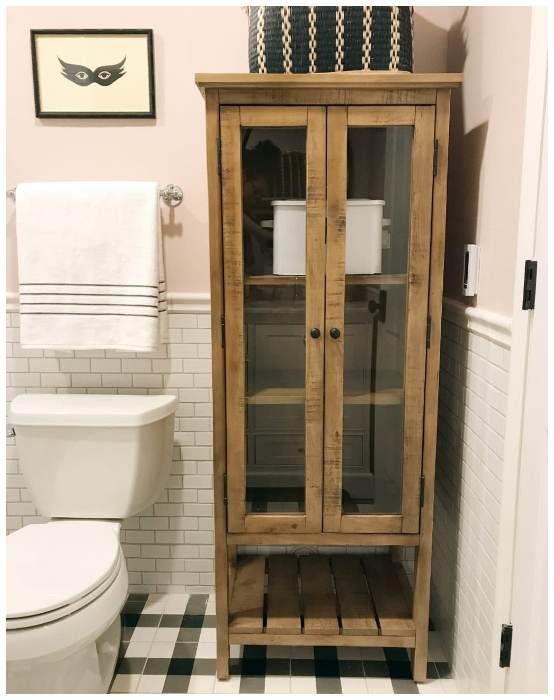
By incorporating a free-standing wardrobe, you infuse your space with personality and vitality. This practical addition enables you to neatly store paper products, towels, and various other items. Embrace better organization by installing one today and unlock the potential of your living environment.
Effortless Washcloth Organization with a File Sorter
Say goodbye to the frustration of misplaced washcloths among your body and hand towels. Here’s a clever solution that ensures your washcloths stay organized and easily accessible.
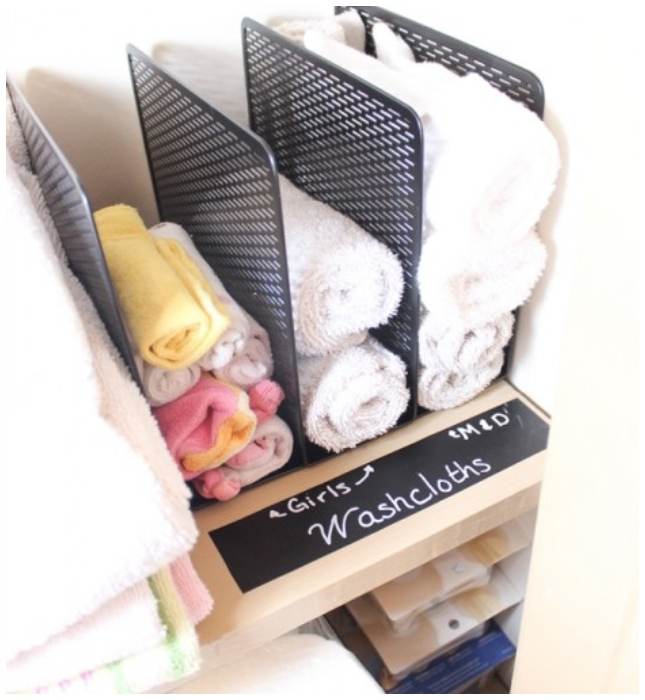
To stylishly organize your linens, all you need is a magazine and a file sorter. This combination proves highly effective at its primary task—collecting clean surfaces—and keeps them readily available whenever you need them.
Embrace the Serenity of White
While it’s true that white items can show dirt more easily, there’s no denying the timeless elegance and purity that white brings to a space.
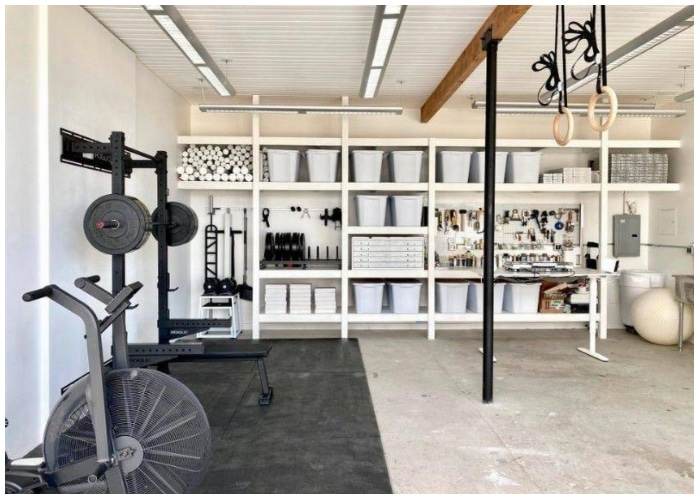
If you’re seeking a room where you can unwind and release the accumulated stress of the day, opting for white decor can be a wonderful choice. White has a profound psychological effect, imparting a sense of cleanliness and purity. Its calming and soothing nature makes it an ideal color for bedrooms or even your personal gym.
Organized Spice Drawer Solution
Similar to a tea drawer, a spice drawer is another fantastic DIY creation. If you’re skilled in DIY projects, you can effortlessly create it in a short amount of time. Simply craft holes in a piece of wood or cardboard and ensure that the base fits snugly within the drawer. This ingenious design allows you to store your spice jars neatly in their own dedicated compartments.
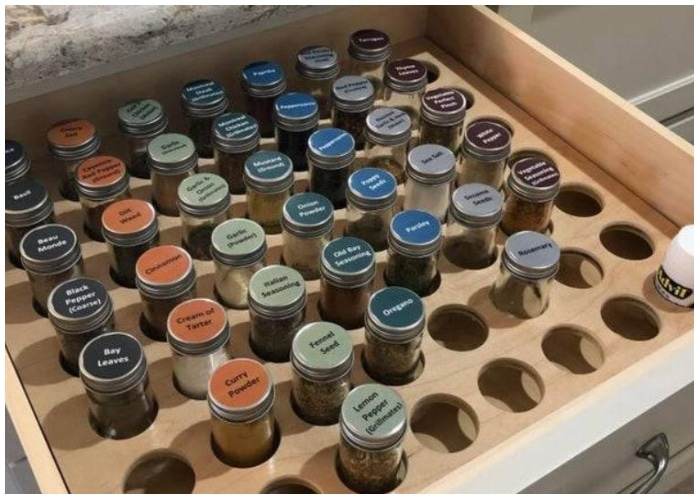
For those who prefer a ready-made option, drawer inserts for spices are readily available and highly popular. You can find them in various materials, including plastic, at most handicraft shops.
Whether you choose to unleash your creativity and make your own or opt for a store-bought solution, a well-organized spice drawer ensures that your spices are easily accessible and neatly arranged. Simplify your cooking experience and elevate your culinary adventures with this practical storage solution.
Efficient Face Mask Storage with S-Hooks
In the midst of the ongoing COVID-19 pandemic, face masks have become an essential part of our daily lives, both at home and when venturing outside. If you find yourself overwhelmed with numerous masks scattered around your house, struggling to find the one you need, consider utilizing an S-hook in your closet or wardrobe.

Fortunately, many closets nowadays come equipped with their own S-hooks, eliminating the need for additional purchases. By utilizing an S-hook, you can neatly hang all your masks, ensuring they are easily accessible whenever you require one.
Streamline your mask organization with this simple yet effective solution. Embrace the convenience of an organized mask collection and effortlessly locate the mask you need, simplifying your daily routines and promoting a safer environment.
Transforming a Closet into a Book Haven
When a closet door refuses to hinge and remains neglected, it’s a missed opportunity to utilize valuable space. Instead, consider transforming it into a captivating centerpiece—a delightful retreat, especially for children, if you prefer to leave the entrance open.
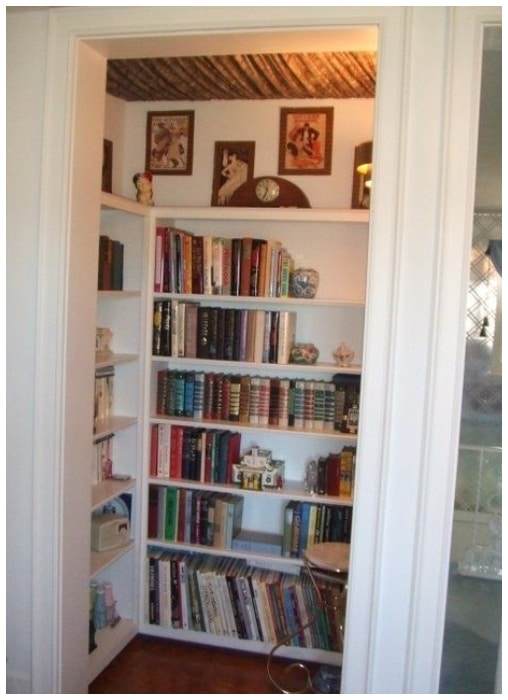
To create an eye-catching backdrop for bookcases, repaint the walls in a bold, vibrant color. This small library will not only keep kids engrossed on snowy or rainy days but also serve as a captivating theme when guests visit. With a touch of paint and some rearrangements, assembling and maintaining this book haven becomes a breeze.
Unlock the hidden potential of your closet by converting it into a haven for books. Embrace the joy of reading and create a unique space that captivates both young and old, elevating your home’s charm and providing a sanctuary for literary adventures.
Space-Saving Folding Desk Solution
If you’re short on space and unable to have a dedicated home office, consider incorporating a folding desk setup into any available nook of your room. By creating a few shelves and a flip-down working surface, you can store essential stationary items conveniently within reach.
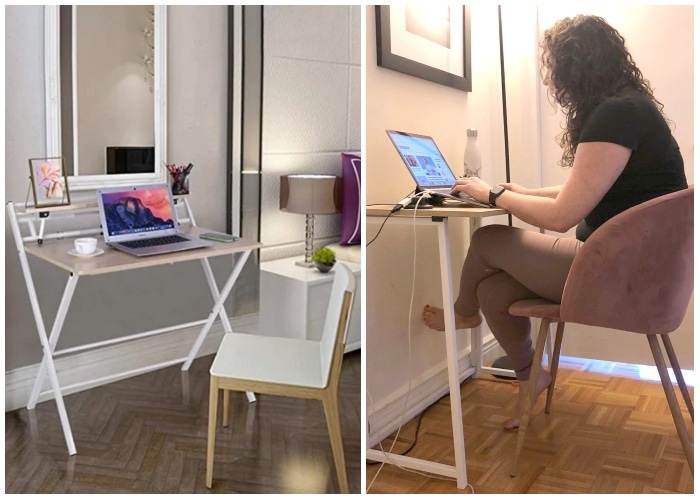
Once your work is complete, effortlessly tuck away journals, a laptop, and other materials, keeping them out of sight. With minimal tools required, this desk can be easily assembled and utilized without taking up additional space in your home. Its size can be adjusted to suit your specific needs.
Efficient Craft Supplies Organization with Shelves
Taking inspiration from Monica’s organization skills on FRIENDS, you can implement a clever trick to keep your craft supplies, such as ribbons and wrapping papers, neatly organized and free from tangles or tears.
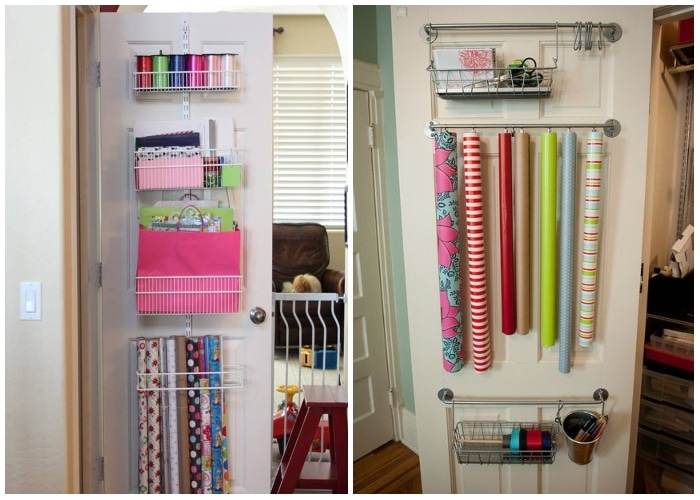
For efficient organization, consider using separators and pull-out rails on shelves for ribbon reels. This allows easy access and prevents them from getting tangled. Additionally, sliding-out cabinets with a slide-out arrangement can be utilized for storing wrapping sheets. Adjust the number of removable rails based on the quantity of supplies you have. You can also color-code or type-code the separators to facilitate quick identification and access to specific supplies.
Discreet Pet Housing Solution
Pet accessories and gear can often take up a significant amount of space in your home, resulting in a cluttered appearance. To address this, consider creating a medium-sized cabinet that can accommodate all of your pet’s needs.
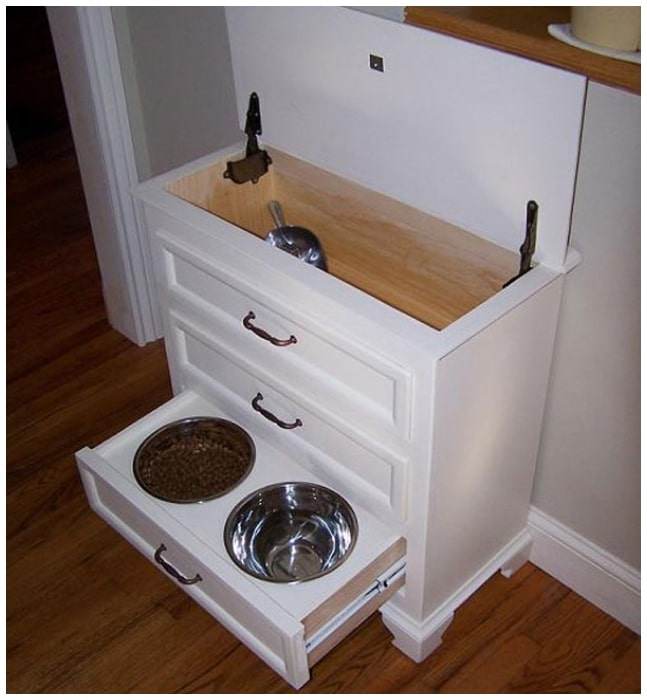
With this solution, you can keep your furry friends close while ensuring that their bedding, feeding dishes, and toys don’t disrupt your home decor. The cabinet features a hidden dog bed within the bottom compartment and a shelf specifically designed for pet food containers, utilizing a sleek and neutral design that complements any home decor style. This setup is remarkably easy to assemble.
Stylish and Space-Saving Ladder Shelving
Ladder-style shelves not only add a touch of elegance to your space but also serve as excellent storage solutions, particularly for linens. These shelves offer generous storage capacity while maintaining a compact footprint, making them ideal for small spaces that demand efficient organization.
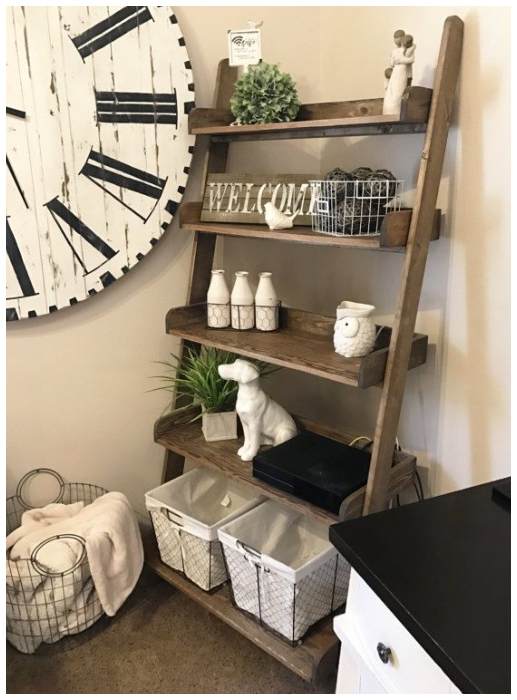
If you’re seeking additional storage without the bulk of traditional furniture, ladder-style shelving is the perfect choice. Its lightweight design provides ample storage space while minimizing visual clutter. Moreover, it seamlessly integrates into any bathroom design, adding functionality and style.
Efficient What-To-Do Board Creation
Forgetting grocery items or misplacing important slips can be quite a hassle. To stay organized and tackle these issues, consider creating a dedicated space for storing these essential items—an ingenious organizational hack.
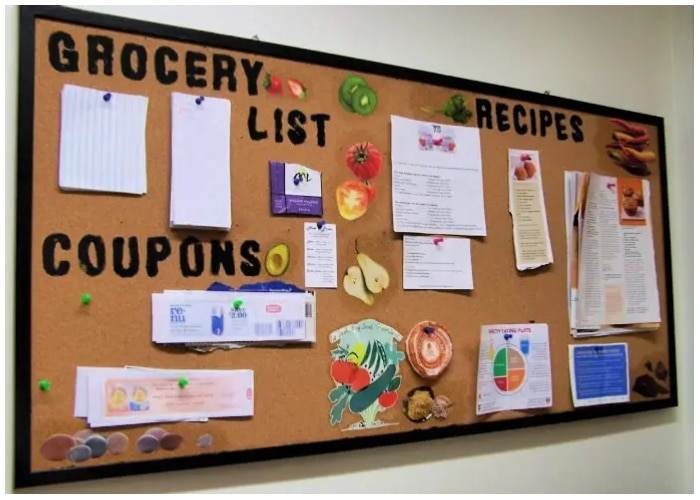
To store shopping lists, vouchers, and recipes all in one place, attach adhesive pouches to the interior of a condiment rack. Attach a string with a pen so that it’s always within reach when you need to jot something down. Keep a small calendar in one of the pouches and mark important dates. This way, you won’t miss any appointments.
Efficient Towel Hangers for Linen Storage
Linen closets offer ample storage for household linens, extending beyond just the bathroom. To maximize space and ensure easy access to fresh bed sheets, blankets, and towels, consider utilizing over-the-door towel hangers.
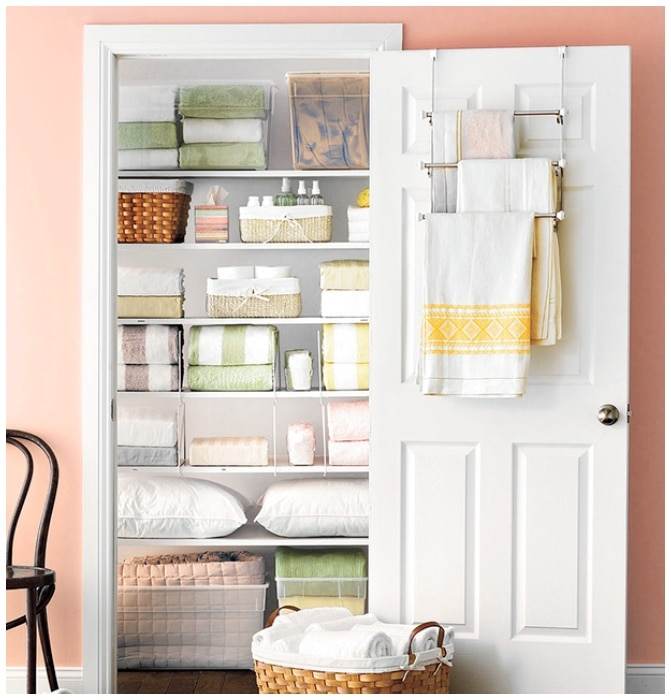
These hangers provide a discreet storage solution, allowing excess tablecloths, blankets, or towels to be stored out of sight while remaining easily accessible. The additional racks provided by the hangers not only create more space for extra linens but also promote quick drying. This helps prevent overcrowding in the cabinets and allows delicate linens to be stored without damage.
The beauty of these towel hangers lies in their versatility and convenience. They are removable and can be easily folded and stored if needed, making it a cost-effective solution to optimize space without extensive renovations or expenses.
Efficient Closet Organizers for Enhanced Organization
When it comes to storage, a cluttered desk can hinder overall efficiency, even if the saying “out of sight, out of mind” comes to mind. Luckily, a simple and affordable solution like closet organizers can greatly improve space utilization and reduce unnecessary hassle.
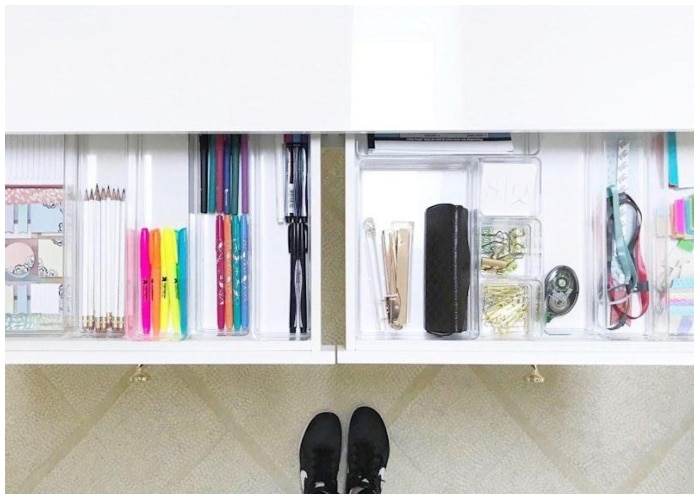
Acrylic dividers are a versatile option, allowing you to mix and match to create designated spaces for pens, pencils, paper clips, and other essentials. These separators come in various sizes and can be color-coded based on the type of stationary. Utilize additional small containers to store tiny essentials, keeping them neatly organized within the cabinet. This not only prevents small cuts or punctures but also enhances the visual appeal of a neatly organized drawer, encouraging its use.
Convenient Laundry Reminders on the Washing Machine
Laundry days can be chaotic, and it’s easy to forget which garments should not go in the dryer, leading to accidental damage. However, a simple solution can prevent such mishaps—use a dry-erase marker to write notes directly on the washing machine.
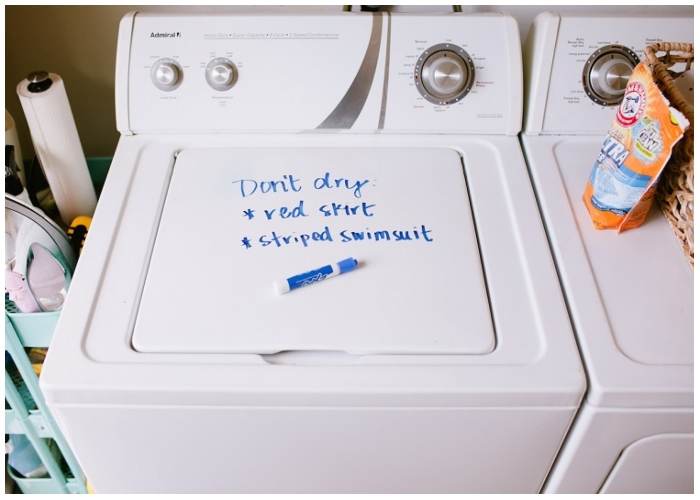
Most washing machines feature an enamel finish, making it ideal for temporary writing with dry-erase markers. Simply jot down a list of items that should not be put in the dryer. This way, whenever someone is doing the laundry, they’ll have a clear reminder of which clothes require air drying.
Convenient Fridge Organization with a Lazy Susan
Even with a well-organized fridge, it can still be frustrating when a desired item is out of reach. It’s not always feasible to keep every item within easy reach, especially when stocking up for an extended period.
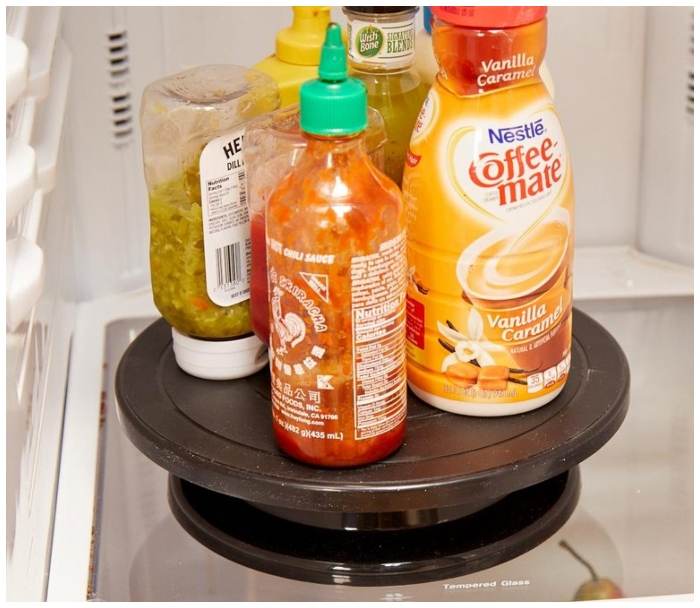
A Lazy Susan, typically used on large tables to facilitate access to dishes, can also come to the rescue in the fridge. By placing a Lazy Susan or turntable inside the fridge, items stored in the far back become easily accessible. This unconventional but effective method allows for efficient organization and convenient retrieval of items in your fridge.
Colorful and Playful Lego Keychain Organizer
Organizing doesn’t have to be boring—it can be fun and visually appealing too! With Legos, you can add a touch of color and style to your home while keeping your keys organized.
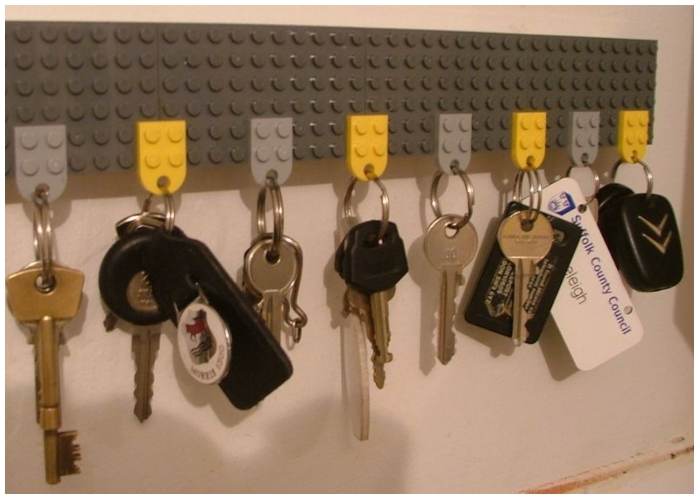
Start by mounting a Lego board near the main door. You can securely attach it by drilling screws into the four corners of the Lego board. This will ensure it stays in place.
Next, take some Lego pieces and drill holes on one side of each piece. Make sure the holes are large enough to accommodate an eyelet screw. Once you’ve completed this step, use the Lego pieces as hooks to hang keyrings onto the Lego board. The Lego pieces will securely hold the keyrings in place, providing a playful and functional keychain organizer.
Optimize Shower Space with a Shower Organizer
Make the most of your shower space by utilizing a clever trick: attaching a shower organizer to the same hooks as your shower curtain. By affixing a small shower organizer or a shoe organizer to the inner portion of your shower curtain, you can effectively utilize unused space.
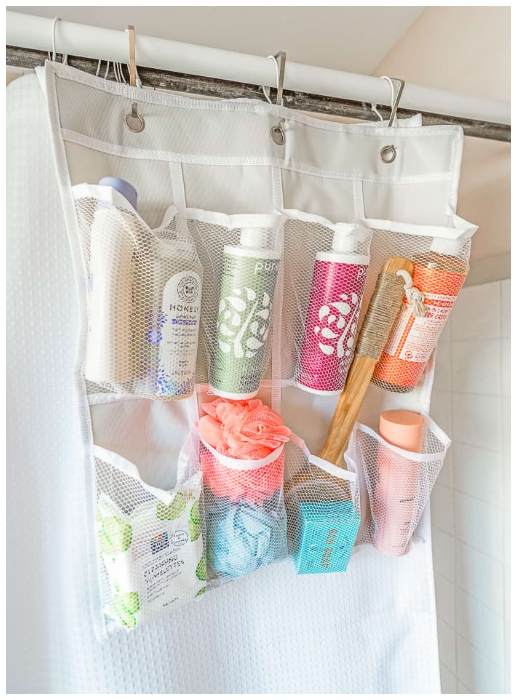
This innovative solution enhances the accessibility of your shower essentials, making bathing more convenient. With the shower organizer in place, you can store your essential items in one centralized location, ensuring easy access whenever you need them.
Organized Long-Handled Tool Storage with a Pallet
Keeping long-handled tools neatly stored is essential for maintaining a safe and tidy lawn or garden area. Merely stacking these tools is not sufficient, as it can lead to tripping hazards and disorganization. That’s where a pallet can become a valuable lifesaver.
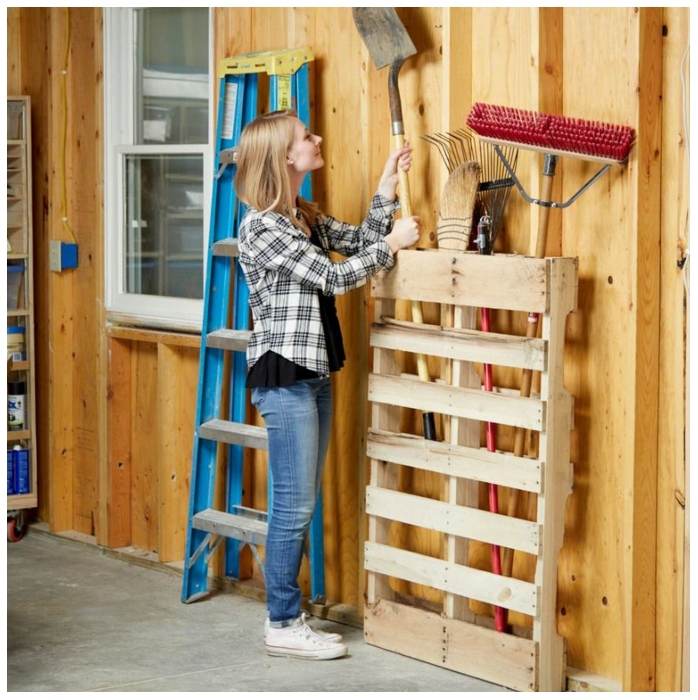
If you have a pallet available in your house, you’re in luck. However, if not, finding a pallet is relatively easy. By attaching a pallet to a wall, beside a shed, or to a fence, you can quickly create a practical storage solution for your long-handled tools. Once the pallet is securely attached, you can arrange all your tools properly, ensuring they are easily accessible and no longer prone to creating hazards.
T-molding for Coffee
For coffee enthusiasts, keeping coffee pods neatly organized is a must. Inexpensive and efficient, utilizing T-molding is a commendable solution for this purpose. Although not typically used for organization, T-molding proves to be an effective choice in this case.
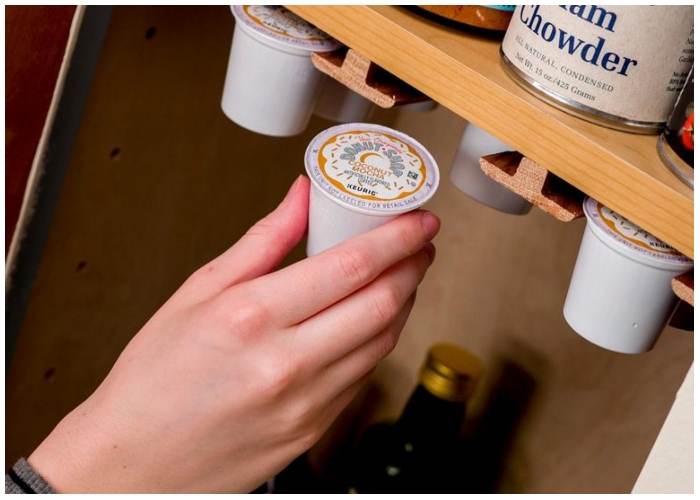
You can find T-molding at stores that sell wood flooring, usually costing around $20 for a 4-foot section. To start, measure the top of the coffee pods to determine the required spacing between each molding. Cut the T-molding accordingly and drill screw holes before fixing the T-moldings in place. The underside of a shelf or inside a cabinet makes an ideal location for the T-moldings, ensuring easy access to your coffee pods while keeping them neatly arranged.
Sturdy Grocery Bags
Reusable grocery bags are known for their durability and reusability, but they can sometimes struggle to handle heavy loads without showing signs of wear and tear. However, there’s a simple hack to salvage and strengthen the bag for future use.
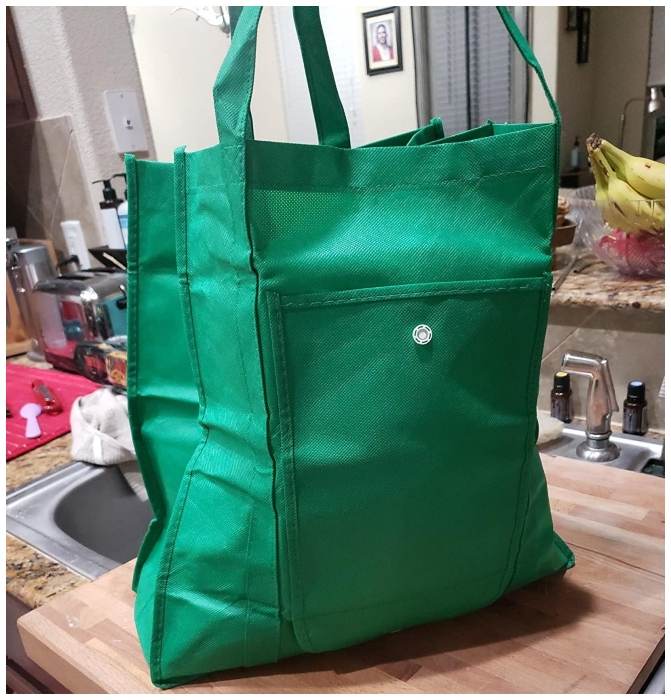
To reinforce a reusable grocery bag, locate a piece of plywood or a rectangular piece of wood. Cut the piece to fit the bottom of the bag and place it inside. This added support will prevent the bag from tearing when carrying heavy items. Once the reinforcement is in place, you can confidently load the bag with your groceries or other heavy objects, knowing that it will maintain its integrity.
Organizer out of Gutters
Engaging in DIY projects allows for creative exploration and repurposing items for storage solutions. Instead of discarding old tool bags or picnic bags, consider utilizing them as organizers. While spacious tool bags may lack smaller compartments for keeping tools organized, a PVC gutter downspout can come to the rescue.
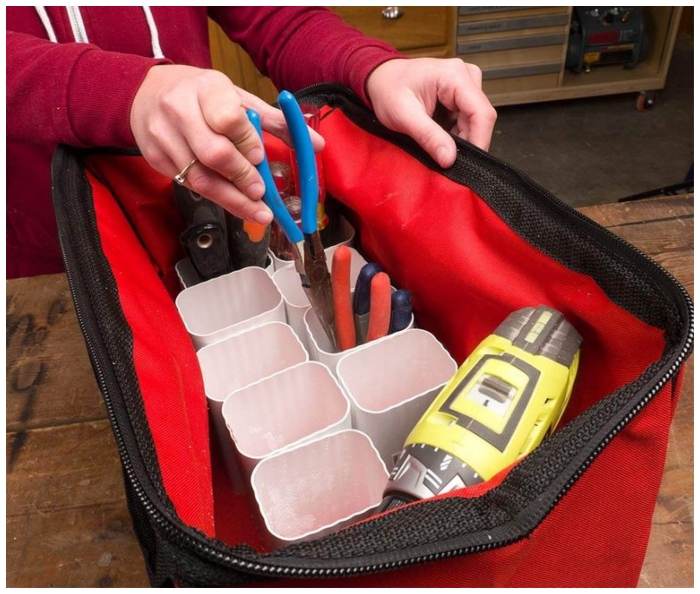
To create compartments inside the bag, cut the PVC downspout into sections and place them vertically inside the bag. It’s advisable to use glue to securely attach the sections, ensuring a sturdy structure. This way, all your tools can be neatly arranged inside the gutter downspout compartments, keeping them organized and easily accessible.
Multipurpose PVC Pipe
Don’t let any leftover PVC pipe go to waste after completing bathroom or kitchen renovations. Instead, repurpose the unused PVC pipe to create a practical and organized solution for your bathroom.

Start by cutting the PVC pipe into sections of desired lengths. These sections can be either different heights or the same height, depending on your preference. Next, use glue or a glue gun to securely attach the sections together. Voila! You now have a customized razor or toothbrush holder.
Place the PVC pipe holder in your bathroom and utilize it to keep razors and toothbrushes neatly organized. This clever hack reduces clutter around the bathroom sink, providing a clean and tidy space.
Organization in Both the Kitchen and Bathroom
Effective organization is not limited to the kitchen alone; the bathroom also benefits greatly from well-arranged spaces. While kitchen drawers are often designed with utensils in mind, bathroom drawers tend to be more simplistic, which can result in a messier environment. However, you can utilize certain techniques to bring order to your bathroom storage as well.
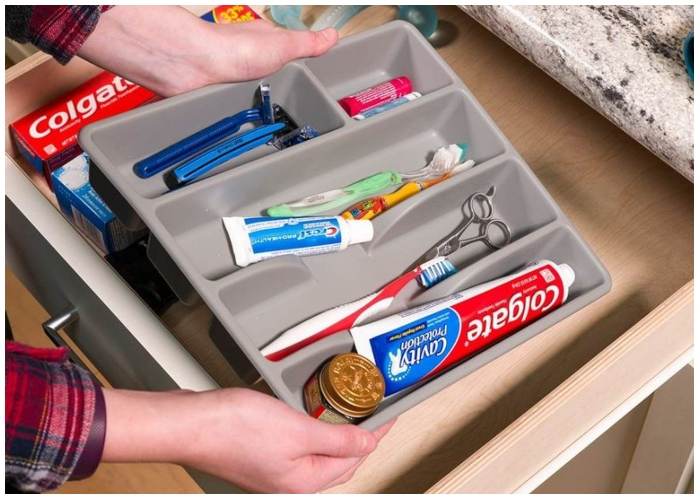
Take inspiration from silverware drawers in the kitchen, which typically have long compartments designed for storing long-handled spoons and spatulas. These compartments can be repurposed to neatly hold toothbrushes, toothpaste tubes, and other dental care essentials. Utilize the other compartments for organizing items like razors, foot cream, dental floss, and more.
DIY Bag Dispenser
Managing the accumulation of reusable plastic bags from supermarkets and stores can become a challenge without proper organization. Creating a simple bag dispenser can make accessing these bags quick and hassle-free.
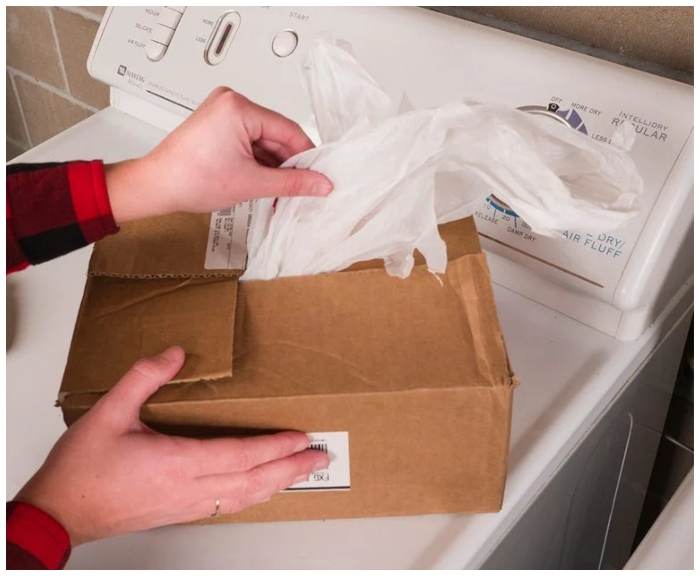
Start by straightening out all the reusable bags you have. Next, find a cardboard box that is suitable for the purpose and cut a hole on the top large enough for the bags to be pulled out. Place the stacked bags inside the box and close the lid. This DIY bag dispenser is easy to make and highly effective.
By utilizing this solution, you’ll save a significant amount of time whenever you need a plastic bag. With the bags neatly stored and easily accessible, you’ll be able to grab one effortlessly whenever required.
Easy Label Removal for Clear Jars
When it comes to organizing smaller items like staples, pins, or ingredients, small clear jars can be a practical solution. However, if the jars you have already come with labels, it’s important to remove them before use.
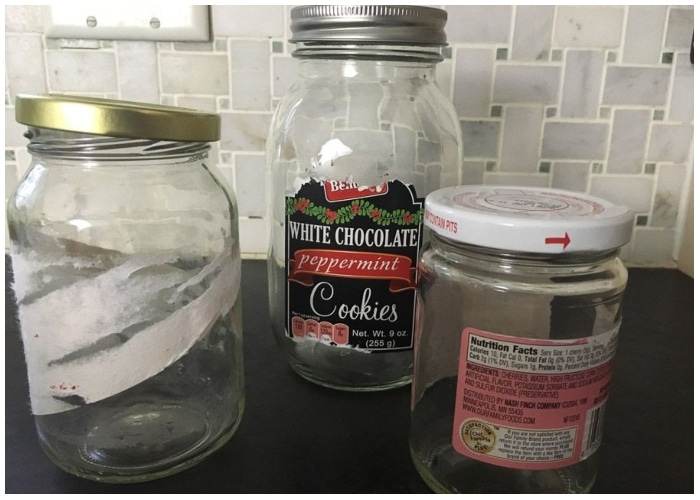
To remove labels from the jars, you can rely on acetone nail polish remover or stain removers. Begin by pouring a small amount of the chosen chemical onto a wiping cloth. Then, gently rub the label on the jar until it starts to come off. Continue rubbing until the entire label is removed.
If there are any remnants or adhesive residue left behind, you can further clean the surface using the same method or by using warm soapy water. Once the jars are clean and label-free, you can consider adding new labels on top to hide any traces of the old label or to provide clear identification of the contents inside.
Hang plastic baskets inside the cabinet doors
Baskets are versatile and aesthetically pleasing storage options that can be utilized in various sizes and shapes. To optimize your cabinet space, consider utilizing the interior of your cabinet doors by hanging plastic baskets. This solution is particularly suitable for storing small items that may not easily fit in drawers or cabinets.
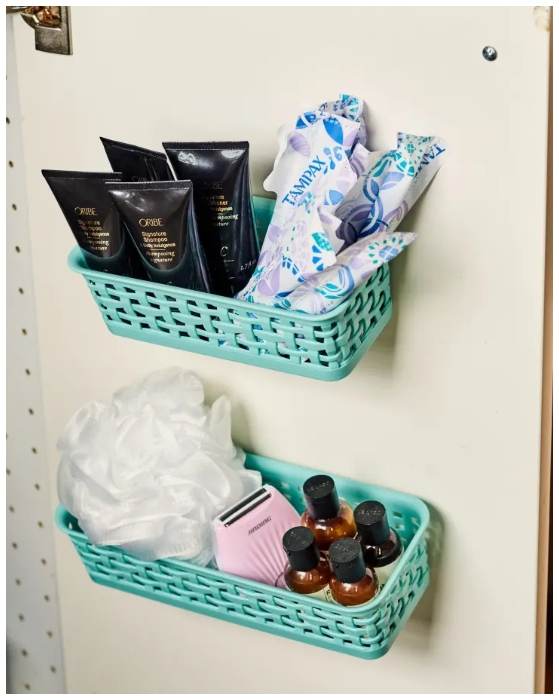
Dollar store baskets are a budget-friendly option for organizing feminine products, essential oils, razors, and other similar items. By hanging these baskets inside the cabinet doors, you create a convenient and accessible storage area, making it easy to locate and retrieve your essentials whenever needed.
DIY Flatware Tray
If you enjoy DIY projects or find yourself frustrated with the lack of grip in your current flatware tray, why not create your own custom solution? By using wood crafting materials and a quality piece of wood, you can shape a tray that provides a satisfying grip for your spoons and forks. Alternatively, you can modify your existing tray to enhance its gripping strength using various technical methods or by placing mats on top of the tray to increase friction and prevent sliding.
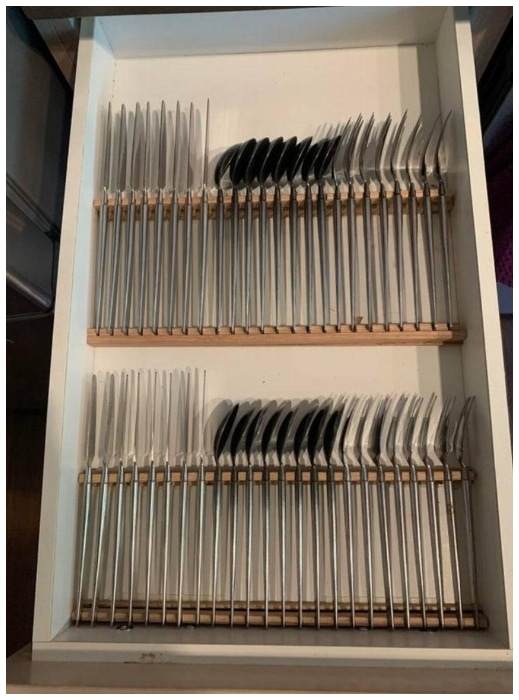
Building your own flatware tray allows you to tailor it to your specific needs, ensuring that your utensils stay securely in place. Whether you prefer the satisfaction of crafting your own tray or simply enhancing your existing one, these solutions will provide a practical and effective grip for your small forks and spoons.
Containers a Solution to All Problems
Containers are incredibly versatile and can be utilized to store a wide range of items found in your kitchen, bedroom, or bathroom. Whether you opt for large PET containers or simple plastic ones, they offer a practical and organized solution for your storage needs.
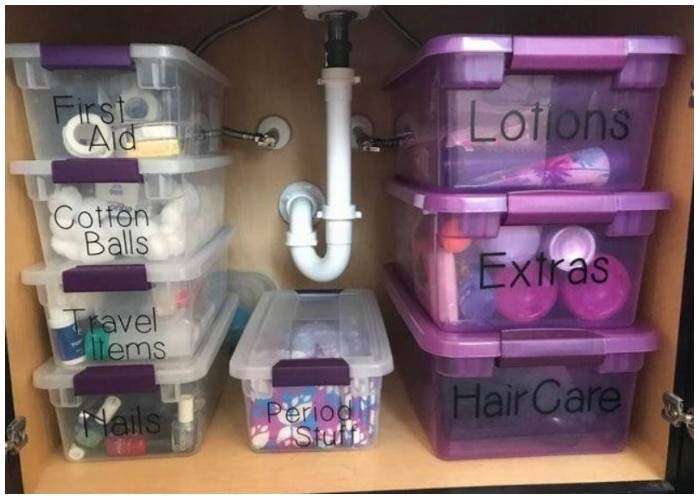
Labeling the containers is key to efficient organization. Clearly indicate the contents of each box, such as clothes, food items, packets, travel items, or miscellaneous items that may be needed in the future. With labeled containers, you’ll know exactly where to find an extra nail cutter when needed or locate your everyday clothing items without rummaging through the wrong place.
Efficient Closet Organization with Baskets
Baskets are excellent alternatives to boxes for achieving an organized closet. If you find your closet in disarray, large linen baskets can be your go-to solution for sorting clothes based on different needs.
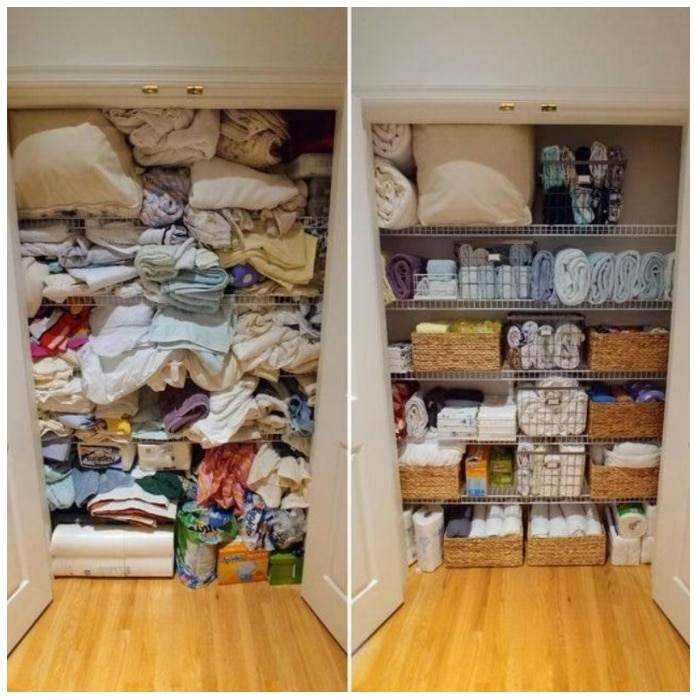
Utilize the baskets to organize clothes by garment type, material, or even the specific weather conditions in which they would be worn. By categorizing your clothes and storing them in designated baskets, you’ll be able to easily locate and access items as needed. Baskets also prove useful for storing toiletries such as brushes, shampoos, and other bathroom essentials, providing a tidy and accessible storage solution.
In addition to clothing and toiletries, baskets are versatile for storing packaged food and fruits, offering a practical and visually appealing solution. They not only keep your items conveniently organized but also add a touch of aesthetic charm to your storage space.
Photo Albums for Storing Seeds
Photo albums can serve a surprising purpose when it comes to storing seeds for future use. The plastic sleeves of photo albums create an ideal environment for maintaining the right temperature and conditions, ensuring that the seeds remain dormant without germinating or rotting.
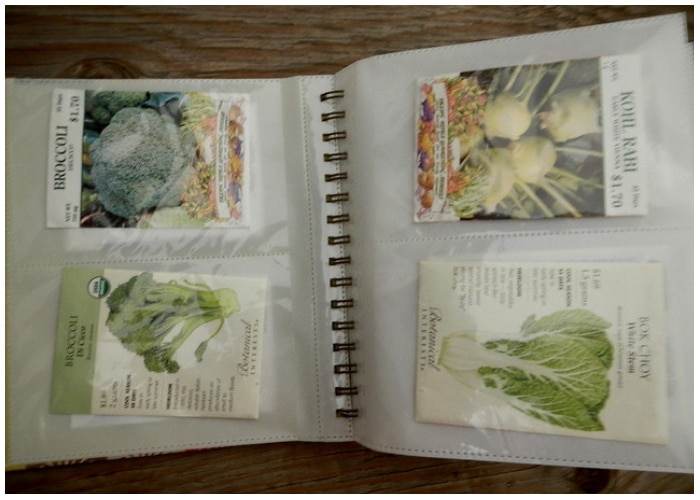
To effectively utilize photo albums for seed storage, mark the pages beforehand with the name of the specific seed variety you are storing on each page. This simple labeling system allows for easy identification and retrieval of seeds when needed, preventing any confusion or inconvenience.
The Sewing Room
For sewing enthusiasts, having a dedicated sewing room or section is essential. However, with the multitude of pins, yarns, and fabrics, it’s common for the room to become cluttered. Fortunately, with a few modifications and hacks, you can transform your sewing space into a well-organized and visually appealing haven. 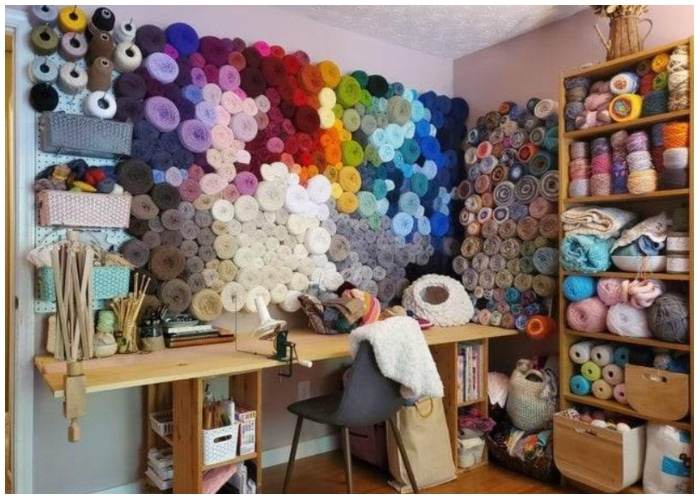
Utilize hangers and boxes to keep loose items in place. Hang fabric remnants or rolls on hangers to prevent them from becoming tangled or wrinkled. Use boxes or storage bins to neatly store pins, buttons, and other small sewing essentials. By keeping everything in its designated place, you can maintain an organized and functional sewing room.
In addition to the practical benefits, an organized sewing room with colorful yarns and fabrics can double as an art display. Embrace the creative potential of your sewing supplies and arrange them in an aesthetically pleasing manner, turning your sewing room into a work of art.