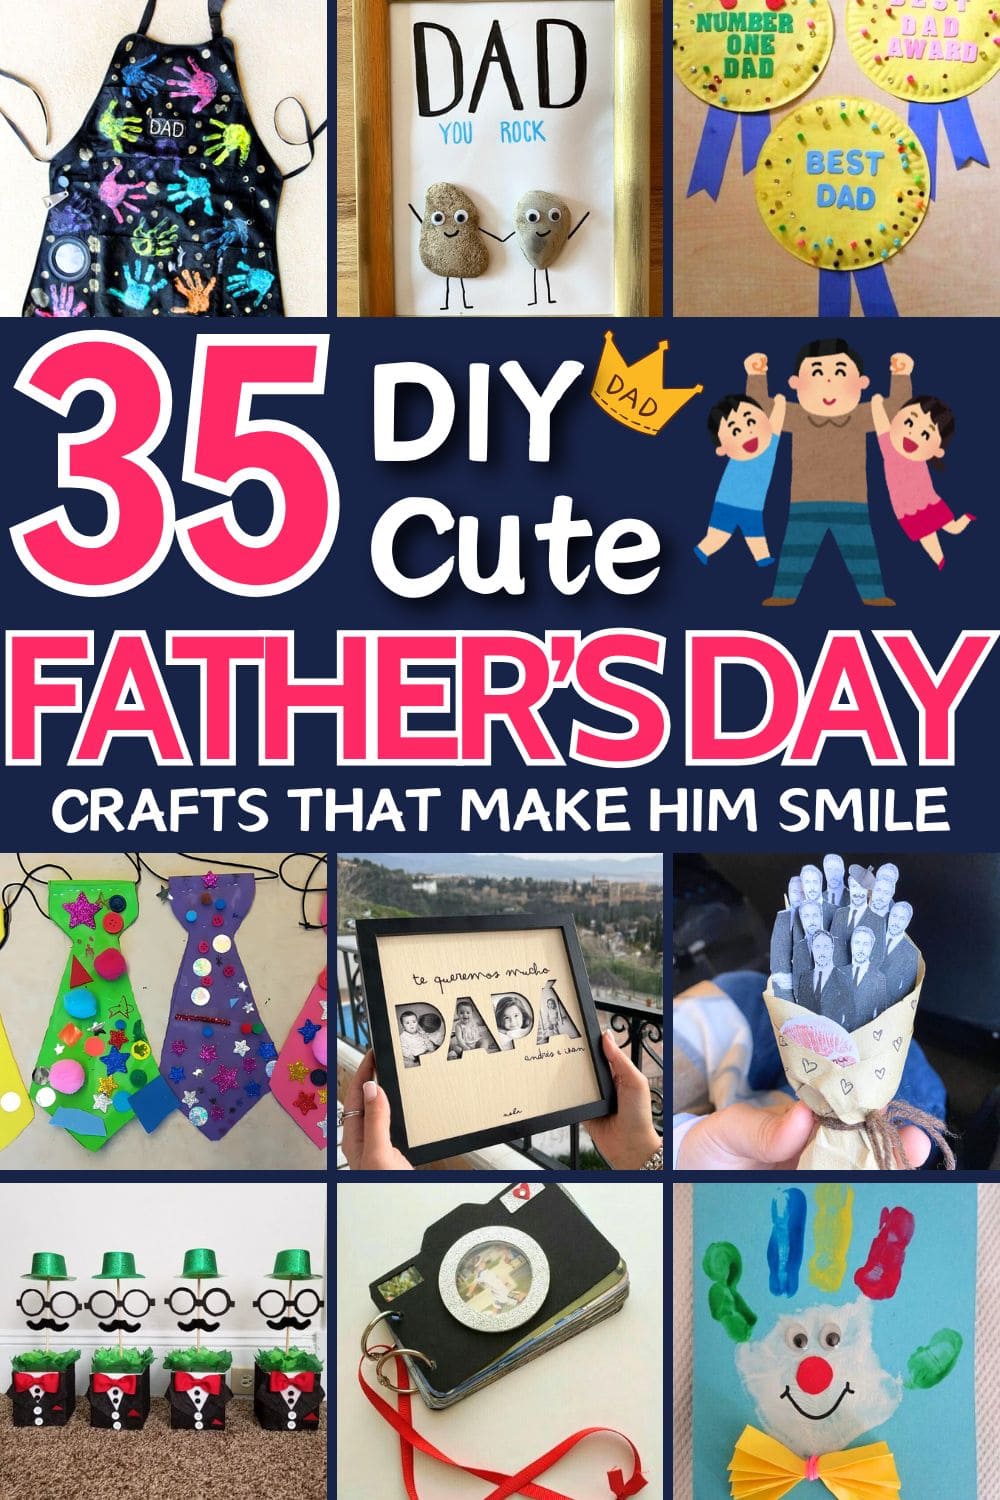
Father’s Day isn’t just about ties or tools, it’s about showing love in the most personal way possible. And nothing says “I love you, Dad” like a handmade craft straight from the heart (and a little glitter on the side).
Whether your kids are painting, gluing, folding, or scribbling, these 35 charming Father’s Day craft ideas bring out big smiles and even bigger laughs.
From hilarious keepsakes to sweet little surprises, these ideas are easy to make, full of heart, and perfect for all ages. So if you’re looking to melt his heart while making memories, get ready to dive into a mix of giggles, glue, and genuine love.
This article contains affiliate links. If you purchase through them, I may earn a small commission at no extra cost to you. Thank you for your support!
#1. Classy Tuxedo Father’s Day Gift Bag
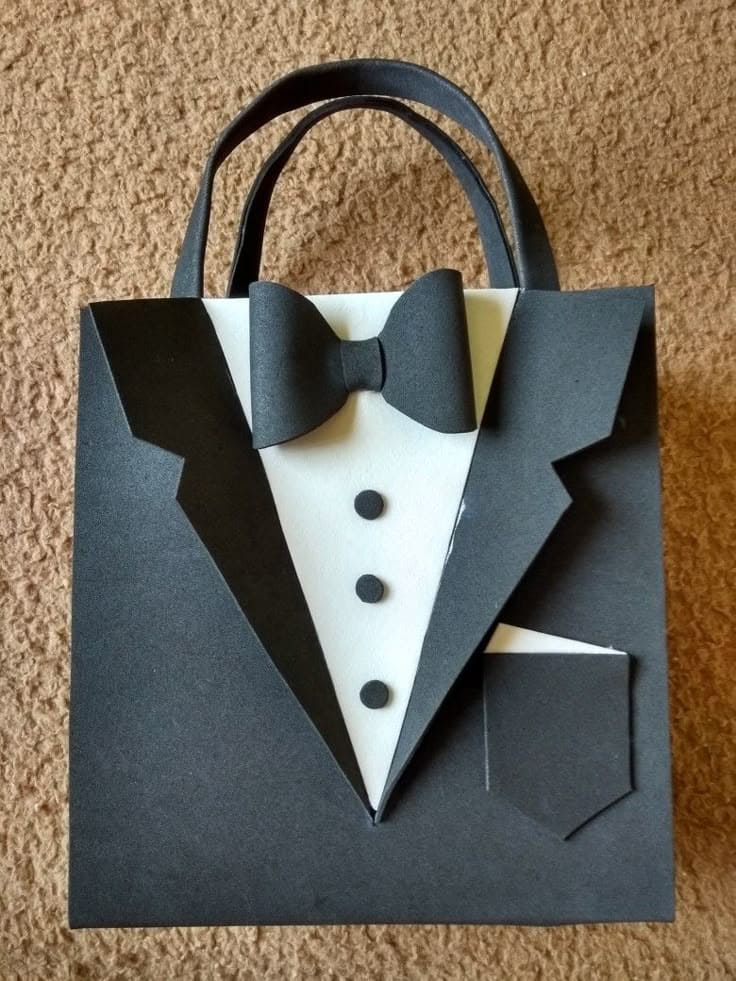
With its crisp paper collar, buttons, and iconic bowtie, this stylish bag says, “Dad, you’re the real gentleman.”
Materials Needed
- Black gift bag (8×4.25×10.5 inch) or black cardstock
- White cardstock
- Black foam sheet or construction paper
- Glue dots or tacky glue
- Scissors or precision craft knife
Step-by-Step Guide
- Cut a white cardstock rectangle slightly smaller than the front of the bag and glue it in the center to create the “shirt.”
- Cut two symmetrical black paper pieces shaped like suit lapels. Glue them diagonally onto each side of the white paper to create the jacket look.
- Add three small black foam or paper circles vertically as buttons down the white shirt.
- Cut and fold a simple black bowtie and glue it just beneath the handles.
- For extra flair, glue on a tiny black pocket with a sliver of white paper inside to mimic a pocket square.
#2. DIY Paper Neckties
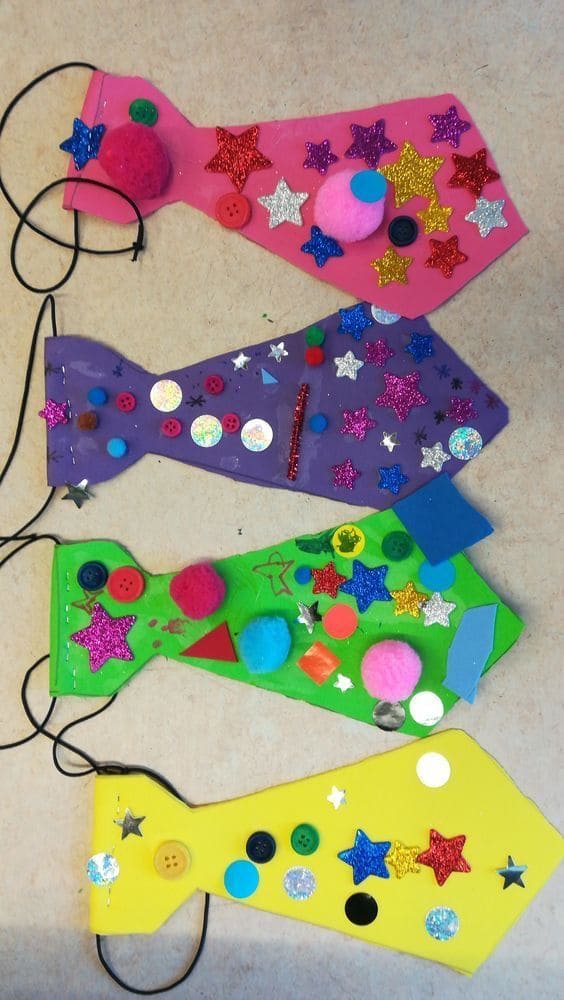
Every tie tells a story – glittery, goofy, heartfelt. Plus, it’s wearable art that turns Dad into the coolest guy on the block.
Materials Needed
- 4 Colored cardstock sheets (A4 size, various colors)
- Pom-poms (1–3 cm)
- Buttons and glitter foam stars
- Glue stick or tacky glue
- Elastic cord cut into 18″ lengths
- Hole puncher
- Scissors
- Tie template (hand-drawn or printable – approx. 11” long and 4.5” wide)
Instructions
- Print or trace a tie shape on cardstock and cut it out. Punch a hole on each top corner of the tie.
- Let your child decorate it with pom-poms, stickers, glitter shapes, and buttons. Get creative, there’s no wrong way to sparkle!
- Once dry, loop the elastic cord through the holes and tie knots on the back so it can be worn around the neck.
#3. Handprint Clown Card
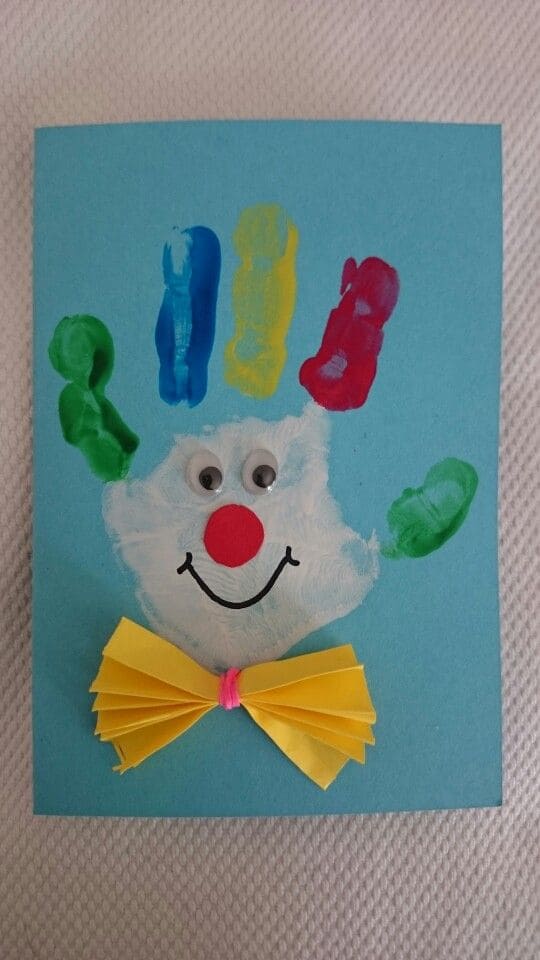
With its tiny handprint turned into a smiling clown face, it’s not just a greeting card, it’s a keepsake of childhood magic.
Materials Needed
- 1 sheet of blue cardstock (A5 or folded A4)
- Washable finger paints in red, blue, yellow, green, and white
- 2 googly eyes (~1 cm)
- 1 red pom-pom or round sticker
- Black permanent marker
- Yellow origami paper (15×15 cm)
- Small rubber band or twist tie
Step-by-Step Guide
- Fold the blue cardstock in half to create your card base.
- Help your child paint their palm white and each finger a different color. Stamp their handprint centered on the card. Let it dry.
- Glue on googly eyes and the red pom-pom to make the clown’s face. Draw a big smile using a black marker.
- Fold the yellow paper accordion-style, pinch it in the middle, and secure with a rubber band to form a bow. Glue it just under the palm print.
#4. Camera-Shaped Mini Photo Album
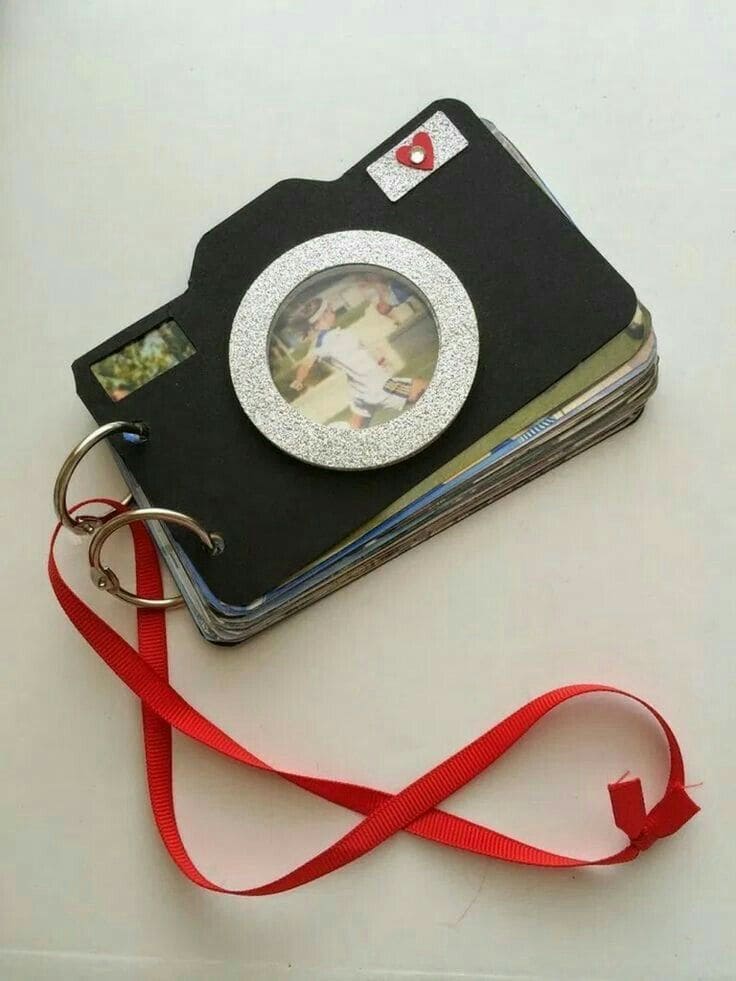
Designed to look like a camera, this album flips open to reveal a series of treasured photos and handwritten notes.
Materials Needed
- 1 sheet black craft foam or cardstock (8×11 inches)
- Silver glitter foam
- Photo paper or regular printed photos
- 2 small binder rings (~1 inch diameter)
- Red satin ribbon
- Glue stick or double-sided tape
- Hole punch, and scissors
Step-by-Step Guide
- Cut two identical camera shapes (front and back cover) from the black foam or cardstock. Make the front cover slightly detailed with a circular “lens” window and flash section using silver foam.
- Print and trim your favorite photos to fit inside the album pages, roughly 4×3 inches. You can print around 10–12 pictures and back them on cardboard for sturdiness.
- Punch a hole in the top corners of each page and the covers. Use binder rings to hold them together.
- Glue the red ribbon on each side of the back cover as a “camera strap” for added cuteness.
#5. Dad You Rock Pebble Frame Gift
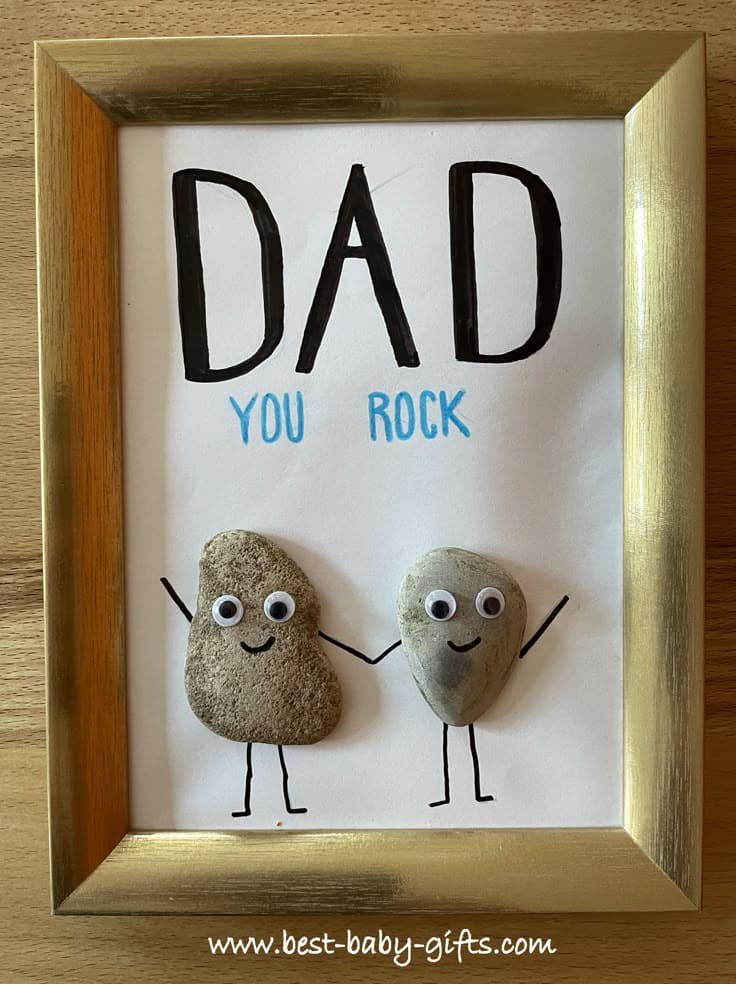
Perfect for younger kids, this heartfelt rock-themed craft is a sweet way to show appreciation while keeping it simple, fun, and tactile.
Materials Needed
- 5″x7″ photo frame (any color)
- 2 small smooth rocks (1.5″–2″ wide) or collected from nature
- 1 sheet of white cardstock (5″x7″)
- Googly eyes (10mm)
- Black permanent marker
- Blue marker
- Strong craft glue or hot glue gun
Instructions
- Place your 5″x7″ white cardstock inside the frame backing as a guide. Remove the glass if your rocks are thick.
- Write the title at the top: “DAD” in bold black letters, followed by “YOU ROCK” beneath in blue. You can also stencil or use vinyl letters for extra neatness.
- Glue two small rocks near the bottom half of the page. Let them sit for 10–15 minutes to set.
- Attach googly eyes to each rock. Then, using the black marker, draw stick arms and legs, adding smiling faces to bring them to life.
- Place the cardstock into the frame. Leave the glass off if needed.
#6. DIY Snickers Dumbbell Gift for Dad
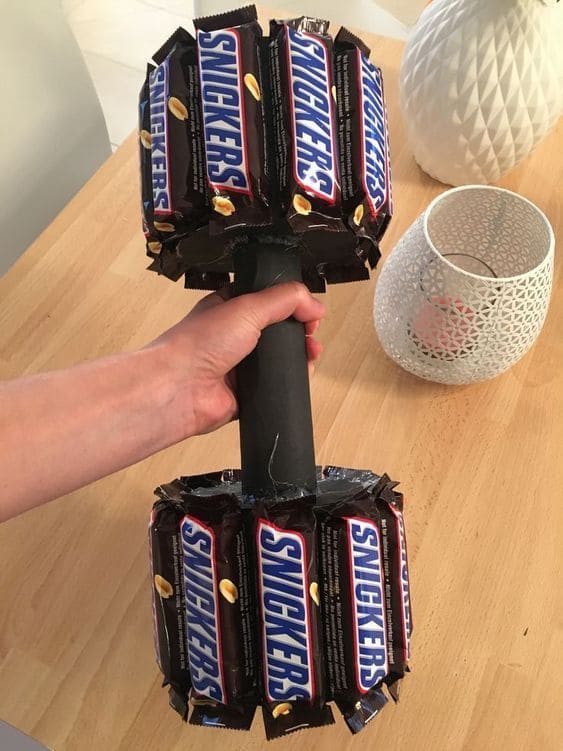
Here’s the ultimate “Dad Bod” tribute that’ll have your father laughing and snacking.
Materials Needed
- 12 full-size Snickers bars (2.07 oz)
- 1 empty paper towel roll (or 10” cardboard tube)
- Double-sided tape or hot glue gun
- Cardboard circles (4 pieces, 4″ diameter)
Instructions
- Cut out four sturdy cardboard circles (each 4” wide). These will serve as the dumbbell’s end plates.
- Attach three Snickers bars evenly around each circle using double-sided tape or hot glue. Make two identical “weight ends.”
- Secure each candy-weight circle onto either end of the handle using strong adhesive. Press firmly and allow to dry.
#7. Shirt and Suspenders Gift Wrap for Dad
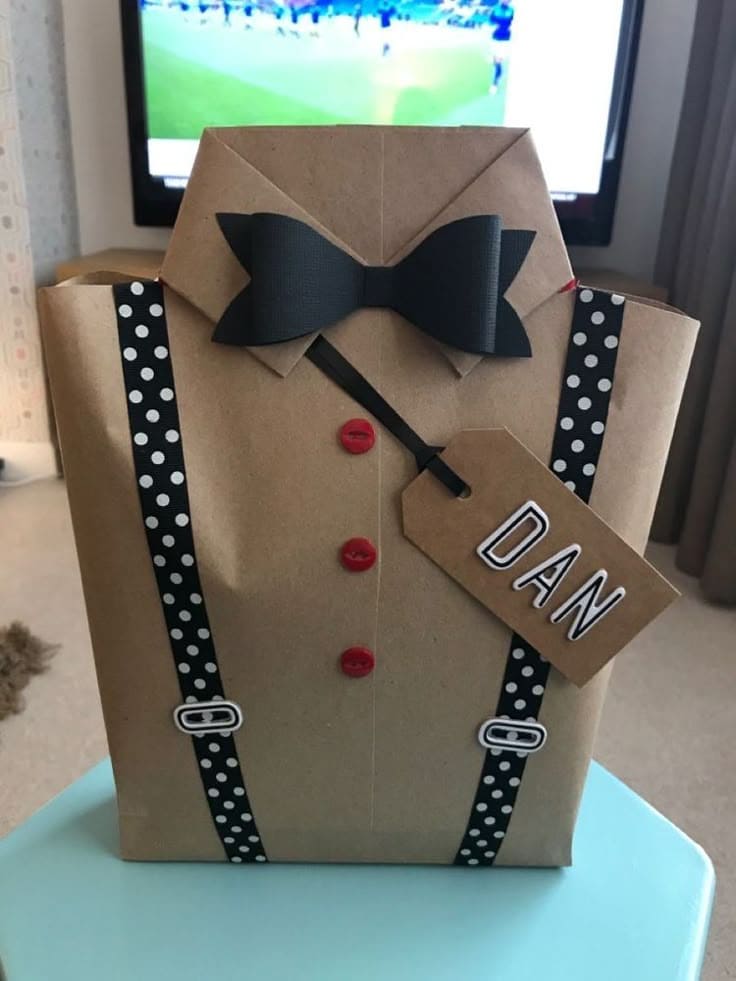
This creative wrapping style turns any present into a fashion statement, perfect for Father’s Day or birthdays.
Materials Needed
- 1 sheet kraft wrapping paper (18″ x 24″)
- 2 strips of black ribbon with white dots (each 1″ x 12″)
- 3 red craft buttons (0.5″)
- Black paper (cut to 6” x 1.5”)
- Mini metal fasteners or paper clips
- Tag and letter stickers
- Double-sided tape or glue dots
Instructions
- Wrap your gift in kraft paper as usual. Keep the seams clean and sharp for a professional look.
- To create the collar, fold down the top two corners at an angle to meet in the middle, forming a “shirt collar” point.
- Tape or glue down the black-and-white ribbons vertically to mimic suspenders – start about 2″ from each edge, running top to bottom.
- Glue the red buttons vertically down the center, evenly spaced (about 1.5″ apart).
- Cut a strip of black paper and shape it into a bow tie. Fold and tape the center to cinch it. Attach just under the collar flap.
- Add embellishments like mini metal clips on the suspenders, and a kraft paper name tag using alphabet stickers or handwritten flair.
#8. Dapper Dad Centerpiece Boxes
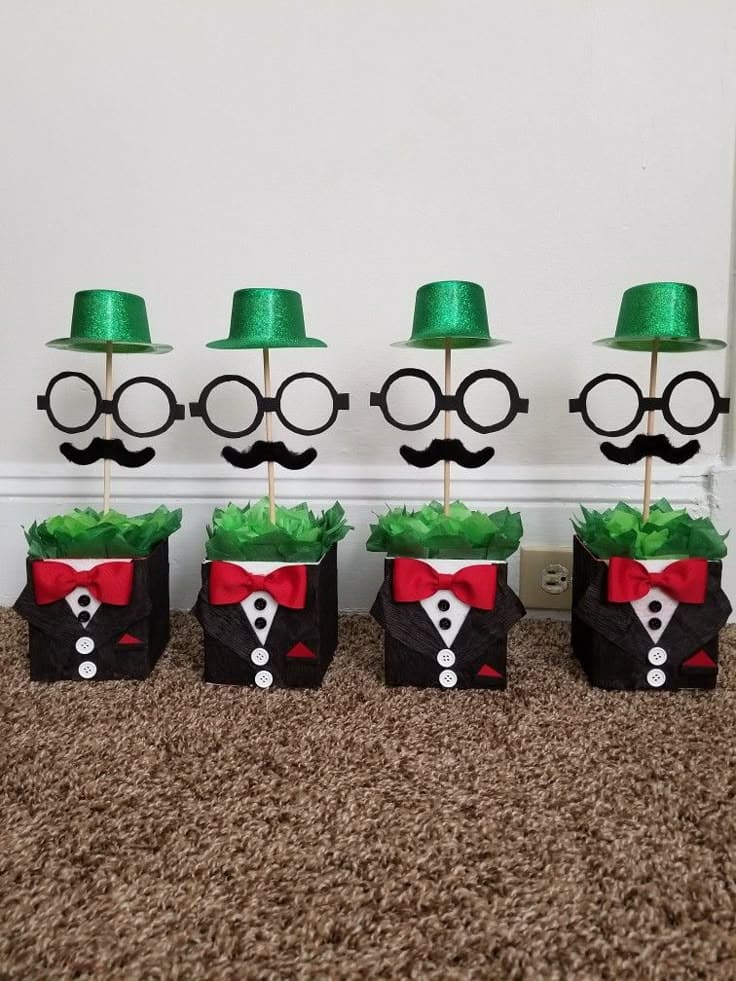
Perfect for preschool parties, dad-themed BBQs, or just as a surprise centerpiece waiting on the dining table.
Materials Needed
- Black square favor boxes (4″x4″)
- White buttons (0.5″)
- Mini red satin bows
- Green tissue paper
- Wooden skewers or dowels
- DIY green glitter foam hats or mini leprechaun party hats
- Black cardstocks
- Hot glue gun
Step-by-Step Guide
- Glue three white buttons vertically on the front of the black box. Add a red mini bow above them. You can also add a red paper triangle “pocket square” for extra charm.
- Stuff the box with crumpled green tissue paper to create height.
- Print and cut out the mustache and glasses on stiff black cardstock or foam. Glue them together onto the wooden skewer.
- Top each skewer with a mini green hat (glue it securely).
- Insert the stick in the center of the box through the tissue paper so it stands upright.
#9. DIY Things I Love About Dad Hanging Craft
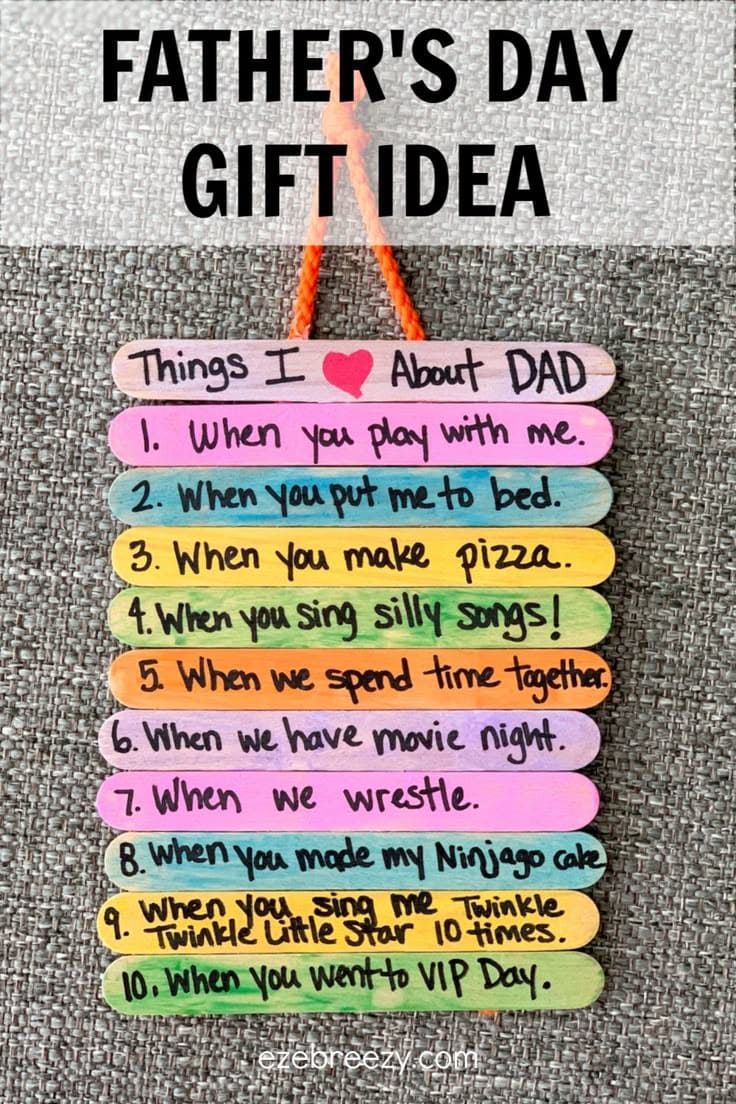
This colorful 10 Things I Love About Dad craft is one of the most heartfelt DIY Father’s Day gifts you can make with kids.
Materials Needed
- 11 jumbo craft sticks
- Black permanent marker
- Craft glue or hot glue gun
- Yarn or twine
- Optional: Clear sealant spray
Instructions
- Write “Things I ❤️ About Dad” on the top stick using a bold black marker.
- On each of the next 10 sticks, write a different reason your child loves their dad, let the child dictate or write them in their own handwriting.
- Once written, lay the sticks in order on a flat surface.
- Glue two strips of yarn vertically along the back sides of the sticks to hold them together. Leave extra at the top to create a hanging loop.
#10. Tech-Themed Father’s Day Card
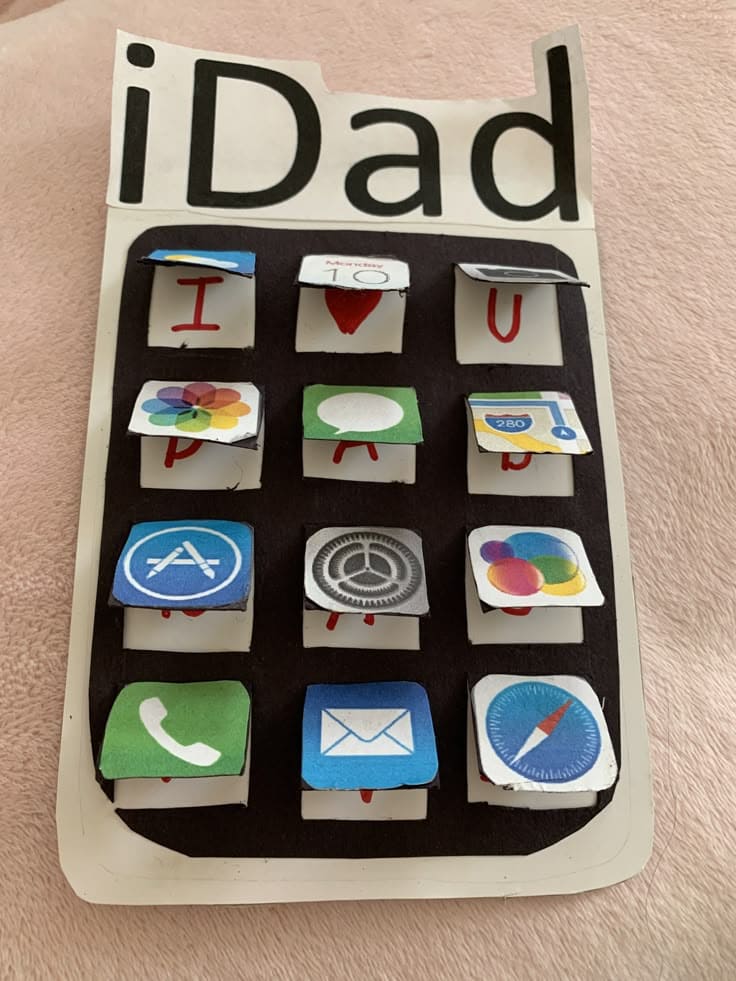
This iDad card is the ultimate blend of tech humor and heartfelt creativity, perfect for the dad who’s always on his phone but never misses your calls.
Materials Needed
- 1 sheet of white cardstock (8.5 x 11″)
- Black construction paper (6 x 8″)
- Mini app icon printables or hand-drawn icons – about 1×1 inch each
- Glue stick or double-sided tape
- Scissors or craft knife
- Red marker
Instructions
- Cut out 12–16 app icons (real or hand-drawn) and fold a tiny flap on the top so they can open like windows.
- Arrange and glue the flaps to the black construction paper in a 4×4 grid, leaving space between each “app.”
- On the white cardstock, glue the black sheet in the center. At the top, write or paste “iDad” in bold black letters.
- Under each icon flap, write a fun message or mini doodle like “I ❤️ U,” “You’re my Hero,” “#1 Dad,” or “You text back fastest.”
- Personalize the background with your name, the date, or even a drawn “charging port” at the bottom!
#11. Giving a Flower Photo Craft
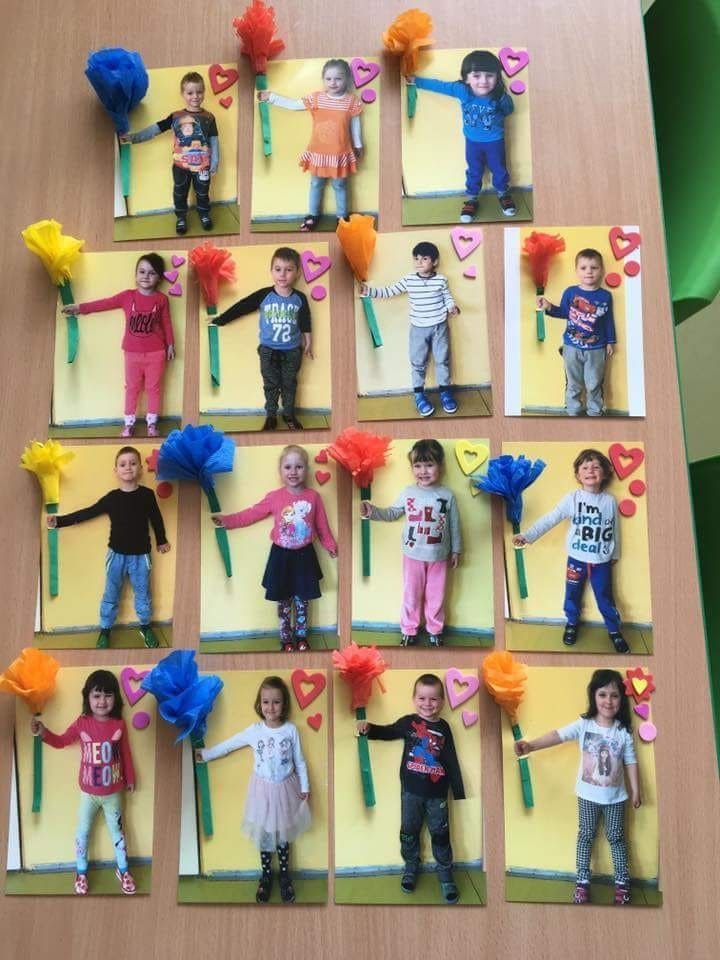
This Father’s Day photo flower card is a sweet and colorful classroom craft that captures the joy of giving.
Materials Needed
- 4×6” photo paper prints of each child (arms extended to the side as if holding something)
- Colored cardstock (5×7”)
- Tissue paper (20×26” sheets, assorted colors) – 1 sheet per flower
- Green straws or pipe cleaners (6” long)
- Double-sided tape or glue dots
- Foam heart stickers
- Scissors and glue stick
Instructions
- Take individual photos of each child standing against a plain wall with their arm extended as if offering a gift. Print each one in 4×6 size.
- Cut a rectangle from cardstock slightly larger than the photo. Glue the picture onto the cardstock.
- Twist a piece of tissue paper accordion-style (about 5 inches wide), then pinch and wrap one end with a green pipe cleaner or insert into a straw to make a flower.
- Attach the flower next to the child’s hand using double-sided tape. Make sure the flower stem aligns with the child’s arm for a natural look.
- Decorate the frame with foam heart stickers and colorful dots.
#12. Best Dad Award Paper Plate Craft
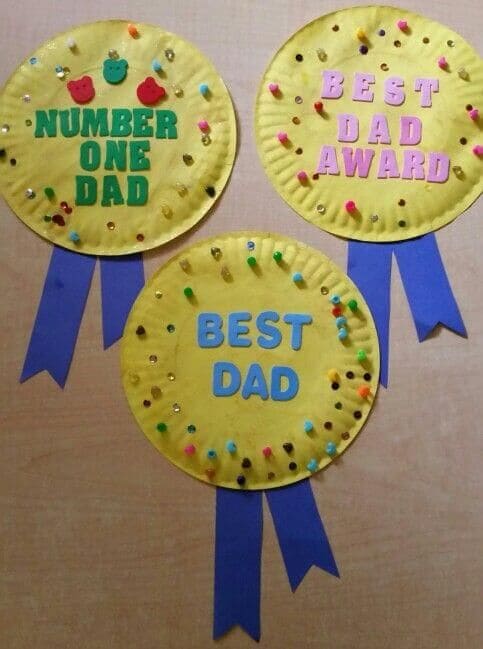
It’s a golden way to say “You’re the best!” and it’s an easy win for classrooms or home crafting.
Materials Needed
- 3 yellow paper plates (9-inch)
- 1 sheet of blue construction paper (9×12 inches)
- Colorful foam letters or alphabet stickers
- Mini pom-poms (1 cm size)
- Gold and multicolor sequins
- Craft glue or hot glue gun
- Scissors
Instructions
- Take one yellow paper plate and flip it bottom-side up to give it a nice flat display area.
- Glue foam letters in the center to spell phrases like “BEST DAD,” “NUMBER ONE DAD,” or “BEST DAD AWARD.”
- Decorate the outer edges of the plate with pom-poms and sequins. Use a dot of glue for each, spacing them evenly for a medal-like sparkle.
- Cut out two 1.5″x6″ strips from the blue construction paper. At the bottom of each strip, cut a small triangle to make ribbon tails.
- Glue the ribbon strips behind the plate, letting them hang down like award ribbons.
#13. PAPA Photo Collage Frame
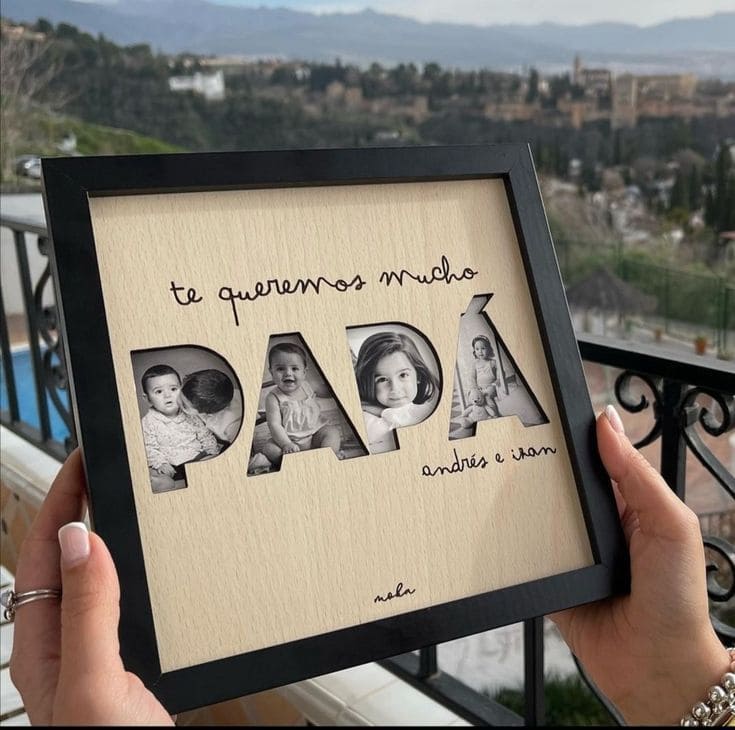
This custom frame is an emotional Father’s Day keepsake that says it all without needing to say much.
Materials Needed
- 1 8×10 black photo frame with mat insert
- 1 sheet of light woodgrain textured cardstock
- Printed photos (4 images)
- Alphabet stencil set or cutting machine like Cricut
- Double-sided photo tape
- Fine-tip black pen or calligraphy marker
Step-by-Step Guide
- Trace or cut out the letters “P-A-P-Á” onto your cardstock using a stencil or Cricut. Keep the spacing wide enough to insert photos behind.
- Print and trim your chosen photos to fit snugly behind each letter—each should highlight one child or moment.
- Use double-sided tape to secure the photos behind the cardstock, ensuring they peek perfectly through each letter.
- Add a handwritten message like “te queremos mucho” and sign with the names of the children.
#14. Mini Me Dad Bouquet
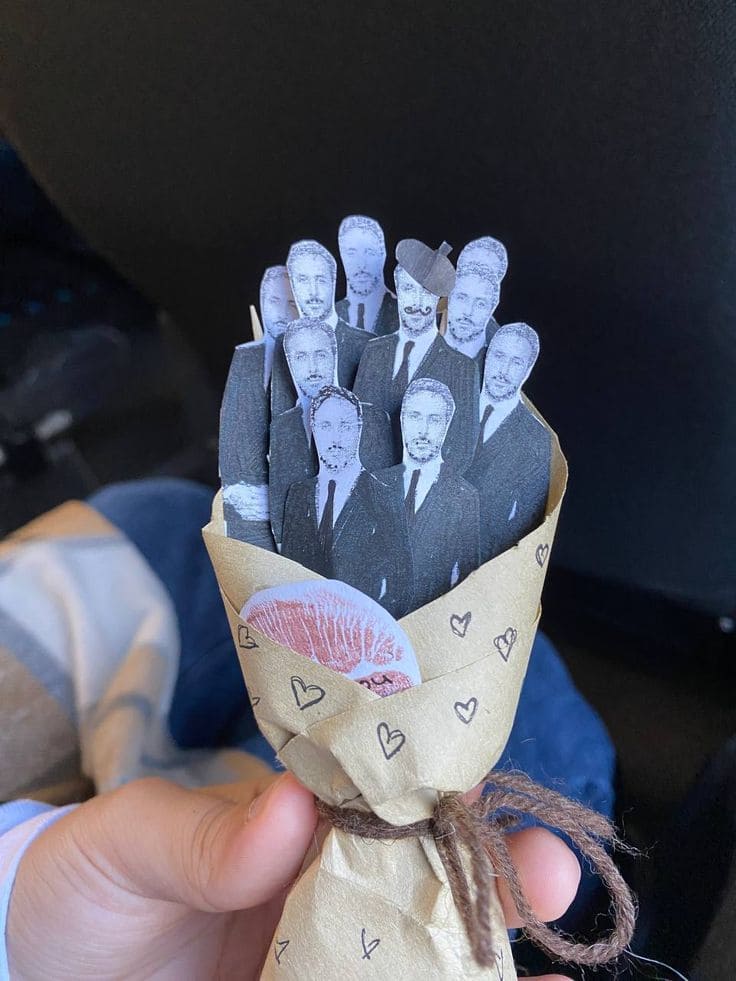
Instead of flowers, the bouquet is packed with tiny cutouts of Dad’s face, each one dressed to impress.
Materials Needed
- 1 printed sheet of Dad’s face in suit (copy the same face multiple times in grayscale, each ~3 inches tall)
- Thick white cardstock
- Wooden toothpicks or craft skewers
- Hot glue gun
- Tissue paper or kraft wrapping paper
- 1 black pen
- Twine or ribbon
Step-by-Step Guide
- Print and cut out 10–12 miniature versions of Dad’s face and upper body. You can repeat the same photo or add funny touches like hats, glasses, or speech bubbles.
- Glue each face to a wooden toothpick or skewer using a dab of hot glue. Let them dry for a few minutes.
- Bundle the mini Dads together in a cone shape using tissue or kraft paper. Secure the base with twine or a small ribbon.
#15. DIY Mini Handprint Bead Keychains for Dad

These tiny hand keychains are more than just cute – they’re a piece of your little one’s heart you can carry anywhere.
Materials Needed
- Shrink plastic sheets (printable or traceable) – approx. 8×10″ per 4–6 hands
- Color permanent markers
- Alphabet letter beads
- Bright colored pony beads – around 5–6 per chain
- Key rings or lobster clasps
- Leather cord or plastic lacing (8–10 inches per keychain)
- Hole punch
- Scissors, baking sheet, parchment paper
Step-by-Step Guide
- Trace your child’s hand on the shrink plastic sheet using a permanent marker and color it in. Cut out the handprint and punch a hole near the wrist.
- Bake the handprint according to the shrink plastic instructions. It should shrink to about ⅓ of its size and become hard plastic (this takes 2–3 minutes in the oven at 325°F).
- Thread a key ring or lobster clasp onto a cord. Then string on colorful beads and alphabet blocks to spell DAD, or any name.
- Tie the shrink plastic hand to the bottom end of the string securely. Double knot it or glue the knot for extra hold.
#16. Hardware Buddy Keychains
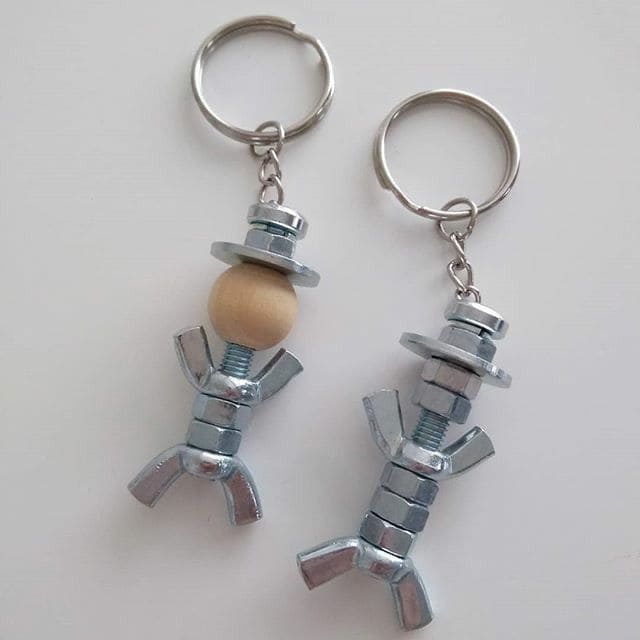
Who knew nuts and bolts could be this adorable? These keychains are small, sturdy, and scream “Dad” with every little twist and turn.
Materials Needed
- 2 key rings with chain connectors
- 2 metal bolts (4 cm long, M6 size)
- 9 hex nuts (M6)
- 2 flat washers (M6)
- 2 wing nuts (M6)
- Optional: 2 wooden beads (12–14 mm)
- Super glue or hot glue (optional)
Assembly Guide
- Screw three hex nuts onto the bolt to form the body.
- Add two wing nuts to create arms – tighten them opposite each other near the top.
- Stack two hex nuts at the bottom for legs.
- Add a flat washer and top it with a wooden bead or a nut to act as the head. You can sandwich the bead with another washer for a “hat” effect.
- Attach the entire assembly to the key ring loop using a small eye hook or wire loop.
#17. DIY Painted Cork Board with Clip
These handmade displays as mini message boards or photo holders, perfect for Dad’s workspace.
Materials Needed
- 2 Round cork trivets (7″–8″ diameter)
- Acrylic paint set
- Painter’s tape
- 2 Wooden clothespins
- Pushpins or colorful map pins
- Craft glue or hot glue gun
- Twine
Step-by-Step Guide
- Use painter’s tape to create a geometric pattern across the cork round.
- Fill each section with a different color of paint. Let dry completely.
- Carefully remove the tape to reveal sharp lines.
- Glue one clothespin on the front – top right or bottom corner works best.
- Add a few colorful pushpins for décor or use.
- Punch two holes at the top and thread a 7-inch piece of string through for hanging.
#18. Personalized Hanging Kid Photo Bookmarks
This DIY Photo Bookmark is one of those deceptively simple ideas that hits right in the heart.
Materials Needed
- Full-body printed photo of your child, arms raised
- Scissors or craft knife
- Clear laminating sheets or thermal laminator
- Hole puncher
- Yarn or embroidery thread – choose Dad’s favorite colors
Step-by-Step Guide
- Take or select a photo of your child with arms up, like they’re hanging. Print it on photo paper at about 6–7 inches tall.
- Cut out the figure closely around the outline using sharp scissors or a precision knife.
- Laminate the cutout using self-adhesive or thermal laminating sheets for durability.
- Punch a hole above the raised hands and tie on a yarn tassel.
#19. Gold Paper Trophy Box
Just in 30 minutes you can complete this project, showing Dad he’s your ultimate champion.
Materials Needed
- 2 sheets of gold cardstock paper (A4 size, 250 gsm)
- 1 glue stick or tacky glue
- Scissors or craft knife
- Printable label or custom sticker paper
- Small ribbons in green and yellow
- Trophy template printable (free PDF) or you can draw
- Optional: white gel pen or gold glitter pen
Step-by-Step Guide
- Print and cut out the trophy template on sturdy gold cardstock. Fold along the edges for sharp, clean lines.
- Glue all tabs neatly, starting with the cup body, then the base. Let it dry completely.
- Use a sticker maker or printable label to personalize with Dad’s name or a custom logo like shown.
- Glue or tie on the green and yellow ribbons to one trophy handle for a charming extra touch.
- Add glitter pen accents, stars, or even hide a small gift or note inside the box base.
#20. Handprint Father’s Day Hat
This fun project lets kids stamp their love in the most personal way.
Materials Needed
- White cotton baseball caps (adjustable, 12-pack)
- Fabric paint set
- Paintbrush set
- Alphabet stencils (2-inch letters)
- Apron or old T-shirt
Instructions
- Place a protective layer (like cardboard or plastic) inside the hat to prevent paint from seeping through.
- Let your child dip one hand into the fabric paint of their choice and firmly press it on the front of the cap above the brim. Repeat with both hands, side by side.
- Let the handprints dry for 15–20 minutes. Meanwhile, prepare your stencil letters.
- Use a stencil and brush to paint “DAD,” “PAPA,” or “TATA” on the brim.
#21. DIY Hot Wheels and Candy Bouquet for Dad
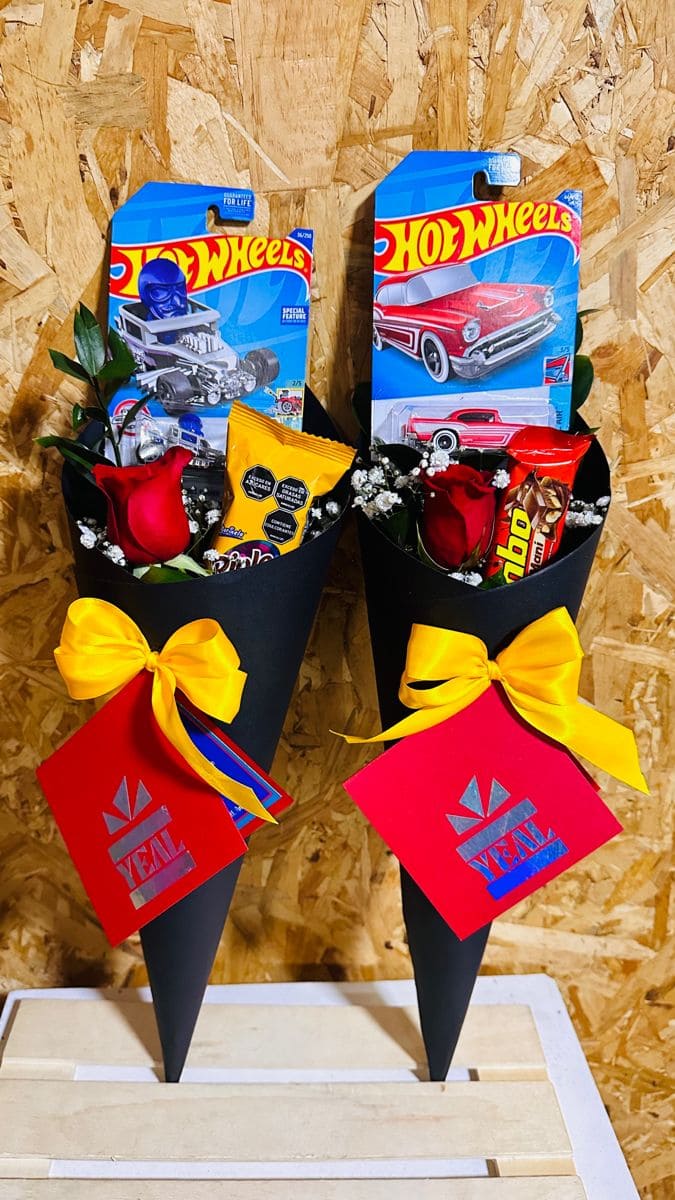
This DIY Father’s Day bouquet swaps out roses for race cars and sweets because who says dads don’t deserve flowers, too?
Materials Needed
- 1 sheet of black cardstock (12 x 12″)
- 1–2 Hot Wheels cars
- 2–3 mini candy bars or snack packs
- 1–2 artificial red roses or fresh ones
- Baby’s breath stems (fresh or faux)
- 1 large yellow satin ribbon (about 50 cm)
- 1 red cardstock tag + optional stickers or metallic pen
- Hot glue gun or strong double-sided tape
- Greenery
Instructions
- Roll your black cardstock into a cone, about 8″ tall, with a 3″ wide opening at the top. Secure with glue or strong tape.
- Fill the bottom of the cone with crumpled paper or floral foam to keep everything upright.
- Insert a Hot Wheels car in its packaging at the back so it stands tall. You can hot glue it lightly to stay in place.
- Arrange the candy bars and artificial flowers at the front. Balance them out by placing one rose on each side and candy in the middle or layered.
- Add small sprigs of baby’s breath or greenery around the items for a full, boutique-like look.
- Tie a yellow satin ribbon around the middle of the cone and attach a red card with a personal message.
#22. Super Dad Bottle Openers with Felt Capes
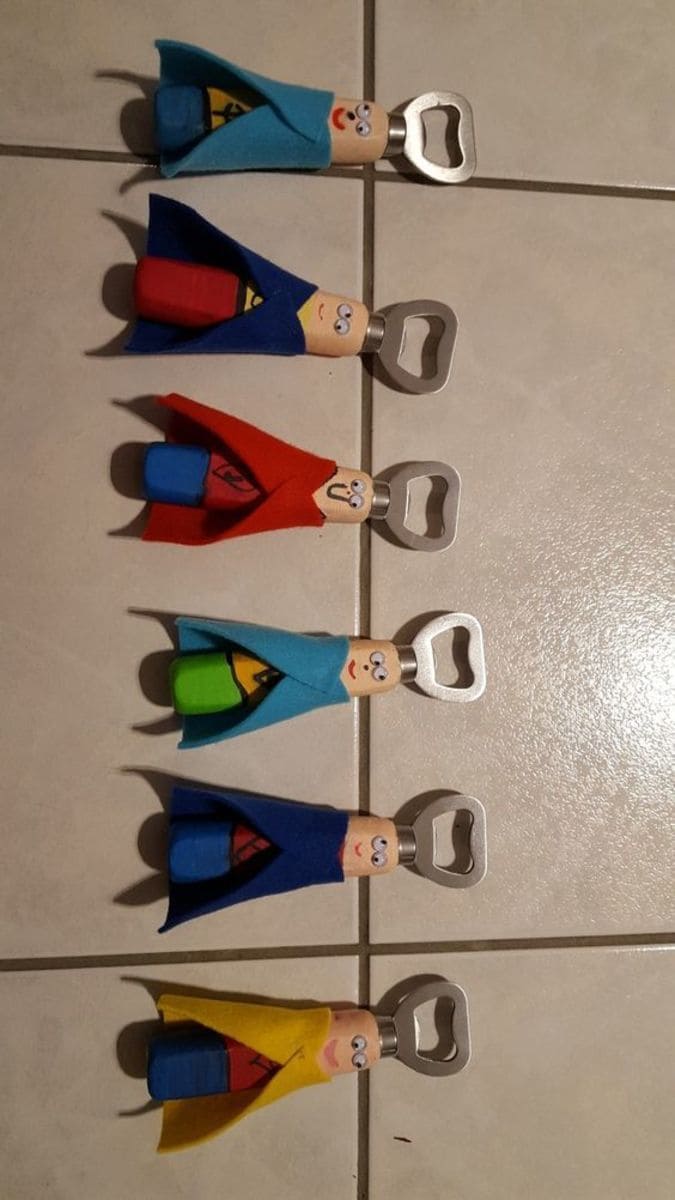
These superhero-themed bottle openers are the ultimate combination of fun and practical!
Materials Needed
- 5-6 Wood-handled metal bottle openers
- 3-5 Colorful felt sheets
- Googly eyes
- Acrylic paint or permanent markers
- Glue gun or craft glue
- Black fine-tip pen or paint pen
Step-by-Step Guide
- Paint or draw the superhero suit directly onto the wooden handle, include a bright “S” or lightning bolt for that classic comic look.
- Cut a triangle or trapezoid piece of felt to form the cape. Glue it around the “neck” of the opener handle so it fans out like it’s blowing in the wind.
- Add googly eyes, paint on a smile or mustache, and finish off with tiny painted details like a belt or buttons. You can even write “Super Dad” on the back.
#23. DIY Father’s Day Craft Stick Photo Frame
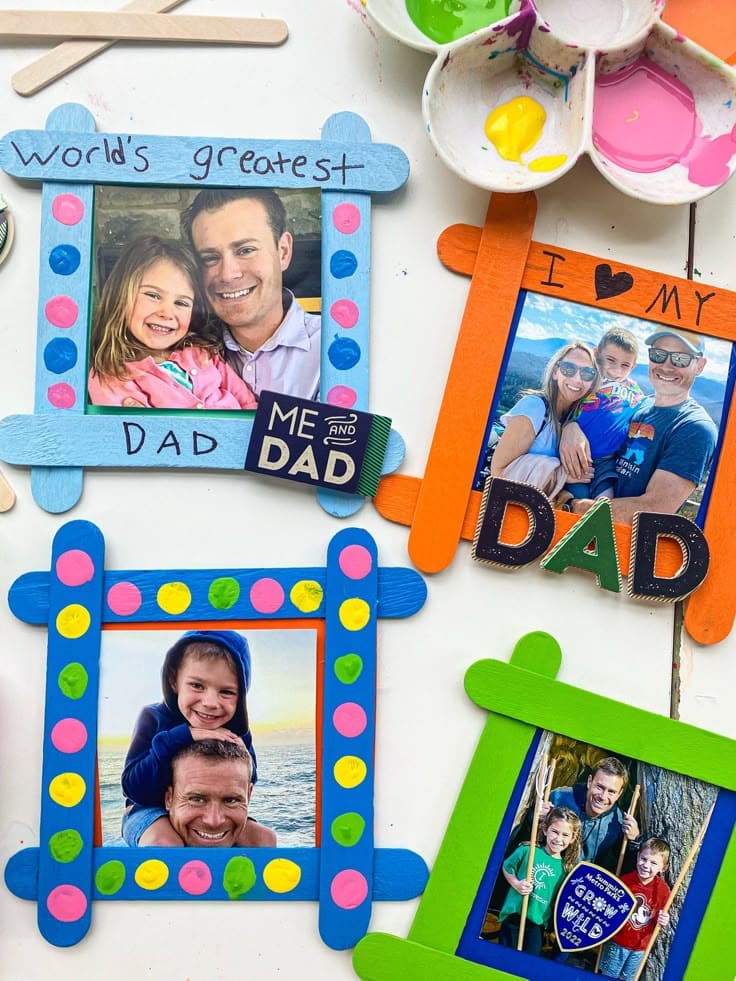
A simple, heartwarming craft for kids that turns popsicle sticks and paint into a cherished keepsake Dad will treasure forever.
Materials Needed
- 8 jumbo craft sticks (6” x ¾”)
- 1 printed 4×4″ photo
- Acrylic paint set (non-toxic)
- Foam paintbrushes (1” wide)
- Craft glue or glue dots
- Decorative foam stickers or pom-poms
- Black permanent marker
- 10” twine or ribbon
Instructions
- Paint 4 sticks in your favorite color for the frame’s front. Let them dry for 20–30 minutes.
- Form a square with the painted sticks, overlapping the edges, and glue at each joint. Flip over and attach the photo to the back so it shows in the center.
- Decorate the frame’s front with foam shapes, dots of paint, or pom-poms.
- Optionally, write a message like “World’s Greatest Dad.” Glue a 10” loop of twine to the top back for hanging.
#24. Handprint Apron for Dad
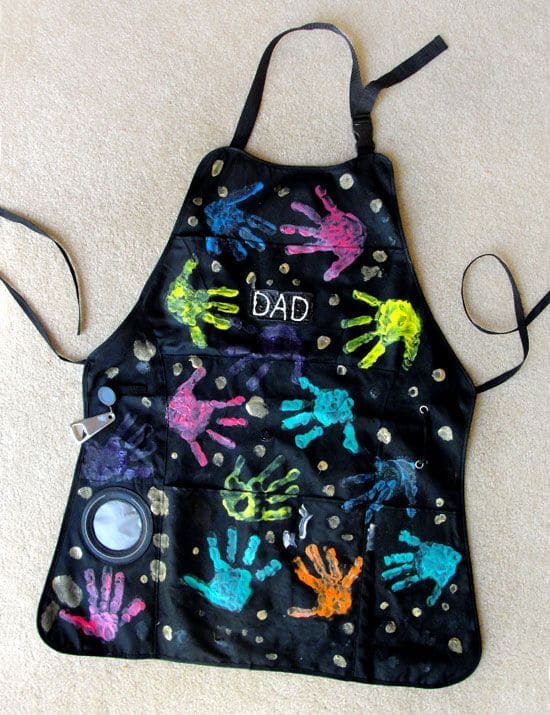
Every handprint is a burst of love he can wear while he flips burgers or whips up pancakes.
Materials Needed
- 1 black canvas apron (size: 27″ x 33″)
- Set of 10 fabric paints
- Foam paint brushes (1″ wide)
- White fabric paint pen
- Plastic plate or paint palette
Instructions
- Lay the apron flat on a protected surface. Pour small amounts of fabric paint onto a plastic plate.
- One by one, help each child dip their hand into a paint color and press firmly onto the apron. Spread out prints across the front and pockets.
- Use contrasting colors for layered effect or stamp the same hand multiple times for a playful design. Let each print dry for at least 20 minutes.
- In the center chest area, write “DAD” using a fabric paint pen. You can also add names or dates near each handprint.
#25. Moustache Message Board
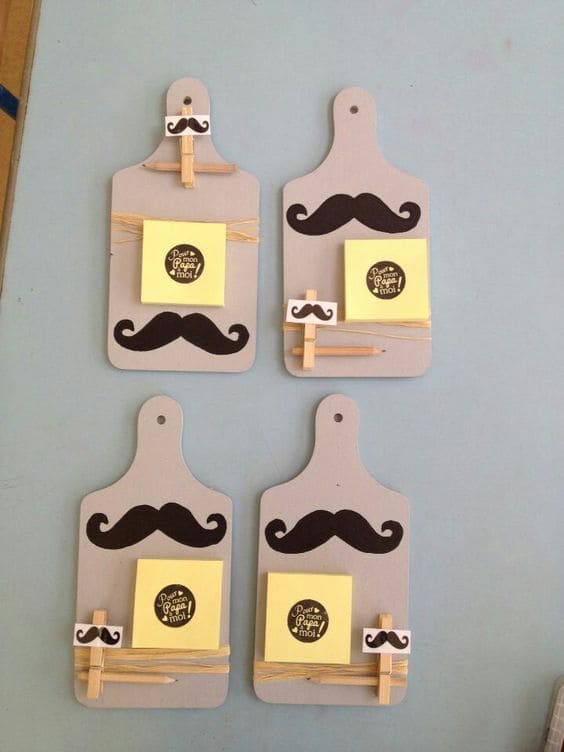
This is a charming and practical DIY Father’s Day gift idea, a “Moustache Message Board” for Dad’s desk, kitchen, or workshop.
Materials Needed
- 1 small wooden cutting board (approx. 8×4 inches)
- 1 black moustache decal
- 1 mini notepad or sticky note pad
- 1 mini wooden clothespin
- Small rubber bands or natural jute twine
- 1 mini pencil
- Glue gun and scissors
Instructions
- Place the moustache decal in the center upper area of the board to create the playful face vibe. Let dry if it’s painted or glued.
- Stretch a rubber band or jute string horizontally near the bottom to tuck in a pencil securely.
- Use hot glue to fix a clothespin just above the band or twine, this will hold your notepad in place. You can clip or glue the notepad directly.
- Add the second clothespin to the top and decorate it with a small moustache cutout for extra flair.
#26. Father’s Day Toolbelt Card
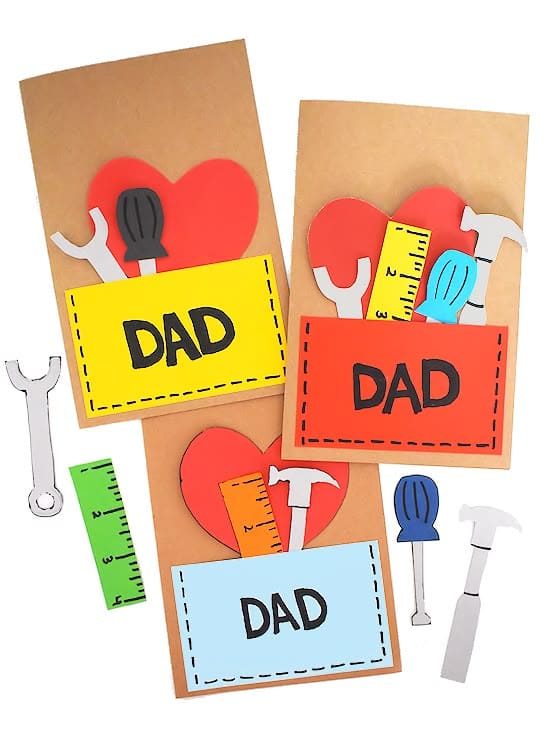
It’s like a hug disguised as a toolbox, completely handmade, fun to decorate, and fully customizable for Dad’s personality.
Materials Needed
- Kraft paper blank cards (5″x7″)
- Colored cardstocks
- Black marker pens
- Glue stick
- Scissors or craft knives
Step-by-Step Guide
- Cut out a red heart (around 3.5 inches wide) and glue it near the top of the card.
- Cut a 3.5″x2.5″ rectangle to create the “toolbelt pocket” from colored cardstock and glue it below the heart.
- Cut out mini paper tools like hammers, screwdrivers, rulers, and wrenches, about 3–4 inches tall. Decorate or label them.
- Tuck the tools into the paper pocket, gluing only the bottom of each tool to secure.
#27. Colorful Foam Hammer Bookmarks for Dad
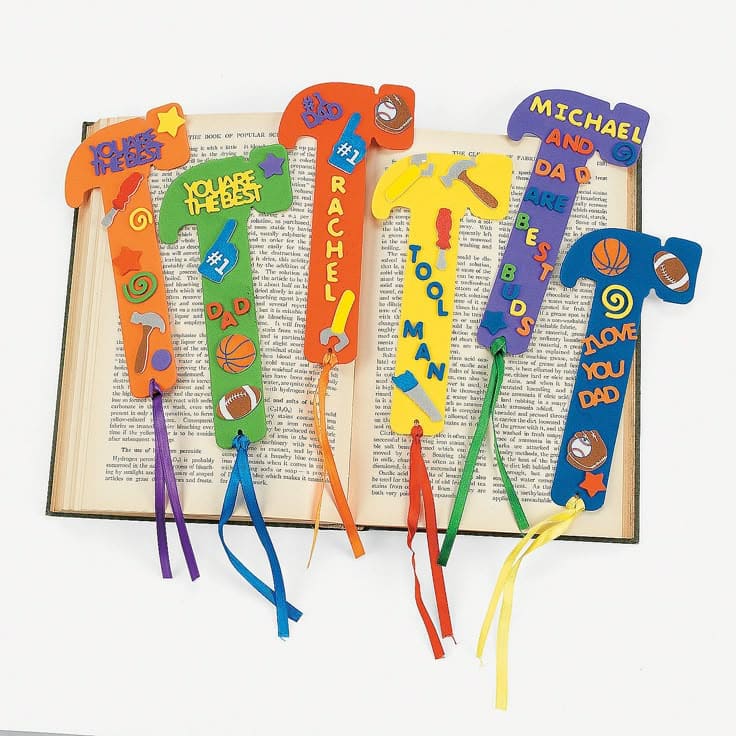
These bookmarks are a perfect mix of creativity and fun, giving Dad a daily dose of smiles every time he flips open his favorite read.
Materials Needed
- Sturdy colored craft foam sheets
- Alphabet sticker letters or paint pens
- Mini foam tool stickers or themed embellishments
- Hole punch
- Ribbon, string, or yarn
Step-by-Step Guide
- If not using pre-cut foam, draw a hammer or wrench shape on craft foam – about 6.5 inches tall and 2 inches wide. Cut it out.
- Decorate with phrases like “#1 Dad,” “You Are the Best,” or personalize with names like “Rachel” or “Michael” using stickers or paint pens.
- Add small tool-themed stickers, sports motifs, or stars to enhance the fun.
- Punch a hole near the handle’s bottom and tie on colorful ribbon or yarn.
#28. Toilet Paper Roll Dads
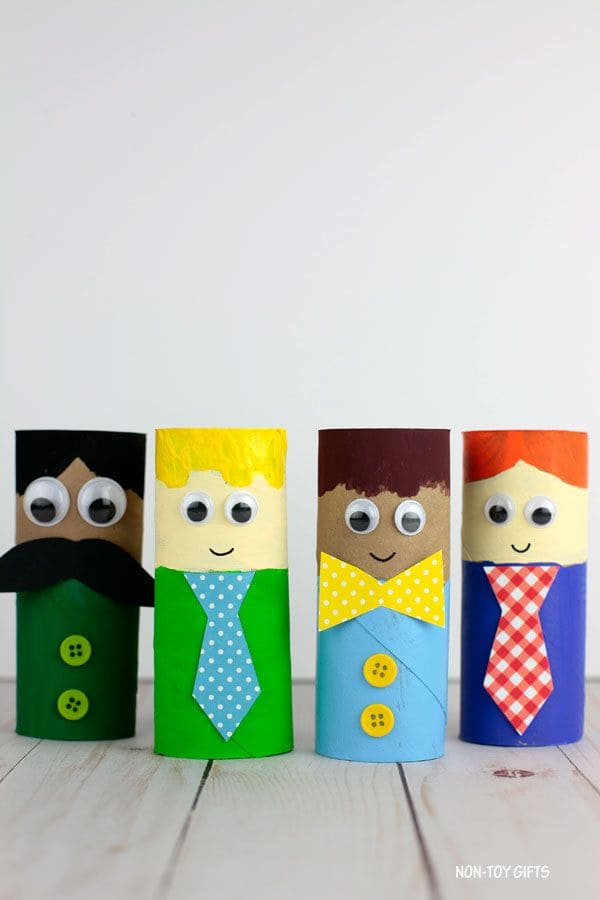
Each one is made with recycled cardboard and transformed into a mini version of Dad.
Materials Needed
- 1 empty toilet paper roll per figure
- Acrylic paint set
- Googly eyes (15–20mm)
- Glue stick or tacky glue
- Patterned scrapbook paper
- Mini buttons (yellow, green, etc.)
- Black marker and mustaches
- Scissors and paintbrushes
Step-by-Step Guide
- Paint the top third of the roll with a skin-tone color, then add hair color on top. Let dry.
- Paint the rest of the roll to create a “shirt” in any color of your choice.
- Cut out a small tie from patterned paper and glue it to the middle of the shirt.
- Glue on googly eyes, draw a smile (and mustache, if you’d like!), and attach 2 buttons below the tie.
#29. Tuxedo Wine Bottle Covers
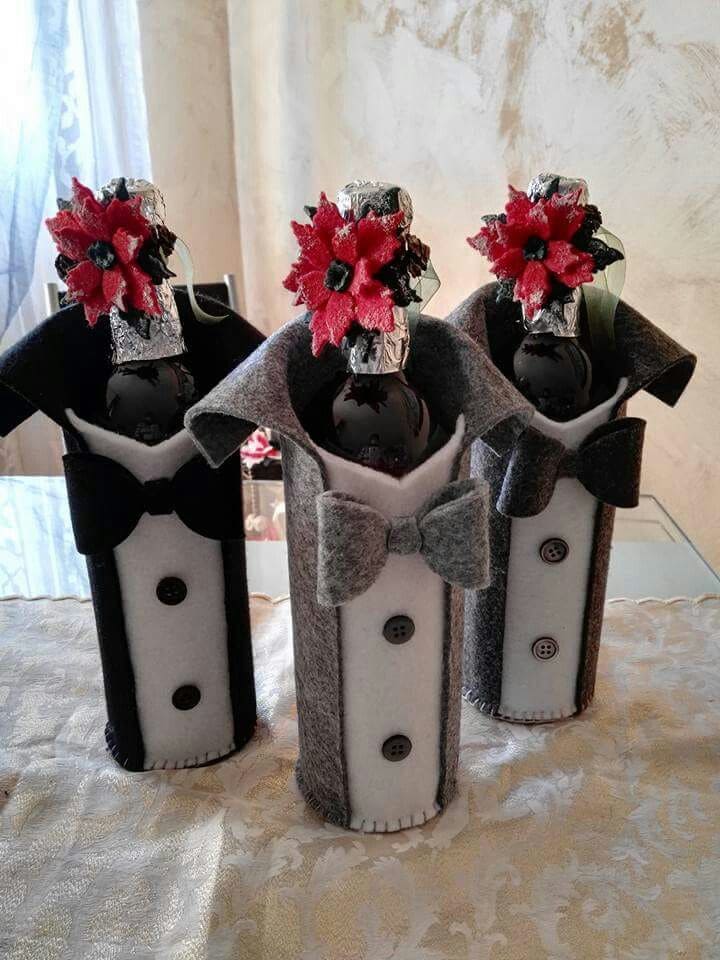
This project is both elegant and affordable, making Dad’s favorite bottle look like it’s dressed to impress.
Materials Needed
- 1 bottle of wine, whiskey, or any beverage of choice
- 2 sheets of felt fabric (black & white or gray) (9×12 inches each)
- 2 black buttons (approx. ¾ inch diameter)
- Red floral felt
- Hot glue gun and scissors
Instructions
- Wrap the white felt around the bottle, securing the back with hot glue to form the shirt base.
- Cut a black or gray piece of felt approximately 5×9 inches and wrap it around the white section to form the tuxedo jacket. Fold corners down into lapels before gluing.
- Attach buttons down the front center of the white felt.
- Glue or stitch a bow tie just below the lapels to complete the tuxedo look.
- Wrap foil or metallic ribbon around the bottle neck, then hot glue a red felt flower or festive accent on top.
#30. DIY Father’s Day Candy Wrench Gift
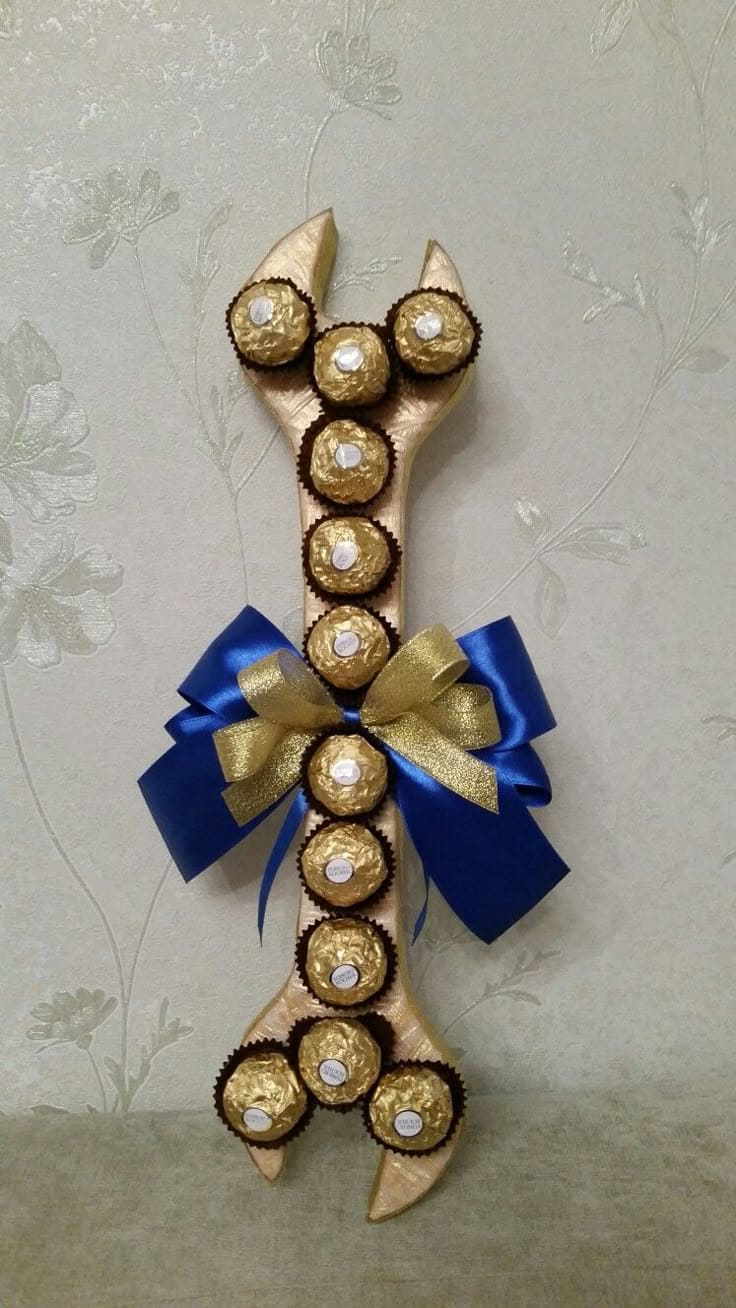
Crafted to look like a giant golden wrench, this wrench cleverly topped with Ferrero Rocher chocolates and finished with double ribbon bows for a charming touch.
Materials Needed
- 10–12 Ferrero Rocher chocolates
- Gold metallic cardstock (approx. 8 x 24″)
- Ribbon (1” wide, blue and gold satin) – about 40 cm each color
- Hot glue gun + sticks
- Scissors or craft knife
- Optional: pencil
Instructions
- On the back of your metallic cardstock, sketch a giant wrench shape about 20–22 inches tall.
- Carefully cut out the wrench using scissors or a craft knife. Smooth any edges so it looks clean.
- Arrange 10–12 Ferrero Rocher candies along the handle and ends. Use a hot glue gun to attach them securely, leave a little space between each for a neat finish.
- Tie a large blue and gold ribbon bow where the wrench narrows near the middle and hot-glue it in place.
#31. DIY Foam Cup Pen Holder
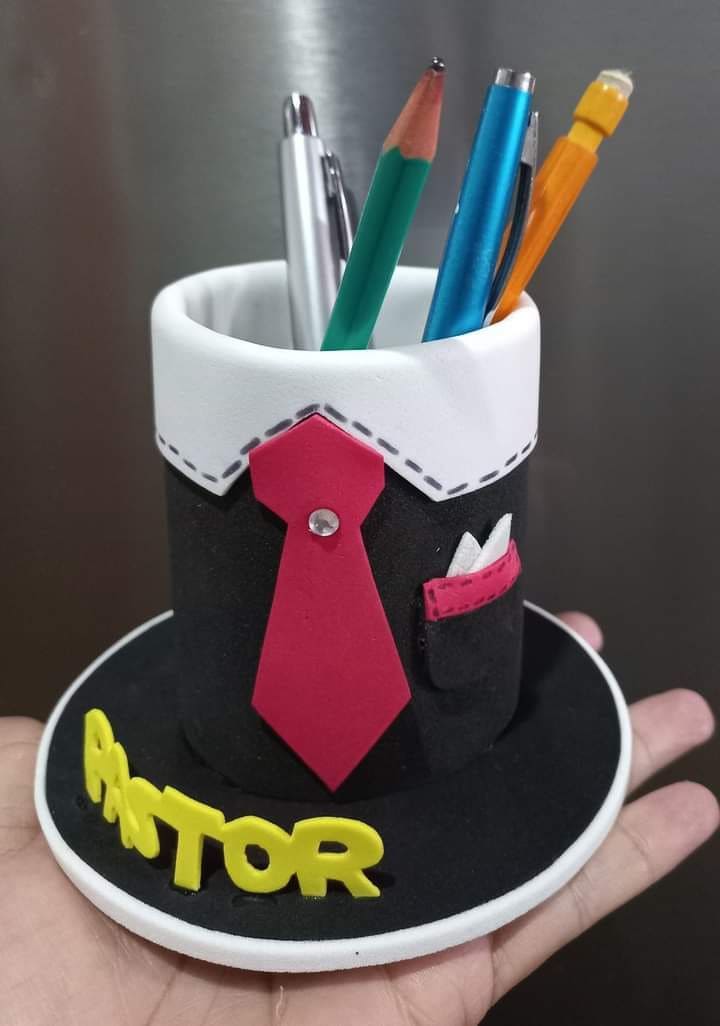
A Father’s Day craft that dresses up Dad’s workspace – literally. This cup isn’t just practical; it’s bursting with personality, charm, and heartfelt detail.
Materials Needed
- 1 plastic cup (approx. 9 cm height × 7.5 cm diameter)
- Black, white, red, and yellow EVA foam sheets (2mm thick)
- Craft glue or glue gun
- Small rhinestone or button
- Mini white felt square
- Scissors, pen
Step-by-Step Guide
- Cut a rectangle from the black foam sheet that wraps snugly around the cup. Secure it with glue.
- Cut a white strip (~3 cm wide) to form the “shirt collar.” Fold each end to form collar points and glue them at the top rim. Use a black marker to add stitched lines for detail.
- Create a red tie: cut a hexagon knot and a long strip (approx. 8 cm) for the tie body. Glue both under the collar. Add a gem or button to the knot center.
- Add a mini “pocket” from red foam and a white felt triangle inside.
- Use yellow foam letters or alphabet stickers to spell Dad’s name at the base.
- For the base, cut a foam circle (about 10–11 cm in diameter), glue the cup onto it, and finish with a white foam rim if desired.
#32. Painted Bottle Opener Handles
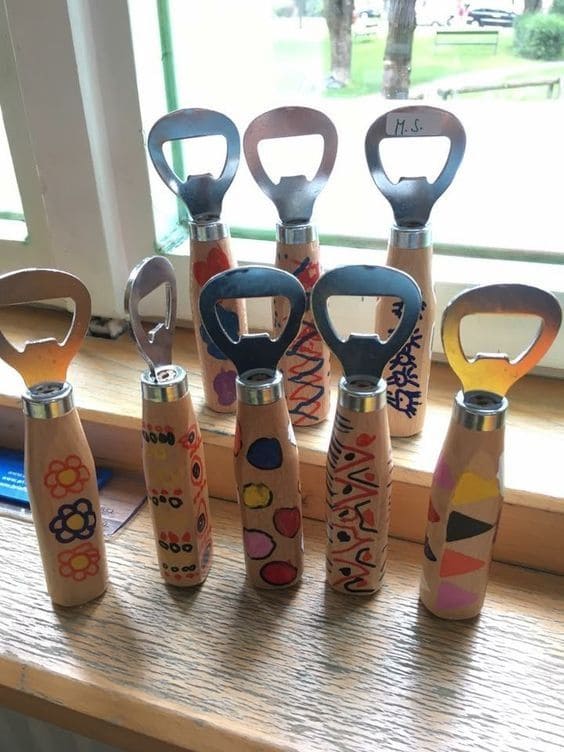
These hand-painted DIY bottle openers are the kind of Father’s Day gift that’s both heartfelt and hilariously practical.
Materials Needed
- 6-8 Wood-handle bottle openers (4–5” long)
- Acrylic paint pens
- Mod Podge sealer or spray varnish
- Painter’s tape
Step-by-Step Guide
- Wipe the wooden handles clean and dry.
- Let kids freely draw or paint designs like dots, zigzags, hearts, stars, or silly faces all work great.
- Optional: Mask off sections with painter’s tape for a clean, geometric look then let the paint dry completely.
- Seal the design using Mod Podge or a spray varnish to protect the art from wear.
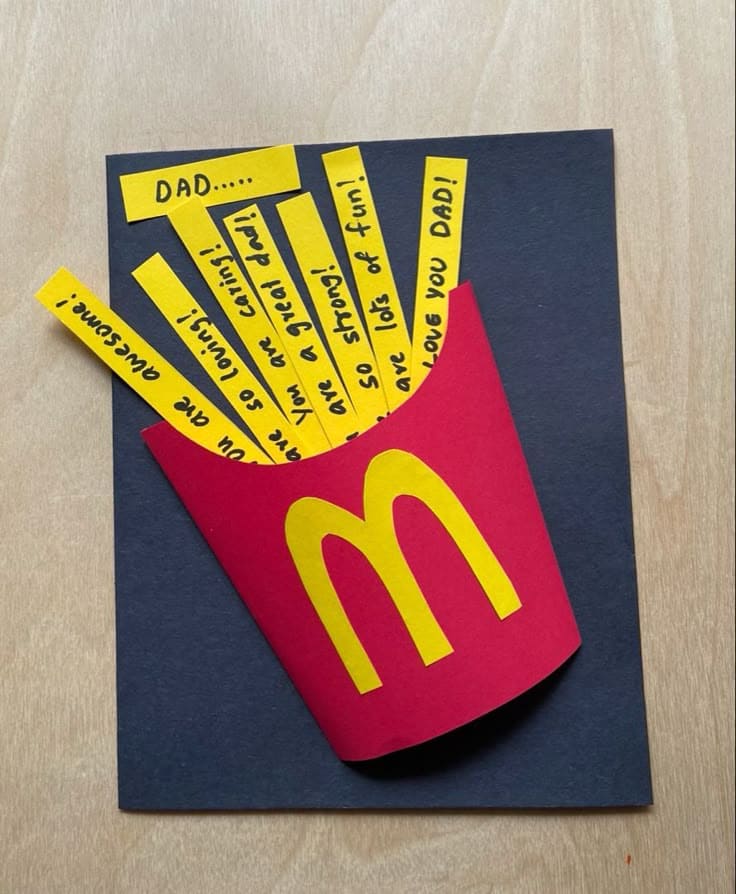
#33. Fry-Love Father’s Day Card
Modeled after a box of fries, each “fry” carries a loving message straight from the heart.
Materials Needed
Step-by-Step Guide
- Fold black cardstock in half to create a card base (approx. 5.5″x8.5″).
- Cut a red paper arc to form the fry sleeve (about 5″ wide and 4.5″ tall at center), and glue only the sides and bottom onto the card so it forms a pocket.
- Cut 6–8 strips of yellow paper, each about 0.75″x5″, to look like fries.
- On each fry, write a sweet or funny message like “You are so caring,” “You’re awesome,” “You’re strong,” or “You make the best pancakes!”
- Cut out an “M” from yellow paper and glue it to the front of the fry box for that classic fast-food look.
#34. Shirt-Shaped Foam Photo Frame
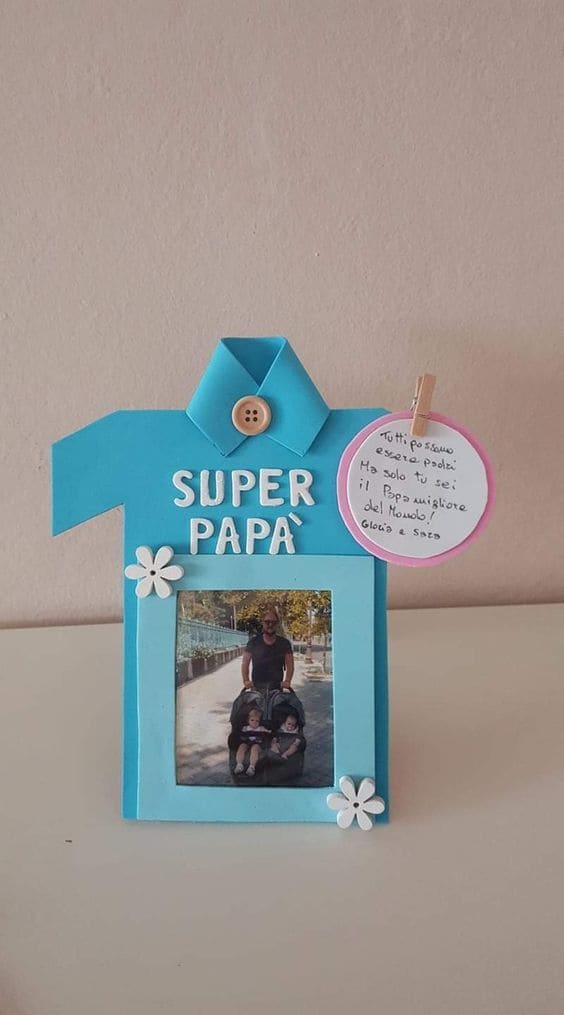
This is the ultimate heartfelt tribute for a Father’s Day gift and you just pay 4-6$.
Materials Needed
- Craft foam sheets (light blue + slight blue)
- 1 Wooden buttons
- 1 Mini clothespin
- White alphabet stickers
- Glue gun
- Photo (approx. 3×3 inches)
- Small note tag or round paper
- Scissors and pen
Step-by-Step Guide
- Cut the foam sheet into a shirt shape: 8 inches tall and 6.5 inches wide. Angle the sides slightly to mimic a shirt silhouette.
- Fold two small triangles at the top and glue down for the collar. Add a wooden button in the center.
- Cut a square opening (3.5×3.5 inches) and glue the photo behind the frame.
- Add alphabet stickers to spell “SUPER PAPÀ” or your own nickname for Dad.
- Decorate with small white foam flowers or heart stickers.
- Clip a mini note tag to one corner with a personal message using a mini clothespin.
#35. Tuxedo Mason Jars for Father’s Day
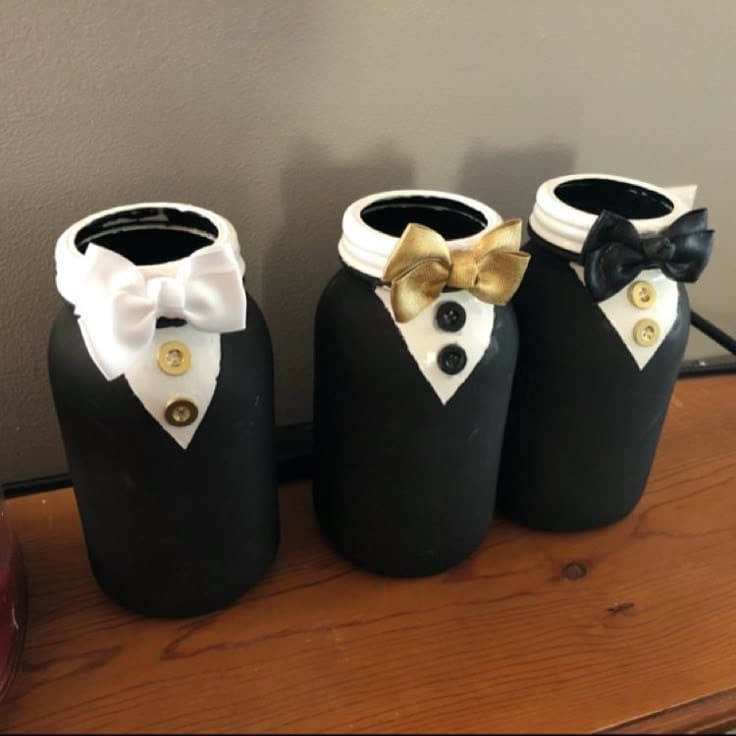
Whether you fill them with his favorite snacks, tools, or simply let them shine as desk organizers, they scream “cool dad” with style.
Materials Needed
- 3 Pint-size mason jars (16 oz)
- Black chalk paint
- White acrylic paint
- Mini satin bows (white, black, gold)
- Small buttons set (black + gold)
- Hot glue gun
- Paintbrush + painter’s tape
Step-by-Step Guide
- Paint each mason jar entirely in black chalk paint. Let it dry for 30 minutes.
- Use white acrylic paint to create a V-shaped “shirt” at the mouth of the jar. Let dry.
- Glue on two small buttons vertically in the center of the V.
- Attach a mini bowtie just below the rim. Match your color choice to Dad’s personality: black tie formal, gold for a fun twist, or white for elegance.
- Fill with small gifts: candies, pens, or even BBQ rubs.