Are you exhausted from tirelessly battling stubborn stains and grime, only to end up with a lackluster and untidy home? Bid farewell to the tediousness and annoyance of cleaning with our handpicked assortment of revolutionary cleaning hacks! From conquering challenging stains to simplifying your cleaning routine, we’ve gathered the exclusive tips to revolutionize your home and take your cleaning skills to new heights. Prepare yourself for the ultimate cleaning guide that will leave your home flawlessly clean and radiantly sparkling!
Achieve a Dazzling Oven Glass Top with Ease
Sick of spending hours scrubbing and scraping your oven, only to be frustrated by stubborn grime? Don’t worry, we’ve got a secret weapon that will make your oven shine effortlessly. Enter Dawn soap, known for its versatile cleaning abilities. Begin by applying a small amount of Dawn soap to your oven’s glass top.

Grab some peroxide from the bathroom and gently coat it over the soap layer. It might seem unusual, but trust us, it works wonders. Sprinkle baking soda on top and grab a dish brush. Carefully scrub away any grime without scratching the glass. Finish by wiping off the residue with a damp cloth, revealing a shiny, good-as-new glass top. Enjoy the satisfaction of a spotless oven that’s ready to impress!
DIY Air Fresheners: Personalize Your Home’s Scent Naturally
Looking to infuse your home with a unique and natural aroma? Creating your own air fresheners using essential oils and water is the perfect solution.
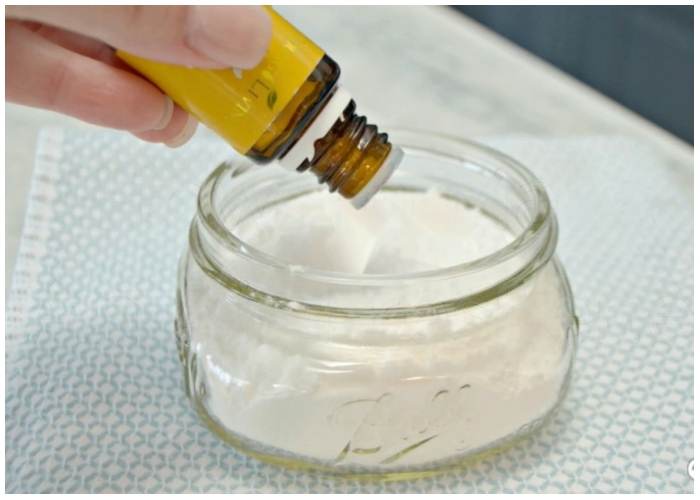
Follow these simple steps to get started:
- Choose your favorite essential oils. Lavender, peppermint, lemon, eucalyptus, and tea tree are popular options for air fresheners. Feel free to experiment and create your own custom blend.
- Fill a spray bottle with water and add a few drops of your chosen essential oil(s). The number of drops will depend on the size of the spray bottle and your desired fragrance intensity. Start with 10-15 drops and adjust as needed.
- Shake the bottle vigorously to blend the oil and water together.
- Spritz the mixture around your home as needed to refresh the air. Whether it’s in your living room, on furniture, carpets, or even bed linens, this DIY air freshener is versatile and can be used throughout your house.
Enjoy the delightful and personalized scents that will greet you every time you enter your home, all thanks to these natural and easy-to-make air fresheners!
Simplify Broom Cleaning with a Clever Hack
Tired of battling persistent dust and tangled hair while sweeping, turning it into an arduous task? We’ve discovered a simple yet brilliant solution that we can’t wait to share with you: the Bristle Buddy! This handy tool can be easily crafted at home using an old wide-tooth comb and a dustpan. Simply attach the comb securely to the dustpan using hot glue.

The result? An effective companion for your cleaning routine. As you sweep, effortlessly run the broom through the comb’s teeth to dislodge stubborn dust and hair. This not only streamlines the sweeping process but also extends the lifespan of your broom. Don’t wait any longer! Create your own Bristle Buddy today and revolutionize your cleaning experience!
Restore the Shine to Your Cabinets
Did you know that your cabinets can harbor hidden dirt, including grease and fingerprints, from everyday use? But fret not! We have a quick and effective solution to make your cabinets sparkle again using a humble ingredient: dish soap. In just a minute, you can give your cabinets a refreshing makeover.

Here’s what you need to do: Grab a bowl and fill it with warm, soapy water using your preferred dish soap. Armed with a sponge, gently scrub your cabinets, ensuring you cover all surfaces. Once you’re done, dry them thoroughly with a towel. Say goodbye to grease and hello to gleaming cabinets that will impress anyone who sets eyes on them!
Restore the Radiance of Your Lamp Shades
Have you ever glanced up at your lamp shades and wondered how they accumulated so much dust? It’s a common issue that often goes unnoticed in our regular cleaning routines. But worry not, for there’s a simple solution to bring back their sparkle! According to cleaning experts, the key lies in incorporating a brush extension into your vacuuming routine. By gently running the brush over the lamp shades during your thorough vacuuming sessions, you can effectively remove any accumulated dust and debris.

Alternatively, you can opt for a dry microfiber cloth or a duster to wipe away the dust. It’s as straightforward as that! Don’t let dusty lamp shades dull the ambiance of your home. With these easy tips, you can keep them looking clean and radiant all year round. So, the next time you embark on your cleaning routine, remember to give your lamp shades some well-deserved attention!
Freshen Your Home with a Crock-Pot Air Freshener
Dealing with unpleasant odors in your home? Whether you’re lacking scented candles or air freshener sprays, or simply haven’t had a chance to visit the store, worry not! We have a solution that requires just an instant or crock pot. Follow these simple steps:
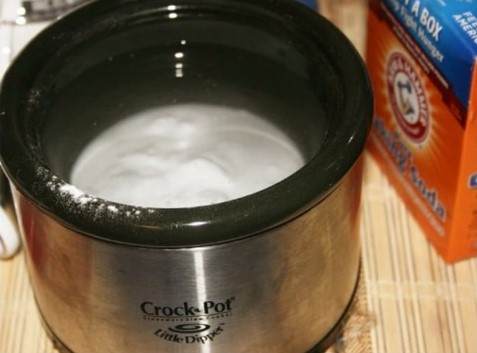
- Add a few teaspoons of baking soda to your crock pot.
- Turn on the crock pot, leaving the lid open. The baking soda alone will work to neutralize the air, eliminating unwanted odors.
- For a personalized touch, you can enhance the scent by adding a sprinkle of cinnamon or a few drops of lemon. This will give your space a delightful and customized aroma.
Enjoy the refreshing ambiance as your crock-pot air freshener works its magic, transforming your home into a more inviting and pleasant environment, even without traditional air freshening products.
Conquer Stubborn Grime with a Citrus Twist
Say goodbye to the relentless battle against bathtub rings and soap scum in your bathroom. These stubborn stains often seem unbeatable, but what if we told you there’s a genius solution involving a simple citrus fruit? Enter the mighty grapefruit, a humble fruit that packs a powerful cleaning punch.

Here’s how to put this hack into action: Grab a grapefruit and slice it in half. Sprinkle some rock salt onto the juicy exposed surface of the fruit. Now, use the grapefruit as your scrubbing tool and work it across your bathtub. The natural acidity of the citrus juice will break down grime, while the salt provides a gentle abrasive action, ensuring a thorough cleaning. The result? A sparkling clean bathtub that shines like new, accompanied by a refreshing, citrusy aroma that fills your bathroom. Who would have thought your trusty cleaning companion could be found right in your fruit bowl?
Keep Your Stove Pristine with a Simple Sanitizing Method
Is your non-glass stovetop prone to accumulating dirt and grime? No worries! Cleaning it can be as easy as caring for a glass stovetop. Follow these straightforward steps:
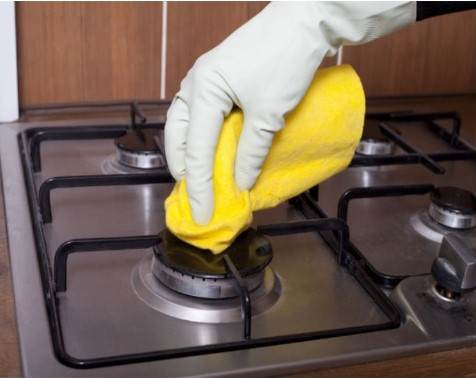
- Sprinkle baking soda generously over the stovetop surface.
- Fill a spray bottle with vinegar and lightly mist it over the baking soda. You’ll notice a satisfying fizzing reaction as the two ingredients combine.
- Use a non-wire scrubber to gently scrub away the dirt, taking care not to damage the surface.
- Finally, wipe off the residue with a damp cloth, leaving your stovetop fresh and sanitized.
Say goodbye to stubborn stains and hello to a spotless stove that will enhance the appearance of your kitchen. This hassle-free method will have your stovetop looking its best in no time!
Revive Your Cookie Sheets with a Brilliant Cleaning Hack
Over time, cookie sheets can become discolored, burnt, and lose their shine. But fear not! We have a cleaning hack that will give your cookie sheets a well-deserved makeover. Once again, the star of the show is baking soda. Here’s what you need to do:
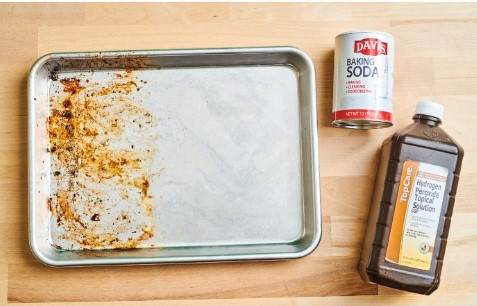
- Create a baking soda paste by mixing it with hydrogen peroxide. The paste should be thick enough to adhere to the cookie sheets.
- Spread the baking soda paste evenly across the surface of the sheets. Allow it to sit for a few minutes, giving the paste time to work its magic.
- Use a brush or sponge to scrub the sheets, going deeper to eliminate any built-up residue or grime. The baking soda paste will help lift away the gunk, leaving your cookie sheets looking refreshed.
- Rinse the sheets thoroughly with water, ensuring all the baking soda residue is washed away.
- Finally, dry the cookie sheets completely before using them again.
With this simple cleaning hack, you can breathe new life into your baking essentials and enjoy better-looking results for your delicious treats!
Unleash the Cleaning Power of Vodka
While vodka is commonly associated with celebrations and cocktails, it also possesses remarkable cleaning abilities. The high alcohol content and potent properties of this clear liquor make it a surprising powerhouse for tackling stubborn carpet stains.

To harness vodka’s cleaning potential, follow these simple steps:
- Take a clean, white cloth and soak it in vodka.
- Gently dab the cloth onto the stain, ensuring it is thoroughly saturated. Allow the vodka to sit on the stain for a few minutes, giving it time to break down the components of the stain.
- Alternatively, you can directly spray vodka onto the stain. Blot the area with a dry cloth, followed by a clean, damp cloth to remove the stain.
- Allow the treated area to dry naturally. If the stain persists, repeat the process.
Discover the remarkable cleaning abilities of vodka as it helps you conquer tough carpet stains. This unexpected cleaning agent is a must-try for any carpet owner seeking effective stain removal.
Simplify Cleaning Double-Paned Oven Doors
Cleaning double-paned oven doors can be a tricky task, as reaching between the glass panes is no easy feat. However, we have a clever trick that you might not have considered, and it’s highly effective! Here’s how you can tackle this challenge:
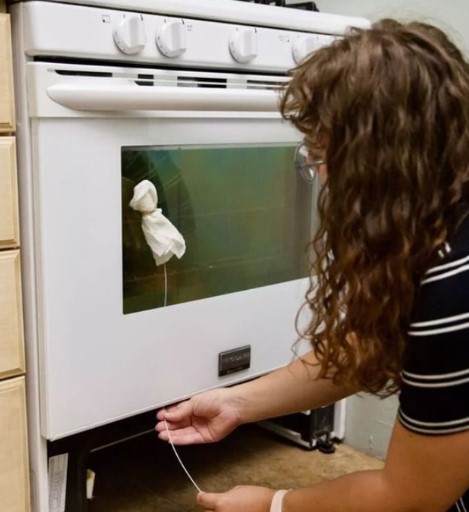
- Find a small stick that can fit between the panes of glass.
- Wrap the stick with paper towels, making sure they are securely fastened with tape.
- Spray glass cleaner onto the paper towels, ensuring they are damp but not soaking wet.
- Gently clean the glass by inserting the stick with the paper towels between the panes. Move the stick carefully to wipe away any dirt or grime.
This innovative and creative approach allows you to clean between the double panes of your oven door, leaving it spotless and transparent. Say goodbye to the frustration of dirty, hard-to-reach areas, and enjoy the convenience of this effective cleaning solution!
Say Goodbye to Pet Hair in Cars and Carpets
For pet owners, managing pet hair can be an ongoing challenge, particularly in areas where your furry friends don’t typically spend time, like your car. Thankfully, there’s a simple solution to effectively remove pet hair from cars and carpets: a squeegee.
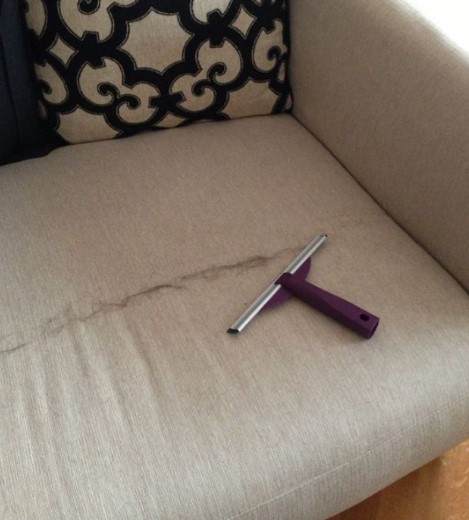
Here’s how to make it work: Using a squeegee, gently sweep the pet hair into a clump, making it easy to collect before vacuuming. This technique is not only useful for cars but can also be applied to various surfaces such as car seats, stairs, or furniture. By using a squeegee, you’ll be amazed at how effortlessly you can say goodbye to those pesky pet hairs.
For more comprehensive cleaning tips specifically tailored to carpets, be sure to check out our collection of cleaning tips. You’ll find a wealth of information to help you keep your carpets looking fresh and pet hair-free.
Revive Your Iron with Simple Kitchen Staples
A sticky iron can wreak havoc on your quest for wrinkle-free clothes. Often, starch residue is to blame, hindering your iron’s smooth glide. But before you consider replacing your trusty iron, let us share a quick and effective hack using common household items: tin foil and salt.

Here’s what you need to do:
- Take a piece of tin foil and sprinkle a tablespoon of rock salt onto it.
- Heat your iron as usual and run it over the salt-covered foil.
The combination of heat and the abrasive texture of the salt will work wonders, removing starch residue and any dirt clinging to the iron’s surface. This simple yet effective hack breathes new life into your iron, ensuring optimal performance for wrinkle-free clothes.
With this trick up your sleeve, your ironing sessions will be back on track, leaving you with crisp, professionally pressed garments. Say goodbye to a sticky iron and hello to effortless ironing!
Restore the Brilliance of Your Oven Glass
In the hustle of the kitchen, the glass on your oven door often gets neglected. However, when it becomes dirty, it becomes hard to ignore. Luckily, there’s a fantastic solution to this problem: the Magic Eraser. These versatile cleaning tools work wonders in scrubbing away grime and bringing back the clarity and sparkle of your oven door.

Here’s what you need to do:
- Ensure the oven is cool before cleaning. Safety first!
- Grab a Magic Eraser and dampen it slightly with water.
- Gently scrub the glass surface of your oven door with the Magic Eraser, focusing on areas with stubborn grease or stains. Depending on the level of grime, you may need to use multiple Magic Erasers.
- Take caution around the heating elements and avoid applying excessive pressure to prevent any damage.
With this quick and easy solution, you’ll be amazed at how effortlessly your oven door becomes clear and sparkling again. Say goodbye to the buildup of grime and hello to a gleaming oven glass that enhances the overall aesthetic of your kitchen!
Revitalize Your Carpet after Spills
Accidents happen, and carpet spillages can leave a lasting impact on both the appearance and odor of your carpet. If you’re dealing with an oily or greasy spill, don’t fret! Your carpet cleaner can come to the rescue.
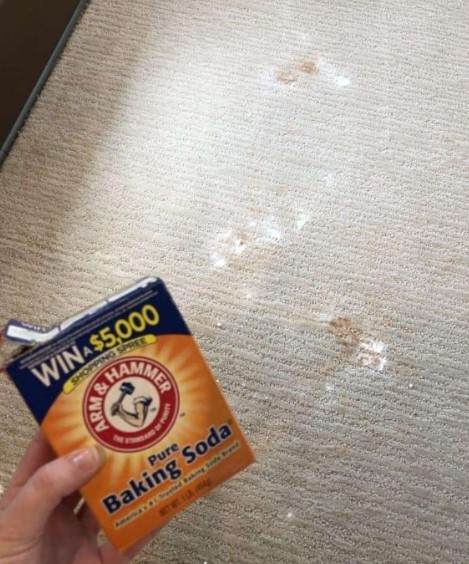
Follow these steps to effectively remove oily residues from your carpet:
- Start by immediately absorbing the liquid spill with baking soda. This will help lift the excess moisture from the carpet fibers.
- In a mixing bowl, combine two cups of water, one tablespoon of dish liquid, and a tablespoon each of vinegar and white vinegar. Stir the mixture gently.
- Take a microfiber washcloth and apply the prepared mixture to the stain, gently blotting and rubbing it in. Be sure to work from the outer edges of the stain toward the center to prevent spreading.
- Once you’re satisfied with the cleaning process, use a clean, dry cloth to blot any excess moisture from the carpet.
By following these steps, you can breathe new life into your carpet after spills, even those with oily or greasy residues. Say goodbye to unsightly stains and hello to a refreshed and clean carpet!
Elevate Your Toilet Cleaning Routine with DIY Toilet Bombs
Transform your toilet cleaning experience into a spa-like treat with homemade toilet bombs! These delightful creations offer the same rejuvenating sensation as using a bath bomb. Here’s how to make them:
Ingredients:
- 1 cup of baking soda
- ¼ cup of citric acid
- 1 tablespoon of dish liquid
- Silicone tray (similar to an ice cube tray)

Instructions:
- In a mixing bowl, combine the baking soda, citric acid, and dish liquid. Stir the mixture until it forms a consistent paste.
- Press the mixture firmly into the silicone tray, filling each cavity. Ensure it is tightly packed.
- Allow the bombs to dry for a few hours until they harden completely.
- Once dry, carefully remove the bombs from the tray and store them in a jar with a lid.
On cleaning day, drop one of these delightful toilet bombs into your toilet bowl and watch as it works its magic. No scrubbing required! The fizzing action and cleaning properties of the bomb will help freshen your toilet, leaving it sparkling clean and pleasantly scented.
Revitalize Your Couch with an Easy Cleaning Hack
Is your cherished couch in need of some cleaning and freshening up? Don’t worry! We havee a simple yet highly effective method to make your couch look and smell as good as new. Follow these steps:

- Lightly mist your couch with warm water using a spray bottle. Ensure the fabric becomes slightly damp but not soaked.
- Sprinkle a fine layer of baking soda over the entire couch, including the cushions and armrests. Baking soda is renowned for its cleaning prowess and will help eliminate stubborn odors.
- Use a damp cloth to gently massage the baking soda into the fabric. This ensures that the baking soda reaches deep into the fibers, effectively removing any lingering smells.
- Allow the couch to dry completely. Once dry, use your vacuum cleaner to thoroughly remove all the baking soda, along with any hidden crumbs or debris.
- To lock in the newfound freshness, lightly mist your entire couch with rubbing alcohol.
Step back and admire the revitalized couch that looks and smells wonderful. This easy cleaning hack will bring new life to your beloved piece of furniture, making it a more inviting and pleasant place to relax.
Undo Permanent Marker Mishaps with an Unexpected Solution
Children’s artistic adventures can sometimes go beyond the intended canvas, leaving you with unexpected permanent marker stains. But fret not! There’s a surprising solution that can come to your rescue: vegetable oil.
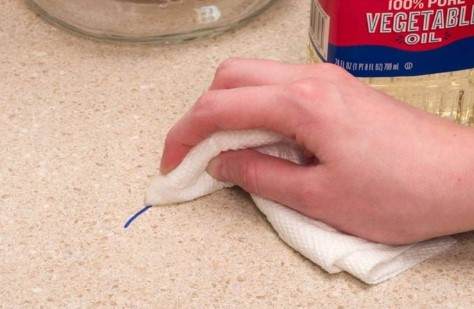
Follow these steps to eliminate marker stains:
- Pour a small amount of vegetable oil onto a cloth or cotton wool.
- Apply the oil to the marked area, exerting a bit of elbow grease. The oil will break down the marker pigments, making them easier to wipe away.
- Once the stain is gone, clean the area with a mild cleaning solution to remove any residual oil. This will restore the surface to its original state.
This hack is a game-changer for parents, allowing their children’s creativity to flourish without the fear of lasting damage. So don’t panic when faced with permanent marker mishaps. Just reach for some vegetable oil and watch those stains vanish!
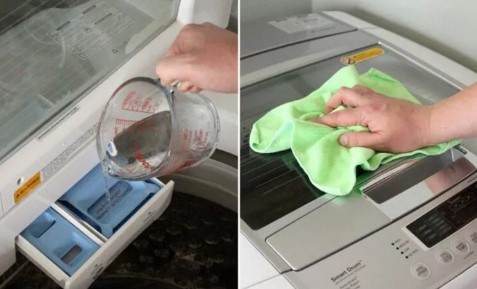
Show Your Top Loader Some TLC
While a top-loading washing machine is a household essential, it often gets overlooked when it comes to cleaning. However, giving it regular care is crucial for maintaining efficiency and ensuring its longevity. Here’s how you can show your top loader some love:

- Run a Bleach Cycle: Start by running a bleach cycle. Add bleach to the dispenser or directly into the drum. Let the machine run a full cycle, allowing the bleach to sanitize the machine and eliminate any bacteria. Leave the machine to soak for about an hour before proceeding.
- Run a Vinegar Cycle: After the bleach cycle, run a vinegar cycle to clean the interior parts of the machine. Add vinegar to the dispenser or directly into the drum. Vinegar helps remove mineral buildup and leaves the machine smelling fresh. For added cleaning power, you can also add baking soda to the cycle to tackle tough stains or odors.
- Clean the Exterior: Regularly clean the machine’s exterior with a damp cloth to remove any dust or dirt that may accumulate.
- Check for Mold or Mildew: Pay attention to the dispenser tray and interior drum. Look for any signs of mold or mildew and clean them thoroughly to prevent any buildup.
- Allow for Proper Drying: After each use, leave the machine’s door open to allow it to dry out completely. This helps prevent the growth of mold and mildew.
By following these cleaning steps and incorporating regular maintenance, you’ll keep your top-loading washing machine fresh, running smoothly, and ready to tackle your laundry with efficiency.
Restore Your Shower Head’s Shine with Vinegar
A shower head clogged with hard water stains and chalky buildup can not only look unappealing but also affect the performance of your shower. Luckily, a simple vinegar solution can come to the rescue. Here’s how you can free your shower head from these stubborn stains:
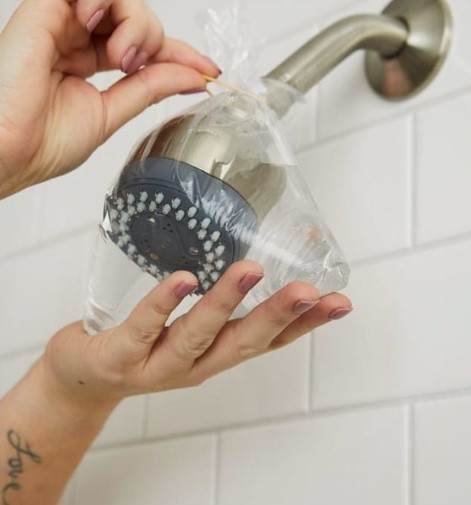
- Fill a sandwich bag with white vinegar. For a pleasant scent, add a few drops of your favorite essential oil into the vinegar.
- Submerge the shower head into the bag of vinegar, ensuring it is fully immersed. Use an elastic tie or rubber band to secure the bag in place, making sure it covers the affected area.
- Leave the shower head submerged in the vinegar solution overnight. The acidic properties of vinegar will work to dissolve the hard water stains and minerals.
- In the morning, remove the bag and wipe the shower head with a microfiber cloth. You’ll be amazed at the difference this simple process makes.
- For any remaining stubborn stains, you can use a toothbrush or a pipe cleaner to gently scrub them away, ensuring the water flows smoothly.
By using this vinegar treatment, you can keep your shower head looking fresh and new while ensuring optimal water flow. Say goodbye to hard water stains and hello to a revitalized shower experience!
Revitalize Your Sidewalk/Pathway with Proper Cleaning
Prepare for your cleaning adventure by gathering the necessary supplies: a power washer (rent one if needed), concrete cleaner or mild detergent, a broom, a bucket, protective eyewear, and rubber gloves. Here’s how to embark on your cleansing crusade:

- Sweep Away Debris: Begin by sweeping away loose debris, dirt, and leaves from your sidewalk or pathway. This essential step sets the stage for a thorough cleaning.
- Embrace the Power Washer: Hold the power washer in your hand, feeling the power of Excalibur as you bravely confront grime and stains. Put on your protective gear to shield yourself from any mess.
- Unleash the Cleaning Solution: Mix your chosen concrete cleaner or mild detergent with water in a bucket. Follow the instructions on the label to achieve the perfect blend. Apply this magical concoction to your concrete surface, focusing on stubborn stains and using a hard-bristled brush to scrub them away.
- Rinse and Revel: Use the power washer to rinse off the soapy solution, watching as the grime and dirt vanish before your eyes. Ensure thorough coverage, leaving no trace of soap behind.
With these steps, you’ll revitalize your sidewalk or pathway, revealing its true beauty. Embrace the power of proper cleaning and enjoy the satisfaction of a sparkling clean outdoor space.
Simplify Oven Rack Cleaning with Baking Soda and Vinegar
Cleaning oven racks can feel like a daunting task, but it’s crucial for maintaining the efficiency and safety of your oven. Thankfully, there’s a simple and effective method using baking soda and vinegar. Here’s how to do it:

- Remove the oven racks and place them in the bathtub or a suitable cleaning area.
- Spray the racks with vinegar, ensuring they are thoroughly saturated. The acidity of vinegar helps break down grime and stains.
- Sprinkle baking soda over the racks, focusing on areas with stubborn dirt or buildup. Baking soda acts as a gentle abrasive, assisting in scrubbing away the grime.
- Use a scrub brush or sponge along with hot water to scrub the racks thoroughly. For extra cleaning power, you can add a small amount of dish soap to the mix.
- Once you’ve scrubbed the racks, rinse them off with water to remove any remaining residue.
- Dry the racks with a towel or allow them to air dry before placing them back in the oven.
By following these steps, you’ll achieve clean and shiny oven racks that look as good as new. This method is not only simple and effective but also an inexpensive alternative to harsh chemical cleaners. Keep your oven running smoothly with clean oven racks and enjoy the benefits of a well-maintained kitchen appliance.
Revive Your Shower Curtain with Washing Machine Magic
Shower curtains can easily accumulate dirt and mold, especially in humid bathrooms. Luckily, there’s a quick and easy hack to clean them—your washing machine! Here’s how to do it:
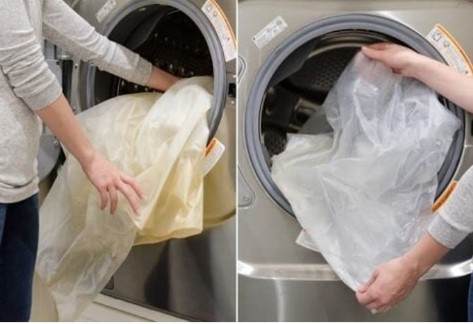
- Remove the shower curtain from the hooks and toss it in the washing machine along with a couple of towels. The towels will provide extra scrubbing action during the wash cycle.
- Add a cup of white vinegar to the washing machine as a natural disinfectant to combat mildew and soap scum. You can also include a cup of baking soda to eliminate any lingering odors.
- Set your washing machine to the gentle cycle and use cold water. Avoid using hot water or a high-heat dryer, as this can cause the curtain to shrink or become distorted.
- Once the washing cycle is complete, hang the shower curtain back on the rod to air dry. This allows for proper drying without the risk of damage.
Alternatively, you can clean your shower curtain in a bathtub. Fill the tub with warm water and add a cup of white vinegar. Place the curtain in the tub and scrub it with a brush or sponge. Rinse it thoroughly and hang it to dry.
Banishing Stubborn Stains on 30-Year-Old Tile Surfaces
Over time, tile surfaces, especially those that have been around for 30 years or more, can accumulate stubborn stains that seem impossible to remove. However, fear not! There are effective methods to tackle these stains and restore the appearance of your tile surfaces. Here are a few approaches to try:
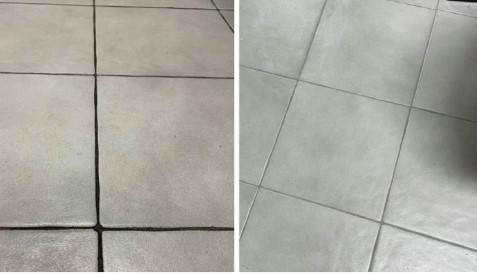
- Baking Soda Paste: Create a paste by mixing baking soda with water. Apply the paste to the stained area and let it sit for 15-20 minutes. Scrub the area using a stiff-bristled brush, then rinse with water. Repeat this process until the stain is no longer visible.
- Vinegar and Water Solution: Mix white vinegar and water in a spray bottle. Spray the mixture onto the stained area and let it sit for 15-20 minutes. Use a stiff-bristled brush to scrub the area, then rinse with water. This method can be effective in breaking down tough stains.
- Commercial Tile and Grout Cleaner: If the stain persists, consider using a commercial tile and grout cleaner. These cleaners are specifically designed to tackle stubborn stains. Follow the instructions on the product label carefully, and be sure to choose a cleaner suitable for your type of tile. Remember to wear protective gloves and ensure proper ventilation when using chemical cleaners.
- Professional Cleaning Service: For particularly stubborn stains or if you prefer to leave the job to experts, hiring a professional tile and grout cleaning service is a great option. They have specialized equipment and knowledge to deal with even the toughest stains.
Remember that some stains may be permanent, so it’s important to address them as soon as possible. Regular cleaning and maintenance can also help prevent stains from building up over time. With these methods and a little perseverance, you can restore the beauty of your 30-year-old tile surfaces and make them look as good as new.
Simplify Bottle Cleaning with Gravel Power
Cleaning narrow-necked jars and vases can be a tedious task, but with a few simple ingredients, it can become a breeze. Here’s an easy and effective solution using small gravel, like aquarium gravel:
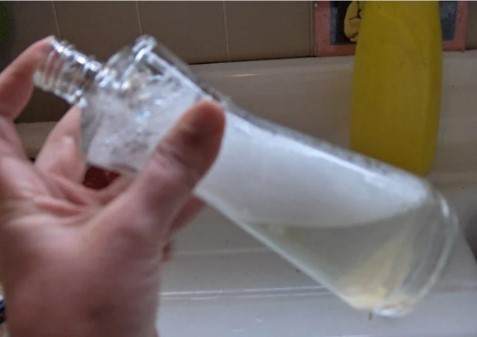
- Fill the jar or vase one-third full with water.
- Add a handful of gravel into the jar.
- Give the jar a good stir and shake, allowing the gravel to scour the inside and remove dirt and debris.
- Once you’ve finished, pour the gravel into a strainer and rinse it quickly to prevent any unpleasant odors.
You can save the gravel for future use, making it an economical and eco-friendly cleaning solution. This ingenious trick will have you wondering why you never thought of it before. Give it a try the next time you’re faced with the challenge of cleaning narrow-necked jars or vases. It’s a quick, easy, and effective technique that will help you clean in no time!
Sparkling Light Switches, Doorknobs, and Pulls
Light switches, doorknobs, and pulls may not always be top of mind when it comes to cleaning, but they are important areas to keep clean and germ-free. Here’s a simple guide to make them sparkle:

- Remove Visible Dirt: Start by using soap and water or a multi-surface cleaner to remove any visible dirt or grime from the surfaces. Wipe them down thoroughly and allow them to dry.
- Disinfect: Once the surfaces are dry, it’s time to disinfect. Use a disinfectant spray or wipes specifically designed for killing germs. Follow the contact time mentioned on the product label to ensure maximum effectiveness. This step is crucial, especially during cold and flu season, to prevent the spread of germs.
- Skip Cleaning if Not Visibly Dirty: If the surfaces aren’t visibly dirty, you can skip the cleaning step and go straight to disinfecting. This saves time and resources while still ensuring a germ-free environment.
By incorporating these simple tips into your cleaning routine, you can keep light switches, doorknobs, and pulls sparkling clean and free from germs. Remember, these high-touch areas can easily harbor dirt and germs, so regular disinfection is essential for a cleaner and healthier home.
Revitalize Your Appliance Interiors
Are your clothes and dishes not coming out as clean as you’d like, despite your best efforts? It may be time to give some attention to the insides of your appliances. Regularly cleaning your appliances is crucial for maintaining their efficiency. Here’s what you can do:
- Follow Manufacturer’s Instructions: Check the manufacturer’s directions for specific cleaning instructions for each appliance. Different appliances may require different cleaning methods, so it’s important to follow the guidelines provided.
- Use Appliance-Specific Cleaners: Invest in products designed specifically for cleaning appliance interiors. These cleaners are formulated to tackle the unique challenges of each appliance, ensuring effective and safe cleaning.
- Don’t Forget the Filters: Filters in appliances play a vital role in their performance. Regularly clean out the filters to prevent clogs and maintain optimal functioning. Refer to the manufacturer’s instructions for the recommended frequency and method of cleaning.
- Allow Appliances to Dry: To prevent the buildup of bacteria or mold, consider leaving your washing machine or dishwasher open for a while after use. This allows them to dry out and reduces the risk of unpleasant odors or potential issues.
By giving your appliances a little tender loving care, you’ll not only enhance their performance but also extend their lifespan. Your clothes and dishes will come out looking their best, and you’ll enjoy the benefits of efficient and reliable appliances. Roll up your sleeves, follow the cleaning instructions, and let your appliances sparkle from the inside out!
Restore Stainless Steel’s Shine with Cream of Tartar
If you’re searching for a simple and effective method to clean your stainless steel surfaces, look no further than cream of tartar. This versatile powder, derived from tartaric acid, serves as a natural scrub that can eliminate stains and bring back the shine. Here’s how to do it:

- Dampen a cotton towel with cold water.
- Sprinkle some cream of tartar onto the damp towel.
- Gently scrub the stainless steel surface using the cream of tartar-coated towel.
- Rinse the surface thoroughly with water and wipe it clean with a microfiber cloth.
You can employ this method to clean various stainless steel items, including appliances, pots, pans, and even to diminish the appearance of scratches.
Cream of tartar can also serve as an alternative to bleach when removing ink stains from clothes. Mix 1/2 a lemon with cream of tartar, apply the mixture to the stain, let it sit for three hours, and then wash as usual.
Achieve Sparkling Shower Glass with Shaving Cream
Believe it or not, shaving cream can be a surprisingly effective cleaning solution for removing water stains from shower glass. Follow these simple steps to achieve sparkling, streak-free results:
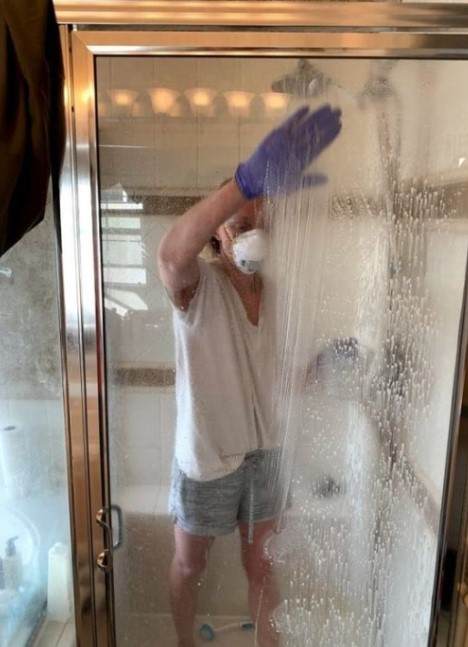
- Apply a small amount of shaving cream directly onto the dirty surface of your shower glass. Ensure that the entire area is covered.
- Allow the shaving cream to sit and work its magic for about 15 minutes. This gives it time to break down the water stains and grime.
- Take a clean cloth and wipe away the shaving cream, along with the dissolved water stains. Make sure to use gentle, circular motions to avoid any scratches on the glass.
- Rinse the glass thoroughly with water to remove any residual shaving cream.
You’ll be amazed at the transformation of your shower glass, which will now appear sparkling and streak-free.
In addition to its use in cleaning shower glass, shaving cream can also help restore the shine of your jewelry. Over time, oils and product buildup can dull the appearance of jewelry. To bring back the sparkle, apply a small amount of shaving cream to your fingers and gently rub it onto the jewelry. Then, wipe it clean with a non-abrasive cloth.
Achieve Streak-Free Windows with Black Tea
If you’re tired of dealing with streaky and dirty windows and mirrors, you’ll be delighted to discover the cleaning power of black tea. The tannic acid present in black tea acts as a natural cleaning agent, effectively dissolving dirt and grime. Follow these simple steps to revitalize your windows:

- Brew a strong pot of black tea using 3 tea bags and 8 oz of boiling water. Allow the tea to steep for several minutes to extract maximum tannic acid.
- Let the tea cool for about an hour, ensuring it reaches room temperature. This will prevent any potential damage to your windows from temperature shock.
- Transfer the cooled black tea into a spray bottle or dip a cotton cloth into the solution.
- Spray the black tea directly onto the window surface or use the soaked cloth to apply it.
- Wipe the windows thoroughly, making sure to cover the entire surface. The tannic acid will dissolve dirt and grime, leaving your windows streak-free and sparkling.
- For a flawless finish, buff the windows with a dry cloth to remove any remaining moisture and further enhance their shine.
Not only is this method cost-effective and easy, but it’s also environmentally friendly as it avoids the use of harsh chemicals. Additionally, you can also use this black tea solution to remove stains on tile surfaces, grout, or even clothes. If you’d like to add a pleasant aroma to your cleaning experience, consider adding a few drops of essential oils to the solution.
Say Goodbye to Sticky Residue with Mayonnaise
Removing stubborn sticker residue can be a hassle, but you don’t need harsh chemicals to get the job done. Surprisingly, a common condiment found in your kitchen may hold the solution. Mayonnaise, with its oil and vinegar mixture, can effectively remove sticky residue from glass bottles and various surfaces.
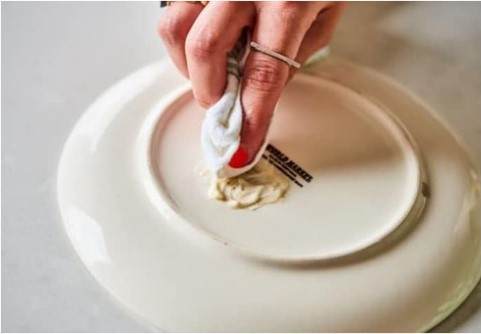
Follow these steps to make sticker residue vanish with mayonnaise:
- Apply a generous amount of mayonnaise directly onto the sticky residue. Ensure the affected area is fully covered.
- Let the mayonnaise sit on the residue for approximately 15 minutes. This allows the oil and vinegar in the mayonnaise to penetrate and loosen the sticky residue.
- After the designated time, use a dry cloth to wipe away the mayonnaise and the loosened residue. Apply gentle pressure as you wipe to ensure thorough removal.
- If the residue persists, you may need to repeat the process. Simply reapply mayonnaise and let it sit for another 15 minutes before wiping it away.
This simple and effective hack provides an alternative to harsh chemicals, making it a safer and more eco-friendly option for removing sticker residue. Mayonnaise’s oil and vinegar content work together to break down the sticky residue, leaving your surfaces clean and free from unwanted marks.
Next time you’re faced with sticky residue, don’t fret. Reach for a jar of mayonnaise from your pantry and watch as it effortlessly removes the problem.