Are you ready for an exciting adventure of self-expression and exploration? Get ready to revitalize the spaces around you with a curated collection of ingenious DIY projects. These projects will not only test your design skills but also ignite your creativity, bringing sophistication and excitement to your daily life. By embracing these unconventional renovations, you’ll not only transform your home but also cultivate a renewed perspective on the endless possibilities that await. So, it’s time to get hands-on and let yourself be inspired by a world of transformation that’s waiting to be discovered. Let’s dive in and embark on this thrilling journey together!
Revamp Your Light Switches
While framing a television has become increasingly popular, let’s not overlook the potential of giving light switches a stylish makeover.
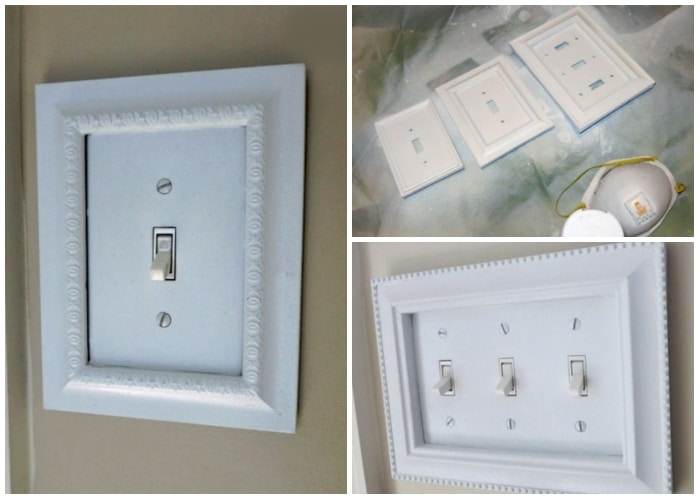
Typically encased in plain white plastic, light switches can be rather mundane. However, with a little creativity, you can elevate their appearance. Start by cutting trim to fit around the switch, and consider painting it in a vibrant color of your choice. Another option is to repurpose an old picture frame and place it over the switch, instantly transforming its look. This budget-friendly project requires minimal time and effort. Simply secure the frame to the wall using adhesive or a nail, if needed. For those feeling crafty, you can even craft a unique frame using Fimo clay, adding figurines or textures by pressing small objects into the clay.
By giving your light switches a touch of flair, you can effortlessly enhance the overall aesthetic of your space.
Enhance Your Outdoor Spaces with Artificial Florals
While it’s commonly believed that only real greenery can adorn the exterior of a home, this is not necessarily true when it comes to potted plants and built-in planters on a front porch. Introducing fake flowers can create the illusion of blooming beauty all year round. Specially designed artificial flowers and plants exist for outdoor use, ensuring their durability and longevity. UV-protected artificial flowers are specifically crafted to withstand the elements.

Their UV protection shields them from sun damage and prevents color fading, similar to how sunbrella fabric protects outdoor cushions and pillows. Some faux plants are made of plastic, making them resilient against rain and easy to clean. The lifespan of artificial flowers and plants will vary based on whether they are placed under a covered area or exposed to direct sunlight. When purchasing them, ensure that the leaves mimic the natural color of real plants rather than appearing overly vibrant. So, go ahead and add a touch of floral charm to your outdoor spaces with artificial blooms that look remarkably close to the real thing.
Transform Your Couch with a Stylish Blanket
The bohemian style is all about embracing macrame, rattan furniture, vibrant colors, and a couch adorned with an array of throw pillows. If your older couch doesn’t quite match this aesthetic, don’t worry. You can easily cover it with a blanket in a muted shade until you either purchase a new one or have it reupholstered. Wool blankets offer an affordable solution, allowing you to effortlessly introduce new colors, patterns, and textures without the hassle and expense of replacing your entire sofa.
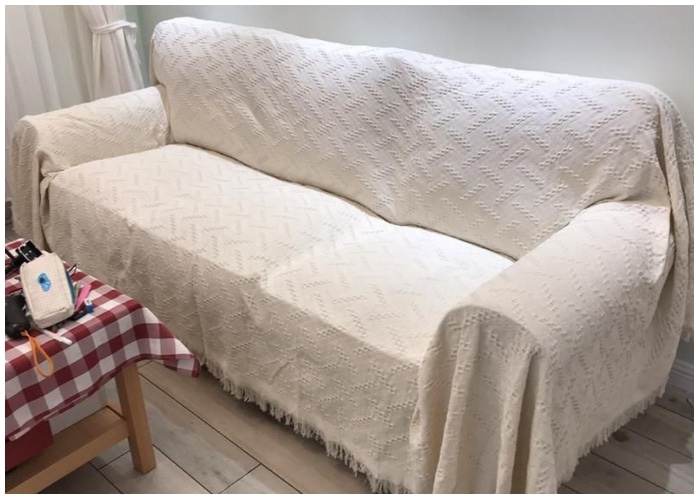
Invest in a high-quality wool blanket that can elegantly conceal worn-out or stained cushions on a fabric sofa. Opt for herringbone patterns, beehive motifs, or classic checkered and plaid designs to complement your existing or evolving interior design scheme. This simple and budget-friendly hack will instantly breathe new life into your couch, giving it a fresh and stylish look that perfectly aligns with the bohemian vibe you desire.
Create Your Own Hidden Room
Step into the charm of old Victorian homes and English manors by adding a hidden room to your own living space. In the past, these secret rooms were ingeniously tucked away behind bookshelves and other large pieces of furniture. Now, you can recreate that sense of mystery and intrigue in your home.
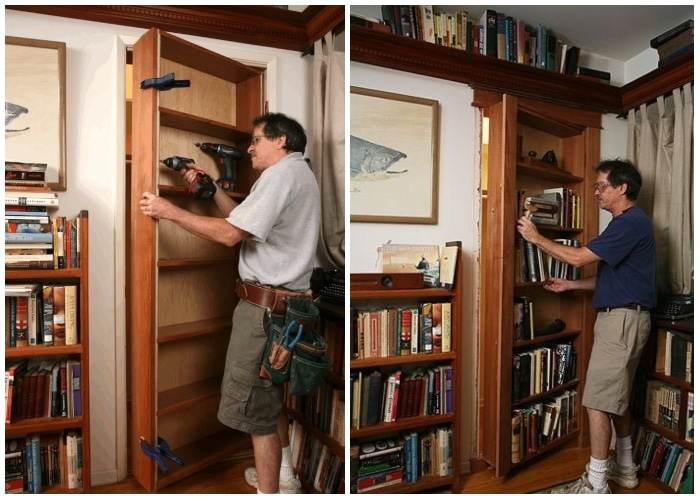
Start by selecting a suitable location for your hidden room. A spacious closet often works well for this purpose. To maintain the element of surprise, ensure that the entrance doesn’t resemble a typical doorway, as you don’t want to give away the presence of a hidden space. Doors can be skillfully concealed within the woodwork or disguised as furniture pieces.
One popular method is to install a hinged bookshelf that doubles as an entryway. Carefully drywall off the desired area and position the bookshelf in front of it. The bookshelf should be movable, allowing it to swing open to reveal the hidden room behind. Prior to starting the construction, create a detailed plan outlining how your finished door will look. Take accurate measurements of the entrance and construct a bookcase that seamlessly serves as the door.
Once your hidden room is complete, it’s time to add the finishing touches. Arrange books and decorative items on the bookshelf to maintain its authenticity. This unique addition will not only captivate your guests but also provide you with a private retreat within your own home.
Give Old Pennies New Life with a Penny Floor
If you have jars filled with shiny pennies lying around, why not put them to creative use? Transforming your flooring with a stunning penny floor can be an eye-catching and budget-friendly project, especially ideal for bathrooms.
To start, accurately measure the area you plan to cover and ensure you have enough pennies to complete the project. Ordering the pennies in advance can be helpful. Proper planning and layout are crucial for achieving the desired outcome. Additionally, it’s essential to ensure the floor is level for the best and safest results. Sand any bumps and fill any holes to create a smooth surface.
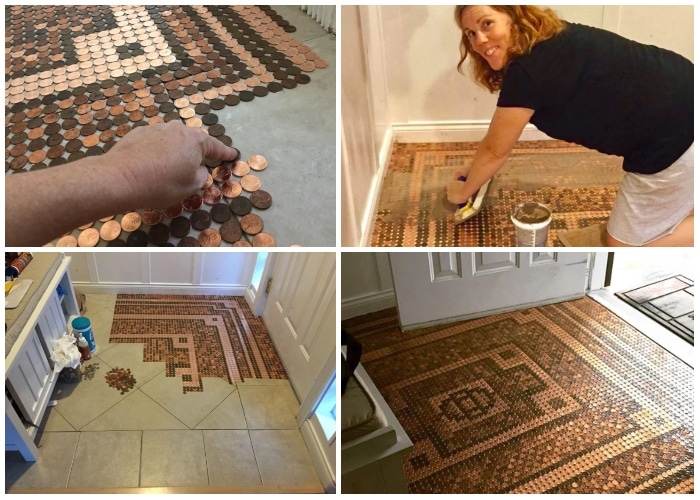
Since you’ll be pouring epoxy onto the floor later, it’s important to use an appropriate sealant to protect the edges of your surface beforehand. This step ensures a clean and professional finish. Once the surface is prepped and sealed, it’s time to glue the pennies onto the floor using adhesive. Take your time to arrange them in a pattern or design of your choice.
After securing the pennies, the final step is pouring epoxy over the floor. This not only enhances the overall appearance but also protects the pennies and creates a durable surface. Allow the epoxy to cure for approximately four days to achieve its optimal hardness and quality.
Refresh Your Space with New Grout
Over time, grout in tile floors or bathrooms can become worn, discolored, and even develop mold. However, you can easily rejuvenate your space by regrouting with white or clear grout, instantly transforming the look and maintaining waterproofing.
To begin, equip yourself with an oscillating tool fitted with a grout removal blade. Use this tool to carefully remove the bulk of the old grout along the grout joints. Once the old grout is cleared, clean the area thoroughly and prepare the tile grout mix according to the manufacturer’s instructions.
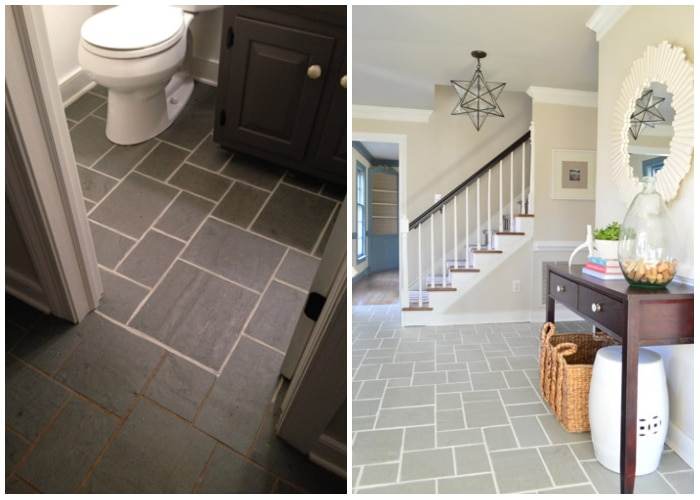
Using a rubber grout float, scoop up a generous amount of grout and apply it onto the tile surface. With the float held at an angle of around 60 degrees, spread the grout over the joints, ensuring it is pressed fully into the gaps. Work in alternating directions to guarantee complete coverage of the joints. Once all the grout lines are filled, use a moistened sponge to carefully remove any excess grout from the tile surface.
Upgrade Your Bathroom with a New Bathtub
Not all bathtubs are created equal, and if you find yourself longing for a deeper and more luxurious bathing experience, it may be time to install a new bathtub. Thankfully, there are various options available to suit your preferences and budget.
Start by exploring wholesalers for bathroom fixtures, as they often offer discounted rates on floor models. Additionally, thrift stores can sometimes surprise you with unique finds. With some patience and exploration, you can discover a tub that truly captures your heart and brings your bathroom dreams to life.

Consider the timeless elegance of a clawfoot tub, which evokes images of indulgent, leisurely baths. These tubs not only provide a deep soaking experience but also add a classic touch to your bathroom decor. In the early 19th century, clawfoot bathtubs were symbols of social standing and opulence, adorning the private baths of affluent households where servants would fill them with water and leave ample space around the sides for bathing. Today, as homeowners seek to infuse their designs with distinction and luxury, the trend of clawfoot tubs is resurging, reminiscent of the elegance that defined their early days. While original clawfoot tubs were made of heavy cast iron, modern models are typically crafted from acrylic or fiberglass, offering durability and easier installation.
Give Your Ceiling Fan a Modern Update
If you have an older ceiling fan that functions perfectly well but looks outdated with its wooden blades, there’s no need to replace it. Instead, you can easily transform its appearance with a fresh coat of paint, bringing it into the present day.
To begin, detach the fan from the ceiling, ensuring you remove the light kit first, if applicable. This will prevent any fragile shades or bulbs from getting damaged. Thoroughly clean all the fan parts and surfaces using an all-purpose household cleaner. Ceiling fans tend to accumulate dust, debris, and grime over time. Once cleaned, set the parts aside and allow them to dry completely.
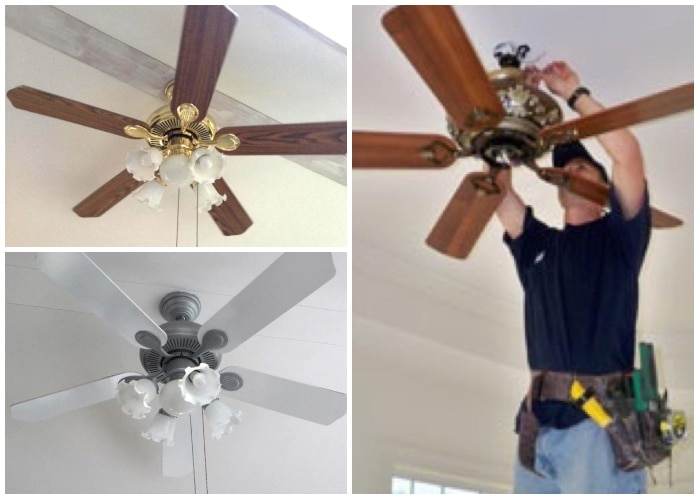
Choose a well-ventilated area to paint the fan. If the blades are made of wood, lightly sand them with fine-grit sandpaper to remove any remaining grime and prepare the surface for painting. Select a shade of paint that complements your desired aesthetic, such as white, gray, or a darker color. Apply the paint to the blades evenly, ensuring full coverage.
After the paint has dried, reassemble the fan and reinstall it in its original location. Take care to follow the manufacturer’s instructions for reassembly to ensure proper functionality and safety.
Add a Vibrant Touch with an Accent Ceiling
While accent walls are a well-known design concept, have you ever considered accent ceilings? While walls are often painted in neutral tones like white, off-white, or cream, this can sometimes give a room a cold feel. To infuse warmth and create an unexpected visual impact, opt for a vibrant color on your ceiling.
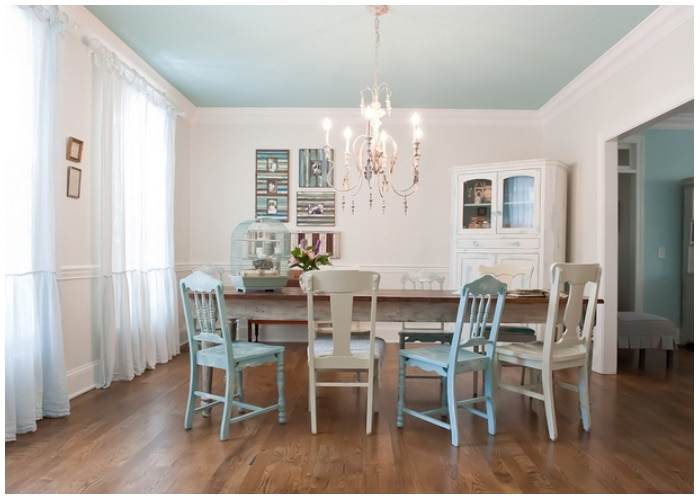
Choose a shade that speaks to you, such as deep purples, rich blues, or lush forest greens. When people enter the room and look up, they’ll be pleasantly surprised by the burst of color overhead. According to interior designers, warm oranges, reds, and pinks can make beige colors appear brighter, making them ideal for powder rooms and social spaces. Blue is versatile and can work well in various settings. However, greens may make beige and taupe tones appear cooler, so it’s best to avoid them in powder rooms and dressing areas. It’s important to find a balance, as selecting an excessively bright color in an otherwise neutral space can overshadow the rest of the room. To create harmony, anchor the space by incorporating equally impressive accessories and elements that complement the accent color.
Enhance Your Space with Trim
Sometimes, a simple addition of trim can make a significant difference in the overall appearance of a room. If your windows, doors, and wall edges lack trim, it’s easy to rectify this and give your space a finished look.
Begin by visiting a hardware store to select the appropriate trim for your needs. Choose a trim style that complements your existing decor. Once you have the trim, paint it in a color that matches or contrasts nicely with your walls and other elements in the room.
To install the trim, start by measuring the main frame area. Measure the distance from the windowsill to the top of the window on each side, as well as the width of the window. Cut the main frame trim pieces accordingly. Use a battery-operated nail gun to secure the DIY window trim frame in place.
Next, repeat the measuring, marking, and cutting process for the exterior frame. Nail it into place to complete the trim installation around the window. Ensure the trim is securely attached.
To achieve a polished finish, caulk the trim using paintable latex caulk. This helps to fill any gaps and create a seamless appearance. Once the caulk has dried, patch the nail holes and apply a coat of paint to the trim to match your desired aesthetic.
Revamp Your Bathroom Mirrors with Style
Outdated, frameless bathroom mirrors can leave a space looking lackluster, while old-fashioned light fixtures can contribute to an overall dated appearance. Fortunately, there are simple ways to add flair and modernize your bathroom.
Start by installing frames around your mirrors to instantly update their look. This not only adds a touch of sophistication but also breaks up larger mirrors, creating visual interest. Consider adding a shelf in the middle to further enhance the design and functionality of the space. Additionally, swapping out old light fixtures for more contemporary options can give your bathroom a significant facelift.
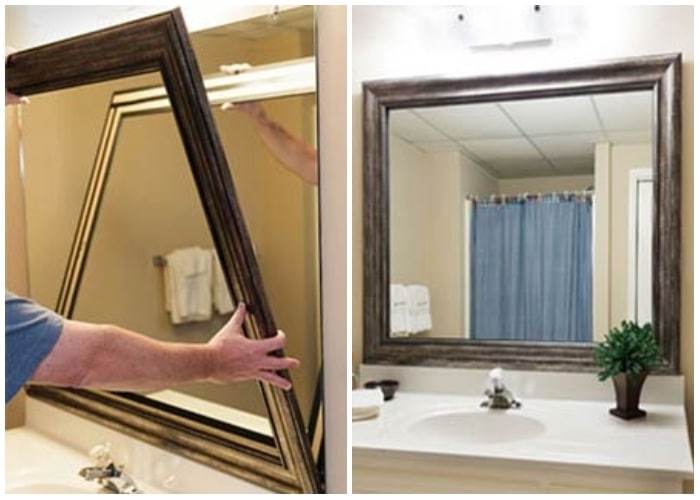
If you prefer a DIY approach for framing your mirrors, here’s what you can do:
- Measure the width and height of your mirror.
- Transfer these measurements to MDF (medium-density fiberboard) boards and use a miter saw to make precise cuts.
- Paint the backs and fronts of the boards to ensure a clean, finished look. This step is crucial to prevent the brown MDF from being visible in the mirror reflection.
- Once the paint has fully dried, use a construction adhesive designed for mirrors to adhere the MDF boards directly onto the mirror surface. This adhesive is moisture and humidity resistant.
- After the adhesive has cured completely, caulk all the seams to achieve a seamless appearance. Touch up the paint as needed along the caulk lines.
By framing your bathroom mirrors and updating the light fixtures, you can breathe new life into your space and create a more contemporary look. Embrace these simple yet effective remodeling ideas to transform your bathroom into a stylish oasis.
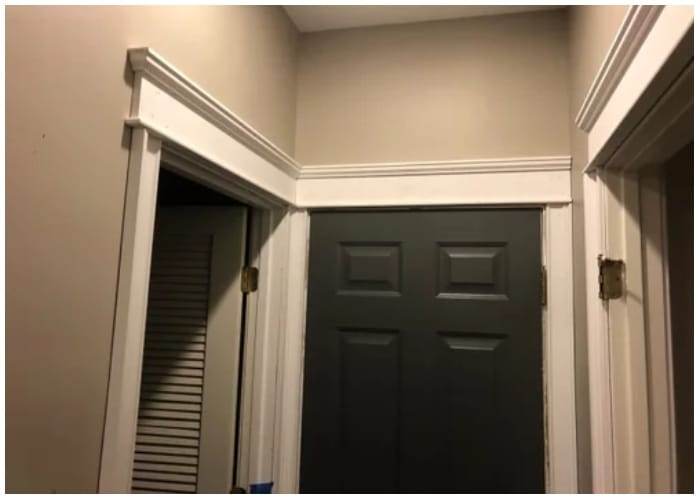
Elevate Your Entryway with Painted Doors
Just as a ceiling can showcase a splash of color, so can your entryway door. As one of the first things anyone sees, the entryway door deserves to make a statement. Not everyone can afford expensive wooden doors, but fear not, as paint can come to the rescue once again.
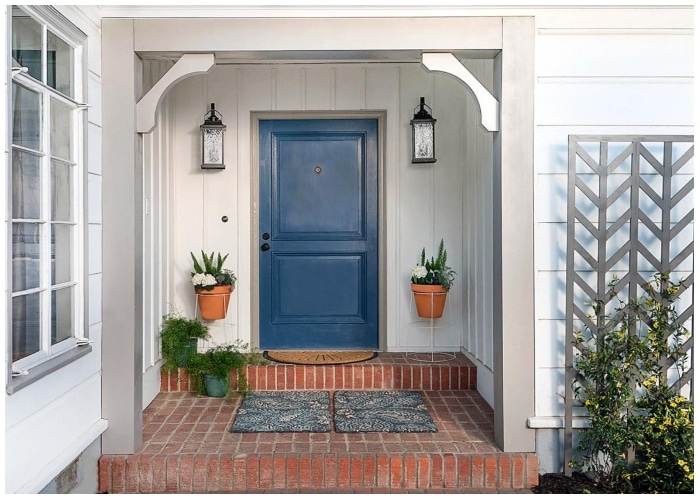
Colors like charcoal, dark blue, and fire engine red can add a touch of elegance and personality to your entryway. However, it’s important to select a color that harmonizes with the rest of the house’s trim. Before painting your door, consider that interior doors in high-traffic areas are prone to fingerprints and grime. Therefore, it’s advisable to choose a paint with a gloss or semi-gloss finish. This type of finish makes it easier to wipe clean and maintain the door’s appearance. Moreover, a glossier paint will make your doors and trim stand out beautifully against the flatter wall surfaces.
By painting your entryway door, you can instantly enhance the curb appeal and make a memorable impression. Choose a color that resonates with your style and complements your home’s overall aesthetic. Transform your entryway into a focal point that welcomes guests with a touch of charm and character.
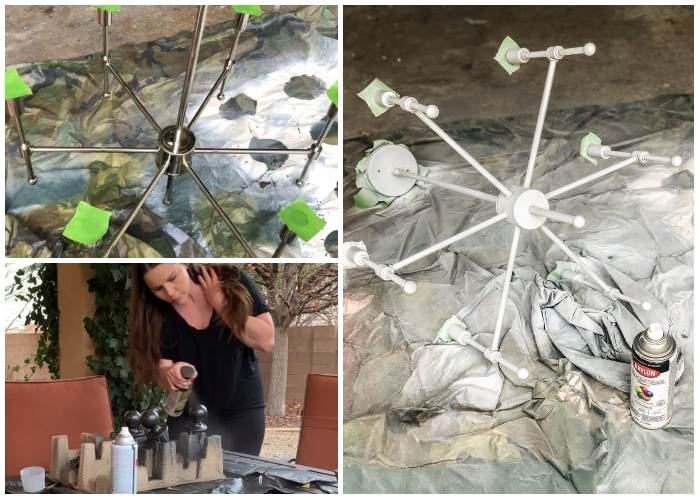
Refresh Your Space by Saying Goodbye to Old Lights
As design trends evolve, furnishings and fixtures can quickly lose their stylish allure. However, updating a room is easier than you may think, and one of the most effective ways to do so is by changing out old light fixtures. If purchasing new fixtures isn’t within your budget, don’t worry! There are other creative options available.
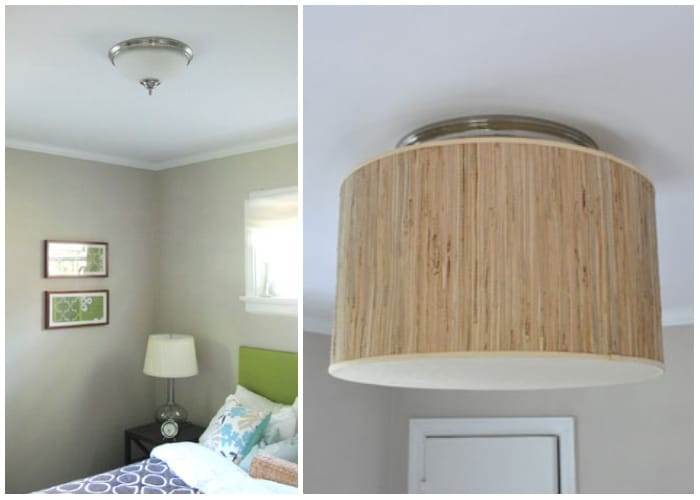
Consider giving your existing fixtures a fresh look with a coat of paint or the addition of an upside-down lampshade in a cool fabric. For those with a crafty inclination, adding chandelier crystals can create a more dynamic and modern fixture.
To modernize an old chandelier, start by wiping it down with a damp rag to remove any dust and grime. Then, position the chandelier against a stable surface so that you can spray paint the bottom portion. Apply one coat of spray paint, wait 10-15 minutes, and then apply a second coat. Once the bottom has dried, use an old piece of wire to hang the chandelier upside down from the underside of a ladder. Proceed to apply the first coat of spray paint to the rest of the chandelier. Wait 10-15 minutes, apply the final coat, and then let it dry for 48 hours. Finally, hang your newly painted chandelier in its designated spot.
Revitalize Your Space with Wood Paneling
Wood paneling, once popular in the 1970s, has made a comeback in recent years. However, the modern approach is to use wood paneling as an accent wall instead of covering an entire room. Achieving this stylish look involves carefully placing and attaching wood panels to an existing wall. The wood can then be stained to the desired shade, harmonizing with the rest of your home’s decor.
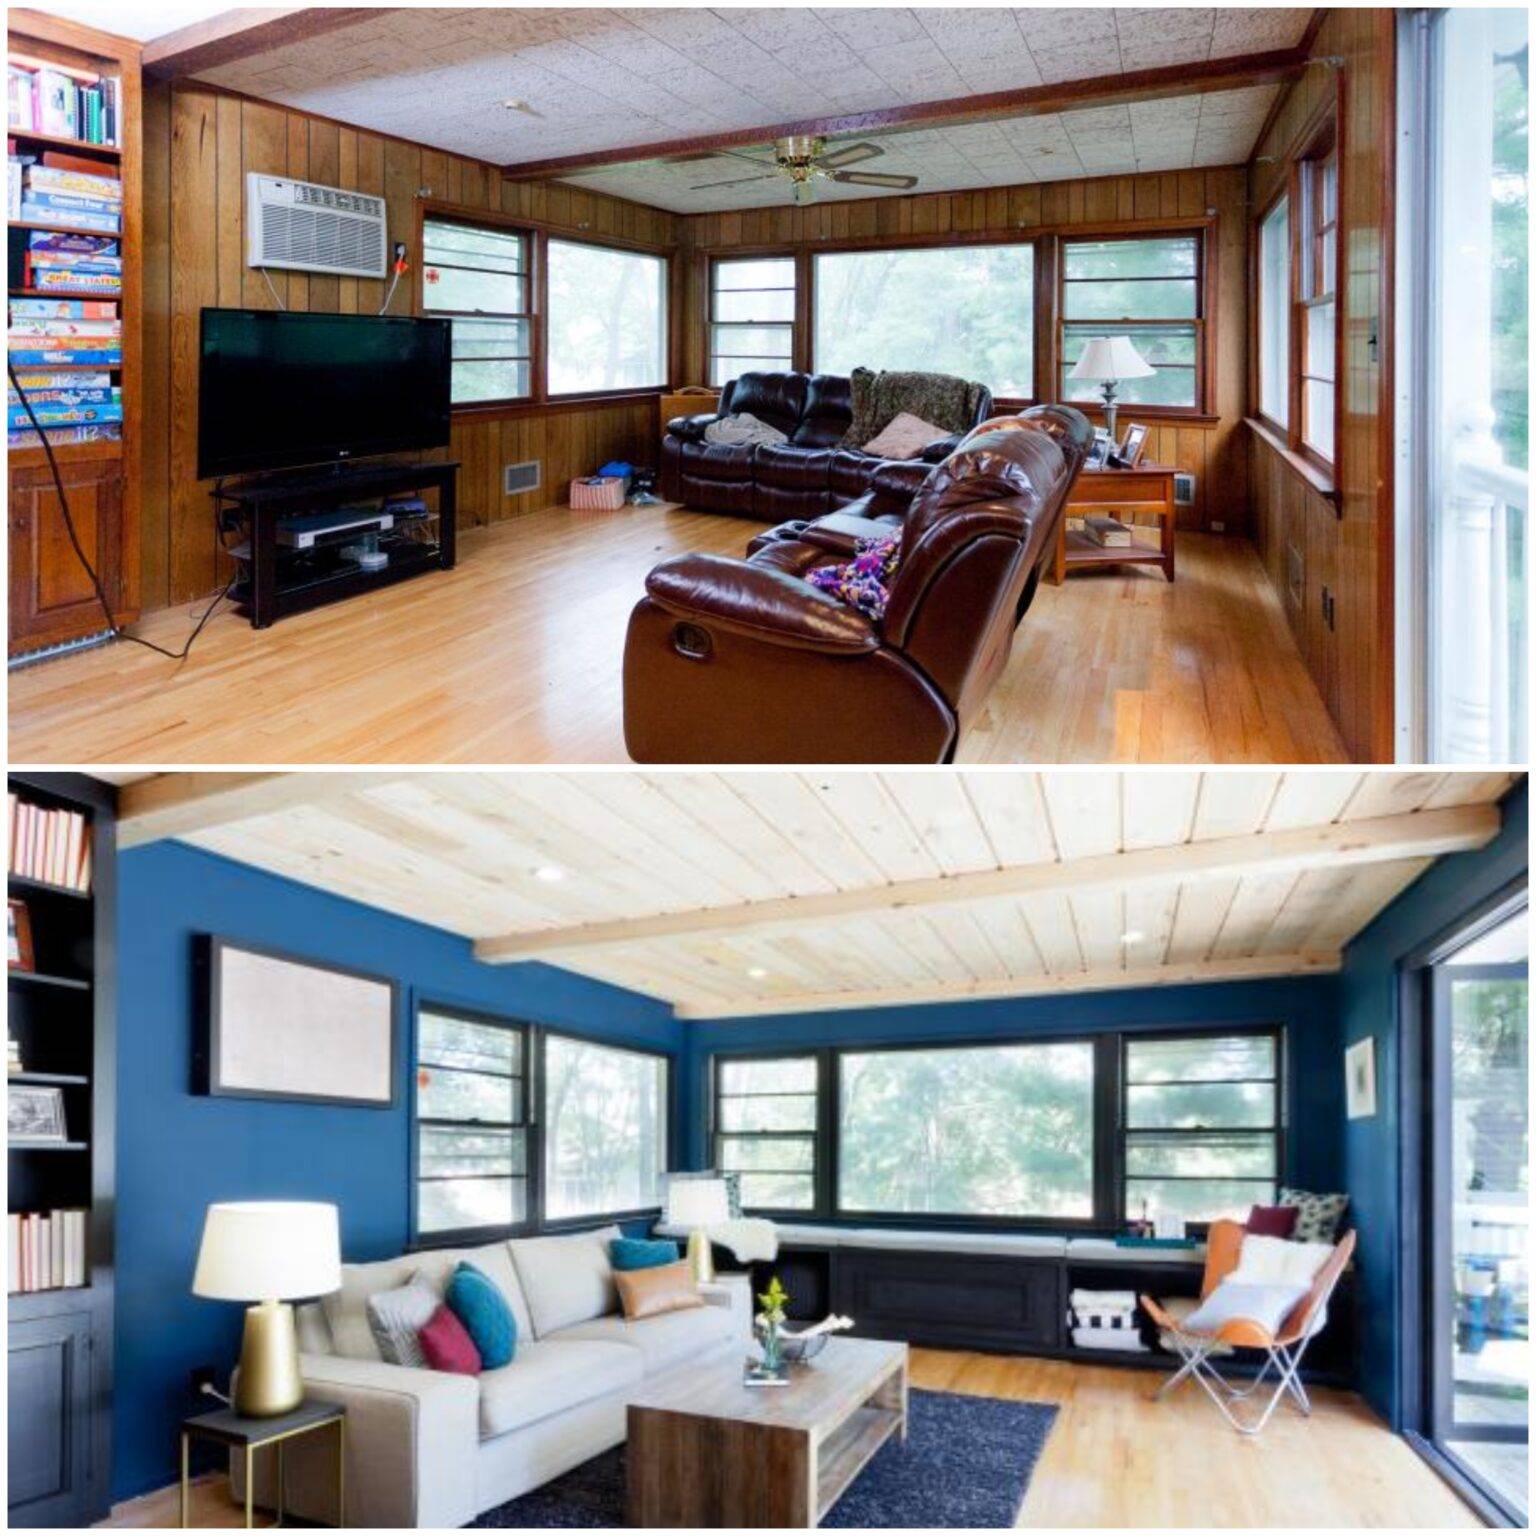
Shaker wall paneling has become a popular choice among homeowners for DIY upgrades. This classic wood paneling style consists of evenly spaced vertical posts bordered by a horizontal trim at the top. However, there are various ways to get creative with wall paneling. You can explore geometric designs with a grid-style layout or experiment with crafty herringbone patterns, among other possibilities. Step-by-step tutorials are readily available online to guide you through the process.
By incorporating wood paneling as an accent wall, you can infuse your space with warmth, texture, and a touch of rustic charm.
Transform Your Laminate Countertops with Faux Granite or Marble
Granite and marble countertops may be out of reach for some budgets, but that doesn’t mean you can’t achieve a similar look with your existing laminate countertops. With special paints designed for creating faux granite and marble finishes, you can give your countertops a fresh and updated appearance.
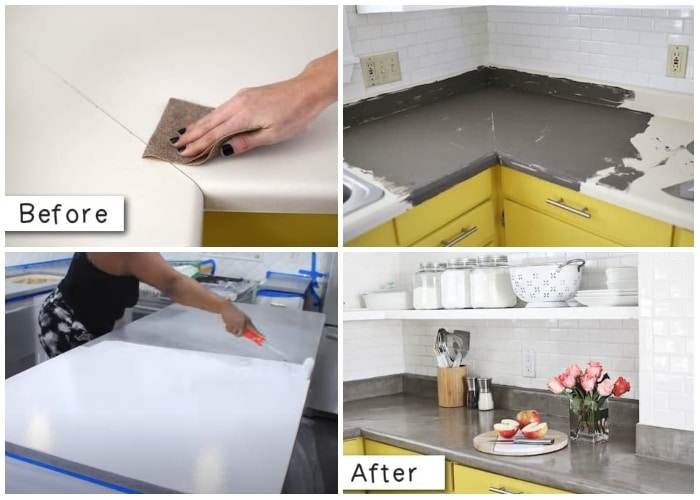
Start by sanding the surface of the countertop to ensure proper adhesion of the paint. Next, select the paint color that best matches the granite or marble look you desire. For a marble-esque finish, there are painting techniques and effects you can use to mimic the natural veining and patterns.
When it comes to faux granite, there are numerous shades of granite paint available. Choose four colors that you want to incorporate into your countertop. One will serve as the base color in primer, while the other three colors will create the natural stone look. Finish off with a clear coating to achieve the shiny and polished appearance of real granite.
By painting your laminate countertops to resemble stone, you can revitalize the look of your kitchen or bathroom without breaking the bank. The money saved from this DIY project can be allocated towards other high-end items for your remodeling project, allowing you to achieve a more luxurious overall aesthetic.
Create Your Own Sliding Mirror for a Functional Closet
A sliding mirror can be the perfect solution for a smaller walk-in closet with limited wall space and limited mirror options. With a simple design featuring finger-pull holes and stationary wheels, the sliding mirror effortlessly glides along a pipe, eliminating the need for a lower track system.
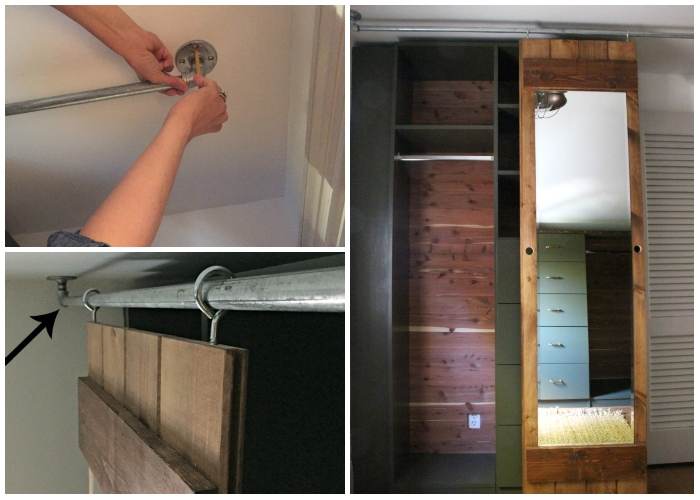
To begin, measure the floor-to-ceiling height of your closet before constructing the sliding mirror. Subtract the height of the wheels, screw eyes, and any plumbing sections that may affect the installation. This calculation will help you determine the appropriate height for the boards used in constructing the mirror.
Once you have determined the height, follow these steps to build your sliding mirror:
- Gather the necessary materials, including boards for the frame, a mirror, finger-pull holes, stationary wheels, a pipe, and appropriate screws or hardware.
- Cut the boards to the desired width and height, ensuring they are sturdy enough to support the weight of the mirror.
- Attach the finger-pull holes to the top of the boards, allowing for easy sliding of the mirror.
- Install the stationary wheels at the bottom of the boards, ensuring they are secure and can smoothly roll along the pipe.
- Attach the mirror to the frame using appropriate hardware, ensuring it is centered and secure.
- Install screw eyes at the top of the boards to connect the mirror to the pipe.
- Hang the pipe from the ceiling, ensuring it is level and securely attached.
- Carefully slide the mirror onto the pipe, allowing it to glide effortlessly along the track.
By building your own sliding mirror, you can optimize the functionality of your walk-in closet while adding a stylish and practical element
Upgrade Your Air Grilles with Elegance and Style
Air grilles in homes with central air conditioning are essential for proper air flow, but they often lack decorative appeal and can be visually unappealing. Fortunately, transforming them into elegant and ornate features is a simple solution. A trip to the hardware store can provide you with an updated and decorative air grille that adds a touch of sophistication to your space.
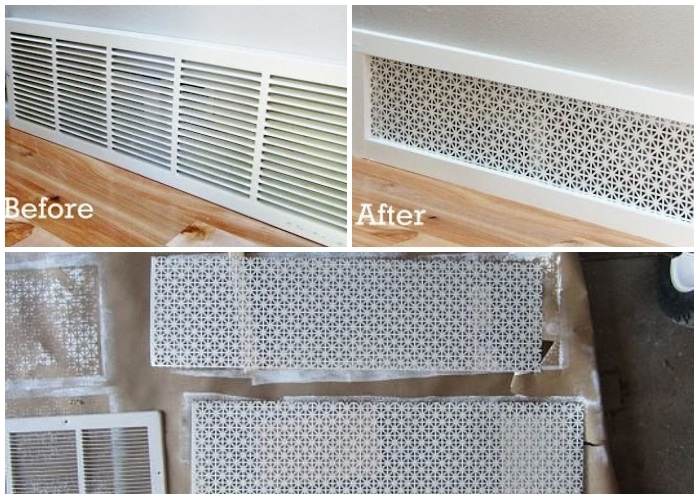
Consider opting for a patterned grille that complements your existing decor. With inexpensive materials and a DIY approach, you can create your own custom vent cover in about an hour. Here’s a step-by-step guide:
- Measure the size of the air return opening in your wall.
- Cut pine boards to the appropriate length, and miter the corners or use butt joints for assembly.
- Glue and reinforce the corners of the outer frame using a brad nailer for added strength.
- Paint the frame in a color that suits your aesthetic.
- Cut a decorative metal sheet, using metal snips, to a size slightly smaller than the frame to ensure it fits properly. Glue the sheet onto the frame.
- Once the vent cover is painted and the decorative metal sheet is attached, assemble the frame.
- Install the newly crafted vent cover over the air return opening, and you’re done!
By upgrading your air grilles with decorative and stylish vent covers, you can enhance the overall appearance of your space while ensuring proper air circulation
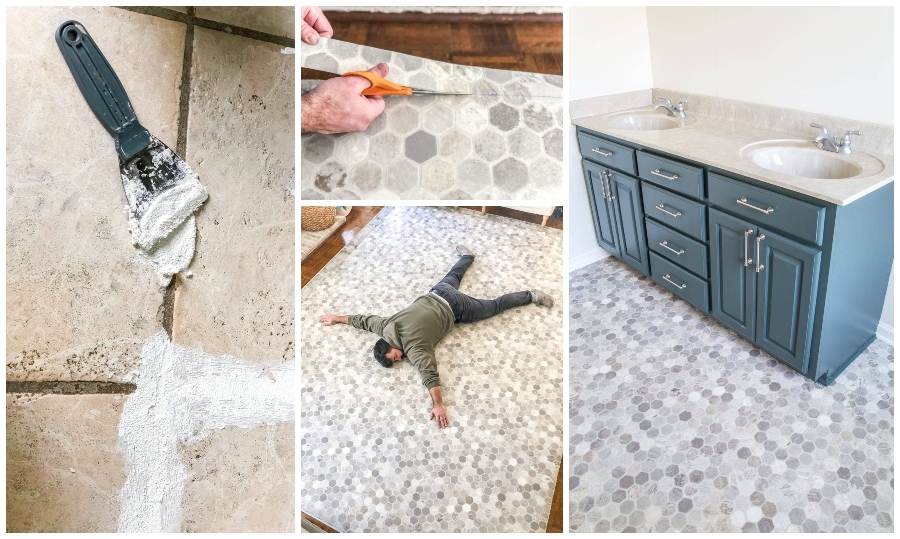
Give Your Space a Quick Flooring Update by Installing Vinyl Floors Over Old Tiles
If you’re looking for a quick and easy way to update your flooring, installing vinyl floors over old tiles is a great option. Vinyl floor tile stickers and sheets offer a unique and amazing solution for a temporary flooring fix until you’re ready for a permanent floor replacement.
Here’s a step-by-step guide to help you through the process:
- Create a smooth surface: Patch any damaged areas in the existing tiles using a thin-set mortar and a putty knife. Allow the mortar to dry completely. If there are any uneven spots, sand them using medium grit sandpaper for a level surface.
- Clean the floor: Thoroughly clean the tiled surface, ensuring all debris and dirt are removed. Use a vacuum cleaner to ensure a clean and smooth base for your vinyl flooring. It’s essential to have a clean surface to ensure proper adhesion.
- Measure and create a template: Measure all the edges around the room and create a diagram of your space using those measurements. Roll out your sheet vinyl and use the diagram to create a template by marking your measurements onto the edges of the vinyl.
- Cut and position the vinyl: Using the template you created, carefully cut the sheet vinyl to fit your space. Position the cut vinyl in the room, ensuring it aligns properly with the edges. Roll it over the tiles, pressing firmly to ensure a secure bond.
- Reinstall baseboards and seal the edges: Once the vinyl flooring is in place, reinstall your baseboards. Apply silicone or an appropriate sealant along the edges of the vinyl to fill any gaps or cracks, providing a finished and polished look.
With your vinyl floors installed over the old tiles, you can enjoy a refreshed and updated space. This DIY solution offers a temporary fix that is cost-effective and easy to implement. When you’re ready for a permanent flooring replacement, you can explore other options with confidence.
Create the Illusion of Bigger Windows with Carefully Hung Curtains
If you have small windows that you want to appear larger, there are clever techniques you can use with curtains to create the illusion of more spacious and grand windows. Follow these tips to achieve the desired effect:
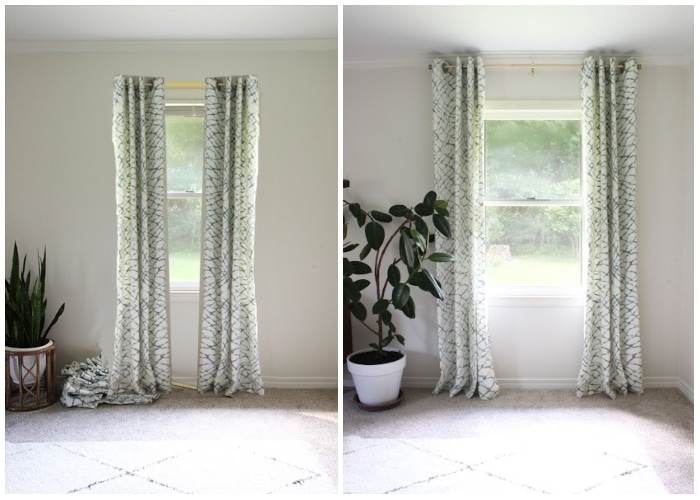
- Hang curtains high and wide: Install your curtain rod higher than the window and extend it wider than the window frame. This positioning draws the eyes upward and outward, making the window appear larger than it actually is.
- Choose quality fabric: Opt for curtains made of thick and sturdy materials that give a sense of substance and elegance. Skimpy curtains can make the design look cheap and unprofessional. High-quality fabrics with good drapery properties will help hide the line between the wall and the window, creating a seamless and visually expansive look.
- Consider vertical patterns: Fabrics with vertical patterns, such as vertical stripes or elongated motifs, can visually elongate the window and draw the eyes upward. This trick gives the illusion of a taller window and can make the entire room feel more spacious.
- Experiment with eye-catching patterns: Any pattern that directs the eyes side to side can create the illusion of width. Play with different patterns and designs to find the one that suits your aesthetic and enhances the appearance of your windows.
By carefully hanging curtains and selecting the right fabric and patterns, you can transform small windows into visually larger and more impressive features in your space
Refresh Your Laundry Room with Hand-Drawn “Wallpaper” and Functional Additions
Give your laundry room a unique and personalized touch by creating hand-drawn “wallpaper” and incorporating functional additions. Follow these steps to revamp your space:
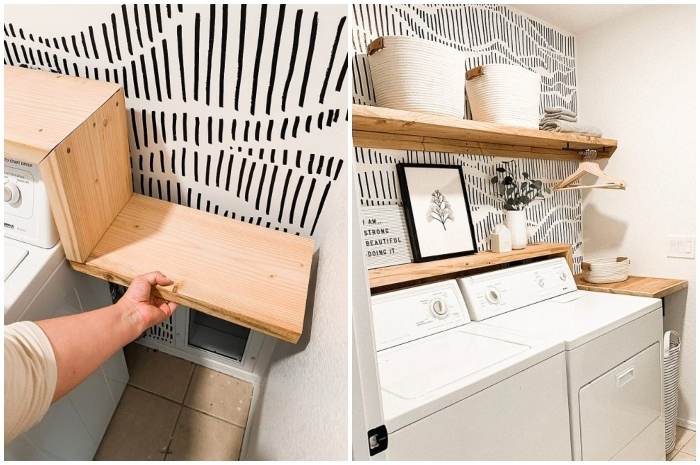
- Prepare the wall: Choose the wall where you want to create the design. Use a large knife or spatula to spread joint compound evenly across the wall, ensuring it reaches the corners and fills in any grooves. Apply three coats of joint compound, allowing each coat to dry completely and lightly sanding between coats to achieve a smooth finish. The pink joint compound will turn white when dry.
- Prime and paint: Apply two coats of primer to the joint compound and drywall to ensure good paint results. Allow sufficient drying time between coats. Follow with two coats of white paint to create a clean and fresh backdrop for your design.
- Create the pattern: Use a marker to hand-draw your desired pattern directly on the wall. Let your creativity flow and experiment with different designs, motifs, or inspirational quotes. This hand-drawn “wallpaper” adds a unique and personal touch to your laundry room.
- Install a shelf: Use basic lumber to create a functional shelf in your laundry room. Attach three cleats to each wall with general-purpose screws, then add a 12″ board as the top shelf. Treat the wood with a 3:1 mixture of wood conditioner and stain to enhance its appearance.
- Add additional storage: Install a second shelf directly above the washer and dryer for extra storage. Consider adding a small platform next to the appliances, mounted with French cleats, to provide a convenient surface for folding or organizing laundry. Incorporate large baskets to store cleaning supplies and keep your space tidy.
- Finishing touches: Spruce up the room by adding framed art and faux plants for a touch of decoration. Mount a kitchen drawer pull for hanging items, such as lint rollers or clothespins. These functional and aesthetic additions will add charm and organization to your laundry room.
By hand-drawing a personalized “wallpaper” design, installing shelves for storage, and adding decorative elements, you can transform your laundry room into a more inviting and functional space.
Revamp Outdated Cabinetry with Paint, Molding, and New Knobs
If your kitchen cabinetry feels outdated and in need of a refresh, you can easily transform it with a few simple steps. By applying paint, adding molding, and replacing the knobs, you can achieve a dramatic update that gives your kitchen a whole new look.
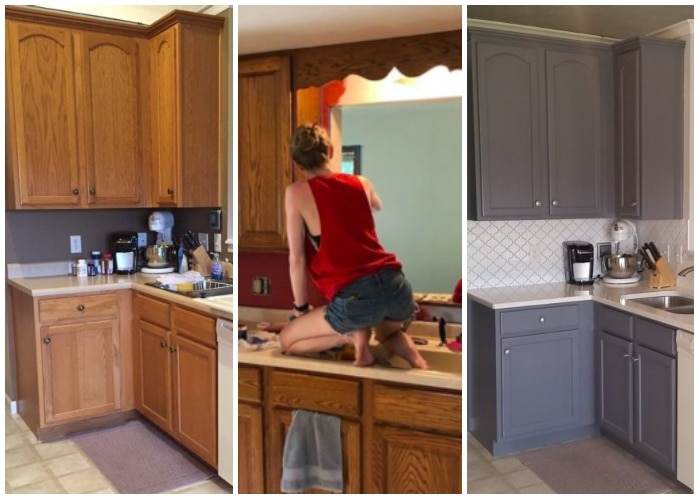
Consider the following techniques:
- Paint and molding: Apply a fresh coat of paint to your cabinetry to instantly modernize its appearance. Choose a color that suits your desired style, whether it’s a crisp white for a clean and classic look or a bold hue for a more contemporary feel. Carefully apply the paint to the cabinet doors and frames, ensuring even coverage. For added elegance, consider adding molding to the doors or along the edges of the cabinets. This detail can elevate the overall design and make your cabinetry look more custom and sophisticated.
- New knobs: Swap out the old knobs or handles on your cabinetry with new ones to instantly update their look. Choose knobs or handles that match your desired style, whether it’s sleek and modern, vintage and ornate, or minimalistic and streamlined. This small change can make a big impact and give your cabinetry a fresh and polished appearance.
- Techniques for added personality: If you want to go beyond a simple paint update, consider exploring different techniques to add more personality to your cabinets. For example, a “crackling glaze” paint can create an aged effect with cracks forming as it dries. A rustic finish can be achieved by layering colors and spattering dark paint to mimic fly specks. Once the paint is dry, you can lightly sand the cabinets in areas that would naturally wear over time, revealing the colors underneath and adding a distressed look.
Bid Farewell to Brass with a Budget-Friendly Solution
If you have brass fixtures in your home that are no longer in style, you don’t have to worry about the expense of replacing them. There are affordable paint products available specifically designed to cover metals like brass, allowing you to update the look without breaking the bank. Follow these steps for a successful transformation:
- Prep the surface: Before painting, ensure that the brass surface is clean and free of any dirt, grease, or grime. Use a suitable cleaner to thoroughly clean the surface. This step is crucial to ensure proper adhesion of the paint.
- Apply a primer: Priming the brass surface is essential for the paint to adhere properly. Choose a primer suitable for metal surfaces and apply it evenly over the brass, following the manufacturer’s instructions. The primer will create a strong bond between the brass and the paint.
- Choose the paint: Once the primer is dry, you have various options for painting the brass. Acrylic paint, enamel paint, latex-based paint, or spray paint can all be used, depending on your preference. Select a color that matches your desired aesthetic and follow the manufacturer’s instructions for application.
- Seal the paint (if needed): Depending on the type of paint you used, you may need to seal the brass after painting. Some paints require a topcoat or sealer to protect the finish and enhance durability. Consult the paint manufacturer’s instructions to determine if a sealant is necessary and apply it accordingly.
Remember to cover any surrounding areas that should not be painted to avoid accidental spills or splatters. With proper preparation and the right paint, you can transform your outdated brass fixtures into stylish pieces that match your desired aesthetic.
Transform the Look of Light Oak with Stain for a Stunning Makeover
If you have light oak wood elements in your home and prefer a darker wood aesthetic, staining is a simple and effective solution. By following these steps, you can easily transform your light oak staircase, cabinets, or other wooden features:
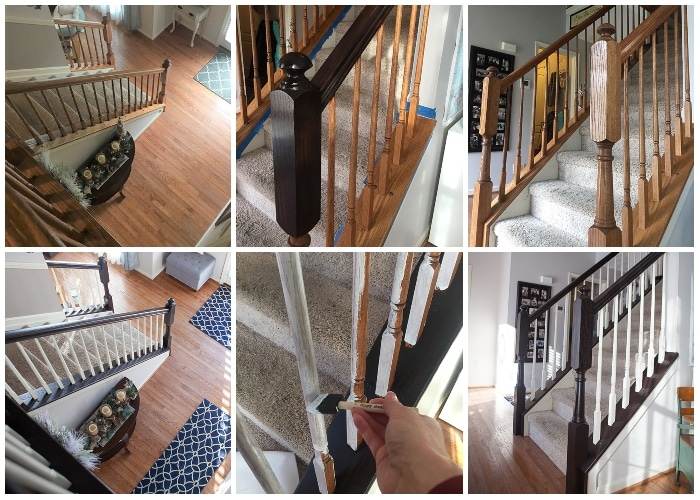
- Prepare the surface: Begin by ensuring that the oak surface is clean and free of any dirt, grease, or existing varnish. Sand the surface to remove any varnish or previous finish, using a medium to fine-grit sandpaper. This step is crucial to create a smooth and even surface for the new stain to adhere to.
- Select the stain color: Choose a stain color that suits your desired aesthetic. Darker stains can provide a rich and dramatic look, while lighter stains can still enhance the wood’s natural beauty while adding a touch of depth. Test the stain on a small, inconspicuous area or a sample piece of oak to ensure you achieve the desired color.
- Apply the stain: Following the manufacturer’s instructions, apply the stain evenly using a brush, cloth, or sponge applicator. Work in small sections, going with the grain of the wood. Allow the stain to penetrate the wood for the recommended time, and then wipe away any excess stain using a clean cloth.
- Optional: Apply a sealant: Depending on the type of stain you used and the desired finish, you may choose to apply a sealant or topcoat to protect the newly stained wood. Select a sealant suitable for your project and follow the manufacturer’s instructions for application.
By staining light oak wood, you can achieve a darker and more dramatic look that suits your personal style preferences
Create the Illusion of a Larger Bedroom with Mirrored Closet Doors
If you have a smaller bedroom and want to create the illusion of a larger space, you can achieve this effect by utilizing the closet doors. By attaching full-size mirrors to the doors and carefully coordinating the mirror frames with the color of the doors, you can visually expand the room. Follow these steps to transform your bedroom:
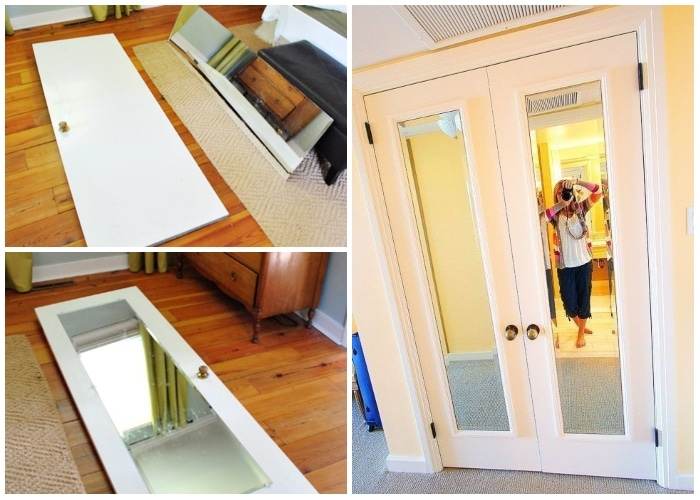
- Attach the mirrors: Measure the dimensions of the closet doors and purchase two full-size mirrors that fit the doors perfectly. Securely attach the mirrors to the doors using adhesive or mirror clips, ensuring they are centered and properly aligned.
- Coordinate the frames: Paint the mirror frames to match the color of the doors. This step helps create a cohesive and seamless look, making the mirrors blend seamlessly with the doors and the overall aesthetics of the room.
- Enjoy the illusion of space: Mirrors have a remarkable ability to make a room appear larger by creating an illusion of depth and reflecting light. The larger the mirror, the greater the impact. The reflected light and color across the room create a sense of expanded space. By incorporating a large mirror, you visually extend the boundaries of the room and create a more spacious and open feel.
If attaching mirrors to the closet doors is not feasible, consider using furniture with mirrored surfaces as an alternative. Pieces such as mirrored dressers or nightstands can reflect light and create a similar effect, making the room feel larger.
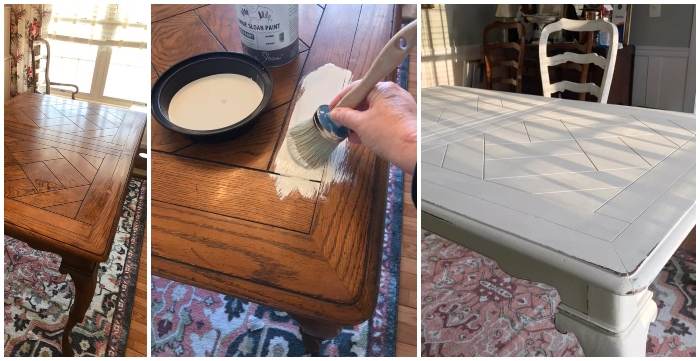
Revitalize Your Dining Table with Chalk Paint for a French-inspired Look
If you have a dark dining space and want to brighten it up, consider giving your dining table a fresh and unique look with chalk paint. By applying chalk paint to the table, you can achieve a charming French-inspired aesthetic reminiscent of the renaissance.
Follow these steps for a delightful transformation:
- Choose your chalk paint: Select a chalk paint color that suits your desired French look. Opt for lighter shades such as whites, creams, pastels, or even subtle shades of green or blue for a touch of elegance. Chalk paint provides a matte finish that adds character and a vintage appeal to your furniture.
- Prep the table: Prepare the dining table for painting by ensuring it is clean and free of any dirt, grease, or previous finishes. Lightly sand the surface to create a smooth and slightly textured base for the paint to adhere to. Wipe away any dust with a clean cloth.
- Apply the chalk paint: Using a brush or roller, apply a thin and even coat of chalk paint to the entire dining table, including the tabletop and legs. Allow the first coat to dry completely according to the paint manufacturer’s instructions. Depending on the desired level of coverage, you may choose to apply one or more additional coats, ensuring each coat is dry before proceeding.
- Optional: Distressing and waxing (if desired): For an added touch of authenticity and a vintage look, you can distress the table by lightly sanding certain areas to reveal some of the underlying wood or paint layers. After distressing, apply a clear wax or topcoat to protect the paint finish and enhance its durability.
To enhance the French-inspired aesthetic, consider decorating the table with floral tea sets, adding a delicate and charming touch to the overall look.
Repurpose Metal Blind Casings into Stylish Roman Shades with Linen Blend Fabric
If you have old metal blinds that are no longer functional but still have a sturdy casing, you can repurpose them into beautiful Roman shades. By following these steps, you can create stylish window treatments that block out sunlight and add a touch of elegance to your space:
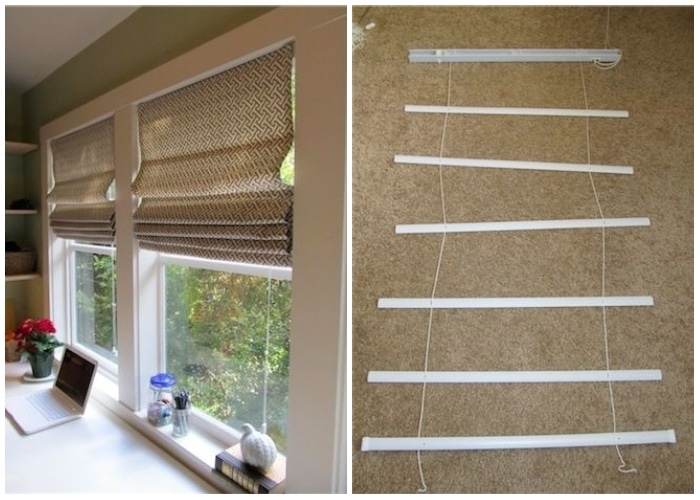
- Choose the fabric: Select a heavy fabric that blocks out sunlight and provides the desired level of privacy. Linen blends are an excellent choice for Roman shades due to their weight and structure. The linen’s inherent stiffness and thickness contribute to the shade’s structure, creating a clean and tailored look.
- Measure and cut the fabric: Measure the dimensions of the window to determine the size of the fabric needed for the Roman shades. Cut the fabric to the appropriate size, allowing for seam allowances and the desired length of the shade.
- Create the Roman shade pockets: Carefully cut evenly spaced holes along the top edge of the fabric, through which the blind cords will pass. These holes should align with the metal blind casings. Follow a tutorial or instructional guide for precise measurements and hole placement.
- Attach the fabric to the blind casing: Thread the blind cords through the holes in the fabric, making sure they are evenly distributed. Secure the fabric to the blind casing, ensuring it is taut and straight. You may need to remove any existing blinds or hardware from the casing to accommodate the fabric.
- Install the Roman shades: Mount the Roman shades above your window, following the manufacturer’s instructions for installation. Make any necessary adjustments to ensure they hang evenly and operate smoothly.
Enhance Your Walls with Thicker Baseboards for a Polished Look
If your walls lack trim and you want to add a touch of sophistication to your space, installing thicker baseboards can make a significant difference. Follow these steps to create baseboards that appear professionally molded into place:
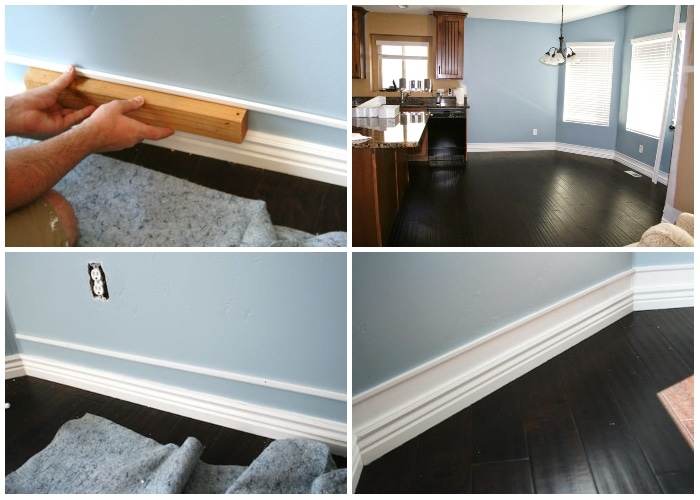
- Choose the right trim: Visit your local hardware store and select wooden trim that is thicker and more substantial in size. Thinner trims may not provide the desired visual impact, especially in larger rooms. Alternatively, you can use medium-density fiberboard (MDF) as a cost-effective and easy-to-use option for molding and baseboards.
- Measure and cut the trim: Measure the length of each wall where you plan to install the baseboards. Using a miter saw or a miter box and hand saw, carefully cut the trim at 45-degree angles to create precise corners. It is similar to the process of installing crown molding, so learning how to cut and measure angles will be helpful.
- Install the baseboards: Apply a thin bead of construction adhesive to the back of each piece of trim, then carefully press it against the wall, making sure it is level and aligned with the floor. Secure the baseboards in place with finishing nails, countersinking the nails slightly below the surface. Fill the nail holes with wood putty and sand them smooth.
- Paint the baseboards: Once the adhesive and putty have dried, apply a coat of primer to the baseboards, followed by a couple of coats of white paint or the color of your choice. This will give your baseboards a clean and finished appearance.
By installing thicker baseboards, you can add depth and elegance to your walls, giving them a professionally finished look. Whether you choose wooden trim or MDF, these baseboards will enhance the overall aesthetic of your space.
Transform an Unused Closet into a Cozy Reading Nook
If you have an underutilized closet space that can be repurposed, why not turn it into a charming reading nook? Follow these steps to create a cozy and inviting space for relaxation and literary adventures:
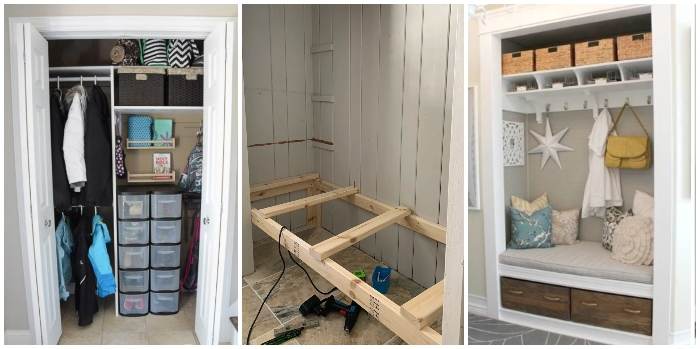
- Remove the closet doors: Take off the closet doors to open up the space and create an accessible entryway to your reading nook. You can either store the doors or repurpose them for another project.
- Adjust the interior dimensions: Measure and cut the drywall to match the size of the actual closet space, leaving an open area for the reading nook. This step will help define the space and make it feel intentional.
- Build a bench: Construct a bench along one side of the closet, providing a comfortable seating area for reading. You can use plywood and lumber to create a sturdy and functional bench. Customize the height and depth to suit your preferences and the available space.
- Install shelving units: Incorporate shelving units above or around the bench area to store books, decorations, and other reading essentials. Adjustable or modular shelving can maximize the use of space and accommodate different storage needs.
- Create a cozy atmosphere: Enhance the ambiance of your reading nook with soft and warm lighting. Install a reading lamp or string lights to provide a gentle glow. Add plush pillows, a comfortable cushion, and a cozy blanket to make the seating area inviting and snug.
- Stock it with books: Fill your reading nook with your favorite books, creating a mini library within arm’s reach. Arrange them on the shelves or in a nearby bookcase for easy access and visual appeal.
- Add finishing touches: Personalize your reading nook with decorative elements such as potted plants, a small stool for children, or a side table to hold a warm cup of tea or a reading lamp. Consider adding wall art or inspirational quotes to inspire reading and create a visually appealing space.
Transform Your White Refrigerator with a Stainless-Steel Finish
If you’re looking to give your white refrigerator a sleek and modern upgrade, painting it with a stainless-steel finish is a cost-effective solution. Follow these steps to achieve a stunning transformation:
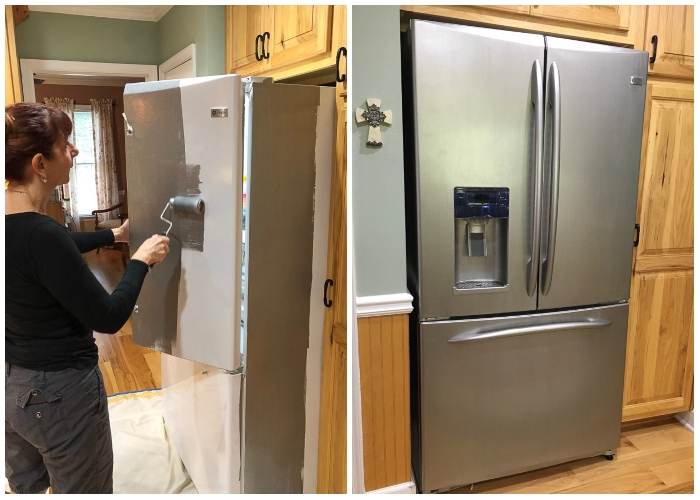
- Gather the necessary supplies: Purchase a refrigerator painting kit specifically designed for stainless-steel finishes. These kits usually include a primer, base coat, metallic paint, and a protective topcoat. Make sure to read the instructions provided with the kit before starting the project.
- Prepare the refrigerator: Thoroughly clean the surface of the refrigerator to remove any dirt, grease, or residue. Use a mild detergent and warm water, and ensure that the surface is completely dry before proceeding.
- Apply the primer: Apply the primer included in the kit according to the manufacturer’s instructions. The primer creates a smooth base for the paint and promotes adhesion. Allow the primer to dry completely before moving on to the next step.
- Apply the base coat: Use a brush or roller to apply the base coat evenly across the surface of the refrigerator. Follow the instructions provided with the kit for proper application techniques and drying times. Allow the base coat to dry thoroughly.
- Apply the metallic paint: Once the base coat is dry, it’s time to apply the metallic paint. Mix the paint thoroughly to ensure the stainless-steel particles are evenly distributed. Apply the metallic paint using a brush or roller, ensuring smooth and even coverage. Allow the paint to dry between coats as recommended by the manufacturer.
- Apply the protective topcoat: After the metallic paint has dried, apply the protective topcoat provided in the kit. The topcoat adds durability and enhances the stainless-steel appearance. Follow the instructions for proper application and drying times.
- Allow sufficient drying time: It’s important to allow ample time for the paint to cure and dry completely. This process usually takes around three or more days. Avoid using or touching the refrigerator until the paint has fully dried to prevent any damage to the finish.
By following these steps and using a high-quality refrigerator painting kit, you can achieve a stunning stainless-steel finish on your white refrigerator. The end result will be a refreshed and modern appliance that adds a touch of elegance to your kitchen, all without the need for a costly replacement. Enjoy your “new” stainless-steel refrigerator!
Elevate Your Stairs with Wallpaper
If you’re looking to add a touch of style and personality to your staircase, wallpaper can be a fantastic option. With self-adhesive, repositionable, and removable cloth wallpaper, the installation process becomes a breeze. Say goodbye to the sticky mess often associated with traditional wallpaper.
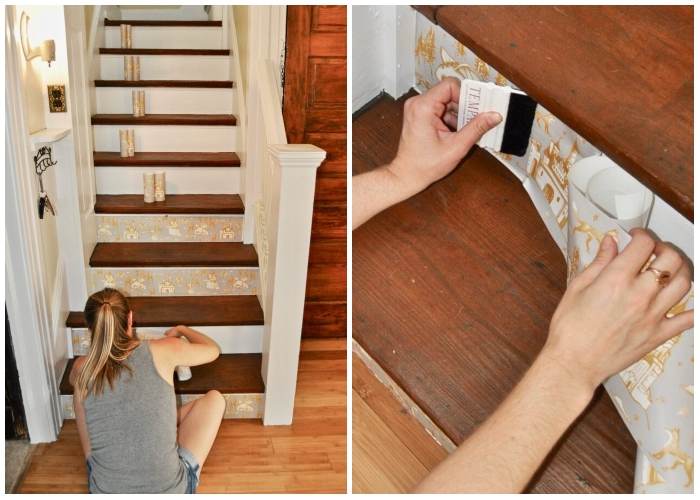
Here’s how you can transform your stairs with wallpaper:
- Choose the right wallpaper: Select a wallpaper design that suits your style and complements the overall aesthetic of your home. Consider patterns, colors, and textures that will enhance the look of your staircase.
- Prepare the stairs: Ensure that the stairs are clean and free of any dust or debris. Smooth out any rough spots or imperfections on the surface to create a clean canvas for the wallpaper.
- Measure and cut: Measure the height and width of each stair riser. Using these measurements, cut the wallpaper into strips that will fit each riser. It’s important to cut the strips slightly longer than the measurements to allow for adjustment during installation.
- Apply the wallpaper: Starting from the bottom of the staircase, peel off the backing of the wallpaper strip and carefully apply it to the riser. Use a squeegee or a smooth, flat object to remove any air bubbles and ensure a smooth application. Continue applying the wallpaper strips to each riser, aligning the patterns if necessary.
- Reposition if needed: The advantage of self-adhesive, repositionable wallpaper is that you can easily adjust the placement if needed. If a strip is not aligned correctly or you want to reposition it, gently peel it off and reapply.
- Smooth out any wrinkles or bubbles: Once all the strips are applied, go over the entire staircase, smoothing out any wrinkles or air bubbles. Pay attention to the edges and corners to ensure a clean and polished look.
- Finishing touches: Trim any excess wallpaper using a sharp utility knife or scissors. If desired, apply a clear wallpaper sealer or topcoat to protect the wallpaper from wear and tear.
Now you have a stunning staircase adorned with beautiful wallpaper. This simple DIY project can instantly elevate the look of your home and create a striking visual impact.
Revive Your Bathtub: Refinishing or Reglazing
When your bathtub starts to lose its shine and show signs of wear and tear, refinishing or reglazing can be a cost-effective alternative to replacing it. Here’s a step-by-step guide to help you achieve a refreshed and rejuvenated bathtub:
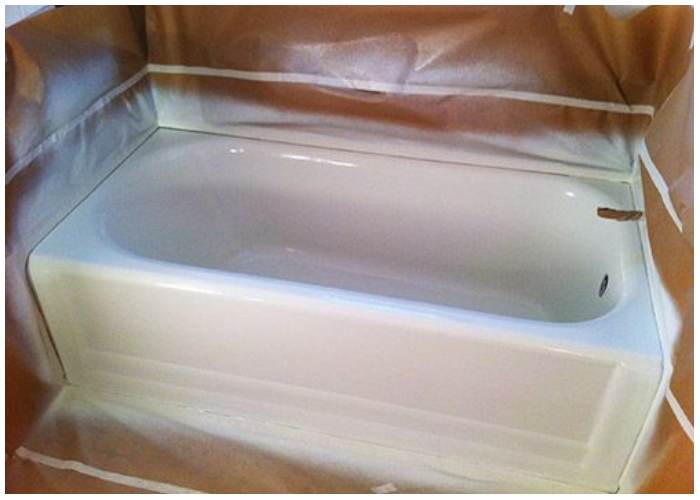
- Prepare the area: Begin by removing any decorative items from the bathroom and covering the toilet, vanity, and mirror with plastic sheets. Protect the walls and furnishings with plastic covers. Ensure proper ventilation by opening windows or using fans.
- Remove old caulk: Use a utility knife to carefully cut away the old caulk around the bathtub. A silicone remover can help soften the caulk, making it easier to peel off. A razor scraper can also be handy for this task. After removing the caulk, use lacquer thinner to clean off any residue left by the silicone remover.
- Address hard water deposits: If your bathtub has hard water deposits, sand them gently using 120-grit sandpaper. This will help smooth out the surface and prepare it for refinishing.
- Repair any damages: Inspect the bathtub for any chips, cracks, or other damages. Repair these areas using a bathtub repair kit, following the manufacturer’s instructions. This step is crucial for achieving a smooth and even finish.
- Clean the bathtub: Thoroughly clean the bathtub using a mild abrasive cleaner and a sponge or brush. Remove any dirt, grime, or soap scum to ensure a clean surface for refinishing.
- Apply the refinishing product: Follow the instructions provided with the refinishing product carefully. Typically, you’ll need to apply an etching solution to prepare the surface, followed by multiple coats of the refinishing product. Use a roller or brush to apply the product evenly, following the recommended drying times between coats.
- Allow for proper curing: After applying the final coat, allow the bathtub to cure for the recommended time specified by the product manufacturer. This will ensure a durable and long-lasting finish.
- Reapply caulk and enjoy: Once the refinishing process is complete and the bathtub is fully cured, reapply new caulk around the edges to create a watertight seal. Give the caulk sufficient time to dry before using the bathtub.
By refinishing or reglazing your bathtub, you can transform its appearance, restore its shine, and extend its lifespan. This budget-friendly option allows you to enjoy a like-new bathtub without the hassle and expense of replacement.
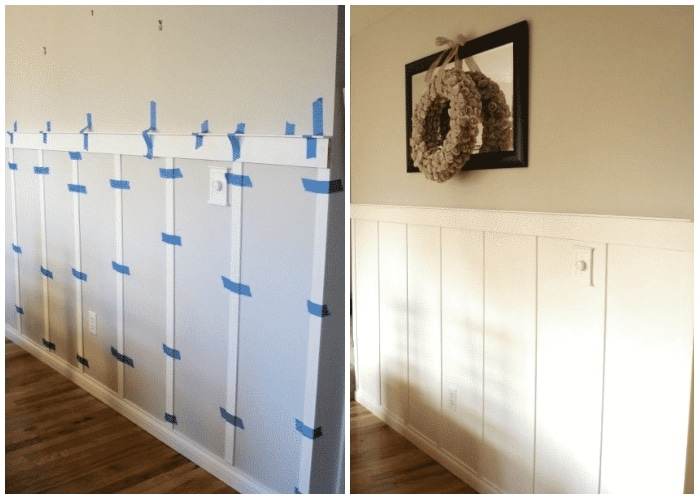
Create Elegant Wainscoting: A DIY Guide
Wainscoting is a classic architectural feature that can add charm and sophistication to any room. With a few simple steps, you can create beautiful wainscoting in your home. Here’s a step-by-step guide to help you get started:
- Measure and plan: Begin by measuring the height and width of the wall where you want to install the wainscoting. Decide on the desired height of the wainscoting, keeping in mind the proportion of the room and the overall aesthetic you want to achieve. Sketch out a plan to visualize the layout and measurements.
- Choose your materials: Select wood trim that complements your design style and fits your budget. MDF (medium-density fiberboard) is a popular and cost-effective option for wainscoting. Decide on the width and profile of the trim based on your design preferences.
- Prepare the wall: Remove any existing baseboards or trim from the wall. Ensure the wall surface is clean, smooth, and free of any imperfections. If necessary, patch and sand the wall to create a suitable surface for the wainscoting.
- Install the baseboard: Start by installing the baseboard along the bottom of the wall. Use a level to ensure it is straight and secure it to the wall using nails or adhesive. Ensure the baseboard sits flush against the wall.
- Install the vertical stiles: Measure and mark the spacing for the vertical stiles on the wall. Typically, stiles are evenly spaced between 16 to 24 inches apart. Use a level to ensure they are straight and secure them to the wall with nails or adhesive.
- Install the horizontal rails: Measure and cut the horizontal rails to fit between the stiles. Position them at the desired height, ensuring they are level. Secure them to the stiles with nails or adhesive.
- Fill nail holes and caulk: Use wood filler to fill any nail holes or gaps in the trim. Allow it to dry and then sand it smooth. Caulk along the edges of the trim where it meets the wall to create a seamless finish.
- Paint or finish: Apply a primer coat to the wainscoting and allow it to dry. Follow with one or two coats of paint in the desired color. Consider using a semi-gloss or satin finish for easy maintenance and durability.
By following these steps, you can create stunning wainscoting that adds elegance and character to your home.
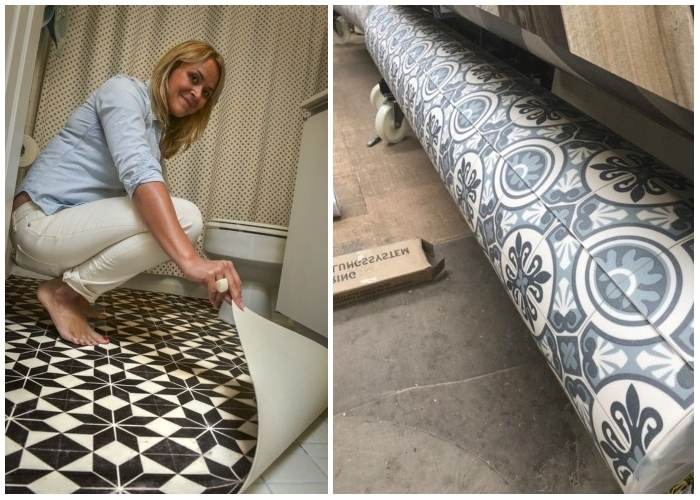
Vinyl Rug for the Floor
Using a vinyl rug to cover a damaged bathroom floor is a practical and cost-effective solution. Here’s a step-by-step guide to help you with the process:
- Measure the bathroom floor: Start by measuring the dimensions of your bathroom floor to determine the size of the vinyl rug you’ll need. Be sure to measure accurately, taking into account any nooks or corners.
- Purchase the vinyl rug: Look for a vinyl rug that suits your style and fits the measurements of your bathroom floor. You can find vinyl rugs at home improvement stores, online retailers, or even repurpose a vinyl scrap if available.
- Prepare the floor: Clean the bathroom floor thoroughly, removing any dust, debris, or loose tiles. If there are any damaged or uneven tiles, consider repairing or leveling them before laying the vinyl rug.
- Cut the vinyl rug: Lay the vinyl rug on a flat surface, and using a box cutter or sharp utility knife, carefully trim it to the exact dimensions of your bathroom floor. Make sure to cut along straight lines for a clean and precise fit.
- Lay the vinyl rug: Once the vinyl rug is cut to size, carefully place it over the bathroom floor, starting from one corner and working your way across. Smooth out any wrinkles or bubbles as you go along, ensuring a flat and even surface.
- Secure the edges: Depending on the size and shape of your bathroom, you may need to secure the edges of the vinyl rug to prevent it from shifting or lifting. You can use double-sided tape or adhesive specifically designed for vinyl flooring to secure the edges.
- Finishing touches: Once the vinyl rug is in place, take a moment to ensure it is properly aligned and fits snugly against the walls and fixtures. Trim any excess vinyl if necessary. Clean and maintain the vinyl rug according to the manufacturer’s instructions.
Using a vinyl rug as a temporary floor covering can provide a quick and affordable solution to a damaged bathroom floor. It not only hides imperfections but also adds a touch of style and comfort to the space.