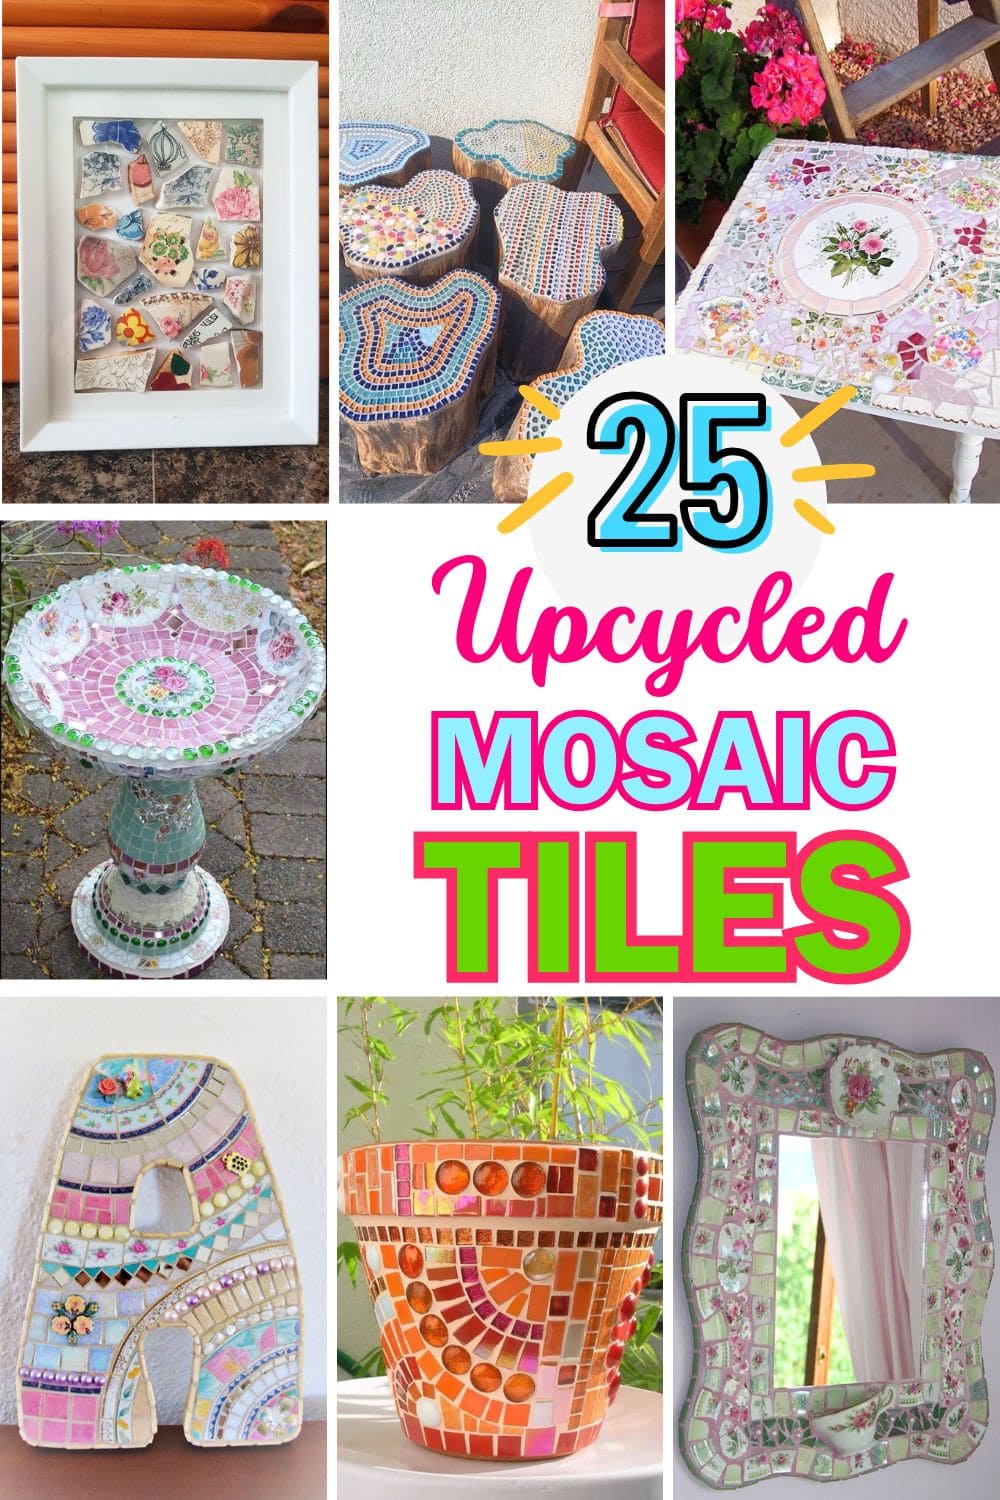
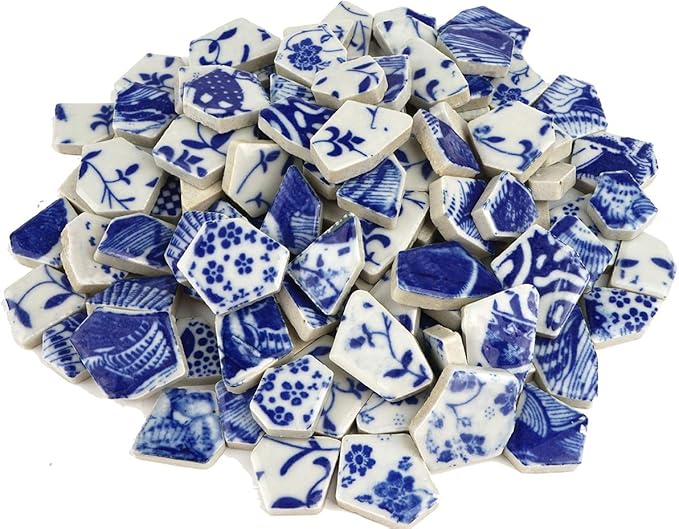
Broken mosaic tiles can transform into beautiful works of art with a little creativity and effort. Instead of discarding these colorful fragments, why not turn them into eye-catching designs that breathe new life into your space?
From vibrant garden decor to unique home accessories, upcycling mosaic tiles is a sustainable and artistic way to add charm to your environment. With endless possibilities, you can create one-of-a-kind pieces that showcase your personality and creativity.
Now, dive into these 25 inspiring ideas, and get ready to transform those broken tiles into stunning masterpieces that will amaze everyone!
This article contains affiliate links. If you purchase through them, I may earn a small commission at no extra cost to you. Thank you for your support!
#1. Whimsical Upcycled Mosaic Birdbath
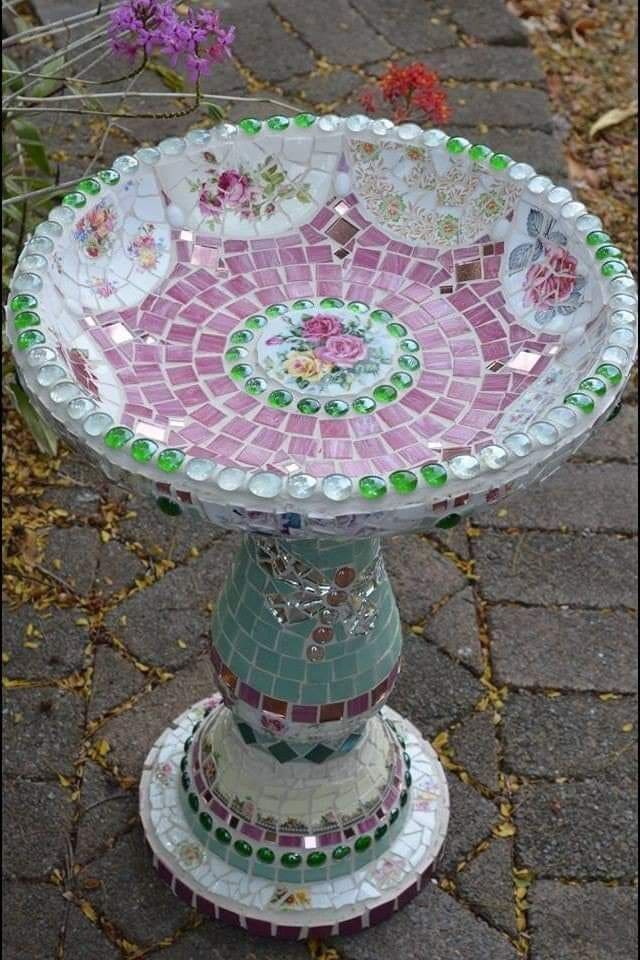
By combining vibrant broken tiles, vintage floral ceramics, and sparkling glass pieces, this stunning birdbath becomes a garden masterpiece.
Materials Needed
- 1 wide ceramic bowl (12–14″)
- 1 large terracotta pot (10–14″ tall)
- 4-5 cups of broken china pieces
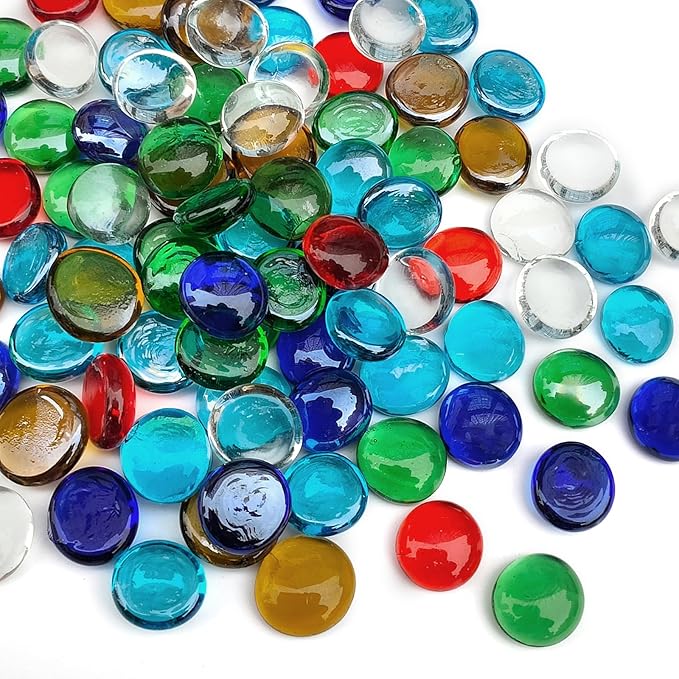
- 1 pack of assorted glass gems
- Mosaic tiles
- Tile adhesive (3.7 oz)
- 1 lb pre-mixed grout
- 1 plastic scraper
- 1 soft cloth, sponge, gloves
- Optional: clear outdoor sealant spray
Step-by-step Guide
Step 1: Arrange your tile and china shards in sections – floral patterns for the interior, plain or gem edges for the border. Begin gluing them into the bowl, working from the center outward in spiral or concentric designs.
Step 2: Apply grout over the mosaic with a plastic scraper, pressing it firmly into every crevice. Let it set for 15–20 minutes, then wipe gently with a damp cloth to clean the tile surfaces and reveal the details.
Step 3: Attach the bowl to the pedestal base using strong adhesive. Once dry and secure, spray the entire piece with sealant if you plan to leave it outside.
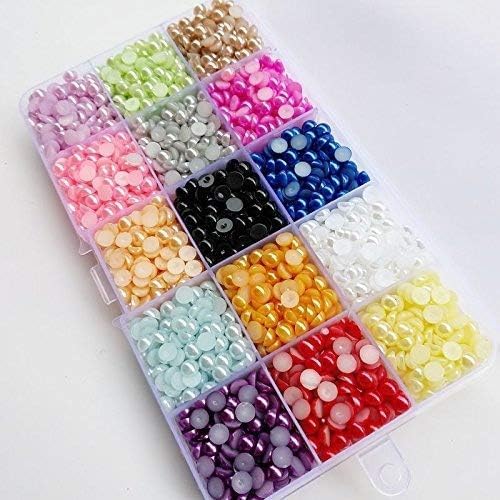
#2. Charming Mosaic Letter Decor Made Unique
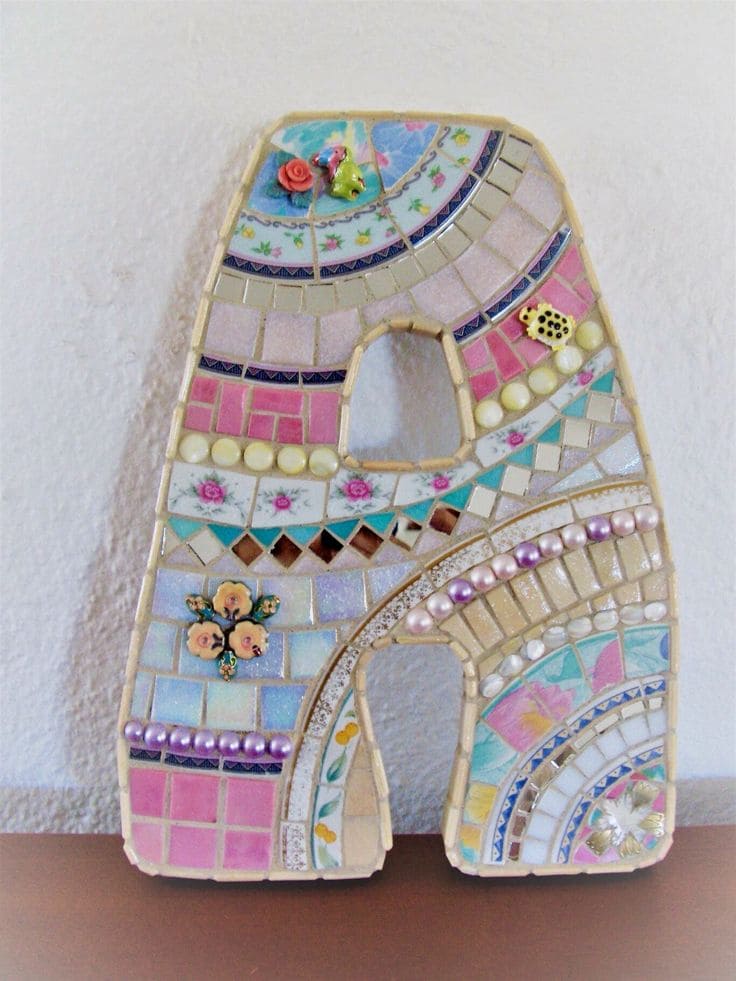
If you’re searching for a personalized and artistic way to decorate, this mosaic letter craft is perfect.
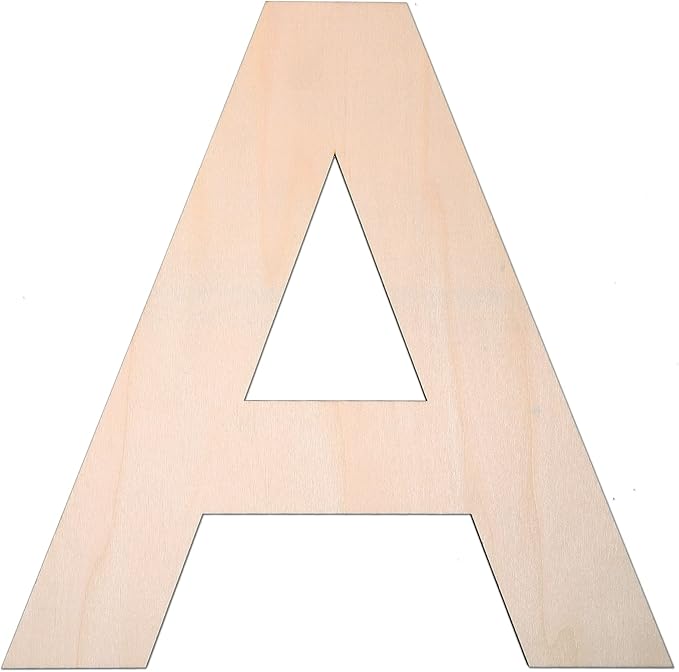

Materials Needed
- 1 MDF letter (8–12″)
- Mosaic tiles
- 1–2 cups of broken ceramic pieces
- Assorted pearl beads, tiny trinkets
- 1 strong adhesive
- 1 lb sand-free grout
- 1 plastic scraper
- 1 soft cloth, gloves
- Optional: clear acrylic spray
Step-by-step Guide
Step 1: Arrange tiles and trinkets over the letter base. Once you’re happy with the design, begin gluing each piece down, pressing gently into place.
Step 2: Spread grout over the surface using a scraper or your hands (with gloves). Press it into all the crevices. After 15–20 minutes, wipe the top of your tiles gently with a damp cloth to remove excess grout and reveal the shine.
Step 3: Polish gently with a soft cloth. Seal with clear spray for extra shine or durability.
#3. Whimsical Floral Mosaic Tabletop Design
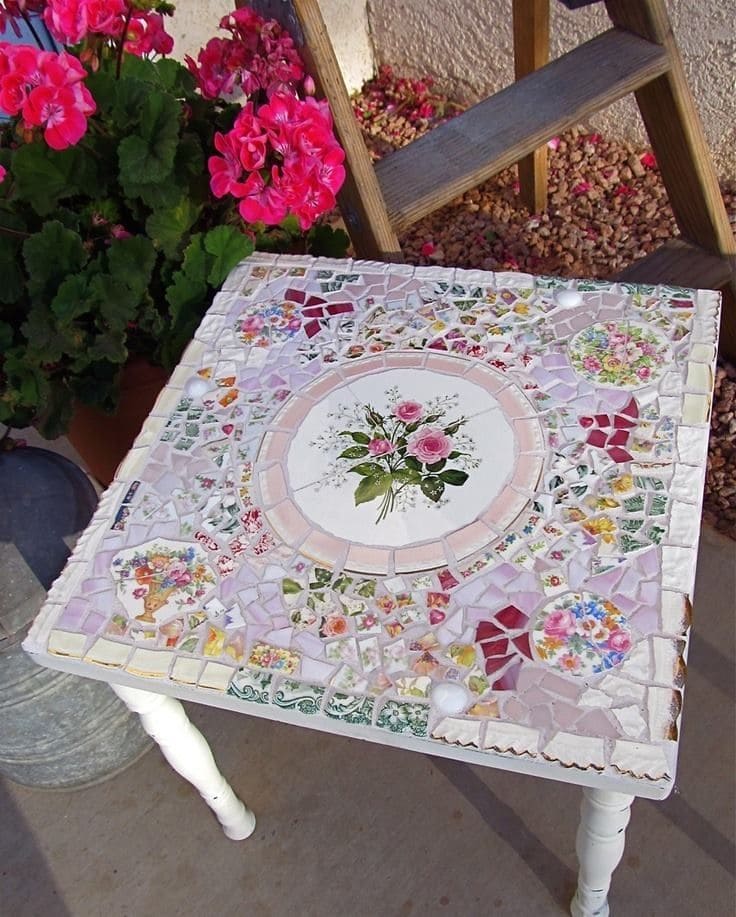
Inspired by vintage charm, this mosaic table transforms broken tiles into a stunning, one-of-a-kind surface.
Materials Needed
- 1 old wooden side table
- 3–5 vintage floral plates
- 2–3 cups of ceramic tiles
- Mosaic tiles
- Assorted glass beads (optional)
- 1 tube of E6000 glue
- 1 lb sanded grout
- 1 plastic scraper
- Damp sponge
- Optional: clear outdoor sealant spray
Step-by-step Guide
Step 1: Arrange your main floral plate or centerpiece in the middle of the table. Surround it with broken china pieces, fitting them together like a blooming patchwork quilt, then glue down each piece, leaving small gaps.
Step 2: Spread grout across the table using a scraper, pushing it into all the spaces between your tiles. Let it set for 20 minutes, then gently wipe tile surfaces with a damp cloth.
Step 3: Finally, seal with a clear coat for outdoor durability.
#4. Charming Mosaic Tea Fountain Creation
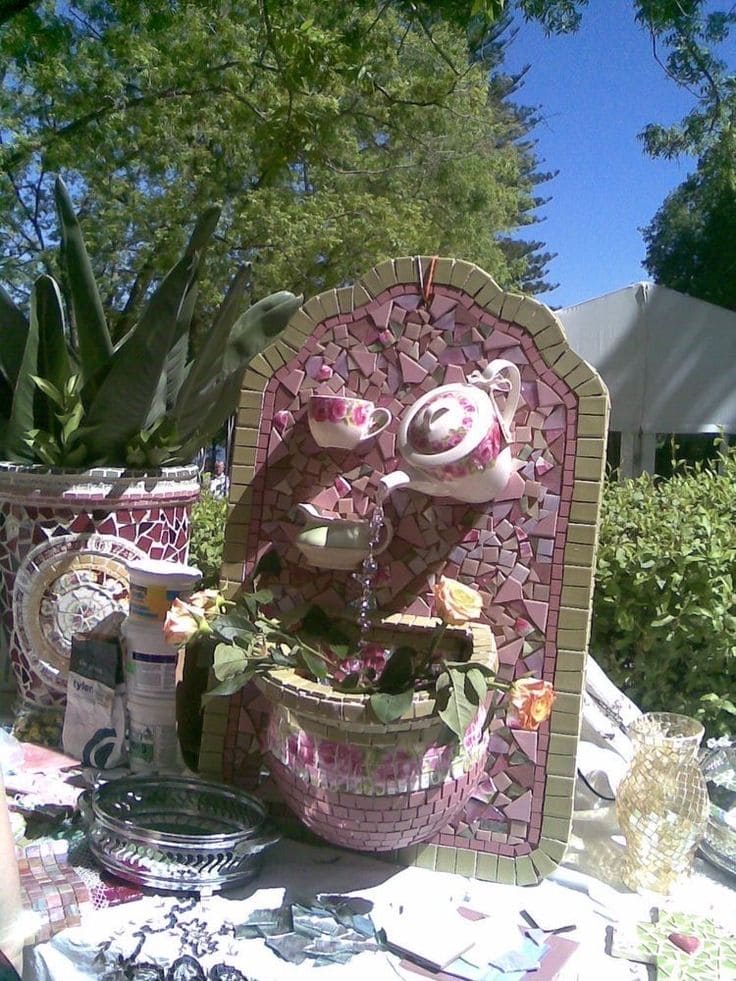
With upturned teacups, a tilting teapot, and cascading beads resembling a magical pour, it’s like Alice in Wonderland met a garden wall.


Materials Needed
- 1 MDF backing board (approx. 18×24″)
- 1 broken ceramic teapot and 2–3 teacups
- 2–3 cups of mosaic tiles
- 1 half planter pot
- Tile adhesive
- 1 pack of grout
- Optional: glass bead strands
- Hanging hardware, sponge, gloves
Step-by-step Guide
Step 1: Glue the teapot and cups onto the board, staggering their positions to mimic a pouring tea scene. Place the planter base at the bottom to “catch” the tea.
Step 2: Arrange your broken tiles and china shards around teacups like a mosaic border. Let all adhesive cure overnight.
Step 3: Apply grout across the surface with a scraper, making sure to fill all gaps between the tiles. After 15–20 minutes, gently wipe excess grout from the surfaces with a damp sponge.
Step 4: Let dry completely, then polish with a soft cloth. Attach hanging hardware on the back and add fresh flowers, silk blooms, or herbs to the planter.
#5. Vibrant Mosaic Planter Revamp Idea
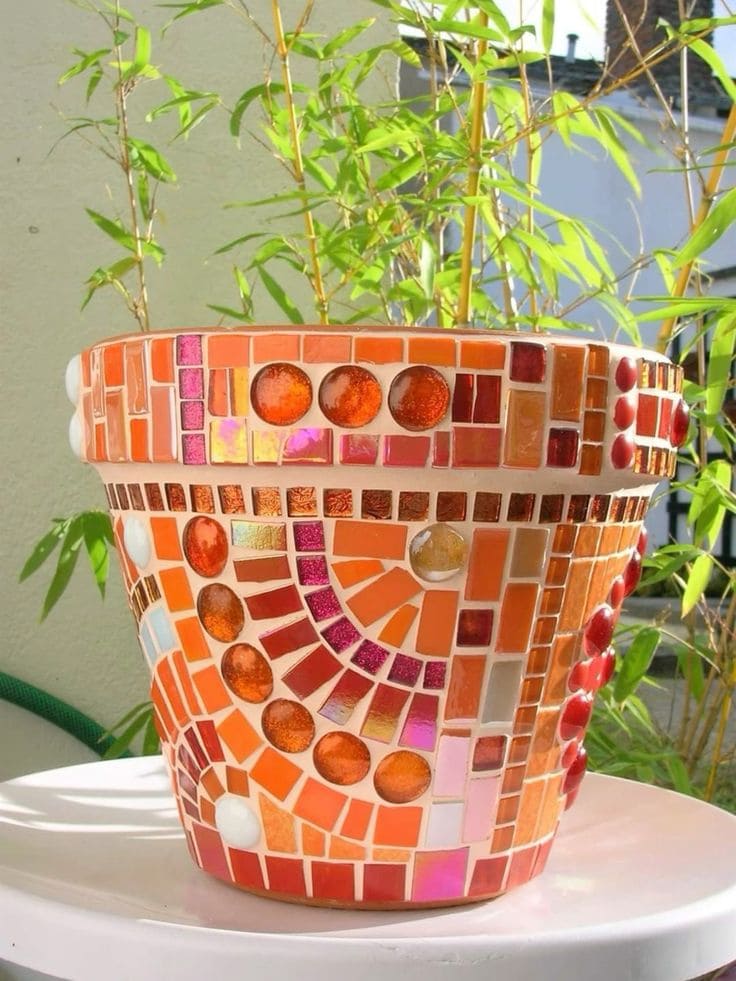
This mosaic planter feels like it was kissed by sunshine. The fiery oranges, shimmering pinks, and glints of metallic reflect the light like stained glass.
Materials Needed
- 1 terracotta flower pot (10–12 inches wide)
- 1–2 cups of assorted mosaic tile pieces
- 10–15 round glass gems
- Tile adhesive
- 1 lb pre-mixed grout
- 1 plastic spatula
- Sponge, gloves, soft rag
- Optional: clear sealer spray
Step-by-step Guide
Step 1: Clean your pot surface and plan your mosaic layout. Apply adhesive to each tile or directly to the pot in small areas, creating swirling patterns, bursts, or bands of color. Press each piece in gently and let the design set overnight.
Step 2: Once dry, spread grout over the entire surface using a plastic spatula. Work it into all the spaces between tiles. Let the grout set for about 20 minutes, then wipe away excess from the tile surfaces using a damp sponge.
Step 3: Once the grout is fully cured and tiles polished, spray with a protective sealant for weather resistance.
#6. Whimsical Mosaic Planter with Teacup Details
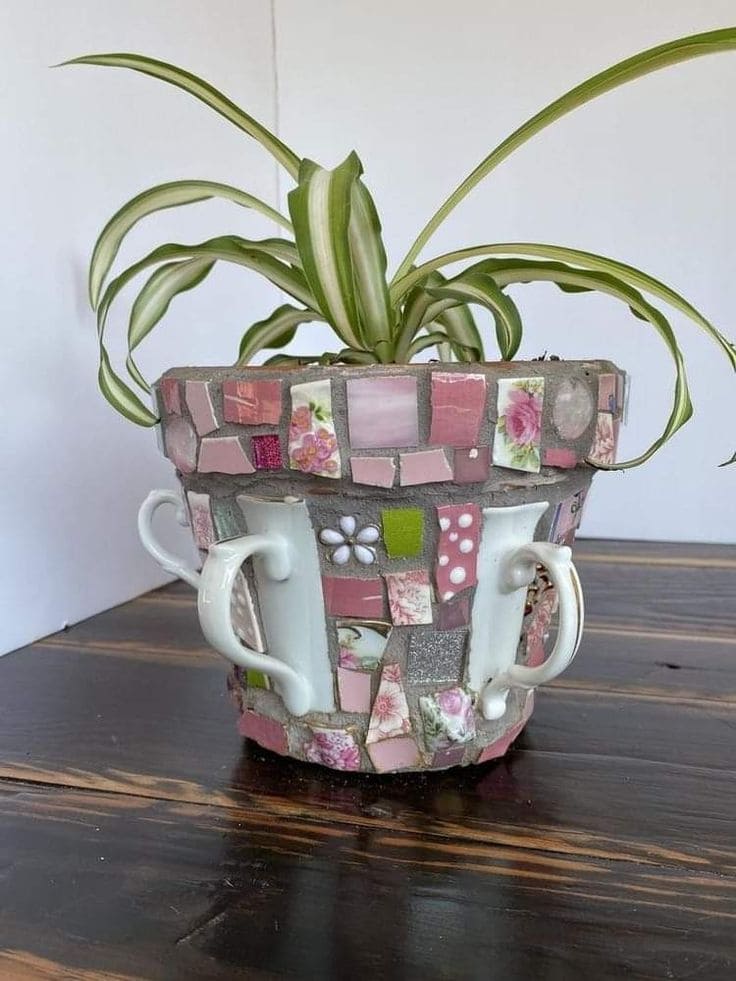
The charming mosaic planter is whimsical, nostalgic, and totally one-of-a-kind with handles sticking out like little arms ready to hug the plant inside.

Materials Needed
- 1 terracotta pot (6–8 inches)
- 5 ceramic teacup handles
- 1–2 cups of broken tile
- Mosaic tiles
- 1 tube of E6000 glue
- 1 lb grout
- Gloves, plastic spatula, sponge, soft cloth
- Optional: clear sealant spray
Step-by-step Guide
Step 1: Attach the teacup handles first with strong glue. Space them evenly around the pot and allow them to dry fully.
Step 2: Once secure, begin gluing mosaic pieces between and around the handles, forming a colorful collage.
Step 3: Once the adhesive is fully dry, spread grout over the entire surface using a plastic spatula or your gloved hands. Then wipe off the excess with a damp sponge after 15–20 minutes.
Step 4: Polish the tiles with a soft rag, seal if desired, and plant your favorite herb, trailing vine, or dainty flower.
#7. Intricate Mosaic Art with Stunning Patterns
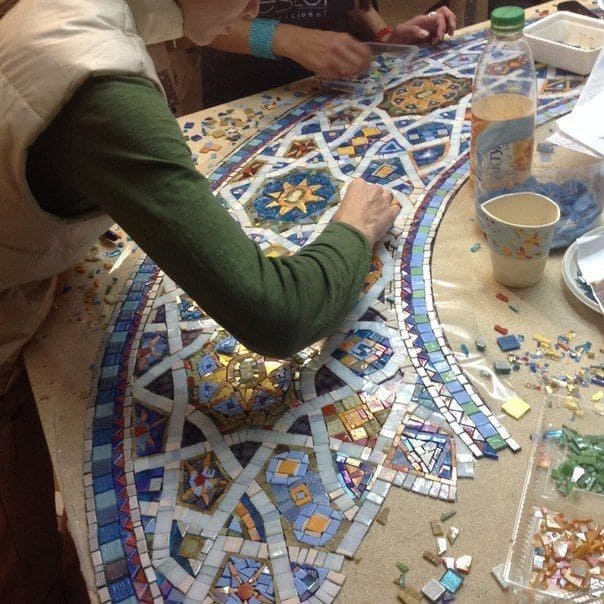
There’s something deeply meditative about piecing together a mosaic this large, like painting with fragments.

Materials Needed
- 1 large concrete board base (2×4 ft or larger)
- 2–3 lbs of assorted mosaic tiles
- 1 roll of mosaic mesh
- Tile adhesive
- 2–3 lbs of grout
- Tile nippers
- Spatula, gloves, sponge, cloth
- Optional: clear mosaic sealer
Step-by-step Guide
Step 1: Start by sketching your geometric or floral design onto the base or create the layout separately on mesh or contact paper. Sort tiles by color and size for easier building.
Step 2: Begin applying tile adhesive section by section, pressing each tile in following your design. Use nippers for custom cuts. Once all pieces are in place, allow to dry 24 hours.
Step 3: Apply grout using a rubber float, pressing it firmly into the gaps. After 20 minutes, clean the surface with a damp sponge. Buff dry and seal the surface if it’s going outdoors.
#8. Framed Mosaic Art from Ceramic Shards
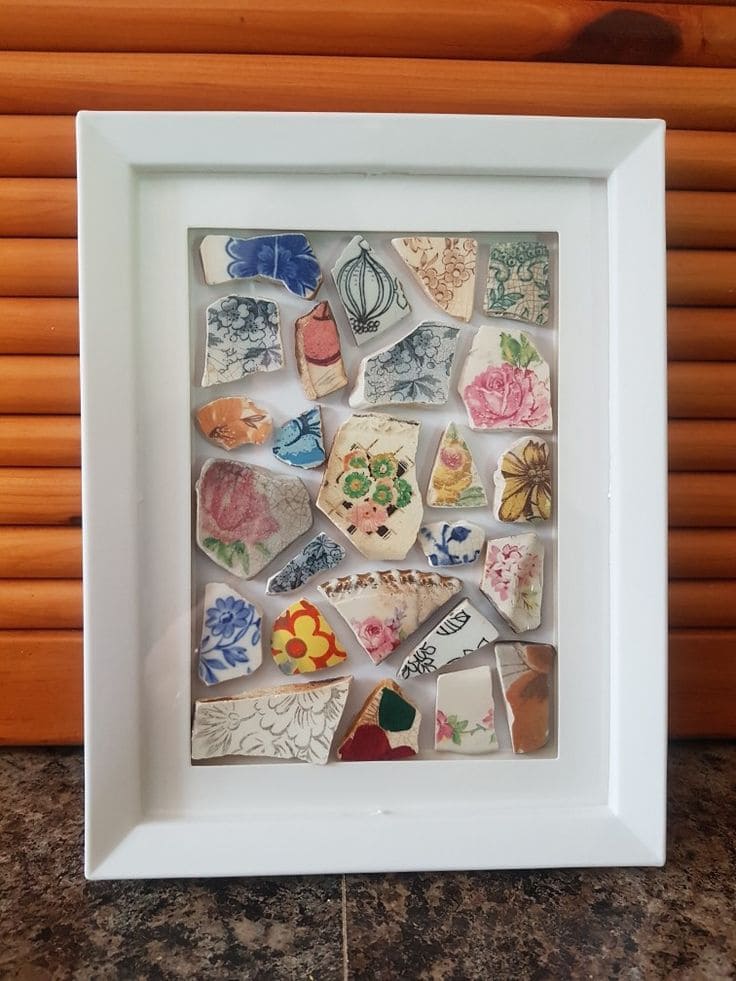
I made one just like this with pieces from my grandmother’s chipped plates, and every glance at it feels like flipping through a mosaic photo album.
Materials Needed
- 1 deep-set photo frame (8×10″)
- 20–30 ceramic shards
- Strong adhesive dots
- 1 sturdy cardboard backing
- Tweezers
- Optional: acrylic clear sheet
Step-by-step Guide
Step 1: Lay out your pieces on the backing board without gluing. Choose your favorites for the center and balance out the corners with smaller or simpler designs.
Step 2: Next, glue down each shard carefully using adhesive dots or a thin layer of glue. Press gently and let dry completely (preferably 12–24 hours).
Step 3: Place the backing into your shadow box or frame. If you’re using glass or acrylic on top, ensure pieces don’t press too hard.
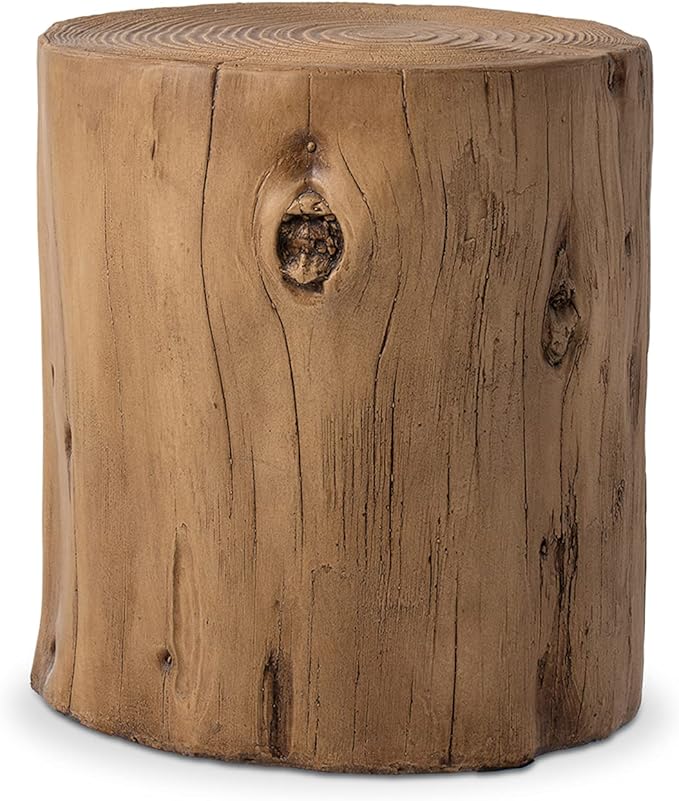
#9. Colorful Mosaic Tree Stump Tables
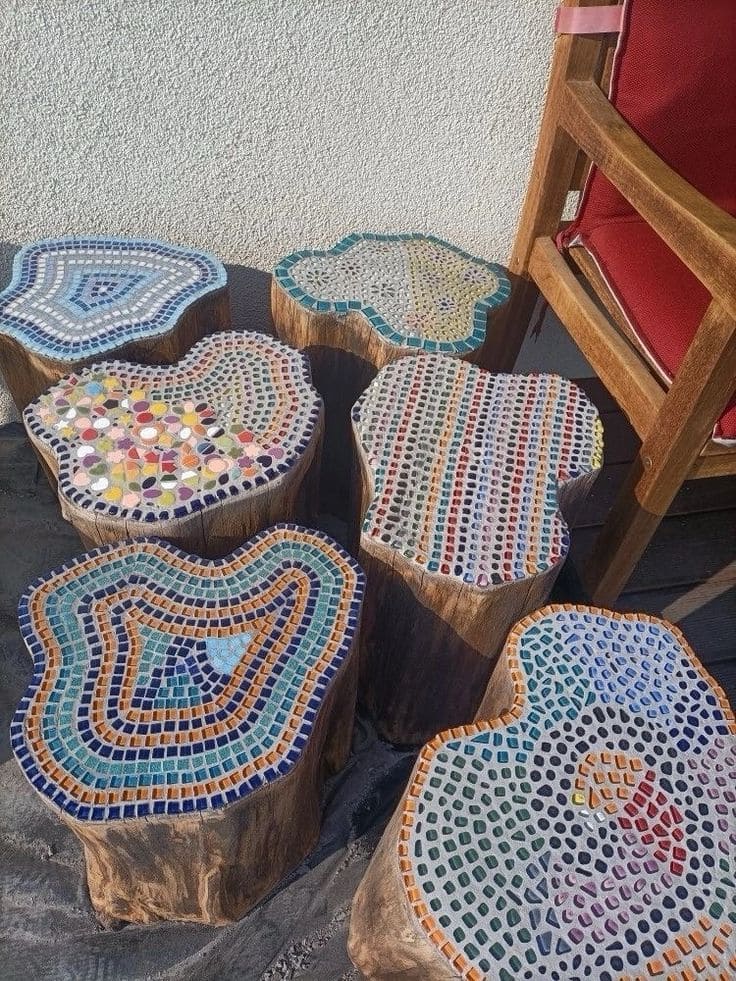
These mosaic-topped tree stumps feel like they were plucked from a woodland fairytale and sprinkled with rainbow magic.
Materials Needed
- 1 natural wood stump (12–18″ tall)
- 1–2 cups of glass mosaic tiles
- 1 tube of E6000 glue
- 1 tub of sanded grout
- Gloves, sponge, spatula, rag
- Optional: outdoor grout sealer
- Optional: polyurethane wood sealer
Step-by-step Guide
Step 1: Sand and clean the top of the stump.
Step 2: Arrange your mosaic tiles in spirals, rings, or mandala-style patterns before gluing them down. Leave small spaces between tiles for the grout. Let dry 24 hours.
Step 3: Apply grout with a spatula, pushing it into every gap. Wipe the excess off the tiles with a damp sponge and let the whole thing dry for at least 24 hours in a protected space.
Step 4: Buff the tiles with a soft cloth and seal the surface if it will live outdoors. Optional: Apply a wood sealer to the stump sides.
#10. Charming Floral Mosaic Garden Vase
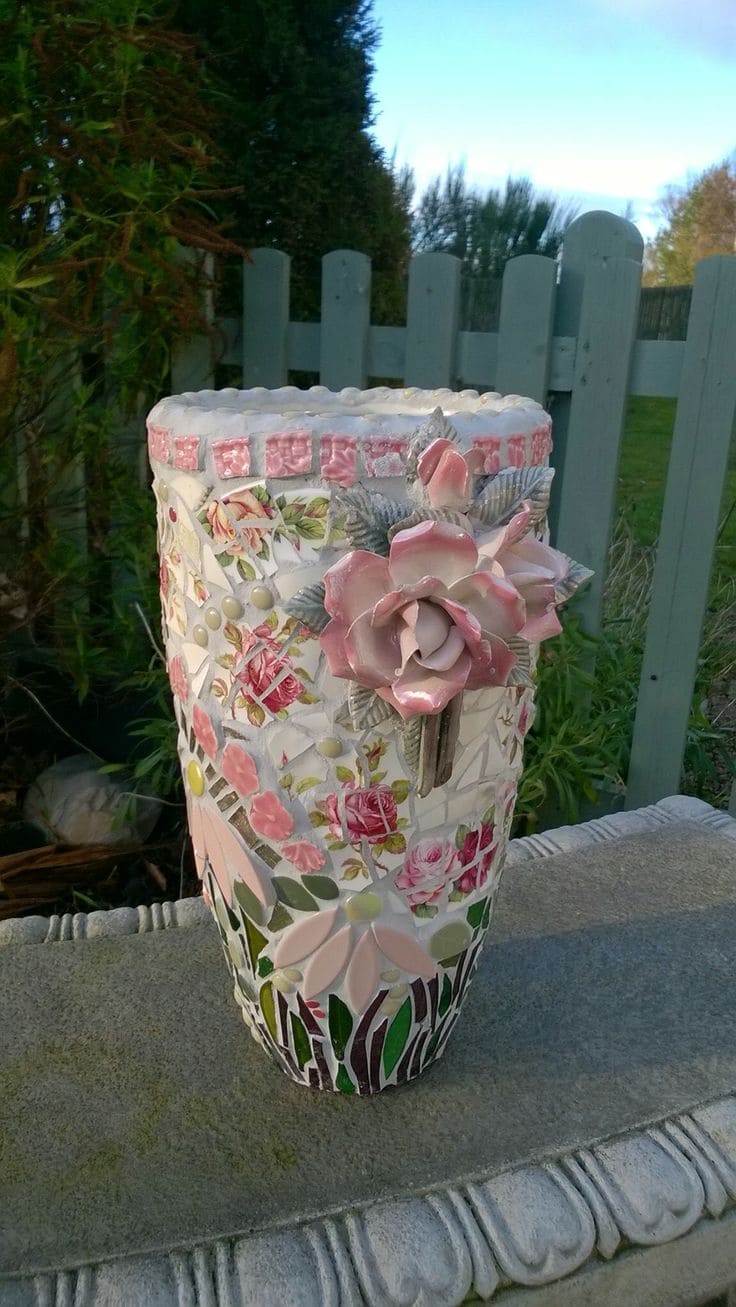
Crafted with delicate pink shards, leaf motifs, and an eye-catching ceramic rose centerpiece, this mosaic vase feels like it came out of a Victorian garden dream.
Materials Needed
- 1 tall terracotta vase (10–14″ tall)
- 2–3 cups of broken mosaic tiles
- 1–2 large ceramic flower piece
- 1 strong adhesive
- White grout
- Gloves, sponge, soft cloth, spatula
- Optional: clear mosaic or tile sealer
Step-by-step Guide
Step 1: Begin by grouping the floral shards near the center and use more abstract or leafy tiles at the bottom and rim. Glue each piece firmly and let dry for 24 hours.
Step 2: Once set, gently apply grout to fill the spaces using a gloved hand or spatula. Wipe away the excess with a damp sponge after 15 minutes.
Step 3: Let the piece cure completely, then polish with a soft cloth to bring out the shine.
#11. Vibrant Bee Mosaic Art from Tiles
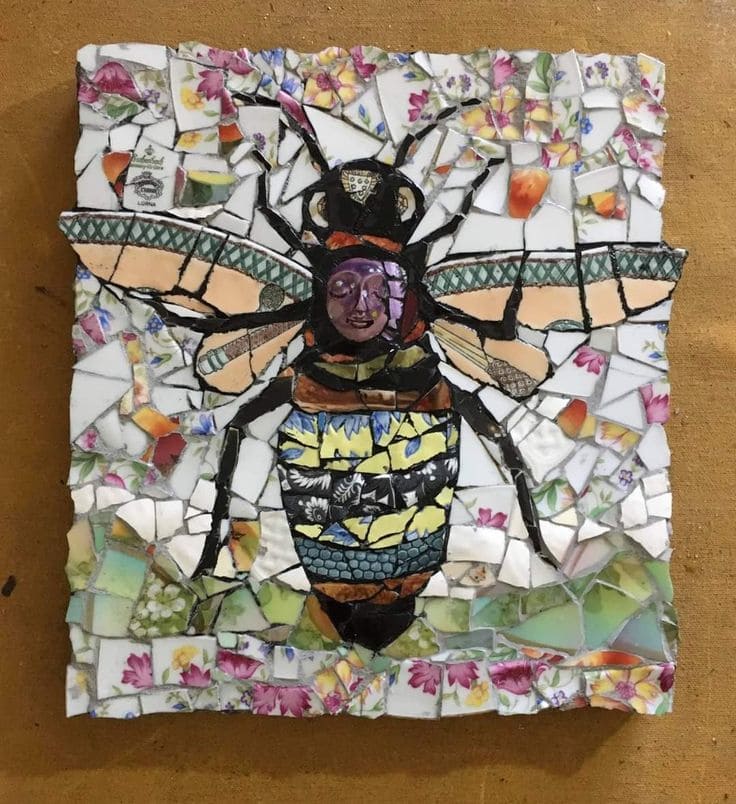
Made entirely from broken china and pottery fragments, each wing, stripe, and petal carries a hidden past, fused into a joyful buzz of color and form.
Materials Needed
- 1 wooden board (8×8″)
- 30–50 small pieces of broken china in mixed patterns
- 1–2 pieces of vintage jewelry
- Black grout
- E6000 glue
- Grout float
Step-by-step Guide
Step 1: Start by sketching or taping a bee silhouette onto your board.
Step 2: Lay out the china pieces like puzzle fragments – fitting wings from plate rims, stripes from pottery, and florals in the background. Add small jewelry bits for the face or thorax to create a standout focal point.
Step 3: Secure each shard with glue and let cure 24 hours. Fill in the gaps using grout, smoothing with a gloved hand or spatula.
Step 4: Once fully set, polish the tiles gently with a soft cloth and hang or display proudly.
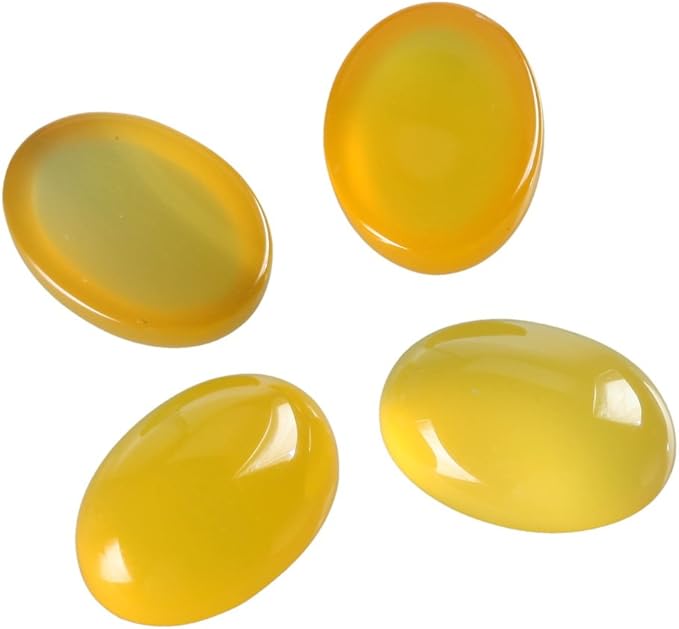
#12. Whimsical Breakfast Mosaic Tile Art
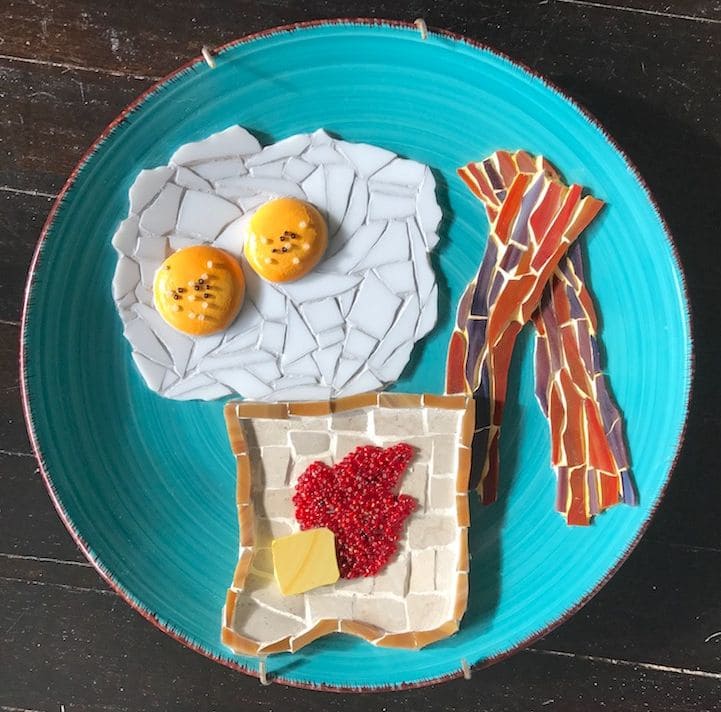
I can’t help but smile when I look at it, it reminds me of lazy Sunday mornings and the smell of pancakes.
Materials Needed
- 1 sturdy ceramic plate (11–14″)
- Mosaic tiles
- 2 glossy yellow cabochons
- Red microbeads
- Small tile adhesive
- Black grout
Step-by-step Guide
Step 1: Plan your plate layout with toast near the bottom, eggs on the upper left, and bacon off to the right. Use triangle or wedge-shaped tile shards for realistic bacon and curve the tile edges to soften the egg whites.
Step 2: Glue each element in place. Use microbeads for the jelly center, a small square tile for the butter pat, and rounded gems for egg yolks.
Step 3: Apply grout or clear resin between pieces to fill gaps. Wipe off excess gently and let cure fully.
#13. Creative Mosaic Hopscotch Garden Path
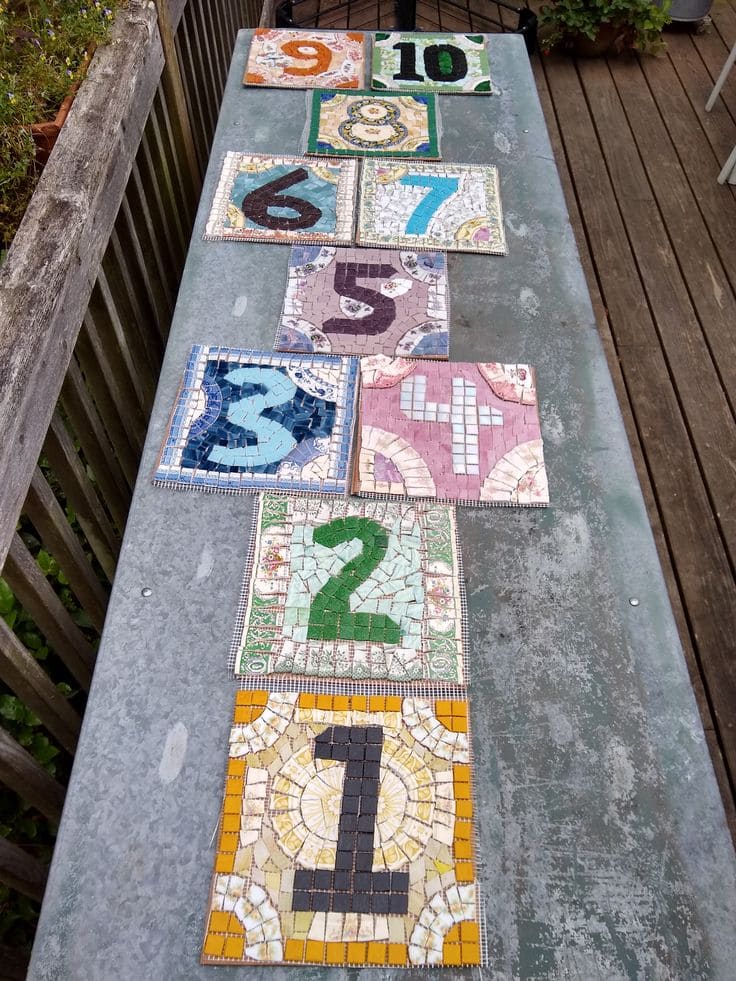
Who says hopscotch is only for playgrounds? This colorful set of hand-crafted mosaic tiles brings the classic childhood game into the garden with a creative twist.

Materials Needed
- 2–3 lbs of assorted mosaic tiles
- Mosaic tiles
- Number stencils (1–10)
- Tile adhesive
- Pre-mixed grout
- Tile nippers
- Sealant
Step-by-step Guide
Step 1: Prepare the base tiles by cleaning the surfaces and sketching out your number layouts. Use contrasting colors for numbers and backgrounds to ensure visibility. Cut and pre-arrange pieces if necessary.
Step 2: Glue down the broken tiles, starting with the numbers and filling in around them. Use curved or irregular edges to give each tile a playful, organic feel. Let everything dry for at least 24 hours.
Step 3: Grout over the entire surface, pressing into cracks. Wipe off excess grout with a damp sponge and polish gently once dry, then seal with a weatherproof coating.
#14. Vibrant Mosaic Tile Artwork Creation
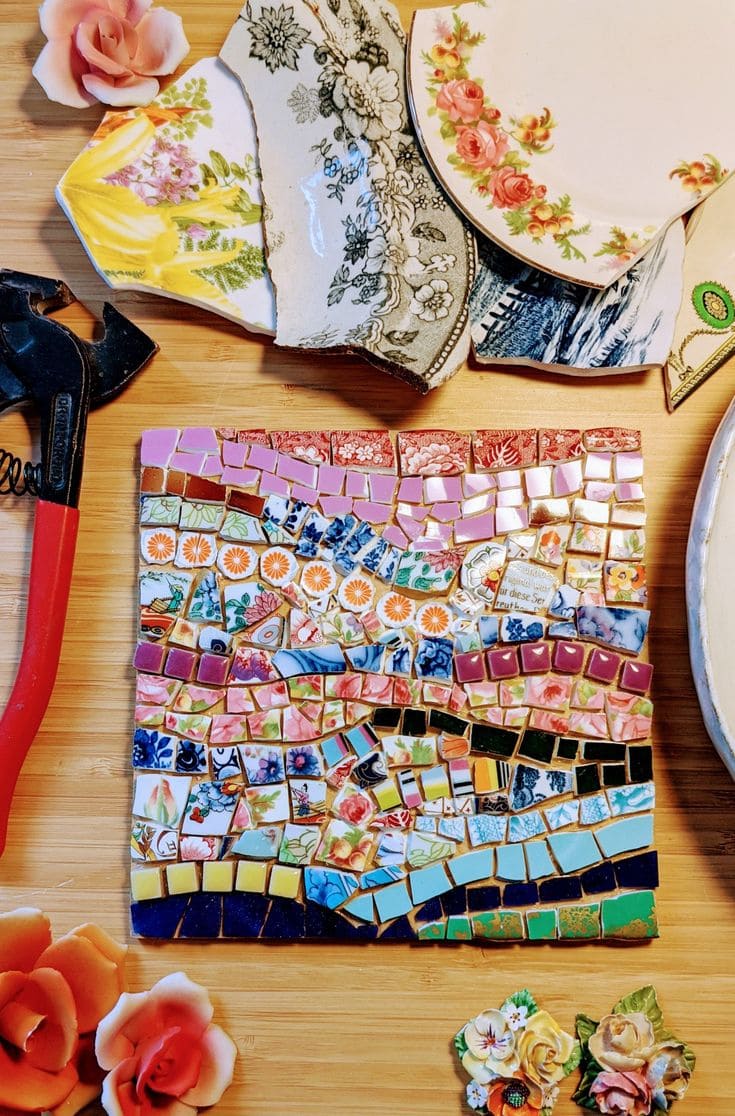
Whether you’re drawn to the romance of antique china or the thrill of hands-on making, this mosaic is a perfect beginner project with heartfelt impact.
Materials Needed
- 1 MDF board (approx. 10″x10″)
- 10–12 broken floral-pattern ceramic plates
- Mosaic tiles
- Tile adhesive
- Pre-mixed grout
- Soft sponge and safety gloves
- Tile nippers
- Optional: decorative ceramic flowers
Step-by-step Guide
Step 1: Lay out your broken pieces into a rough pattern before gluing. Start with your focal plates or color bands first, then work outward, keeping shards close together but not touching.
Step 2: Glue down the ceramic pieces one by one. Let the adhesive cure for a few hours. Take your time to fill edges and corners with smaller chips.
Step 3: Once fully dry, spread grout over the design using your fingers or a rubber grout float. Wipe off excess with a damp sponge and let it cure.
#15. Romantic Mosaic Mirror with Vintage Charm

I made this piece from shattered heirloom plates that once held tiny cakes and Sunday morning memories.
Materials Needed
- 1 ornate wooden mirror frame (approx. 16″x20″)
- 8–10 broken vintage plates
- Glass tile adhesive
- Pink or light grey grout, 1 lb
- Tile nippers
- Sponge, cloth, and protective gloves
- Optional: Mini teacup embellishment
Step-by-step Guide
Step 1: Arrange your mirror frame flat. Pre-fit the mosaic layout, mixing floral rounds, soft green tiles, and broken cup rims. Leave space for your special 3D accents like a cup or saucer.
Step 2: Begin gluing each shard around the frame. Work from the outer edge inward, trimming pieces as needed with nippers. Let the glue dry completely, about 6–8 hours.
Step 3: Apply grout using a gloved hand or spatula, working it deep into crevices. Wipe gently with a damp sponge to expose the patterns.
#16. Charming Mosaic Ladder for Unique Decor
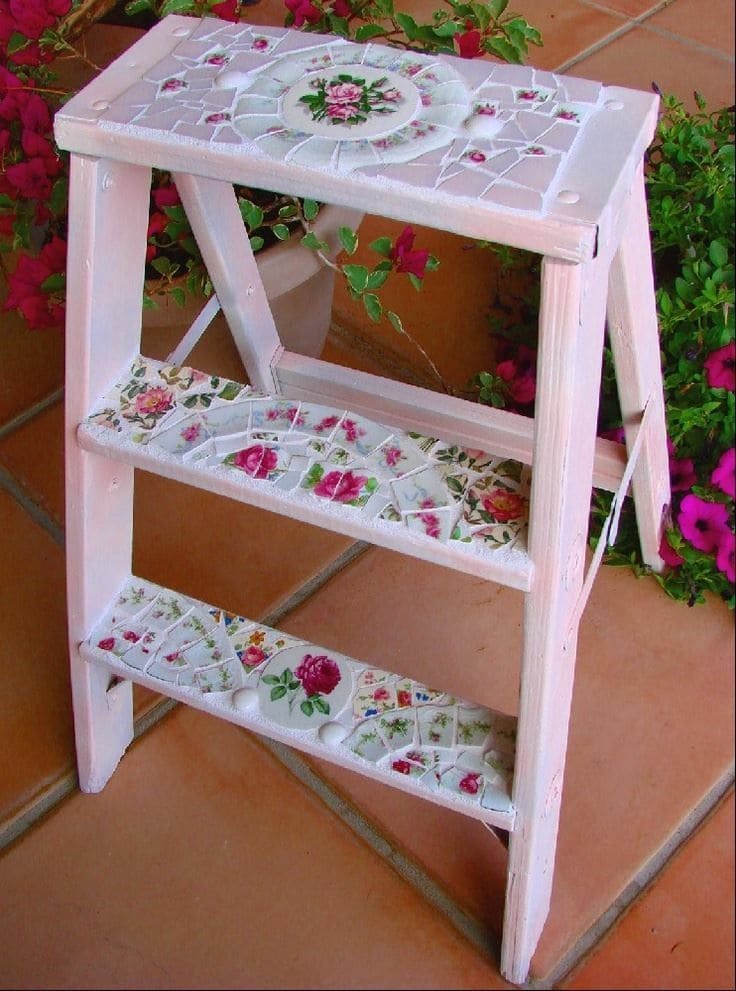
There’s something romantic about old ladders, they’ve helped paint memories onto walls and now, they cradle potted blooms and teacups.
Materials Needed
- 1 small wooden ladder
- 4-6 broken floral-patterned plates
- Mosaic tiles
- Strong tile adhesive
- White grout, 1 lb
- Tile nippers
- Soft pink chalk paint and sealer
- Sponge, cloth, safety goggles, and gloves
Step-by-step Guide
Step 1: Lightly sand and paint the ladder with soft pink chalk paint. Let it dry completely. Begin laying out your broken tiles on each step, especially focusing on the plate centers for a striking focal point.
Step 2: Glue each tile in place, leaving slight space between pieces. Allow to set overnight. The next day, spread grout across the surface, wiping away excess and buffing clean once dry.
Step 3: Seal the paint and tiles with a matte topcoat. Optional: use it as a garden display, herb rack, or plant stand.
#17. Cute Hen Mosaic from Recycled Tiles
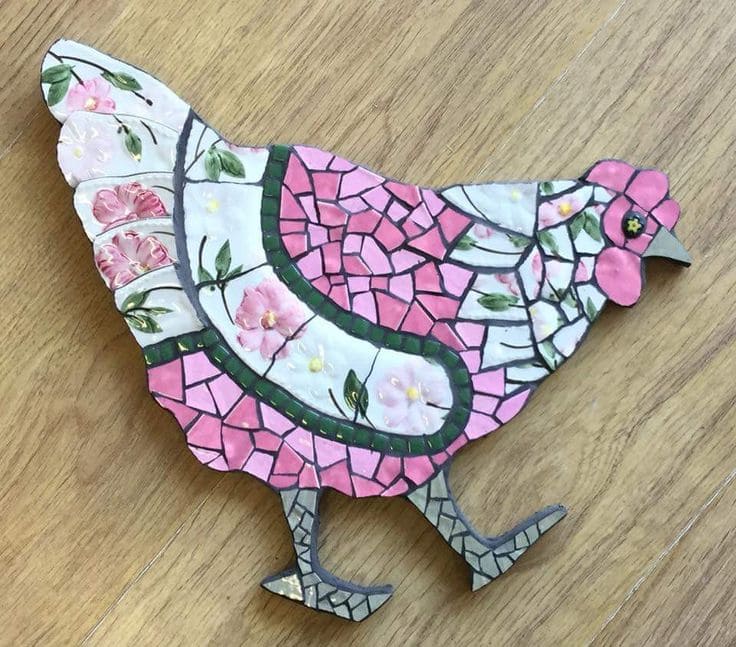
I shaped and placed each shard with care, giving her a gentle, storybook-like personality.
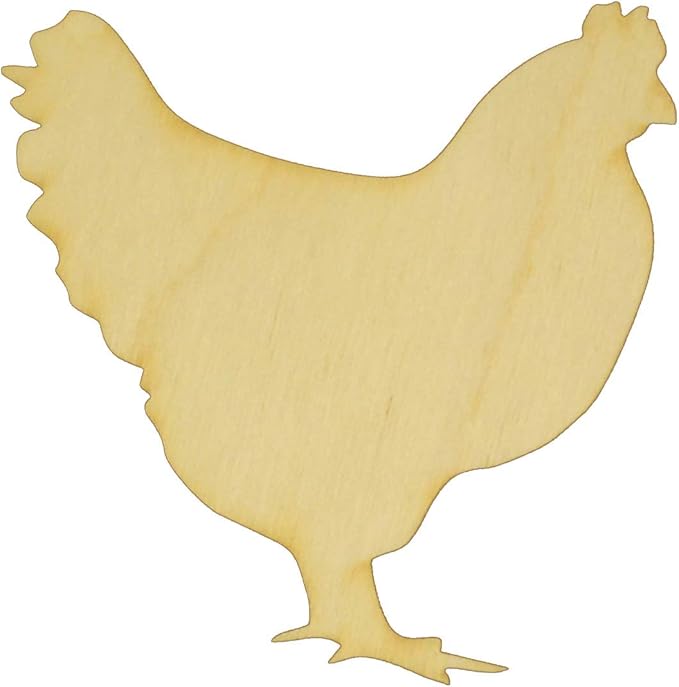
Materials Needed
- Wooden hen cutout (approx. 8-10″ wide)
- 2–3 broken floral china plates
- Mosaic tiles
- Tile adhesive
- Grout, color: gray
- Nippers, gloves, and safety glasses
- Small sponge, soft cloth, and sealer
Step-by-step Guide
Step 1: Lightly sand your wooden hen and sketch the sections you’d like to define (wing, feathers, etc.).
Step 2: Start gluing the broken tile pieces in place – use flower centers for the wing and solid pinks for the body to create contrast.
Step 3: Once your design is dry (usually overnight), apply grout across the surface, making sure to work it into all the tiny spaces. Wipe off the excess with a damp sponge and buff the surface once set.
Step 4: Finish with a clear sealer to protect your hen and give it a soft gleam.
#18. Charming Mosaic Vase with Cultural Flair
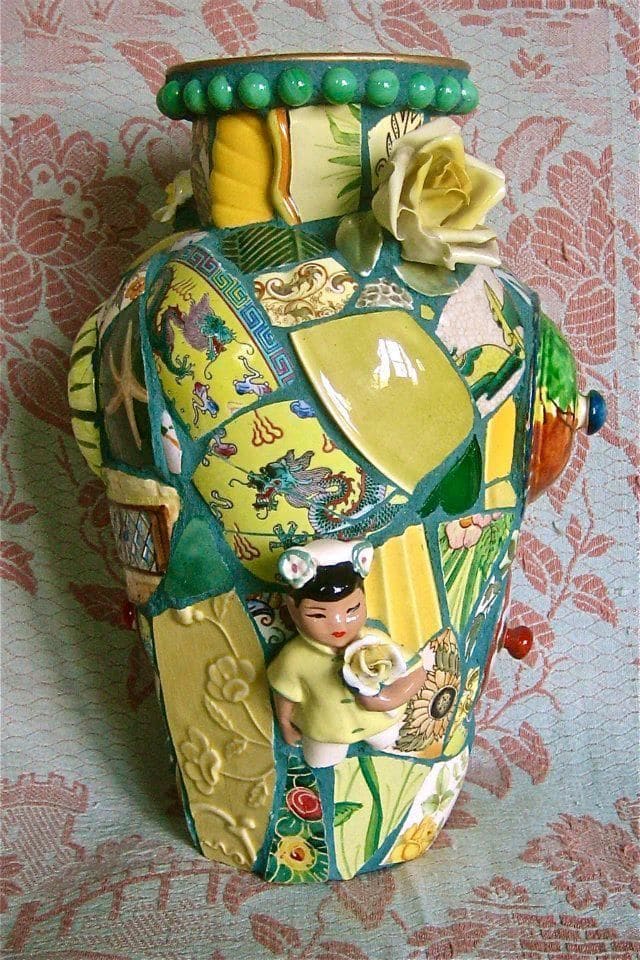
The broken vase found in a thrift shop was already lovely, but after it cracked, I couldn’t bear to toss it, so it became a canvas for creativity.
Materials Needed
- 1 old ceramic vase (10–12″ tall)
- 5–7 small broken plate pieces with vivid patterns
- 1–2 small figurine embellishments
- Tile adhesive, grout, grout sealer
- Safety gloves, tile nippers
Step-by-step Guide
Step 1: Begin by sanding the surface of the vase slightly to help the adhesive grip.
Step 2: Plan your layout loosely before you glue – mix textures like glossy dragon tiles and matte yellows for visual contrast. Fix the broken pieces around the vase, gently curving them to the surface and pressing firmly.
Step 3: Once fully dry (usually overnight), apply grout generously and use your fingers or a sponge to push it into every seam. Let it set for 10–15 minutes, then wipe clean with a damp sponge and polish with a dry cloth once the haze disappears.
Step 4: Finish with a clear sealer to protect your design and lock in the colors.
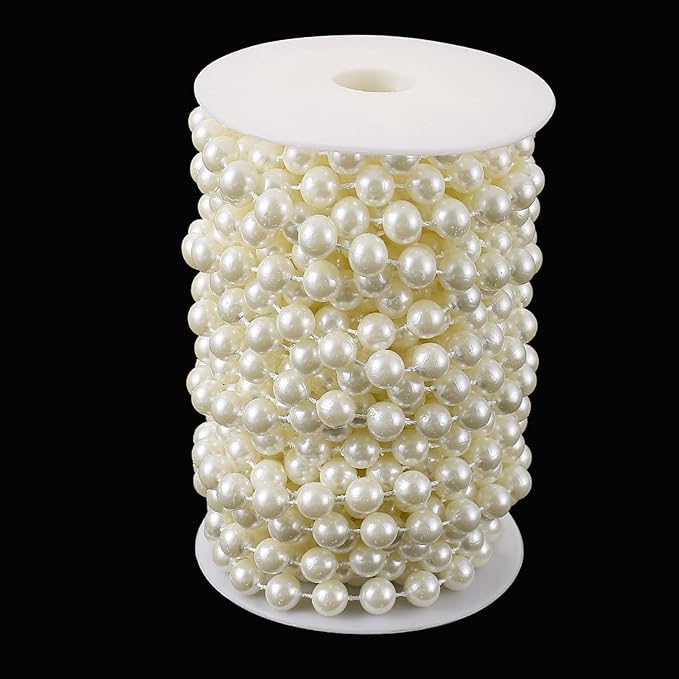
#19. Elegant Floral Mosaic Birdhouse Design
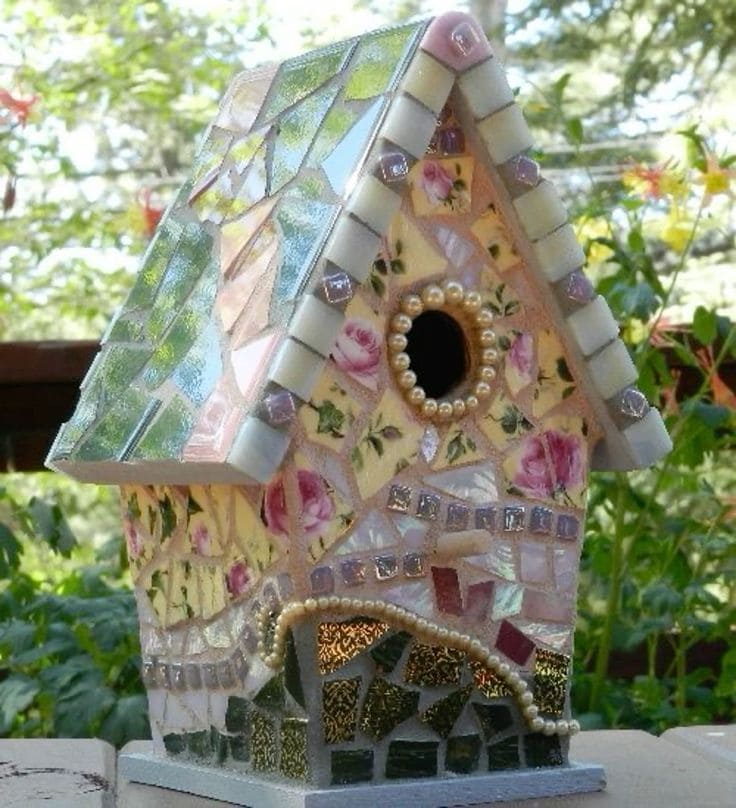
This mosaic birdhouse feels like it flew straight out of a secret garden. The glimmer of iridescent tiles, soft pink tones, and glints of gold draw the sunlight just right.
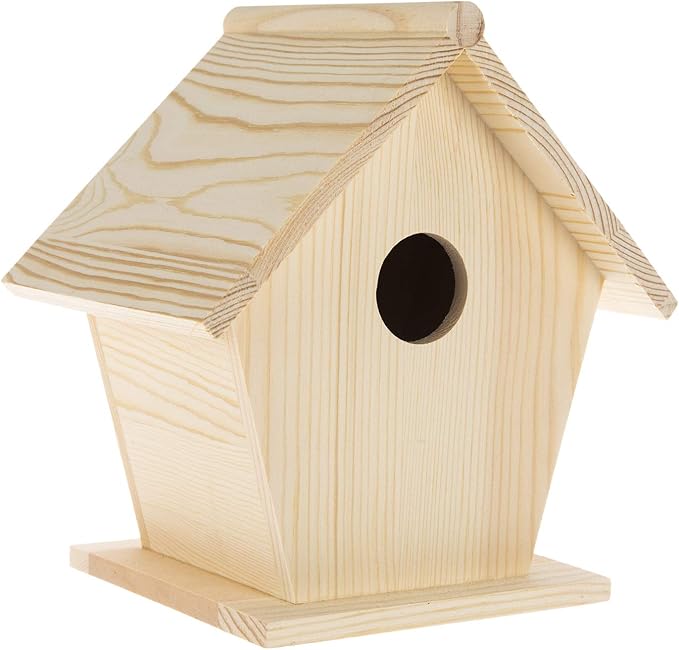
Materials Needed
- 1 unfinished wooden birdhouse (about 8” tall)
- About 50+ mosaic tile and floral china shards
- Pearl craft trim
- Tile adhesive, grout, optional sealant
- Gloves, sponge, nippers
Step-by-step Guide
Step 1: Begin by gluing your largest feature pieces like floral china or pearl beads around the entrance and roof edges. Then fill in with a mix of mirror tiles and broken shards, pressing firmly into tile adhesive.
Step 2: Once dry (12–24 hours), gently apply grout over the surface, pushing it into gaps with your fingers or a spreader. Let sit 10 minutes before wiping with a damp sponge.
Step 3: Attach a hook or hanger if desired, or place it on a garden table for instant storybook charm.
#20. Whimsical Mosaic Tea Cup Planter Art
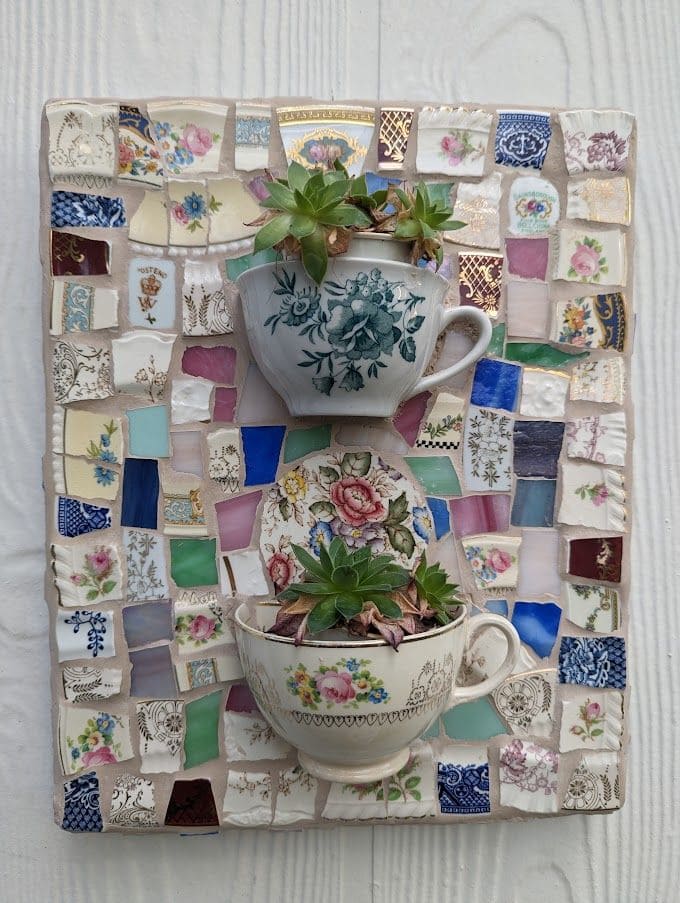
This piece is one of those rare blends of elegance and imagination that warms up any nook it’s hung in.
Materials Needed
- 1 wooden board (around 10″ x 14″)
- 2 vintage teacups
- Assorted broken ceramic tiles
- Mosaic tiles
- Heavy-duty adhesive
- Grout
- Hanging hardware, gloves, sponge, sealant
Step-by-step Guide
Step 1: Start by arranging your broken mosaic pieces on the board like a puzzle. Use the patterned ones toward the center and edges to frame your cups, mixing shapes and colors for balance.
Step 2: Once you’re happy with the layout, glue each shard securely onto the wooden board and let it dry overnight.
Step 3: Carefully grout over the entire surface, pressing grout into the gaps and gently wiping the tiles clean. After drying for a few hours, polish any residue for shine.
Step 4: For the final touch, attach your teacups using heavy-duty adhesive. Press and hold for a few minutes to ensure they stay in place, and let them dry for 24 hours.
#21. Elegant Mosaic PVC Pipe Planters
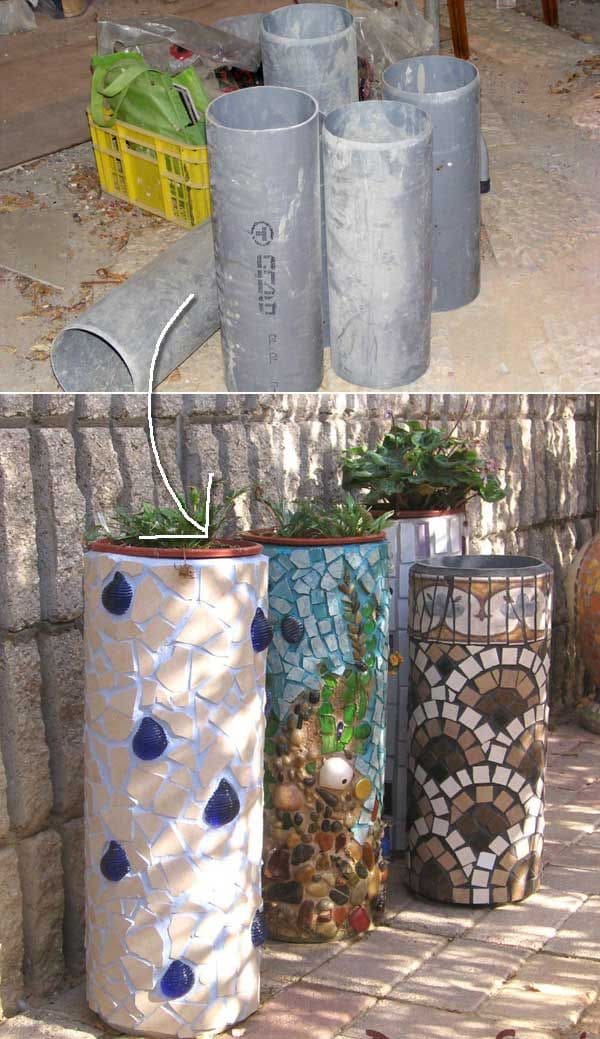
Whether you want to create a tropical backdrop or simply showcase succulents in style, this project proves how beauty can bloom from construction leftovers.

Materials Needed
- 3 PVC pipes (6–8 inches diameter, 12-18 inches tall)
- Assorted mosaic tiles
- Tile adhesive
- Pre-mixed grout
- Small flower pots
- Optional: sealant spray, gloves, grout float, sponge
Step-by-step Guide
Step 1: Clean your PVC pipes thoroughly and sand the surface slightly for better adhesion.
Step 2: Apply tile adhesive in small sections and begin pressing your mosaic pieces in your desired pattern – geometric, ocean-themed, abstract, it’s entirely up to your imagination.
Step 3: Once the adhesive dries (usually overnight), fill in the spaces with grout. Spread it generously with a grout float or your hands (gloved), then wipe clean with a damp sponge. Let everything dry again for 24 hours.
Step 4: Nest a flower pot into the open top of each pipe and seal around the edge if needed.
#22. Elegant Mosaic Tile Switch Plate Cover
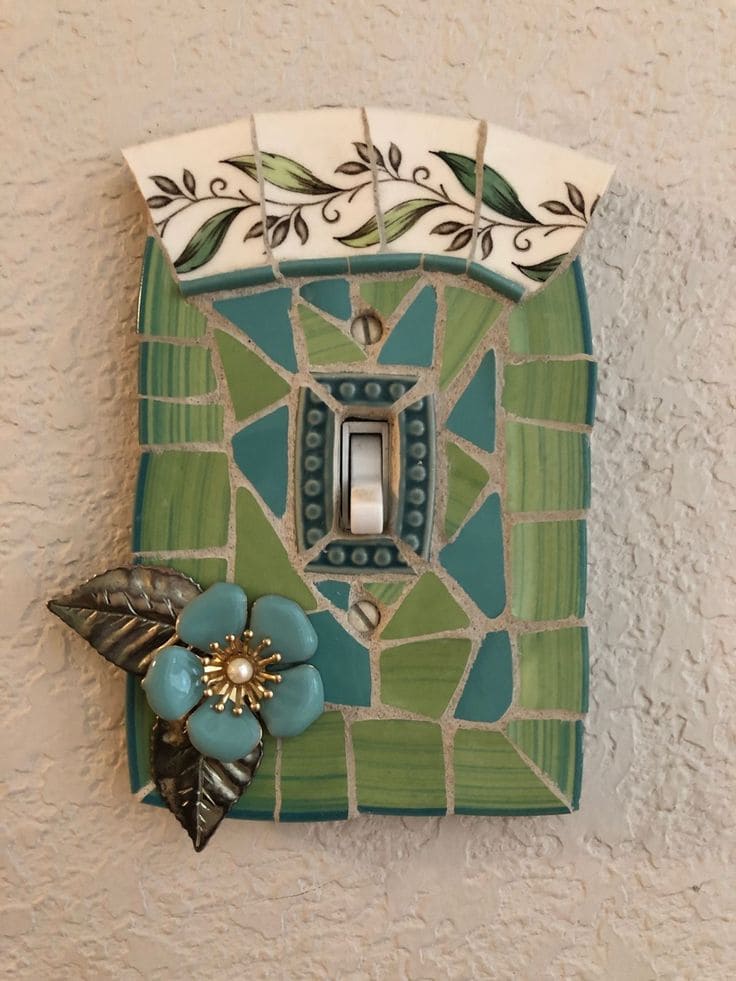
Who knew a basic light switch plate could turn into such a whimsical gem?
Materials Needed
- 1 plastic switch plate cover
- Small tile shards, broken plates
- Ceramic adhesive
- Grout
- Sponge and old rag
- Optional: jewelry flower, metal embellishments
Step-by-step Guide
Step 1: Start by arranging your chosen tile shards or plate pieces loosely around the switch plate. Once you find a pattern you love, glue them in place with your adhesive. Leave room around the switch opening and screw holes.
Step 2: Once fully dry (around 6–8 hours), apply grout carefully across the entire plate. Push it between the gaps with your fingers or a popsicle stick, then wipe gently with a damp sponge. Clean any film after 30 minutes.
Step 3: Add a final decorative piece like a flower pin or button near the corner for a custom flourish. Reinstall the cover—and flip the lights with flair!
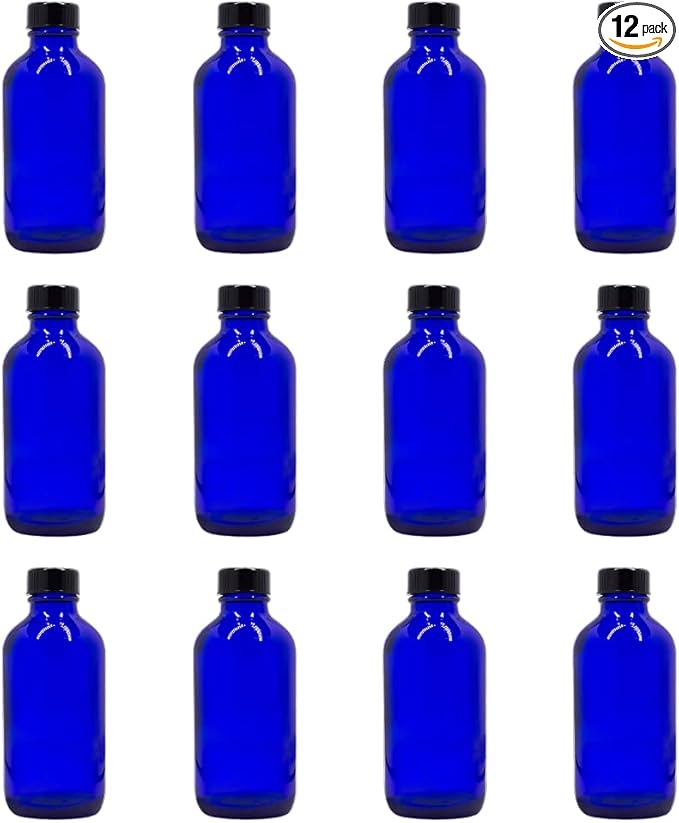
#23. Mosaic Wall Vase Display
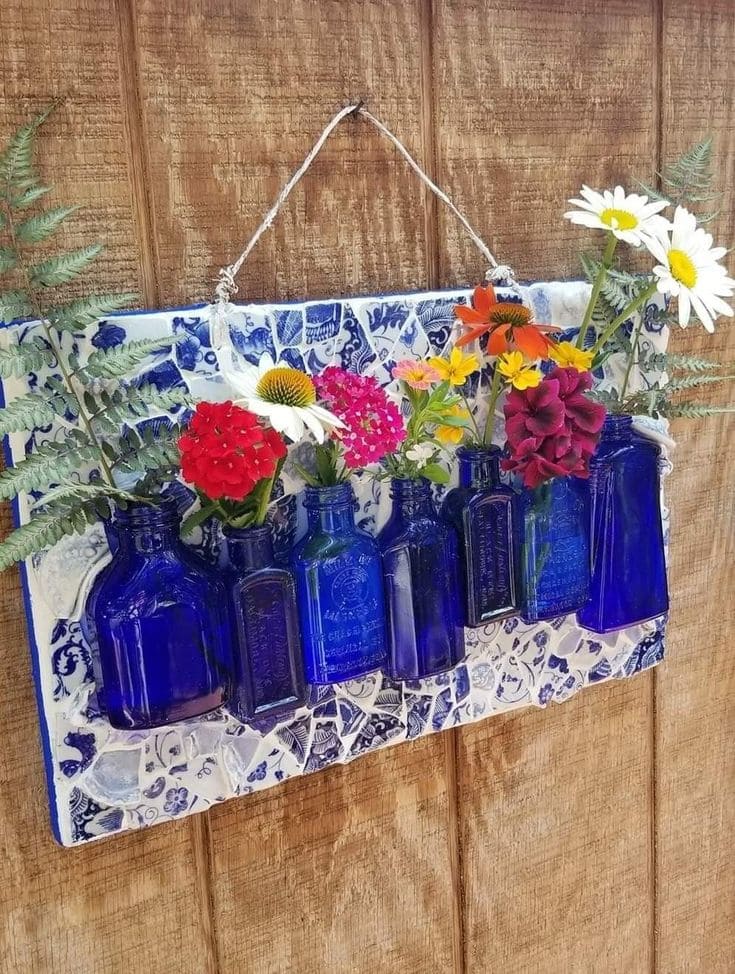
I used chipped plates from my grandmother’s cabinet and thrifted vintage apothecary bottles. It’s a piece of memory that blooms daily.

Materials Needed
- 1 MDF board (12×18 inches or larger)
- 6–7 cobalt blue glass bottles
- Broken china pieces
- E6000 glue
- Grout
- Wire
- Hanging hardware
- Optional: clear sealer spray
Step-by-step Guide
Step 1: Start by cleaning and prepping the wooden base. Glue your broken china pieces in a flowing, puzzle-like pattern, leaving small gaps between each piece.
Step 2: Once cured, attach your blue bottles evenly across the mosaic surface using E6000. Support them with painter’s tape while drying for 24–48 hours to ensure a strong hold.
Step 3: Add two small hooks or screws to the top corners of the board, then string a length of twine or wire for hanging. Spray with clear sealer if you plan to hang it outdoors.
#24. Chic Mosaic Tile Upcycled Chair Design
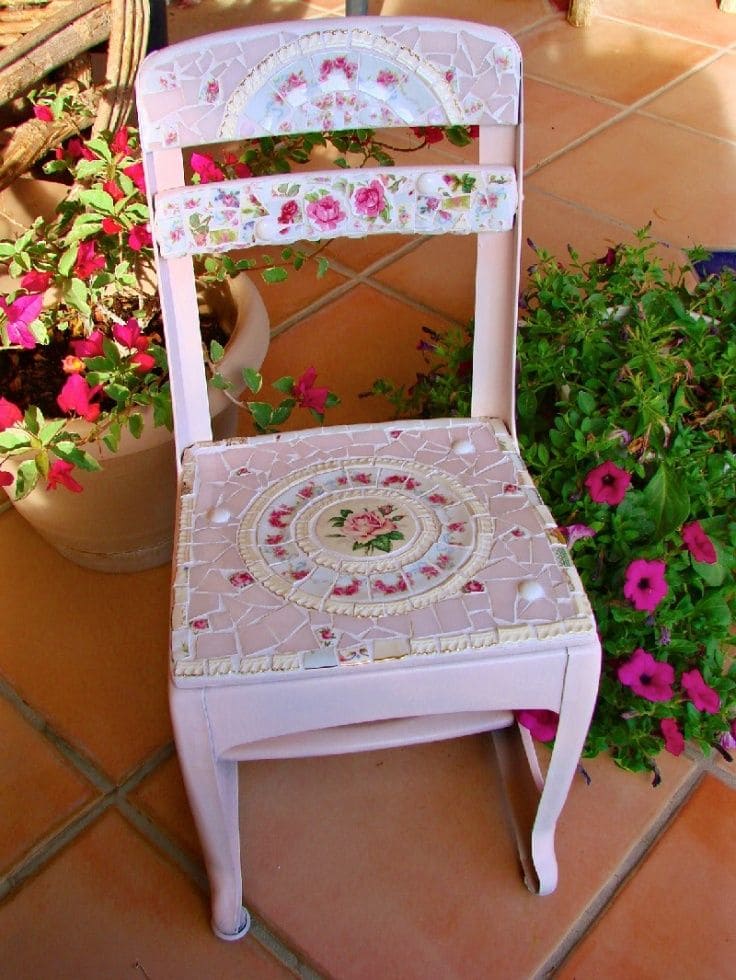
I rescued this forgotten wooden chair from a flea market corner, and the moment I saw it, I knew exactly what it could become.
Materials Needed
- 1 old wooden chair
- Pink chalk paint
- 1–2 floral porcelain plates
- Tile adhesive
- Grout
- Sponge and soft cloth
- Safety glasses and tile nippers
- Optional: Clear acrylic sealant
Step-by-step Guide
Step 1: Begin by sanding and painting your chair with soft pink chalk paint. Let it dry completely.
Step 2: While it dries, carefully break your floral china into small curved pieces using tile nippers, aim for accent shapes that keep rose clusters or decorative edges intact.
Step 3: Start by laying out your focal pieces (like the rose circle in the center of the seat), then build your mosaic around it with coordinating shards.
Step 4: Next, adhere each tile with glue, working section by section. Once dry, spread grout across the surface and press into cracks with a rubber spatula. Wipe off excess with a damp sponge and let cure.
Step 5: Polish the tiles once dry to reveal their shine, then seal with an outdoor protectant if placing on a porch or garden.
#25. Mosaic Jewelry Boxes with Elegance
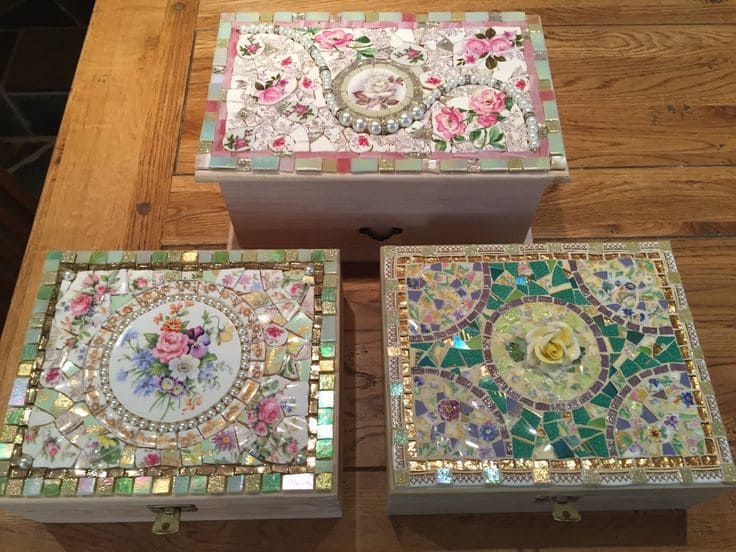
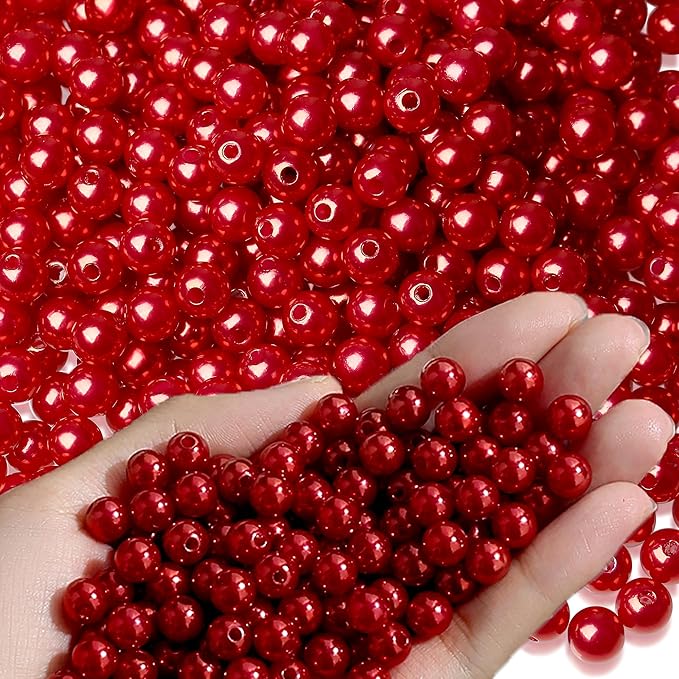
Each design tells its own tale: delicate roses, golden glimmers, and pearlescent beads – pieces that once sat on shelves or tables, now transformed into treasure keepers.
Materials Needed
- Wooden craft boxes (6″–10″)
- Broken china plates
- Mosaic tiles
- Tile adhesive
- Grout
- Pearl beads
- Tile nippers and safety goggles
- Small sponge, soft cloth, and sealant spray
Step-by-step Guide
Step 1: Lay out larger plate centers or decorative accents first – like floral saucer centers or gold-trimmed cup edges.
Step 2: Break china pieces using tile nippers and arrange them puzzle-style on the lid. Add tiny embellishments (like pearls or rhinestones) into gaps. Secure everything with glue and allow it to cure overnight.
Step 3: Grout over the surface, wiping gently to reveal the beauty beneath. Once dry, polish with a soft cloth. Add felt lining or a mirror inside for a thoughtful touch.