If you’re into simple, creative DIYs, rope can become your new favorite garden tool. With just a few knots and loops, it turns into something beautiful or surprisingly practical.
You’ll find all kinds of ideas here, from hanging shelves and light strands to plant supports and rustic edging. These projects are budget-friendly and easy to do, even if you’re not a seasoned crafter.
So grab a coil and start shaping your space with something as humble as rope.
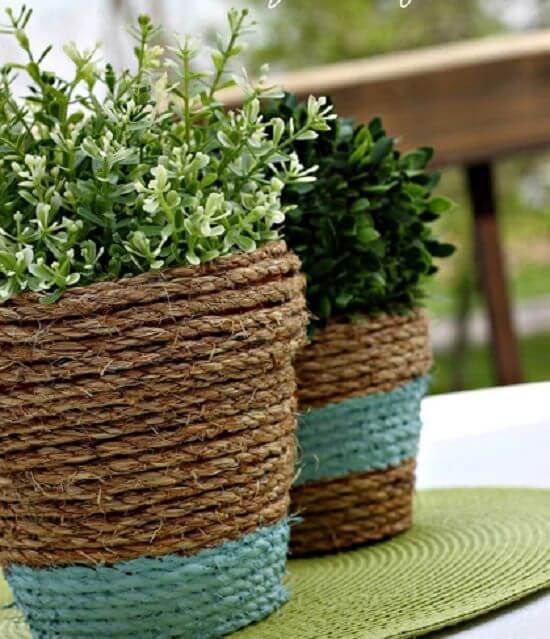
#1 Rope Wrapped Planters
 Source: Balconygardenweb
Natural jute rope gives the planter an earthy texture, while a strip of painted rope adds a pop of color that feels both stylish and relaxed.
Just hot glue the rope tightly around your container, layering it upward until the surface is completely covered. For a custom finish, paint the bottom section or dip-dye the rope beforehand.
Materials Needed
- 1 coil of jute or sisal rope (around 8–10 ft per pot)
- Plastic or terracotta planter (any size)
- Hot glue gun and glue sticks
- Acrylic paint (optional)
- Paintbrush
Step-by-step Guide
Step 1: Clean your planter and make sure it’s dry.
Step 2: Starting from the bottom, add hot glue in small sections and press the rope into place as you go around the pot.
Step 3: Continue coiling the rope up the planter, pressing it firmly into the glue each time.
Step 4: When you reach the top, cut the rope and secure the end with extra glue.
Step 5: If desired, paint the bottom few inches of rope or add a color block using painter’s tape for clean lines.
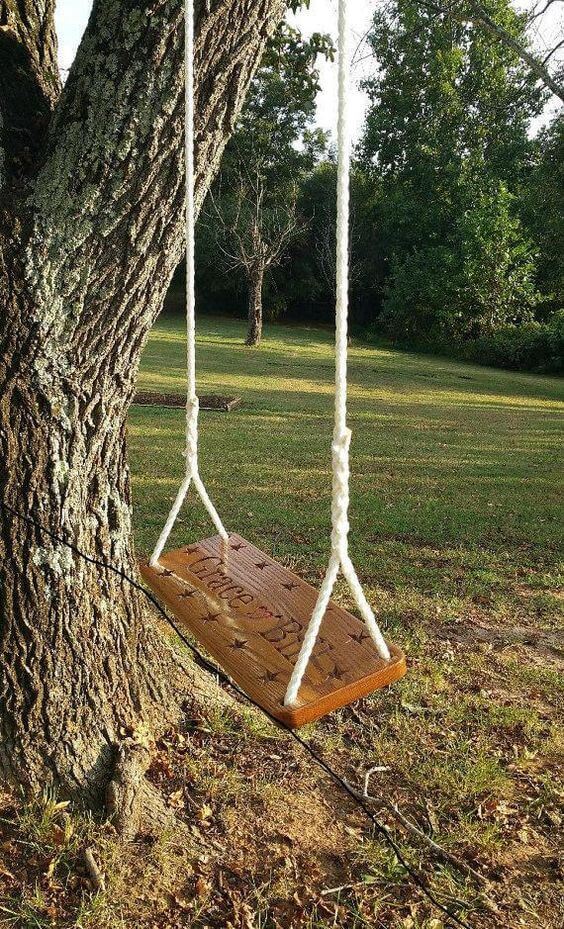
#2 Rope Swing
 Source: Etsy
There’s something magical about a rope swing swaying beneath an old tree, especially one you made with your own hands. This DIY version brings back the nostalgia of slow afternoons and childhood laughter, but with a sturdy, thoughtful design.
The natural rope combined with a polished wooden seat blends beautifully with the landscape.
To build it, just drill two holes into a thick, smooth plank and thread your rope through securely. Tie strong knots underneath, then loop and secure the other ends over a heavy tree limb.
Materials Needed
- 1 wooden board (approx. 24” x 8” x 1.5”)
- 2 lengths of heavy-duty rope (about 12–15 ft each)
- Drill with wood bit
- Sandpaper and wood sealer (optional)
- Sturdy tree limb (at least 8 ft high)
Step-by-step Guide
Step 1: Sand and seal your wooden board to make it smooth and weather-resistant.
Step 2: Drill two evenly spaced holes near each end of the board.
Step 3: Thread the rope through the holes and tie tight, secure knots underneath the seat.
Step 4: Throw the rope ends over a strong tree branch and adjust for your desired swing height.
Step 5: Tie off the top ends with a secure knot or carabiner for easy removal if needed.
Tip: Test the swing before use to make sure it holds firmly and swings freely without rubbing the bark too much.
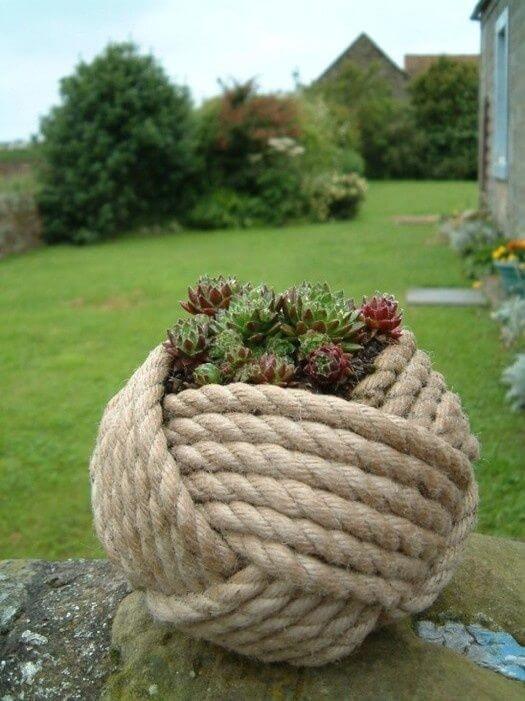
#3 Rope Planters
 Source: Garden
This charming succulent planter looks like a giant sailor’s knot, but it’s cleverly made with rope wrapped around a small pot. It’s compact, creative, and perfect for patios, steps, or window ledges where you want a little texture and greenery.
The chunky twist of the rope gives a cozy, handmade look that balances beautifully with the hardy, structured form of succulents.
Grab a small plastic container and coil rope tightly around it, gluing as you go to form a secure, round shape. Once complete, tuck in your favorite low-maintenance succulent and place it where it can catch the sun.
Materials Needed
- 1 small round planter (4–6 inches diameter)
- 10–12 ft of thick jute or sisal rope
- Hot glue gun and glue sticks
- Potting soil
- Succulent of your choice
Step-by-step Guide
Step 1: Begin by gluing the rope tightly at the base of the planter, working in a spiral motion.
Step 2: Continue coiling and gluing the rope upward, creating a knotted, layered effect.
Step 3: Once the rope reaches the top edge, trim and glue the end neatly into place.
Step 4: Fill the pot with well-draining succulent soil and plant your succulent.
Step 5: Place it in a sunny spot and water sparingly.
Tip: Use a faux succulent if you want a no-maintenance display for indoor shelves or office desks.
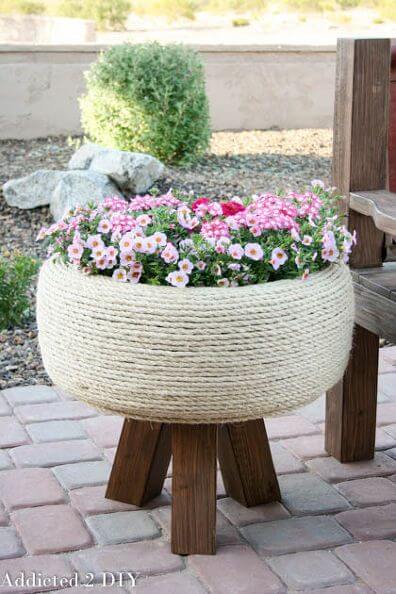
#4 Rope-Tire Flower Planter
 Source: Diytotry
This upcycled tire planter wrapped in thick rope is a smart way to combine rustic charm with bold blooms. Set on a sturdy wooden base, it brings height and structure to patios, porches, or garden corners that need a fresh pop of color.
You can fill it with trailing flowers like petunias or calibrachoa to soften the edge and give it a fuller look. Start with a clean old tire, wrap it tightly with rope using hot glue, and then add a wood stand or reuse an old table base for support.
Line the interior with a plastic container or landscape fabric to hold the soil.
Materials Needed
- 1 old tire (standard size)
- 50–60 ft of natural rope (1/2 inch thick)
- Hot glue gun and plenty of glue sticks
- Wood base or table legs
- Landscape fabric or large plastic pot insert
- Potting soil and flowering plants
Step-by-step Guide
Step 1: Thoroughly clean the tire and let it dry.
Step 2: Begin gluing and wrapping the rope tightly around the tire, starting at the bottom.
Step 3: Continue coiling and gluing until the tire is fully covered.
Step 4: Secure the wood base underneath using screws or strong adhesive.
Step 5: Line the inside with fabric or a large pot, add soil, and plant your favorite blooms.
Tip: Add small drainage holes to the liner before filling with soil to prevent water buildup.
#5 Hanging Basket Vegetable Garden
 Source: Bhg
This three-tier rope basket garden’s a great solution for growing fresh herbs or leafy greens. Each layer is crafted from rope-covered baskets in bright tones, held together with sturdy cords and hung from a hook or beam.
To make it, wrap woven rope around plastic containers, attach them securely using rope or chain, and hang from a bracket or pergola post. Fill each level with lightweight soil and plants that thrive in partial sunlight.
Materials Needed
- 3 round plastic containers or baskets (8–10″ diameter)
- Colored rope or jute (around 30 ft total)
- Hot glue gun and glue sticks
- Strong nylon cord or rope (6–8 ft)
- Drill (for drainage holes and hanging)
- Potting soil and herbs or salad greens
Step-by-step Guide
Step 1: Wrap each container with rope, securing with hot glue as you go.
Step 2: Drill holes at the sides near the top of each basket for threading the cord.
Step 3: Thread the cord through each basket, knotting securely under each tier.
Step 4: Hang your vertical garden from a hook or pergola post and fill each layer with soil and plants.
Tip: Choose herbs like basil or lettuce that grow quickly and look lush in cascading layers.
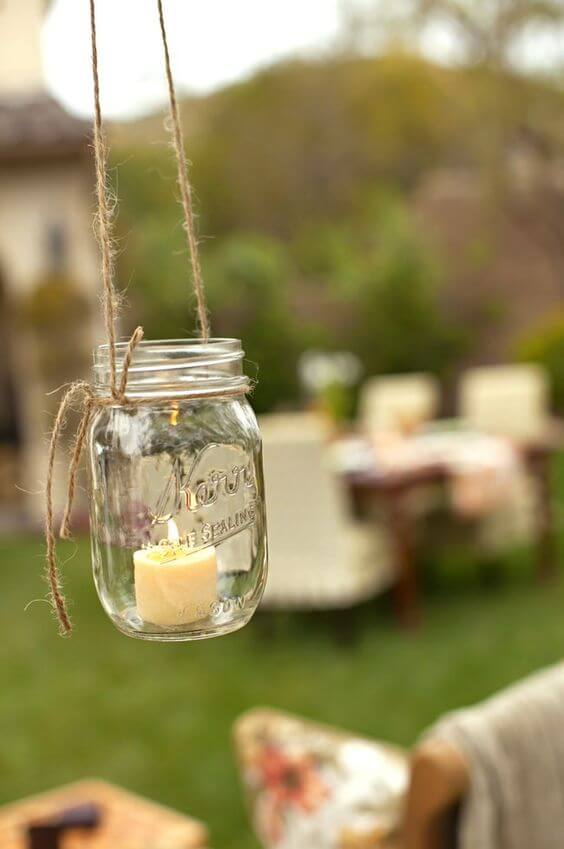
#6 Hanging Mason Jar
 Source: Thegardenglove
A mason jar, a bit of twine, and a tealight candle are all you need. It hangs easily from a tree branch or pergola beam and adds a cozy touch to backyard dinners or evening gatherings.
You can use citronella candles to help keep bugs away or switch to LED tealights for safety. This idea works well for patios, weddings, or just a quiet evening outside.
Materials Needed
- 1 mason jar (pint-size)
- 1 tealight or LED candle
- 2–3 ft of jute twine or string
- Scissors
- Lighter (if using a real candle)
Step-by-step Guide
Step 1: Wrap twine around the neck of the mason jar several times and tie securely with a double knot.
Step 2: Create a hanging loop by tying both ends of the twine together.
Step 3: Place the tealight inside the jar.
Step 4: Hang from a branch or hook and light the candle when ready to enjoy.
Tip: Use multiple jars at different heights for a layered lighting effect.
#7 Rope Railing
 Source: Michael Westgate
This wooden staircase provides a safe and steady path up a slope, making it easier to move between levels in a hilly yard or wooded area. Each step is made from sturdy timber, with gravel filling for better grip and drainage.
The thick rope handrail, secured to wooden posts, adds both function and rustic charm. This setup works well in natural landscapes where you want to blend practicality with a handmade feel. Ideal for cabins, garden trails, or backyard slopes.
Materials Needed
- Wooden planks (2×6″ or 2×8″, 36″ wide)
- Wooden posts (4×4″, about 3 ft tall)
- Outdoor-grade screws or nails
- Thick rope (1–1.5″ diameter)
- Gravel or crushed stone
- Post caps (optional for finishing)
- Level, shovel, and drill
Step-by-step Guide
Step 1: Mark and clear the path where the stairs will go.
Step 2: Set your wooden posts along the sides, spacing evenly for support.
Step 3: Build the steps by securing wooden planks into the slope and filling with gravel.
Step 4: Attach the rope handrail, threading it through or tying it securely to each post.
Tip: Use treated wood to prevent rot and add post caps for a finished look.
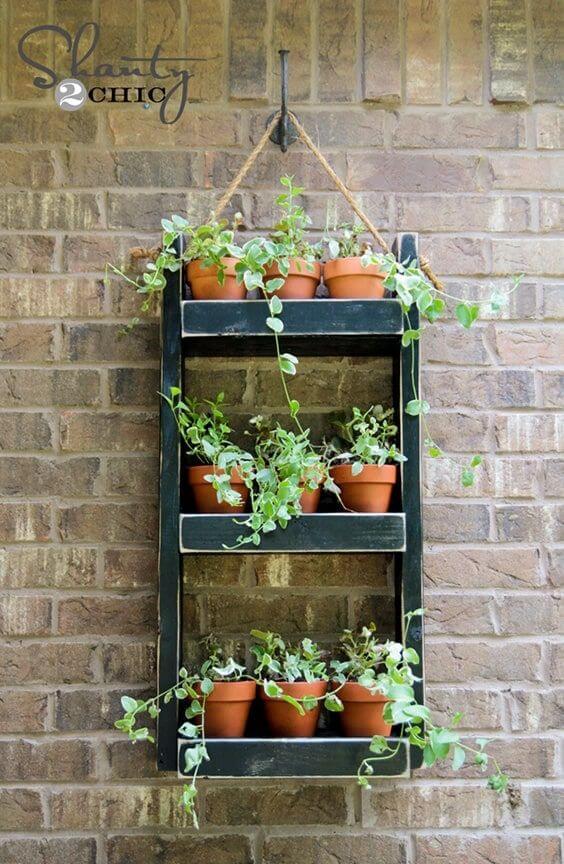
#8 Hanging Planter Shelf
 Source: Backyardboss
This wall-mounted ladder shelf makes use of vertical space to hold a trio of potted plants in a neat and tidy way. It’s a simple structure with two shelves, suspended by a thick rope and hung on a hook against a brick wall.
The rustic frame, combined with small terracotta pots and trailing greenery, adds charm without taking up floor space. This is great for small patios or narrow balconies where space is limited but you still want greenery close by.
Materials Needed
- Old wooden ladder or custom wood frame (approx. 2 ft wide, 3 ft tall)
- Two wooden boards for shelves (cut to width)
- Sturdy rope (about 3 ft)
- Screw hooks or wall mount bracket
- Clay pots (4–6 inch diameter)
- Plants or herbs of choice
Step-by-step Guide
Step 1: Attach the wooden shelves to the frame using screws or wood glue.
Step 2: Secure a rope across the top for hanging, tying knots at each end.
Step 3: Hang the ladder shelf on a sturdy wall hook or bracket.
Step 4: Place the potted plants evenly across each shelf.
Tip: Choose trailing or low-maintenance herbs for the best effect in outdoor settings.
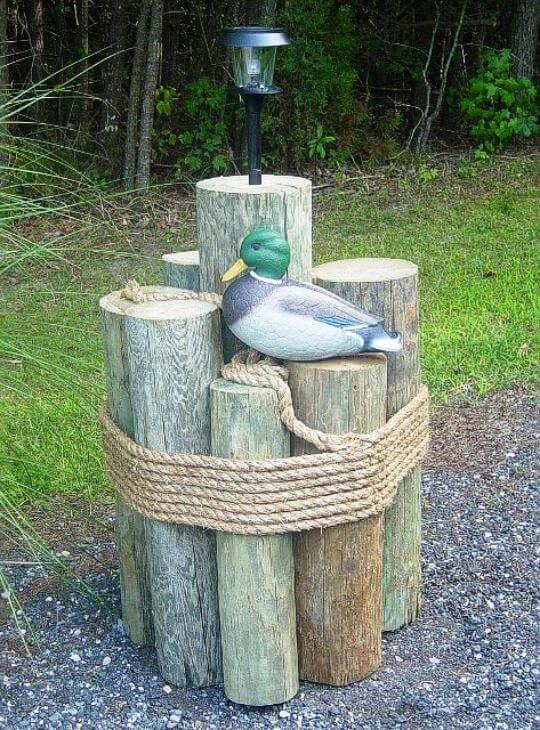
#9 Nautical Pilings With Rope Arranged To Hide A Well Pipe
 Source: Chesapeakecrafts
This outdoor accent brings a touch of lakeside charm to your yard using simple materials. Several weathered wooden logs are grouped together and tightly wrapped with thick rope, creating the look of dock mooring posts.
A solar light on top adds soft evening glow, and the duck statue perched on one log completes the coastal theme. It’s an easy way to give your garden or driveway entrance a cozy, cabin-style feel.
Materials Needed
- 4–6 wooden logs or thick fence posts (2.5–3 ft tall)
- Thick natural rope (at least 10 ft)
- Duck garden figurine
- Solar landscape light
- Wood glue or screws (optional for securing posts)
Step-by-step Guide
Step 1: Stand the logs upright in a circular cluster.
Step 2: Wrap the rope tightly around the middle and tie it off securely.
Step 3: Place or glue the duck statue on top of one log.
Step 4: Insert the solar light into one of the taller posts.
Tip: Use reclaimed wood for a naturally weathered look that blends into outdoor settings.
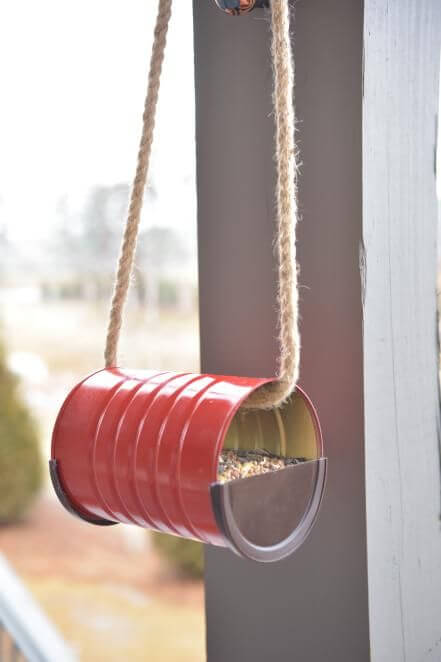
#10 DIY Hanging Bird Feeder
 Source: Hgvt
This clever little feeder uses a recycled tin can to create a cozy snack stop for birds. Painted in a cheerful red and suspended with thick rope, it’s simple yet eye-catching.
The open ends make it easy for small birds to perch and enjoy seeds, while the curved shape helps keep the feed contained. It’s a fun and practical project for your balcony, porch, or backyard garden.
Materials Needed
- 1 empty tin can (cleaned, label removed)
- Outdoor paint (any color)
- 2 wooden craft sticks or popsicle sticks
- Thick rope or twine (about 2–3 ft)
- Birdseed mix
- Strong glue or hot glue gun
Step-by-step Guide
Step 1: Paint the tin can and let it dry completely.
Step 2: Glue a stick across the open edge of each end to act as a perch.
Step 3: Thread the rope through the can and knot both ends securely for hanging.
Step 4: Fill the base with birdseed and hang it where birds can safely visit.
Tip: Add a light coat of clear sealant to protect the paint from weathering.
#11 Rope Plant Hanger
 Source: Anythingologyblog
This chunky rope hanger gives your hanging planter a nautical, hand-crafted touch that feels both sturdy and stylish.
The thick knots and wooden beads add texture and charm, while the shallow bowl overflows with succulents, pebbles, and a touch of candlelight. It brings a calming, spa-like energy to porches or patios and thrives in bright indirect light.
You can use any lightweight bowl or dish and adjust the rope length depending on your space.
Materials Needed
- 1 shallow bowl or ceramic dish (10–12″ wide)
- Natural jute rope (about 12 ft, divided into three or four strands)
- Wooden beads (optional, about 1–1.5″ diameter)
- Potting soil and succulents
- Decorative stones or pebbles
- Battery-operated candle (optional)
Step-by-step Guide
Step 1: Cut your rope into equal lengths and thread beads onto them before knotting the bottom center to support the bowl.
Step 2: Nest the bowl inside the rope cradle, adjusting knots so it sits level.
Step 3: Fill the bowl with well-draining soil and arrange succulents evenly.
Step 4: Top with decorative pebbles and place the candle in the center if desired.
Tip: Use faux succulents and a flameless candle for low-maintenance décor.
#12 Rope Support To Plants
 Source: Seedmoney
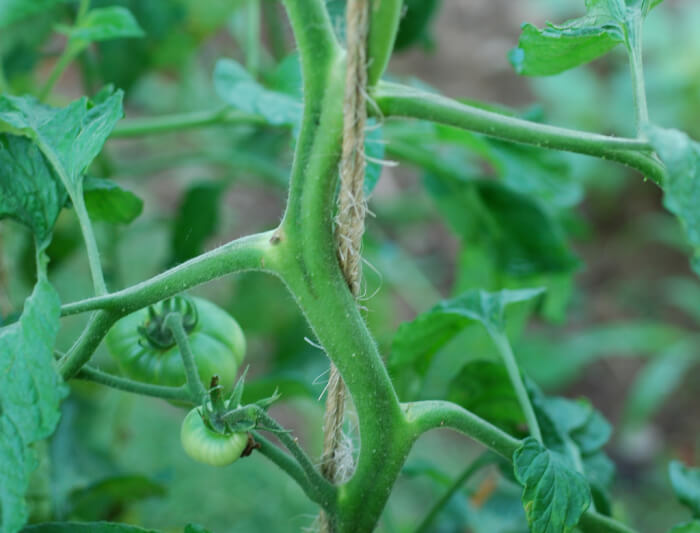
This natural twine support system is a straightforward and budget-friendly way to keep tomato vines upright and productive.
By using strong jute rope tied vertically, your tomato plants stay well-supported while maintaining airflow and easy access for pruning or harvesting. It’s ideal for gardeners looking to minimize clutter in raised beds or container gardens.
Plus, the rope blends effortlessly into the greenery, making the setup visually clean and natural.
Materials Needed
- Jute or sisal rope (1/4″ thick, 5–6 ft per plant)
- Garden stakes or an overhead support bar
- Scissors or garden clippers
- Tomato plants (indeterminate types work best)
Step-by-step Guide
Step 1: Tie one end of the rope securely to an overhead beam or crossbar above your tomato bed.
Step 2: Gently wrap the other end around the tomato stem, giving support without pinching the plant.
Step 3: As the plant grows, continue twirling it around the rope or secure it with plant ties as needed.
Tip: Avoid using synthetic rope; it can cut into stems or trap moisture, inviting rot.
#13 Rope Trellis
 Source: Gardenoid
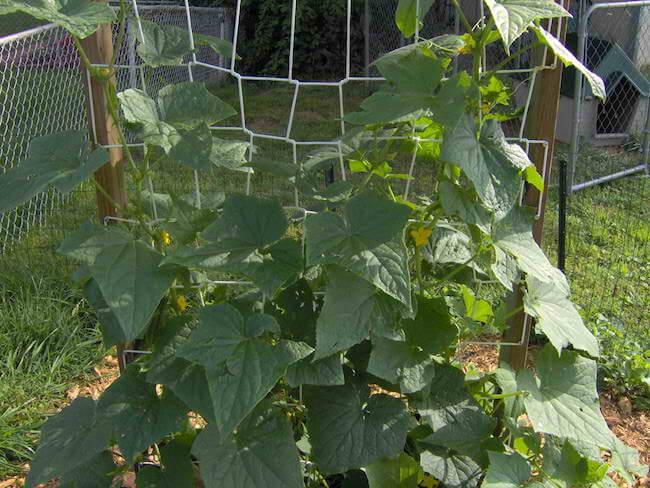
This upright cucumber trellis makes it easier to manage sprawling vines while saving space in your garden. The flexible netting allows tendrils to climb naturally, which boosts air circulation and minimizes disease.
It also keeps cucumbers off the ground, resulting in straighter, cleaner fruits. You’ll be able to see and pick cucumbers with ease, and your garden stays tidy and productive.
Materials Needed
- 2 wooden posts (6 ft tall, 2″ x 2″)
- Garden trellis netting (approx. 5 ft wide x 6 ft tall)
- Zip ties or garden staples
- Hammer or post driver
- Cucumber seedlings
Step-by-step Guide
Step 1: Drive the wooden posts into the ground about 3–4 feet apart.
Step 2: Attach the trellis netting between the posts using zip ties, stretching it tightly.
Step 3: Plant cucumbers at the base and guide the vines through the netting as they grow.
Tip: Install your trellis before planting to avoid disturbing roots later on.
#14 Rope String Lights
 Source: Loveproperty
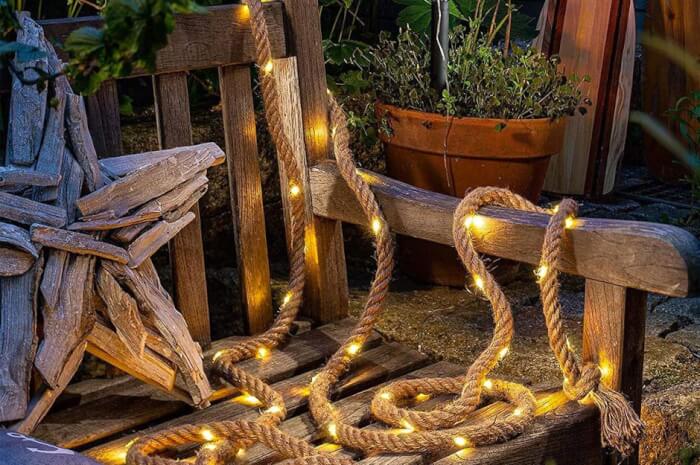
This cozy setup blends natural texture with soft lighting using thick rope entwined with warm fairy lights. Draped over a wooden bench and around nearby decor, it creates a warm and welcoming glow perfect for evening relaxation.
The rough jute rope adds a coastal or rustic farmhouse touch, making it ideal for patios, garden seating areas, or even balcony corners.
Materials Needed
- 1 thick jute rope (about 15 ft long)
- 1 string of warm LED fairy lights (battery or solar-powered, 15–20 ft)
- Wooden garden bench or seating area
- Optional: Clear zip ties or clips
Step-by-step Guide
Step 1: Stretch the rope and wrap the fairy lights around it evenly from one end to the other.
Step 2: Drape or weave the rope light over your bench or furniture, arranging it loosely for a casual feel.
Step 3: Secure with zip ties if needed, and turn on the lights at dusk for instant ambiance.
Tip: Use solar-powered lights for hassle-free illumination and no need for outlets.
#15 Rope Garden Edging
 Source: Ruralsprout
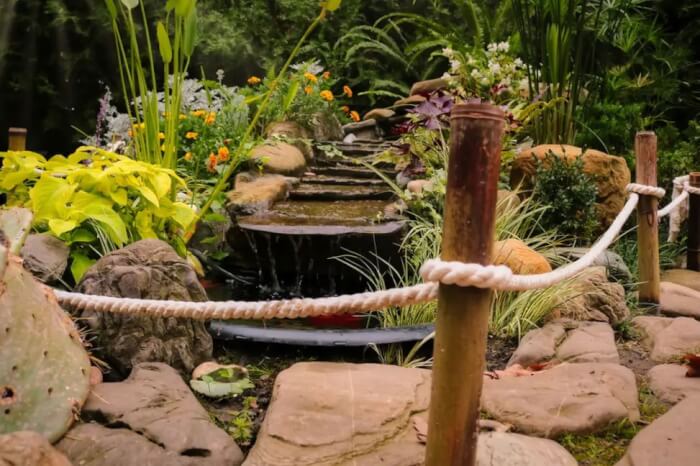
This elegant garden setup uses thick rope and rustic wooden posts to subtly guide visitors along a stone pathway while framing a tranquil waterfall.
Soft curves of the rope contrast with the rugged natural stones, lush foliage, and flowing water, creating a harmonious blend between order and wild beauty.
Materials Needed
- 6–8 wooden posts (2–3 ft tall)
- 1 durable outdoor rope (20–30 ft depending on layout)
- Hammer or mallet
- Optional: Wood sealant for weatherproofing
Step-by-step Guide
Step 1: Space your wooden posts evenly along your garden path or pond perimeter and hammer them into the soil securely.
Step 2: Thread your rope through the posts or tie it securely around each one, keeping the tension even but relaxed.
Step 3: Trim any excess rope and knot the ends for a finished look.
Tip: Choose a weather-resistant rope to maintain charm through every season.
#16 Rope Tire Ottoman
 Source: Stylemepretty
Turn worn-out tires into durable ottomans perfect for outdoor or indoor use. The rope wrapping gives a solid grip for sitting, and the tire core holds weight well. These ottomans can function as footrests, small tables, or casual seating.
They’re low-cost, weather-friendly, and sturdy enough for everyday use. Make one in an afternoon and customize the rope size for different comfort levels.
Materials Needed
- 1 standard car tire (cleaned and dry)
- 50 ft of 1/2-inch jute or sisal rope (per ottoman)
- 1 round plywood piece (same diameter as tire, optional but adds structure)
- Heavy-duty hot glue gun + 10–15 glue sticks
- Scissors or utility knife
- Clear outdoor sealant (optional for weatherproofing)
Step-by-step Guide
Step 1: Wash the tire with soap and water, then let it dry completely.
Step 2: If using plywood, screw or glue it onto one or both sides of the tire for a firm base.
Step 3: Apply hot glue in small sections and begin spiraling the rope from the center outwards on the top surface.
Step 4: Keep wrapping the rope around the sides tightly, gluing as you go to prevent gaps or loosening.
Step 5: Finish the bottom side (if desired), cut excess rope, and glue the end securely.
Tip: Let the glue cure fully before sitting. Use clear sealant if leaving the ottoman outdoors to resist moisture and mold.
#17 Gutter Hanging Planter With Rope
 Source: Makeit-loveit
This space-saving setup is ideal for patios or balconies with limited ground space. The rope shelves support three lightweight rectangular planters, giving you vertical growing real estate for herbs, flowers, or leafy greens.
Each tier hangs from strong rope and stays balanced with proper knot spacing. Great for renters too, minimal wall drilling required. Best for plants with shallow root systems and daily watering routines.
Materials Needed
- 3 plastic or lightweight planter boxes (approx. 24″ x 6″)
- 40–50 ft of 3/8-inch jute rope (cut into four even lengths)
- 2 heavy-duty wall brackets with hooks
- 8 metal grommets or eyelets (optional for added support)
- Potting soil and plants of choice
- Drill and 3/8” drill bit
Step-by-step Guide
Step 1: Drill 4 holes in each planter’s corners for the rope to pass through.
Step 2: Thread two lengths of rope through the holes on each side, tying knots under each box to hold them in place.
Step 3: Space the tiers evenly and adjust knots for level balance.
Step 4: Attach the top of the ropes to wall hooks using a loop knot or secure with carabiners.
Step 5: Fill planters with soil and shallow-rooted plants. Water carefully to avoid runoff.
Tip: Line the bottom of each planter with coconut liner or small pebbles to improve drainage without dripping onto lower levels.
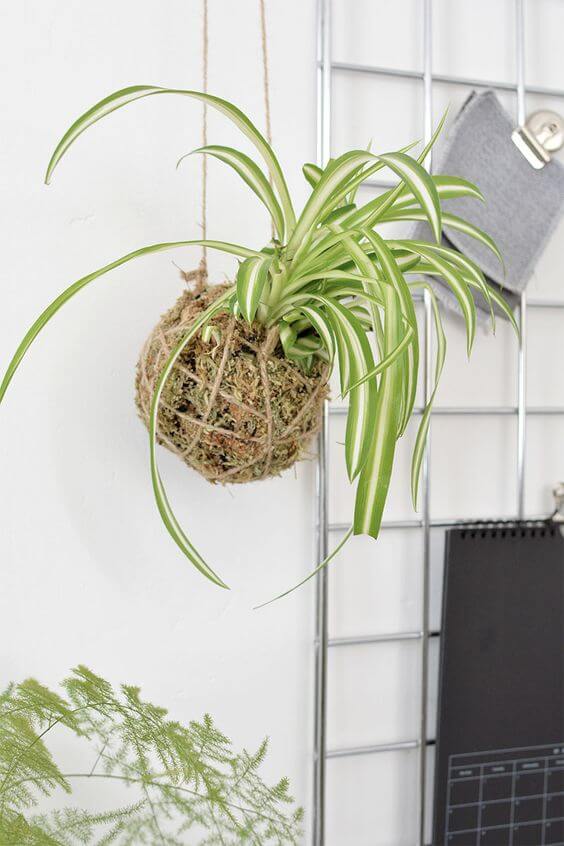
#18 Kokedama String Indoor Garden
 Source: Burkatron
Kokedama is a Japanese root-wrapping technique that eliminates the need for pots, perfect for displaying spider plants in small spaces.
This hanging design holds the plant in a soil ball wrapped in moss and twine, creating a breathable root structure. It’s ideal for homes with bright, indirect light.
You’ll need to soak it every 5–7 days and let it drain well before rehanging. A drip tray below is recommended if used indoors.
Materials Needed
- 1 healthy spider plant
- 1–2 cups bonsai or akadama soil
- 1 cup peat moss or coco coir
- Sheet moss (enough to cover a 6” ball)
- 4–6 ft of garden twine or jute string
- Scissors and a water bowl
Step-by-step Guide
Step 1: Mix peat moss and bonsai soil 1:1 and moisten with water until it clumps like clay.
Step 2: Form the soil into a ball around the spider plant roots. Compress firmly.
Step 3: Wrap the entire ball in sheet moss, then tightly bind it with twine in multiple directions.
Step 4: Tie a loop of twine at the top to hang your kokedama from a hook or rail.
Step 5: To water, soak the moss ball in a bowl of water for 10–15 minutes, then drain completely.
Tip: Mist the moss between waterings to maintain humidity, especially during warm months.