Recycled hanging planters are more than just eco-friendly, they’re a fun way to breathe life into your home and garden using objects that would otherwise be forgotten. With just a few tweaks, discarded items like light bulbs, bottles, and old fabric can turn into stunning displays of greenery suspended in mid-air.
These projects don’t require much time or money, but they do bring a big charm. You’ll get to repurpose what you already have, reduce waste, and craft planters that are as meaningful as they are beautiful. Some designs are rustic, others are playful, but each one is a conversation starter.
They also offer space-saving solutions that make vertical gardening feel stylish and personal. And depending on what you grow, they can purify air, add fragrance, or even help stock your kitchen with fresh herbs and greens. Ready to turn clutter into creativity? Let’s dig into these weekend-worthy ideas.
#1 Handmade Wooden Hanging Planter
 Source: Etsy
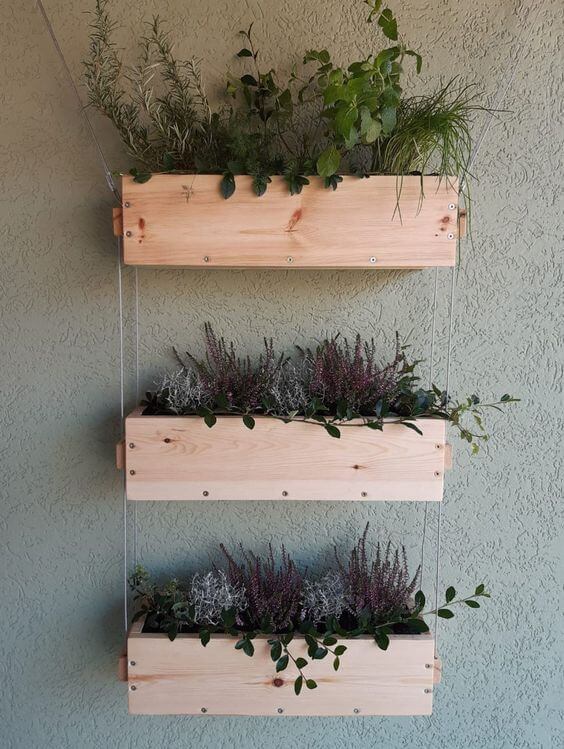
This is a charming vertical hanging planter made from three wooden boxes. It’s perfect for small spaces like balconies, patios, or even inside your kitchen.
You can grow herbs, flowers, or small leafy plants. It saves floor space while still letting you enjoy a lush, green view on the wall.
Materials Needed
- 3 wooden boxes or crates (each about 16-20 inches wide)
- Strong rope or cord (around 10–12 feet)
- Wall or ceiling hooks (2 pieces)
- Drill and screws
- Potting soil
- Plants of your choice
Step-by-step Guide
Step 1: Drill small holes on each side of the boxes (two per side) for threading the rope through.
Step 2: Cut two equal lengths of rope. Tie a strong knot under each box to keep them in place and spaced evenly apart.
Step 3: Thread the ropes through all the boxes, stacking them vertically. Leave extra rope at the top for hanging.
Step 4: Mount strong hooks into your wall or ceiling where you want the planter to hang.
Step 5: Fill each box with soil and plants. Water lightly and make sure there’s drainage or don’t overwater.
Tip: Choose lightweight plants and water gently to keep the planter steady and safe.
#2 Hanging Light Bulb Planters
 Source: Feeistmeinname
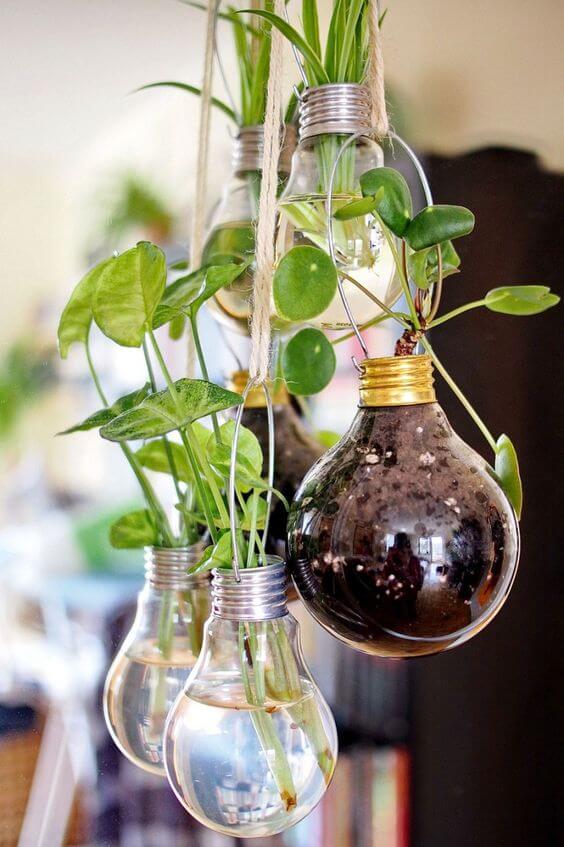
This project turns old light bulbs into small hanging planters. They’re perfect for rooting cuttings or growing tiny plants, and they look beautiful when grouped together.
These planters add a fun, creative touch to your space and are a smart way to reuse items you already have.
Materials Needed
- Old light bulbs (clear, used ones work best)
- Twine or string
- Wire or metal hooks
- Small plants or water-rooted cuttings
- Gloves and pliers
- Safety glasses (optional but helpful)
Step-by-step Guide
Step 1: Carefully remove the metal base and inner parts of the bulb using pliers. Be gentle—glass can crack.
Step 2: Rinse out the bulb and let it dry. Loop some wire or strong twine around the metal part of the bulb.
Step 3: Add water or a bit of potting mix inside the bulb. Insert a small plant cutting or low-root plant.
Step 4: Hang your bulbs near a bright window or in a sheltered outdoor area. Avoid direct sun to prevent overheating.
Tip: Use plants like pothos, baby spider plants, or lucky bamboo for best results.
#3 Coconut Shell Hanging Planter
 Source: Etsy
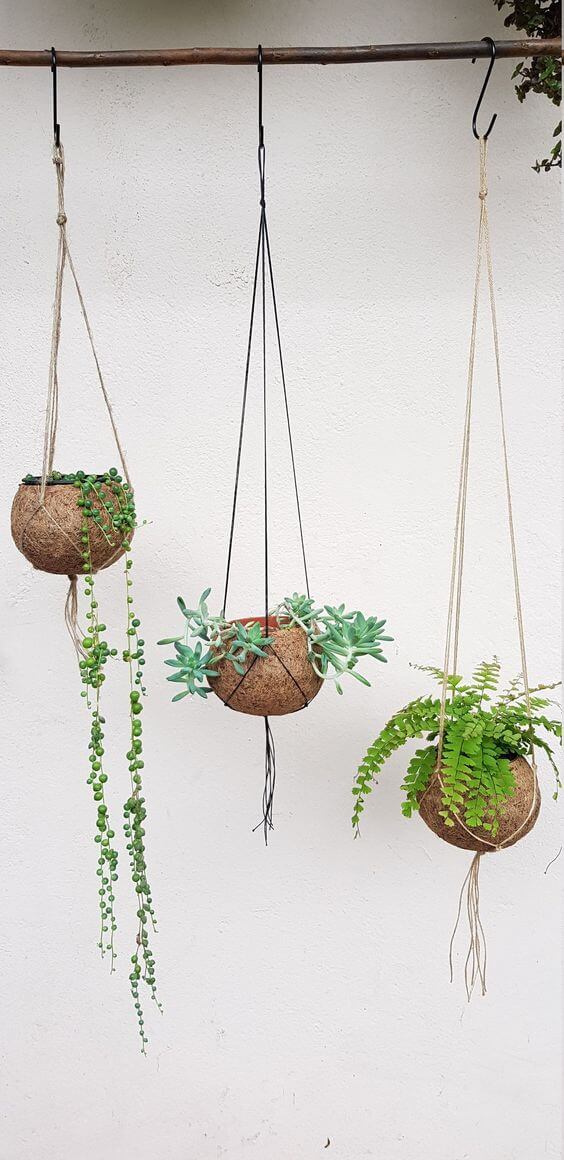
These planters are made from halved coconut shells. They’re lightweight, natural, and perfect for small plants like succulents, ferns, or trailing vines. You can hang them indoors or out, and they hold up well with the right care.
Materials Needed
- Halved coconut shells (cleaned and dried)
- Drill and small drill bit
- Twine or wire
- Soil and small plants
- Optional: liner for moisture control
Step-by-step Guide
Step 1: Drill three or four holes evenly spaced near the top edge of each shell.
Step 2: Cut equal lengths of twine or wire and tie them through the holes. Gather and knot at the top to form a hanger.
Step 3: Add a liner if needed, then fill with potting soil and insert your chosen plant.
Step 4: Hang the planter in a spot with bright, indirect light and water gently as needed.
Tip: Great for small trailing plants like string of pearls or hardy herbs.
#4 Hanging Succulent Planter Log
 Source: Etsy
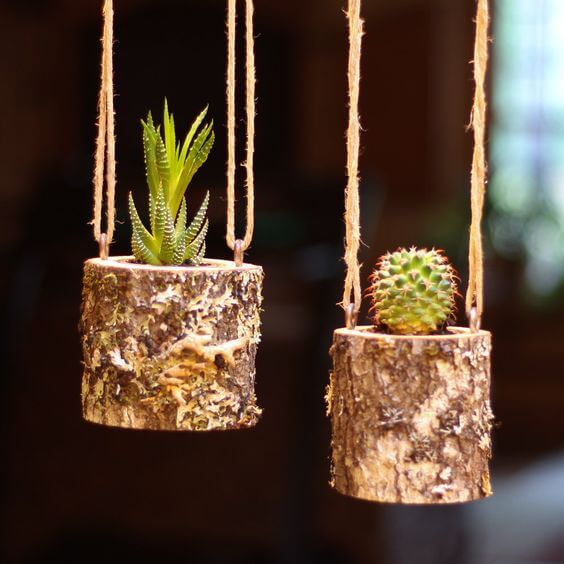
These little hanging planters are made from short logs with the centers hollowed out. They keep that raw, earthy texture and are perfect for showing off small succulents or cacti.
Their rustic look adds charm to patios, balconies, or even indoor corners.
Materials Needed
- Small logs (about 4–6 inches long)
- Drill with a wide bit or hole saw
- Twine or strong string
- Small succulents or cacti
- Potting soil suitable for succulents
Step-by-step Guide
Step 1: Drill a hole in the top of the log to create space for soil and roots. Make sure it’s deep enough for the plant.
Step 2: Drill two small holes near the sides and thread through the twine to create a hanger. Tie the ends tightly.
Step 3: Add a bit of cactus or succulent soil, then plant your tiny green friend.
Step 4: Hang it somewhere with bright light and water sparingly.
Tip: Choose logs with thick bark for a stronger, longer-lasting planter.
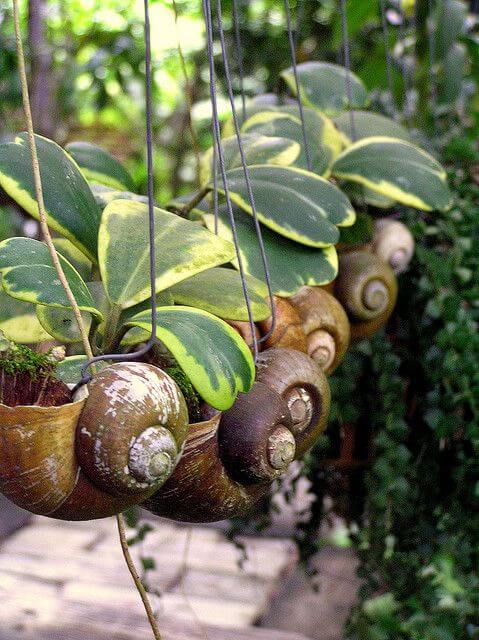
#5 Giant Snail Shell Planter
 Source: Flickr
These stunning planters reuse large snail shells to cradle small plants in a one-of-a-kind display. Their spiral shape and natural texture make them look like tiny sculptures hanging in the air.
This project brings a fun and earthy touch to your indoor or garden space.
Materials Needed
- Large, clean snail shells
- Strong string, wire, or twine
- Small indoor plants or succulents
- Potting mix (light and well-draining)
- Small spoon or tweezers
Step-by-step Guide
Step 1: Rinse and dry each shell. Make sure there are no cracks that could break under weight.
Step 2: Fill the shell opening gently with potting mix, using a spoon or tweezers to avoid mess.
Step 3: Insert the plant carefully, making sure the roots fit snugly inside the shell.
Step 4: Tie string around the shell’s grooves or glue a small hook, then hang it somewhere with indirect light.
Tip: Choose hardy plants like peperomia or succulents that don’t need deep soil or frequent watering.
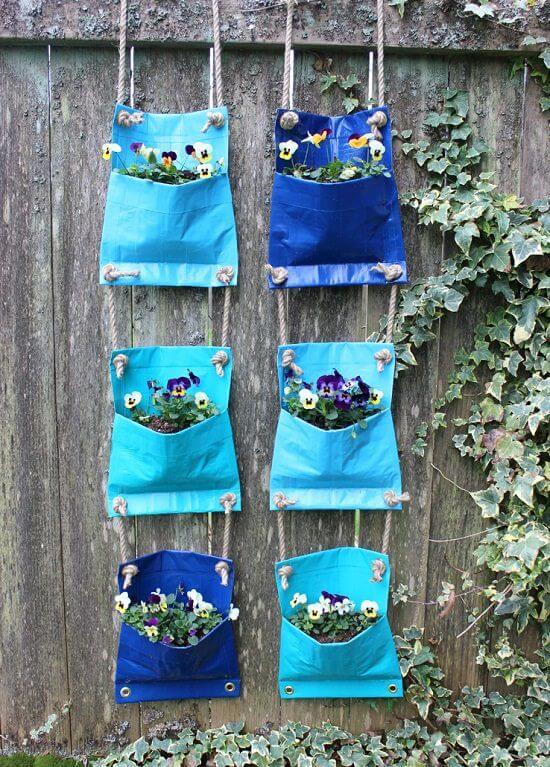
#6 Hanging Pocket Planters
 Source: Balconygardenweb
These colorful pocket planters turn old fabric or vinyl into a fun vertical garden. The deep pockets are perfect for flowers or herbs and hang easily on any fence or wall. Their playful colors brighten up even the dullest outdoor space.
Materials Needed
- Old aprons, fabric pouches, or sturdy pocketed cloth
- Rope or twine
- Hooks or nails for hanging
- Soil and small plants
- Scissors and strong thread (optional)
Step-by-step Guide
Step 1: Choose pouches or aprons with deep pockets. Reinforce the top edge with stitching if needed.
Step 2: Add small holes at each corner to run rope through. Make sure the fabric is strong enough to hold weight.
Step 3: Fill each pocket with soil and place your flowers or herbs inside carefully.
Step 4: Hang the ropes on nails or hooks in a sunny spot on your fence or wall.
Tip: Line each pocket with plastic or landscape fabric to hold in moisture and prevent leaks.
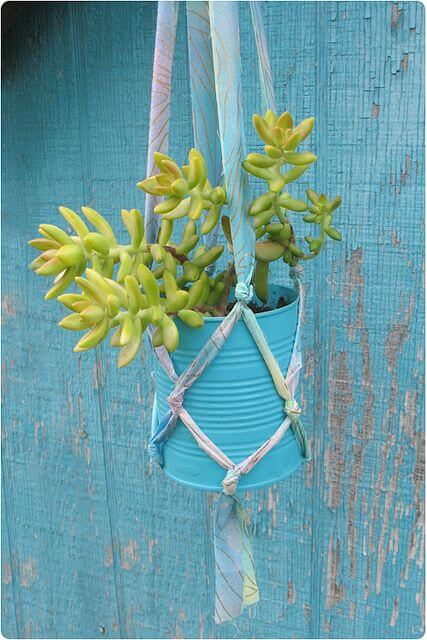
#7 Hanging Tin Can Planter
 Source: Flickr
This cute hanging planter uses an old tin can and a few fabric scraps to create a cheerful home for your favorite succulent.
It’s small, simple, and perfect for brightening up a balcony, fence, or porch. The colorful can and soft ties give it a cozy, handmade charm.
Materials Needed
- Empty tin can (clean and dry)
- Acrylic paint (any color)
- Fabric scraps or ribbon for hanging
- Soil and a small plant like a succulent
- Nail and hammer (for drainage holes)
Step-by-step Guide
Step 1: Paint the tin can in your favorite color and let it dry completely.
Step 2: Use a nail and hammer to poke 2-3 holes in the bottom for drainage.
Step 3: Cut strips of fabric and tie them securely around the can to make a hanger.
Step 4: Fill the can with soil and gently plant your succulent inside.
Step 5: Hang it in a sunny spot using a hook or nail.
Tip: Use weatherproof paint if you’re hanging it outdoors to make it last longer.
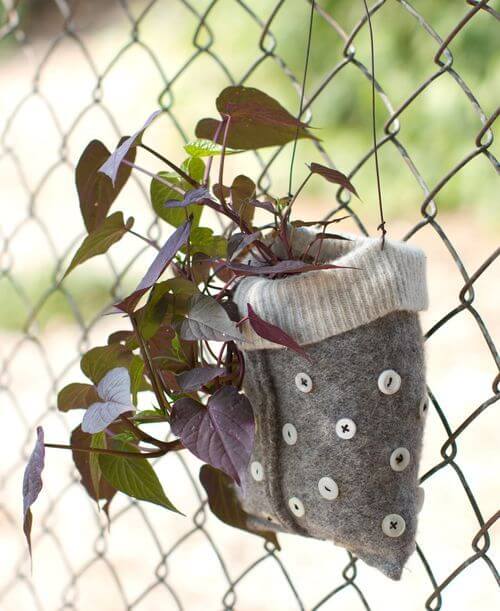
#8 A Hanging Plant Pouches Made Out Of Old Sweaters
 Source: Cynthiashaffer
This cozy planter is made from an old sweater sleeve, giving your plant a warm and soft place to grow. The buttons add a playful touch, and the soft fabric makes it perfect for hanging along a fence or balcony.
It’s lightweight, charming, and easy to put together with materials you already have.
Materials Needed
- Old sweater sleeve or sock
- Plastic lining or small pot (to hold soil)
- Buttons (optional for decoration)
- Needle and thread or glue
- String or wire for hanging
- Soil and a small trailing plant
Step-by-step Guide
Step 1: Cut the sleeve to the length you want and line it with a small plastic container or bag for soil.
Step 2: Decorate the outside with buttons if you’d like, sewing or gluing them on.
Step 3: Add soil and plant your greenery inside the liner or container.
Step 4: Use string or wire to hang it securely on a fence, hook, or balcony rail.
Tip: Choose lightweight plants like sweet potato vine or ivy to avoid stretching the fabric.
#9 Bamboo Planter
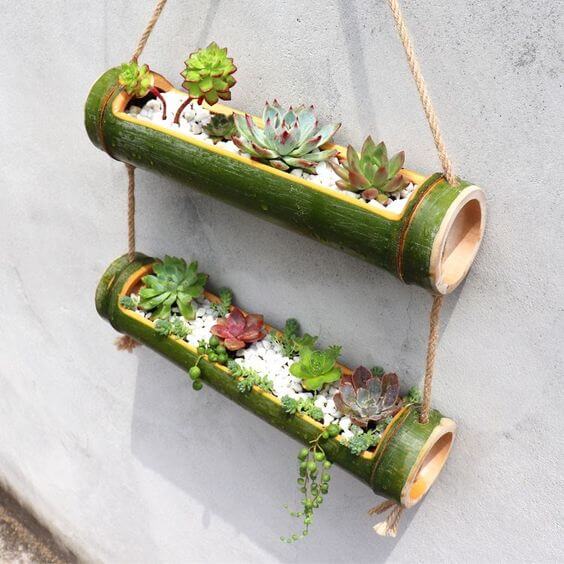 Source: Valentina Diary
This hanging bamboo planter is a simple and eye-catching way to show off your favorite succulents. The natural green of the bamboo adds a fresh, earthy touch to any wall or fence.
It’s a smart use of space and brings life to even small outdoor corners. Plus, it’s a fun project you can finish in an afternoon.
Materials Needed
- 2 thick bamboo sections (about 12–16 inches long)
- Drill and handsaw
- Twine or rope
- Small pebbles or white rocks
- Succulent potting mix
- Assorted succulents
Step-by-step Guide
Step 1: Cut open a long strip from each bamboo piece to create a trough. Sand any rough edges.
Step 2: Drill holes on each end of the bamboo for the rope to go through.
Step 3: Thread the rope through the holes and tie knots underneath to hold the bamboo in place.
Step 4: Fill the bamboo with a layer of small rocks, then add succulent soil.
Step 5: Plant your succulents and top with white pebbles for a clean look.
Tip: Hang it somewhere with morning sun and good airflow to keep your succulents happy.
#10 Hanging PVC Pipe Planter
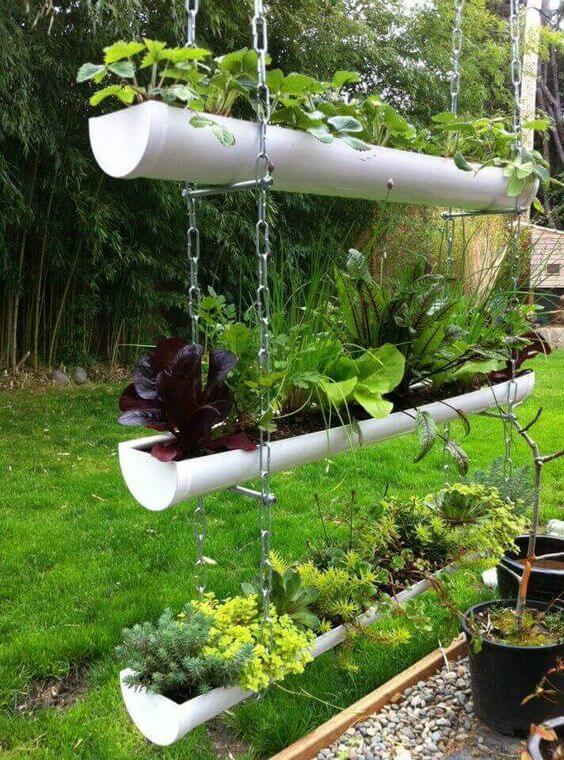 Source: Homebnc
This clever setup turns simple PVC pipes into a full vertical garden. It’s perfect for growing herbs, greens, and flowers when you don’t have a lot of space.
The hanging style keeps your plants off the ground, helps with drainage, and makes everything easy to reach. It’s great for balconies, patios, or even an open backyard corner.
Materials Needed
- 3 large PVC pipes (around 3–4 inches in diameter and 3 feet long)
- Metal chains and hooks
- Drill and handsaw
- Potting soil
- Plants or seeds (lettuce, herbs, strawberries, succulents)
Step-by-step Guide
Step 1: Cut each PVC pipe in half lengthwise to create troughs.
Step 2: Drill small drainage holes along the bottom of each trough.
Step 3: Drill holes at each end of the pipe for attaching the chains.
Step 4: Use strong chains to connect and hang the pipes from a sturdy beam or hook.
Step 5: Fill with soil and plant your chosen greenery.
Tip: Place sun-loving plants on top and shade-tolerant ones on the bottom for balance and healthy growth.
#11 Hanging Plastic Bottle Planter
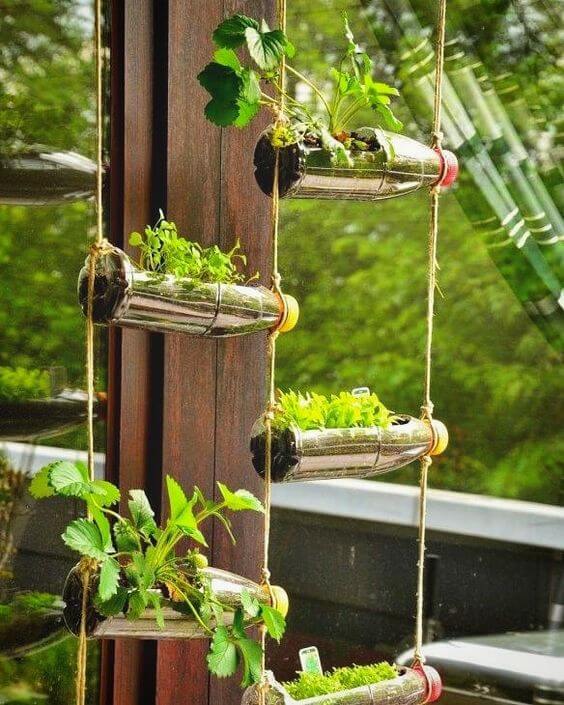 Source: Evolveabroad
This hanging garden uses empty plastic bottles to grow herbs or small greens. It’s a simple and affordable way to recycle and plant at the same time.
The bottles are hung in a vertical pattern, making them great for small balconies or walls. This idea works well for light plants like lettuce or strawberries.
Materials Needed
- 6 large plastic bottles (2-liter works well)
- Sharp knife or scissors
- Twine or strong rope
- Small pebbles and potting mix
- Herbs or leafy vegetables
Step-by-step Guide
Step 1: Cut a wide opening on the side of each bottle for planting.
Step 2: Poke small drainage holes on the bottom of the bottles.
Step 3: Punch holes on each end of the bottles to thread the rope through.
Step 4: Thread the rope through all bottles, tying knots below each to hold them in place.
Step 5: Fill with pebbles and soil, then plant your herbs or greens.
Tip: Hang it somewhere that gets a few hours of sunlight a day for the best growth.
#12 Egg Shell Succulent Planter
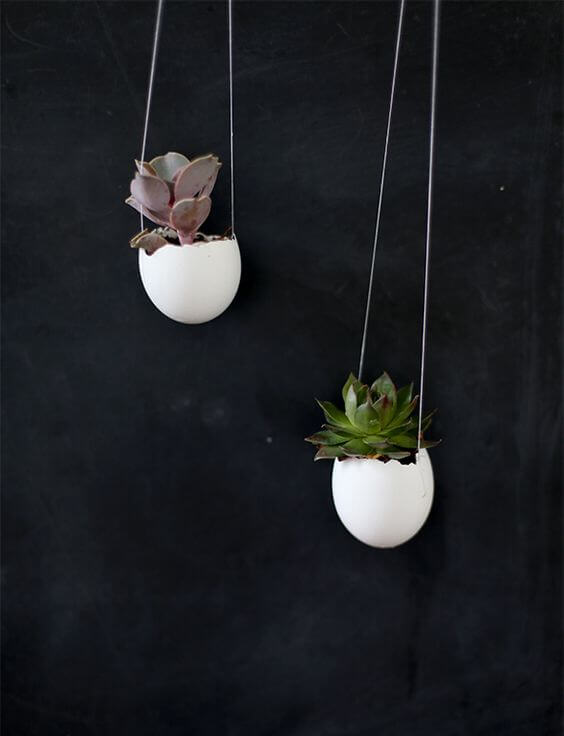 Source: Sayyes
These mini hanging planters are made from real eggshells. They look delicate and sweet, perfect for growing tiny succulents.
The smooth white shell makes the plants stand out, adding charm to any small space or windowsill. It’s a fun way to reuse eggshells and bring a bit of life indoors.
Materials Needed
- Eggshells (tops carefully cracked)
- Twine or string
- Glue or a small needle
- Potting soil
- Tiny succulents or seedlings
Step-by-step Guide
Step 1: Crack and clean the top of the eggshell, removing the yolk and rinsing gently.
Step 2: Dry completely, then glue or pierce holes on each side to tie a string for hanging.
Step 3: Add a little soil inside each shell.
Step 4: Carefully plant the succulent inside and hang it up in a bright spot.
Tip: Be gentle when watering, just a few drops will do!
#13 Hanging Marson Jar Planter
 Source: Beesandroses
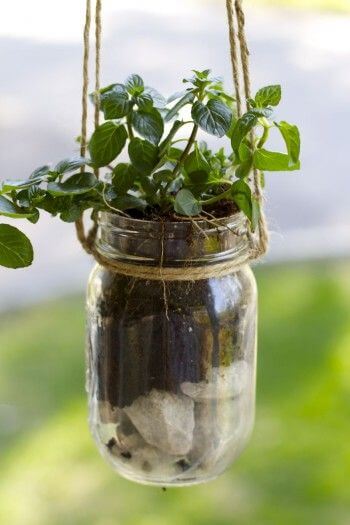
This hanging planter uses a simple mason jar to grow herbs or small plants. The glass lets you see the layers of soil, rocks, and roots, which adds a pretty natural look.
It’s perfect for a sunny kitchen window or porch. The rustic twine gives it a handmade feel, and it’s a great way to reuse jars you already have.
Materials Needed
- 1 mason jar (16 oz or larger)
- Twine or rope (about 2–3 ft)
- Small rocks or pebbles
- Potting soil
- Herbs or small plants
Step-by-step Guide
Step 1: Fill the bottom of the jar with a layer of rocks for drainage.
Step 2: Add soil and gently place the plant inside.
Step 3: Wrap twine around the jar’s neck and tie tightly to hold the weight.
Step 4: Attach two more pieces of twine to create a hanging loop.
Tip: Choose herbs like mint or basil for a fresh scent and easy care.
#14 Hanging Clay Pot Planters
 Source: Beesandroses
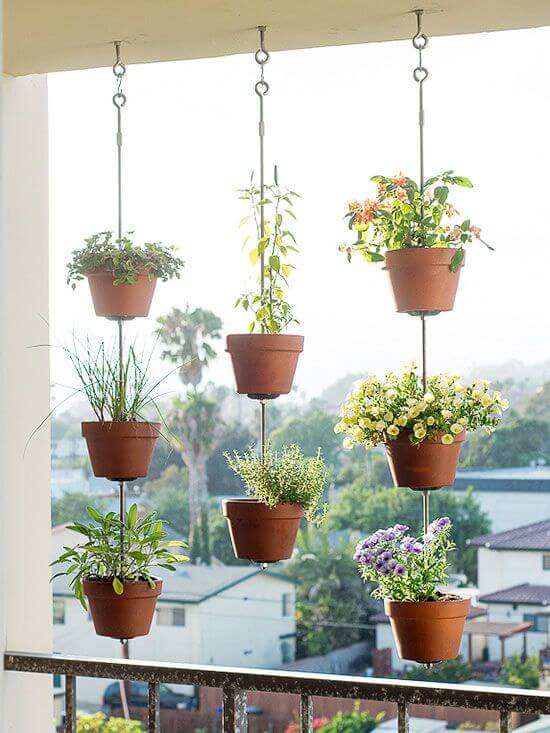
This vertical clay pot garden is a smart way to grow lots of plants in a small space. It looks tidy and stylish, especially for a balcony or patio.
The stacked pots are attached to a metal rod or pipe, letting each pot hang securely without swinging. This idea is great for herbs, flowers, or small vegetables. It also keeps your plants off the ground, away from pests.
Materials Needed
- Terracotta pots (6–8 inches wide)
- Metal rods, pipes, or strong poles
- Washers or spacers (to keep pots steady)
- Hanging hooks or ceiling anchors
- Potting soil and your choice of plants
Step-by-step Guide
Step 1: Drill a hole in the base of each pot if not pre-drilled.
Step 2: Slide one pot at a time onto the rod, using washers between each for balance.
Step 3: Secure the rod vertically with hooks or anchors.
Step 4: Fill each pot with soil and add your plants.
Tip: Use lightweight soil and small plants to avoid too much weight on the rod.
#15 Hanging Ceramic Bowl Planter
 Source: Pinterest
These dainty hanging planters are made from vintage teacups and bowls, turning ordinary dishes into pretty plant holders. They hang from thin strings and look light and delicate in the sunlight.
Perfect for small plants like succulents, orchids, or string-of-pearls, this setup adds charm and character to any garden corner. It’s a beautiful way to reuse mismatched ceramics and create something fresh and magical.
Materials Needed
- Old teacups or porcelain bowls
- Strong thread, wire, or fishing line
- Small plants or trailing vines
- Potting soil and moss
- Glue or a small drill (optional, for secure hanging)
Step-by-step Guide
Step 1: Clean your cups and check they’re not cracked.
Step 2: Attach strings evenly on three or four sides to hang straight. Use glue or drill small holes if needed.
Step 3: Add a little moss at the bottom, fill with soil, and gently plant your greens.
Step 4: Hang them where they’ll get dappled light and a breeze.
Tip: Lightweight trailing plants look best and help balance the cups without tipping.
#16 Hanging Teacup Planter
 Source: Gardenmatter
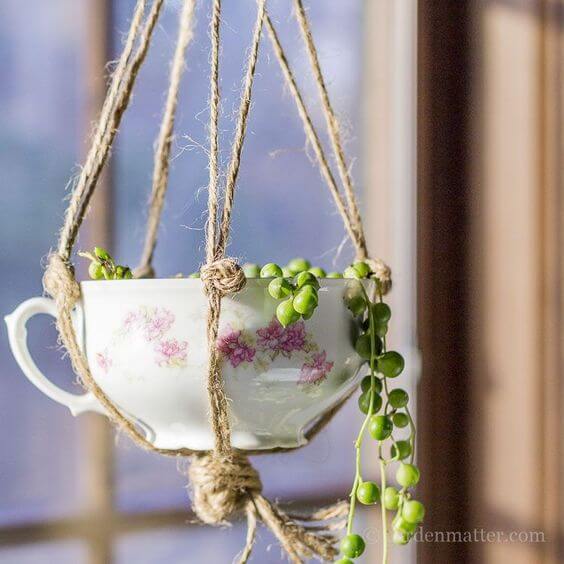
This sweet little hanging planter uses a teacup as the main feature. Wrapped in rustic jute twine, the cup holds a small trailing plant like a string of pearls, creating a cozy and charming look.
It’s perfect for a sunny kitchen window or a quiet reading corner. The mix of delicate floral china and rough rope makes it feel both vintage and handmade.
Materials Needed
- 1 teacup with handle
- Jute twine or thick string
- Small succulent or trailing plant
- Potting soil
- Hot glue gun (optional)
Step-by-step Guide
Step 1: Cut 4 equal lengths of twine and tie them together at one end.
Step 2: Spread the twine evenly and place your teacup in the center, then tie the strings around the cup to hold it steady.
Step 3: Add a little soil and plant your chosen greenery.
Step 4: Tie the top ends of the twine together to hang it.
Tip: Keep the plant small and light so the cup stays balanced and safe to hang.
#17 Hanging Old Funnel Planter
 Source: Twitter
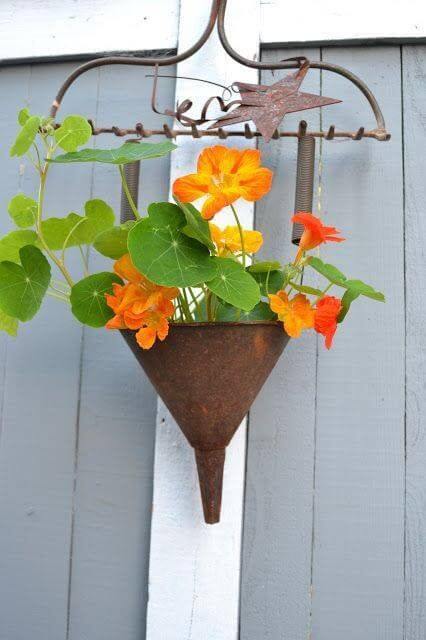
This clever planter uses an old metal funnel as a rustic flower pot. Its pointed shape and weathered look bring vintage charm to any garden wall or shed.
Bright orange and yellow flowers pop against the metal, giving it a cheerful, farmhouse feel. It’s a great way to reuse old tools and add life to a plain surface.
Materials Needed
- 1 large metal funnel
- Wall hook or hanger
- Potting soil
- Small flowering plant (like nasturtium)
- Drill (optional)
Step-by-step Guide
Step 1: Clean the funnel and check for drainage. If needed, drill a small hole in the side for water to escape.
Step 2: Fill the funnel with potting soil.
Step 3: Plant your flowers and gently press the soil around the roots.
Step 4: Hang the funnel on a sturdy hook or decorative hanger on the wall.
Tip: Choose trailing or bright flowers to make the rusty surface feel more lively and balanced.
#18 Hanging Woven Basket Grows Organic Vegetables
 Source: Bhg
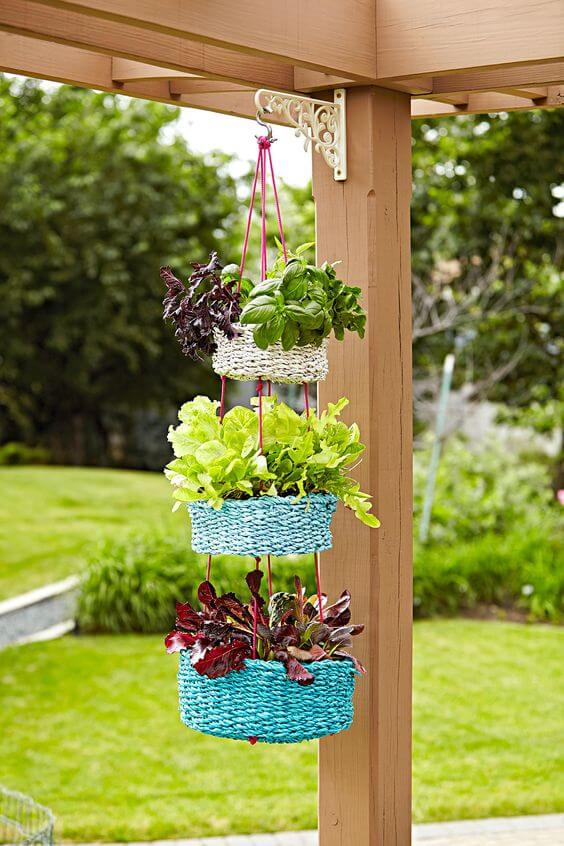
This bright and fun hanging planter turns simple woven baskets into a vertical herb garden. Each layer grows different leafy greens and herbs like basil, lettuce, and beet leaves.
It’s perfect for small patios or sunny balconies, and the colorful baskets bring a cheerful pop to the space. Plus, it makes picking fresh herbs super easy.
Materials Needed
- 3 woven baskets with flat bottoms
- Strong rope or cords (bright colors look great)
- Potting soil
- Herbs and leafy greens
- Metal hook for hanging
Step-by-step Guide
Step 1: Line each basket with a plastic liner or coconut fiber to hold the soil.
Step 2: Fill with soil and plant your herbs or greens.
Step 3: Thread rope through each basket’s sides and knot tightly to hold the layers.
Step 4: Hang from a sturdy hook on a pergola, beam, or balcony post.
Tip: Water from the top, and the moisture will trickle down to lower layers naturally.
#19 Hanging Tire Planter
 Source: Homehacks
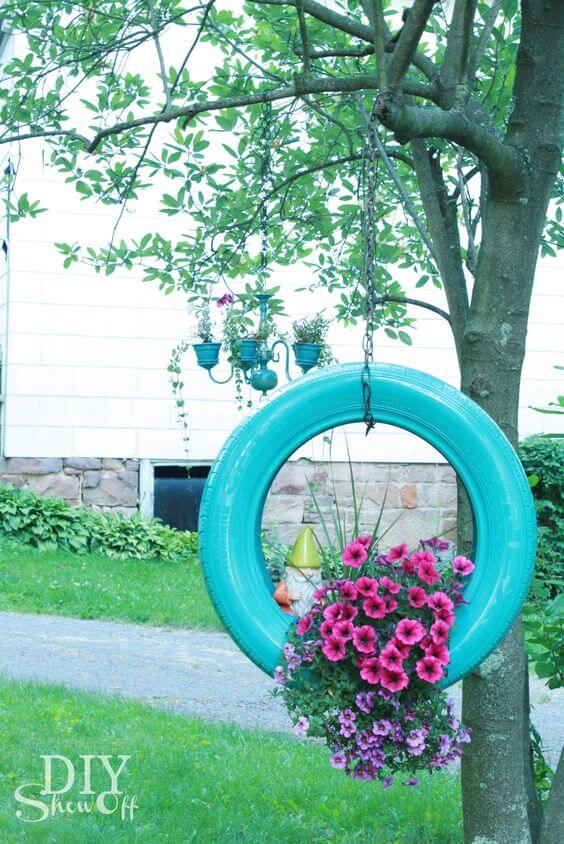
This fun and colorful garden project uses an old tire turned into a vibrant flower planter. Painted in bright turquoise, the tire is hung from a sturdy tree branch with chains and filled with trailing flowers like petunias.
It’s a creative way to reuse something old and bring life and charm to your outdoor space. Plus, it’s eye-catching and full of character.
Materials Needed
- 1 old tire
- Outdoor spray paint (color of your choice)
- Heavy-duty chains and hook
- Plastic liner or coconut fiber
- Potting soil
- Colorful trailing flowers like petunias or verbena
Step-by-step Guide
Step 1: Clean the tire and paint it with spray paint. Let it dry fully.
Step 2: Add a liner or fiber base to the bottom part of the tire to hold the soil.
Step 3: Fill the liner with potting soil and plant your flowers.
Step 4: Attach strong chains and hang the tire from a tree or pergola.
Tip: Use bright flowers that spill over the edge for the best visual effect.
#20 DIY Hanging Tomato Planter
 Source: Flickr
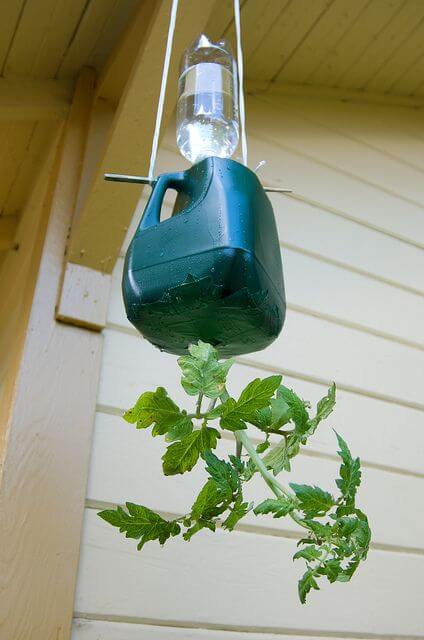
Turn a plastic jug into a smart little tomato grower with this gravity-defying setup. This hanging planter flips traditional gardening on its head, literally allowing tomato vines to grow downward, which helps prevent pests and saves space.
A water bottle on top provides slow-drip hydration. It’s efficient, clever, and perfect for tight spots like balconies or patios.
Materials Needed
- 1 empty plastic gallon jug
- 1 plastic water bottle (16 oz or 1 liter)
- Sturdy string or twine
- Tomato seedling
- Potting mix
- Knife or scissors
Step-by-step Guide
Step 1: Cut a hole in the bottom of the jug for the tomato plant stem.
Step 2: Carefully insert the seedling through the hole, roots first.
Step 3: Fill the jug with soil from the top, securing the plant in place.
Step 4: Punch holes and thread string through the jug handle for hanging.
Step 5: Place a water bottle (with small holes in the cap) upside down in the soil for slow irrigation.
Tip: Choose a sunlit spot and water regularly for healthy tomato growth.