Clay pots aren’t just for planting anymore; they’re a blank canvas waiting to become something special. If you’ve got a few plain terracotta pots lying around (or can grab some on the cheap), you’re already halfway to a weekend full of crafting fun.
In this list, you’ll find 21 easy and imaginative clay pot DIYs that go beyond the usual. From mini water fountains and cheerful garden animals to quirky planters and charming wind chimes, these ideas turn humble pots into delightful pieces of art.
And the best part? You can repurpose old ones, add a splash of paint, and make each one completely your own. Let’s roll up our sleeves and turn those pots into something amazing!
This article contains affiliate links. If you purchase through them, I may earn a small commission at no extra cost to you. Thank you for your support!
#1. Bee DIY Project
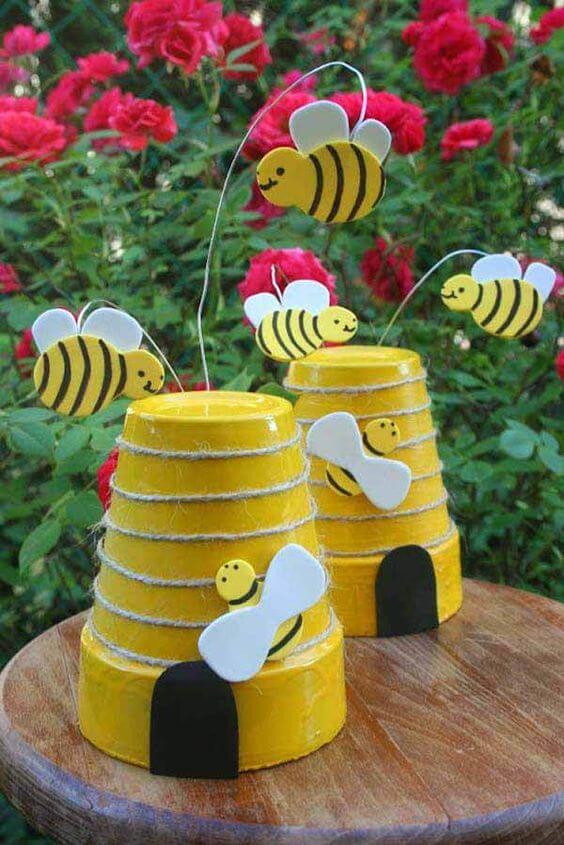
This project is an absolute joy. The bright yellow paint, the looped twine, and those smiling bees turn everyday materials into a whimsical garden accent or a charming kid-friendly craft.
 SHOP SMALL CLAY POTS
 SHOP ACRYLIC YELLOW PAINT
 SHOP FOAM SHEETS
 SHOP JUTE TWINE
 SHOP CRAFT WIRE
 SHOP HOT GLUE GUN WITH GLUE STICKS
Materials Needed
- 2 small clay pots (approx. 4 inches tall)
- Acrylic yellow paint and paintbrushes
- Black, yellow and white foam sheets
- Jute twine
- Craft wire
- Hot glue gun with glue sticks
- Scissors and a black permanent marker
Step-by-step Guide
Step 1: Paint the entire surface of each clay pot with yellow acrylic paint. Apply two or three coats until smooth and bright. Let dry fully.
Step 2: Wrap twine around the pot in horizontal rows, evenly spaced. Secure each row with hot glue at the back of the pot.
Step 3: Cut small oval shapes from black foam to resemble the entrance of a hive. Glue these to the bottom front of the upside-down pot.
Step 4: Create bees by cutting yellow ovals for the body and using black marker to draw stripes and facial details. Add white foam wings and glue them in place.
Step 5: Attach some bees directly to the hive. To make flying bees, glue them to the end of a curved craft wire. Insert or glue the other end of the wire into the pot’s drainage hole or the inner rim.
#2. Topsy Turvy Pots
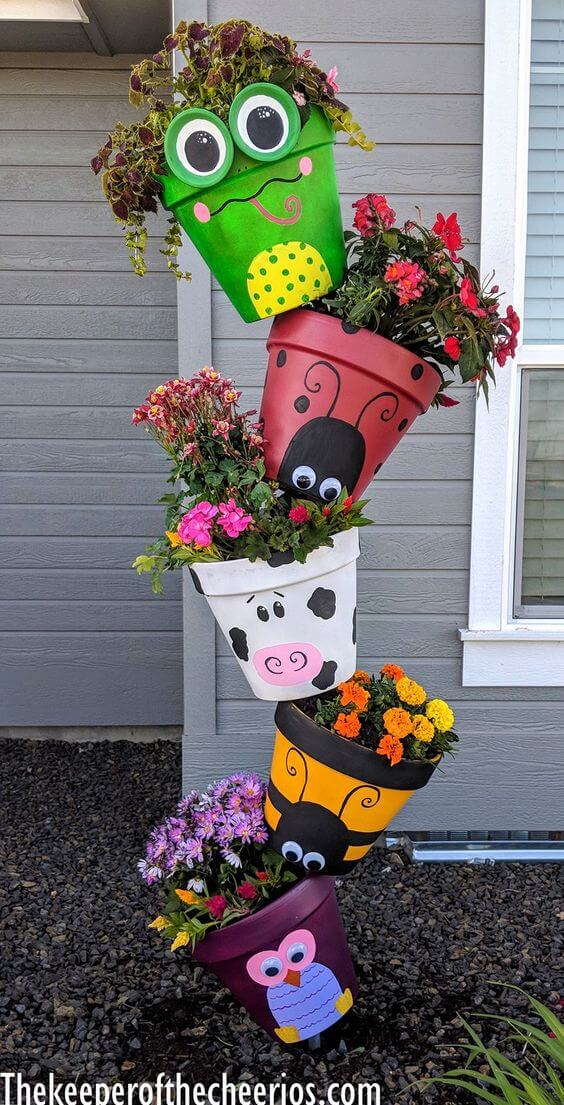
Painted to resemble cheerful animals from a frog and ladybug to a cow, bee, and owl, this topsy-turvy planter tower turns a plain garden corner into a storybook scene.
 SHOP LARGE CLAY POT
 SHOP LONG ROD
 SHOP ACRYLIC PAINT SET AND PAINTBRUSHES
 SHOP GOOGLY EYES
 SHOP POTTING MIX
 SHOP FLOWER SEEDS
Materials Needed
- 5 large clay pots (about 10–12 inches each)
- 1 long rod (about 4–5 feet tall)
- Exterior acrylic paints in green, red, white, yellow, purple, black, and accent colors
- Googly eyes
- Hot glue gun
- Paintbrushes + foam sponges
- Potting soil and your choice of flowers
Step-by-step Guide
Step 1: Start by painting each pot in a base color that matches your chosen animals (e.g., green for frog, red for ladybug). Let each coat dry before layering details like eyes, noses, wings, or paws.
Step 2: Once dry, glue on accessories like googly eyes. Get creative, use old bottle caps, paper, or fabric scraps to add dimension.
Step 3: Hammer your metal rod deep into the soil (at least 1.5 feet down) to ensure stability. Thread the first pot through the center hole and tilt it slightly to one side.
Step 4: Continue stacking each pot by angling them in alternating directions around the rod. Add potting soil and vibrant flowers to each tier as you go to stabilize the weight.
#3. Garden’s Flowering Pots
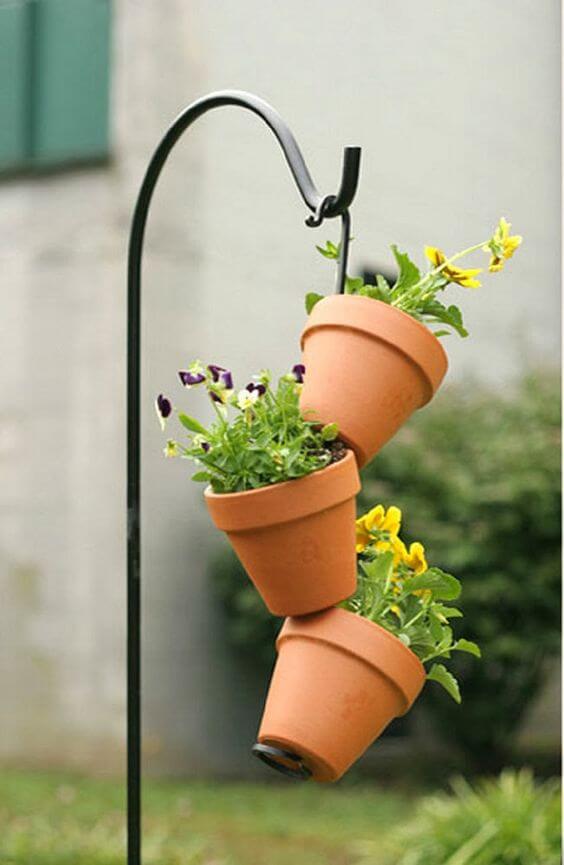
I love how simple it is to put together, yet it adds such a polished, modern charm to outdoor décor.


Materials Needed
- 3 terracotta pots (around 6–8 inches diameter)
- 1 shepherd’s hook garden stand (minimum 4 ft tall)
- 1 sturdy threaded rod
- Washers and nuts
- Potting soil and flowers of your choice
Step-by-step Guide
Step 1: Insert your threaded rod vertically through the drainage holes of the clay pots. Before adding each pot, place a washer and nut to support its weight at the right height.
Step 2: Tilt each pot slightly so it leans on the one below for balance. Secure each one with another washer and nut above it to hold its angle.
Step 3: Hang the rod from your shepherd’s hook using the top loop or a carabiner clip if needed.
Step 4: Fill each pot with potting soil and add bright, trailing flowers or herbs. Water gently, making sure not to dislodge the tilt.
#4. Fairy Door Idea
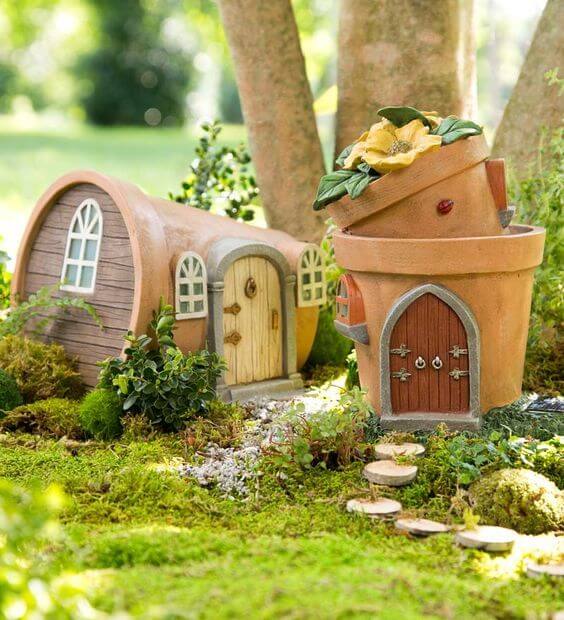
Using basic clay pots and a few clever accessories, you can transform a corner of your yard into a magical world.
 SHOP MINIATURES FAIRY DOORS AND WINDOWS
 SHOP CRAFT MOSS
 SHOP FAUX FLOWERS
 SHOP STRONG ADHESIVE
 SHOP TINY STEPS
Materials Needed
- 2–3 terracotta pots (various sizes)
- Miniature fairy doors and windows
- Strong adhesive
- Acrylic paint set and sealant spray
- Craft moss and stones
- Decorative accents (e.g. faux flowers, tiny steps, vines, etc.)
Step-by-step Guide
Step 1: Clean and dry the clay pots thoroughly. Paint the pots if desired, using earth tones or pastel shades to evoke a fairytale mood. Let them dry and seal them for outdoor durability.
Step 2: Stack the pots at a slight angle and glue them together. Add smaller pots or accessories to the top for a chimney or turret look.
Step 3: Attach the miniature doors and windows with strong adhesive. Embellish with moss, faux vines, and little stones to create a natural, enchanted effect.
Step 4: Place the finished house in a shady garden spot. Add stepping stones or create a tiny gravel path for extra magic.
#5. DIY Clay Terracotta Pot Wind Chimes

This minimalist wind chime is a quiet charm for any garden. The terracotta pots create gentle tones when the wind stirs, and the touch of glass at the bottom adds a soft sparkle.
 SHOP TERRACOTTA POT 3 INCH
 SHOP TERRACOTTA POT 2 INCH
 SHOP TERRACOTTA POT 1.5 INCH
 SHOP DECORATIVE GLASS PENDANT
Materials Needed
- 3 small terracotta pots
- Strong twine
- Decorative glass pendant
- Washer (optional)
- Shepherd’s hook
Step-by-step Guide
Step 1: Thread your twine through the top hole of each pot, stacking them upside down. Start with the largest at the top, then the medium, and finally the smallest.
Step 2: Tie a bead or washer between each pot to prevent them from sitting tightly and to allow free movement.
Step 3: At the bottom, attach a glass pendant or chime weight. Ensure it’s heavy enough to sway and strike the pots gently in the breeze.
Step 4: Tie a secure knot at the top of the string and hang the chime from a tree branch, hook, or porch beam.
#6. DIY Turtle Leg Project For Mini Succulent Planters
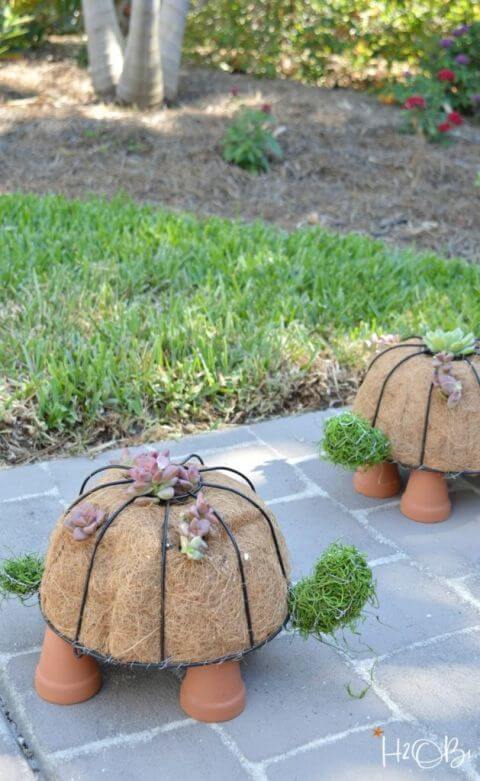
These quirky turtle planters bring a hint of personality and playfulness to your patio, and if you’re anything like me, you’ll find yourself smiling every time you walk past them.


Materials Needed
- 1 round hanging wire basket (12–14 inches in diameter)
- 1 coconut liner
- 4 mini terracotta pots (2-inch size)
- Green moss and succulents
- Black zip ties
- Strong glue
Step-by-step Guide
Step 1: Line the wire basket with a coconut liner, and fill it with potting mix and a selection of succulents on top. Keep the liner facing upward for a rounded “turtle shell” look.
Step 2: Flip the basket over and use strong glue to attach four mini clay pots as legs. Make sure they’re spaced evenly for balance.
Step 3: Use a small moss ball or succulent and glue it to the back edge of the basket to form a cute little turtle tail.
Step 4: For extra security, use zip ties to reinforce the legs and any décor that might need extra support.
#7. Cute DIY Bird Bath
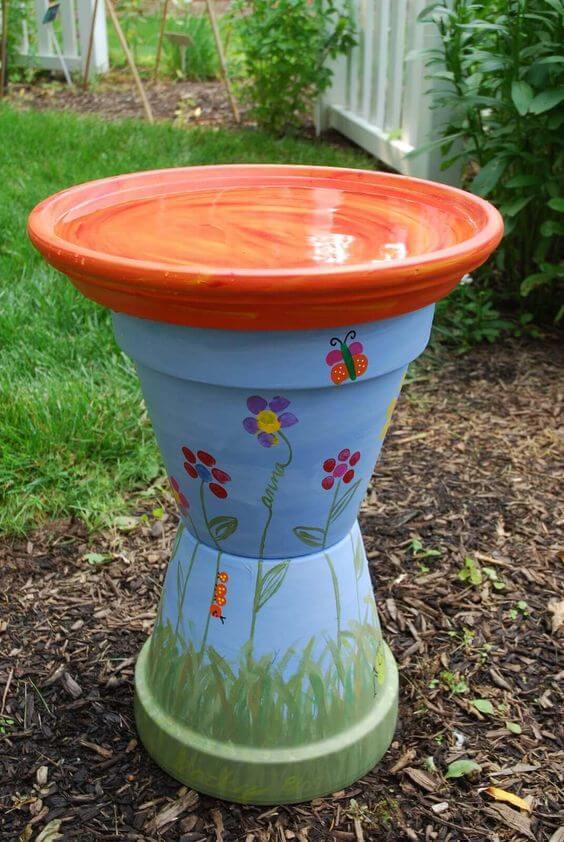
Bright, cheerful, and eco-friendly, this bird bath is a joy to make and a magnet for feathered visitors.

Materials Needed
- 2 large terracotta pots (10–12 inches tall)
- 1 large terracotta saucer (14 inch)
- Outdoor acrylic paints
- Paint sealer spray (weatherproof finish)
- Outdoor adhesive
Step-by-step Guide
Step 1: Flip one terracotta pot upside down and glue the second pot (right side up) directly on top to form the pedestal. Let it dry for several hours.
Step 2: Decorate both pots with cheerful designs like flowers, bugs, or grass. Use bright, outdoor-safe acrylic paints. Let the paint dry completely.
Step 3: Spray the entire base with a waterproof sealant to protect your art from rain and UV damage.
Step 4: Once dry, glue the saucer to the topmost pot. Ensure it’s centered and level, it will serve as the bird bath basin.
#8. DIY Clay Pot Flower Tower
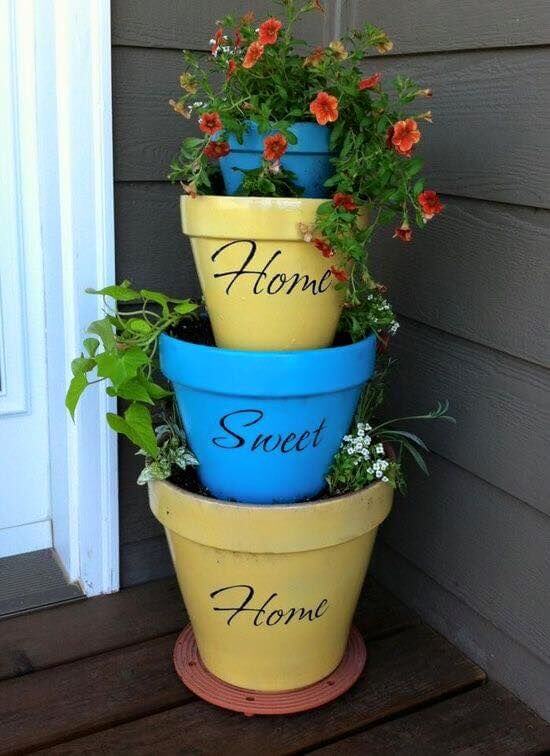
This stacked pot display feels like a warm hug every time I step outside. It’s personal, eye-catching, and simple to recreate on a budget.

Materials Needed
- 4 terracotta pots (10″, 8″, 6″, 4″)
- Acrylic outdoor paint
- Paintbrushes + sponge brush set
- Alphabet stencils
- Permanent black paint pen
- Potting soil
- Various small flowering plants
Step-by-step Guide
Step 1: Paint each pot in a different vibrant color. Let each coat dry thoroughly before adding a second layer if needed.
Step 2: Use stencils or freehand to write “Home,” “Sweet,” and “Home” on three pots. Let the paint dry, then go over it with a paint pen for precision and durability.
Step 3: Stack the pots by filling the largest one about 2/3 with soil. Insert a slightly smaller pot at an angle, repeat this step until all pots are stacked.
Step 4: Fill the top edges of each pot with soil and plant trailing or blooming flowers so they cascade beautifully over each layer.
#9. Pretty Girl With Flower

This cheerful flower figure brings such a lively, welcoming vibe to any garden shelf or porch corner. It feels like it’s waving at every guest and blooming with joy.


Materials Needed
- 2 medium clay pots (6-8 inches)
- 4 small pots (4 inches)
- Acrylic outdoor paint set in purple, white, and black
- Rope, about 3 feet
- Hot glue gun and glue sticks
- Heart/flower embellishments
- Potting soil
- Small flowering plants
Step-by-step Guide
Step 1: Paint each pot including body, head, arms, and feet in your chosen color scheme. Let them dry completely before continuing.
Step 2: Use a black paint pen to draw the facial features on the head pot. Add any cute details like whiskers or nose.
Step 3: Cut four equal pieces of rope. Tie one through the drainage holes of each small pot (arms and feet). Knot securely and glue the other end inside the body pot.
Step 4: Attach embellishments like flowers or hearts to the front of the body pot with hot glue. Set the head pot upside-down over the body.
Step 5: Fill the head pot with soil and add your flowering plant so it looks like hair. Water lightly.
#10. DIY Garden Tool Storage Use Clay Pot And Sand
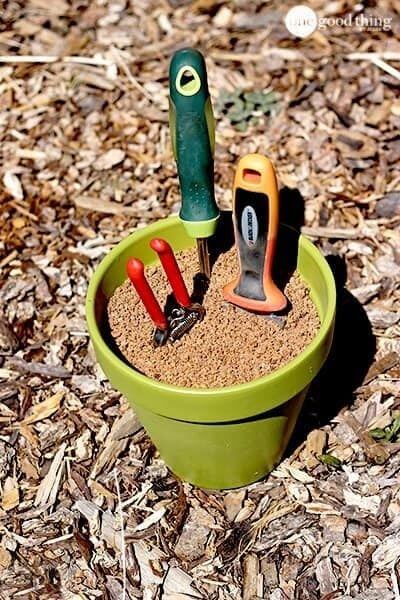
If you’re like me, garden tools somehow disappear right when you need them most or they’re caked in dirt when you finally find them.


Materials Needed
- 1 large clay pot (10–12 inches)
- Play sand
- Mineral oil, about ½ to 1 cup
- Garden hand tools like a trowel, weeder, and pruning shears
Step-by-step Guide
Step 1: Fill the clay pot with play sand until about 2 inches from the top.
Step 2: Slowly pour in the oil, mixing it into the sand as you go until the sand is moist but not soaked. The consistency should be crumbly, not muddy.
Step 3: Insert your gardening tools into the sand when not in use. As you push them in and pull them out, the sand gently scours off dirt while the oil coats the metal to prevent rust.
#11. DIY Terra Cotta Race Car Garden Sculpture
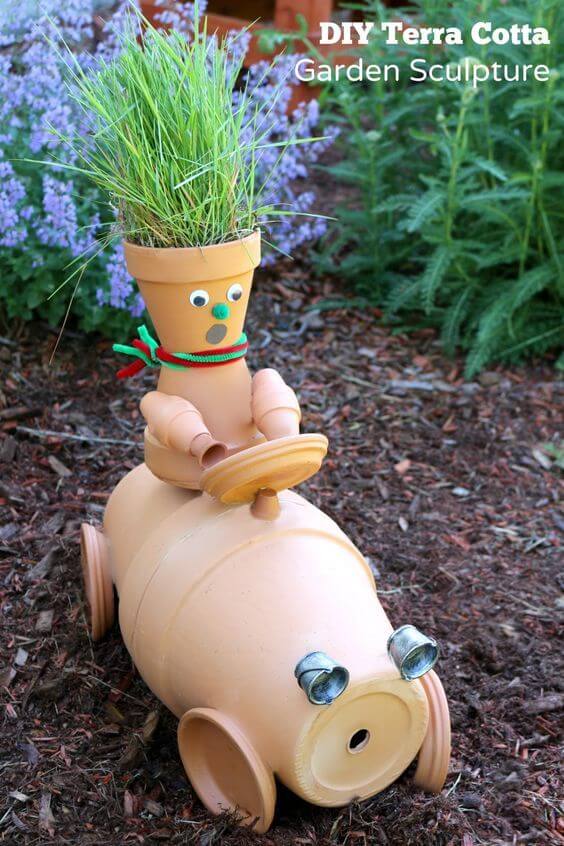
Built entirely from terra cotta pots, it’s both a quirky decoration and a celebration of garden creativity.


Materials Needed
- 2 large clay pots, 2 medium pots, 8 mini pots and 5 small saucers
- 2 metal bottle caps
- Googly eyes
- Acrylic paint
- Craft pipe cleaners
- Strong glue
- Potting soil + grass seeds
Step-by-step Guide
Step 1: Start with the base. Turn the large pot on its side as the car body. Glue two mini pots on each side for wheels.
Step 2: Stack the medium pot on top as the driver’s torso, securing it with glue. Add the small pot upside-down for the head.
Step 3: Attach mini pots as arms and legs using glue or secure with wire inside for flexibility. You can pose the arms to hold a mini saucer as a steering wheel.
Step 4: Decorate the face, glue on googly eyes, draw a mouth, and add any other cute details.
Step 5: For headlights, glue on two shiny caps or mini cans to the front.
Step 6: Fill the top pot (head) with soil and sprinkle grass seeds or place a small plant for “hair.” Water it regularly until it sprouts.
#12. Clay Pot Wreath
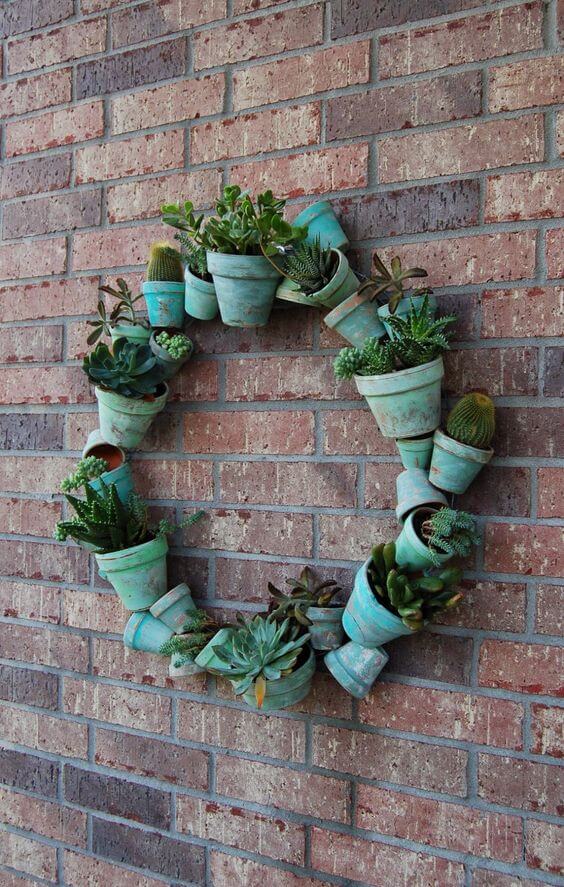
A wreath made entirely of tiny distressed clay pots, each brimming with fresh succulents, arranged into a perfect circle and mounted on a brick wall.


Materials Needed
- 22 mini clay pots (approx. 2–4 inches)
- Circular wire wreath frame
- Floral wire
- Assorted succulent cuttings
- Moss or lightweight soil
- Spray paint (optional)
- Wall-mounting hooks
Step-by-step Guide
Step 1: If you want the pots to have that vintage look, use patina spray paint or distress them with a sponge and watered-down paint. Let them dry completely.
Step 2: Arrange your clay pots around the wire wreath form, spacing them evenly or clustering for a more organic feel. Use floral wire or zip ties to secure them firmly in place. Angle them slightly outward so plants can be seen.
Step 3: Fill each pot with a small amount of moss or cactus soil. This helps anchor the succulents without making the wreath heavy.
Step 4: Add your succulent cuttings or miniature plants. Opt for compact varieties like echeveria, sedum, or crassula. Tuck in any extra moss around the base of the plants to keep everything snug.
Step 5: Mount your wreath securely to your chosen wall space using brackets or sturdy hooks.
#13. A Terra Cotta Lighthouse
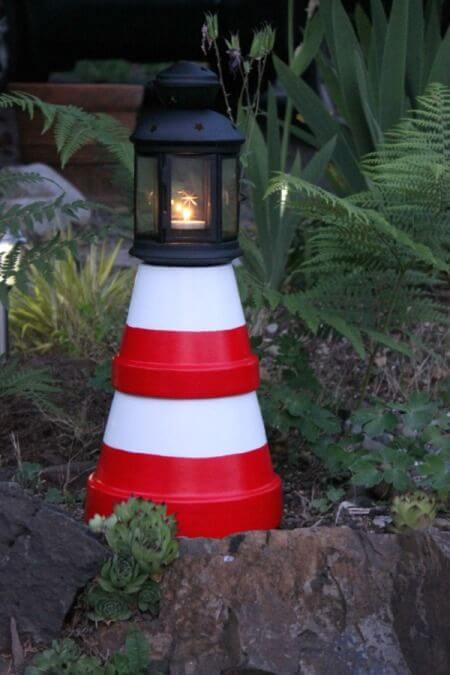
I’ve made one myself and the glow it gives off at dusk? Incredibly soothing. The transformation is almost magical.

Materials Needed
- 3 clay pots (6″, 8″, and 10″)
- Outdoor acrylic paint and paintbrush
- Solar lantern
- Strong adhesive
Step-by-step Guide
Step 1: Paint each clay pot in alternating red and white stripes. Begin with the largest pot, then move to the medium, and finish with the smallest. Let the paint dry between coats to avoid streaking.
Step 2: Once the paint is fully dry, stack the pots upside down, largest on the bottom. Use outdoor adhesive to glue each pot in place and let it cure for several hours.
Step 3: Secure your solar to the top of the smallest pot using the same outdoor glue. Ensure it’s centered and stable.
#14. DIY Lovely Pigs Walking In The Garden
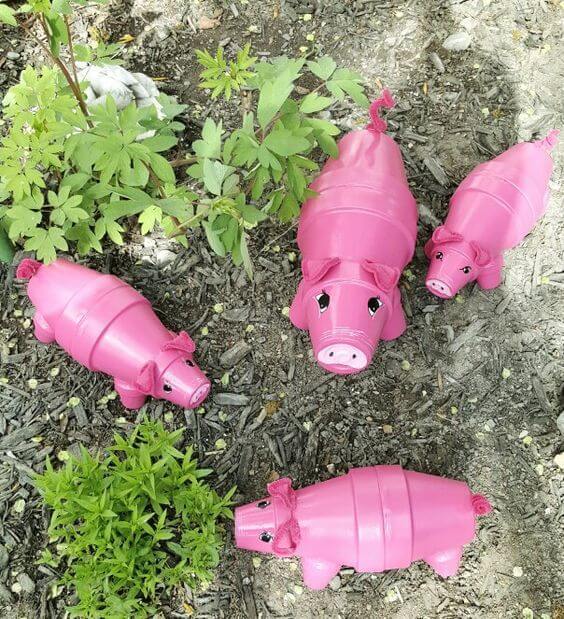
Each pig has its own little charm and whether you’re making just one or an entire herd, the joy they spark is the same.


Materials Needed
- 3 various sizes of clay pots
- Pink spray paint
- Hot glue gun with strong adhesive sticks
- Pink pipe cleaners
- 2 foam sheets per pig
- Optional: black marker
Step-by-step Guide
Step 1: Clean and dry your clay pots thoroughly. Spray or paint them pink. Apply multiple thin coats and let them dry completely.
Step 2: For each pig, glue two small pots together bottom-to-bottom to form the body. Attach a smaller pot to the front for the snout.
Step 3: Cut ears from foam and glue them to the “head” pot. Paint eyes with white and black acrylic.
Step 4: Twist a pink pipe cleaner and glue it onto the rear as a curly tail. Use extra small pots as legs and glue them beneath the body.
#15. A Lady!
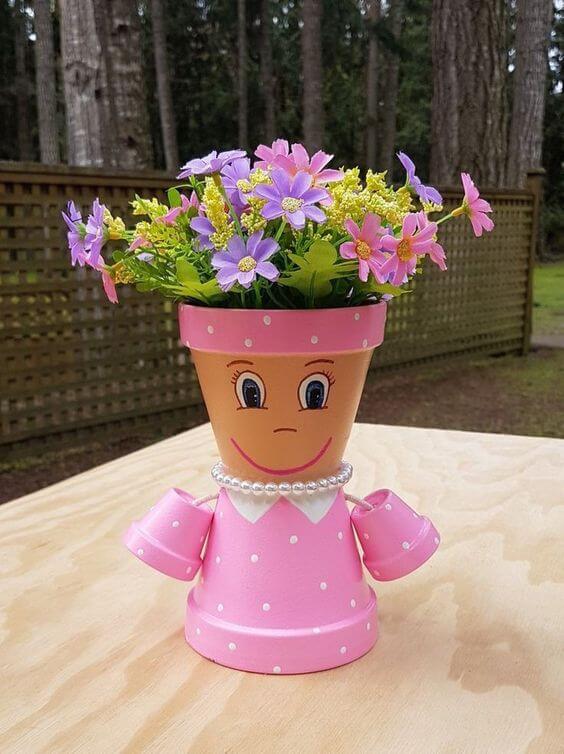
It’s simple, affordable, and a project that lets your creativity shine, plus, it makes a great gift for Mother’s Day or spring celebrations.

Materials Needed
- 2 small terracotta pots and 2 medium clay pots
- Acrylic paint in pink, white, and black
- Paintbrush set
- Hot glue gun and glue sticks
- Pearl bead string
- White craft foam
- Artificial flowers
Step-by-step Guide
Step 1: Paint the large pot and the smaller ones in a polka dot dress style. Use pink for the main color and add white dots. Let everything dry.
Step 2: On one of the small pots (the head), paint facial features: eyes, nose, lashes, and a smiling mouth. You can also outline the rim as a hat band.
Step 3: Glue the small pots onto the sides of the medium pot as arms. Add the “head” pot upright on top with glue if needed.
Step 4: Cut a simple collar shape from white craft foam and glue it near the neckline. Wrap and glue a faux pearl string to mimic a necklace.
Step 5: Insert your floral arrangement into the top pot.
#16. A Fairy Garden
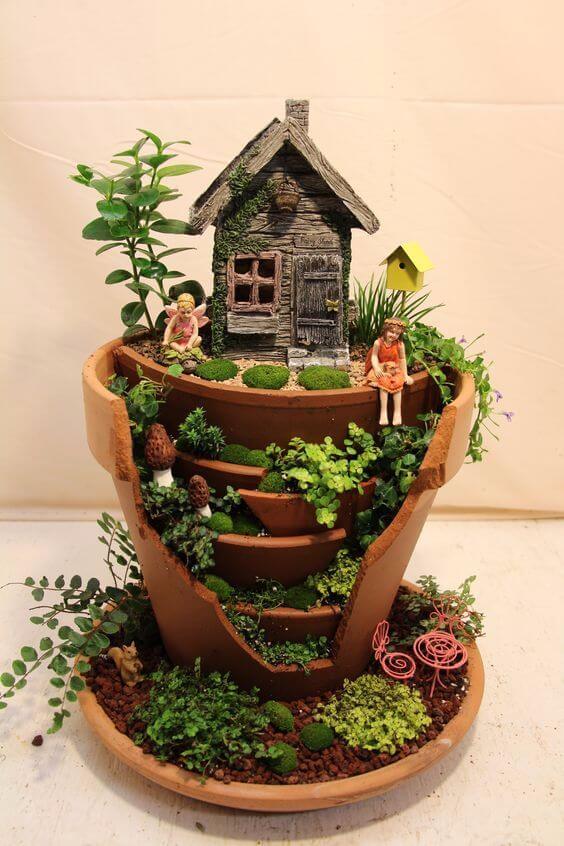
This enchanting project reuses what would otherwise be tossed away and brings it to life with tiny steps, lush greenery, and charming fairy elements.


Materials Needed
- Large broken terracotta pot and saucer 10 inch
- Small broken terracotta pieces
- Miniature house
- Mini fairy garden accessories (fairies, mushrooms, benches)
- Potting soil
- Small plants
- Decorative pebbles or moss
- Waterproof adhesive
Step-by-step Guide
Step 1: Position the broken large pot on a base or saucer, aligning broken edges to create an open-front view. Place smaller broken pieces inside as stair-like tiers.
Step 2: Fill the base with potting soil, layering upward as you go. Press the smaller pots into the soil to act as planting ledges.
Step 3: Begin adding your mini plants, moss, or succulents, focusing on cascading or small species that can grow in tight spaces.
Step 4: Position your fairy house at the top. Nestle in figurines and accessories to create scenes like fairies reading, animals peeking, or flowers blooming.
#17. DIY Flowerpot Bird Feeder
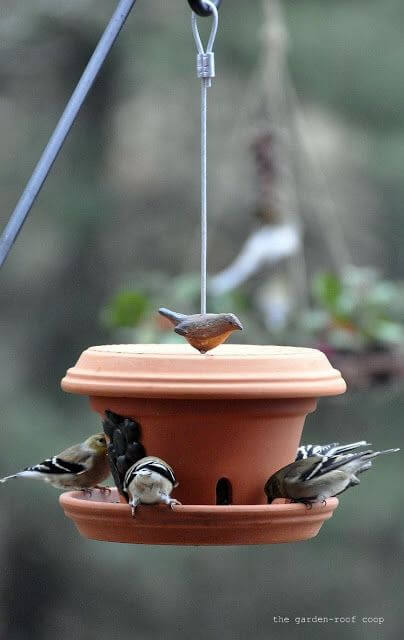
Few things bring as much quiet joy as watching birds gather for a snack in your garden.


Materials Needed
- 1 matching terracotta pots (6–8 inch diameter)
- 2 terracotta saucers (8 and 10 inches)
- Metal rod
- Strong outdoor-safe glue
- Birdseed mix
Step-by-step Guide
Step 1: Drill a centered hole through the bottom of both terracotta pots and saucer. The hole should be large enough for your eye bolt or rod.
Step 2: Stack the pots rim-to-rim, forming a hollow container. The top pot serves as a lid and the bottom as the seed chamber.
Step 3: Secure the pieces by running the rod or bolt through the center holes, using washers and nuts to keep them tightly in place. Attach a hook or loop on top for hanging.
Step 4: Use glue to attach the saucer to the bottom pot to catch falling seed and offer a perch. Let everything dry completely.
Step 5: Fill the feeder through a gap left in the side, or flip the lid to refill. Hang it in a shaded, quiet place and watch your garden come to life.
#18. Colorful Mushroom
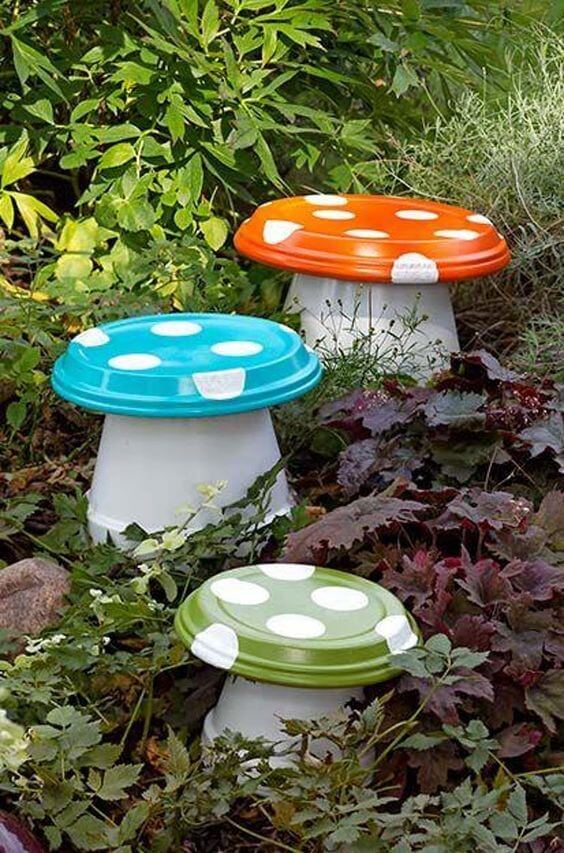
These cheerful mushroom garden stools made from simple clay pots and plastic trays are pure magic. They bring whimsy to shaded corners or fairy-tale charm to garden beds.
Materials Needed
- Large clay pots (at least 10–12 inches tall)
- Plant saucers (14 inches)
- Spray paint in red, blue, green
- White acrylic paint
- Strong outdoor glue
Step-by-step Guide
Step 1: Clean and dry the clay pots and trays completely. Spray paint the trays in bright colors like red, turquoise, or lime green, and let them dry thoroughly.
Step 2: Use white acrylic paint to add dots to the trays. You can use a sponge, bottle cap, or round brush for a clean, whimsical look.
Step 3: Leave the clay pots unpainted or paint them white for a crisp “mushroom stem” effect. Allow them to dry fully.
Step 4: Use a heavy-duty glue to attach the painted tray (the mushroom cap) to the bottom of the clay pot. Center it well and press firmly. Let dry overnight.
#19. DIY Clay Pot Candle Holders
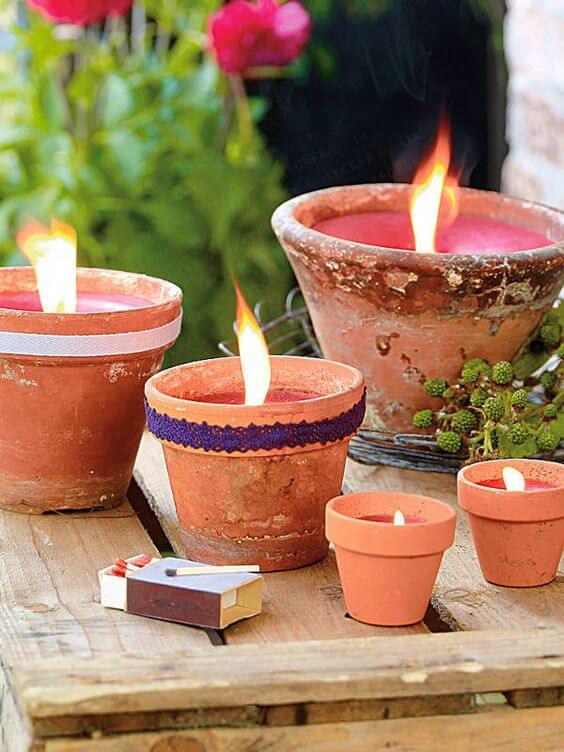
The natural texture of the clay mixed with glowing wax sets a cozy, romantic mood, ideal for patios, garden dinners, or quiet nights outdoors.


Materials Needed
- 4 assorted-size terracotta pots
- Wax flakes
- Candle wicks with metal tabs
- Double boiler
- Glue dots
Step-by-step Guide
Step 1: Clean your terracotta pots thoroughly and dry them. If the hole at the bottom is too wide, seal it using a glue dot to prevent wax from leaking.
Step 2: Melt your wax in a double boiler over medium heat. Once completely melted, mix in fragrance oil (roughly 1 oz per pound of wax) and stir gently.
Step 3: Attach the wick to the bottom of the pot using glue. Use a pencil to balance the wick upright at the center.
Step 4: Carefully pour the melted wax into the pot, leaving about half an inch from the rim. Let it sit undisturbed to cool and harden for several hours.
#20. DIY Clay Pot Water Feature

There’s something soothing about the sound of gently trickling water, and this stacked clay pot fountain brings that serene vibe to any garden corner.


Materials Needed
- 3 terracotta pots in descending sizes: 14″, 10″, and 6″
- Submersible fountain pump kit
- ½” clear vinyl tubing (about 3-4 feet)
- Silicone sealant
- Decorative pebbles
- Optional: outdoor waterproof paint
Step-by-step Guide
Step 1: Seal the drainage holes of all pots with silicone. Let it cure for 24 hours to ensure no leaks.
Step 2: Place the largest pot at your chosen location. Install the pump inside and run the vinyl tubing up through the center holes of each stacked pot, trimming the tube length as needed.
Step 3: Stack the middle and top pots offset for cascading flow. Secure with silicone between layers for extra elevation and stability.
Step 4: Coil the tubing near the top and cut off the excess, leaving the tube exposed by ½ inch for water to flow out. Plug in the pump to test the water flow.
Step 5: Once you’re satisfied with the setup, fill each level with river rocks to disguise hardware and weigh down the pots.
#21. DIY Clay Pot Herb Towel
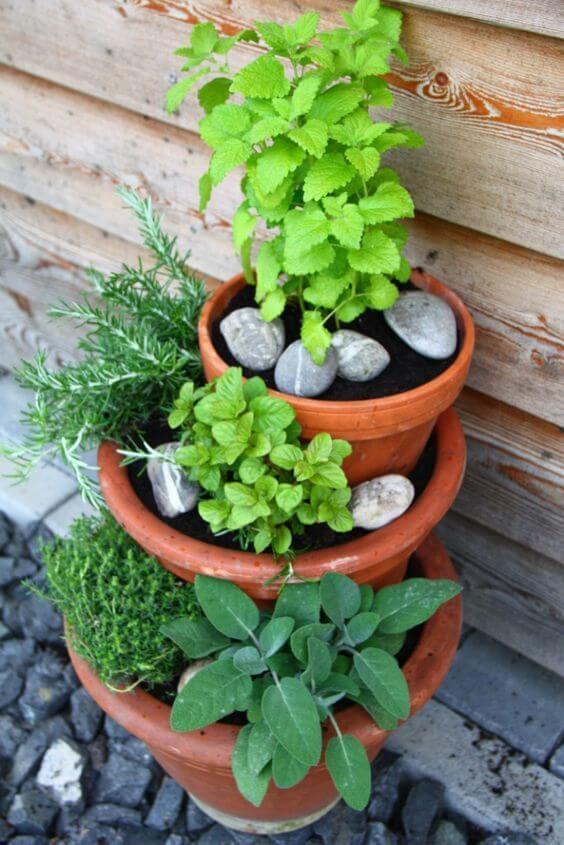
Compact, charming, and incredibly useful, this stacked herb garden is a perfect solution for small spaces or beginner gardeners.

Materials Needed
- 3 terracotta pots in varying sizes: 12″, 10″, and 8″
- Potting soil
- Decorative stones
- Assorted herb plants
Step-by-step Guide
Step 1: Fill the largest pot with soil, leaving 4 inches from the rim. Place the second largest pot inside, slightly off-center and nestled into the soil of the base pot. Press down gently to secure it.
Step 2: Fill the second pot with soil and repeat the stacking with the smallest pot. You now have a stable tiered structure.
Step 3: Plant herbs in the exposed soil areas around each tier, then add decorative stones to the surface for aesthetics and to help retain moisture.