Are you tired of gazing upon a lackluster yard that fails to capture your imagination? If you’re yearning to enhance your curb appeal and craft a stunning outdoor haven without draining your wallet, your search ends here. Brace yourself as we unveil over 70 wallet-friendly and effortless yard landscaping makeovers that will revolutionize your outdoor space. With everything from simple plant additions to captivating DIY hardscaping ventures, these ideas will empower you to maximize your yard’s potential without breaking the bank. Regardless of your gardening expertise, prepare to ignite your creativity and embark on an exhilarating journey toward your next outdoor masterpiece!
Create a Stunning DIY Tire Planter: A Creative Twist for Your Garden
Give your garden a captivating touch by repurposing old tires into one-of-a-kind planters.
Gather the following materials and tools: a tire, spray paint (optional), soil, plants, landscaping fabric or plastic liner, rocks or gravel, scissors, and a utility knife.
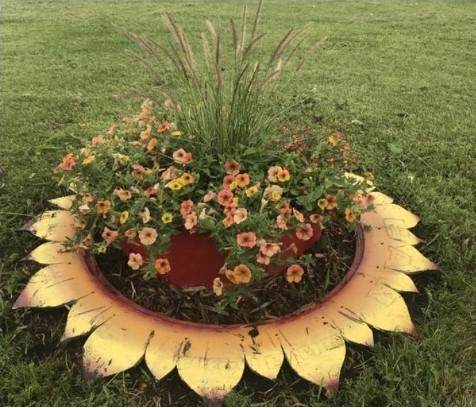
Follow these simple steps to bring your tire planter to life:
- Start with a clean slate: Thoroughly remove any dirt, debris, and dust from the tire.
- Personalize with paint (optional): If desired, spray paint the tire in your preferred color.
- Line it up: Cut a piece of landscaping fabric or plastic liner to fit the interior of the tire, providing a barrier to prevent soil leakage.
- Boost drainage: Enhance the planter’s drainage system by filling the bottom with a layer of rocks or gravel.
- Fill with soil: Add soil to the tire, leaving ample space at the top to accommodate your chosen plants.
- Plant with finesse: Select plants that align with your desired aesthetic and carefully place them in the tire, gently pressing the soil around their roots to secure them.
- Nurture and nourish: Regularly water and care for the plants, treating them as you would any other garden or planter.
- Revel in its uniqueness: Delight in the charm and eye-catching appeal of your new tire planter as it adds a distinctive touch to your garden or outdoor space.
Experience the joy of transforming waste into beauty with this remarkable DIY project, and let your tire planter become the centerpiece of your garden’s allure.
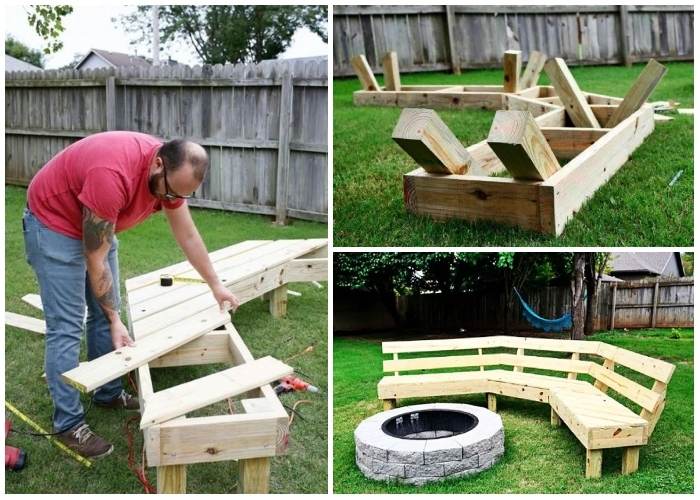
Craft Your Own Backyard Oasis: A Step-by-Step Guide to Building a DIY Stone Fire Pit
Transform your outdoor space into a cozy retreat by constructing a stunning DIY stone fire pit. Follow these simple steps to create a captivating focal point in your backyard:
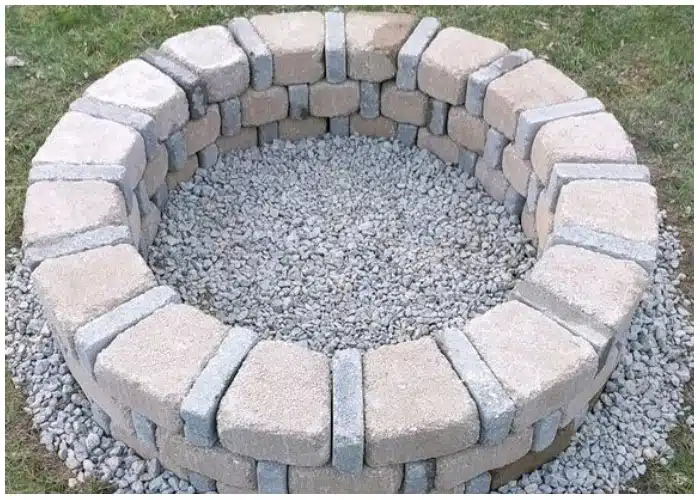
- Select the perfect spot: Choose a level, open area away from trees, shrubs, and structures for your fire pit.
- Determine size and shape: Decide on the dimensions and shape of your fire pit. A circular design with a diameter of 4-6 feet is a popular choice.
- Mark the designated area: Use spray paint or a garden hose to clearly mark the boundaries where your fire pit will be built.
- Excavate the ground: Dig a trench in the marked area, reaching a depth of 6-8 inches.
- Line the pit: Create a barrier by placing fire-resistant bricks, stones, or concrete blocks along the inner perimeter of the trench.
- Ensure proper drainage: Spread a layer of gravel at the bottom of the pit to facilitate drainage.
- Construct the walls: Begin stacking bricks, stones, or blocks to build up the walls of your fire pit.
- Crown it with a fire ring: Position a metal fire ring on top of the bricks, stones, or blocks to safely contain the flames.
- Create a cozy seating area: Surround your fire pit with comfortable chairs, benches, or other seating options to enhance relaxation and enjoyment.
- Ignite the flame: Safely start a fire within the pit, and relish the soothing warmth and captivating ambiance of your backyard fire pit.
With careful attention to detail and adherence to safety measures, you can bring this charming DIY stone fire pit to life. Get ready to savor countless evenings of tranquility and delight in your personal outdoor haven.
Revamp Your Space with Upcycled Charm: Craft Your Own DIY Stools Using Wood Logs and Ceramics
Unleash your creativity and transform old materials into functional treasures with this simple and rewarding DIY project. Follow these steps to create stunning stools using upcycled wood logs and ceramics:
Materials needed: Old wood logs, Upcycled ceramics, Mosaic glue, Mosaic grout.
Tools required: Tile nippers, Sponges, Tile cutter (optional).
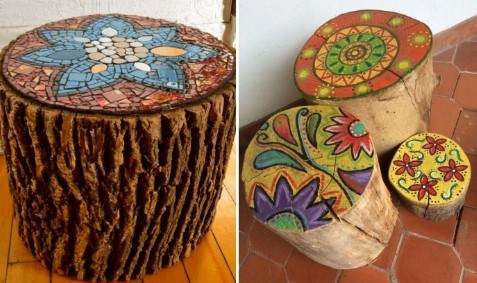
Step-by-step instructions:
- Prepare the ceramics: Sort through your collection of upcycled ceramics and select pieces that harmonize well together in a mosaic pattern. Using tile nippers, cut the pieces to fit the surface of the wood log.
- Apply the mosaic: Utilize mosaic glue to affix the ceramic pieces onto the log, arranging them in your desired pattern. Allow the glue to dry completely.
- Fill the gaps: Fill any gaps between the ceramic pieces with mosaic grout. Use a sponge to smooth out the grout and remove any excess. Let the grout dry entirely.
- Finish the surface: For a polished look, consider sanding down the log’s surface. Apply a protective finish to safeguard its beauty if desired.
- Embrace your new creation: Your upcycled log stool is now ready for use! Its distinctive design and repurposed materials make it a remarkable and sustainable addition to your home decor.
Unleash your inner artist and bring new life to old materials through this engaging project. Enjoy the sense of accomplishment and admire the unique charm of your handmade, upcycled stool that effortlessly combines natural elements with artistic flair.
Unleash Your Creativity: Budget-Friendly Garden Flowers Under $5!
Discover the secret to crafting stunning, eye-catching flowers for your garden without breaking the bank. Here’s a fantastic idea that will have you rushing to your nearest Dollar Tree store for the perfect supplies.
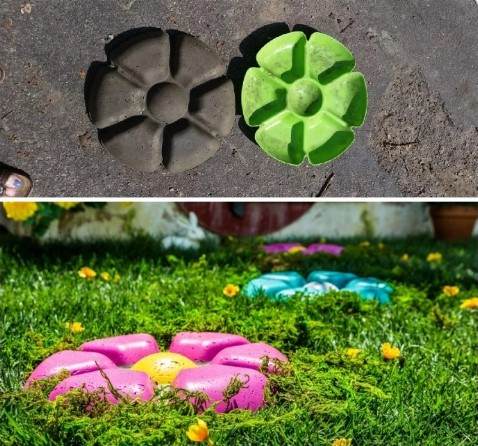
During a recent trip to find a frame, we stumbled upon chip-and-dip plastic dishes perched on a gondola. Instantly, inspiration struck. Equipped with the ingredients to create hypertufa, we wasted no time in whipping up a generous batch to fill two trays. After patiently allowing them to set overnight, we eagerly ventured outside to witness the magic.
Gently releasing the hardened hypertufa flowers from their molds, we placed them in the warm embrace of the sun to dry further. A few hours later, we adorned them with a captivating spray paint finish. Curiosity piqued, we chose to leave one flower in its natural state, keen to observe its aging process.
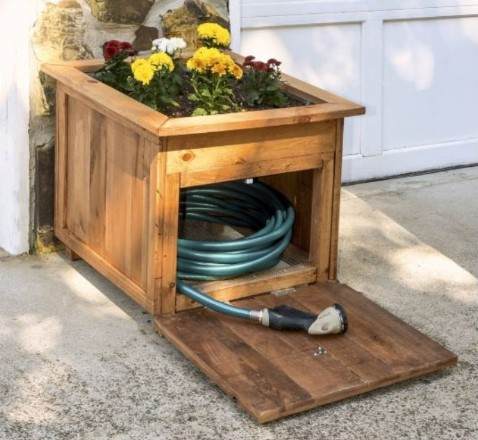
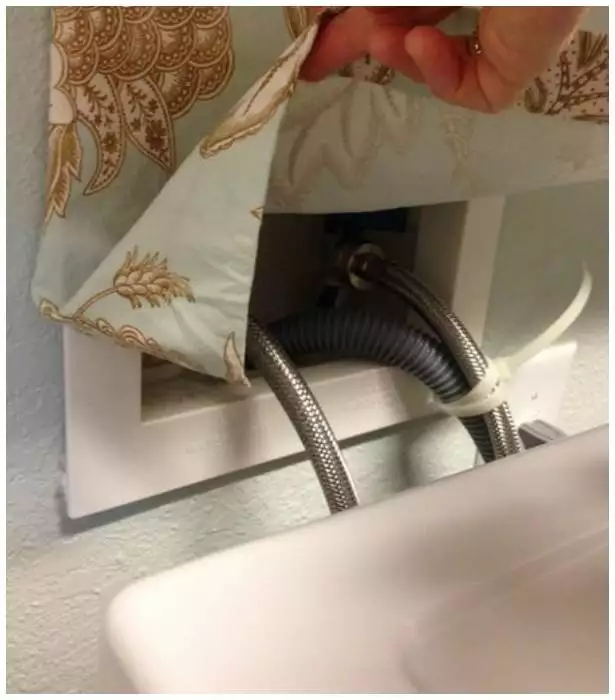
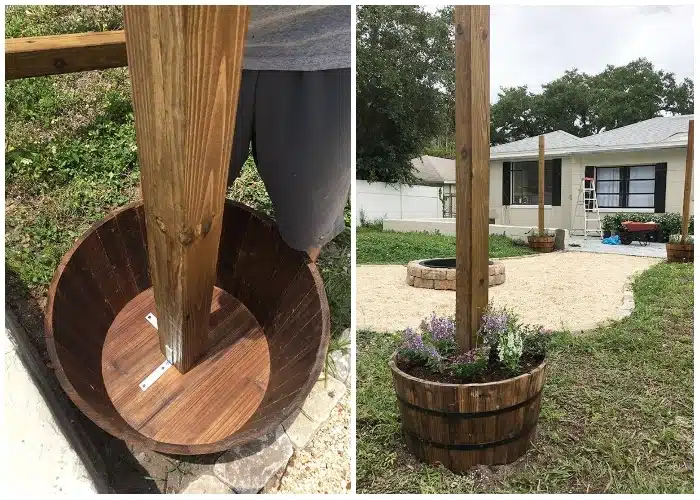
Tidy and Practical: Build Your Own Hose Holder for a Small Backyard
Looking for a clever DIY solution for storing your garden hose? We have an ingenious idea that will not only keep your hose organized but also add a touch of charm to your small backyard.
For an impressive hose holder that seamlessly blends into your garden, opt for a wooden design. The holder can discreetly store your hose out of sight, while the top can double as a planter, allowing you to nurture beautiful flowers.
Here’s what you’ll need:
- 4 by 4 by 48″ long pressure-treated post
- 4 hooks
- Epoxy glue
- Cement
- Solar post cap
Let’s dive into the step-by-step process:
- Determine the ideal height for the post, as well as its distance from the house and the water spigot. Use chalk to mark the spot on the brick where the holder will be installed.
- Measure out from the chalk mark on the brick to find the perfect location to dig a one-foot-deep hole. Take your time to create a sturdy foundation.
- Place the post securely into the hole and pour dry concrete around it. Add a quart of water to initiate the concrete’s setting process. Allow it to set for approximately four hours.
- Once the cement is completely set, attach the hooks to the post. These hooks will hold your hose neatly in place.
- Finally, add the solar light post cap using a two-part-mix epoxy. This will not only provide a decorative touch but also illuminate your backyard in the evenings.
Create a Paver Path that Evolves with Nature
Building a beautiful and durable paver path in your yard has never been easier, thanks to Trustone pavers. With their unique design, you can effortlessly create a path that harmonizes with nature and evolves over time.

Follow these simple steps to bring your vision to life:
- Set the path depth: Begin by determining the desired path depth, which should be approximately 3-1/2 inches below the surrounding lawn. Skim off the sod and dirt to achieve the desired depth, and use a rake to ensure a smooth soil surface.
- Lay the pavers without gaps: Unlike traditional paths, with Trustone pavers, you don’t need to worry about fitting or cutting the stones. Simply lay them end-to-end to form the path, allowing for any natural curves. Don’t be concerned about gaps between the pavers, as these will be concealed as the grass grows through.
- Fill recesses with quality soil: Fill the recessed areas between the pavers with high-quality soil, ensuring it is free of clumps. Lightly tamp the soil in each square to create space for the sod.
- Install the sod squares: Using a utility knife, cut small squares from a roll of sod. Press these squares into the recessed areas in the Trustone pavers. Tamp the soil alongside the sod squares to secure them in place.
- Water for growth: Give the sod a good watering to ensure proper growth. This will encourage the grass to establish itself between the pavers, creating a seamless and natural-looking path.
Experience the Magic of a DIY Smokeless Fire Pit in Your Backyard
Turn your outdoor space into a captivating oasis with this ultimate DIY project: a smokeless fire pit that will elevate your backyard gatherings to new heights of comfort and enjoyment.
Follow these 4 simple steps to create your own cozy haven:
Materials needed:
- Sunnydaze Steel Outdoor Fire Ring Insert
- Master Flow Round Metal Duct Pipe
- Galvanized Steel Worm Gear Clamp
- Dryer Vent Installation Duct Tape
- Master Flow Round Duct Cap
- HDX 27-Gallon Tough Storage Tote
- IRON FACE Adapter for DEWALT 12v Max Battery
- 12V Lithium Ion Battery
- Aluminum Flexible Dryer Vent Hose
- SEAFLO 4″ in-Line Marine Bilge Air Blower
- Round Grate, 4-Inch
- Scrap 2×4 (see step 2 for purpose)
- Shovel
- Large pavers
- Utility knife
- Drill with a large bit
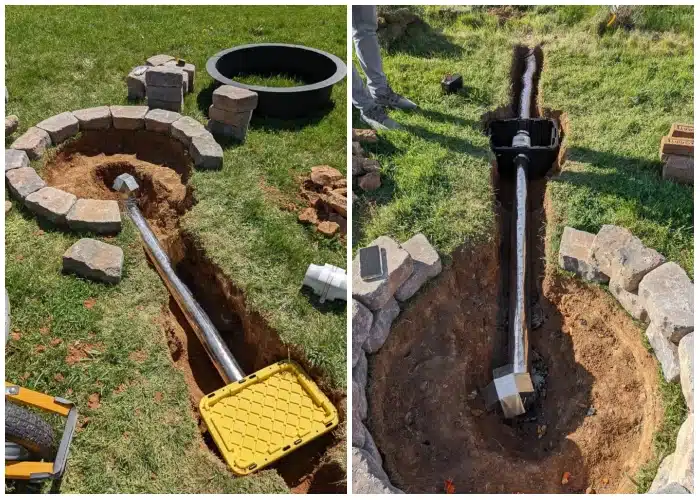
Step 1: Prepare the space Dig a 36-inch diameter pit, approximately 6 inches deep. Also, dig a trench connecting to a mechanical box (a heavy-duty plastic tote) placed 3.5 feet away from the pit. Adjust the trench length based on the distance between the pit, mechanical box, and air intake.
Step 2: Set up the blower Mount a small piece of 2×4 to the bottom of the tote to stabilize and align the blower. Attach the blower using screws, cut out circles in the tote for the piping, and connect the blower’s lines to a 12V power connector.
Step 3: Connect the components Place the mechanical box in its dug-out location and align the metal duct pipe and dryer vent hose to the blower’s intake and outtake. Customize the lengths of the pipe and hose to fit your setup. Drill air holes in the duct cap and attach the round grate to it.
Step 4: Final touches Cut a semi-circle in the fire ring to accommodate the duct pipe. Fill the trench and pit with dirt and rocks, ensuring stability and proper drainage. Lay down wide pavers to protect the area. Connect a 12V lithium-ion battery to power the blower, and voila! Your smokeless fire pit is ready to create a warm and cozy atmosphere for your outdoor gatherings.
Immerse yourself in the enchantment of a smoke-free fire pit that will mesmerize and delight, while providing a welcoming ambiance for memorable moments with family and friends in your backyard haven.
Elevate Your Garden with a Whiskey Barrel Planter and Birdhouse Ensemble
Capture the enchantment of a garden adorned with birdhouses by crafting your very own whiskey barrel planter masterpiece! Let’s gather the supplies and embark on this delightful DIY project:
Supplies needed:
- Whiskey barrel planter
- 4×4 post
- Birdhouses (craft from scratch or purchase ready-made ones)
- Scrap plywood (optional)
- Fence board
- Bright, eye-catching blue spray paint
- Assorted handles and knobs (for a whimsical touch)
- Tops for the posts

Step-by-step guide:
- Acquire the supplies: Make a quick trip to your local hardware store to procure a whiskey barrel planter and a 4×4 post. Depending on your skill level and preference, you can choose to craft the birdhouses from scratch or purchase pre-made ones.
- Measure and cut the post: Cut the 4×4 post into three pieces of varying lengths: 2 1/2 ft, 2 ft, and 1 1/2 ft. These will serve as the bases for your charming birdhouses. Experiment with their placement within the whiskey barrel, visualizing the final arrangement. If you desire additional height, create a square-shaped scrap plywood base and trim the corners to fit comfortably on top of the wooden pieces inside the barrel.
- Secure the planter: Align the front of your planter to rest on the top of the whiskey barrel, and use a fence board to provide support at the back.
- Paint and decorate: Spray paint the posts with a vibrant and eye-catching blue color. Let your inner artist shine as you unleash your creativity on the birdhouses, making them as colorful and vibrant as you desire. Mount each birdhouse on a new base, ensuring easy attachment and detachment from the posts. For a whimsical touch, replace the dowel perches with quirky handles and knobs that add character and charm. Finally, crown each post with a top, completing your fabulous creation.
This unique DIY project is sure to become a centerpiece of admiration and a source of endless delight for you and your visitors.
Craft Your Own Weatherproof Wooden Bench for Garden Bliss
Transform your garden into a tranquil oasis with a cozy and durable wooden bench that will stand the test of time.
Follow these steps to construct a sturdy and weather-resistant seating option:
- Select the right wood: Opt for water-resistant wood types such as oak or larch, known for their ability to withstand outdoor conditions. Consider applying a layer of wood preservatives to provide additional moisture protection.
- Build a strong frame: Utilize smooth and planned wood planks with dimensions of either 40 x 70 mm or 50 x 100 mm for the frame. If desired, incorporate a 100 x 100 mm piece of timber for extra reinforcement. Planed-edged boards, which are precisely trimmed and smoothed, are ideal for constructing the bench’s structure.
- Attach the seat and backrest: Use a 40-50 mm thick smoothed-edge board for the seat and a 30-40 mm thick one for the backrest. Secure these boards to the frame using wood screws.
- Enhance durability: Add a 70 x 70 mm bar to the frame and utilize it as lintels, which are cross pieces that provide support for the weight of the seat and backrest.
- Secure the bench: Assemble the components of the bench and secure them with metal fasteners such as wood screws, bolts with nuts and washers, and steel corners. This will ensure stability and longevity.
- Weatherproof the bench: Apply a layer of alkyd-urethane varnish to protect the wood from the elements. This will enhance its weather resistance and prolong its lifespan.
Immerse yourself in the serenity of your garden oasis as you relax on your handcrafted wooden bench. With its durable construction and weatherproofing, this cozy seating option will become your go-to spot for peaceful moments amidst nature’s beauty.
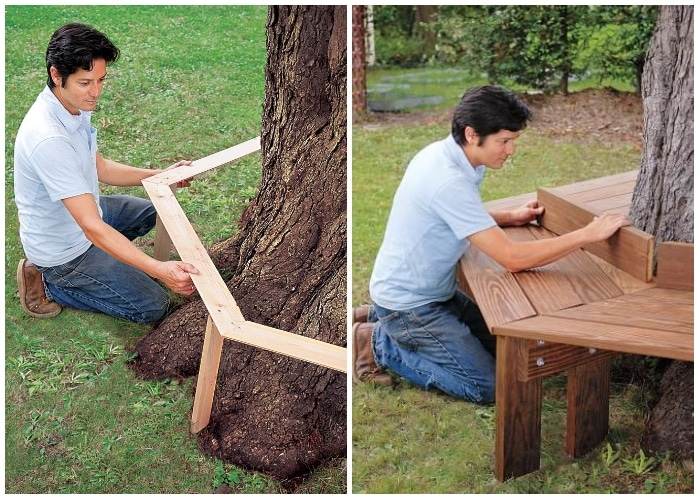
Enhance Your Backyard with a Charming Tree Bench
When you’re unsure how to adorn that old tree in your backyard, a treehouse might seem daunting and expensive to build. However, fear not! A tree bench offers a simple and affordable makeover solution. Create a circular bench that everyone can enjoy, utilizing spare wood lying around the house. It’s easy, elegant, and adds a rustic touch to your outdoor space without the need for additional furniture.
Follow these steps to construct your marvelous DIY tree bench:
- Determine the seat’s height: Measure the diameter of the tree trunk at the desired seat height (typically 16 to 18 inches). For a mature tree, add 6 inches to allow for growth, or add 12 inches for a young tree.
- Calculate the length of the short sides: Multiply the total from step 1 by 1.75. Mark this length on a scrap piece of wood or cardboard, then cut the ends at 30-degree angles so that the opposite side is longer. This will serve as a template for the inner seat boards.
- Prepare the remaining pieces: Cut five more pieces to match the template’s size. Check for fit by clamping or temporarily placing the pieces around the tree trunk, making any necessary adjustments.
- Build up the bench: Begin by attaching the inner seat boards to the tree trunk, making sure they are evenly spaced. Gradually add the remaining pieces, securing them to each other and the tree trunk as you work your way around.
Let this DIY project be a testament to your creativity and resourcefulness, turning an ordinary tree into a unique and inviting seating area.
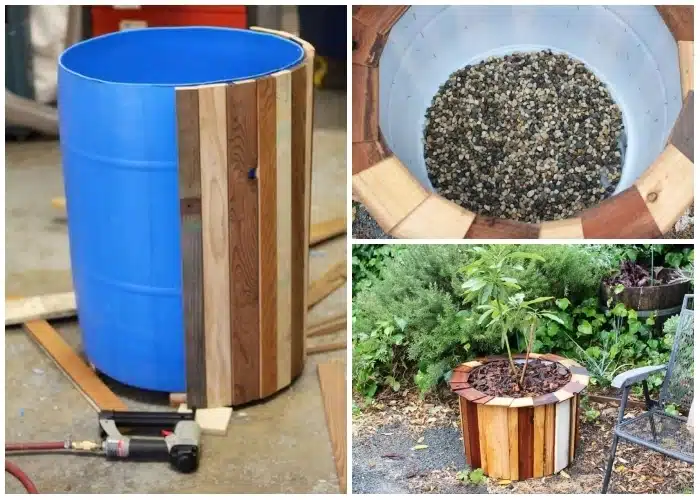
DIY Plastic Barrel Planter
Unleash your creativity and transform an ordinary plastic barrel into a visually stunning and cost-effective planter that will be the envy of every garden enthusiast. Gather the following materials and tools to embark on this exciting DIY project:
Materials needed:
- Plastic barrel
- 1/8″ – 1/4″ wood planks
- Brad nails
- Mesh screen
- 1″ thick scrap wood (risers)
Tools required:
- Jigsaw
- Cordless drill
- Miter saw
- Brad nailer
- Hammer
Follow these exhilarating steps to create your masterpiece:
- Cut the barrel: Use a jigsaw to remove the top portion of the barrel or divide it into two smaller planters, depending on your preference.
- Deburr and drill: Smooth the cut lip of the barrel and drill multiple drainage holes at the bottom to ensure proper water drainage.
- Attach skids: Create two 2×4 skids and securely fasten them to the bottom of the barrel. This will allow for easy positioning of the planter.
- Prep wood: Give salvaged wooden slats and scrap wood a new lease on life by planing, ripping, and cutting them to the desired dimensions.
- Nail slats: Cover the barrel with the contrasting wooden slats using an air-powered brad nailer. Ensure each plank is securely fastened.
- Secure slats: Bend the exposed ends of the brad nails inside the barrel to lock the boards in place and protect your hands from sharp edges.
- Create the rim: Get creative and craft an octagon or sunburst pattern for the top rim using scrap wood, brads, and glue. This will add a unique touch to your planter.
- Add screen and pebbles: Cover the larger drainage holes at the bottom of the planter with mesh screen material to prevent soil from escaping. Place small pebbles on top of the screen for added drainage.
- Plant: Fill the planter with a container-friendly soil mix, plant your chosen flora, and add wood chunks or mulch to complete the planting process.
- Preserve: To prolong the life of your planter, apply a water-based exterior polyurethane or varnish coat. This will protect the wood from outdoor elements and ensure longevity.
Embrace the satisfaction of creating a unique and visually stunning plastic barrel planter that will elevate your gardening experience. Let your creativity flourish as you bring life to your outdoor space with beautiful blooms and greenery.
Unlock Your Creativity: Transform Plastic Bottle Caps into Colorful Art
Discover a fantastic way to upcycle plastic bottle caps and turn them into stunning flower designs that adorn trees. This unique and eco-friendly art project not only serves as a visual delight but also promotes the importance of recycling and repurposing materials that would otherwise end up in landfills.
Materials Needed:
- Plastic bottle caps of various colors and sizes
- Strong adhesive or hot glue gun
- Scissors
- Thin wire or twine
- A tree or wooden structure to display your creation
Instructions:
- Collect a variety of plastic bottle caps: Gather bottle caps in different colors and sizes. The more diverse the collection, the more vibrant and eye-catching your artwork will be.
- Create flower shapes: Start by arranging the bottle caps into flower shapes. Use a single cap as the center of the flower and surround it with smaller caps to form petals. Play with different combinations to achieve the desired look.
- Attach the bottle caps together: Use a strong adhesive or hot glue gun to securely attach the bottle caps to one another. Ensure that the caps are firmly connected to create a sturdy and visually appealing flower design.
- Display your creation: Decide on the location for your artwork. Find a tree or wooden structure that can serve as the canvas for your colorful creations. Use hot glue or nails to attach the flower designs to the tree or structure, ensuring they are securely fastened.
Let your imagination bloom as you adorn your surroundings with these beautiful and eco-conscious creations. Witness the transformation of plastic bottle caps into vibrant flowers, showcasing the power of repurposing and recycling. Inspire others with your unique artwork and encourage them to embrace their own creative journeys while promoting sustainability.
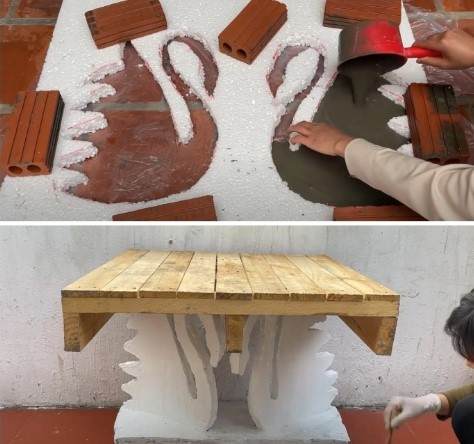
Create a Sophisticated Swan-Inspired Coffee Table
Elevate your living area with a homemade coffee table featuring elegant swan-shaped cement legs. By using styrofoam molds, you can achieve a unique and captivating centerpiece.
Follow these steps to bring this stunning creation to life:
Step 1: Gather the materials: Collect styrofoam blocks, a carving knife, cement mix, water, sandpaper, primer, paint, a tabletop, and adhesive.
Step 2: Shape the swan molds: Draw the outline of a swan on each styrofoam block and carefully carve and sculpt the foam to create molds that resemble swan legs.
Step 3: Fill the molds with cement: Mix the cement and water according to the manufacturer’s instructions. Pour the cement mixture into the styrofoam swan molds and allow it to harden completely.
Step 4: Remove the styrofoam and refine the legs: Once the cement has hardened, carefully remove the styrofoam molds. Use sandpaper to refine and smooth the surfaces of the cement swan legs.
Step 5: Prime and paint the legs: Apply a coat of primer to the cement swan legs. Once the primer is dry, paint the legs in your desired color or finish, adding a touch of elegance to the design.
Step 6: Attach the legs to the tabletop: Align the cement swan legs on the underside of the tabletop. Apply adhesive to the upper surfaces of the legs and secure the tabletop in place. Allow the adhesive to dry completely before using the table.
This unique piece of furniture will become the focal point of your living area, adding a touch of elegance and creativity to your space. Enjoy the satisfaction of creating a functional work of art that showcases your DIY skills and artistic vision.
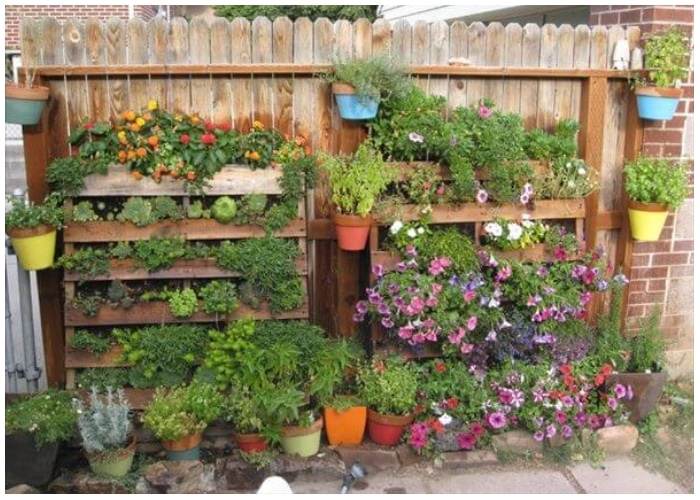
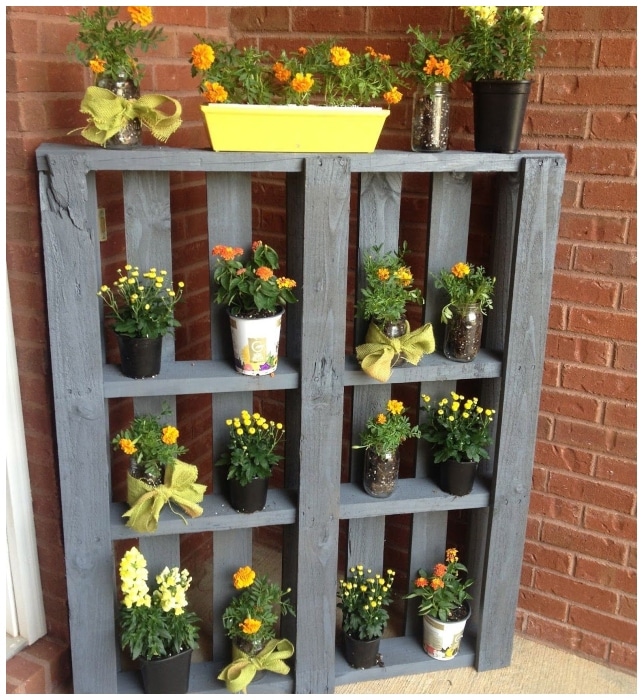
Create Stunning Wall Planter Pallets for a Striking Garden Display
Wood can be utilized in various DIY projects, including the creation of planter pallet boxes to adorn your walls. These sturdy and visually appealing pallets add structure and charm to your garden or backyard. Let your imagination and creativity soar as you design colorful schemes that are truly unique
Here’s how you can bring these wall planter pallets to life:
- Choose the right pallet size: Pallets measuring 48 inches by 40 inches typically have seven top deck boards, while 30-inch by 30-inch pallets usually have five. These top deck boards will form the front wall of the planter after converting the pallet.
- Position the deck boards: For larger 40-inch pallets, there will be five deck boards at the bottom, while smaller 30-inch pallets will have three. These bottom deck boards will serve as the backs of individual planter boxes within the pallet planter.
- Identify the stringers: The two-by-fours that run perpendicular to the top and bottom deck boards are called stringers. In a pallet planter, there will be two side stringers and one center stringer, creating the sides of separate planter boxes.
With these steps completed, you’ll have your wall planter pallet ready for a beautiful display of flowers or plants. Hang the pallets on different sections of your outdoor walls, creating an exceptional design that adds a touch of natural beauty to your space.
Experience Ultimate Relaxation with an Effortless DIY Hanging Daybed
Create a serene oasis in your outdoor space with a captivating DIY project: the hanging daybed. This budget-friendly endeavor promises comfort and charm, providing the perfect spot to unwind.
Gather the following materials and get ready to embark on your relaxation journey:
Materials needed:
- 17 pieces of 2×4 boards
- Wood and lag screws
- Nylon rope or chain with a load limit of at least 200 lbs
- Exterior wood filler
- Clear coat spray paint
- Various grits of sandpaper
- Measuring tape
- Carpenter’s square
- Drill
- Saw
Measurements: The daybed is designed to accommodate a standard twin mattress with an additional 4 inches of space around it.
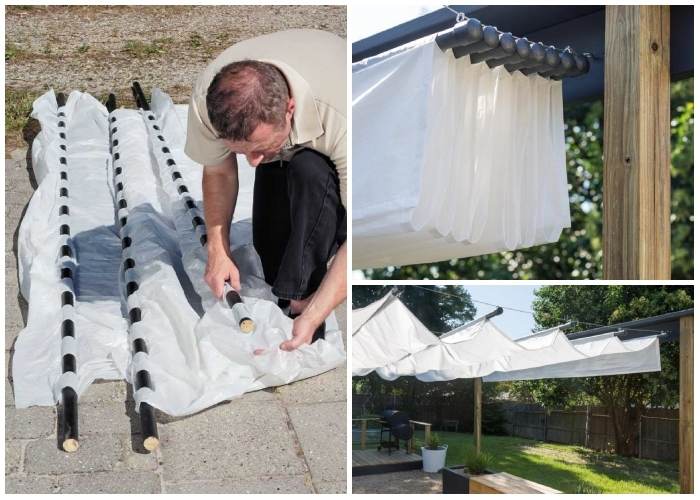
Cutting: Most hardware stores offer cutting services. Have your 2×4 boards cut into specific lengths for the frame sides, joists, and deck boards according to your measurements.
Assembly:
- Begin by building the frame. Measure, mark, predrill holes, and glue together the joists and frame sides.
- Attach the deck boards, ensuring they overhang by 1 inch on all sides.
- To secure the frame, drill holes at the daybed’s corners and tightly fasten the lag screws, taking care not to strip the wood.
Finishing:
- Fill any exposed screw holes with wood filler and allow it to dry.
- Sand the daybed to a smooth finish, removing any rough edges or imperfections. Vacuum off the sanding residue.
- Apply a protective layer of clear exterior coat and let it dry completely.
Installation:
- Locate a sturdy beam or rafters where you wish to hang your daybed.
- Install the lag screws securely into the beam or rafters.
- Use a rope or chain to hang the daybed at your desired height, ensuring proper stability.
Create an Elegant DIY Cement Stone Pathway
If you’re looking to add a touch of elegance to your front yard with a stone pathway but don’t have access to stones or rocks, we have a quick and creative DIY idea for you. Put on your gloves and gather some wet cement to create round or “stone” shaped cement bags using small plastic bags or lunch bags.
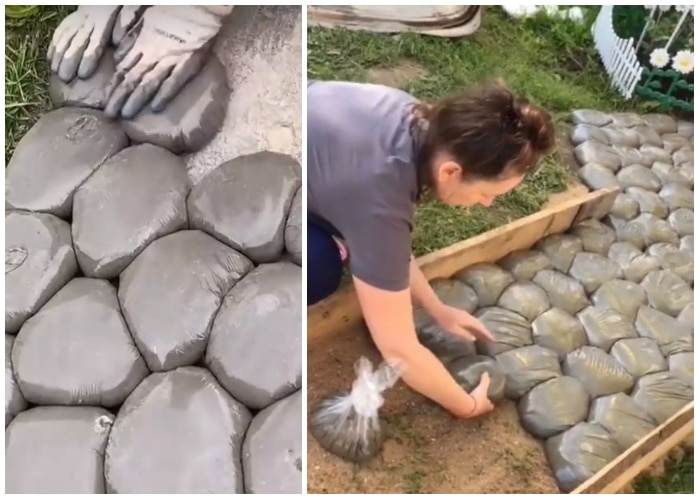
Stack them neatly along the desired pathway and let them dry. Here’s how to bring this project to life:
- Gather the materials: You’ll need wet cement, small plastic bags or lunch bags, gloves, and a knife.
- Shape the cement bags: Fill the plastic bags with wet cement, shaping them into round or stone-like forms. Be sure to pack them tightly to create sturdy “stones” for your pathway.
- Stack the cement bags: Arrange the cement bags neatly along the pathway, creating the desired layout. Leave a small gap between each bag for a natural and authentic look.
- Allow the cement to dry: Let the cement bags dry completely. This may take several days depending on the weather conditions.
- Remove the plastic bags: Once the cement is fully dry and hardened, carefully cut and remove the plastic bags using a knife. This will reveal the shiny and rough concrete texture, giving your pathway an authentic appearance.
It’s important to note the difference between cement and concrete. Cement is a powdered substance made from pulverized calcined limestone and clay, while concrete is made by mixing cement powder with additional ingredients like various types of mineral aggregates and water. The cement provides the bonding power and strength to the poured concrete as it cures.
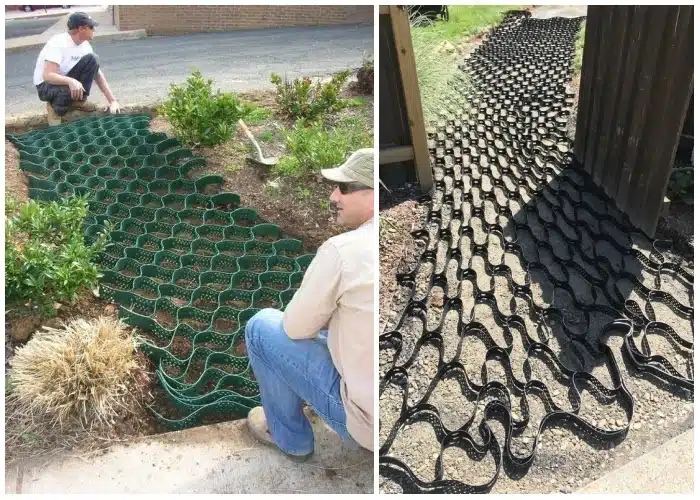
Secure Your Sand or Stone with a Ground Grid for a Beautiful Yard
Transform your yard into a stunning oasis with an affordable and hassle-free solution: a ground grid that keeps your sand or stone dust in place. Choose a 2-inch deep plastic ground grid for effective erosion prevention and stability.
Here’s why it’s the perfect choice for your yard:
- Prevents movement: The ground grid ensures that your pavers, sand, or stone dust stay in position, even when subjected to heavy traffic from mowers, carts, or occasional vehicle use. Say goodbye to constantly readjusting or dealing with eroded surfaces.
- Ideal for driveways: Ground grids are available in various depths, ranging from 4 to 8 inches, making them a great option for driveways. Their design allows for reduced use of base materials while still providing excellent stability and durability.
- Easy installation: Installing a ground grid is a straightforward process. Simply lay it down over the desired area, following the manufacturer’s instructions. With minimal effort, you can achieve a secure and level surface.
- Cost-effective solution: The cost of a ground grid typically ranges from 40 to 50 cents per square foot, making it an affordable choice for your yard makeover. You can achieve a visually appealing and functional space without breaking the bank.
Upgrade your yard with a ground grid that keeps your sand or stone dust firmly in place. Enjoy the peace of mind knowing that your surfaces will remain stable and visually pleasing, even under regular use.
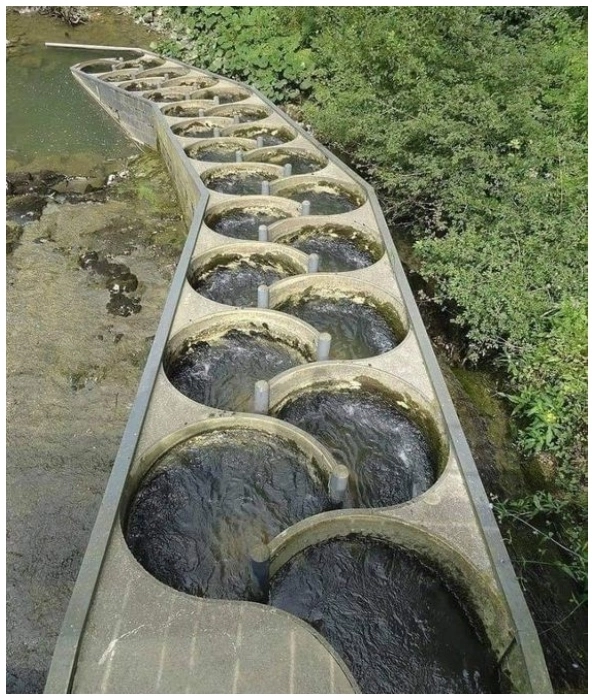
Create a Captivating Fish Ladder for Your Outdoor Space
Enhance your outdoor space with a captivating aquatic feature—a fish ladder. Not only does it add visual interest to your surroundings, but it also provides a fascinating spectacle as fish traverse the ladder, creating a dynamic and lively environment.
Follow these steps to build your own fish ladder:
- Determine the location, size, and design: Choose a suitable spot in your yard for the fish ladder. Consider the available space and the desired size and design that will complement your outdoor aesthetics.
- Gather the materials: You’ll need large rocks, bricks, or concrete blocks to form the steps or tiers of the ladder. Additionally, you’ll need a flexible pond liner, a water pump, and hoses or pipes.
- Construct the ladder structure: Arrange the rocks, bricks, or concrete blocks to create a series of steps or tiers that gradually slope upwards. Ensure each step has a flat surface for water to pool, providing resting spots for the fish before they ascend to the next level.
- Install the pond liner: Lay the flexible pond liner over the fish ladder structure, ensuring it covers each step and is securely tucked into the edges. This will prevent water from seeping out of the ladder and ensure proper water flow.
- Set up the water circulation: Connect the water pump to the hoses or pipes and position it at the bottom of the fish ladder. The pump will circulate water through the ladder, creating a suitable environment for the fish.
- Enhance the surroundings: Opt to landscape around the fish ladder with aquatic plants, decorative rocks, or lighting to enhance its beauty and create a natural habitat for the fish. This will further elevate the aesthetic appeal of your outdoor space.
By constructing a fish ladder in your yard, you’ll create a unique focal point that combines nature, water, and movement.
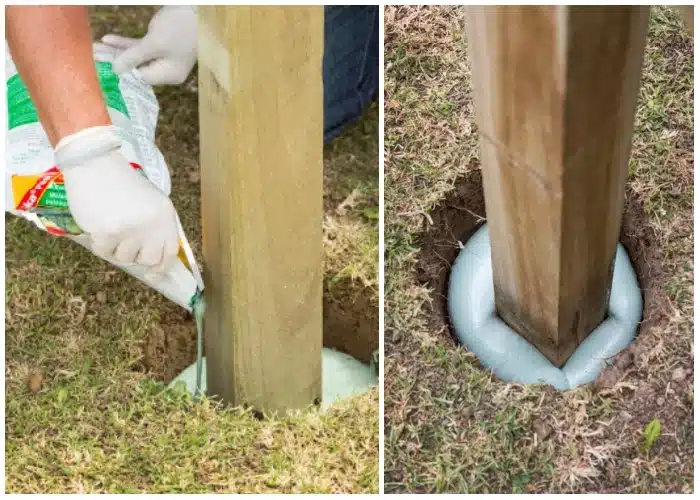
Create Your Own Homemade Concrete Mix for Secure Post Installation
When it comes to redoing your home or backyard, concrete mix is a valuable resource. However, you can create an alternative to instant concrete mix at home that is just as effective. With this homemade concrete mix, you can secure posts with ease using a minimal amount of material.
Here’s how:
Ingredients:
- Dry concrete mix (no-water formula)
Instructions:
- Choose a dry concrete mix that is suitable for your project. Look for a no-water formula, as this will simplify the mixing process.
- Mix in the bag: Before opening the bag, give it a thorough shake to ensure the ingredients are well mixed. This will save you the hassle of measuring and mixing in a separate container.
- Pour the mix: Open the bag and carefully pour the dry concrete mix into the hole where you want to install the post. Ensure the hole is properly prepared and free from debris.
- Watch it expand: As you pour the mix, observe how it quickly expands to fill the hole, providing a secure foundation for the post. This expansion is a result of the chemical reactions within the dry mix.
- Setting time: The mix will begin to set in approximately three minutes, providing initial stability. Allow it to fully set over the course of about two hours, ensuring a solid base for your post.
- Trim excess: Once the mix has set, cover it with topsoil as desired. If there is any surplus mixture above the ground surface, use a sharp knife to carefully cut it away, leaving a clean and polished appearance.
By creating your own homemade concrete mix, you can securely install posts using a minimal amount of material. This no-fuss solution saves you time and effort, while still providing the stability and durability you need.
Unleash Your Creativity with Tire Planters
When it comes to designing and revamping your garden, tire planters offer a unique and unconventional option. Don’t be fooled by their unconventional nature—tire planters can be repurposed to create a versatile and eye-catching look for your yard. They are readily available, cost-effective, and allow for endless creativity.

Here’s how you can make the most of them:
- Choose the right tires: Tires come in various sizes, so select ones that best fit your plant needs and yard size. Large tractor tires, about fifteen inches wide, are perfect for growing multiple plants or vegetables, while standard car tires, around twelve inches wide, are ideal for single-potted plants.
- Get creative with colors: Add a touch of vibrancy and fun to your tire planters by painting them in funky colors. Let your imagination run wild and choose shades that complement your garden’s overall theme.
- Stack them up: Tire planters can be stacked to create an interesting cascading effect. Utilize different tire sizes and colors to add depth and visual appeal to your landscape.
- Choose your plants wisely: Edible plants, such as vegetables and herbs, thrive in tire planters. They benefit from the warmth retained by the tires and have ample room for root growth. Consider your plant preferences and select varieties that will flourish in this unique planter.
- Ensure proper drainage: Drill a few drainage holes in the bottom of each tire to prevent waterlogging and ensure proper drainage for your plants. This will help maintain their health and vitality.
Tire planters offer a creative and eco-friendly way to give your garden a distinctive touch. Embrace their unconventional charm, repurpose old tires, and enjoy the versatility they bring to your outdoor space.
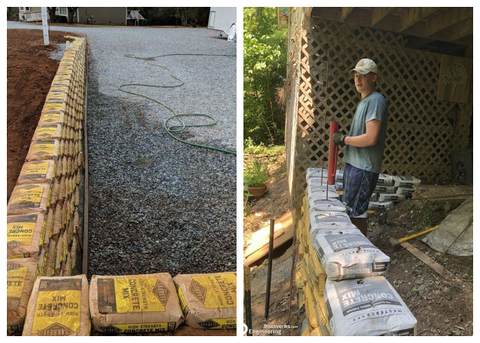
Unleash Your Creativity with a Unique Concrete Bag Wall Feature
Transform your backyard into a visually captivating space with an innovative DIY project—an intriguing concrete bag retaining wall. This unconventional technique utilizes unopened bags of concrete as building blocks, creating a sturdy and robust structure.
Here’s how you can create this interesting backyard wall feature:
- Prepare the area: Clear the desired space for your wall and ensure a level foundation. Remove any debris or obstacles that may interfere with the construction process.
- Lay the concrete bags: Place the unopened bags of concrete in a desired pattern, similar to building blocks. Ensure they are positioned securely and tightly together, forming a solid structure.
- Saturate the bags: Thoroughly soak the concrete bags with water, ensuring they are fully saturated. This water triggers the cement in the bags to harden over time, creating a strong and durable wall.
- Reinforce with rebar (optional): For additional strength, you can drive rebar into the bags before they set. This will provide added stability and reinforce the structure.
- Customize the finish: Once the concrete hardens, you have various options for the final appearance of your wall. You can choose to leave the paper on the bags, allowing it to naturally biodegrade over time. Alternatively, you can peel off the paper or even burn it, creating a unique texture and visual effect.
- Explore other possibilities: This versatile technique can also be applied to create sunken fire pits, perfect for enjoying tranquil summer nights. Let your creativity soar as you explore different applications for this method.
Not only does this DIY project save on traditional construction costs, but it also offers a visually intriguing aesthetic to your outdoor space. Embrace the unique charm of a concrete bag retaining wall and enjoy the striking feature it adds to your backyard.
Delight in the Chirps: Welcome Wildlife with Bird Feeders
Want to bring more life and joy to your garden? Look no further than bird feeders, baths, or houses! These enticing additions not only offer our feathered friends a delicious meal and a refreshing sip, but they also bless our ears with enchanting melodies. Scientific studies reveal that the melodious tunes of birds have a magical effect on our well-being, reducing stress, fatigue, and anxiety levels. It’s like having a personal concert in your backyard!

But here’s the best part: You don’t need to break the bank to enjoy the show. Get crafty and upcycle old tin cans into charming bird feeders. Give them a good scrub, splash on some vibrant paint, fill them to the brim with bird seed, and hang them with care. Voila! You’ve created a delightful and functional masterpiece that showcases your creativity and compassion for our avian companions.
Bug Hotel: A Cozy Getaway for Garden Guests
Calling all nature enthusiasts and adventure seekers! Get ready for a thrilling family activity that will not only bring joy and excitement but also attract a buzzing community to your garden. It’s time to build a bug hotel—an inexpensive and enjoyable project that promises to be a hit with insects of all shapes and sizes.
Imagine a unique and decorative feature that showcases your creativity while providing a comfortable abode for our tiny friends. The best part? You can let your imagination run wild and gather recycled materials to add character and charm to your bug hotel. From old wine corks and sticks to fallen leaves and more, the possibilities are endless!
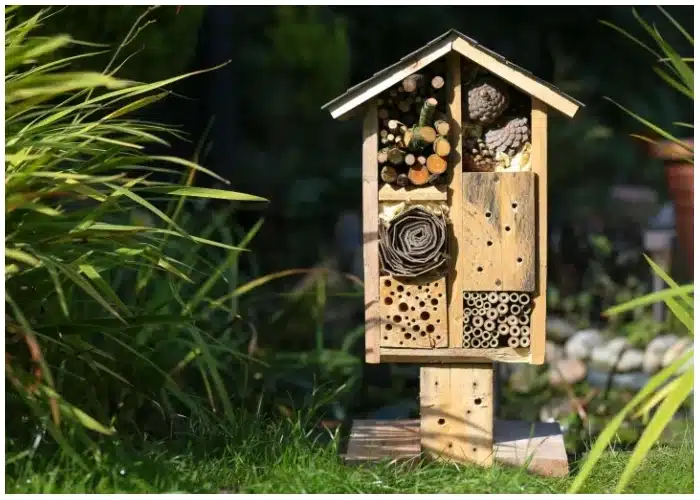
Here’s how to create your bug hotel oasis: Start by collecting an assortment of recycled materials like wooden pallets, bamboo canes, and dried leaves. These will become the building blocks of your bug hotel. Get creative with the design, incorporating multiple compartments to accommodate a diverse range of insect guests.
Stack the materials in a wooden box or attach them to a wall or post, creating a series of cozy nooks for insects to call home. Remember to provide a variety of sizes and materials, catering to the preferences of different bugs. After all, everyone deserves a personalized space!
Now comes the exciting part—find the perfect spot in your garden for your bug hotel. Choose a sunny and sheltered location, ensuring it’s easily accessible to your new six-legged friends. As you observe and explore, you’ll witness a fascinating community of insects making themselves at home in your bug hote
Personalize Your Backyard with Cement Keepsake Garden Stones
Are you ready to add a touch of uniqueness to your backyard? Look no further than delightful cement keepsake stones! With just a bag of quick concrete mix, aluminum pie tins, and a splash of colorful spray paint, you can create stunning accents that will elevate the beauty of your outdoor space.
Let’s get started! Begin by blending the concrete mix with water, following the instructions on the bag, until you achieve the desired consistency. Now, find a flat surface and place the aluminum pie tins within easy reach. Fill each tin with the concrete mix, allowing it to reach the rim.

As the concrete settles in the tins, grab a wooden spoon or a garden spade and gently smooth out the texture of the mixture while it’s still wet. Take your time to create the perfect finish. Remember, you’re crafting something special that will leave a lasting impression.
Now comes the anticipation. Allow approximately 15 minutes for the concrete to harden and retain its shape. This is when your creative spirit truly shines. Once the stones have solidified, they become a blank canvas ready for your personal touch.
Reach for your vibrant collection of spray paint and let your imagination run wild. Decorate the stones with patterns, colors, or even personalized messages. Make each stone a unique keepsake that tells a story and adds character to your garden.
Finally, find the perfect spot in your backyard to display these cherished creations. Arrange them in a cluster, scatter them throughout your garden, or place them strategically along a pathway. Let their presence ignite joy and create a sense of wonder in your outdoor oasis.
Homemade Raised Planter Boxes
Revamp your backyard garden with homemade raised planter boxes. With just a few materials like boards, wood screws, pocket screws, and landscape fabric, you can create stunning planters.
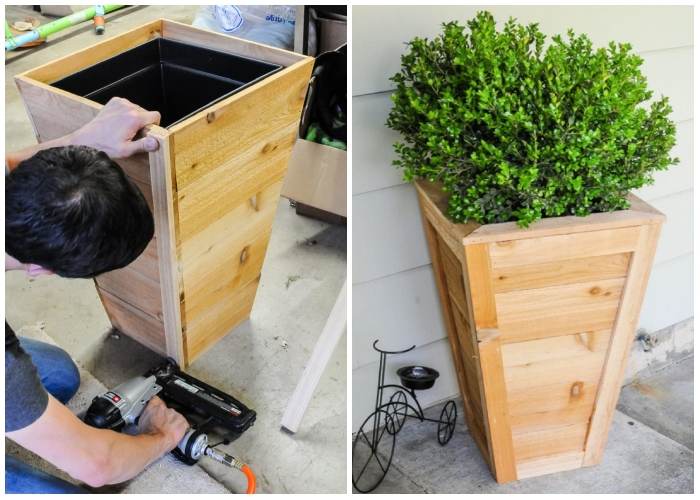
Start by making a blueprint to guide you. Cut the boards into different sizes, secure them with screws, and ensure a tight fit by polishing them to the correct dimensions. Finally, add a personal touch by painting or accessorizing your planter boxes. Elevate your gardening game effortlessly!
Fish Pond Tires
Revitalize your backyard with a unique twist by creating fish pond tires. Break free from the traditional planter ideas and opt for an eye-catching tire pond surrounded by lush greenery. It’s surprisingly simple to transform an old tire into a serene oasis: dig a small hole in the garden to match the tire’s size, place the tire in the hole, and add water (plus optional fish) along with a filter.
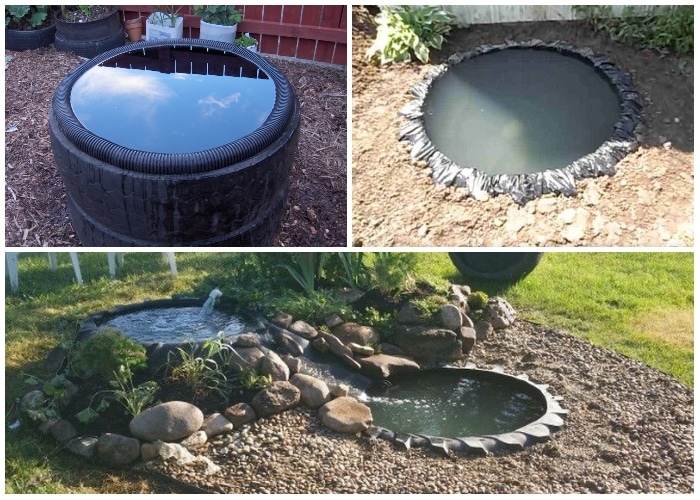
Tractor tire ponds serve various aquatic purposes, such as home fish farming or an outdoor aquarium. Install a pump and filtration box to maintain water quality, regularly top up with fresh water for filtration, and feed the fish consistently. Additionally, incorporating pond plants will enhance the fish-friendly environment and even provide natural fertilizer for your garden. Dive into the realm of tire ponds and enjoy your personal backyard oasis.
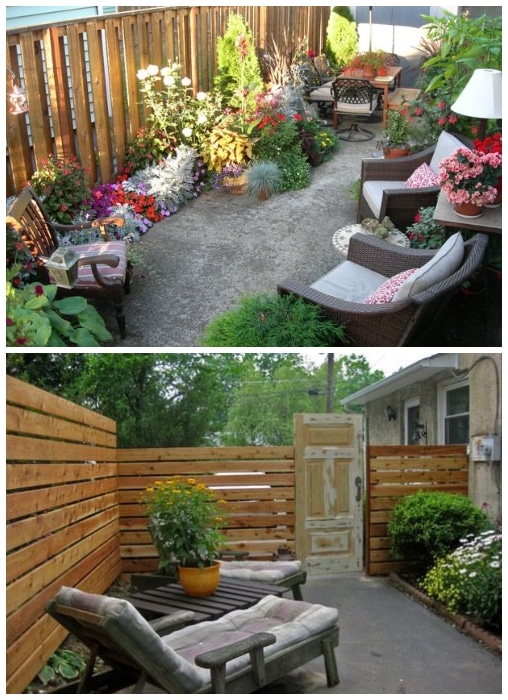
Embracing the Rustic Charm of a Landscape
While not everyone’s preference, a rustic landscape can hold its own appeal amidst the desire for fresh and tidy gardens. Incorporating elements like old furniture or a weathered bench can lend an old-fashioned touch to your backyard. Another simple way to infuse rustic charm is by adding a split rail or rail fence, requiring minimal effort. By carefully trimming trees and strategically placing plants and furniture, you can maximize the beauty of nature.
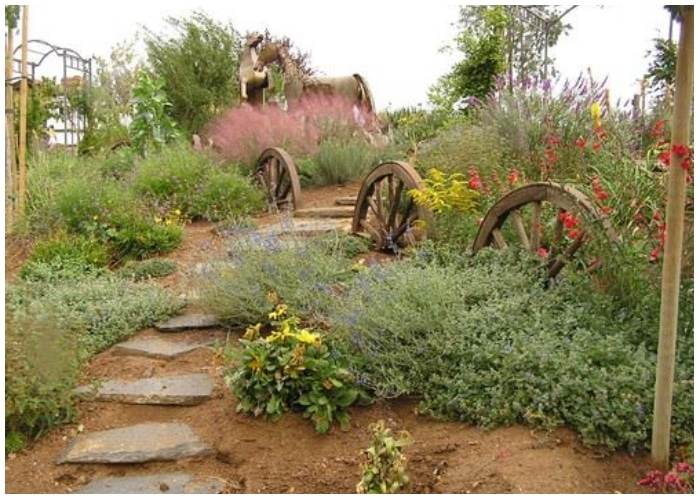
Garden sheds have the potential to become attractive features and tranquil spaces with a little attention. A fresh coat of paint on wooden huts and summerhouses, using cool colors that blend with the surrounding flora, can work wonders. For a more authentic rustic feel, don’t worry about perfect precision in painting; weathered spots and peeling paint contribute to the overall allure.
To create a welcoming environment brimming with personality and interest, consider painting a wooden chair, stool, or side table to match and use them as frames for your favorite container plants. For added charm, incorporate vintage treasures like wooden washboards, stone jars, and glass bottles.
Adding Vibrant Colors to Your Garden
Revamping your garden doesn’t have to be an expensive or exhausting endeavor. You can easily achieve a stunning transformation without buying numerous plants and scattering them across different areas. Instead, consider adorning your yard with beautiful, colorful flowers like roses and lavenders, strategically placed to create eye-catching pops of color.
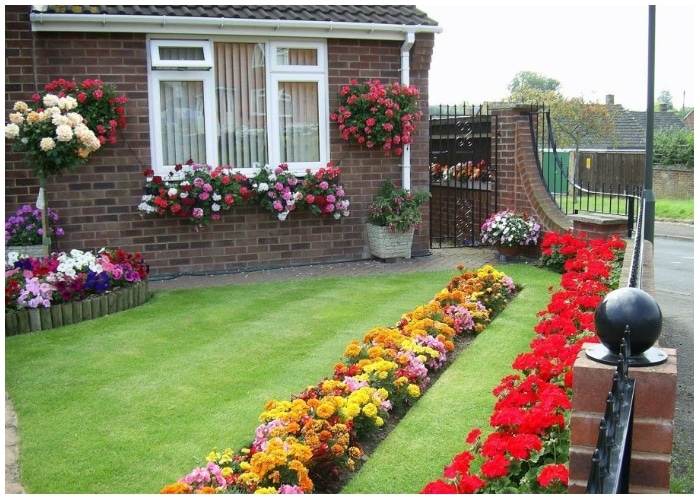
To save money, explore the options of purchasing discounted or “out of season” plants that can seamlessly blend into your picturesque scenery. Seeds or seedlings are also a more affordable choice, allowing you to flex your gardening skills.
When it comes to creating a pleasing garden palette, turn to the color wheel as your trusted ally. The color wheel revolves around the three primary colors: red, yellow, and blue. Imagine a complete color wheel resembling a radiant rainbow, with red and orange beside yellow, followed by green, blue, purple, and violet. Another useful tip from the color wheel is to select plants that are evenly spaced from one another and combine them in what is known as a triad. This approach can make a significant impact in terms of both color harmony and visual interest.
By incorporating vibrant hues into your garden, you can effortlessly breathe life into your outdoor space, transforming it into a captivating oasis bursting with color.
Transforming Your Poolside with a Rock Garden
Revamping the poolside area can often be a challenging and costly endeavor. However, incorporating rocks along the poolside can add a captivating and creative touch. The best part is that rocks can be easily collected from your garden, backyard, or a nearby garden center, making it a cost-effective option.
It’s important to avoid using small stones or pebbles, as they can unintentionally find their way into the pool or pose a risk of someone accidentally stepping on them and getting hurt. Instead, consider creating a rock garden, also referred to as an alpine garden or rockery. This entails arranging stones, boulders, and rocks in a deliberate manner, creating pockets where small plants can be nestled. One of the advantages of a rock garden is its low-maintenance nature.
It’s a perfect opportunity to showcase plants like cacti and other varieties that require minimal watering. Additionally, the presence of rocks helps prevent erosion, making rock gardens an ideal choice for those who appreciate gardens but not the demands of traditional gardening. Grasses, sedums, and mugo pines are among the thriving plants commonly found in rock gardens, which are often positioned in sunny locations.
By implementing a rock garden, you can breathe new life into your poolside area, adding an element of natural beauty and low-maintenance charm that complements your outdoor space.
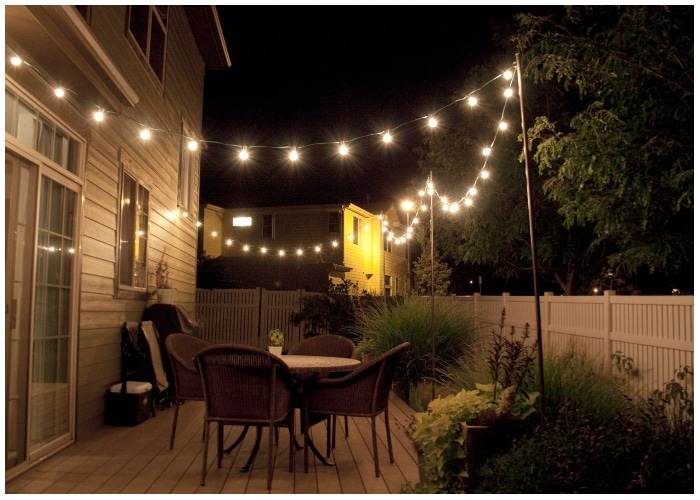
Embrace the Joy of Picnicking
Who says picnics are only for holidays or parks? Now, you can transform your garden into the perfect picnic spot. Simply add a picnic table, which can be an old coffee table or a refurbished dining table. Stack some stylish pillows and drape a charming tablecloth to give it that classic picnic look.
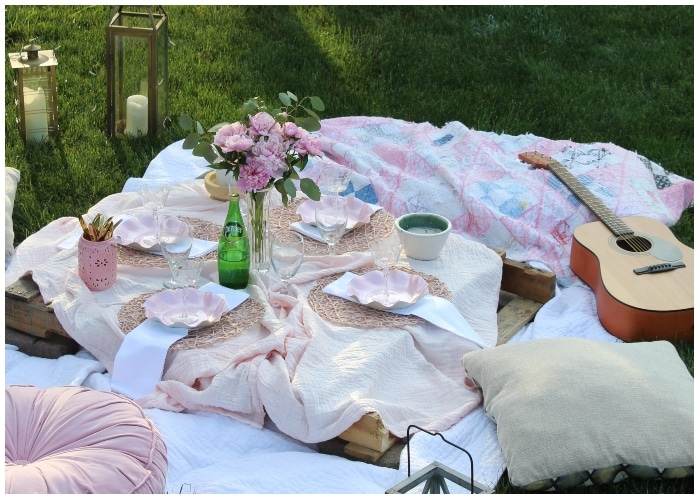
To take it a step further, hang string lights for a magical ambiance and adorn the surroundings with colorful and funky plants. Voila! You now have a stunning outdoor picnic setting right outside your own home. How convenient is that?
Look for a picturesque and serene spot in your garden, one that is lush, grassy, and offers ample natural shade. Setting up under a tree allows you to enjoy the shade when it gets too hot, while ensuring plenty of room for kids to run around and play.
But what if your picnic plans coincide with a rainy day? No worries! Simply set up indoors. While wicker baskets are charming, they may not be the most practical choice. Opt for an insulated tote or bag with compartments and handles, ensuring cushioning to protect delicate food items or glasses.
Harmonizing Blue and Green in Your Front Yard
The combination of blue and green, nature’s colors, can create a striking contrast when incorporated into your front yard. Designing a poolside area can be challenging, as it requires careful consideration to avoid a tacky appearance. One way to add visual interest is by creating raised beds along the poolside, introducing an intriguing texture to the space.
Enhance the raised beds with deep green plants, and if you’re feeling adventurous, add a vibrant splash of colorful flowers. The possibilities are endless, and you can even repurpose wooden pallets or any other suitable materials to spice up the pool area. These plants make a statement when combined with the rest of your landscaping. To add greenery without overshadowing the more captivating plants, consider incorporating vine-like creeping plants, also known as ground cover.
However, it’s important to be mindful of the types of plants you choose for the poolside area. Avoid plants that have two specific characteristics: leaves that shed and plants that thrive in shaded areas. Leaves, pine needles, or dead flowers falling into the pool can create additional maintenance efforts and potentially clog filters.
Unleash Your Creativity with Steel Basin Planters
Think we’ve exhausted all ideas for planters? Think again! When it comes to holding soil, almost anything can become a fantastic DIY planter. Consider the steel basin, for instance—it’s generously sized, carries a refurbished charm, and exudes a rustic look, making it a perfect planter for your backyard.
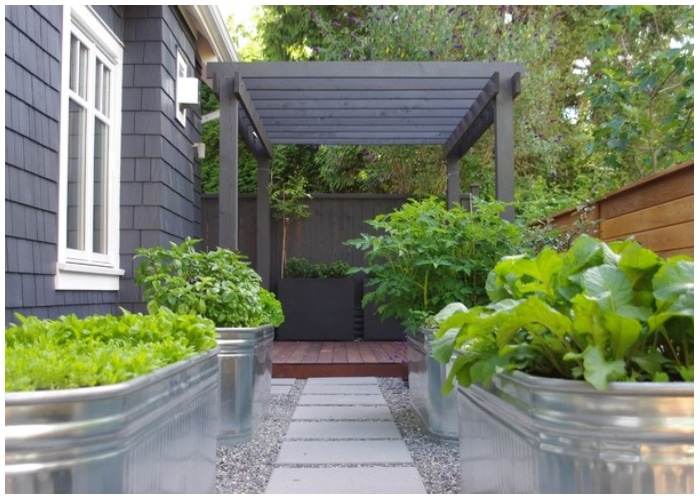
While the basins may appear a bit rusted, a simple solution is to paint them with vibrant colors, instantly adding an extra pop to your garden. Additionally, these rustic steel basins can be paired with other vintage-inspired planters and furniture for the ultimate rustic landscape appeal.
It’s important to note that metal planters do have certain drawbacks, one of which is their tendency to attract and absorb heat. As a result, the soil and plant roots can become hotter than optimal, especially when exposed to direct sunlight. Inadequate insulation in metal planters can exacerbate this issue. To prevent root damage, it’s recommended to incorporate additional insulation, such as a plastic pot liner or clay, which can help regulate temperature, although they may present their own challenges.
By exploring the creative possibilities of steel basin planters, you can add a unique touch to your garden while showcasing your DIY skills. Just be mindful of the potential heat absorption and take necessary precautions to protect your plants’ roots from overheating.
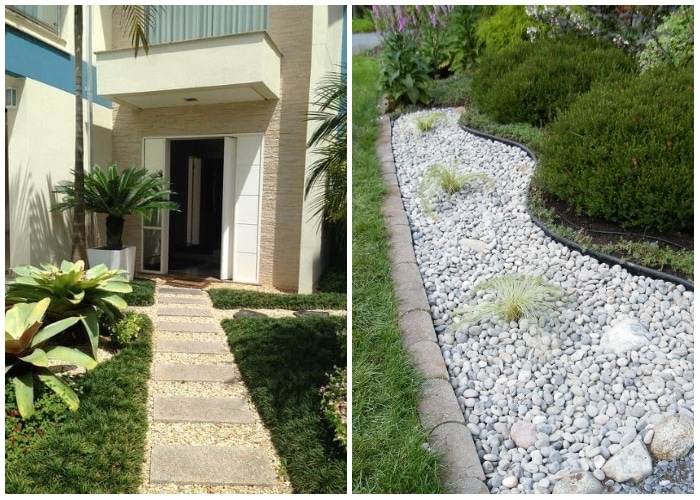
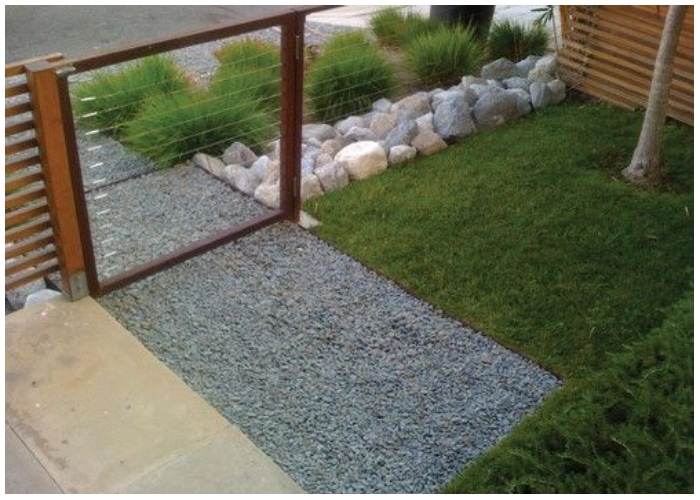
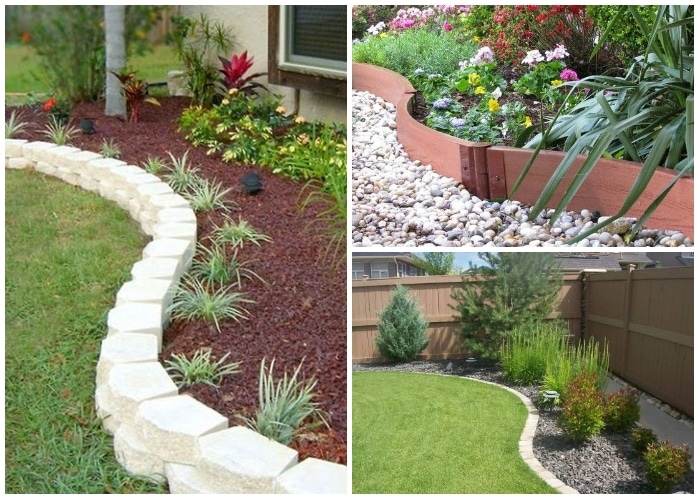
Elevate Your Landscape with Crushed Stones
Here’s another fantastic idea that demonstrates how you can design a landscape using affordable and easily accessible materials. Instead of investing in expensive lawn turfs to cover your front yard, consider using crushed stones or garden rocks to adorn the lawn and create a distinct separation between steps and the garden area.
There is a wide variety of garden fillers to choose from, including gravel, rocks, crushed stones, and even large boulders, each available in different colors and sizes. These fillers offer a wonderful opportunity to introduce contrast and depth to your garden or patio, enhancing its overall beauty.
When selecting the fillers, consider the size of your pavers and the spacing between them. As a general rule, larger pavers can accommodate larger infill stones. It’s important to choose stones that harmonize well with the surrounding elements. For example, if your hardscape features recurring gray tones, opt for filler stones in similar hues.
Furthermore, stability is key. The filler stones should remain in place when stepped on, avoiding any scattering or disruption. A walkway littered with loose pebbles can create a disorganized appearance. Therefore, choose filler stones that stay firmly in position when properly laid.
To ensure a neat and tidy finish, the filler stones should be placed between the pavers at a slightly lower height (at least half an inch) than the paver surface. This helps minimize mess and keeps everything looking well-organized.
By incorporating crushed stones as a landscape element, you can elevate the visual appeal of your outdoor space, adding texture, contrast, and a touch of natural beauty in an economical and practical way.
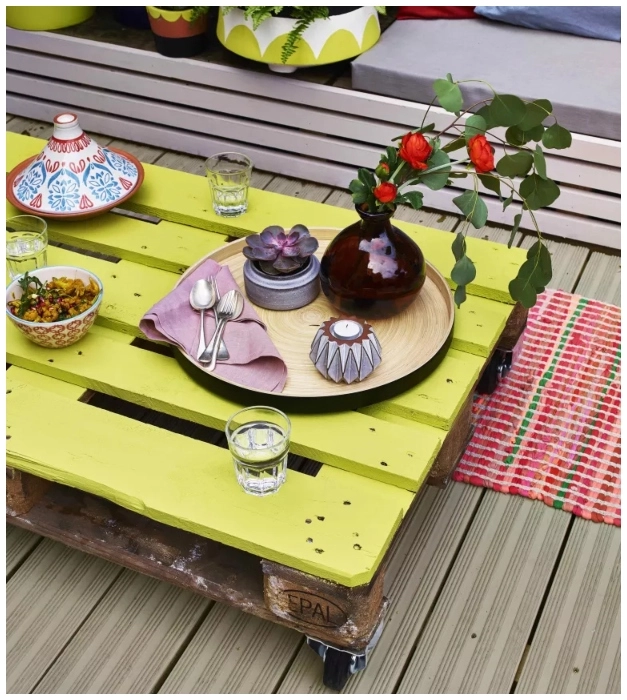
Farmhouse Elegance in Your Backyard
What captures our hearts about a farmhouse? Is it the refreshing atmosphere it offers or the chic landscape that exudes rustic charm? If it’s the latter, fret not, because we can create our own farmhouse chic right in our backyard.
One of the key elements that brings out the farmhouse feel is the abundance of wooden and rustic furniture, just like the table featured in this photo. Make use of the outdoor space by incorporating budget-friendly furniture pieces, complemented by colorful flowers planted alongside, creating a warm and inviting setting for intimate gatherings with friends and family.

When aiming for a traditional farmhouse look, natural materials inspired by the surrounding countryside are your best allies. Reclaimed wood and wrought iron are excellent examples. These materials are well-suited for outdoor farmhouse designs when properly treated. Wicker or luxurious rattan are also ideal materials to achieve an outdoor farmhouse aesthetic. Adding vintage furniture pieces will elevate your garden space, immersing it in the ambiance of a beautiful country cottage.
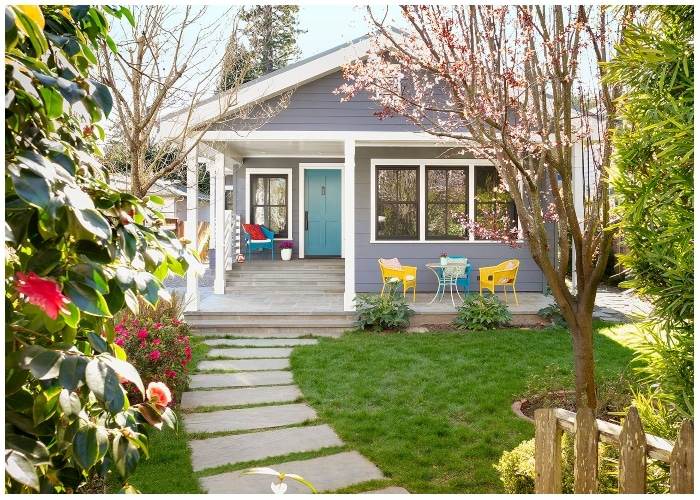
Transforming Unused Spaces: Driveways and Garages
Even a small space in front of your house holds the potential for beauty and transformation. Take, for instance, an unused driveway that can be converted into a charming garden area. By placing pots and shaping a delightful flower garden, you can breathe life into this once-unused space. Adding comfortable chairs along the sides allows for moments of relaxation and basking in the warmth of the sun during the summer.
Similarly, an unused garage can be repurposed into a delightful patio area. With the addition of lights and a skylight, you can enjoy the enchantment of evenings outdoors. Some homeowners have transformed their two-car detached garages into eclectic and welcoming home offices, complete with a cozy sitting area. By maintaining the appearance of a functional garage when the doors are closed, the structure can provide a versatile and multi-purpose space.
White ceilings and walls create a clean and bright ambiance, while a vibrant pop of color can be introduced by painting the cinder block wall. Skylights bring in natural light, providing a pleasant atmosphere for work and relaxation. Ample desk space can be complemented with a comfortable couch and armchairs to create a soothing environment.
Others have converted their detached garages into light-filled exercise studios. Designating specific areas for yoga, pilates, or stretching allows for dedicated spaces to focus on physical well-being. Consider using hardwood floors, as they are gentler on knee and ankle joints compared to concrete garage flooring.
Wooden Stumps in Your Yard
Natural materials like wood and stones are easily accessible and can bring a touch of organic beauty to your outdoor space. The wooden stump, is a perfect example of how you can seamlessly blend nature into your home decor.
A wooden stump holds endless possibilities, serving as a versatile centerpiece for your patio or a charming side table along the poolside—whatever suits your space and ambiance. Let’s not forget other natural treasures at your disposal, such as bamboo fences or wooden stumps repurposed into charming chairs and benches. These elements add rustic elegance and a unique touch to your outdoor oasis.
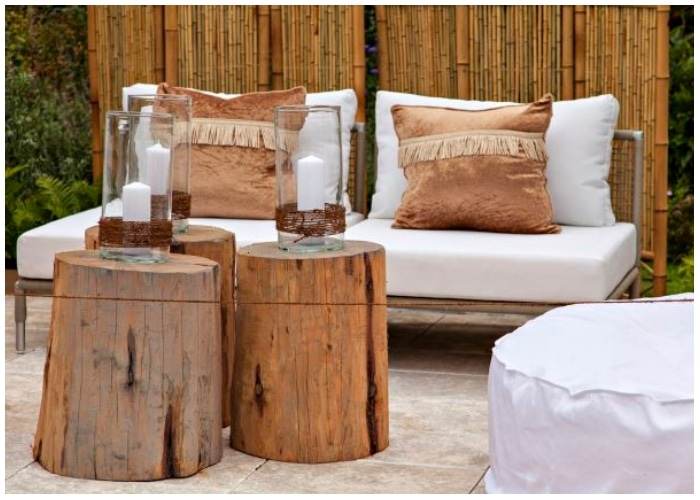
When working with a wooden stump, it’s crucial to allow ample time for it to dry out. Depending on the stump, this process can take up to six months. However, we recommend a minimum of one month of drying time in an indoor environment. This ensures that the bark becomes easy to remove, simplifying the subsequent steps. Embrace the natural beauty of any splits that may occur during the drying process, as they add character and enhance the stump’s unique appeal.
To prepare the wooden stump for its new purpose, start by leveling any uneven surfaces on the top. You can achieve this by using a 60-grit sanding sponge or a saw, depending on the degree of unevenness. Next, carefully remove the bark using a chisel and a hammer, unveiling the raw, enchanting beauty of the wood beneath.
Glow It Up
Lighting up your outdoor space can add a touch of glamour and make it look festive all year round. One easy way to achieve this is by using LED lights. Whether you hang them in your front or back yard, these cute little lights can transform your outdoor area into a fun and stylish space.
LED lights are energy-saving and widely available, so you don’t have to worry about high electricity bills. You can choose from various options like multi-colored, white, or color-changing lights. To protect against water damage, consider getting waterproof LED strip lights. These strips are easy to install and can be used to outline your patio, decking, stairs, walls, or fences. LED strip lights are affordable, eco-friendly, and blend seamlessly into your home or office. They not only provide aesthetic appeal but also serve as functional lighting.
Fencing
Adding a fence to your outdoor space can give it a strong and tidy look that’s perfect for the garden. Whether you prefer a modern miniature fence or a wooden border, the right fencing can add a stylish touch to your yard. It may seem like a lot of work, but fencing is actually affordable and easy to install. There are different materials you can choose from based on your desired look and functionality. Wood fences, made from redwood, cedar, or pressure-treated pine, come in various colors.
Steel and aluminum fences can be coated to resemble wrought iron, offering an aesthetic appeal. Vinyl and PVC fences are cost-effective and low-maintenance options. They are highly durable and can withstand different weather conditions. Some PVC posts are reinforced with wood or aluminum for added strength. The height of your garden fence can be chosen for both appearance and practical reasons. Decorative edging can be as low as 12 inches, but taller fencing is necessary to keep wild animals out.
Borders
Adding borders to your landscape is essential for achieving a polished and sophisticated look. Borders can be created using various materials like plastic, wood, peat, or rocks, depending on your preference. The options for garden borders are virtually limitless. One cost-effective and visually appealing option is to use wooden shavings and border boxes that can be buried in the ground. This combination looks fantastic when paired with garden grass and rocks. It’s a great way to divide your yard into different sections, making the space more visually interesting.
To plan your border, start by outlining the area on graph paper and experiment with different combinations until you find one that works well. Consider the mature size of plants to ensure they fit appropriately. You can find inspiration for plant combinations in books, publications, or online resources. Consider your time constraints when choosing plants. If you have limited time for gardening, opt for low-maintenance options like shrubs, neat conifers, attractive grasses, and resilient perennials that provide color and form without demanding excessive care.
A DIY Outdoor Cinema Guide
Transforming your backyard into a cozy outdoor cinema is easier than you might think. With a few affordable materials and a little creativity, you can create a perfect movie-watching haven. All you need is a white sheet, some pegs, string, and a projector. This DIY setup is ideal for a unique date night, a fun family activity, or simply enjoying the outdoors. Take inspiration from interior stylist Kel Harmer, who successfully created her own outdoor cinema.
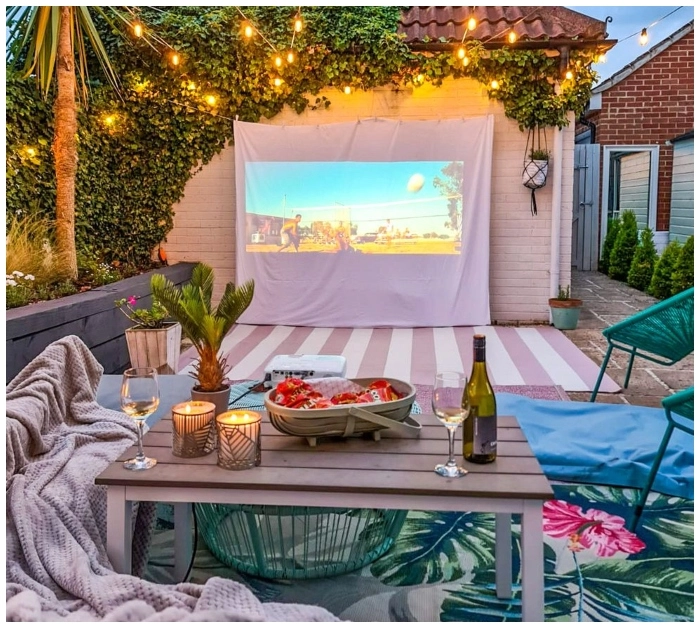
She used a king-sized white sheet, string, and pegs to make the screen. Placing the projector on a garden table and running the cables safely underneath the seating, she ensured a hazard-free setup. By following this example and adding your personal touch, you can easily bring the magic of an outdoor cinema to your backyard, creating lasting memories for yourself and your loved ones.
Transform Your Wine Corks into Handy Garden Tools
Don’t let those wine corks go to waste! Instead, repurpose them into useful garden tools. If you have a collection of wine corks lying around, you can easily transform them into plant markers for your garden. It’s a simple and eco-friendly way to keep track of your plants. Here’s how: Start by cutting off a small portion of the cork to create a flat surface. Then, use a permanent marker to write the name of each plant on the cork.
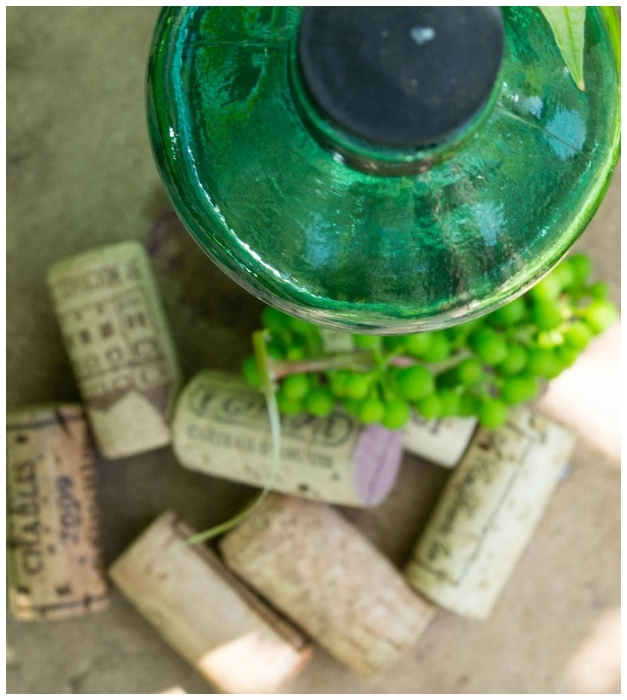
To make the marker stand upright, insert a wooden skewer into the bottom of the cork. Now you have functional and budget-friendly plant markers that will help you identify your plants with ease. It’s a clever way to give those wine corks a new purpose while adding a personal touch to your garden.
Living Fence
Enhance your backyard with a stunning living fence that won’t break the bank. By using the technique of espaliering, you can transform a simple tree into a captivating focal point. Espaliering involves training the tree to grow in a specific pattern, adding texture and visual interest to your outdoor space.
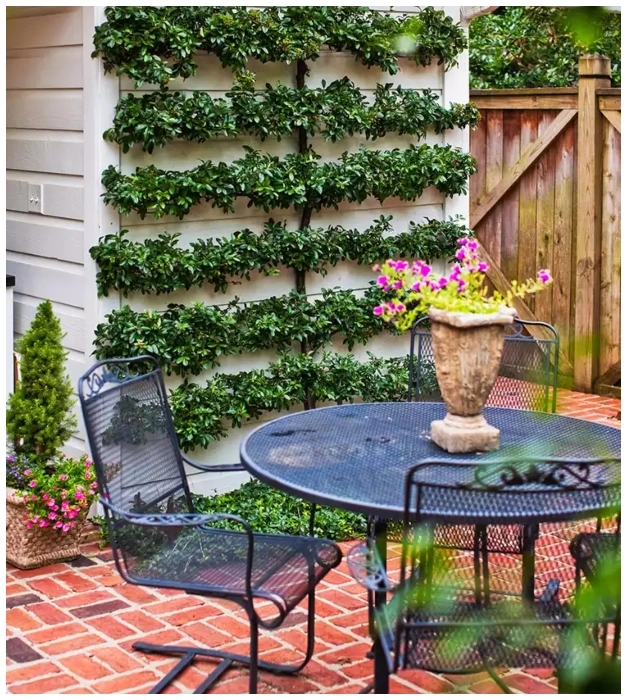
This method provides an affordable alternative to traditional fencing materials while creating a high-end look. Choose a tree species that is well-suited to your local climate and enjoy watching it flourish into a beautiful and functional feature in your yard. In addition to its aesthetic appeal, a living fence offers privacy, wind protection, and serves as a habitat for wildlife. Embrace this simple and cost-effective solution for your next backyard project, and turn your outdoor space into a work of art.
DIY Industrial Outdoor Coffee Table with Pipes
Add a stylish industrial touch to your outdoor area with a DIY coffee table made from steel pipes and cedar boards. This sturdy table features a sleek design and a convenient pull-out storage unit for your outdoor essentials. The best part? Creating this table is a breeze with just a few materials and simple instructions. Here’s how: Gather your materials, including steel pipes, cedar boards, stains, screws, and brackets.
Cut the cedar boards to the desired size and sand the edges for a smooth finish. Assemble the steel pipes and brackets to form the frame of the coffee table, then attach the cedar boards to create the tabletop. Apply a light stain to enhance the wood’s natural beauty, and voila! You now have a stylish and functional coffee table that infuses your outdoor space with industrial charm.
Edible Garden
Starting an edible garden is a wonderful way to grow your own fresh fruits, veggies, and herbs for the whole family to enjoy. Not only does it add beauty to your front yard, but it also promotes eco-friendly practices. It’s a cost-effective and enjoyable alternative to purchasing groceries, as seeds are affordable and easily accessible. You have a wide variety of options to choose from, including herbs, flowers, berries, and various vegetables that are delicious and nutritious.

While a vegetable calendar can help you plan ahead, it’s also important to consider local temperatures and weather conditions throughout the gardening year. Knowing the date of the last frost is particularly crucial for determining when to start sowing and planting delicate crops. Soil temperature plays a significant role in seed germination, so using a soil thermometer can ensure optimal conditions for planting. Additionally, different varieties of the same vegetable may have different sowing and planting periods, so always refer to the instructions on the seed packets. Embrace the joys of an edible garden and savor the satisfaction of harvesting your own homegrown produce.
Don’t underestimate the potential of leftover wood, especially wooden pallets. These versatile pieces can serve multiple purposes in your garden. If you have some spare wood from patio furniture or other projects, you can repurpose it into small boxes for organizing various items. These wooden boxes are ideal for growing vegetables in your edible garden, whether it’s herbs, tomatoes, onions, or other plants. To make them more convenient, consider attaching wheels to the boxes, allowing for easy mobility and preventing waterlogging during rainy seasons. These boxes not only provide functionality but also add an attractive touch to your patio.
Organic Pallets
They are cost-effective alternatives to traditional planting containers. Keep in mind that some wooden crates have wide spaces between the boards, while others have significant gaps. Depending on the design, you may need to add a plastic liner before planting.
For crates with large gaps, a liner is essential to prevent soil and water from draining directly out of the crate. Solid boxes may not require a liner to prevent soil loss, but using a plastic liner with drainage holes at the base can help prevent moisture-related issues like rotting. Embrace the creativity of repurposing wooden pallets and enjoy the practical benefits they bring to your garden.
Grass Terrace
Adding terraces to your poolside or front yard can bring texture and visual interest to your landscape. By creating multiple levels, you can separate the patio and garden areas, making the space more vibrant. These terraces provide an opportunity to plant different types of grasses, shrubs, or colorful flowers and plants, adding a splash of color to the surroundings. To further enhance the aesthetics, consider incorporating small statues or sculptures to add depth to the yard. Let your inner architect shine and create a remarkable terrace that will transform your dull yard into a captivating space.
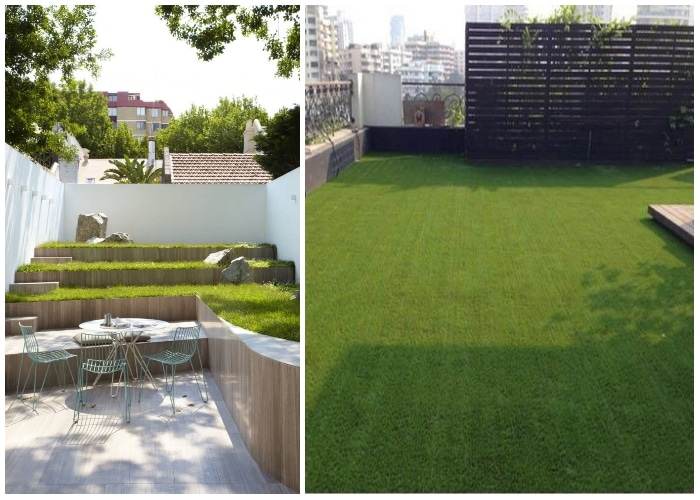
Artificial grass is also a viable option for terraces. However, when choosing artificial grass, it’s important to consider various factors. Look for grass that not only looks good but also performs well, ensuring a long-lasting, lush green appearance. Different types of artificial grass serve different purposes. For instance, some are designed to be durable, using nylon (polyamide) fibers. However, nylon may not be as soft as the polypropylene or polyethylene fibers used in other types of artificial grass. Consider your needs and preferences when selecting the right artificial grass for your terrace.
Old Furniture
Don’t let old furniture go to waste! Instead of getting rid of them, consider refurbishing them to add charm and style to your garden or front yard. An old lawn bench or a neighbor’s coffee table can be repurposed to fit perfectly on your patio. A fresh coat of paint or wood stain can transform these items, giving your garden a rustic and park-like ambiance. The possibilities are endless, and with a little creativity and assistance, you can create a mesmerizing scene in your garden. You don’t need to purchase new pergolas or umbrellas for shade ideas in your garden.
Consider using a vintage ladder as a support for climbing or trailing plants. It adds character while providing the necessary structure, whether suspended as an overhanging pergola or used as a trellis against a wall. Upcycling opens up a world of possibilities! Another idea is to create a stylish potting shed using discarded materials, like a three-door concept shed. By repurposing old furniture and materials, you can give new life to items that would have otherwise been discarded, adding unique and fashionable touches to your outdoor space.
Pallet Furniture
When it comes to selecting patio furniture, the allure of chic and modern pieces is understandable, as they provide an edgy look. However, building your own furniture using old wooden pallets from home can be a cheaper and more enjoyable alternative. Pallet furniture not only adds a rustic touch to the space but also offers the flexibility to paint it in any color to create a vibrant outdoor environment. By adding patio pillows and cushions in different colors and patterns, you can match the furniture to the seasons and personalize the look further. So, let’s grab our tools and embark on a DIY furniture adventure.
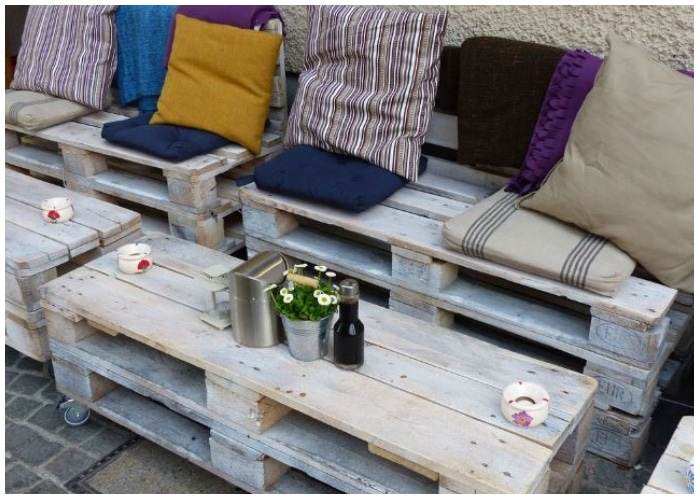
DIY furniture has become a popular trend in interior decor, reflecting the growing emphasis on recycling and upcycling in our lives. Creating items from pallets offers numerous benefits. Firstly, pallets are very affordable, especially if you already have some from a previous materials storage project. Additionally, pallets can be obtained at a reasonable cost from industrial areas, supermarkets, or wholesalers. Although not always made from high-quality wood, pallets are remarkably durable and resistant to damage. As a result, furniture crafted from pallet wood tends to be long-lasting. Moreover, pallets are lightweight and environmentally friendly materials, making them a practical and sustainable choice for DIY projects.
Wood Rounds
Wooden pathways in a front yard don’t have to be traditional rectangular shapes. Add a unique twist by using cross-sections of tree logs to create rounded wooden pathways. This cost-effective approach allows for flexibility in shaping the pathways to fit your desired setting. If circles aren’t what you’re looking for, feel free to cut the logs into any shape and size that suits your aesthetic. Additionally, you can use stepping stones or garden rocks arranged in a circular pattern to create an artistic path in your yard. If you prefer a natural look, these options are a perfect fit.
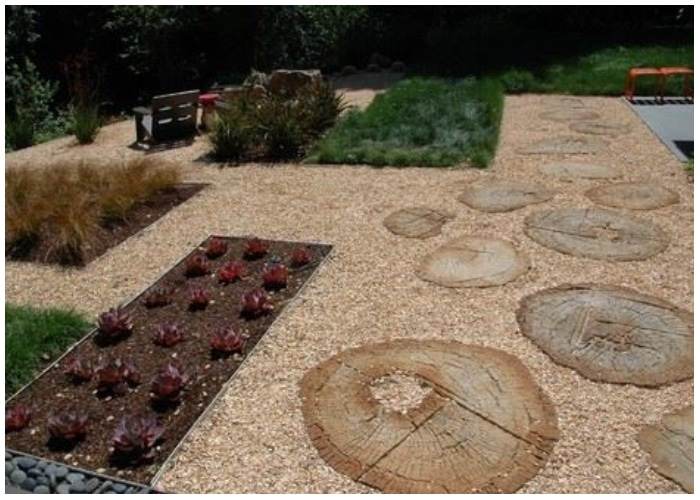
Here’s a step-by-step guide to get you started: Begin by clearing the area of any debris and removing the sod. Make sure to create a level base by raking and trampling the ground. Lay out the various garden sections on a flat work surface, creating a wavy path using cement edging pavers. Once the main pathway is established, fill the outer sections with fresh topsoil and plant your gardens. Cut the logs into 3″ disks (larger ones) and 2″ disks (smaller diameter ones for filler). Begin placing the largest disks evenly throughout the space to create the main stepping stones. Gradually work your way down in log sizes, filling in the remaining gaps with the smallest disks. This process will help you create a visually appealing and unique wooden pathway in your front yard.
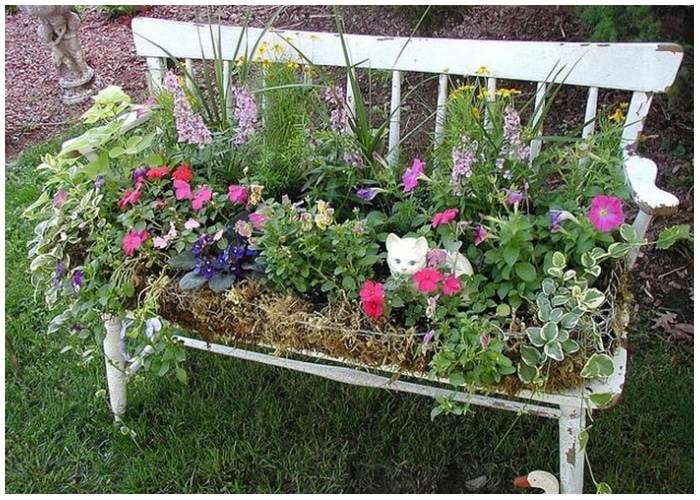
Fun With Refurbished Furniture
When it comes to inexpensive and creative hacks, recycling and reusing old items from your home can be a fantastic solution. One exciting idea is to repurpose an old bathtub as a planter. This gives your yard an antique twist and can be paired with small shrubs of various shapes. Not only will colorful flowers look beautiful in this bathtub planter, but you can also use it as a mini vegetable garden. It’s a great and cost-effective way to transform old appliances and furniture into a new rustic look for your garden. Since vintage tubs are smaller compared to traditional garden plots, it’s best to fill them with smaller and simpler garden items. If you plan to plant larger plants like tomatoes, keep the number of plants to a minimum to ensure they have enough space to thrive.
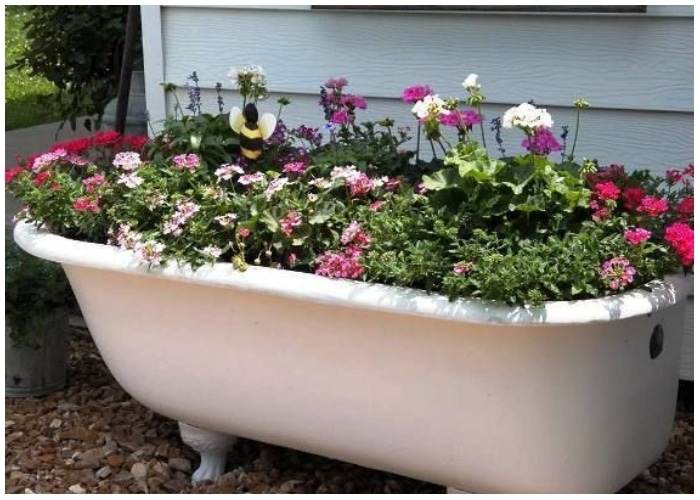
Once you’ve decided what to plant, consider the best location for the tub. Vegetables require direct sunlight, so placing the tub in an area that receives ample sunlight is crucial for a bountiful crop. Proper drainage is essential for successful gardening. While many vintage tubs have drains, some galvanized metal tubs may not. If your tub lacks drainage holes, simply drill holes in the bottom to ensure adequate drainage for your plants. With this creative and budget-friendly idea, you can breathe new life into old furniture and enjoy a charming addition to your garden.
Fence Pallets
When it comes to creating new pallet projects, the possibilities are endless. One great idea, especially for smaller spaces, is to use pallets as fencing and enhance your garden with an abundance of flowers. Fencing not only adds a sense of cohesiveness to your yard but also provides an opportunity to hang small wooden boxes on the fence, making them stand out even more. These charming flower boxes can be easily crafted using spare wood or boards. To protect the wood from water damage, it’s recommended to use flower pots and place them directly inside the boxes.
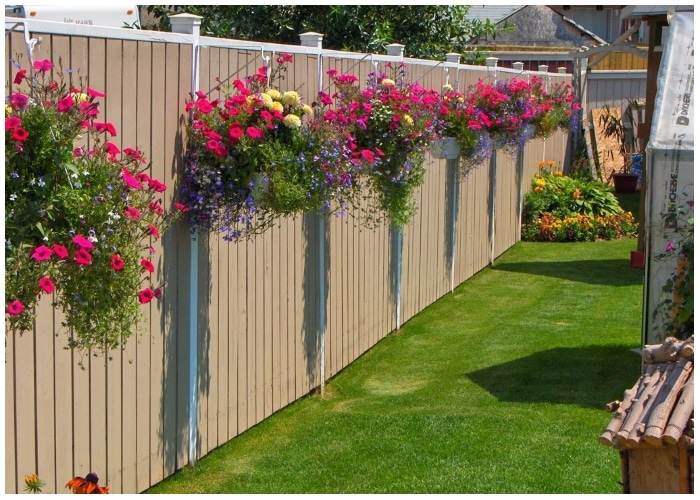
You can create regular rectangular boxes or get creative with different shapes and sizes for added fun. Despite being low-cost and lightweight, small planters are remarkably sturdy. Opting for smaller containers and plants also alleviates concerns about the weight and structural support. This allows you to explore various locations for your vertical garden. Additionally, the upright position of the planters ensures that soil won’t spill out of the sides. Certain plants, like spider plants, have trailing growth that can cover the entire flower pot, creating a similar effect to a vertical planter. Embrace the versatility of pallets and transform them into a beautiful and functional addition to your garden fencing, showcasing an array of vibrant flowers.
DIY Terracotta Candle Holders
Elevate your outdoor space while keeping pesky bugs away with DIY Terracotta Candle Holders. These candle holders, crafted using terracotta pots, sand, and scented candles, not only add a visually pleasing touch to your patio but also act as natural insect repellents. To create them, simply fill several terracotta pots with sand and insert a trio of scented candles. For a balanced look, you can use three standard-sized dinner candles or seven or more slim tapers.
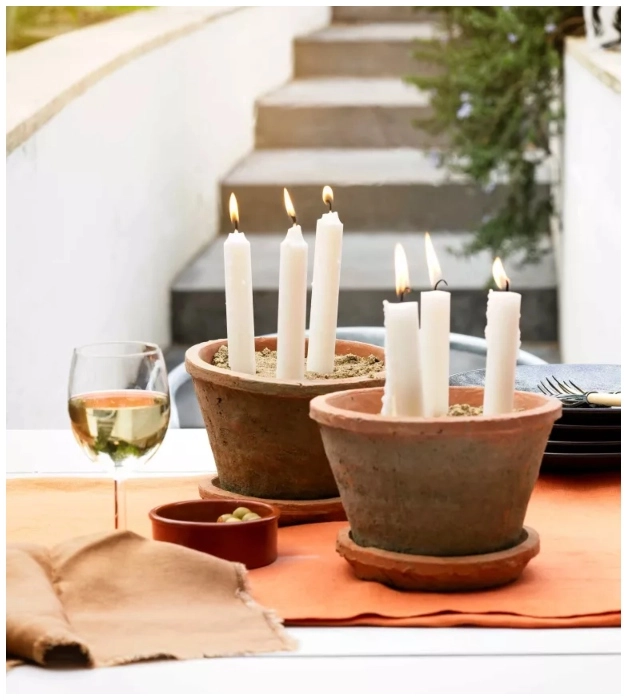
Opt for candles infused with bug-repelling scents like citronella, lemon balm, or lavender. Light them up for a few hours, ensuring they are placed out of reach for children and pets. To enhance the bug-free ambiance, consider incorporating insect-repelling plants into your outdoor space. These DIY Terracotta Candle Holders provide a stylish and practical solution to keep pests at bay while you enjoy the outdoors.
Make String Light Planters at home
To bring life to your backyard, good lighting is essential. However, the idea of installing a lighting system can be daunting for many. Surprisingly, it’s a simpler process than you might think. All you need are a few materials: a large and deep planter to hold concrete, 4×4 outdoor posts, fast-setting concrete mix, cup hooks, string lights, a drill, potting mix, and flowers. To ensure stability, attach the posts to the planters using corner braces.
Next, pour water and concrete mix into the planter and allow it to dry. Once the concrete has set, add flowers to the planter, drilling drainage holes if needed. Feel free to embellish with rocks, soil, or other decorative elements. Finally, attach cup hooks to hang the string lights, and voila! You have a stunning backyard illuminated with enchanting string light planters. Now you can sit back, relax, and enjoy the magical ambiance.
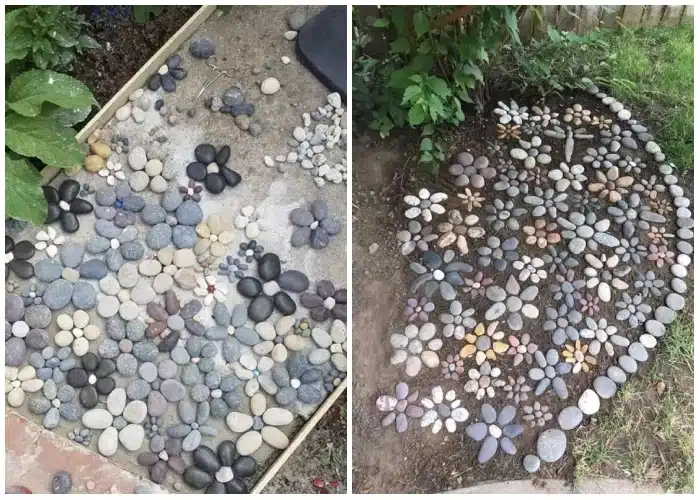
Stepping Stones
Stepping pathways don’t have to be ordinary concrete squares. You can create an innovative and visually appealing pathway using stones. Whether you choose pebbles or garden rocks, these stepping stones can be easily found and incorporated into your design. Add a touch of uniqueness to your garden by opting for out-of-the-box designs like a circular stepping stone pathway. To enhance the contrast, consider using mismatched colorful stones and pebbles. It’s as charming as it sounds! Begin by examining your lawn for natural paths that have formed due to regular foot traffic.

These areas are ideal for your stepping stone walkway. Determine the stone placement to align with the average person’s comfortable walking stride. Plant landscaping spikes where the center of your foot rests at each step as you walk along the path. Transport natural flagstones or artificial garden pavers to each spike using a wheelbarrow. Remove the spikes and place a stone or paver in the center of each marked area. Dig holes in the ground to position the stones, adding gravel to ensure stability. With these simple steps, your new stepping stone pathway will be ready to impress.
Stone Walkway in the Garden
Transforming the look of your garden doesn’t have to be complicated or require professional assistance. With just a few simple materials, such as random-sized stones, pea gravel, and a rubber border, you can create a beautiful stone walkway.

Here’s how to do it:
- Set the border: Start by placing the rubber border along the desired path for your walkway. This will help define and contain the stones and gravel.
- Arrange the stones: Begin placing the random-sized stones in the order of the steps. Take your time to position them securely and evenly along the walkway.
- Spread the pea gravel: Once the stones are in place, carefully cover the entire path with pea gravel. Make sure to distribute it evenly and compact it gently so that the stone steps remain firmly in position.
By following these steps, you can create an attractive and functional stone walkway in your garden. It’s a simple DIY project that can completely transform the look of your outdoor space. Enjoy the beauty and charm of your new stone walkway!
Concrete slabs
When it comes to large outdoor spaces with multiple walking areas, concrete slabs can be an excellent choice for creating a neat and elongated pathway. These slabs can be found at home improvement stores or garden centers and are available in various options, including natural stones, porcelain, or garden bricks. Paving them allows you to create an elaborate and well-defined pathway throughout your garden. The cost of concrete slabs is generally affordable, making them a practical choice.
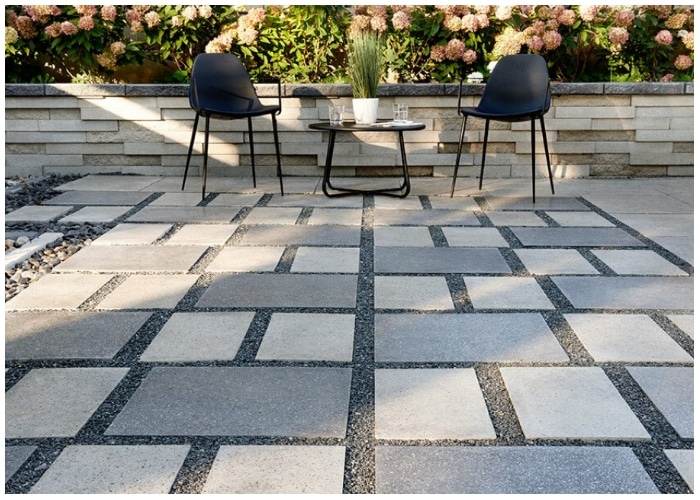
In addition to their decorative potential, concrete garden stepping stones serve practical purposes. They help limit the amount of dirt tracked inside the house from unmulched planting beds. In mulched areas, they prevent mulch particles from being carried indoors during damp weather. Moreover, stepping stones help cushion the impact of foot traffic on the lawn, preventing compaction issues. Additionally, concrete stepping stones can aid in attracting butterflies to your garden. Butterflies are cold-blooded creatures, and hardscape features like concrete absorb and retain heat, providing warm spots for them to rest and recharge.
By using concrete slabs for your garden pathway, you can create an organized and functional space while enjoying the aesthetic appeal they bring to your outdoor area.
Building the Paver Patio
Building a paver patio is a project that requires simple tools and materials. Here’s what you’ll need: essential garage tools, staples or stakes, pavers or concrete stepping stones, pea gravel, metal edging, and a weed mat.
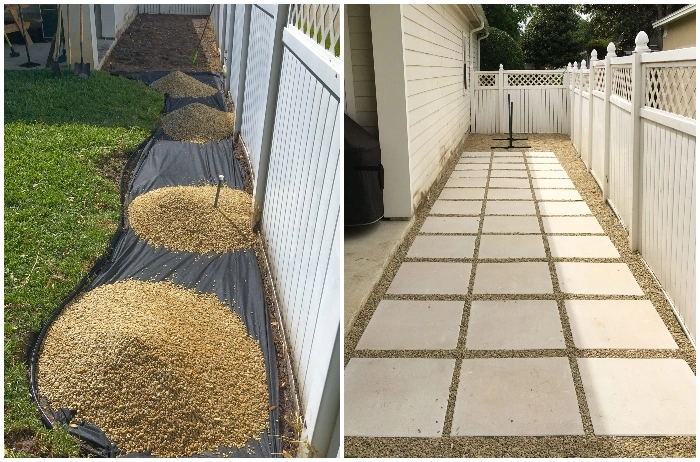
Follow these steps to create your patio:
- Plan the design: Begin by creating a plan for the layout and design of your patio. Consider the shape, size, and pattern of the pavers or stepping stones you will use.
- Clear the area: Remove any debris and clear the designated area for the patio. This is also a good time to dig a trench along the edges where the metal edging will be installed.
- Install the metal edging: Make sure the lines are straight and the edging stays level as you install it. This will provide a defined border for your patio.
- Dig the depth: Dig up the designated area to the appropriate depth for your pavers or stepping stones. Ensure that the depth is consistent throughout the patio.
- Compact the soil: After digging, compact the soil to create a firm and stable base for the patio.
- Install a weed mat: Place a weed mat over the prepared surface. This will help prevent weed growth and maintain the integrity of the patio.
- Lay the pavers: Begin placing the large pavers or concrete stepping stones on the prepared surface, following your planned design.
- Spread the pea gravel: Once the pavers are in place, spread pea gravel between them, filling the gaps. This will provide stability and a finished look to your patio.
With these steps, your paver patio will be complete. Now, sit back, relax, and enjoy your newly transformed backyard space.