Have you ever wished for a tangible way to keep the memory of a loved one alive? Creating heartfelt keepsake ornaments is a deeply personal and meaningful way to honor and cherish those who have passed.
From customized photo ornaments to creative repurposed materials like fabric, wood, and glass, the possibilities are endless. Each ornament becomes a lasting tribute, a story frozen in time, and a comforting reminder of the love shared.
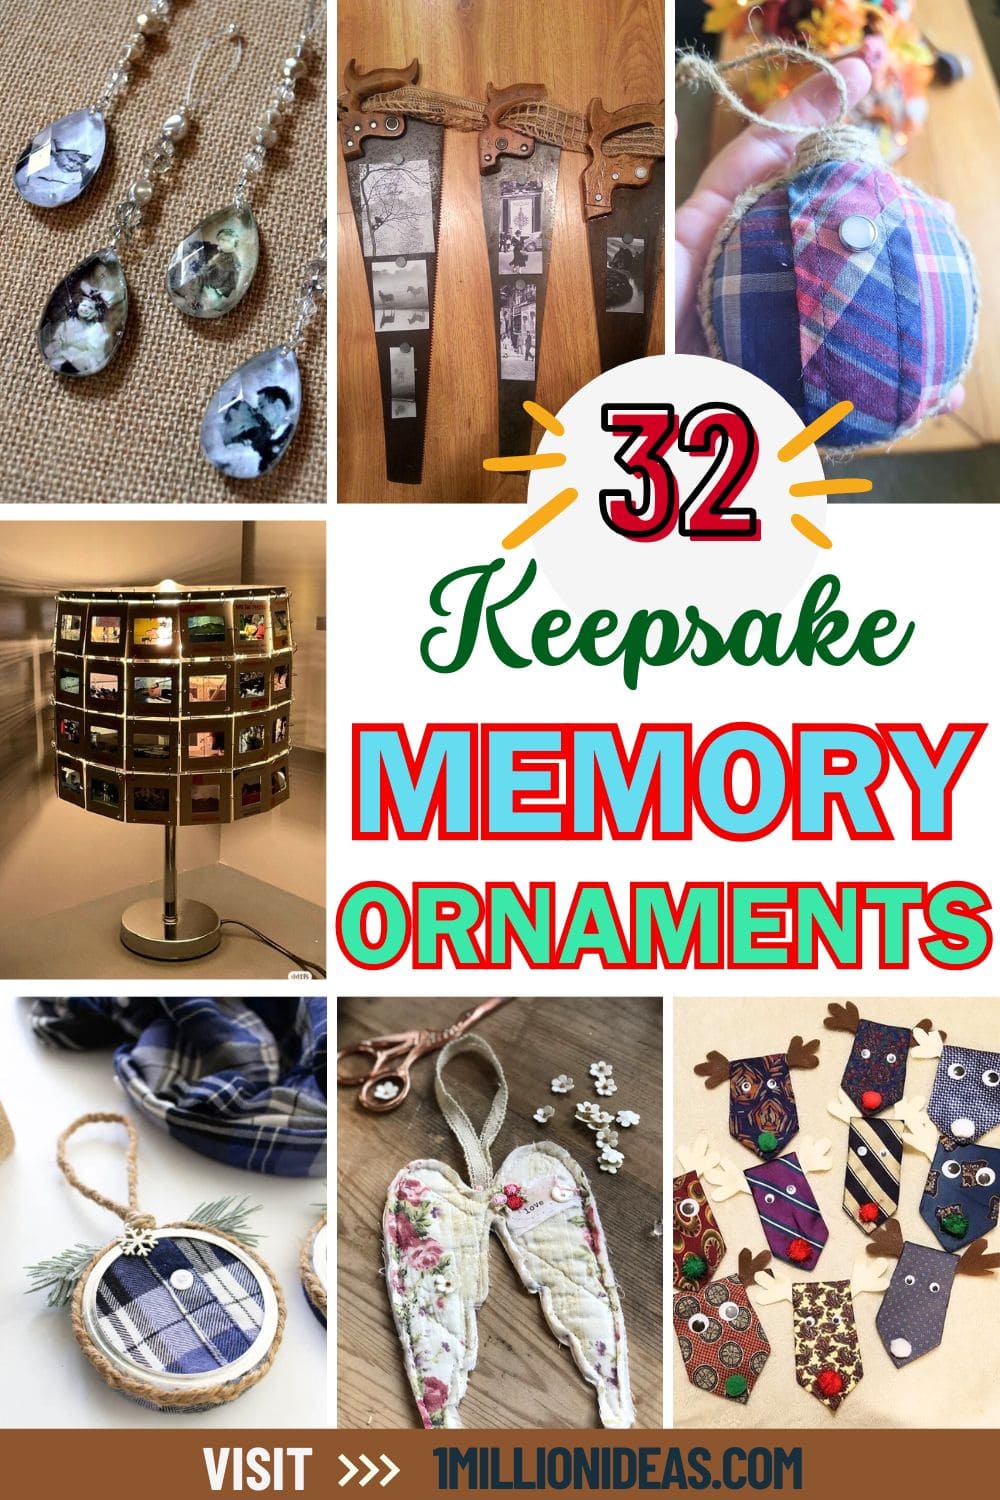
Memorial ornaments not only bring comfort but also add a special, sentimental touch to your home or holiday decor. Whether it’s a beloved pet, a parent, or a dear friend, these ornaments offer a way to celebrate their legacy. Dive into these 32 creative ideas and find inspiration to craft your own treasured keepsake.
This article contains affiliate links. If you purchase through them, I may earn a small commission at no extra cost to you. Thank you for your support!
#1. Heartfelt Burlap and Frame Memory Wreath
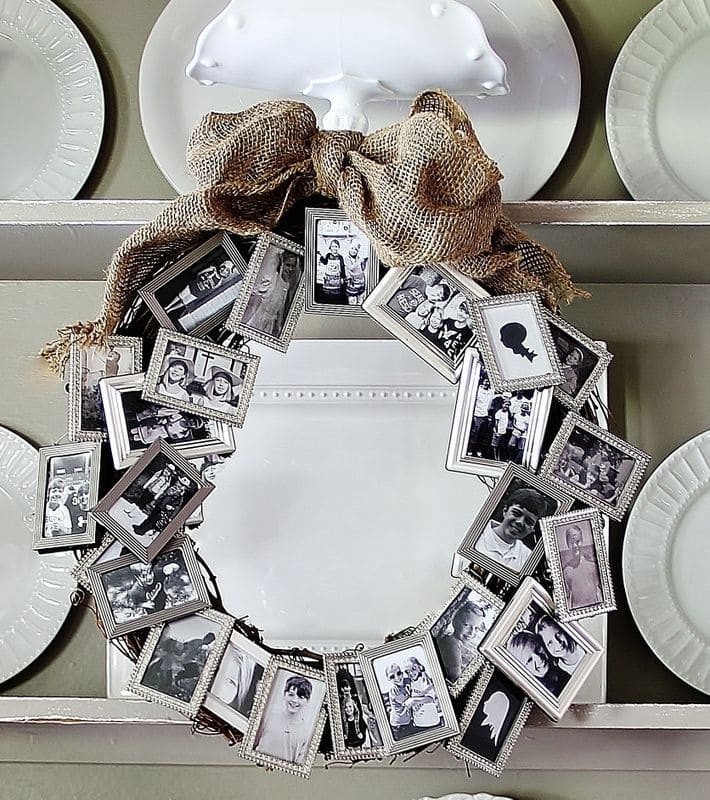
This photo frame wreath is one of my favorite ways to wrap memories in something you can hang with pride.
Materials Needed
- 1 grapevine wreath (12–14 inches wide)
- 20–25 small photo frames (approx. 2×3 inches)
- Printed family photos (sized to fit frames)
- Burlap ribbon (2.5” wide, 2 yards)
- Hot glue gun + glue sticks
- Floral wire or strong twine
- Scissors
Step-by-Step Guide
- Print black-and-white or sepia-toned pictures for a timeless effect. Pop them into the mini frames and secure the backs tightly.
- Begin spacing the frames evenly around the grapevine base. You can either tie them on with wire or use hot glue for a permanent bond.
- Create a full bow from the burlap ribbon and glue it at the top or bottom of the wreath. I love the rustic charm it adds.
- Use a sturdy nail or ribbon hanger, and make sure it’s somewhere visible like the front hallway or your dining room wall.
#2. Personalized Photo Terra Cotta Pot Craft
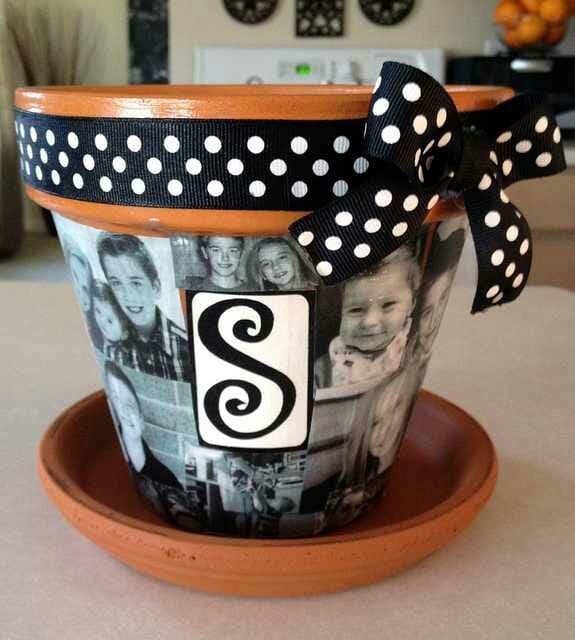
I created this memory flower pot for my grandmother’s porch and it brought tears to her eyes.
Materials Needed
- 1 terracotta flower pot (6–8 inches wide)
- Matte Mod Podge glue
- Inkjet-printed photos on regular paper (approx. 10–15 small faces)
- Foam brush or paintbrush
- Black & white polka dot ribbon (1 yard)
- Hot glue gun + glue sticks
- Scissors
- Printable or sticker monogram initial
Step-by-Step Guide
- Print your photos in black-and-white for a classic, cohesive look. Make sure they’re small enough to fit and overlap naturally around the pot.
- Cut and arrange your photos before gluing. I recommend layering the photos randomly for an authentic, scrapbook-style finish.
- Apply a thin layer of Mod Podge to the back of each photo using the foam brush, and smooth it onto the pot. Press gently to remove air bubbles.
- Coat the entire pot with Mod Podge once photos are in place. Let it dry completely before repeating 1–2 more coats for a sealed, satin finish.
- Add the monogram front and center. Use either a sticker, printable initial, or hand-drawn letter.
- Wrap and glue the ribbon around the rim and finish with a tidy bow. It adds that sweet decorative charm and hides any edges cleanly.
#3. Elegant Angel Button Memorial Keepsake Design
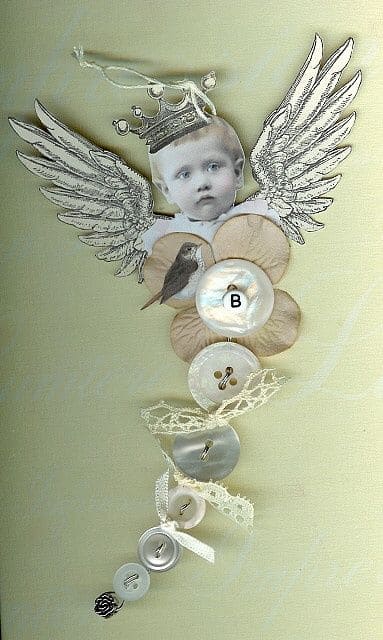
This piece was born from a tin of my grandmother’s buttons and a baby photo tucked behind old books.
Materials Needed
- 1 printed photo (headshot, 2×2 inches)
- Craft angel wings embellishment or printable cutout
- Assorted vintage buttons (about 8–10)
- Lace ribbon or trim (10 inches)
- Craft glue or hot glue gun
- Twine or ribbon
- Optional: paper bird cutout, letter charms
Step-by-Step Guide
- Start with the face, cut out your photo into an oval or round shape. Glue the wings behind it and crown it with a charm or glitter cutout if you’d like.
- Build the button body by gluing the buttons vertically under the photo. I used neutral colors and different textures to keep the vintage tone alive.
- Add lace or delicate ribbon between buttons for softness. You can even tie a tiny bow at the base for flair.
- Glue on tiny accents like a bird sticker, a mini charm letter, or a pearl.
- Attach twine at the back with glue so it can be hung as an ornament or on a keepsake board.
#4. Cozy Plaid Heart Memorial Ornament Design
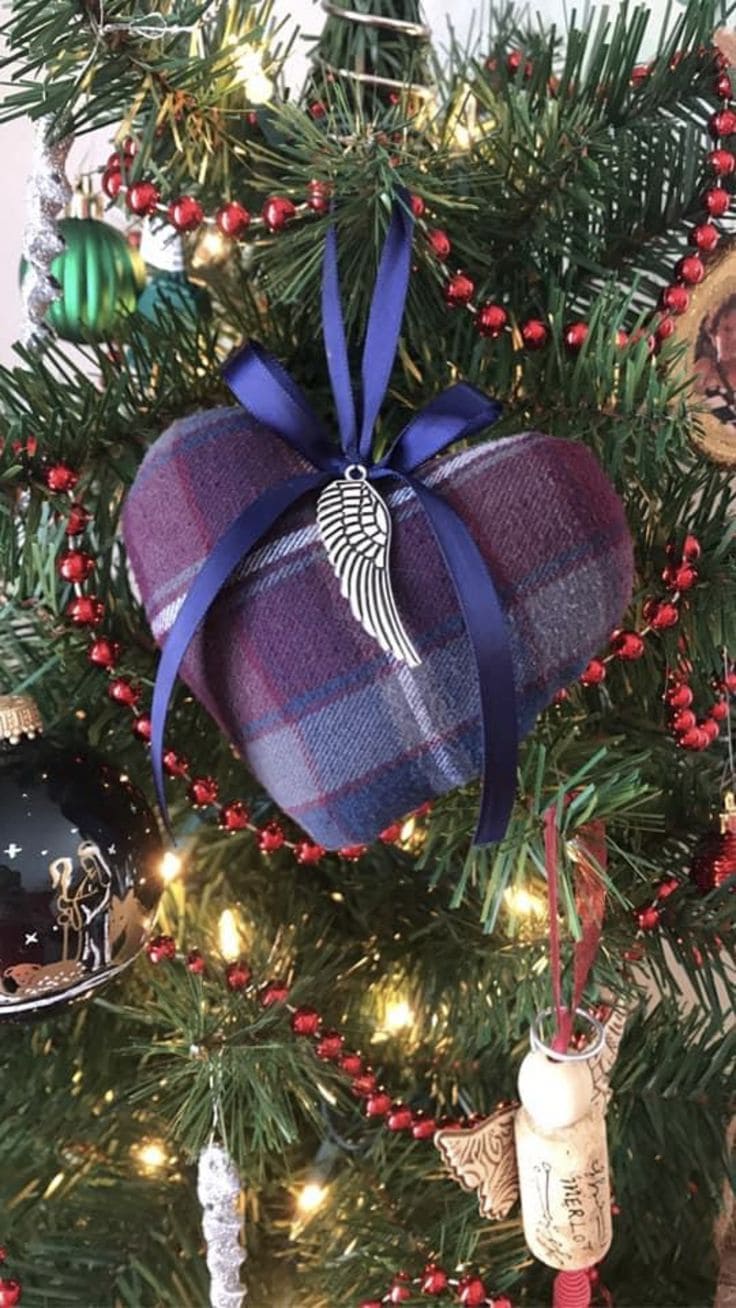
This one holds weight in the softest way. I stitched it using part of my dad’s old flannel shirt, it still carried his cologne.
Materials Needed
- 1 piece of plaid flannel or cotton fabric (6×6 inches) cut from a shirt or meaningful cloth
- Fiberfill stuffing
- Heart-shaped cardboard template or freehand cut
- Satin ribbon (18 inches)
- Angel wing charm
- Needle and thread or hot glue gun
- Scissors and a pencil
Step-by-Step Guide
- Trace a heart onto your fabric and cut two pieces. Stitch around the edges with the right sides facing in, leaving a small gap at the top. Turn it inside out.
- Stuff it lightly with fiberfill to give it a soft, plump look. Stitch or glue the top closed.
- Tie a bow using satin ribbon and attach it to the top with glue. Use the same ribbon to create a loop for hanging.
- Add the angel wing charm to the center of the bow or stitch it slightly below for a beautiful symbol of remembrance.
#5. Charming Necktie Reindeer Memorial Ornament Craft
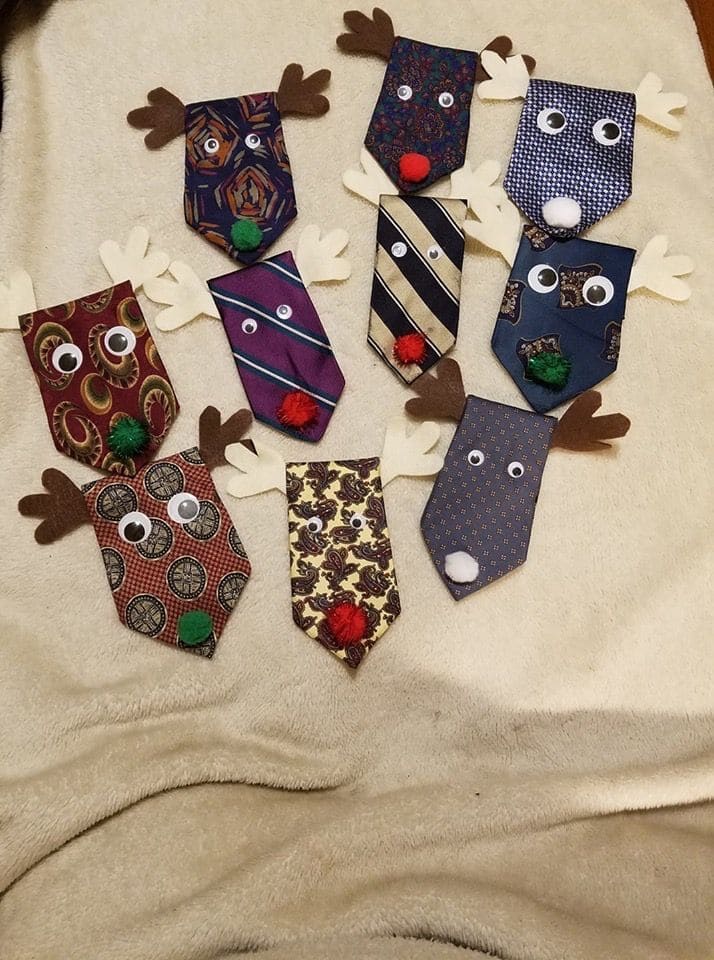
I made these little guys from my grandfather’s old ties, each one a piece of his wardrobe and personality. Now they make everyone smile from the tree, year after year.
Materials Needed
- 1 old necktie (cut in half per reindeer)
- Googly eyes (pair per ornament)
- Small pom-poms (1 per reindeer)
- Felt sheets in brown and cream
- Hot glue gun + glue sticks
- Scissors
- Optional: Ribbon or string
Step-by-Step Guide
- Cut the tie to your desired length, about 5 to 6 inches works well. Let the pointed end become the face.
- Glue on the eyes and pom-pom nose near the top, leaving space above for the antlers.
- Cut out antlers from brown and/or cream felt using a simple silhouette (think three-fingered tree branch shape). Glue one to each side of the tie at the top.
- (Optional) Glue a loop of ribbon to the back so they can hang on the tree. You can also attach magnets to make fridge decor or clips for gift tags.
#6. Heartwarming Photo Memory Ornament with Ribbon
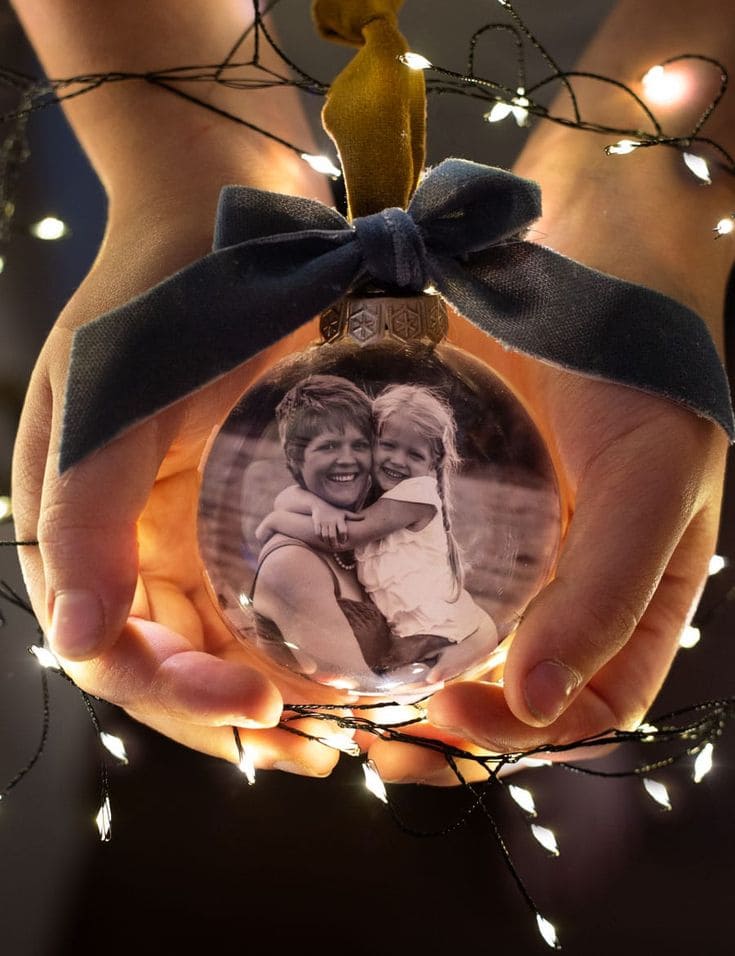
I made one of these clear photo ornaments last year with a picture of my mom and me, and it quickly became my favorite on the whole tree.
Materials Needed
- Clear plastic or glass ornament globe (3–4 inch round)
- Favorite photo printed on thin paper or vellum
- Double-sided tape or craft glue
- Velvet or satin ribbon (about 12 inches)
- Scissors
- (Optional) Battery-powered micro fairy lights
Step-by-Step Guide
- Trim your photo into a circular shape slightly smaller than the inner diameter of your ornament.
- Carefully insert the photo into the ornament using tweezers or a rolled method then use double-sided tape if needed to hold it in place.
- Tie a ribbon at the top for hanging and decoration. I used velvet because it adds a cozy, vintage feel but satin looks beautiful too.
#7. Vintage Floral Fabric Angel Wing Ornament
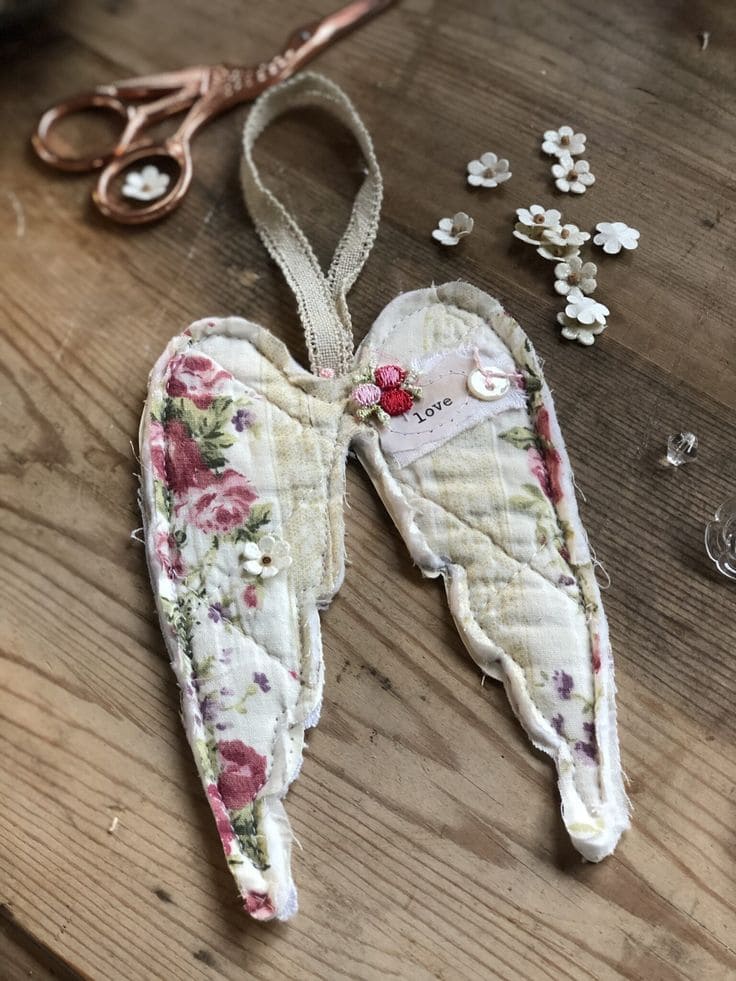
I used a scrap from my grandmother’s old apron, stitched into a winged shape, and added little sewn details that made it feel truly sacred.
Materials Needed
- Floral fabric scraps (approx. 8×10 inches)
- Thin batting
- Lace ribbon or vintage trim (10 inches)
- Needle and thread or sewing machine
- Fabric glue
- Embellishments like mini buttons, charms, or fabric flowers
- Scissors, pen, and paper
Step-by-Step Guide
- Sketch and cut out a simple angel wing shape on paper (around 6–8 inches long). Trace it onto the fabric twice and once onto the batting.
- Layer the pieces like a sandwich: fabric right side down, batting, then fabric right side up. Sew or glue around the edges, leaving a small opening at the top to insert the hanging ribbon.
- Insert the lace ribbon loop into the top opening and sew it shut. I stitched a little “LOVE” tag to one wing and glued on a pearl button.
- Add any extra flourishes: beads, lace, a charm, or even a handwritten tag with a loved one’s name.
#8. Charming Scrabble Tile Name Ornaments Decor
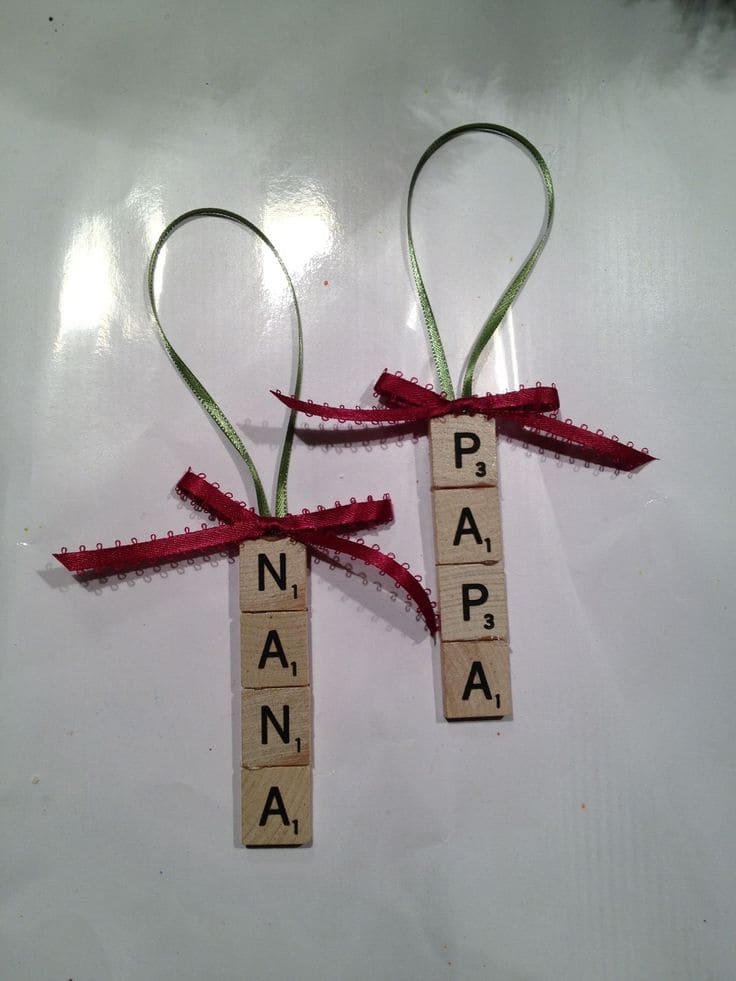
These little “Nana” and “Papa” ornaments made my heart swell. I used leftover Scrabble tiles from a thrift store find and turned them into name tags for the tree.
Materials Needed
- Scrabble-style wooden letter tiles (1 for each letter of the name)
- Thin green ribbon (1 yard)
- Red stitched-edge ribbon (18 inches)
- Hot glue gun and glue sticks
- Scissors
Step-by-Step Guide
- Choose your word (like NANA, PAPA, LOVE, or even initials). Arrange the Scrabble tiles vertically on a flat surface.
- Cut a length of green ribbon and loop it into an ornament shape. Glue the ends to the top tile’s back.
- Carefully glue each tile together in a straight column. Press and hold for a few seconds to ensure firm attachment.
- Finish it with a small bow made from red ribbon, glued just below the loop.
#9. Rustic Denim Angel Memorial Ornament Craft
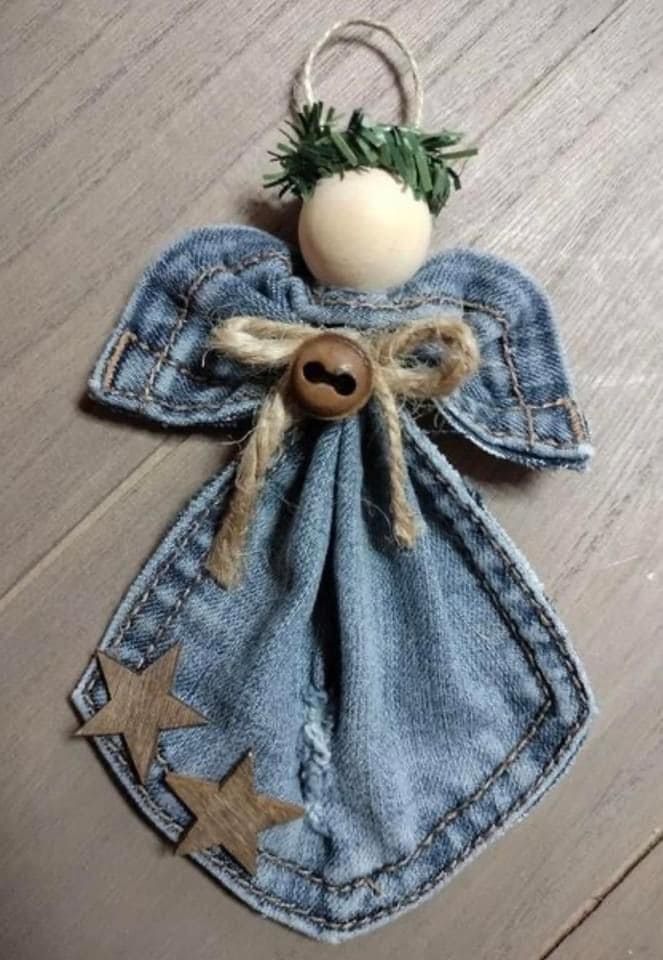
I made mine from the pocket of my grandfather’s old jeans—it turned out rustic, sweet, and full of soul.
Materials Needed
- Old denim jeans (1 back pocket piece)
- Large wooden bead (1 inch diameter)
- Mini faux greenery garland (12 inches)
- Rustic twine (18 inches)
- Wooden stars and buttons (2 pieces)
- Hot glue gun and glue sticks
- Scissors
Step-by-Step Guide
- Cut a back pocket from an old pair of jeans, leaving some room around the stitching. Fold the top to create “wings” and glue or stitch it in place.
- Gather the center of the denim and tie it with twine to form a body shape. Add a bow with another short length of twine.
- Glue a wooden bead to the top for the head. Form a tiny halo using faux greenery and glue it on.
- Add wooden stars or meaningful accents to personalize it. Finish with a loop of twine on the back for hanging.
#10. Quilted Angel Patchwork Memorial Ornament
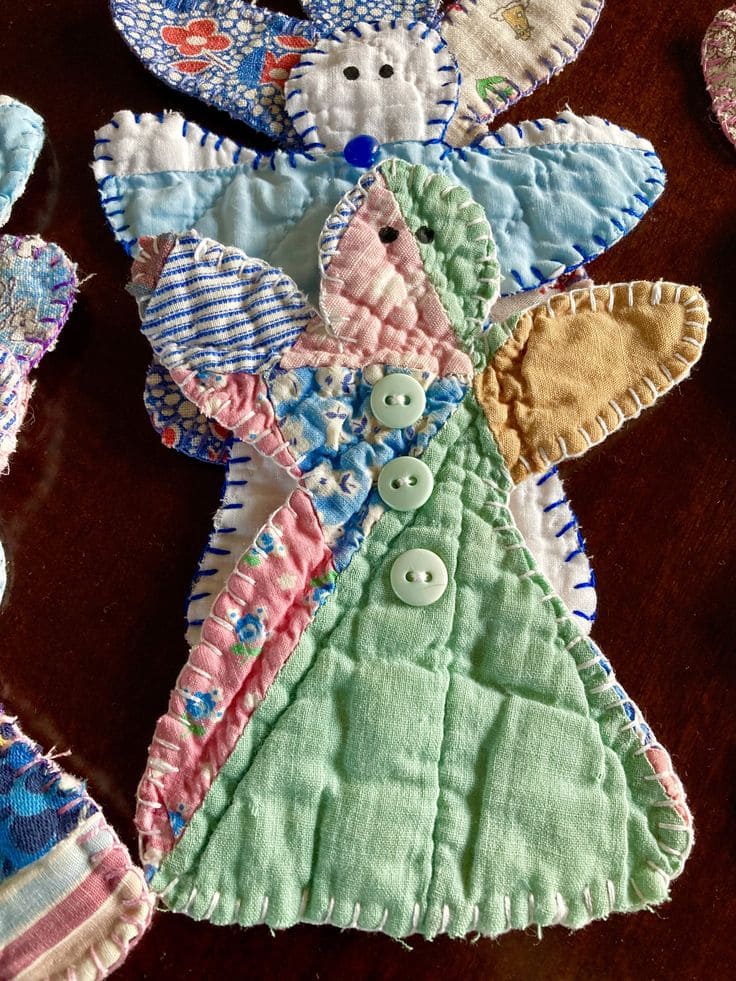
I made this angel using a few worn but loved pieces from my grandmother’s quilt, a fabric whisper of comfort and history.
Materials Needed
- Vintage quilt scraps or cotton fabric (at least 5×5 inches each)
- Embroidery floss and needle
- Soft stuffing or cotton batting
- Mini buttons (3 pieces)
- Fabric scissors and pencil
Step-by-Step Guide
- Draw an angel silhouette on the back of your quilt scrap or use a printed paper template. Cut out two identical pieces.
- Stitch the two layers together using a blanket stitch, leaving a small opening at the bottom. Gently stuff it with batting to give it soft dimension.
- Sew the opening closed and embellish with three buttons down the center. Use embroidery floss to add tiny dot eyes.
- For the wings, cut oval shapes from a second fabric and stitch or glue them to the back. You can add a loop of thread at the top for hanging.
#11. Rustic Plaid Fabric Ornament with Twine

I used a piece of my granddad’s old flannel shirt to create this ornament, it’s like a pocket of comfort from the past, now part of every Christmas.
Materials Needed
- Plastic or foam ornament base (3–4 inches in diameter)
- Flannel shirt fabric or old plaid shirt (at least 5×5 inch piece)
- Hot glue gun + glue sticks
- Twine (1 yard)
- Decorative brad, button, or snap
- Fabric scissors
Step-by-Step Guide
- Cut your flannel fabric into even strips or wedge panels depending on the shape of your ornament.
- Starting from the top, glue each piece down smoothly, wrapping gently around the curves. Use your fingers to press out wrinkles and keep the fit tight.
- Once the ball is covered, hot glue a piece of twine around the top and bottom seam to add a rustic border and hide the fabric edges.
- Add a decorative brad or snap to the front for a classic shirt detail like the middle button of a favorite plaid shirt.
- Tie a loop of twine at the top for hanging.
#12. Creative Upcycled Shirt Memorial Stocking Design
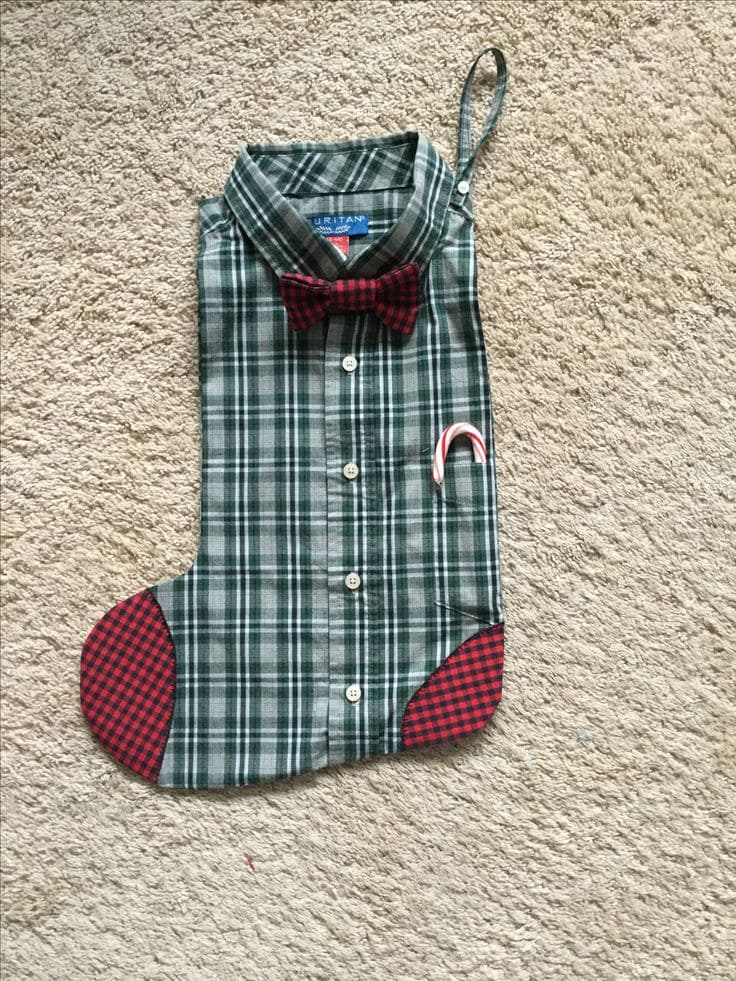
Turning this stocking into a Christmas stocking felt like wrapping part of his presence into the holidays. It’s personal, practical, and irresistibly endearing.
Materials Needed
- One old plaid or flannel shirt (men’s size L or XL preferred for room to cut)
- Basic Christmas stocking template (about 16 inches tall)
- Sewing machine or needle and thread
- Iron-on interfacing (optional)
- Hot glue gun or fabric glue
- Ribbon
Step-by-Step Guide
- Position your stocking pattern over the button-down section of the shirt. Make sure the buttons are centered then cut one front and one back side.
- Add interfacing to the inside of each stocking piece for extra sturdiness, especially if your shirt fabric is soft or thin.
- Cut out contrasting toe and heel patches from another shirt or fabric scrap and stitch them on. Keep the pocket intact for a fun detail.
- Place the pieces right sides together, sew along the edges (leave top open), and then turn right side out.
- Add a ribbon for hanging and a matching mini bowtie above the buttons for a festive touch.
#13. Heartfelt Memory Shirt Pillow Keepsakes Design
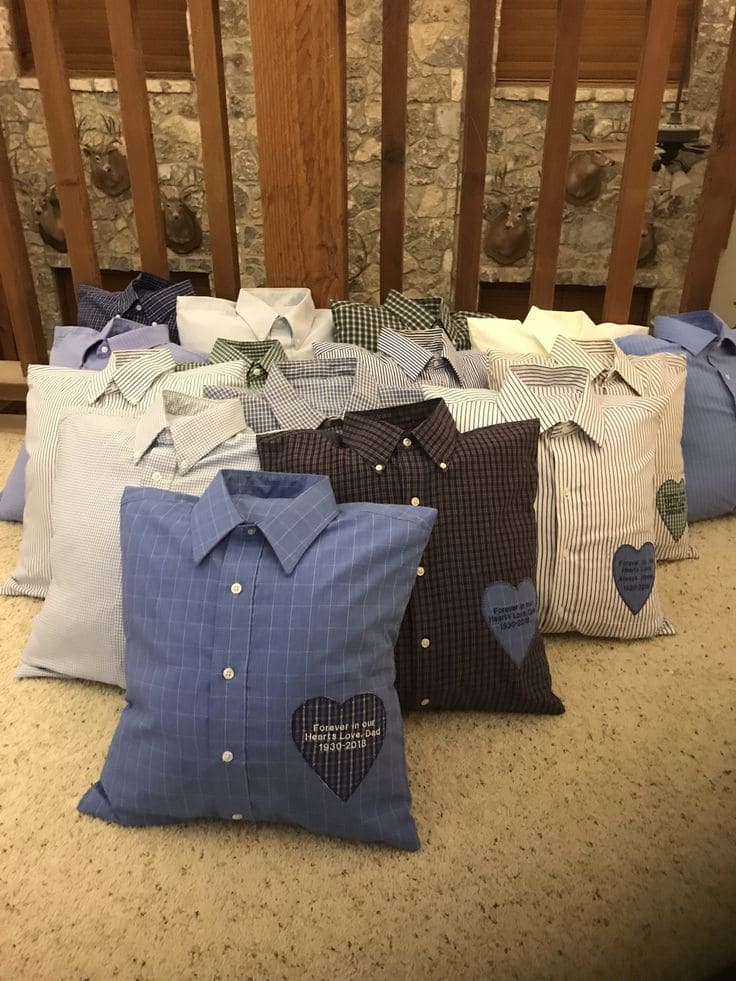
Every time I see these pillows on a couch or bed, I feel like someone special is still with me.
Materials Needed
- Button-up shirt (men’s or women’s, preferably size M or larger)
- 16×16 inch pillow insert or hypoallergenic polyfill
- Fabric scissors
- Sewing machine or hand sewing kit
- Fusible interfacing
- Heart-shaped fabric patch or embroidery patch kit
- Optional: Embroidery machine or iron-on vinyl + press
Step-by-Step Guide
- Button up the shirt and lay it flat. Cut out a 17×17 inch square, centering the buttons. This will become the pillow front.
- Cut a heart out of a contrasting fabric and embroider or write a personal message like “Forever in our hearts” or a name and date. Sew or iron it onto the front panel.
- For an envelope style back, use two pieces of fabric (11×17 inches and 8×17 inches), hem one long edge of each, then layer them over the front piece, right sides together. Sew all four sides, turn right side out, and insert the pillow form.
- Button it up. Done. It’s now a forever keepsake.
#14. Cozy Plaid and Fleece Memorial Scarf Design

When someone you love is no longer here, their shirt often carries a lingering trace of their warmth.
Materials Needed
- One flannel or cotton button-up shirt
- Soft fleece fabric (approx. 8×30 inches)
- Sewing machine or heavy-duty needle + thread
- Rotary cutter or sharp fabric scissors
- Leather scrap + buttons
- Fabric glue or fusible hem tape (optional)
- Iron and ironing board
Step-by-Step Guide
- Lay the shirt flat and cut two rectangles from the front and back panel, about 6–8 inches wide and 30 inches long.
- Lay your fleece lining fabric down, then place the shirt fabric right-side facing it. Pin around the edges.
- Sew along the sides and ends with a ¼-inch seam, leaving a 2-inch opening. Flip the scarf right-side out through the opening and iron it flat. Topstitch around the entire edge to seal the gap and create a polished finish.
- Fold the scarf over itself and sew a short band (made from shirt scraps or leather) across the center to hold it in place. You can add two decorative buttons or even embroider a phrase.
#15. Sentimental Eyeglass Frame Memory Shadowbox Display
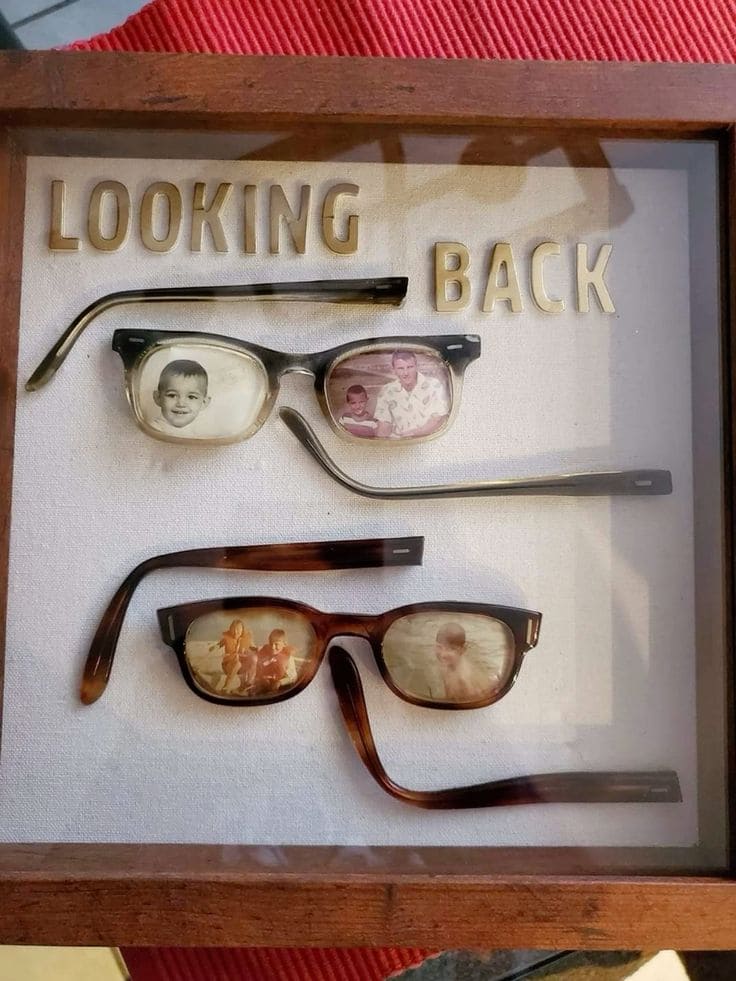
I made something similar with my grandfather’s glasses, and it still stops everyone who sees it. It’s like being seen by someone who isn’t physically there but forever present.
Materials Needed
- 1–2 old pairs of eyeglasses
- Mini printed photos
- Shadow box frame (at least 10×10 inches)
- Craft glue or Mod Podge
- Gold stick-on letters or vinyl text (optional)
- Fine-tip scissors
- Double-sided mounting tape
Step-by-Step Guide
- Carefully disassemble the glasses so you can work with the frames and lenses separately. Clean the lenses and measure them.
- Print your selected images at a scale that fits inside each lens. Use fine-tip scissors to cut each photo into an oval that fits snugly within the lens.
- Apply a thin layer of Mod Podge to the back of the photo and gently press it onto the inside or outside of the lens. Let dry fully.
- Reassemble or arrange the frames inside the shadow box however you like – diagonally, stacked, or side by side.
- Use double-sided mounting tape to secure each piece inside the box. Add vinyl letters or stickers to spell out a caption like “Looking Back.”
#16. Vintage Photo Memory Bottles with Corks

This kind of project feels like a tribute and a treasure at once. I made one of these for my grandmother using an old photograph of her as a child.
Materials Needed
- Mini glass bottles with cork stoppers (various sizes)
- Printed black-and-white photos sized to fit each bottle
- Clear double-sided tape dots or glue dots
- Tweezers or long stick
- Scissors
- Optional: label tags, twine, dried flowers, or keepsake charms
Step-by-Step Guide
- Choose a few meaningful photos. Print and trim them down to fit the bottle shapes, keeping about ¼ inch of width from the glass.
- Roll each photo loosely, insert it through the bottle’s neck, and use tweezers or a long stick to gently flatten it against the inner wall.
- Secure it inside with clear glue dots so it doesn’t shift. Optionally, you can add tiny dried flowers, a charm, or a rolled-up note to personalize further.
#17. Charming Bottle Cap Photo Memory Keepsakes
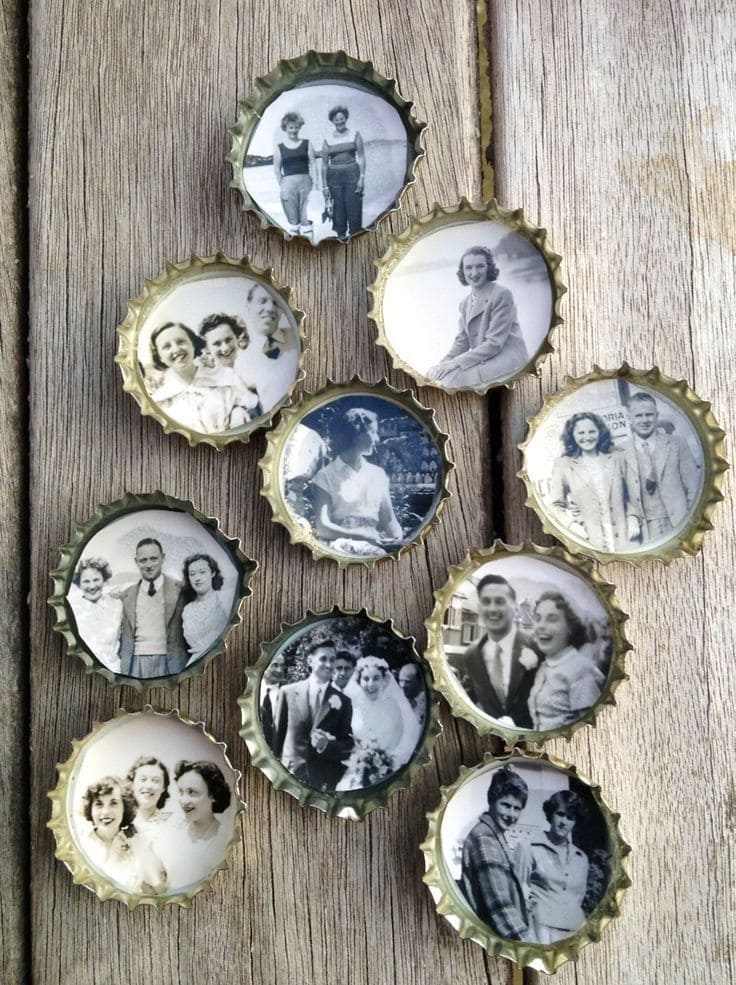
Who knew that something as small and ordinary as a bottle cap could hold so much heart?
Materials Needed
- Metal bottle caps
- 1-inch round printed photos on glossy paper
- Mod Podge Gloss or Resin Kit
- 1-inch circle paper punch (optional)
- Craft glue
Step-by-Step Guide
- Start by printing your chosen photos into 1-inch circles. You can use a craft punch to get perfect edges, or carefully trim them with scissors.
- Place a small dot of glue inside each clean bottle cap and press the photo in, smoothing it flat.
- Once dry, apply a generous layer of Mod Podge Gloss for a smooth finish.
#18. Elegant Marble Clock with Vintage Watch Faces
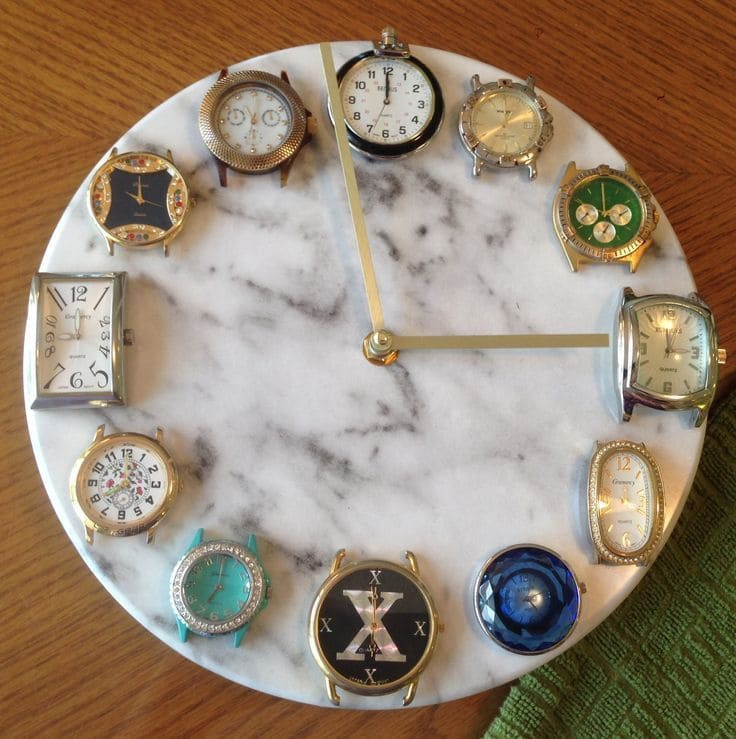
My friend made one of these using her dad’s old watches, each one represented a phase of his life, from his army days to retirement.
Materials Needed
- 12 vintage or sentimental watch faces
- Round clock base – marble, wood, or MDF
- Clock hands and movement kit
- Strong glue or epoxy
- Ruler or printable clock face stencil
Step-by-Step Guide
- Start by deciding on the base: a marble-look tray, wood or MDF. Arrange your 12 watch faces in a clock pattern, playing with colors and sizes for balance.
- Mark placement for each hour, then glue the watch faces securely. Once they dry, install the clock mechanism through the center hole and attach the hands.
- Add a wall hook to the back and hang it somewhere meaningful, where you can “watch time” filled with stories pass by every day.
#19. Rustic Saw Blade Photo Display Keepsake
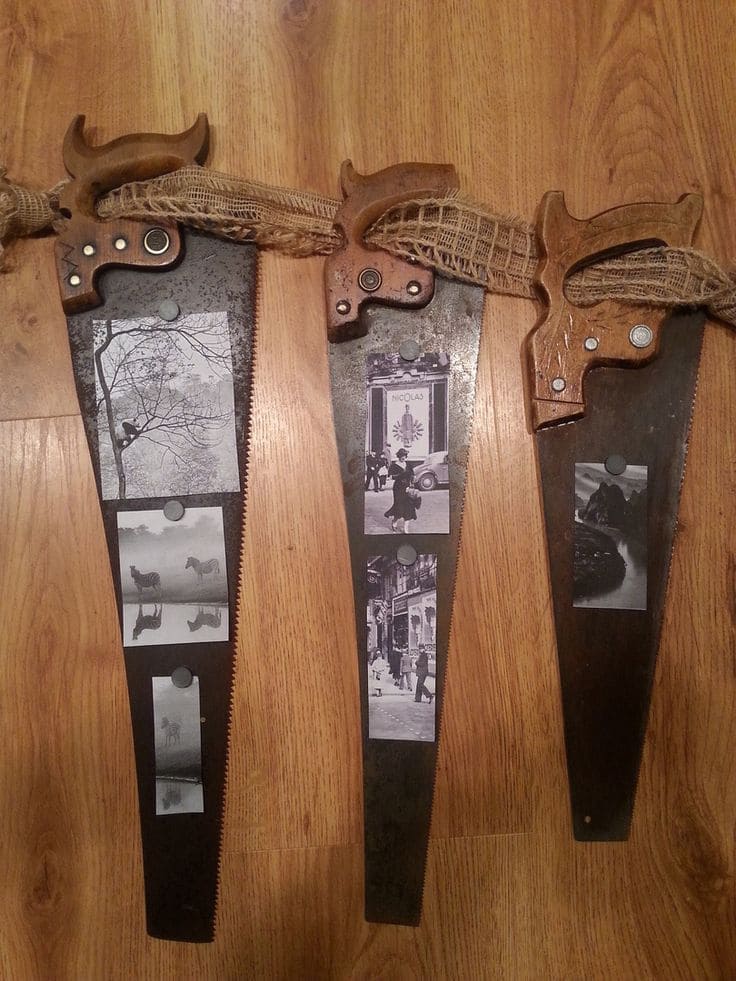
For the dad who built everything with his hands or the grandfather whose garage smelled like sawdust and stories, this keepsake saw gallery hits deep.
Materials Needed
- Old saws
- Black-and-white printed photos
- Mod Podge or matte gel medium
- Burlap ribbon
- Strong magnets or upholstery tacks (optional)
- Sandpaper (light grit)
Step-by-Step Guide
- Lightly sand the metal surface of each saw blade to remove rust without erasing its soul. Wipe clean.
- Decide your layout – vertical photo strip or staggered memory collage and either mod podge the photos directly onto the blade or attach them with magnets for a changeable display.
- Wrap the wooden handles in burlap ribbon for warmth and texture.
#20. Vintage Slide Film Lampshade Memory Display
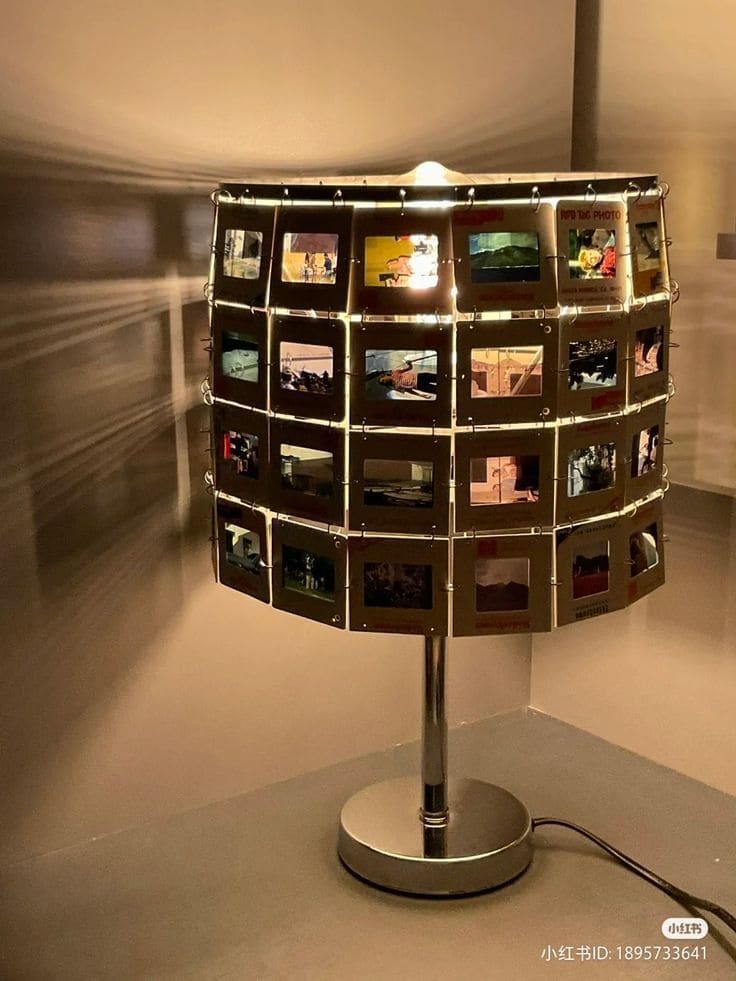
This isn’t just a lamp, it’s a glowing time machine. Crafted from vintage photo slides, each one captures a frozen frame of someone’s story.
Materials Needed
- Old photo slides
- Metal lampshade frame
- Mini binder clips or tiny jump rings
- LED bulb (low heat!)
- Optional: fairy string lights
Step-by-Step Guide
- Remove the existing lampshade fabric to reveal just the wire skeleton.
- Arrange your slides in vertical rows and clip or hook them directly onto the wire frame.
- Add a warm LED bulb or wrap fairy lights around the inner rim of the shade. Once lit, the photos come alive, casting shadows of nostalgia across the room.
#21. Heartfelt Feathered Memorial Photo Ornament Design

Sometimes the simplest things carry the deepest weight. This ornament is more than decor, it’s a quiet remembrance of someone you never stop missing.
Materials Needed
- Clear plastic or glass ornament ball
- Small printed photo
- Soft white craft feathers
- Vinyl decal with quote, or a permanent marker
- Tweezers
- Ribbon
Step-by-Step Guide
- Gently open your ornament and carefully roll up the printed photo to slide it inside. Using tweezers, guide it into position.
- Add a few white feathers around it, making sure they cradle the photo without covering it.
- Apply the vinyl quote decal to the outside or use a permanent marker to handwrite a personal message. Tie a soft ribbon through the loop for hanging.
#22. Elegant Angel Wing Photo Memorial Ornament

There’s something about seeing a smiling face framed by angel wings that feels incredibly healing.
Materials Needed
- Angel wing ornament base or acrylic wings
- Faux fur or soft feather trim
- A printed, trimmed photo
- Clear adhesive photo covers or laminator sheets
- Decorative beaded trim or rhinestones
- Ribbon or metallic cord
- Hot glue gun
Step-by-Step Guide
- Start by printing and cutting your photo to fit the circular space in the middle.
- If your ornament base doesn’t have one, you can glue the image directly onto the center using clear adhesive sheets. Frame it with beaded or rhinestone trim for a beautiful halo effect.
- Gently attach the faux fur on either side of the photo to mimic soft angel feathers, then secure the iridescent plastic wings at the bottom.
- Finish with a hanging loop using ribbon or string.
#23. Rustic Plaid Angel Memorial Ornament for Mom
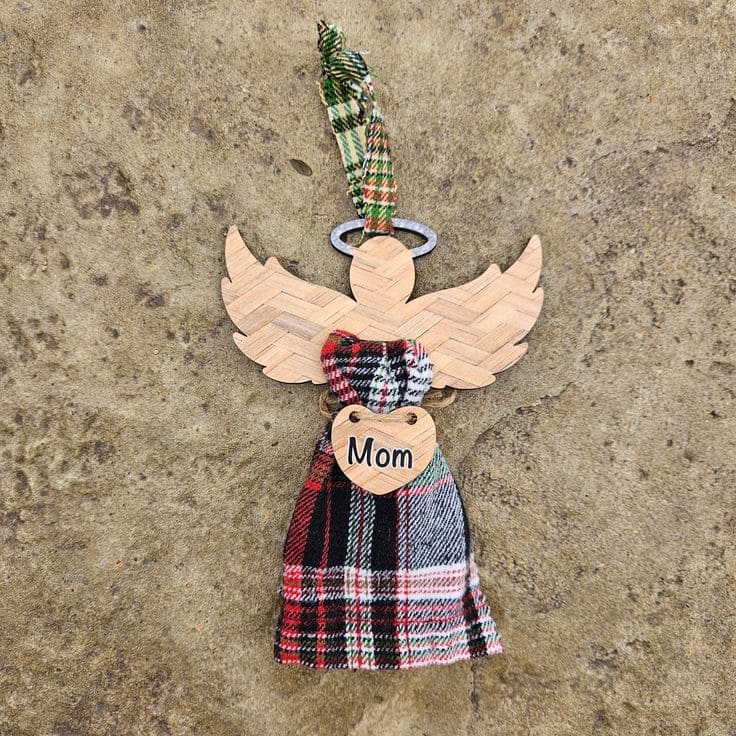
This simple, touching angel ornament is made from plaid fabric and lightweight wood but it holds the weight of deep love.
Materials Needed
- Wooden angel cutout
- Small wooden heart tags
- Scrap plaid fabric (preferably from clothing with meaning)
- Twine or ribbon
- Hot glue or tacky glue
- Black fine-tip permanent marker
Step-by-Step Guide
- Begin by attaching the plaid fabric behind the angel’s torso using glue, let the fabric flow like a skirt. Fold or bunch it slightly at the waist for dimension.
- Write your chosen name or message like “Mom” on the small wooden heart. Glue the heart charm below the arms, right at the chest.
- Add a simple looped ribbon through the top hole, or glue it directly to the back for a cleaner look.
#24. Thoughtful Memory Note-Filled Glass Ornament
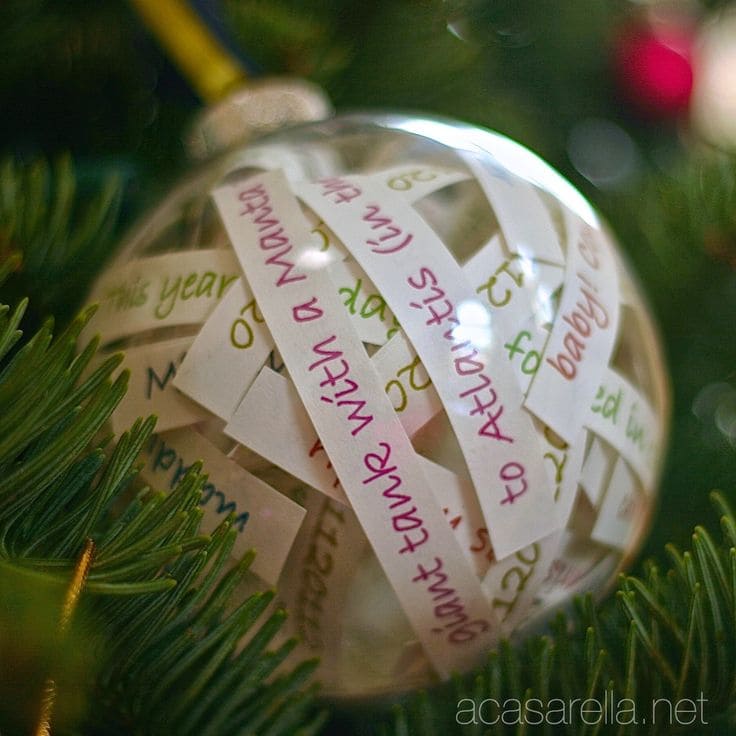
A clear ornament filled with curled paper strips, each one scribbled with moments, memories, milestones, and inside jokes.
Materials Needed
- Clear plastic or glass fillable ornament
- Colorful markers or gel pens
- Paper cutter or scissors
- Plain or patterned printer paper (cut into strips)
- Optional: ribbon
Step-by-Step Guide
- Cut your paper into slim strips – enough to write a short memory or sentence on each.
- Write down the highlights of the year then roll or curl each strip lightly with a pencil and slip them into the ornament until it’s full.
- Top it off with a bow or tag that says the year.
#25. Creative Fabric Photo Embellished Memorial Ornaments
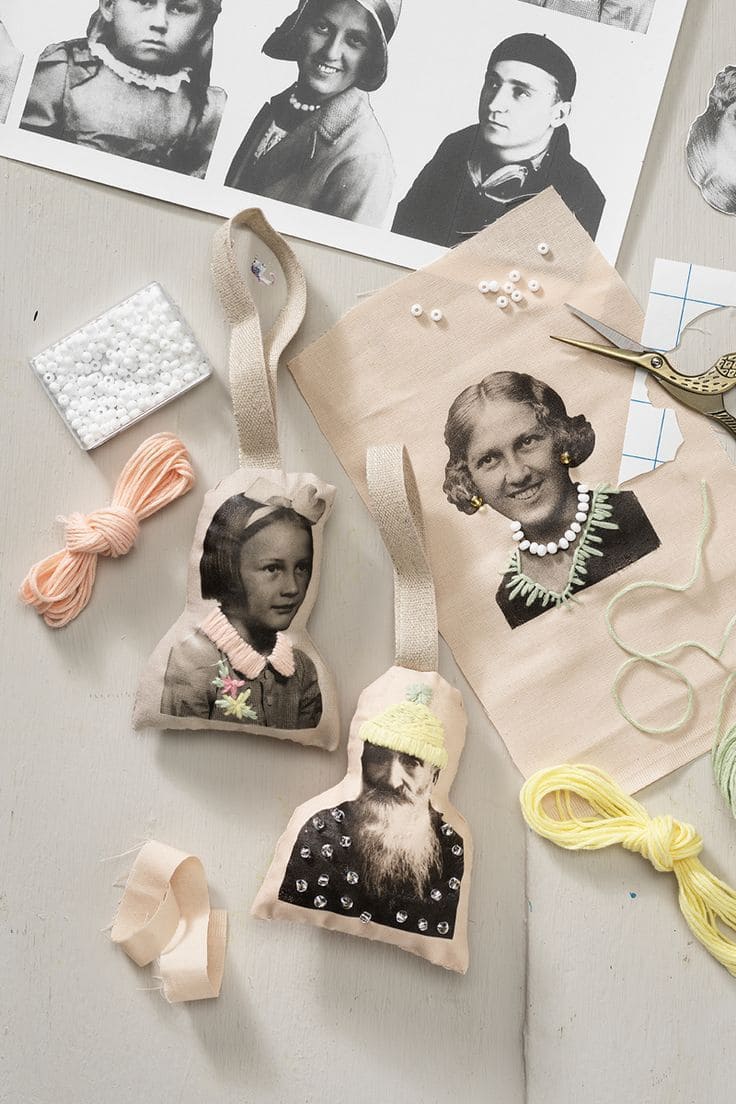
These soft fabric ornaments feature black-and-white portraits of beloved relatives, decorated with whimsical hand embroidery.
Materials Needed
- Fabric transfer paper
- Light-colored cotton or muslin fabric
- Old family portraits (digitized and printed)
- Embroidery floss, yarn, sequins, and mini beads
- Needle and thread or fabric glue
- Polyfill stuffing
- Fabric scissors
- Ribbon or twill tape
Step-by-Step Guide
- Start by printing your chosen portraits onto transfer paper, then iron them onto cotton fabric.
- Cut around each image in a soft, rounded shape. Add small stitches of embroidery floss to mimic clothing textures like collars, necklaces, or hair bows. Stitch beads for buttons or sequins for a little sparkle.
- Sew two layers of fabric together (right sides in), leaving a small hole. Flip it right side out, stuff it lightly, then stitch it closed with a ribbon loop at the top for hanging.
#26. Chic Wooden Frame Photo Memorial Ornament
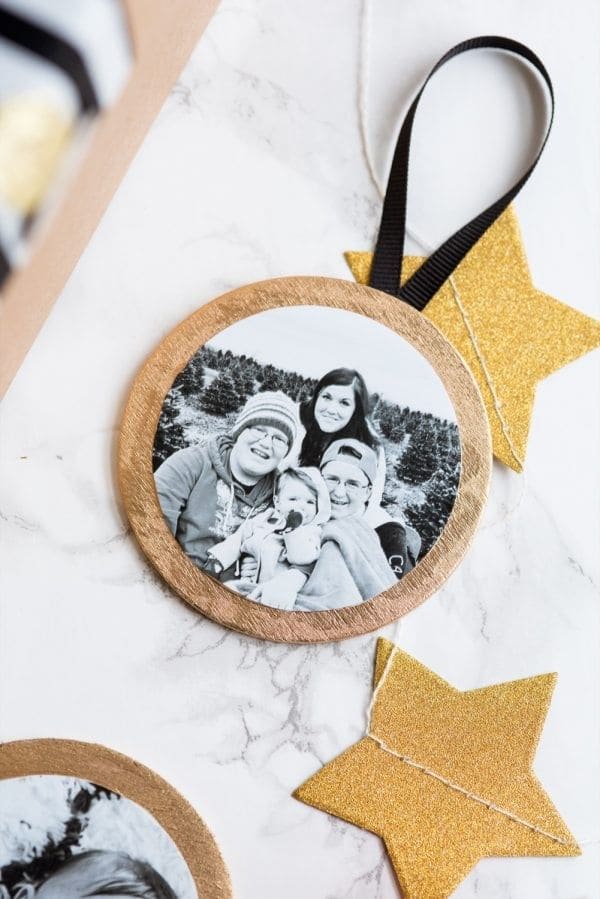
This timeless wood slice ornament turns a treasured family photo into a golden-framed heirloom.
Materials Needed
- Unfinished wood rounds (3–4 inch diameter)
- Printed black-and-white family photo (cut to fit)
- Mod Podge or gel medium
- Foam brush
- Metallic gold paint or gold leaf
- Ribbon or twine
- Drill
Step-by-Step Guide
- First, cut your chosen photo to perfectly match the size of the wood round. Apply a layer of Mod Podge to the back of the image and press it firmly onto the surface.
- Once dry, coat the entire surface with another layer of Mod Podge to seal it.
- Next, carefully paint the border of the wood slice in gold, this adds warmth, shimmer, and an elegant contrast to the black-and-white image.
- Let it dry completely, then thread a ribbon through the top hole to hang.
#27. Charming Plaid Fabric Star Memorial Ornament
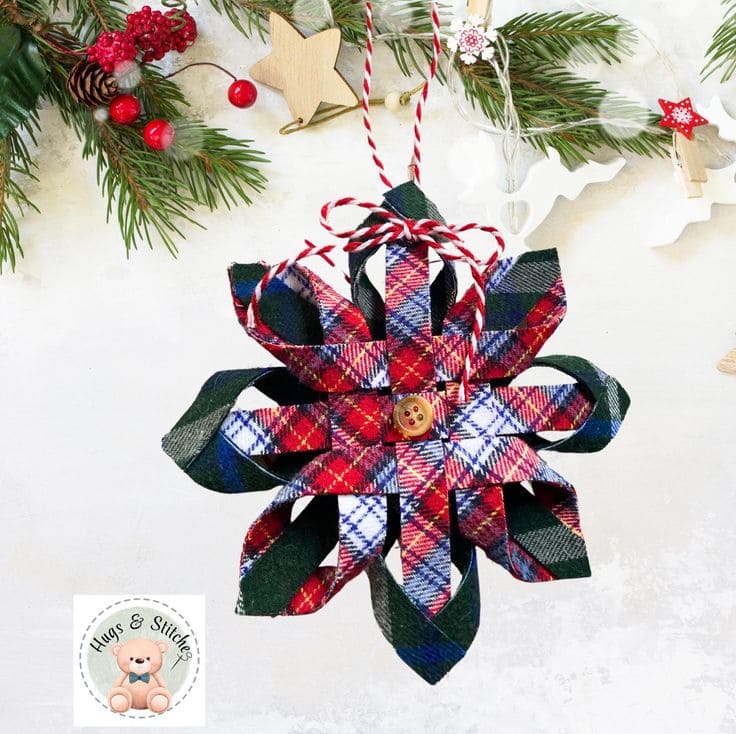
This ornament doesn’t just sit on the tree, it dances with personality. Each plaid loop carries warmth, memory, and a touch of vintage soul.
Materials Needed
- Fabric from a flannel shirt or memory textile
- Scissors or rotary cutter
- Hot glue gun or needle and thread
- One small button
- Twine or ribbon
- Optional: felt backing
Step-by-Step Guide
- Begin by cutting the fabric into several uniform strips around 6 inches long and 1 inch wide.
- Fold and loop each strip into petal-like shapes and secure the ends at the center using hot glue. Repeat, layering the loops in a starburst or snowflake pattern, alternating colors or textures for visual depth.
- Once complete, glue a small button at the center to give it a handmade charm. Add a loop of baker’s twine for easy hanging.
#28. Adorable Handprint Reindeer Keepsake Ornament Design
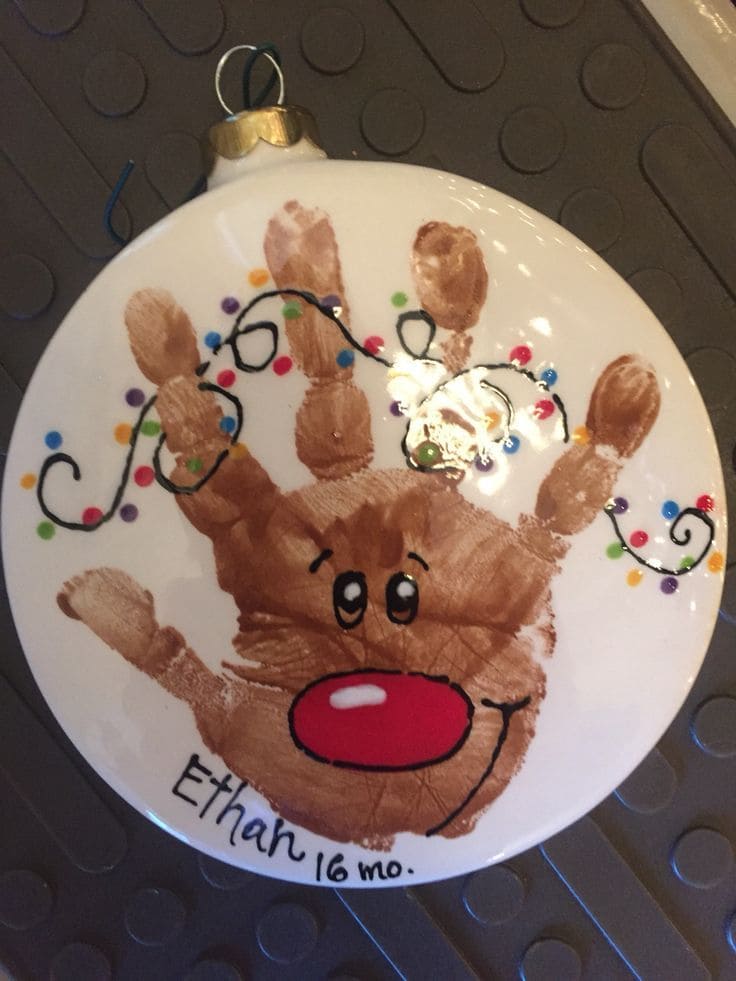
Whether it’s baby’s first Christmas or a sweet toddler moment, this keepsake freezes time with love and laughter.
Materials Needed
- White ceramic or plastic round ornament
- Non-toxic brown paint
- Fine-point paint pens (black, red, and assorted colors)
- Clear sealant spray (optional)
- Marker
Step-by-Step Guide
- Start by brushing brown paint gently onto your child’s hand and carefully pressing it onto the ornament to create the handprint. Let it dry completely.
- Next, use a black paint pen to outline antlers, eyes, and a smiling mouth. Add a big red nose and colorful dots for Christmas lights.
- A curling black line connects the dots like a string of festive bulbs. Personalize it by adding your child’s name and age underneath.
#29. Rustic Plaid Jar Lid Memorial Ornament
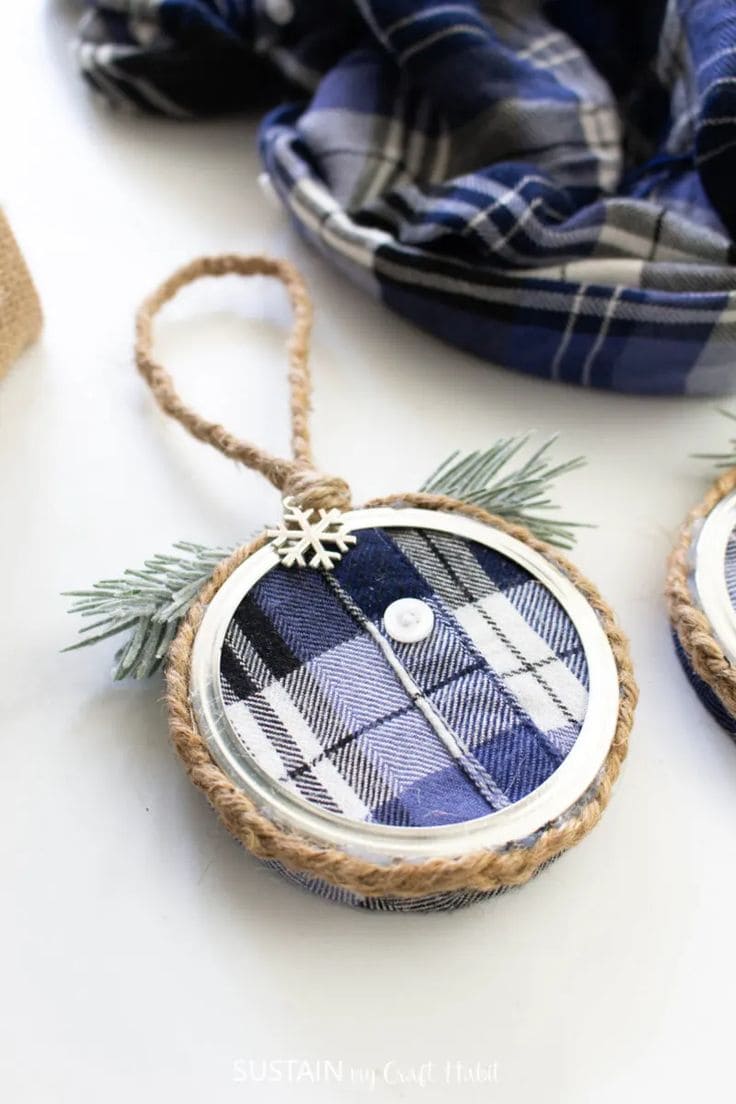
This ornament whispers nostalgia. Crafted from a plaid shirt, this simple circle holds a piece of someone you love, stitched with warmth, wrapped in twine, and accented with a tiny snowflake and evergreen sprigs.
Materials Needed
- Jar lid (Mason jar or similar)
- Small scrap of plaid shirt fabric
- Hot glue gun and glue
- Twine or jute rope
- Decorative button, faux greenery, or mini snowflake charm
- Scissors
Step-by-Step Guide
- Cut a circular piece of plaid fabric large enough to fit inside the lid. Press and glue it into the lid’s inner ring for a smooth, snug fit.
- Wrap the outer edge with twine and glue it in place. Add a loop of twine at the top for hanging.
- Decorate with a mini button from the shirt, a snowflake charm, or evergreen accents for extra meaning.
#30. Festive Plaid Pet Memorial Photo Ornament
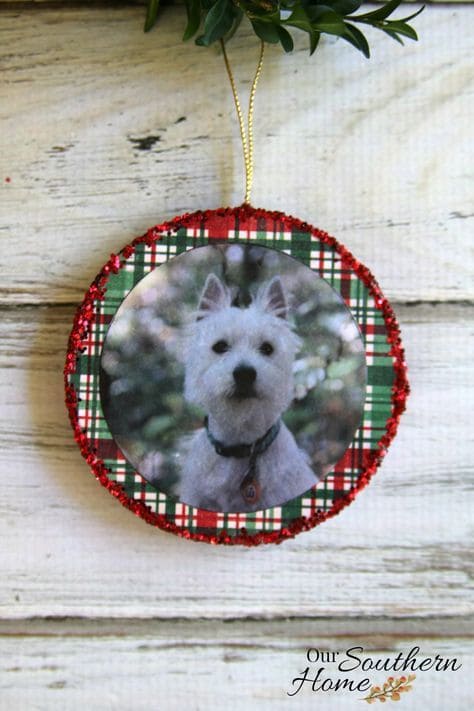
For those who’ve loved and lost a furry friend, this ornament speaks gently to the heart.
Materials Needed
- Round wooden or board ornament base
- Photo of your pet (cut to circle)
- Decorative plaid scrapbook paper
- Red glitter or glitter glue
- Mod Podge or craft glue
- Gold string or ribbon
Step-by-Step Guide
- Trace your base onto the plaid paper and cut it out. Glue the plaid to the ornament, then center and attach the photo on top.
- Add a touch of red glitter around the outer edge to frame it. Seal the whole front with a thin layer of Mod Podge for shine and durability.
- Tie a loop of gold string for hanging.
#31. Elegant Crystal Photo Drop Memorial Ornaments
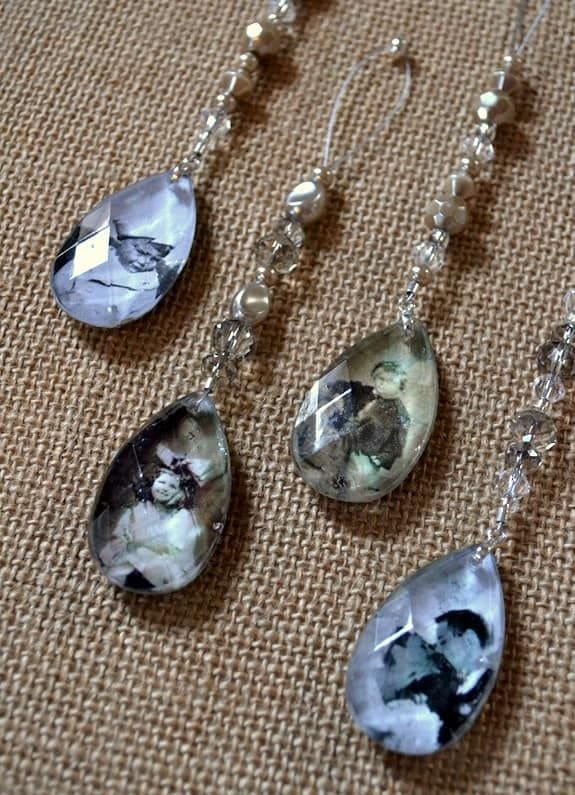
These teardrop ornaments glisten like memories caught in light. Encased within each faceted glass pendant is a faded black-and-white photo.
Materials Needed
- Clear glass or acrylic teardrop cabochons
- Small printed vintage photos
- Jewelry-grade Mod Podge or clear-drying resin
- Beaded wire or crystal chains
- Strong craft glue
Step-by-Step Guide
- Carefully trim each photo to fit the back of the cabochon. Use a thin layer of Mod Podge or resin to adhere the image to the flat side, smoothing out any bubbles.
- Once dry, attach a wire hook or beaded chain to the top loop of the drop.
- You can enhance the elegance with faux pearls or sparkly beads threaded above the pendant.
#32. Vintage Hand Mirror Photo Memorial Display
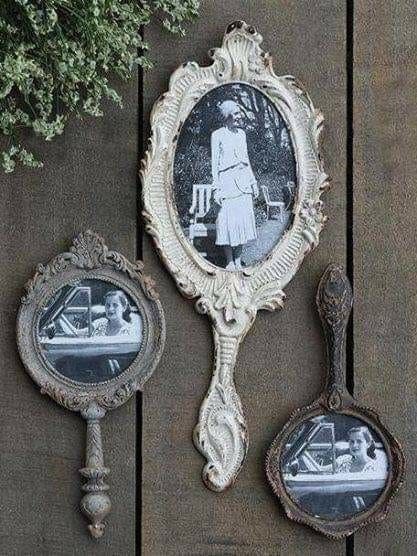
Elegant and hauntingly beautiful, these memory pieces turn antique hand mirrors into timeless photo displays.
Materials Needed
- Vintage or thrifted hand mirrors (preferably with removable backs)
- Small black-and-white printed photos
- Strong adhesive or Mod Podge
- Fine sandpaper (optional)
- Optional: chalk paint
Step-by-Step Guide
- Carefully remove the mirror backing if possible. Cut your photo to fit the mirror shape, then secure it with adhesive or Mod Podge. If the mirror is not removable, you can adhere the photo directly onto the glass using clear-drying glue.
- To enhance the antique vibe, lightly distress the mirror’s handle or frame with sandpaper or add a chalk paint finish.