Have you ever wanted to make a birthday extra special with a personal touch? Instead of grabbing a store-bought card, why not create something unique and heartfelt?
Birthdays are a time to celebrate love, joy, and cherished memories, and a handmade card adds that extra bit of magic. Whether you’re a seasoned crafter or a total beginner, making your own birthday card is easier than you think!
With just a few materials and a little creativity, you can design a stunning, one-of-a-kind card that your loved ones will treasure. From elegant floral designs to fun and playful pop-ups, we’ve gathered 30+ beautiful and effortless DIY birthday card ideas that anyone can make.
This article contains affiliate links. If you purchase through them, I may earn a small commission at no extra cost to you. Thank you for your support!
#1. Trendy Music Player Birthday Card DIY
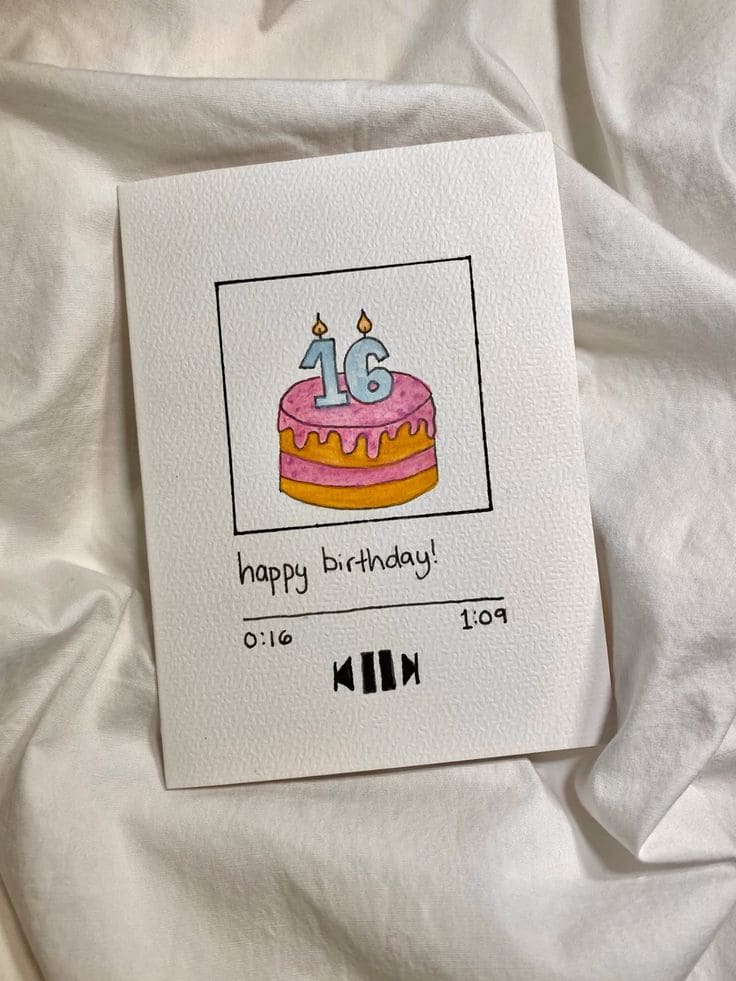
To make a birthday card that feels personal and modern, this creative design mimics a music player screen featuring a hand-drawn cake illustration.
Materials Needed
- 1 A5 textured cardstock
- Black fine-tip pen (0.5 mm)
- Watercolor brush pen
- Pencil + eraser
Step-by-step Guide
- Fold your cardstock into an A6-sized card. Lightly sketch a square near the center top of the front to represent a video screen. Inside it, draw a birthday cake with candles shaped like the number 16.
- Below the square, handwrite “happy birthday!” in a casual, playful font. Beneath that, sketch a thin line for the play bar and add timestamps (e.g., 0:16 and 1:09) and pause/skip icons like a music player.
- Use colored pens to bring the cake and interface to life. Add pink frosting, yellow sponge layers, grey candles, and fill the interface symbols in black.
#2. Patchwork Birthday Cake Card DIY
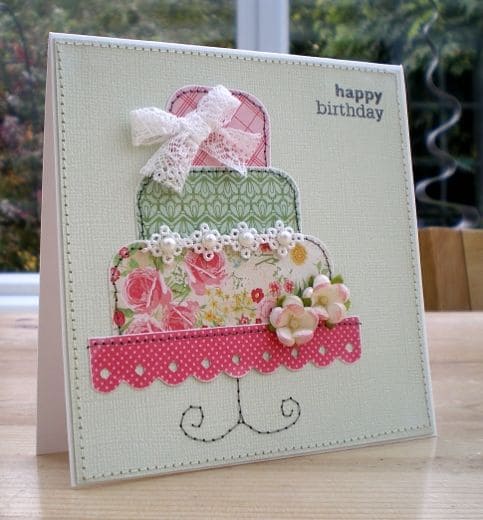
There’s something deeply heartfelt about handmade cards, especially when they feature bits of lace, florals, and soft textures like this vintage-style fabric cake design.
Materials Needed
- 1 Cream cardstock (6 x 6 inches)
- 4 Fabric scraps ( small floral, lace, and textured patterns)
- Double-sided craft tape
- 6 inches decorative lace ribbon
- 3-5 mini faux flowers
- Black embroidery thread OR black gel pen
- Rubber stamp + ink
Step-by-step Guide
- Cut your card base to 6×6 inches and fold it in half. Lightly sketch three stacked rectangles (tiered cake layers) on the front, using a pencil.
- Cut your fabric scraps to match the tiers, using pinking shears or scissors with a scalloped edge if available for the base layer.
- Decorate the layers with lace bows, mini flowers, and a strip of lace or daisy trim. Use embroidery thread or a fine black pen to outline a whimsical cake stand beneath.
#3. Minimalist Candle and Match Birthday Card
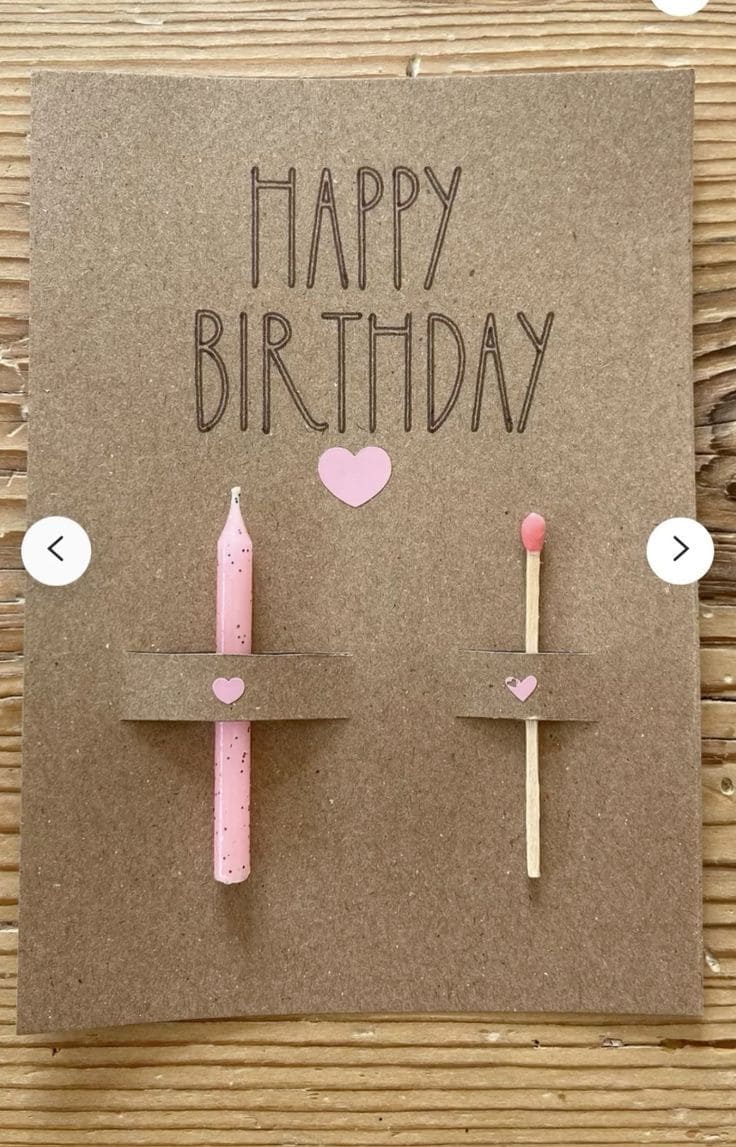
I made this design on a quiet afternoon and was surprised how warm it felt despite how few elements it used.
Materials Needed
- 1 Kraft cardstock (8.5″ x 5.5″, folded to 4.25″ x 5.5″)
- 1 mini birthday candle (2.5–3 inches)
- One wooden matchstick
- Mini heart stickers
- Glue dots
- Black fineliner pen
Step-by-step Guide
- Fold your kraft cardstock to form your card base. Use a fine black pen to write “HAPPY BIRTHDAY” in a tall, playful font across the top, then add a heart sticker or draw one underneath the text for balance.
- Wrap your kraft paper strips around the candle and matchstick to form little holders, gluing the ends behind the candle/match to secure them like a sleeve.
- Attach both holders vertically to the card using glue dots, spacing them evenly.
#4. Colorful Pom-Pom Cupcake Birthday Card
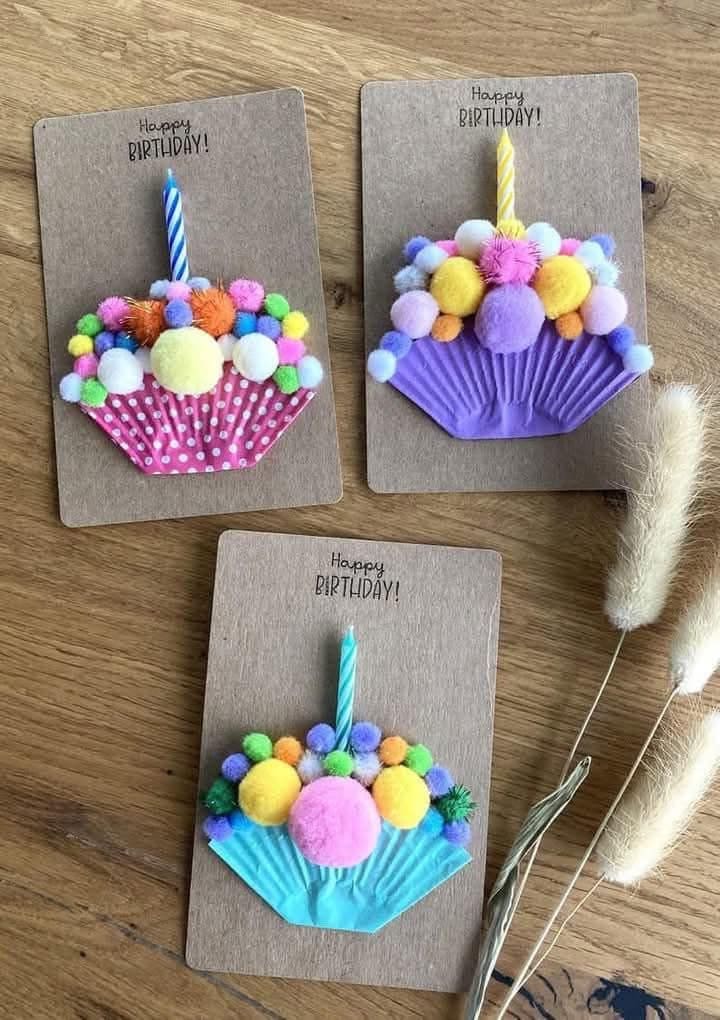
This is one of the most joyful cards I’ve ever made! It’s playful, textured, and has that childlike charm that makes everyone smile.
Materials Needed
- Kraft cardstock (4.25” x 6” folded)
- 3 Mini cupcake liners (standard 3.25” diameter, assorted colors)
- 15-20 Assorted mini pom-poms per card
- 3 Mini birthday candles
- Craft glue
- Black fine-tip pen
- Optional: Glue dots
Step-by-step Guide
- Fold your kraft cardstock in half. Flatten and glue one cupcake liner at the bottom center of the front side, forming the cupcake base.
- Add a generous dab of glue inside the liner and press colorful pom-poms in clusters to form the frosting. Mix sizes and textures for a fun look.
- Finally, glue a candle sticking out from the top of the pom-poms and write a cheerful “Happy BIRTHDAY!” above with your pen.
#5. Creative Money Balloon Birthday Card DIY
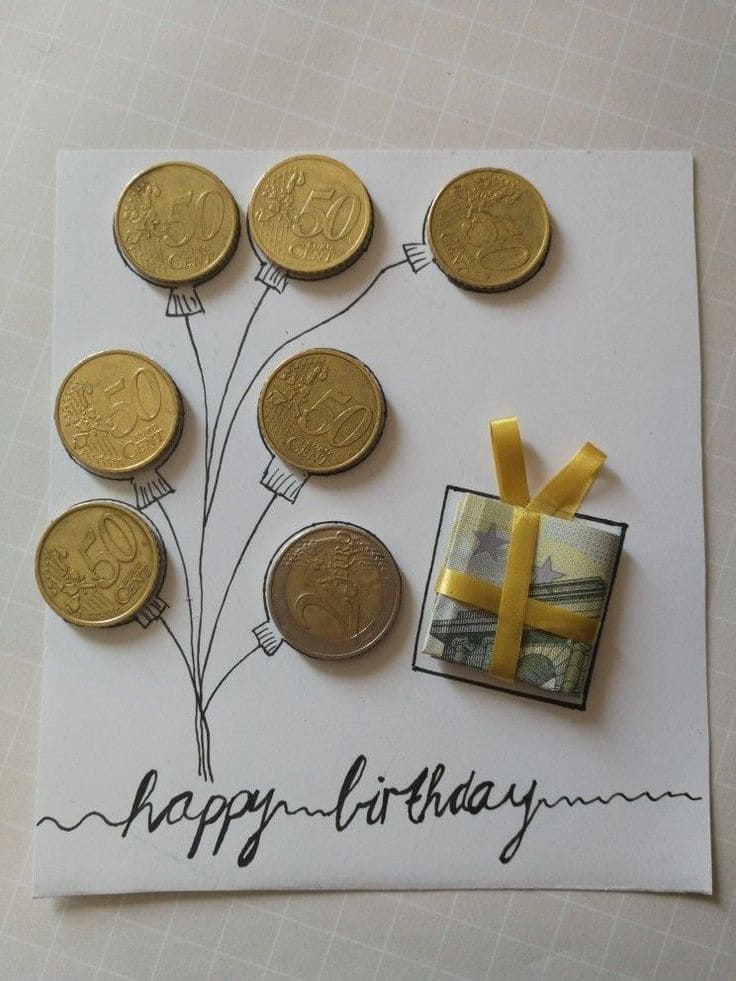
Coins become balloons and folded bills make a gift box, all tied together with a little creativity.
Materials Needed
- 1 White cardstock (5” x 5” folded)
- 7–8 real coins
- Small adhesive dots
- One paper bill
- Yellow thin ribbon
- Black gel pen
- Optional: Glue dots
Step-by-step Guide
- Fold the cardstock into a square card. Draw 6–8 balloon strings gently curving upward and write “happy birthday” across the bottom in a freehand style.
- Using adhesive dots, attach one coin at the end of each string to represent balloons.
- Fold your paper bill into a neat rectangle and tape it flat onto the corner like a gift box. Wrap your ribbon around it and add a small bow to finish the look.
#6. Charming Pop-Up Floral Birthday Card DIY
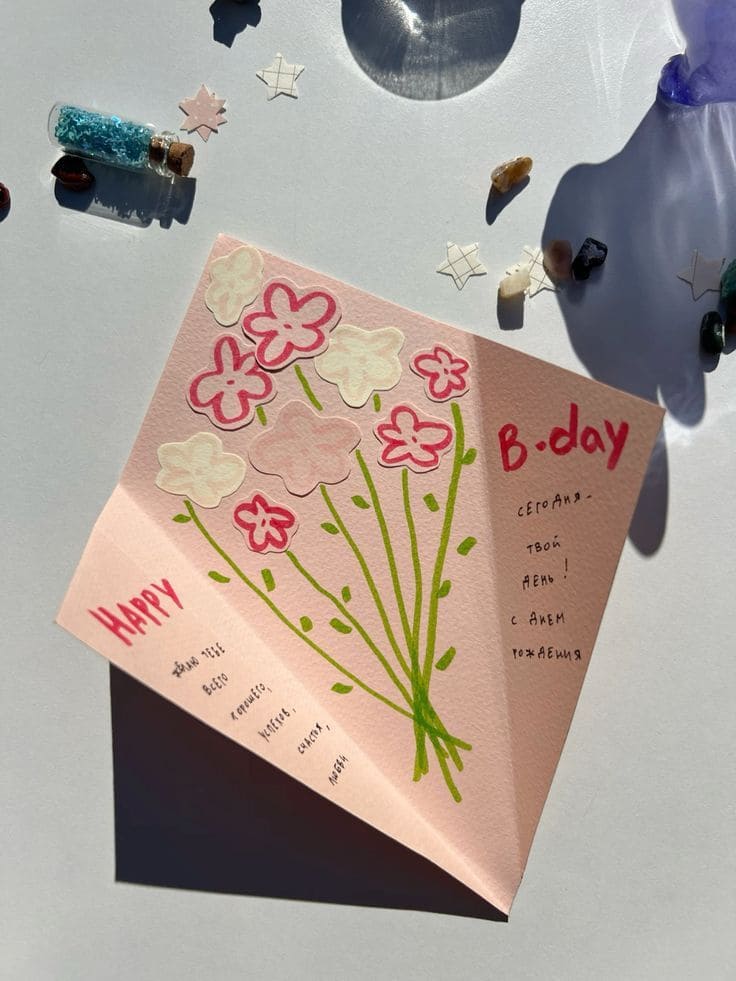
What I love about this one is how easy it is to make, but the final look feels intentional, joyful, and personal.
Materials Needed
- 1 Light pink A4 cardstock (cut to 8.5″ x 5.5″ and folded in half)
- White and pink construction paper
- Glue stick
- Fine-tip markers in green, red, pink, and black
Step-by-step Guide
- Fold the pink cardstock in half diagonally or create a soft gatefold. Sketch a bouquet of stems in green starting from the center fold, fanning outward across the card.
- Cut out simple floral shapes in different sizes from white and pink paper. Layer them over the stems and glue them down like a bunch of wildflowers.
- Add outlines to the flowers, handwrite “Happy B-day” and optional messages in your native language or fun phrases around the petals.
- Personalize the corners and creases to make it feel handwritten and sincere.
#7. Playful Black Cat Birthday Card DIY
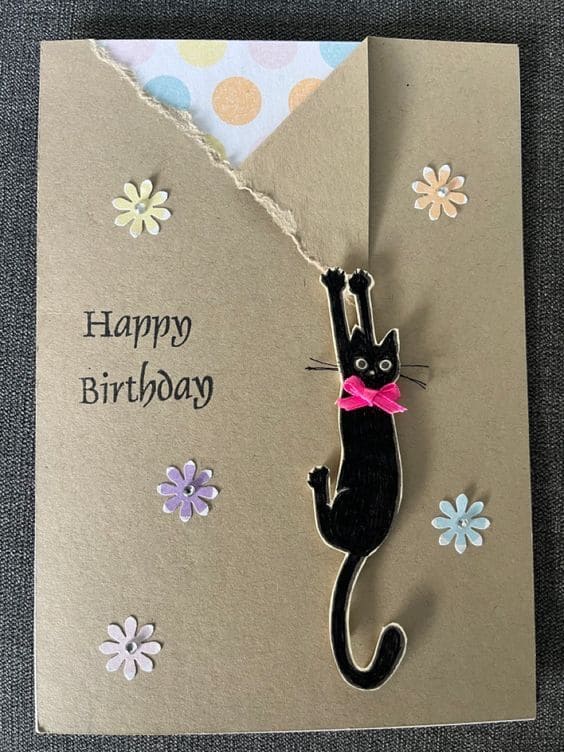
The little black cat, caught mid-climb, adds humor and personality, like it’s literally tearing through to wish someone a Happy Birthday!
Materials Needed
- 1 Kraft cardstock (A5 size folded in half)
- Patterned paper (approx. 3×3 inches)
- Black cardstock
- Mini pink ribbon (1.5 inches)
- White gel pen and black fine-liner
- Tiny adhesive googly eyes
- Craft punch flower shapes
- Scissors, glue stick, pencil
Step-by-step Guide
- Tear a triangular flap off the top corner of the card and glue patterned paper underneath so it peeks through.
- Lightly sketch a climbing cat silhouette on black cardstock and cut it out.
- Add whiskers, a nose, and outline the shape using white gel pen or pencil. Stick on the googly eyes and glue the mini bow at the cat’s neck.
- Attach the cat so its paws line up with the torn paper edge. Add punched flowers and write “Happy Birthday” using a marker or printed sticker letters.
#8. Delightful Butterfly Surprise Birthday Card DIY
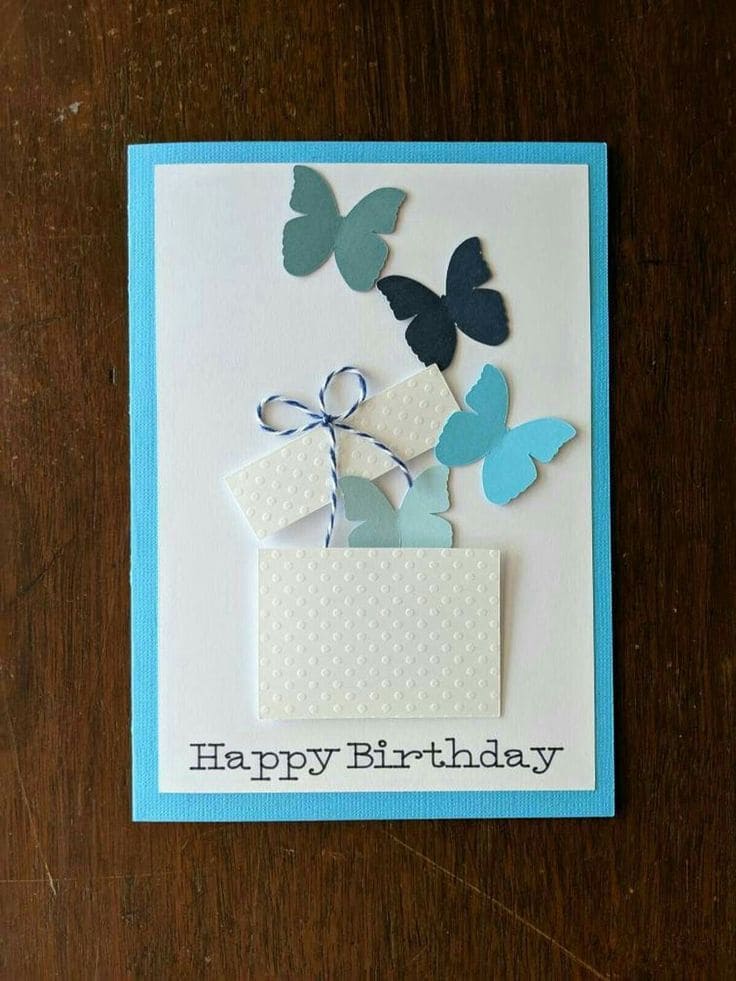
The popping gift box and gentle tones make it feel like a breath of fresh air, perfect for a calm, nature-loving soul.
Materials Needed:
- 1 White textured cardstock (5″x7″)
- 1 Blue cardstock base (5.5″x7.5″)
- Butterfly paper punch
- 3D foam tape
- Thin twine (12″)
- Glue stick and scissors
Step-by-step Guide:
- Glue the white textured card onto the blue base and let dry.
- Punch out or cut butterflies from blue-toned paper and arrange them above a small paper gift box with a raised lid.
- Attach butterflies and box lid with foam tape for depth, glue the box base flat, and tie twine into a bow on top, then add your “Happy Birthday” message below.
#9. Whimsical Watercolor Balloon Birthday Card DIY
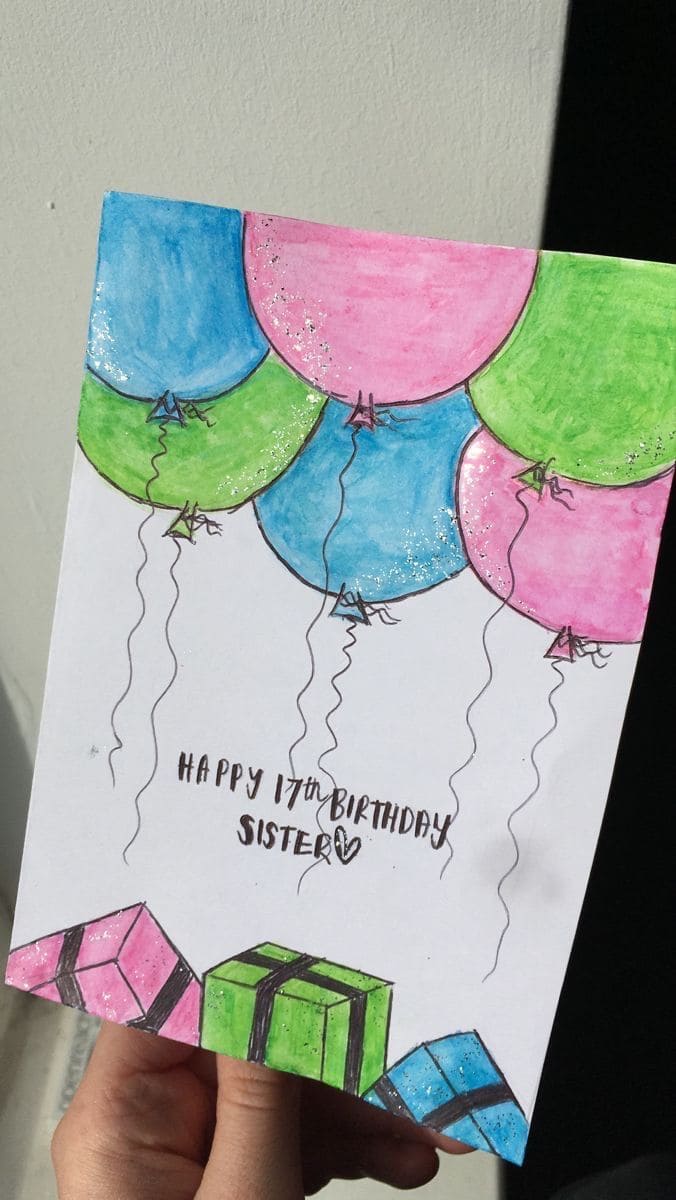
This cheerful hand-drawn birthday card is filled with colorful balloons and glittery presents, creating a sweet and personal surprise for a sister’s 17th birthday.
Materials Needed
- 1 White drawing cardstock sheet (5″ x 7″)
- Watercolor paints (pink, green, blue)
- Glitter glue
- Black fine liner pen
- Ruler
- Paintbrush and water
Step-by-step Guide
- Lightly sketch balloons overlapping at the top and a few presents at the bottom edge. Add strings and gift ribbons.
- Paint the balloons and presents using watercolor or markers. Let them dry fully, then go over outlines and text with a black pen.
- Decorate balloon edges and present ribbons with glitter glue. Once dry, write your birthday message in the center and personalize it with a sweet note.
#10. Rustic Dried Flower Birthday Card
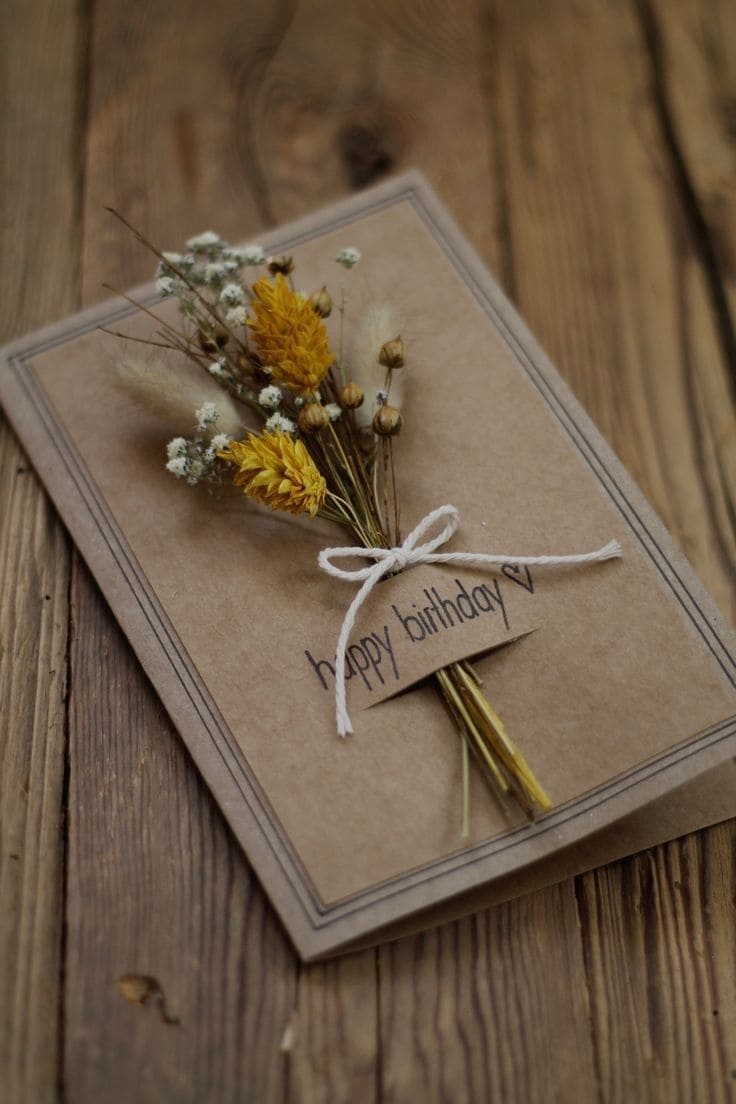
With dried blooms carefully tied in a small bouquet and a hand-lettered “happy birthday” tag, it feels like a heartfelt note plucked straight from nature.
Materials Needed
- 1 Kraft paper cardstock (folded to 5″ x 7″)
- 6–8 Mini dried flowers
- Natural cotton twine
- Double-sided tape
- Fine-tip black pen
- Optional: kraft paper tag scrap
Step-by-step Guide
- Trim a few small dried flowers and arrange them into a tiny bouquet. Tie them together with a bow using twine.
- Secure the bouquet to the center of the kraft card with strong double-sided tape or glue dots. Add a small paper tag under the bow and write your message.
- Frame the card with a double-lined border using a fine black pen to complete the rustic look. Let it dry fully before placing in an envelope.
#11. Rustic Burlap Floral Birthday Card DIY
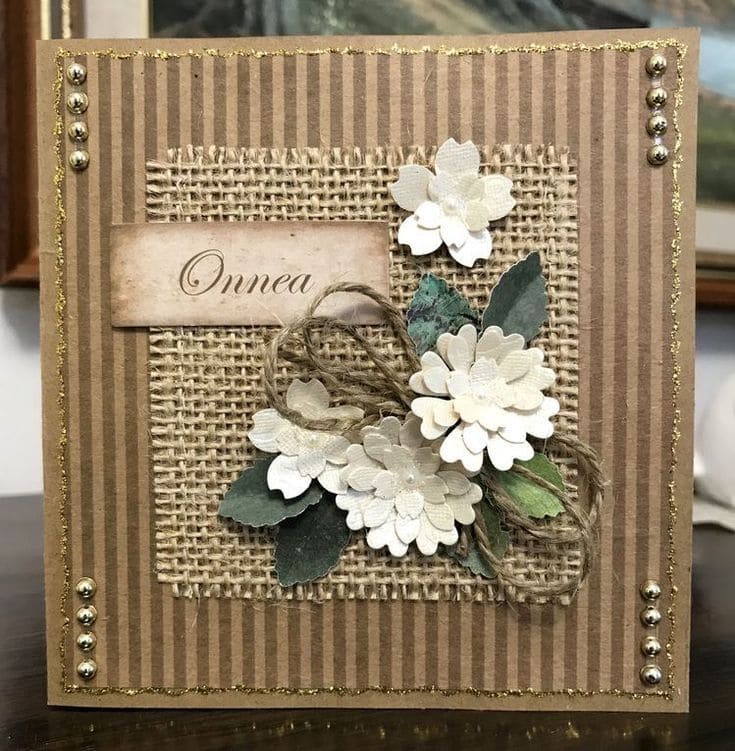
The blend of striped kraft paper, burlap texture, and layered floral embellishments makes this card feel both timeless and personal.
Materials Needed
- 1 Striped kraft cardstock (6” x 6”)
- 1 Square burlap sheet (4.5” x 4.5”)
- 5–6 Paper flower embellishments
- 3–4 Artificial green leaves
- Natural jute twine
- Gold glitter glue
- Pearl stickers
- Ink pad + vintage-style stamp
Step-by-step Guide
- Attach the burlap square to the center of the kraft card using hot glue or strong adhesive. Make sure the edges are secure.
- Arrange paper flowers, green leaves, and a tied twine bow in one corner of the burlap. Layer the elements naturally and glue them in place.
- Add your sentiment label on the opposite side. Decorate the border with gold glitter glue and stick pearl beads in the corners for a vintage finish. Let dry fully.
#12. Elegant 3D Butterfly Birthday Card DIY
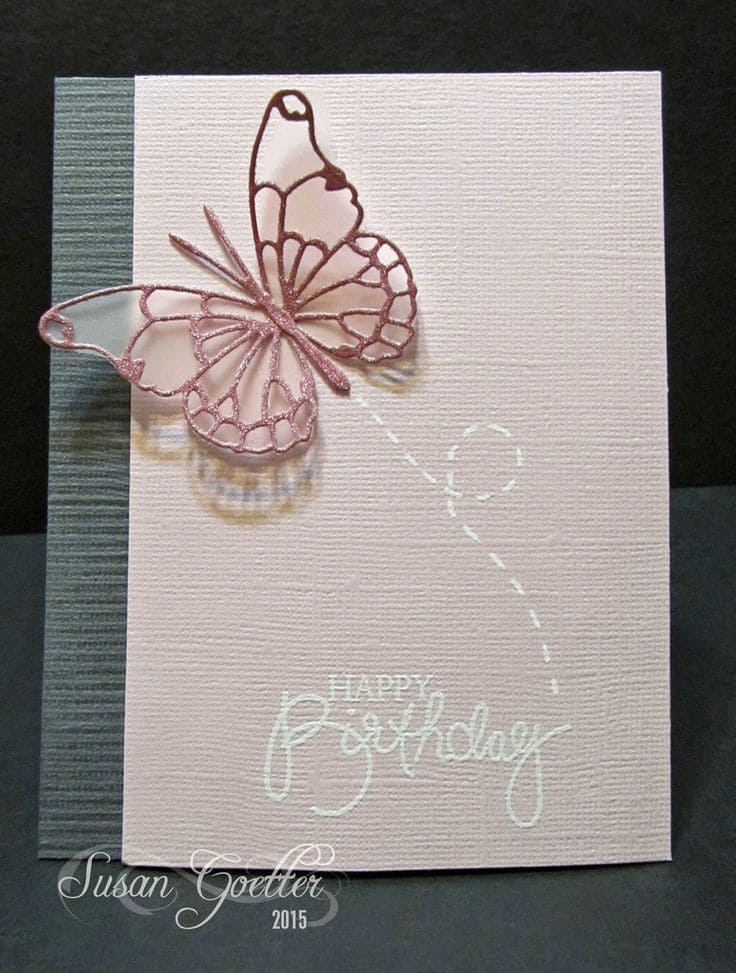
This butterfly birthday card is so delicate and uplifting, it’s like a soft whisper of love caught in flight.
Materials Needed
- 1 pink textured cardstock (A5 folded)
- 1 Striped gray craft paper (1.5” x 5.5”)
- Butterfly die cut or 3D sticker
- White gel pen
- Double-sided foam tape
Step-by-step Guide
- Fold the pink cardstock into a vertical card and glue the gray striped strip along the left side.
- Attach the butterfly diagonally on the top left using foam tape to give it lift. Let the wings remain free for a realistic look.
- Draw a looping flight trail and write “Happy Birthday” using a white gel pen, or emboss the sentiment for a raised texture.
#13. Adorable Bunny Balloon Treat Card DIY
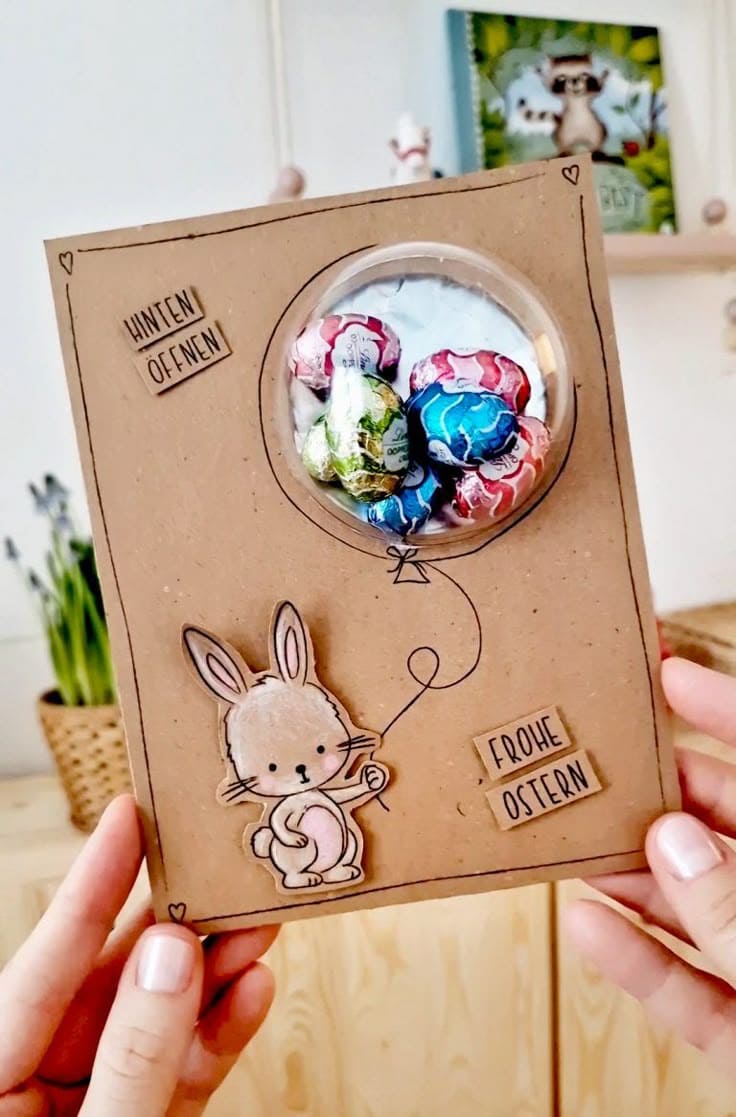
The clever idea of turning a candy-filled plastic bubble into a bunny balloon just melts the heart. It’s interactive and gift-like in one adorable design.
Materials Needed
- 1 Kraft cardstock, A5 folded
- Plastic ornament half (2.5–3 inch diameter)
- 6–8 Assorted mini wrapped chocolates
- Easter bunny sticker (approx. 2–3 inches tall)
- Black fine liner
- Double-sided tape and craft glue
Step-by-step Guide
- Draw and cut a circle the size of the plastic bubble in the front center of the kraft card. Attach the bubble from the back using double-sided tape.
- Fill it with small chocolates, sealing the back of the card securely with an inner panel. Add a message like “Hinten öffnen” (Open back).
- Decorate the front with the bunny cutout holding the balloon string, hand-draw string lines, and glue down cute Easter wishes like “Frohe Ostern.”
#14. Charming Floral Basket Birthday Card DIY
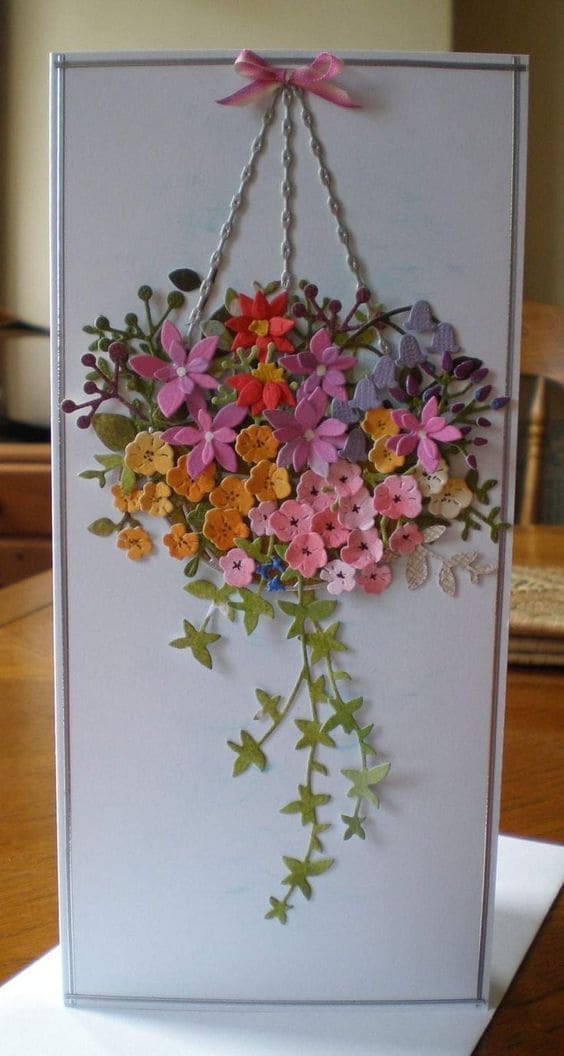
I remember making this with leftover paper scraps from my spring scrapbooking stash, and the finished result looked way more expensive than the materials I used.
Materials Needed
- 1 White vertical cardstock base (4 x 8 inches folded)
- Assorted scrapbooking paper in green, pink, orange, purple, and red shades
- Mini floral paper punch set
- Green cardstock vines
- Silver thread (6 inches)
- Small pink ribbon
- Craft glue and tweezers
Step-by-step Guide
- Start by punching or cutting out a large number of flowers in various shades and small leaves or vines from green cardstock. Lightly curve each flower using a rounded tip or pencil.
- Begin layering the flowers on the center of the card, shaping them into a dome-like basket hanging form. Add vines falling downward and create dimension with overlapping layers.
- Glue silver thread from the top corners to the center top of the flower cluster to create the illusion of a hanging basket. Finish with a bow if desired.
#15. Rustic Floral Cupcake Birthday Card DIY
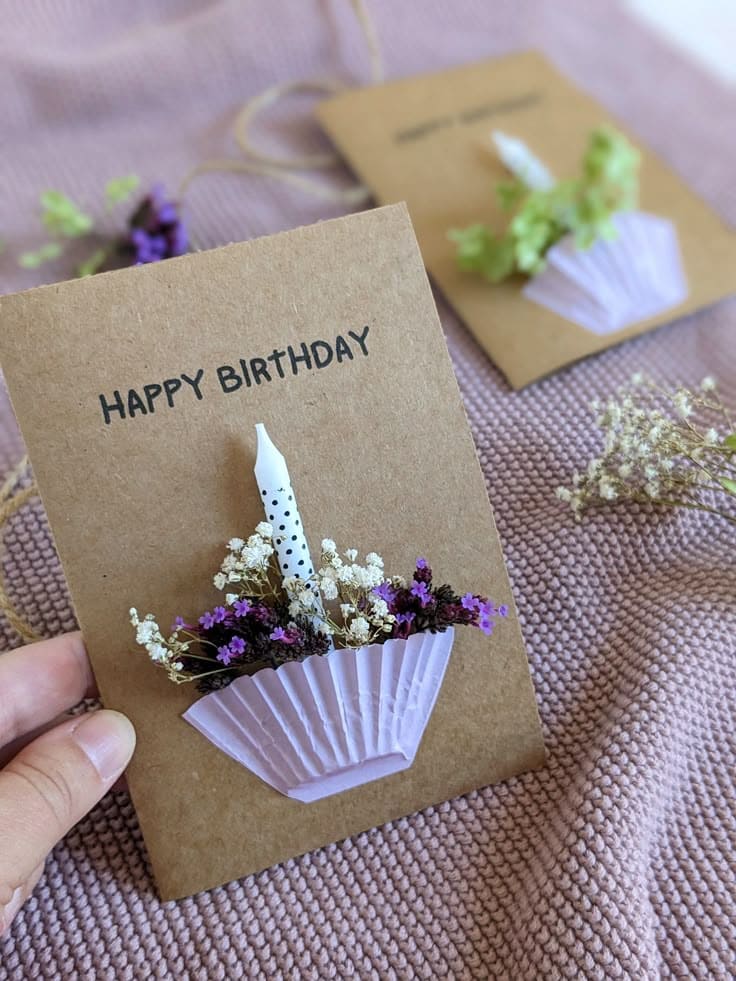
The candle sticking out adds a playful nod to a cupcake, blending whimsy with rustic style. It’s a low-cost project that turns out incredibly elegant and sentimental.
Materials Needed
- 1 Brown kraft card (5 x 7 inches folded)
- 1 Mini pastel cupcake liner
- 3–4 Dried flowers (baby’s breath, statice, or lavender)
- 1 Birthday candle (about 2.5 inches tall)
- Glue gun
- Permanent black marker
Step-by-step Guide
- Fold the kraft paper to create your card base. Flatten a cupcake liner slightly and glue it toward the bottom center to form the “cupcake” base.
- Trim your dried flower stems short and arrange them into a small bouquet. Secure them inside the cupcake liner using glue so they look like cupcake topping.
- Add a candle to the center, standing upright. Glue the base so it holds securely. Finish by hand-lettering “Happy Birthday” above the bouquet with your black marker.
#16. Melodic Button Music Birthday Card DIY
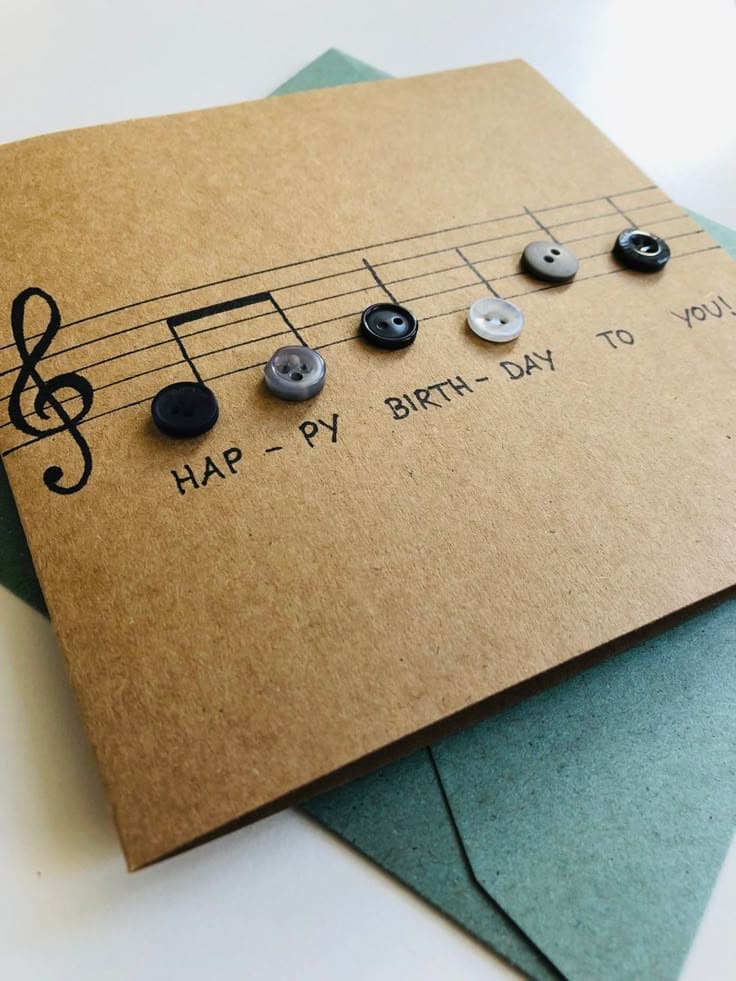
Inspired by sheet music and made with repurposed buttons, it’s a sweet tribute to someone who loves music or just enjoys clever, thoughtful crafts.
Materials Needed
- 1 Brown kraft cardstock (5 x 5 inch square folded)
- 6–8 Assorted small buttons
- Black gel pen
- Ruler
- Glue dots
Step-by-step Guide
- Fold your kraft cardstock into a square card. Use a ruler and black pen to draw five horizontal music staff lines across the top third of the card.
- Sketch a treble clef on the left side and short vertical bars to mimic note stems under each word of “Happy Birthday to You.”
- Glue a button on each note’s position. Mix black, grey, and white shades for contrast, then write lyrics spaced beneath each button to match the tune visually.
#17. Chic Balloon-Themed Birthday Card DIY
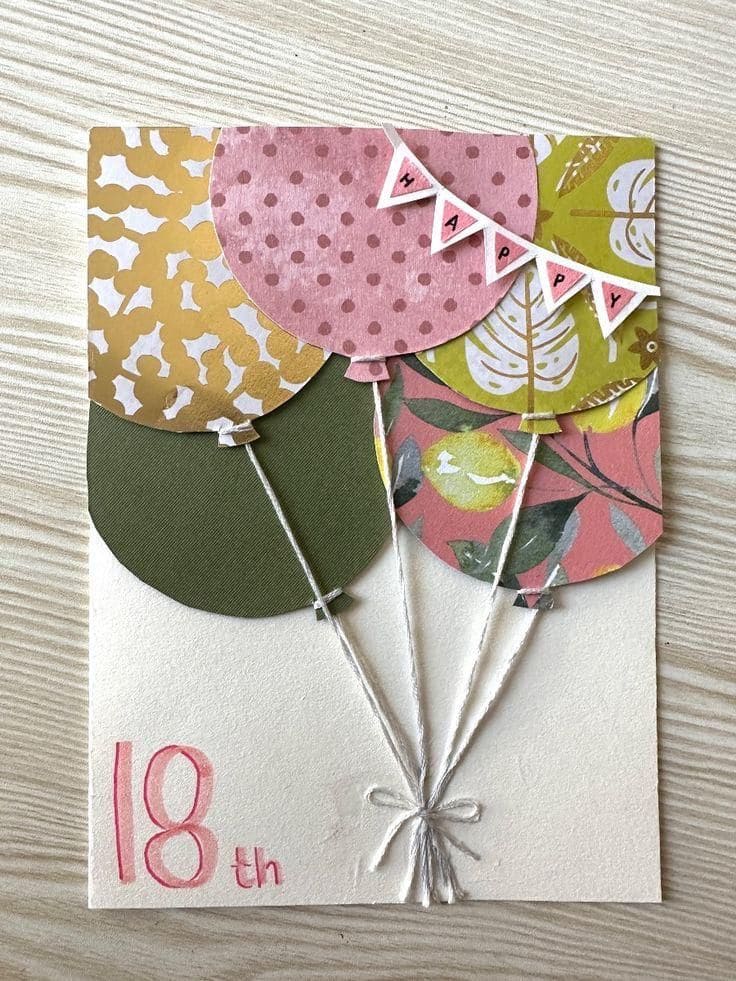
This DIY birthday card is a paper-lovers dream, made with cut-out balloon shapes from patterned cardstock that pop right off the page.
Materials Needed
- 1 Cream card base (5 x 7 inches folded)
- 5 different patterned cardstocks
- 5 White cotton string pieces
- Glue stick
- Fine-tip pink marker
- Small scrap paper
Step-by-step Guide
- Cut out five round balloon shapes from patterned paper and glue them overlapping at the top of the card base. Cut small triangle tabs and glue them to the bottom of each balloon.
- Tape or glue a piece of string behind each balloon, letting them dangle and meet in the middle bottom. Tie the ends together in a neat bow and secure with glue.
- Add a mini bunting banner across the balloons by cutting tiny triangles, stamping “HAPPY” on them, and stringing them across the card.
- Finally, draw or stamp “18th” in the bottom left corner for the final flourish.
#18. Adorable Pop-Up Surprise Birthday Card
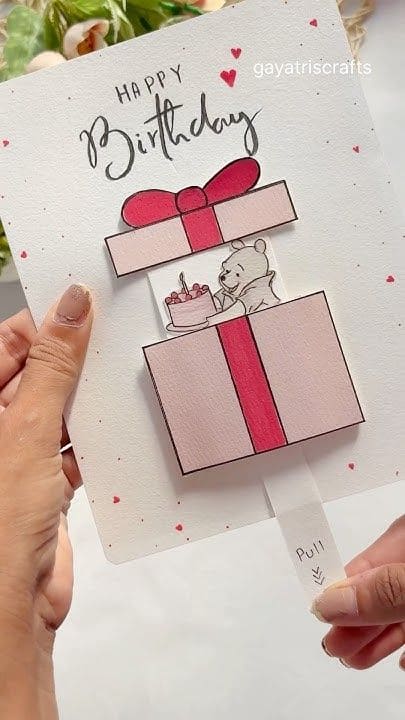
A gentle pull on the tab reveals a sweet surprise: a charming bear holding a birthday cake, hidden inside a pink gift box.
Materials Needed
- 1 White cardstock (6 x 8 inches folded in half)
- Pink cardstock (2.5″ x 2.5″)
- Red washi tape
- Pull tab strip (approx. 1 inch wide x 4.5 inches long)
- Adhesive foam tape
- Illustrated bear printout
- Fine-tip black pen
- Glue stick
Step-by-step Guide
- Glue the bottom pink square onto the white card base, applying adhesive only around three sides to leave the top open like a pocket. Attach the red ribbon strip vertically down the center.
- Attach the top pink square and bow slightly above the first square, creating the illusion of a closed box lid. Tape the red strip vertically to match the bottom part.
- Slide the bear drawing onto the pull tab and insert the strip into the pocket behind the bottom gift box, then add hearts or confetti dots around for extra sweetness.
#19. Minimalist Balloon-Themed Birthday Card DIY
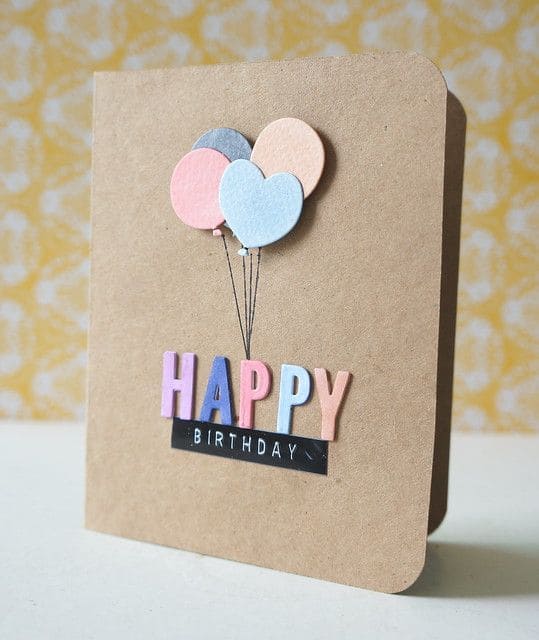
The pastel balloon cutouts pop beautifully against the kraft background, and the layered 3D “HAPPY” letters add such a playful dimension.
Materials Needed
- 1 Kraft cardstock (5 x 7 inches folded)
- 5 Pastel cardstocks
- Black label sticker
- Alphabet die cuts or stencil
- Mini foam adhesive squares
- Black fine-tip pen
- Glue stick
Step-by-step Guide
- Fold the kraft cardstock in half to form your card base. Use a corner rounder punch if you want smooth edges.
- Cut out balloon shapes (circles and hearts) from pastel cardstock. Arrange them slightly overlapping near the top center. Use foam adhesive to attach for a dimensional look.
- Draw thin black lines down from the balloons to simulate strings converging just above the “HAPPY” letters.
- Cut out each letter of “HAPPY” from different colored cardstock and glue them in place using foam tape.
- Add a black strip or washi tape under the letters and write or stick on “BIRTHDAY” using white ink or alphabet stickers for contrast.
#20. Charming Yarn-Wrapped Birthday Calendar Card
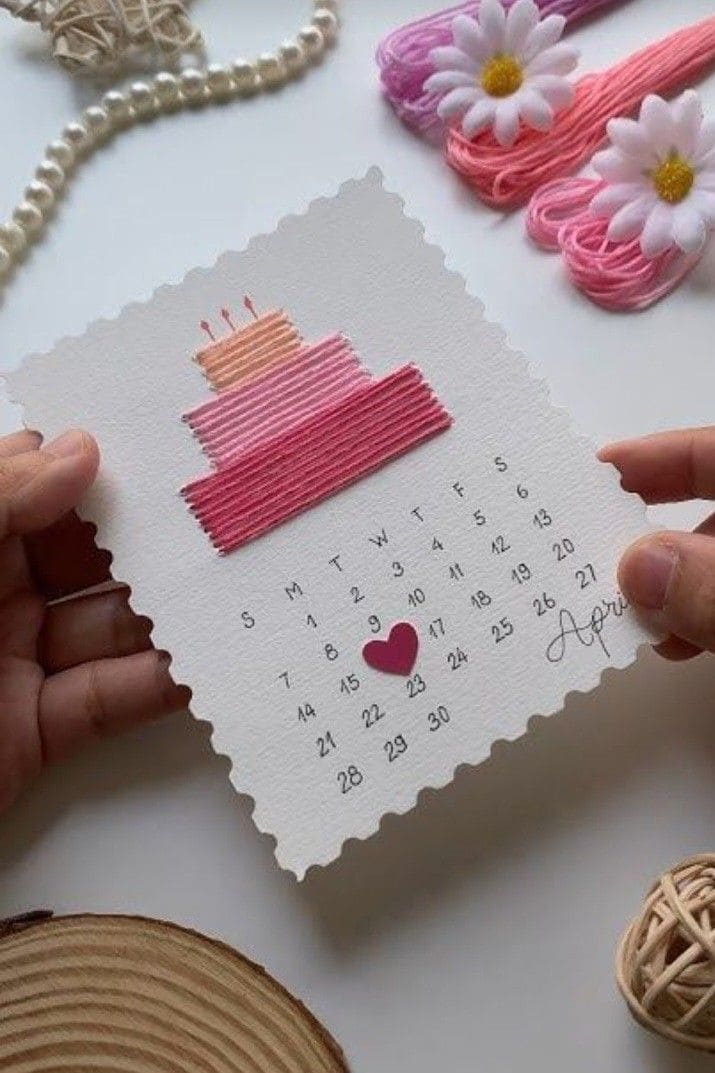
I once made something similar for my sister and highlighted her birth date with a felt heart just like this.
Materials Needed
- 1 Textured white cardstock (approx. 5 x 6 inches)
- Pink, orange, and peach embroidery floss
- Large embroidery needle
- Fine-tip black pen
- Small pink heart sticker
- Pinking shears
- Pencil and ruler
Step-by-step Guide
- Trim your cardstock into a rectangle using pinking shears to give it a delicate scalloped edge.
- Lightly draw three stacked rectangles with pencil for the cake, then use a needle to poke holes along each rectangle’s edge, spacing them evenly.
- Thread embroidery floss through the holes in horizontal stitches to build the layered cake, start with darker shades at the base and go lighter on top.
- Above the smallest cake tier, draw three birthday candles using the fine-tip pen.
- Below the cake, handwrite the calendar layout for the birthday month. Use neat, evenly spaced letters and numbers.
- Mark the birthday date with a small heart sticker or cutout to make it stand out and add a personal touch.
#21. Sparkling Heart Gem Birthday Card DIY
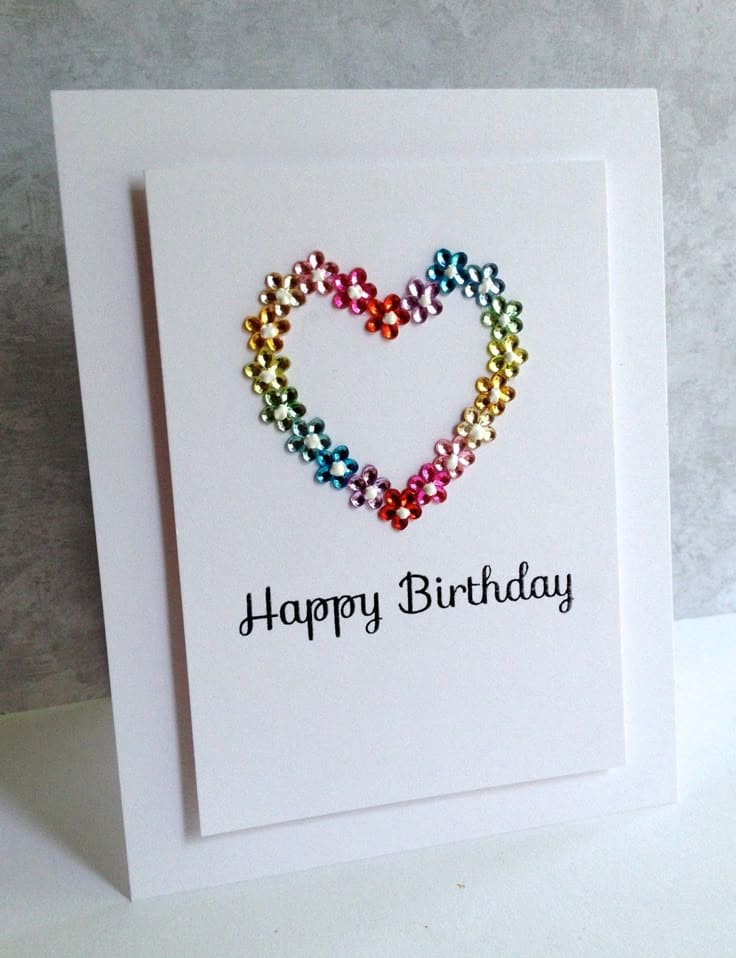
This DIY birthday card is a burst of love and sparkle, simple in design but rich in charm. The rainbow gem flowers shaped into a heart create a joyful energy that instantly lifts the mood.
Materials Needed
- 2 White cardstocks (5″ x 7″ base and 4″ x 6″ topper)
- 24–30 Mini flower-shaped rhinestones in rainbow colors
- Strong craft glue
- Black fine-tip pen
- Pencil and heart-shaped stencil
Step-by-step Guide
- Lightly trace a heart shape with a pencil in the center of your 4″ x 6″ topper cardstock.
- Arrange the rhinestone flowers along the heart outline, then carefully glue down each flower-shaped gem, following the heart line.
- Once the gems are set, use your pen or stamp to write “Happy Birthday” beneath the heart.
- Mount the decorated topper onto the larger base cardstock using glue or double-sided foam tape to give it a raised effect.
#22. Vibrant Plaid Floral Birthday Card DIY
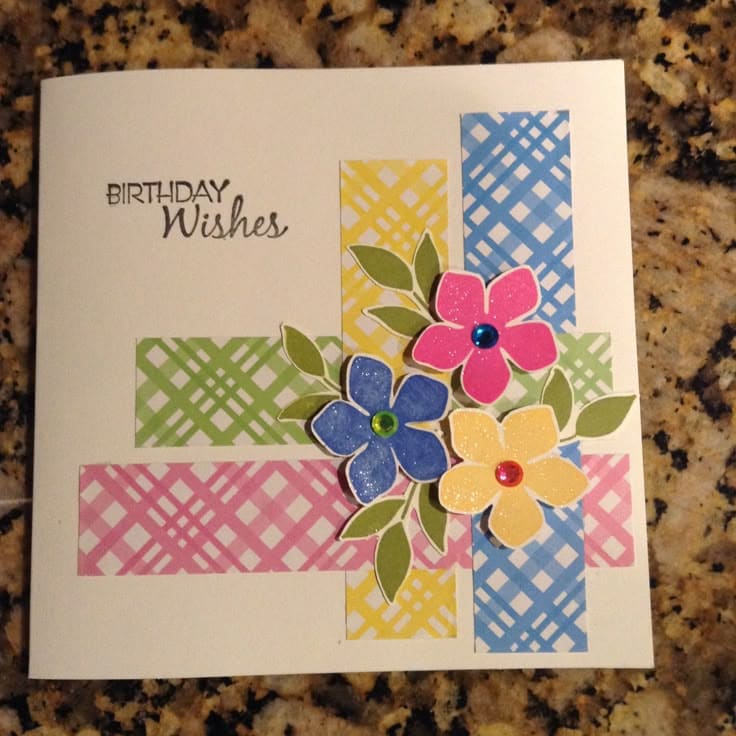
The mix of textures and soft pastels gives it a happy, handmade vibe. I made a card like this once using leftover wrapping paper and it turned out even better than I imagined.
Materials Needed
- 1 White square cardstock base (5″ x 5″)
- 4–5 Patterned plaid paper scraps
- Colored cardstock
- 3 Small rhinestones
- Glue stick
- Scissors
- Black fine-tip pen
Step-by-step Guide
- Cut patterned paper strips and arrange them in a woven pattern across the card front, gluing them down securely.
- Cut 3–4 small flowers from colored cardstock using a punch or by hand, and do the same for leaves.
- Glue the leaves first, then layer the flowers on top, then press a gem sticker into the center of each flower for a pop of sparkle.
- Add your “Birthday Wishes” message in the top left corner using a pen or a pre-made sentiment stamp.
#23. Charming Floral Gift Birthday Card DIY
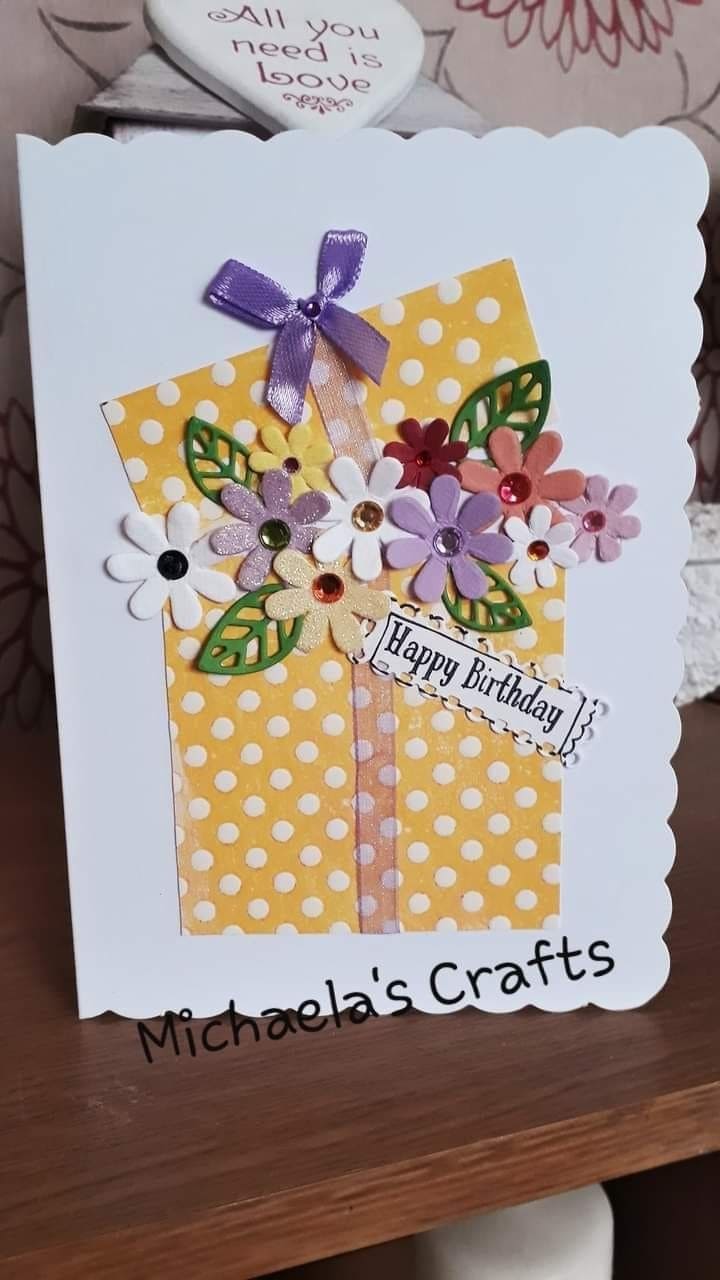
Topped with a delicate ribbon bow and scalloped edges, this card reminds me of spring mornings and little surprises wrapped with love.
Materials Needed
- 1 White scalloped cardstock base (5″ x 7″)
- 1 Yellow polka dot patterned paper (approx. 3.5″ x 5.5″)
- 5 Assorted cardstocks (purple, red, white, pink, green)
- Flower punch set
- Rhinestone embellishments
- Ribbon
- Glue dots
- “Happy Birthday” sentiment tag
Step-by-step Guide
- Cut the yellow polka dot paper into a tall rectangle and glue it to the center of the card front as the “gift box.”
- Attach a strip of ribbon vertically down the center of the gift shape and tie a separate bow for the top, securing both with glue.
- Use paper punches or dies to cut out flowers and leaves from assorted cardstock. Layer the blooms over the ribbon, slightly overlapping for a bouquet effect.
- Add a rhinestone to the center of each flower for sparkle and texture.
- Finish with a glued-on birthday tag toward the bottom right of the floral arrangement.
#24. Charming Hand-Drawn Bow Birthday Card DIY
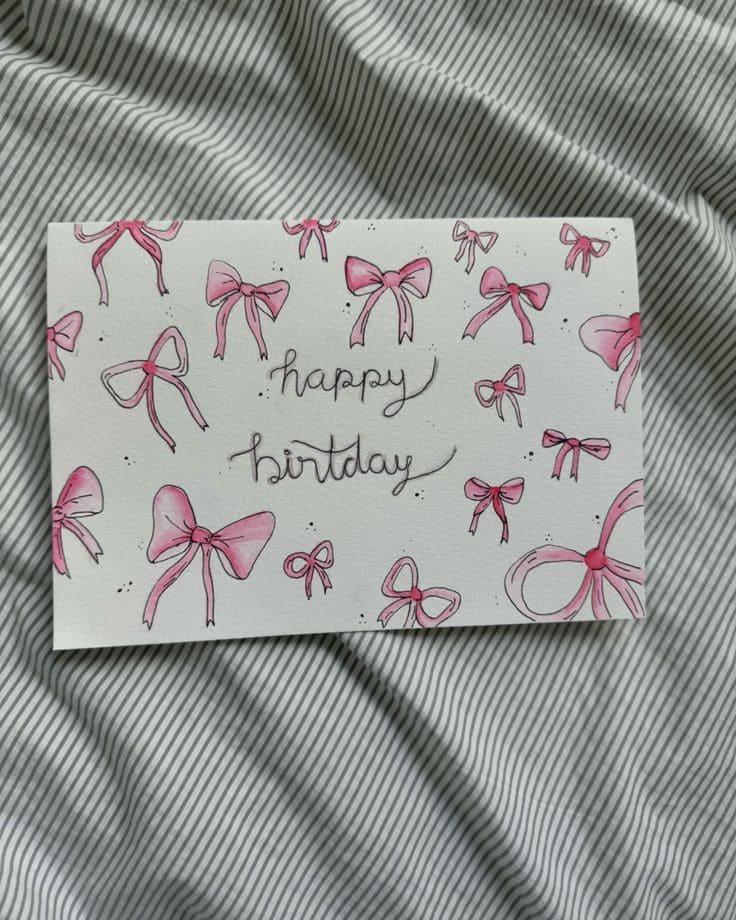
The color palette of this card is soft and lovely, and the design is minimal but full of personality, perfect for a sister, best friend, or anyone who appreciates delicate, handmade charm.
Materials Needed
- 1 White watercolor card stock (5″ x 7″ folded)
- Black fineliner pen (0.3 mm)
- Pink watercolor
- Small round paintbrush
- Pencil + eraser
- Paper towel
Step-by-step Guide
- Lightly sketch various sizes and styles of bows randomly across the card front, leaving a clear space in the middle for your message.
- Go over the bows with a fine black pen, keeping the lines fluid and slightly whimsical. Let dry, then gently erase pencil marks.
- Paint each bow using a pink watercolor tone. Use more pigment on some bows and water it down on others to create depth.
- Once dry, hand-letter “happy birthday” in a flowing script using the same black pen.
- Add tiny dots or stars around the card for extra charm.
#25. Vintage-Inspired Birthday Card DIY
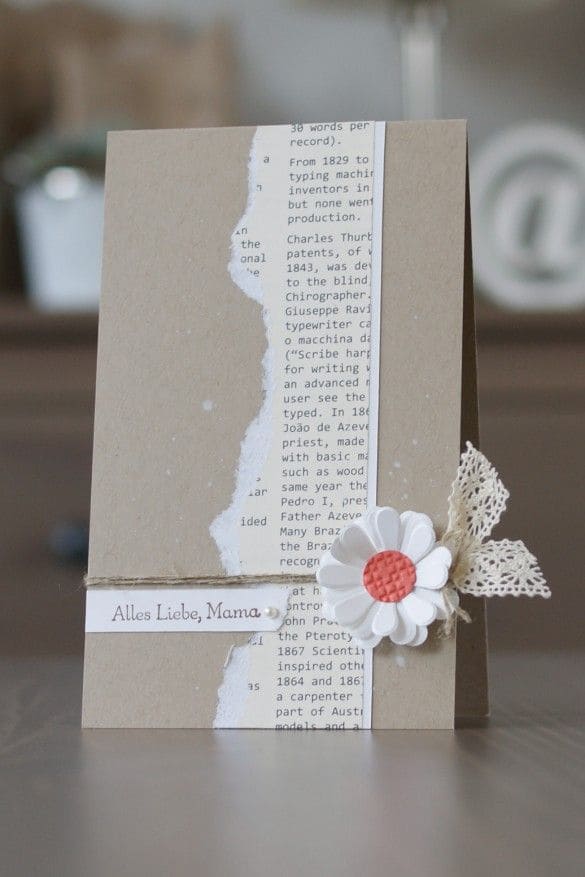
With a strip of torn book page running down the center and a muted kraft paper base, it evokes the warmth of quiet mornings, handwritten notes, and old books.
Materials Needed
- 1 Kraft cardstock (folded to 5″ x 7″)
- 1 Old book page
- 1 White daisy paper embellishment
- Mini textured button
- Lace ribbon, 6″ long
- Thin jute twine, 10″
- Pearl sticker (optional)
- White strip
Step-by-step Guide
- Tear a strip from a book page or printed text paper with soft edges, and glue it vertically along the center of the kraft card.
- Wrap twine horizontally once around the card and tie tightly at the side. Secure with glue if needed.
- Attach the lace ribbon in a bow and position the paper daisy on top using hot glue. Add a coral button or embellishment to the flower center.
- Cut a small white strip and handwrite or print “Alles Liebe, Mama.” Attach it under the twine and finish it off with a small pearl accent for elegance.
#26. Elegant Quilled Floral Birthday Card DIY
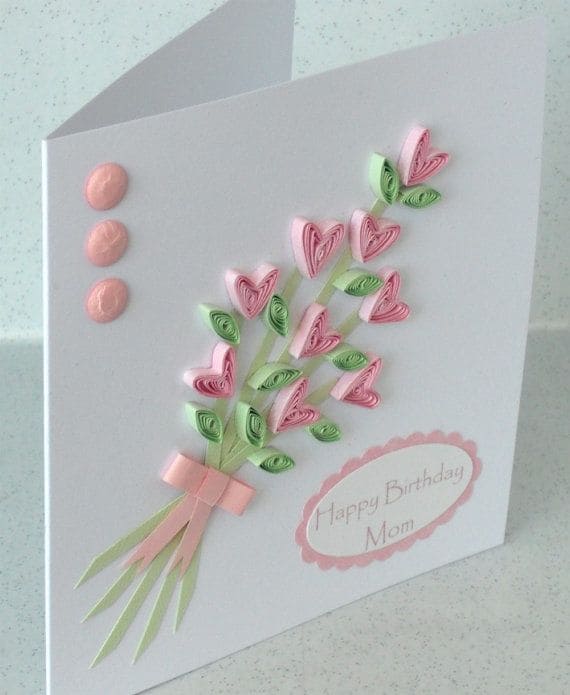
Whether you’re crafting for a loved one or exploring paper art, this quilled birthday card is a delicate masterpiece!
Materials Needed
- 1 White cardstock (folded to 5.5″ x 5.5″)
- Quilling paper strips: pink (5mm x 30cm, 14 strips), green (5mm x 30cm, 12 strips)
- Quilling tool
- Paper bow embellishment
- 3 dome stickers or cabochons
- Scalloped oval punch
- Glue pen
Step-by-step Guide
- Roll pink strips into tight coils and pinch one end to create heart shapes. Do the same with green strips to make leaf shapes, pinching one end.
- Arrange and glue the hearts and leaves into a floral bouquet shape, letting some overlap gently. Tuck a few stems downward using thin strips for stalks.
- Add a small pastel bow where the stems meet and glue down neatly.
- Use your punch to create a scalloped label. Add the “Happy Birthday Mom” text and glue it to the lower right of the card.
- Finally, embellish the top left with three evenly spaced dome stickers to add dimension.
#27. Colorful Paper Candle Birthday Card DIY
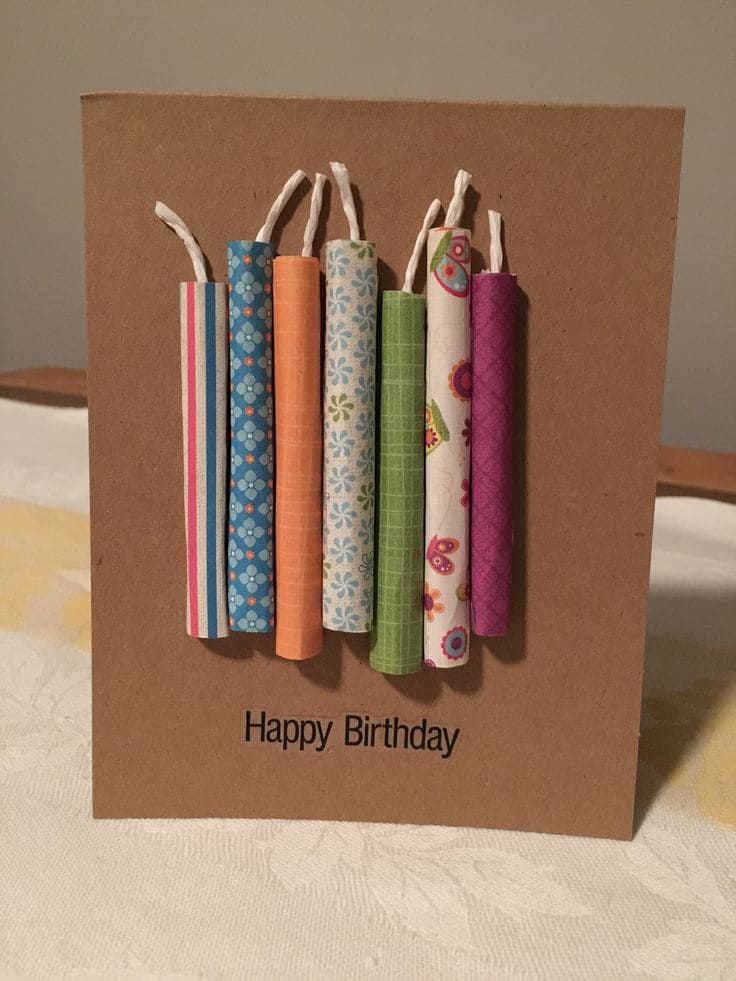
I love how each rolled candle has its own flair, like a tiny party in itself. It feels youthful, quirky, and handmade with joy.
Materials Needed
- 1 Kraft cardstock (folded to 5.5″ x 5.5″)
- 7 different patterned paper scraps (1.25″ x 3.5″)
- White cotton string or baker’s twine for “wicks” (7 pieces, each 2″)
- Double-sided tape
- “Happy Birthday” printed or stamped
- Bone folder (optional)
Step-by-step Guide
- Roll each 1.25″ x 3.5″ strip of patterned paper into a tight cylinder and secure the edge with a strip of double-sided tape or a dot of glue.
- Tuck a 2″ piece of white string into the top of each roll to mimic a wick, then glue it inside securely.
- Line up your candles near the top center of the folded kraft card and glue each one down evenly. Use double-sided tape for a flatter look.
- Add “Happy Birthday” underneath the candles – you can handwrite it, or use pre-cut sticker letters.
#28. Cheerful Smiley Face Birthday Card DIY
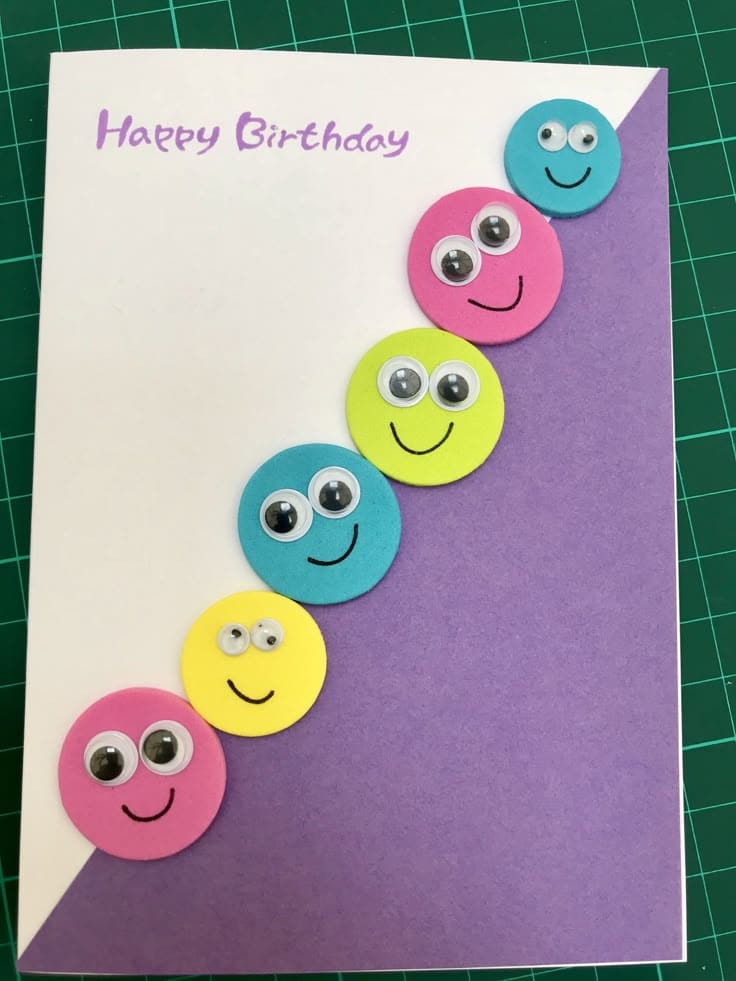
This birthday card is an explosion of cheer! With bright colors, smiley faces, and wiggly googly eyes, it feels like a parade of happiness marching right across the card.
Materials Needed
- 1 White cardstock (folded to 5.5″ x 8.5″)
- Purple construction paper (cut diagonally to cover half of the card front)
- 3 foam sheets in assorted colors
- 12 googly eyes
- Glue stick
- Black permanent marker
- “Happy Birthday” stamp or purple marker
Step-by-step Guide
- Start by gluing a triangle of purple construction paper to cover the bottom-right half of the white cardstock card base.
- Use a 1.25″ circle punch or scissors to cut six circles from colored foam sheets. Pick colors that pop like pink, blue, green, and yellow.
- Glue two googly eyes onto each foam circle, then draw a smiling mouth with a black marker.
- Arrange the faces diagonally across the card, overlapping the white and purple background. Once you’re happy with the spacing, glue each one in place.
- Write or stamp “Happy Birthday” in the top-left corner with a purple pen to tie it all together.
#29. Charming Mason Jar Flower Birthday Card
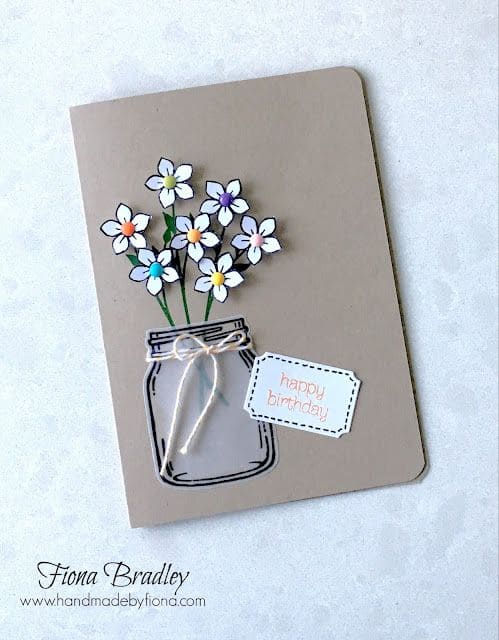
A bouquet of tiny, hand-cut flowers in a jar sketched with elegance, it feels like something you’d find in a rustic kitchen or tucked inside a thoughtful journal.
Materials Needed
- 1 Kraft cardstock (5″ x 7″ folded); 1 White cardstock
- Colored markers
- Fine-tip black pen
- Twine
- Glue stick
- Scissors
- Optional: Mini flower punch
Step-by-step Guide
- Start by folding the kraft cardstock into a 5″ x 7″ card base. Round the corners if you like that softened look.
- Draw a mason jar shape using a black pen on the lower left front of the card. Keep it light and sketchy.
- Cut small white flowers using scissors or a flower punch. Make 7–9 blossoms. Add colorful dots or mini gem stickers to the center of each.
- Draw green stems rising from the jar, fanning outward. Glue your flowers onto the ends of the stems to create a bouquet.
- Cut a small rectangle or decorative label from white paper and write or stamp “happy birthday” on it, then attach it slightly tilted over the jar with glue.
- Finish by tying a bit of twine around the jar’s neck, letting the tails dangle freely.
#30. Elegant Butterfly Envelope Birthday Card DIY
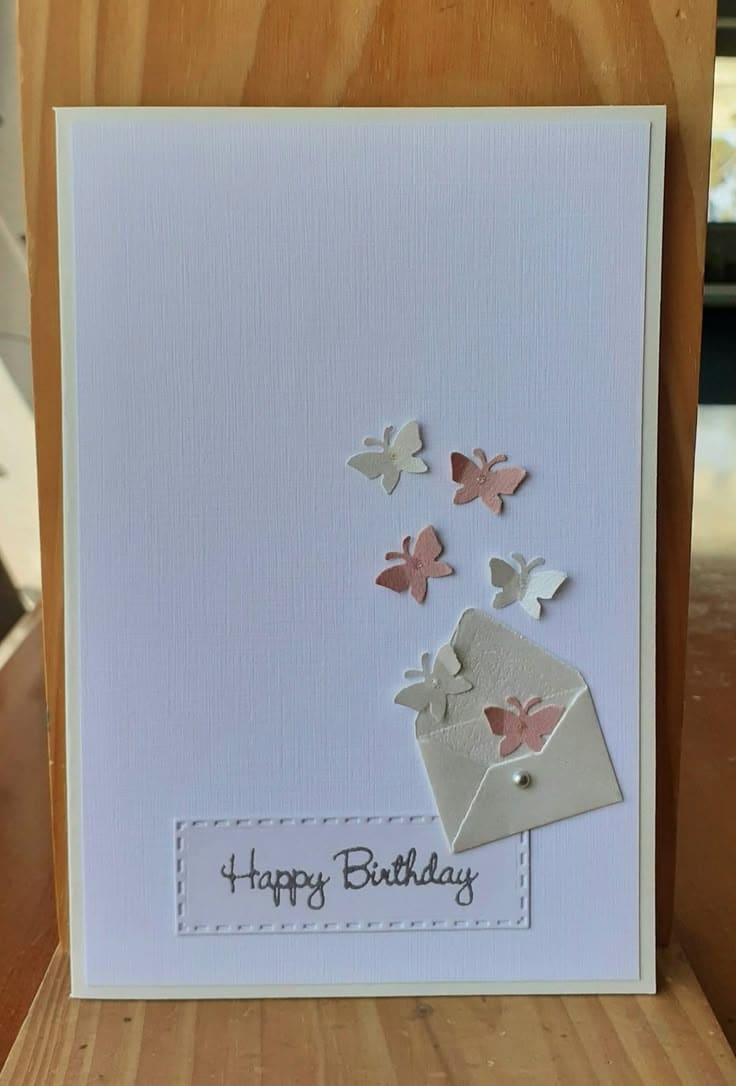
There’s a quiet beauty to this design. It’s not shouting “happy birthday,” it’s gently offering it, like a heartfelt note slipped into a pocket.
Materials Needed
- 1 White textured cardstock (5″ x 7″ folded)
- Pearlescent
- Mini butterfly paper punch
- Mini brads
- Fine-tip glue pen
- “Happy Birthday” stamp and ink pad or handwritten
- Foam mounting tape
Step-by-step Guide
- Start by folding the white textured cardstock in half to form a sturdy 5″ x 7″ card.
- Cut a small envelope shape (approximately 1.5″ x 1.5″) from shimmer paper and lightly fold it to mimic an open flap. Secure it to the lower right quadrant of the card with foam tape for dimension.
- Punch out 6–8 butterflies from soft-tone shimmer or pastel cardstock. Let the colors complement each other.
- Glue a few butterflies just peeking from the envelope and let the rest appear to “fly out” in a curved pattern.
- Attach a small pearl or mini brad as the clasp on the envelope for elegance.
- Finish by stamping or handwriting “Happy Birthday” below the design or on a small stitched-edge label cutout.
#31. Rustic Money Gift Birthday Card DIY
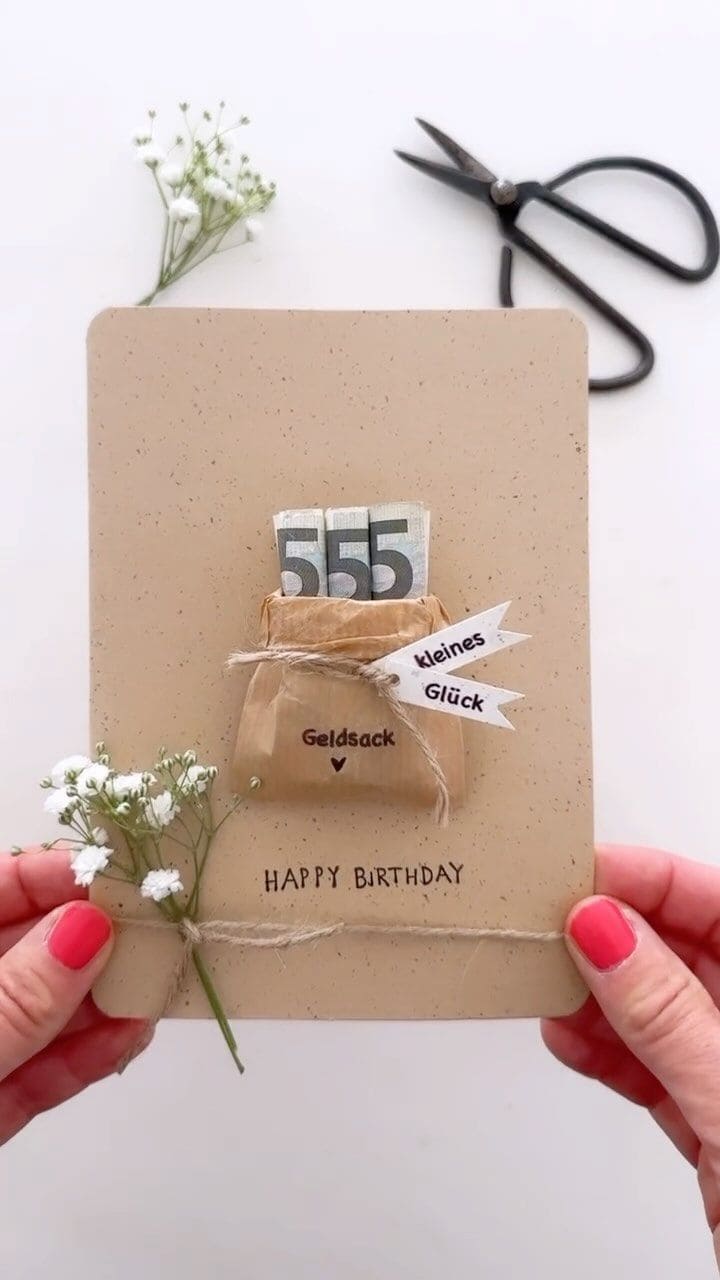
On birthdays, a little extra cash is always a welcome surprise! This charming DIY card features a tiny paper money sack, tied with twine and decorated with handwritten details.
Materials Needed
- 1 Kraft cardstock, A5 size folded
- 1 Small brown paper
- Twine
- Printed or handwritten flags with words
- Double-sided tape
- Fresh or artificial baby’s breath flower
- Black fine-tip pen
- Optional: Folded banknotes
Step-by-step Guide
- Begin by folding your kraft cardstock into a vertical greeting card. If needed, gently round the corners for a soft, finished look.
- Cut a small brown rectangle for the money sack. Fold the top edge down, and crease the sides inward to make it puff out slightly like a sack.
- Use double-sided tape to secure the base of the sack to the center of the card. Slip folded banknotes inside so they peek out.
- Tie twine around the middle of the sack like you’re cinching it, and tuck in the two tiny banner flags before securing the knot.
- Wrap another piece of twine around the base of the card and tuck a sprig of baby’s breath under the knot to create a natural, rustic vibe.
- Below the sack, write or stamp “HAPPY BIRTHDAY” in a clean, minimal style.
#32. Elegant Floral Lace Birthday Card DIY
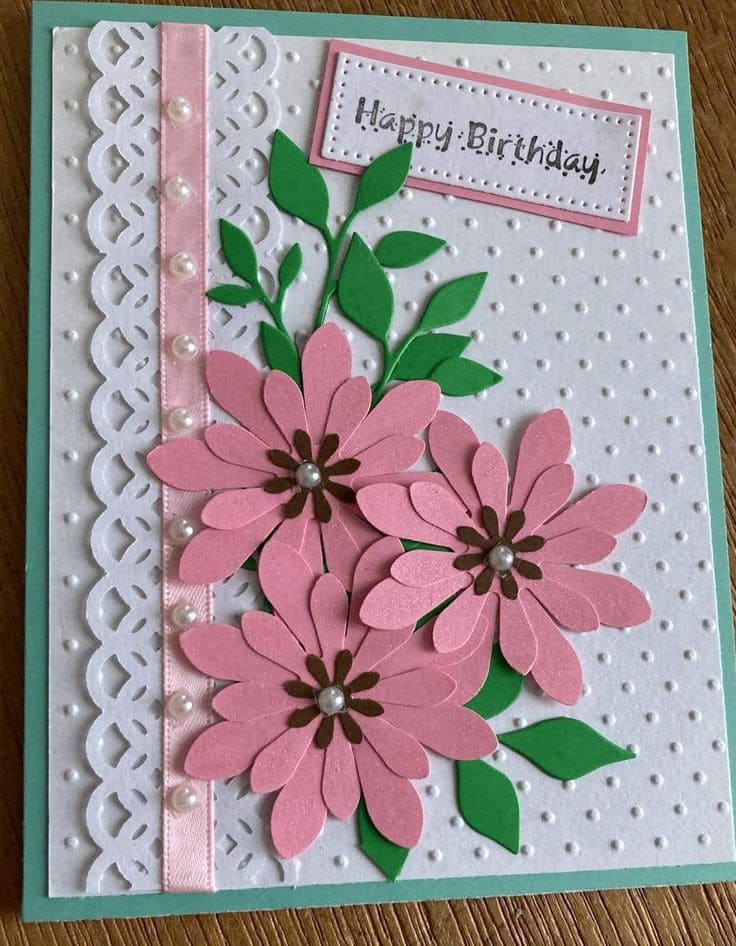
It feels like something you’d give to someone very special, like a best friend or beloved family member and every little detail whispers “I care.”
Materials Needed
- 1 Mint green cardstock (5×7 inch folded)
- 1 White embossed dot paper (4.5×6.5 inches)
- 1 Pink paper; 1 Green cardstock; 1 Brown cardstock
- 12 Flatback pearls
- Pink satin ribbon (1/4 inch)
- Lace paper border
- Foam adhesive dots
- Glue stick
- Printed or stamped “Happy Birthday” greeting
Step-by-step Guide
- Adhere the white embossed paper to the mint green base using double-sided tape or glue, leaving a thin border.
- On the left side, layer the lace border vertically and glue a pink ribbon directly down its center. Add pearls evenly spaced over the ribbon.
- Cut 3 large and 2 small flowers from pink paper using a flower punch or template. Add brown cardstock centers and finish each with a pearl in the middle.
- Die cut or hand-cut leafy stems from green cardstock and arrange behind the flowers. Attach flowers using foam adhesive for a 3D effect.
- Print, stamp, or handwrite “Happy Birthday” on a white stitched-edge tag. Mount it on pink cardstock, then attach it at an angle in the upper right corner.
