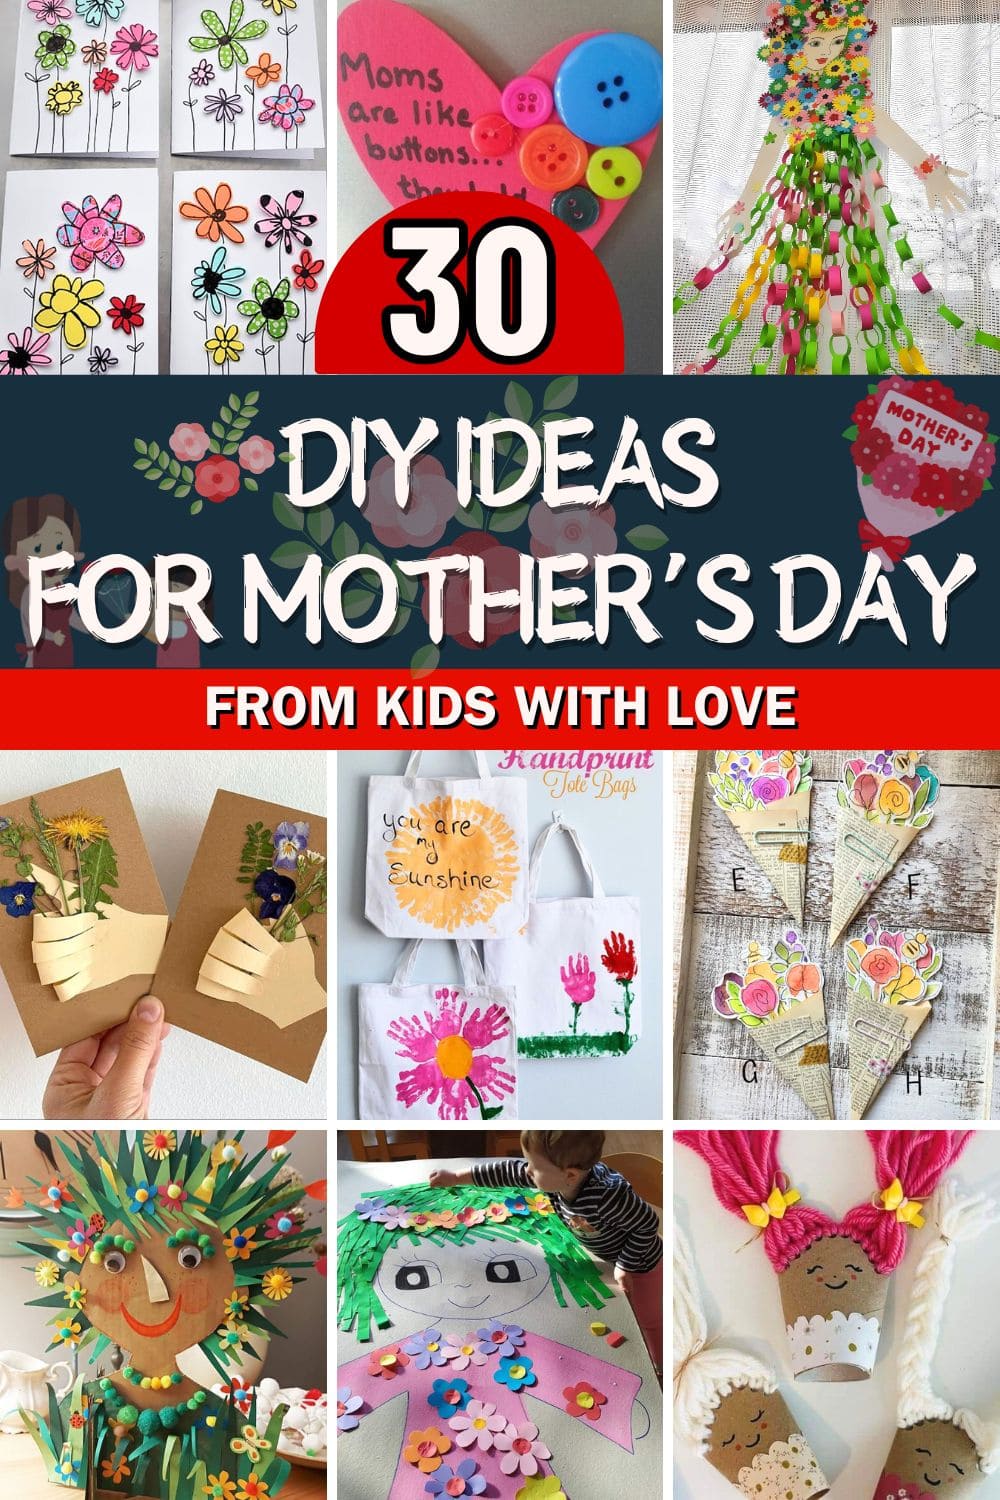
Have you ever wondered what would make Mom smile the most on Mother’s Day? It’s not about fancy gifts, it’s the love, effort, and creativity behind them!
Handmade presents from little hands hold a special kind of magic, turning simple materials into heartfelt treasures. Whether it’s a colorful card, a keepsake filled with love, or a fun craft that captures precious memories, DIY gifts are the perfect way for kids to express their appreciation.
This list is packed with adorable, easy, and thoughtful gift ideas that children of all ages can make with joy. Let’s dive into these charming DIY projects and create something unforgettable for Mom!
This article contains affiliate links. If you purchase through them, I may earn a small commission at no extra cost to you. Thank you for your support!
#1. Charming 3D Handcrafted Flower Cards for Mom

This delightful DIY Mother’s Day craft lets kids create a heartfelt card featuring a pop-up hand holding real pressed flowers. The clever 3D design gives the illusion of a little hand offering fresh-picked blooms.
Materials Needed
- Kraft cardstock (cut to 5 x 7 inches or A6 size: 4.1 x 5.8 inches)
- Cream or beige construction paper (at least 5 x 6 inches per hand)
- Pressed flowers or ferns (3–5 small pieces per card)
- Pencil
- Craft knife or precision scissors
- Regular scissors
- Glue stick or tacky glue
- Ruler
Step-by-Step Guide
- Prepare the card base by cutting kraft cardstock into a 5 x 7 inch rectangle or A6 size if you prefer smaller cards. Fold if you’re creating a greeting card or leave flat for a decorative piece.
- Trace your hand or use a template on the cream paper. Then, using a craft knife, slice 3–4 slightly curved lines across the fingers (not all the way through), about 1 inch long, to allow bending.
- Select 3 to 5 pressed flowers or leaves, and arrange them so the stems rest where the palm will go. Trim the stems to around 2–3 inches so they don’t overwhelm the design.
- Glue the stems down onto the card base. Add the hand cutout on top, applying glue to the wrist and palm area only, leave the fingers free to bend upward.
#2. Adorable Handprint Flower Tote Bags for Mom
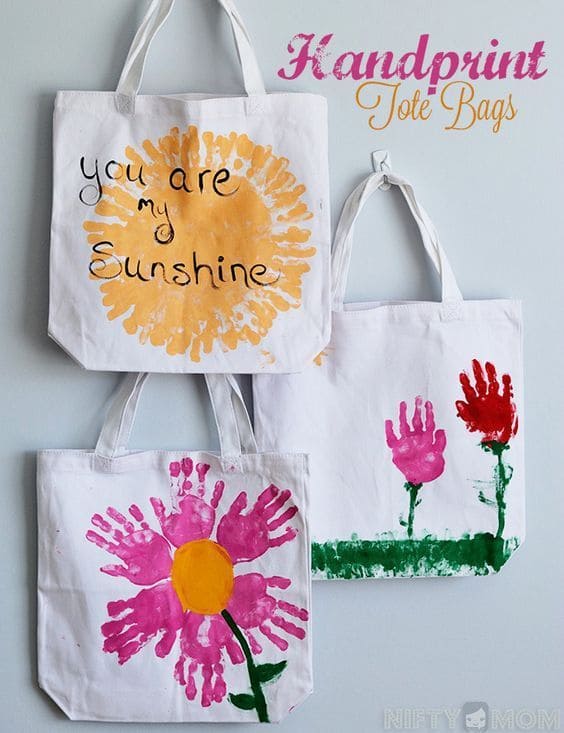
If you’re looking for a heartfelt and practical Mother’s Day gift, these DIY handprint tote bags are a perfect choice! Kids can use paint to transform their tiny hands into vibrant flowers.
Materials Needed
- 3 plain white canvas tote bags (13″ x 15″ or standard size)
- Fabric paint in assorted colors (yellow, pink, green, red, etc.)
- Small paintbrushes or sponges
- Paper plates
- Black permanent fabric marker
- Protective surface or cardboard insert
- Wet wipes or a wash bowl
Step-by-Step Guide
- Prep your workspace by laying down newspaper or a plastic tablecloth. Insert a piece of cardboard inside each tote bag so the paint doesn’t bleed through.
- Pour your paints onto paper plates. Start with lighter shades like yellow or pink if you’re layering handprints.
- Paint your child’s hand with fabric paint using a sponge or brush. Press it firmly onto the tote. For sun rays, place the palm in the center and rotate around it. For flowers, make multiple prints in a circular pattern.
- Once the handprints are dry (usually 30–60 minutes), use a brush to paint flower stems and centers or add a simple border. Use a black fabric marker to write messages like “You are my sunshine” once fully dry.
#3. Blooming Love Card By Little Hands
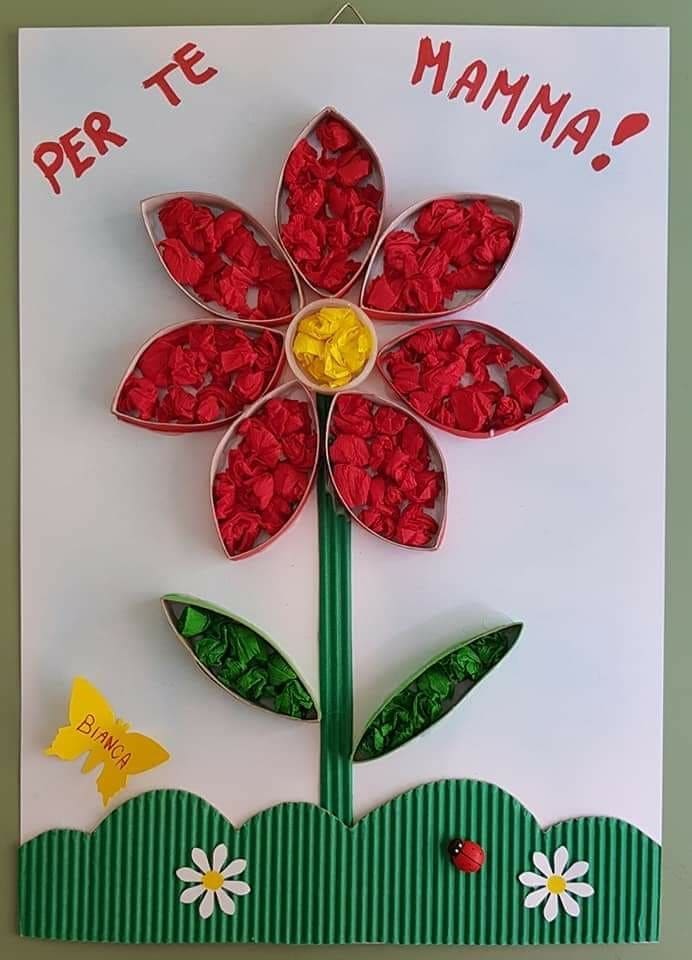
By rolling, gluing, and shaping, kids can create this stunning 3D flower card bursting with color!
Materials Needed
- 1 large white cardstock or cardboard (A3 size works well)
- 3 empty toilet paper rolls
- Red, yellow, and green tissue paper
- Green corrugated paper for grass (approx. 30 x 8 cm strip)
- Craft glue, scissors, pencil
- Butterfly or flower stickers (optional)
Step-by-Step Guide
- Cut the rolls into 2 cm slices. You’ll need 7 slices for petals and 2 for leaves. Gently pinch one end to shape them like petals.
- Glue the petals in a flower shape on the upper half of your board. Add one ring in the center and two below for the leaves.
- Crumple tissue paper into small balls and glue them inside each petal: red for petals, yellow for the center, and green for the leaves.
- Add the stem and grass using a strip of corrugated paper. Then glue your extras like flowers or a name tag to personalize it.
#4. Blooming Paper Portrait Surprise
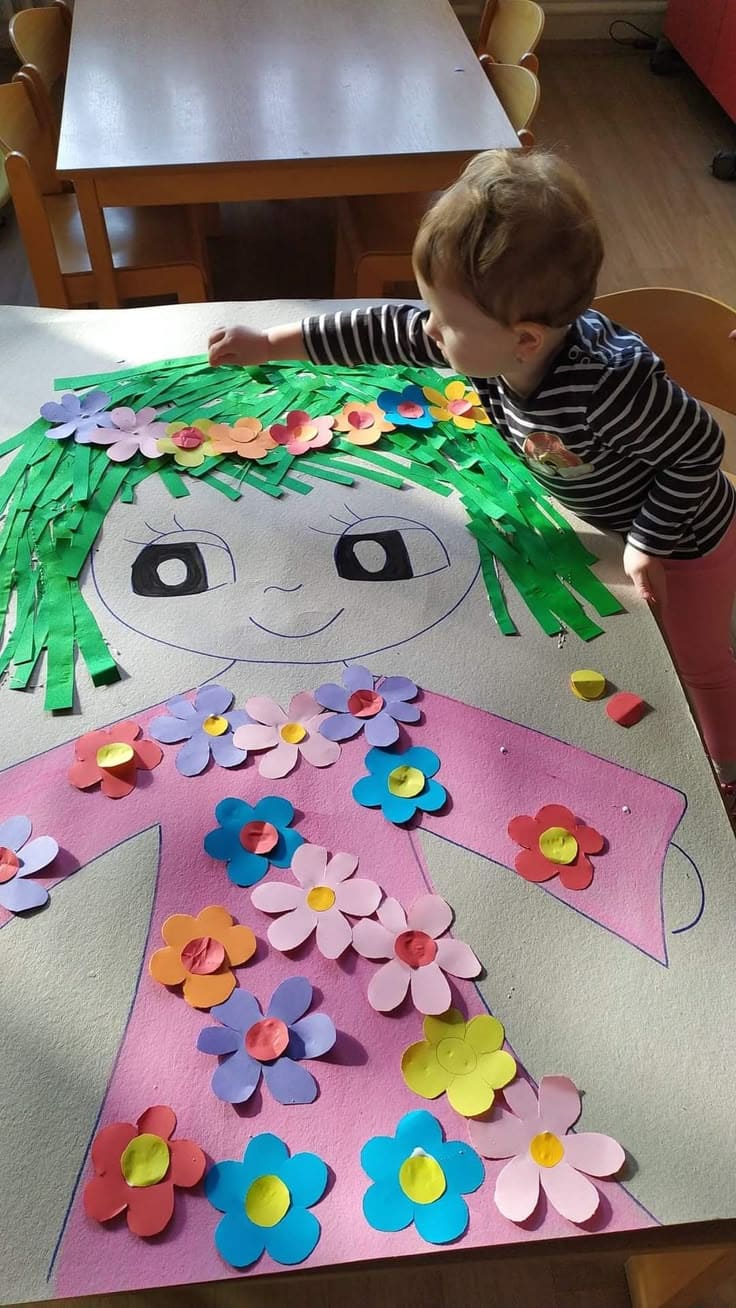
If you’re looking for a heartfelt Mother’s Day gift, this oversized paper portrait is bursting with charm! With vibrant paper flowers, playful green hair, and a sweet hand-drawn face, kids can craft a masterpiece full of love.
Materials Needed
- Large sheet of poster board (at least A1 or 60×85 cm)
- Colored construction paper (at least 10 sheets in assorted colors)
- Green paper strips (around 40–50 pieces for hair, 1×10 cm)
- Glue sticks or white glue
- Black marker or crayon
- Circle punch or scissors
Step-by-Step Guide
- Draw a simple outline of a girl with big eyes and a dress on the poster board using a black marker.
- Cut out flower shapes in different colors. Each flower has 5–6 petals and a small colored circle center (around 2–3 cm diameter).
- Cut green strips for the hair and glue them on top of the head.
- Let the kids decorate the dress and hair with the colorful flowers, arranging them freely or in rows.
#5. Blooming Garden Fairy With Long-Hair Mom
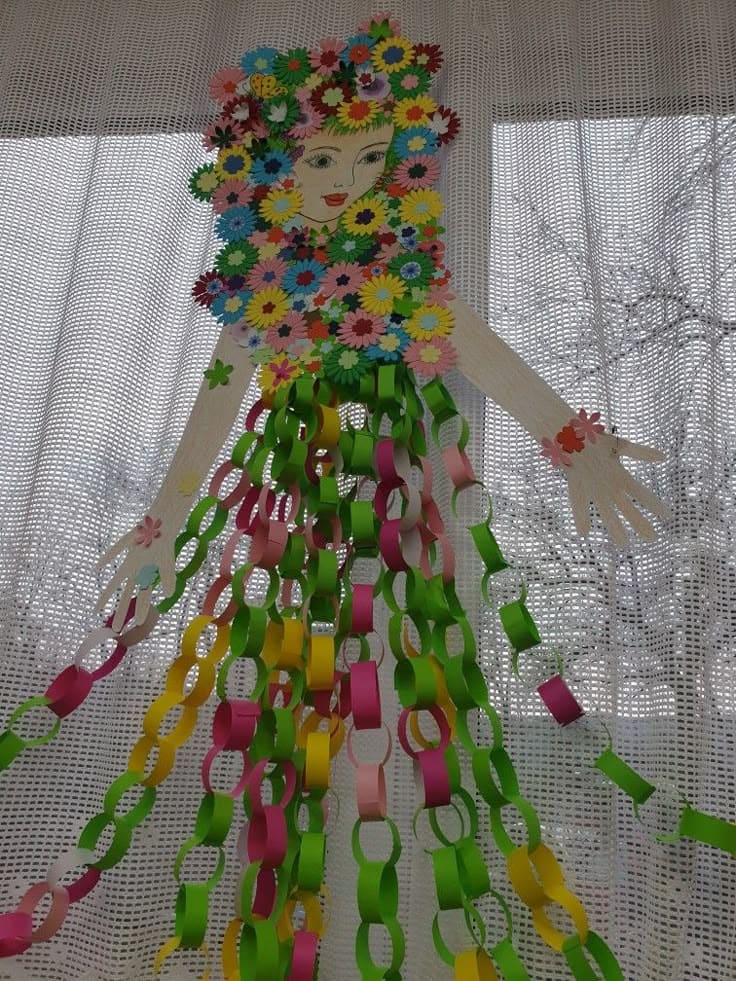
Inspired by nature’s beauty, this DIY Mother’s Day gift is a magical blend of creativity and charm! A hand-drawn figure, covered in colorful paper flowers, comes to life with cascading paper chain vines forming a flowing dress.
Materials Needed
- Construction paper in spring colors (pink, yellow, green, etc.) – at least 10 sheets (9×12 in)
- Glue stick or school glue
- Safety scissors
- Double-sided tape or a stapler
- Large cardstock or poster board
- Paper flower embellishments or a flower punch
Step-by-Step Guide
- Draw a body shape (about 20–24 inches tall) onto your poster board. Keep it simple — arms out, head up.
- For the hair and dress, use paper flowers and chains. Cut 1″x6″ strips from colorful construction paper, and loop each into rings using double-sided tape. Link them as long as you want (ours were 15–18 links per strand).
- Glue or tape the chains at the shoulder area to form the skirt. Use paper flowers for the crown, top, sleeves, and accessories, add as many as you like.
- Draw her facial features or let kids color them in. For a textured finish, curl some strips slightly for a 3D hairstyle.
#6. Timeless Floral Handprint Frame
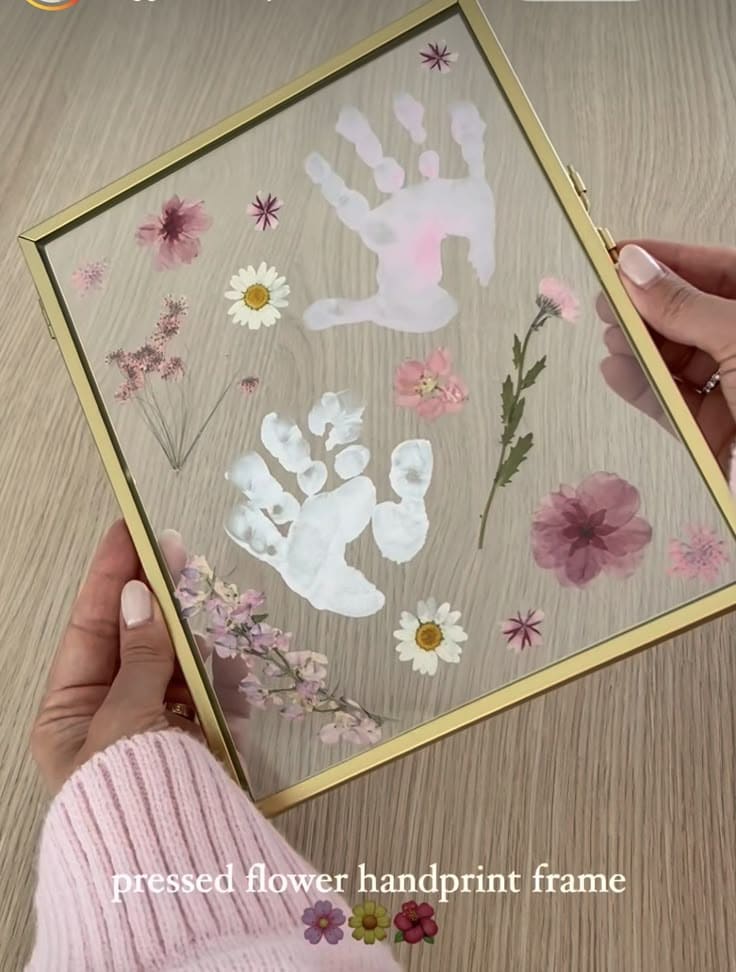
I made this pressed flower handprint frame using my child’s handprint, paired with soft florals from our garden, and I smile every time I walk past it.
Materials Needed
- Floating glass frame (8×10 inches) or any double-glass frame
- Pressed flowers or petals you’ve dried yourself
- Non-toxic acrylic paint
- Paintbrush or sponge brush
- Clear glue dots or tweezers for flower placement
Step-by-Step Guide
- Open your glass frame and remove any protective film.
- Apply a light coat of acrylic paint to the hand and firmly press it onto the inside of the glass. Let dry completely — usually around 30 minutes.
- Arrange your pressed flowers gently around the handprint. I used wild daisies and bits of baby’s breath from last spring, along with a few blush petals.
- Use glue dots or a tiny dab of clear-drying glue to attach each bloom onto the opposite glass panel.
- Carefully close the frame and clean the outer glass with a microfiber cloth.
#7. Whimsical Paper Cone Bouquets with Watercolor Blooms
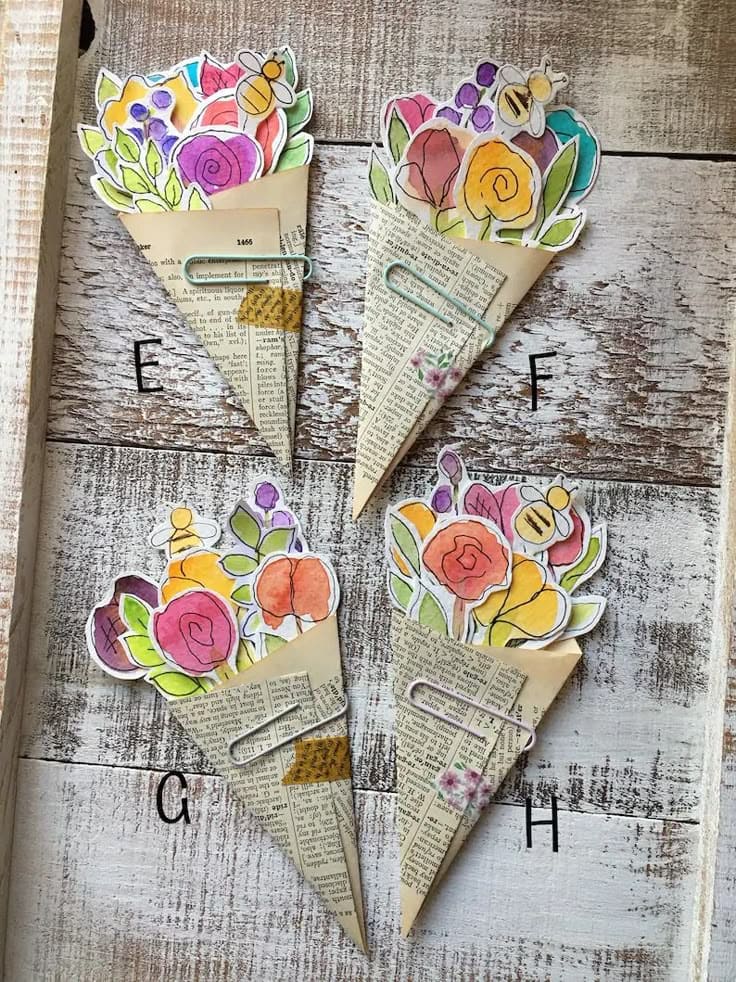
How about a charming floral surprise for Mom? These little vintage-style paper flower cones were the sweetest bookmarks I’ve ever made.
Materials Needed
- 4 Old book pages or vintage-style scrapbook paper
- Watercolor paper
- Watercolor paints and a small brush
- Paper clips or mini clothespins
- Glue stick or double-sided tape
- Washi tape (optional for decoration)
- Scissors or craft knife
Step-by-Step Guide
- Cut a triangle (approx. 4×5 inches) from your book page and fold it into a cone shape, securing the flap with a bit of washi tape or glue.
- Paint a bunch of loose watercolor flowers on watercolor paper, I used roses, poppies, and leafy greens. Once dry, cut them out individually.
- Tuck the florals into your cone and glue them in place. I layered mine for a fuller look and added bees for whimsy.
- Clip everything together with a pastel paper clip or clothespin.
#8. Adorable Yarn-Haired Doll Cups for Mom
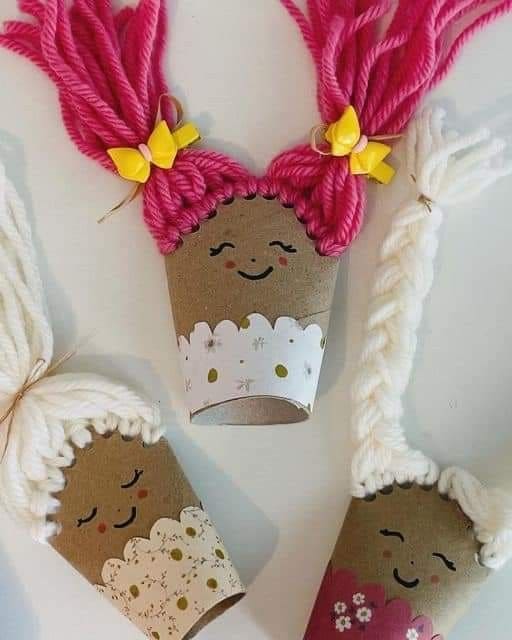
These sweet yarn-haired paper roll dolls were such a cheerful little craft for my weekend. They’re perfect for kids, party favors, or just decorating your craft room shelf.
Materials Needed
- 3 empty toilet paper rolls (approx. 10 cm tall x 4 cm wide)
- Skein of worsted-weight yarn (like this one, 100g)
- 3 strips of fabric or doily lace, each around 4 cm x 18 cm
- Black acrylic paint pen or fine permanent marker
- Bottle of craft glue
- 6 mini ribbon bows or pre-made bows, about 2 cm wide
- Scissors
Step-by-Step Guide
- Cut each roll in half (about 2.5–3 inches tall). Paint or draw on a simple smiling face using a fine-tip pen or acrylic marker.
- Glue a strip of lace, fabric, or a scalloped paper doily to the bottom half to make a dress.
- For the hair, cut 12–14 strands of yarn, each about 10 inches long. Tie them at the middle and glue them to the top of the roll. Braid, twist, or style into pigtails and secure with mini bows.
- Add blush, freckles, or extra embellishments if you’d like.
#9. Charming Egg Carton Flower Wall Art
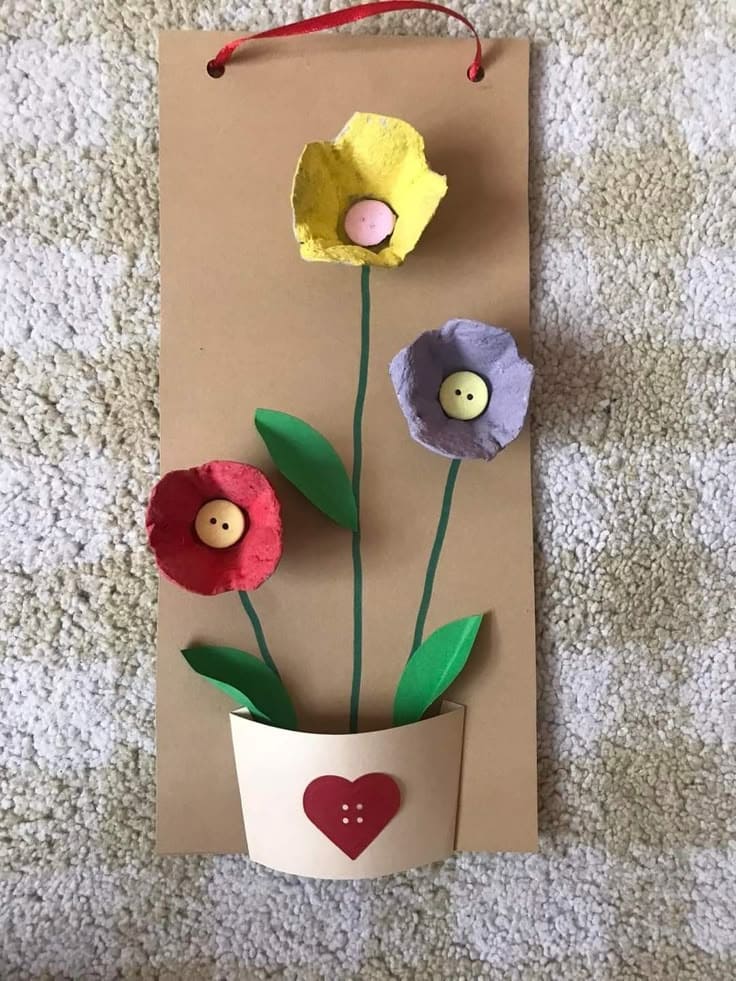
Just a few recycled egg cartons, bright paints, and cute buttons can transform into a heartwarming Mother’s Day gift!
Materials Needed
- 1 egg carton, cut into 3 flower-shaped cups (each about 4–5 cm wide)
- 1 sheet of kraft or cardboard paper, approx. 15 cm x 30 cm
- 3 buttons (about 1.5 cm in diameter)
- 1 red ribbon (25 cm long)
- 1 glue stick or craft glue
- Scraps of green cardstock for leaves (2 per flower)
- 1 paper pot shape, 7 cm wide x 5 cm tall
- Paint and brush set (this set works great)
Step-by-Step Guide
- Paint the egg carton cups in any colors you like. Let dry fully then glue a button inside each to become the flower center.
- On the kraft sheet, draw 3 stems (about 15–20 cm tall) using green marker or paint.
- Cut 6 leaves from green paper (each around 4 cm long) and glue along the stems. Next glue the painted flowers at the top of each stem.
- Attach your paper pot at the bottom and add a heart sticker or cutout for a sweet touch.
- Punch two holes at the top, thread ribbon through, and tie a knot for hanging.
#10. Adorable Handprint Hatching Chicks

My daughter giggled the whole time while making her, she kept calling it “Peekaboo Chickie!”
Materials Needed
- White cardstock (A4 size, cut in half for 2 chicks)
- Yellow washable paint – around 1 tablespoon per child
- Colored construction paper for the eggshells (approx. 10 x 12 cm pieces)
- Black marker (fine tip for eyes)
- Orange marker
- Safety scissors
- Glue stick
Step-by-Step Guide
- Paint your child’s palm with yellow paint and press it firmly onto white cardstock. Let dry for at least 10 minutes.
- Draw two eyes and a small orange triangle beak once the paint dries.
- Cut a half egg shape with zigzag top from colored paper and glue it at the base of the handprint to look like the chick is popping out.
#11. Whimsical Butterfly Message Scrolls for Mom

I believe heartfelt words make the best gifts! These colorful butterfly message scrolls are a magical way for kids to express love on Mother’s Day.
Materials Needed
- 12 Colored cardstock (A4 size)
- Glitter foam sheets for the top wings (6–8 pieces, 9×12 inches)
- Colorful curling ribbon (about 1 meter per scroll)
- Mini scroll notes (use A5 or cut A4 paper in half)
- Double-sided tape or glue dots
Step-by-Step Guide
- Use a butterfly template or freehand two shapes – one slightly larger in cardstock and a smaller glitter version to layer on top.
- Roll your note into a mini scroll and secure it with ribbon. Curl the ends for a playful touch.
- Glue or tape the wings together at the center. Attach the scroll with a bow in the middle so it looks like the butterfly’s body.
#12. Heartfelt Pebble Family Mothers Day Art
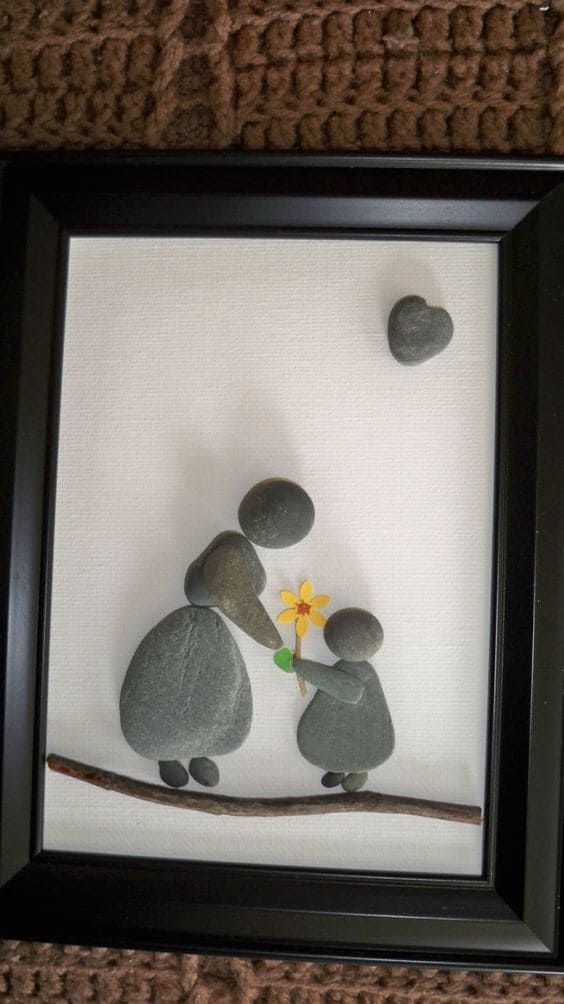
This heartwarming pebble art creation is a beautiful and simple DIY project for kids to make for Mother’s Day. Using smooth stones, kids can craft a touching scene of a mother and child.
Materials Needed
- 1 shadow box frame (8×10 inches works great)
- 6–8 small flat river stones (about 1–2 inches wide)
- 1 small driftwood stick or branch (6–8 inches long)
- Tiny faux flower embellishments
- Hot glue gun + glue sticks
- Thick white cardstock or canvas sheet (cut to frame size)
- Pencil
Step-by-Step Guide
- Place your stones on the cardstock and play around with the layout until the figures (parent and child) feel right. Use rounded stones for heads and flatter ones for bodies, layering small pebbles for feet or arms if desired.
- Once you’re happy with the positioning, glue each piece down with your hot glue gun. Add the driftwood at the bottom to act as a grounding line or “floor.”
- Glue a small faux flower into the child’s hand to add charm and sentiment. You can even glue a tiny heart-shaped stone in the corner like I did for a more heartfelt feel.
- Finish by placing the entire design into your frame.
#13. Precious Footprint Butterfly Mothers Day Planter
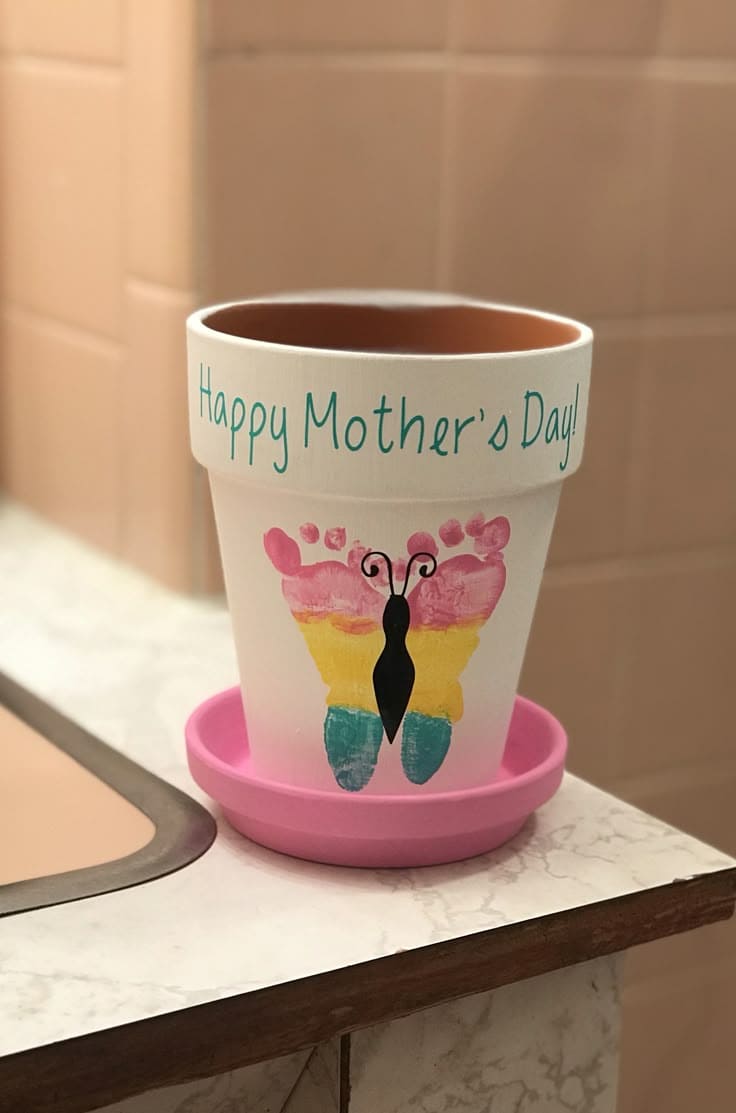
Using their own footprints, kids can create a unique and personalized gift that mom will cherish.
Materials Needed
- 1 terra cotta flower pot (6–8 inches)
- 1 acrylic paint set
- 1 foam paintbrush set
- 1 black paint pen
- Paper towels or wipes for cleanup
- Paint palette or small paper plate
Step-by-Step Guide
- Start by painting the outside of your terra cotta pot with white acrylic paint using a wide foam brush. Let it dry completely before adding any other layers (about 30 minutes).
- Next, paint your child’s feet in 3 bright shades – one color per section (heels, arches, toes). Press each foot onto the pot, heel down, so that both soles meet to form butterfly wings.
- Once the paint dries, use a black paint pen to draw the butterfly’s body between the wings. Add swirly antennae on top and write a sweet message like “Happy Mother’s Day!” around the rim.
#14. Bold and Colorful Flower Crown Portraits
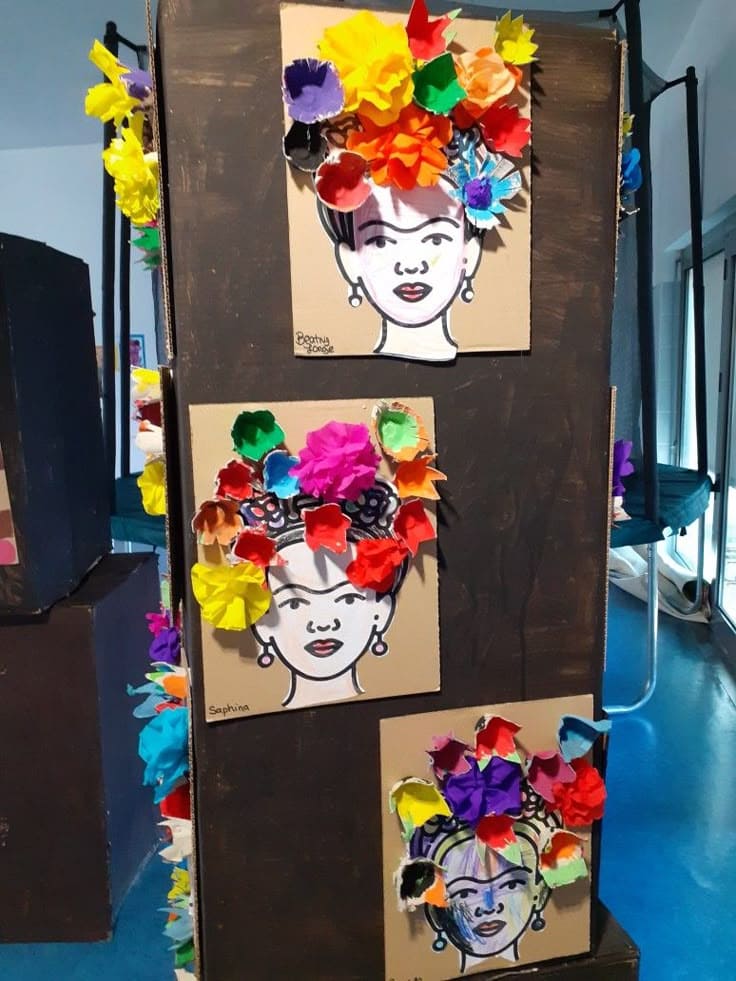
This DIY project blends creativity and love, turning a drawing into a vibrant, three-dimensional work of art.
Materials Needed
- 1 printed Frida Kahlo portrait template (approx. 8.5″ x 11″)
- 1 sheet of kraft or cardstock paper for each portrait
- Tissue paper in assorted bright colors (at least 10 sheets, 10×10 inches)
- Liquid glue or glue sticks
- Scissors
- Black marker for touch-ups or outlining (optional)
Step-by-Step Guide
- Print and glue your Frida template onto a sheet of kraft or tan-colored cardstock. This gives it a strong contrast and more of a gallery-style finish.
- Cut tissue paper into 3×3 inch squares. Crumple each square gently to create dimension — you’ll need 10 to 15 per portrait for a full crown look.
- Apply glue above the forehead area and press each crumpled piece into place, layering them closely for a vibrant, textured crown.
- Let dry flat for at least 30 minutes. Once dry, you can mount these on black poster boards or hang them on doors and walls.
#15. Beaded Bracelet Mothers Day Gifts
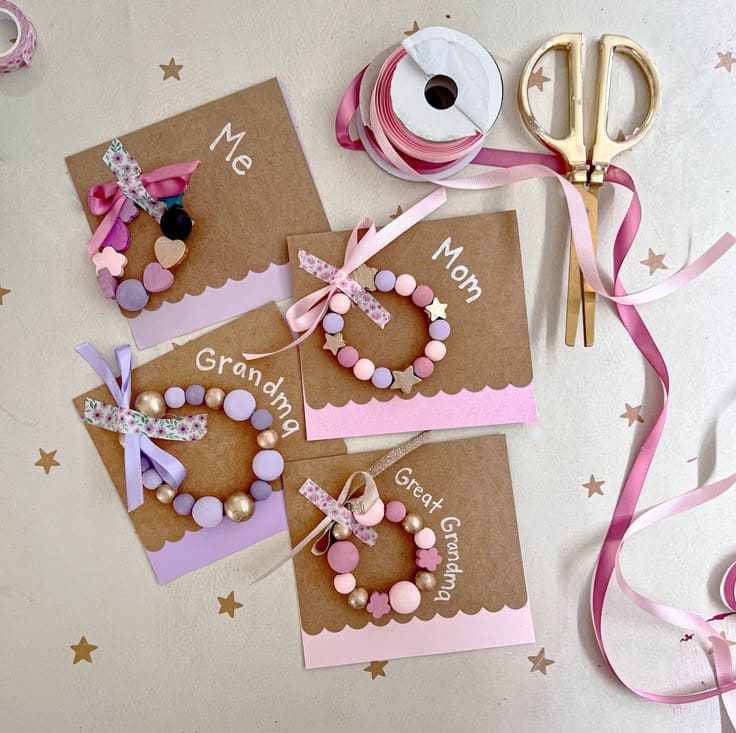
Using colorful beads, ribbon, and a touch of imagination, kids can create unique and personalized bracelets for their moms, grandmas, and even great-grandmas.
Materials Needed
- Wooden or silicone beads in pink, purple, and gold (approx. 15 per bracelet)
- Elastic cord (12 inches per bracelet)
- Kraft paper cards (4×6 inches)
- Pastel paper strips for scalloped trim (1.5″ tall)
- Ribbon set for bows (cut 6–8″ pieces)
- Mini glue dots or hot glue gun
- White gel pen or paint marker
- Scissors
Step-by-Step Guide
- String the beads onto elastic cord, mixing colors and sizes. Tie off the ends with a secure knot. Each bracelet should be 5–6 inches in finished circumference for adult wrists (4 inches for kids).
- Cut a scalloped strip of pastel paper and glue it to the bottom edge of each kraft card.
- Glue the bracelet to the center of the card using a couple of dots of glue behind the beads to hold it loosely in place. Avoid too much adhesive so the bracelet can be removed easily.
- Add a ribbon bow and write names (Mom, Grandma, Great Grandma, etc.) above or beside each bracelet using a white paint pen for that handwritten touch.
#16. Blooming Photo Flower Pots for Mom
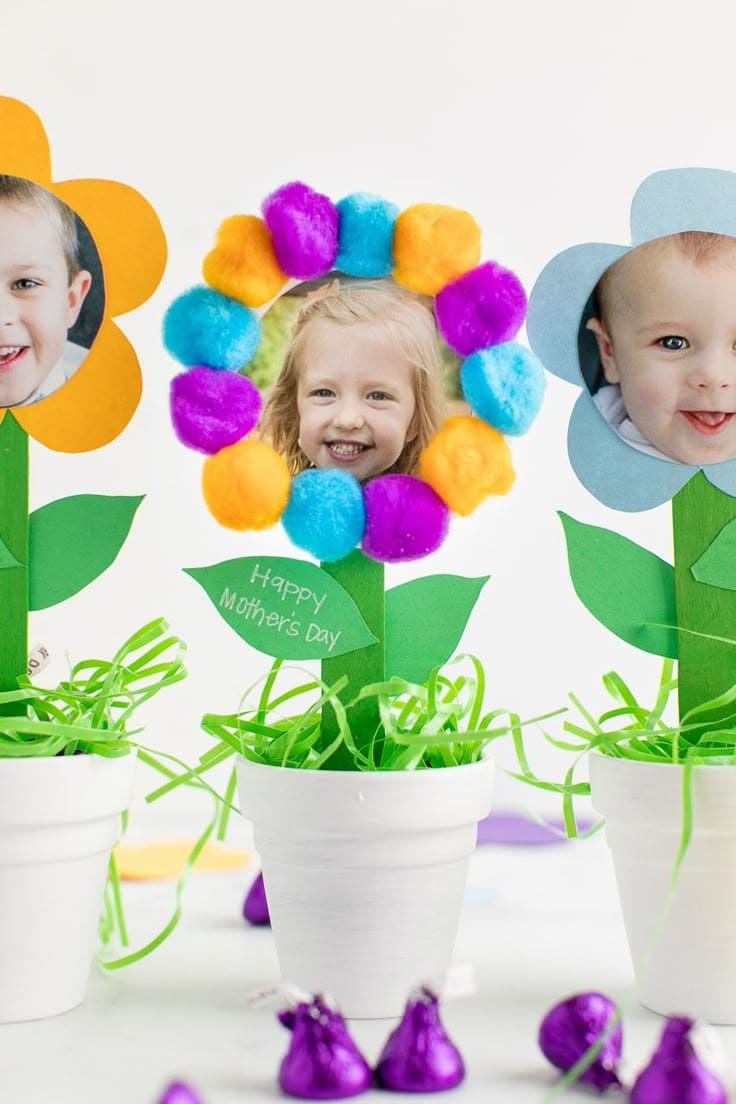
These Mother’s Day photo flower pots make the sweetest keepsakes for moms and grandmas. I made them with my nieces last spring, and they were a hit across the family.
Materials Needed
- White mini flower pots (3–4 inch)
- Green craft sticks (6-inch)
- Colorful pom-poms (1 inch)
- Cardstock paper
- Small printed photo (approx. 2.5–3 inch circle)
- Green paper grass or shredded filler
- Glue dots or hot glue gun
- Scissors, pencil
Step-by-Step Guide
- Cut out flower petals from cardstock and glue them around the edge of your child’s photo. You’ll need 6–8 petals per flower, or skip cutting and just use 8–10 pom-poms around the photo like we did here.
- Glue the finished flower to the top of a green craft stick. Add two cardstock leaves near the base. You can write a message like “Happy Mother’s Day” on one of the leaves for an extra personal touch.
- Fill the flower pot with green paper grass, poke the stick into the center, and adjust so the flower stands upright.
#17. Vibrant Pom-Pom Letter Art for Mom
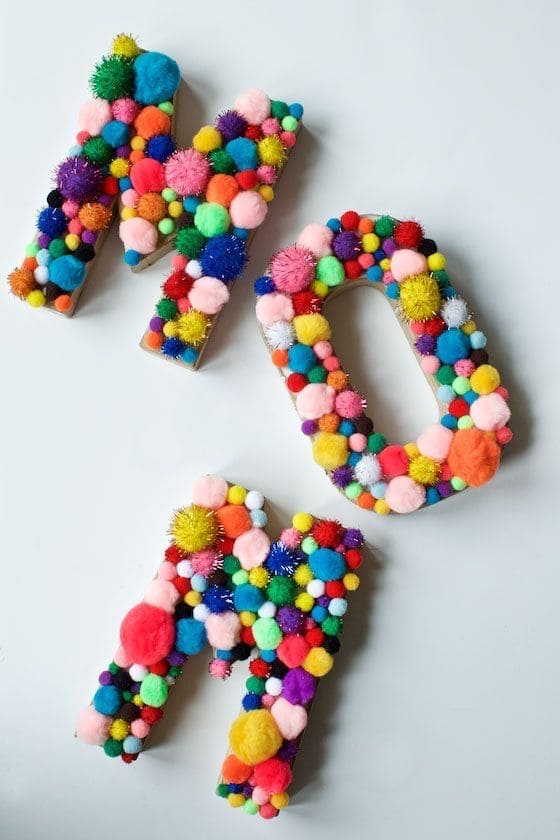
This DIY Mother’s Day craft features bold cardboard letters covered in fluffy, colorful pom-poms, creating a textured, joyful design.
Materials Needed
- Paper mache or wooden letters (M-O-M, 8–10 inch)
- Colorful pom-poms in various sizes (300+ pack)
- Hot glue gun + glue sticks
- Metallic pom-poms or glittery balls
Step-by-Step Guide
- Start by arranging your letters on a flat surface. If you’re using kraft-colored mache letters, you can leave them natural or paint them first to match your theme.
- Sort your pom-poms by size and color. Begin gluing them randomly across the surface of each letter. I like to layer smaller ones in gaps between the large ones.
- You can go with a rainbow scheme like I did or choose 2–3 specific colors to coordinate with a room or gift theme. Add some sparkly or metallic pom-poms here and there to catch the light.
#18. Colorful Handprint Bouquet
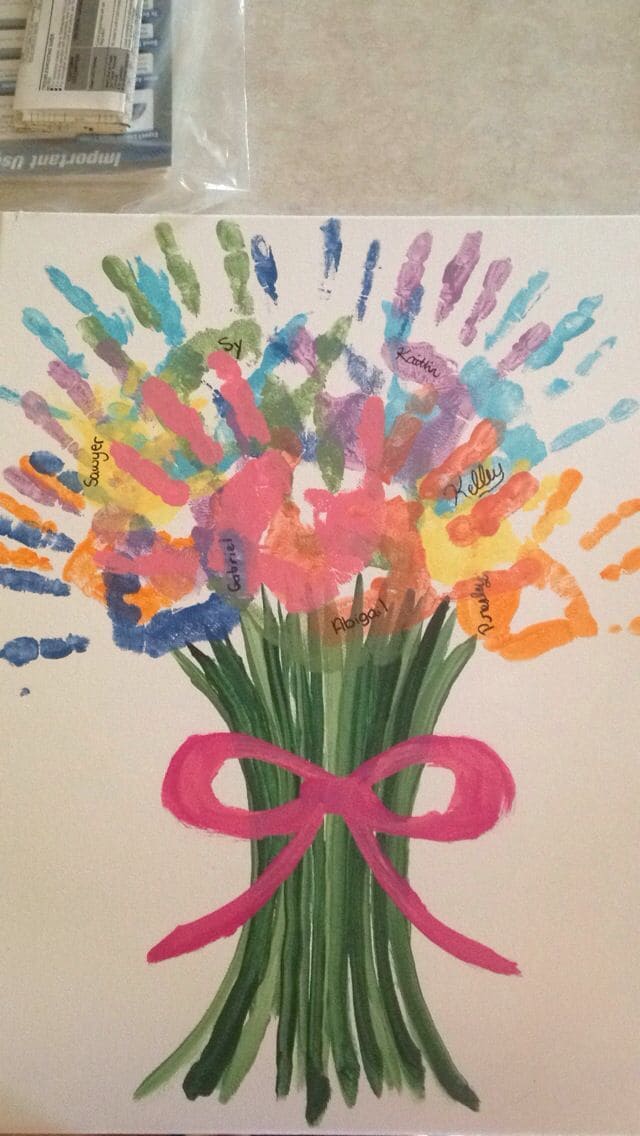
I made one with my nieces and nephews last spring, and my sister framed it right away!
Materials Needed
- Large canvas or thick cardstock (12×16 inches or larger)
- Washable acrylic paint set (at least 6 bright colors)
- Medium paintbrushes
- Black fine-tip permanent marker
- Apron or smock for kids
- Water, towels, and a washable work surface
Step-by-Step Guide
- Start by painting the bouquet’s stems with green acrylic paint at the bottom center of the canvas — wide at the top, tapering down to the base. Add a ribbon bow with pink paint across the stems.
- One by one, have each child dip their hand in paint and press it firmly around the top of the bouquet. Alternate colors and directions to create a full, blooming effect. You can overlap some prints for dimension.
- Once the paint dries, use the marker to label each handprint with the child’s name.
#19. DIY Mothers Day Handprint Flower Gifts
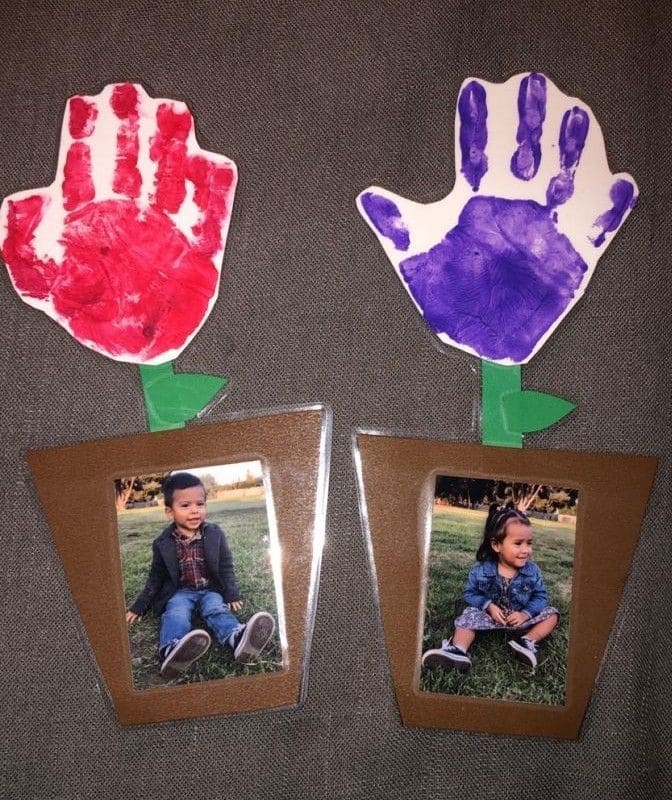
This handprint flower photo frame is one of my favorite crafts for little ones. It captures a moment in time — literally!
Materials Needed
- White cardstock or construction paper (1 sheet per child)
- Washable paint in red, purple, or favorite colors
- Foam sheets or brown cardstock for the pot
- Green construction paper for leaves
- Printed photo (2×3 or 3×4 inches)
- Glue stick or double-sided tape
- Scissors and pencil
Step-by-Step Guide
- Help the child press their hand into washable paint and stamp it onto the white paper. Let it dry completely, then cut out the handprint in a flower shape.
- Cut a small flowerpot shape from brown cardstock and glue the child’s photo in the center. Cut out two leaves from green paper and attach them to the base of the handprint.
- Glue the handprint flower behind the photo pot so it looks like the flower is growing out of it.
#20. Whimsical Garden Face Delight
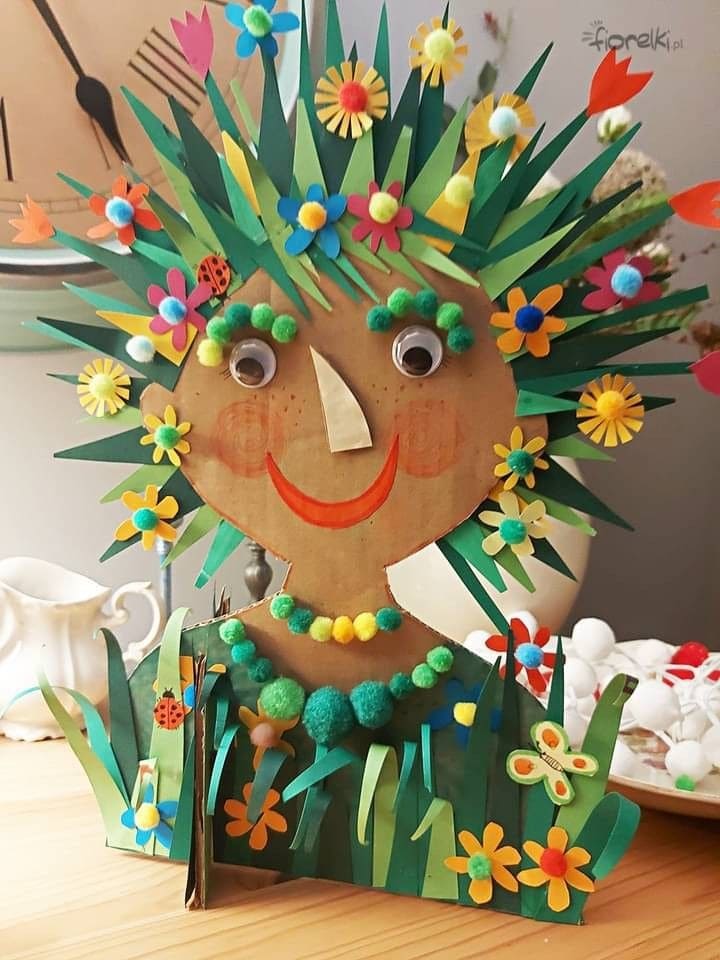
This cheerful spring grass lady centerpiece is such a fun and festive craft, perfect for classroom displays or seasonal home decor.
Materials Needed
- Thick cardboard or poster board (at least 12×12 inches)
- Green cardstock or construction paper (5 sheets)
- Colorful pom-poms (1 pack assorted sizes)
- Googly eyes
- Colored paper scraps
- Glue stick + hot glue gun
- Scissors
- Markers or crayons for drawing face details
Step-by-Step Guide
- Cut a round face shape from the cardboard and use markers to draw a big smile, nose, and blush. Glue on the googly eyes.
- Cut strips of green paper in varying lengths and glue them all around the head like spiky grass hair. Add small flowers, leaves, and tiny paper bugs to decorate.
- Make the necklace by gluing pom-poms around the neck area. You can even alternate sizes for a more natural look.
- Cut a base strip from cardboard and attach the figure upright for standing support. Add more paper grass and flowers at the base for a finished, dimensional look.
#21. Lovely Button Heart Mothers Day Craft
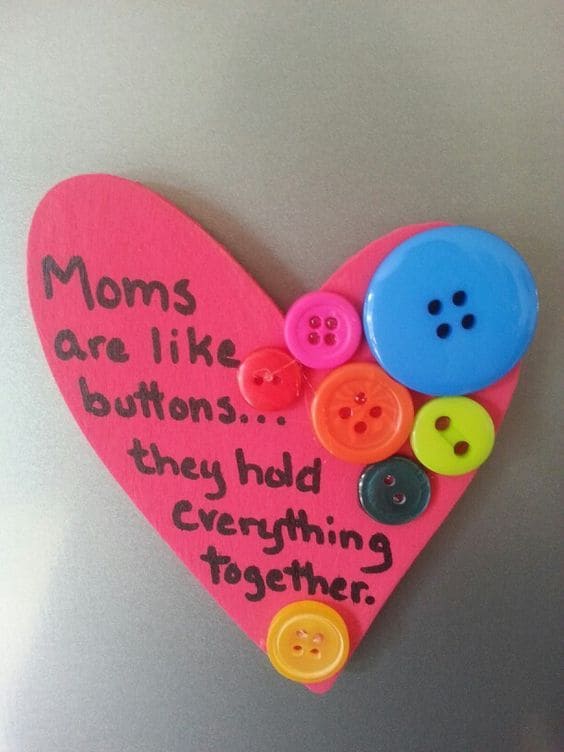
This project is simple, fast, and absolutely adorable, especially when paired with a homemade card or little treat!
Materials Needed
- Foam sheets or sturdy cardstock (1 sheet, red or pink)
- Mixed colorful buttons (10–12 per heart)
- Magnet strips or adhesive magnets (1–2 per piece)
- Permanent marker or paint pen (black)
- Hot glue gun + glue sticks
- Scissors
Step-by-Step Guide
- Cut a heart shape about 5 inches wide from your foam or cardstock.
- Write the message: “Moms are like buttons… they hold everything together.” in the center-left area with a permanent marker.
- Arrange and glue your buttons along one side or scattered on one corner for a bright, textured finish.
- Stick a small magnet to the back so it can go right on the fridge or office board.
#22. Charming Beaded Keychains with Kids Drawings
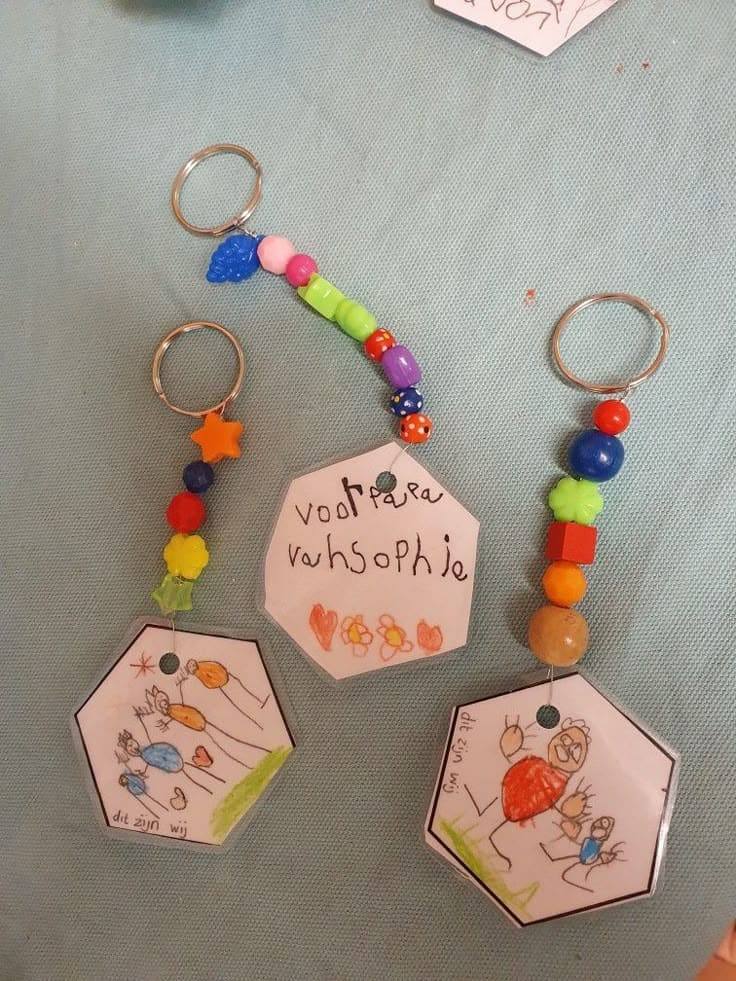
For a heartfelt and colorful Mother’s Day gift, let kids design these adorable beaded keychains! With bright beads, handwritten messages, and precious drawings, each piece becomes a unique treasure.
Materials Needed
- Shrink plastic sheets (3–4)
- Keychain rings with jump rings (pack of 20)
- Colorful beads (100+ pcs mixed shapes)
- Permanent markers or colored pencils
- Hole puncher (1 standard)
- Scissors
- Optional: Laminating sheets if you’re not using shrink plastic
Step-by-Step Guide
- Cut out hexagon or circle shapes from shrink plastic (about 3–4 inches wide before shrinking). Let kids draw their family or write a message using permanent markers.
- Punch a hole at the top of each piece before baking.
- Follow the shrink plastic instructions , usually 2–3 minutes in the oven at 325°F until flat and small. Let cool completely.
- Thread a variety of beads onto string or elastic cord and attach the art piece at the bottom using a jump ring and keychain loop.
#23. Adorable Teacup Mothers Day Cards
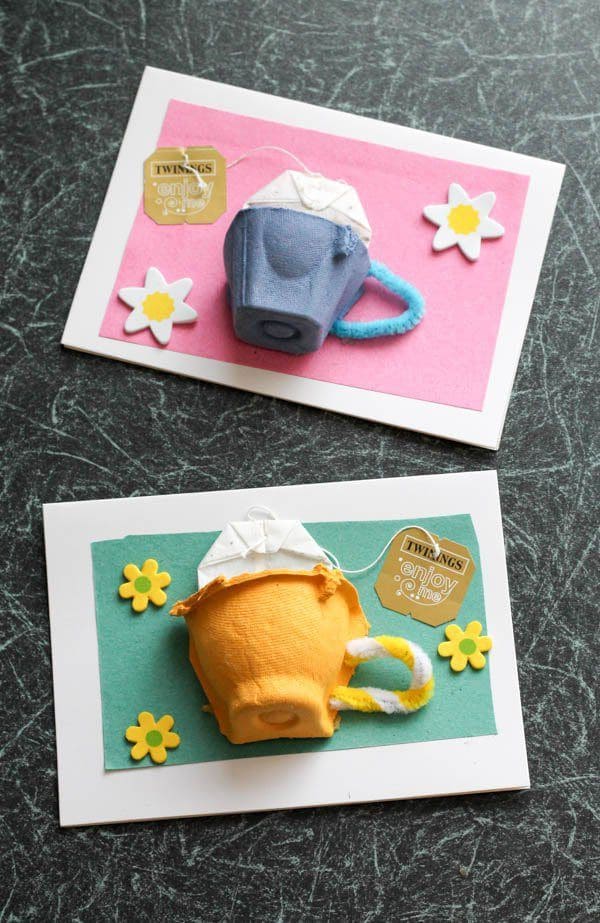
I used upcycled egg cartons and a few scraps from my stash, and the result turned out better than I imagined.
Materials Needed
- Egg carton cups (cut from a 12-count carton) – 1 per card
- Blank cards or thick cardstock (5×7 inches) – 1 per craft
- Craft felt or foam sheets (4×6 inches) – assorted colors
- Pipe cleaners – 1 per teacup handle
- Mini paper napkin or doily – folded as a tea napkin
- Hot glue gun + glue sticks
- Twinnings tea bags or your favorite brand
- Optional: small foam flowers or paper embellishments
Step-by-Step Guide
- Trim a cup section from your egg carton and paint it with acrylic paint. Let it dry completely.
- Twist a pipe cleaner into a small “C” shape and glue it to the side of the painted egg cup to form a handle.
- Cut a felt rectangle (roughly 4×6 inches) and glue it to the front of your card. Then attach the cup in the center with hot glue.
- Tuck a folded paper napkin inside the egg cup to mimic a tea towel. Tape or glue a real tea bag string to the inside and let the tag hang out.
#24. Heartfelt Mothers Day Bean Art Craft
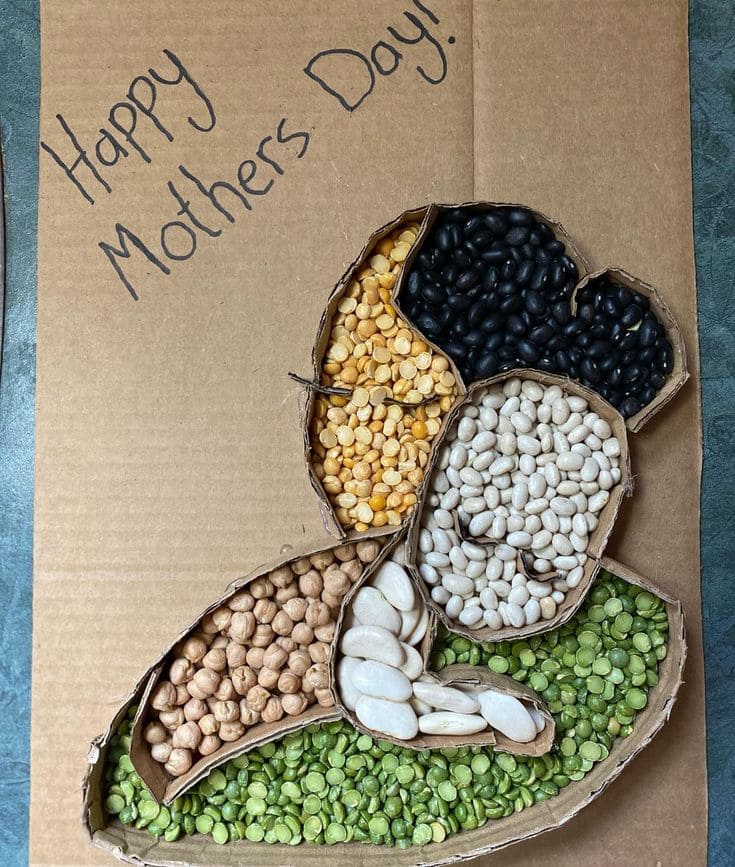
From simple materials to a stunning masterpiece, this DIY bean art is a heartfelt way to celebrate Mom!
Materials Needed
- 1 piece of corrugated cardboard (12×18 inches)
- Hot glue gun + 10 sticks
- 3 ft of thin cardboard strips (cut from another box)
- 2 tbsp each of 6 different dried foods:
- Black beans
- White navy beans
- Split green peas
- Yellow split peas
- Garbanzo beans (chickpeas)
- Butter beans or lima beans
- Pencil or marker
- Craft knife or scissors
Step-by-Step Guide
- Lightly sketch the silhouette of a mother holding her child on the cardboard. Keep the outline simple — curves and closed shapes work best for filling with beans.
- Cut thin strips of corrugated cardboard (about 0.5 inch wide), then glue them along your outline to form borders. Let dry completely.
- Separate each dried food into small bowls. Fill each section of your design with a different type of grain, applying glue first and gently pressing the beans in place.
- Use white navy beans for the child’s head and black beans for the hair to create contrast.
- Let everything dry for a few hours. Display flat or frame it in a deep shadow box for a lasting keepsake.
#25. Fairy Mom Garden Window
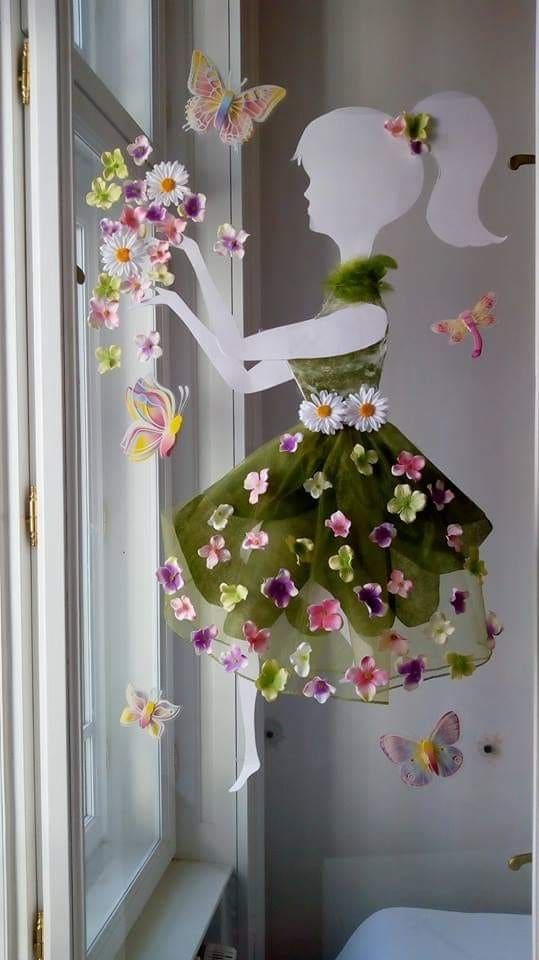
The layered skirt and flower accents gave this floral fairy window a 3D storybook feel, and the sunlight through the fabric made everything glow softly.
Materials Needed
- 1 sheet of white poster board (22×28 inches)
- Green tulle fabric (1 yard)
- Artificial flower heads (set of 100+)
- Decorative butterflies (20 pieces)
- Double-sided mounting tape
- Scissors
- Pencil or marker
Step-by-Step Guide
- Sketch or trace a silhouette of a fairy girl (or use a printable) onto your poster board and cut it out carefully. Mine was about 32 inches tall.
- Cut strips of green tulle for the dress, layering and fluffing them for fullness. Glue or tape the top edge to the waist area of your silhouette.
- Glue a mix of artificial flower heads to the skirt, shoulder, and bouquet area to build a soft, blossoming effect. I used over 50 mini blooms to fill it out.
- Add butterfly decals around the figure, floating toward her hands and hair. This gives the whole display movement.
- Use mounting tape to secure the final artwork to your window or glass door. The natural light brings everything to life.
#26. Charming Paper Tulip Basket Surprise
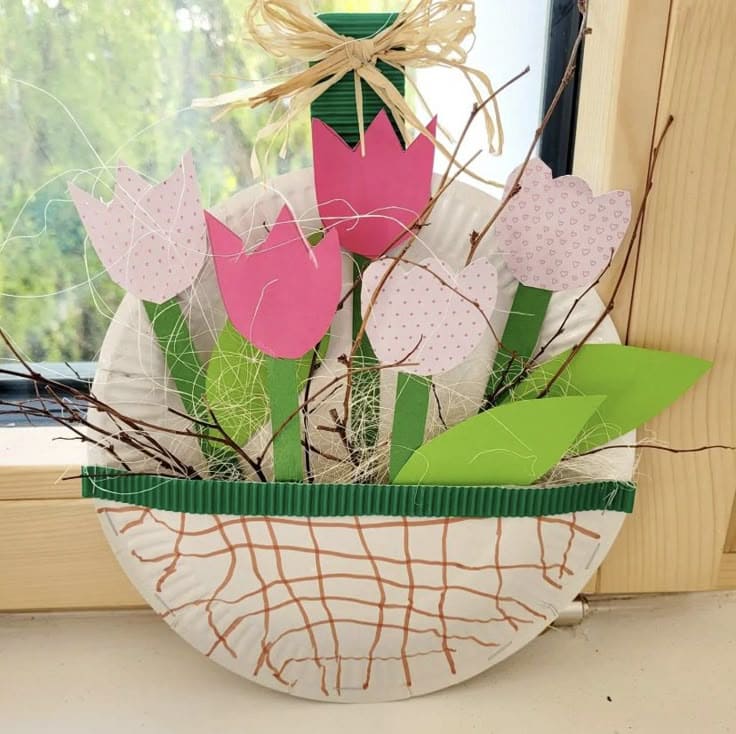
This’s one of those crafts that feels like a little garden in your hands – simple, textured, and blooming with color.
Materials Needed
- Paper plates (9-inch, pack of 50)
- Pink patterned scrapbook paper (12×12-inch, set of 24)
- Green cardstock (8.5×11-inch, 25 sheets)
- Corrugated craft paper strips
- Natural raffia ribbon
- Decorative twigs or dried branches (can also collect outdoors)
- Craft glue or hot glue gun
- Brown marker or crayon
- Scissors
Step-by-Step Guide
- Cut a paper plate in half and use a brown marker to draw a basket-style weave across the bottom. This gives it that woven look.
- Cut tulip shapes from your pink scrapbook paper. I made 5 — a mix of solid and patterned designs — each about 3.5 inches tall.
- Use green cardstock to cut stems and leaves. Glue the tulips and leaves inside the plate so they peek out like a bouquet.
- Tuck small twigs or dry branches in between for added texture, like they’re real flower stems.
- Finish the top of your plate with a strip of corrugated green paper and tie a cute raffia bow at the top to give it a rustic touch.
#27. Vibrant 3D Flower Cards for Mom
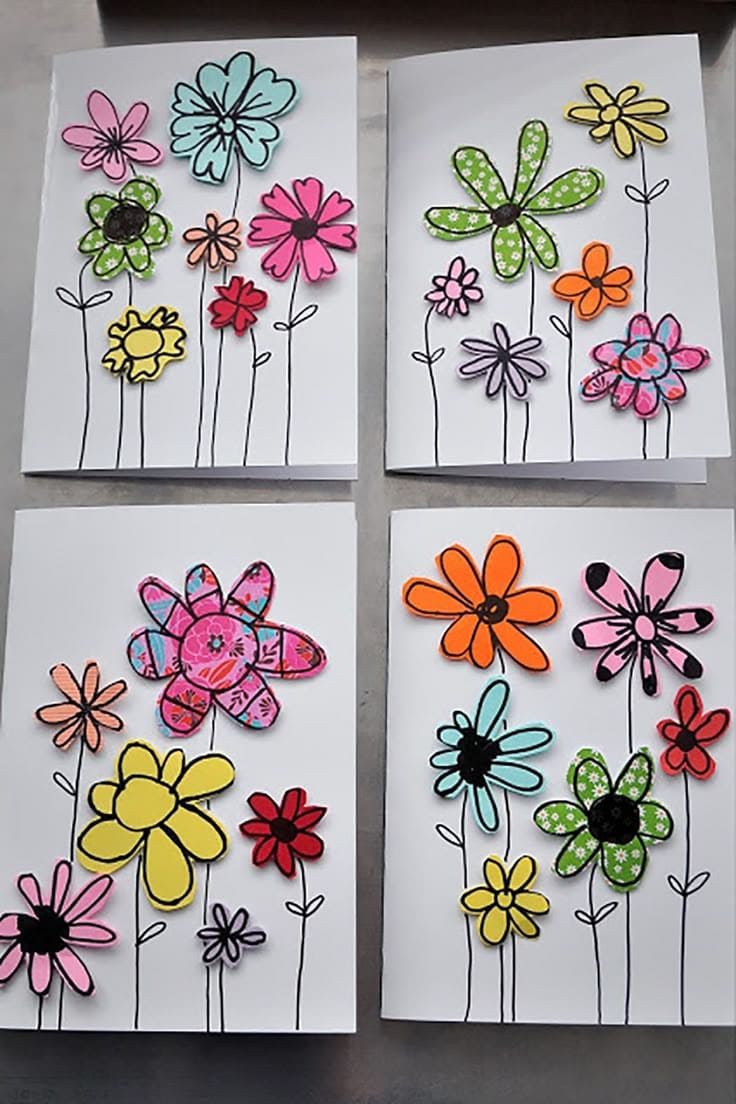
By layering colorful cut-out flowers over hand-drawn stems, kids can create a cheerful, textured design bursting with charm.
Materials Needed
- White blank cards (5×7 inches, pack of 50)
- Patterned scrapbook paper or colored cardstock
- Black permanent markers (pack of 3)
- Craft glue or double-sided foam tape for a 3D effect
- Scissors
Step-by-Step Guide
- Start by drawing long flower stems with a black permanent marker directly onto the white card base. Keep the lines playful and imperfect as it gives a hand-drawn charm.
- Cut out various flower shapes using scrapbook paper and colored cardstock. I made mine in different sizes and layered a few for extra pop.
- Glue the flowers in place using craft glue or use foam tape to raise them slightly for that cute, bouncy look.
- Add black circles or contrasting petals to the flower centers. I even outlined some with a marker for extra definition.
#28. Colorful Heart Frame with Fingerprint Art
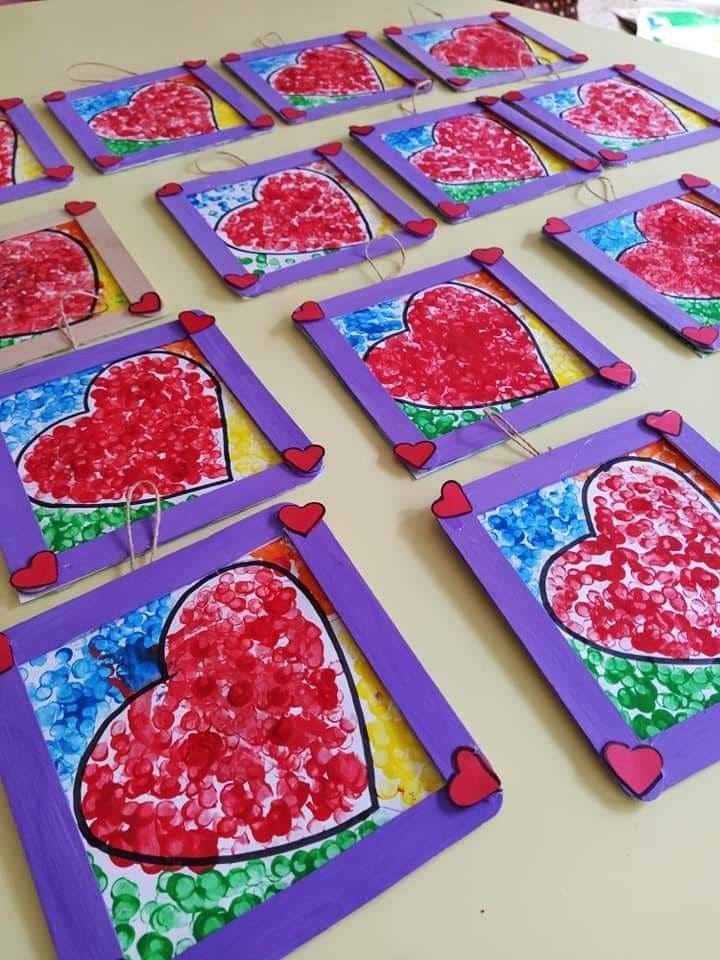
Instead of a store-bought card, why not create a vibrant heart frame with fingerprint art? Using popsicle sticks, bright paints, and little fingerprints, kids can craft a heartfelt masterpiece.
Materials Needed
- Craft sticks (pack of 200) – 4 per frame
- Red, blue, green, and yellow paint (washable if kids are involved)
- White cardstock – one 5×5 inch square per frame
- Black marker
- Glue gun or strong craft glue
- Heart foam stickers or red paper
- Twine for hanging
Step-by-Step Guide
- Begin by drawing a large heart onto the white cardstock with a black marker. Keep the outline bold and clear.
- Dip your finger (or a cotton swab) into red paint and dot gently inside the heart shape. Fill it completely, creating a textured, bubbly look.
- Use blue, green, and yellow to dot color blocks around the outside of the heart – one in each corner.
- Paint four craft sticks in purple or any preferred color. Once dry, glue them around the edge of the cardstock to form a frame.
- Add foam heart stickers to each corner of the frame. Glue a loop of twine to the back for easy hanging.
#29. Heartfelt MOM Photo Collage Keepsake
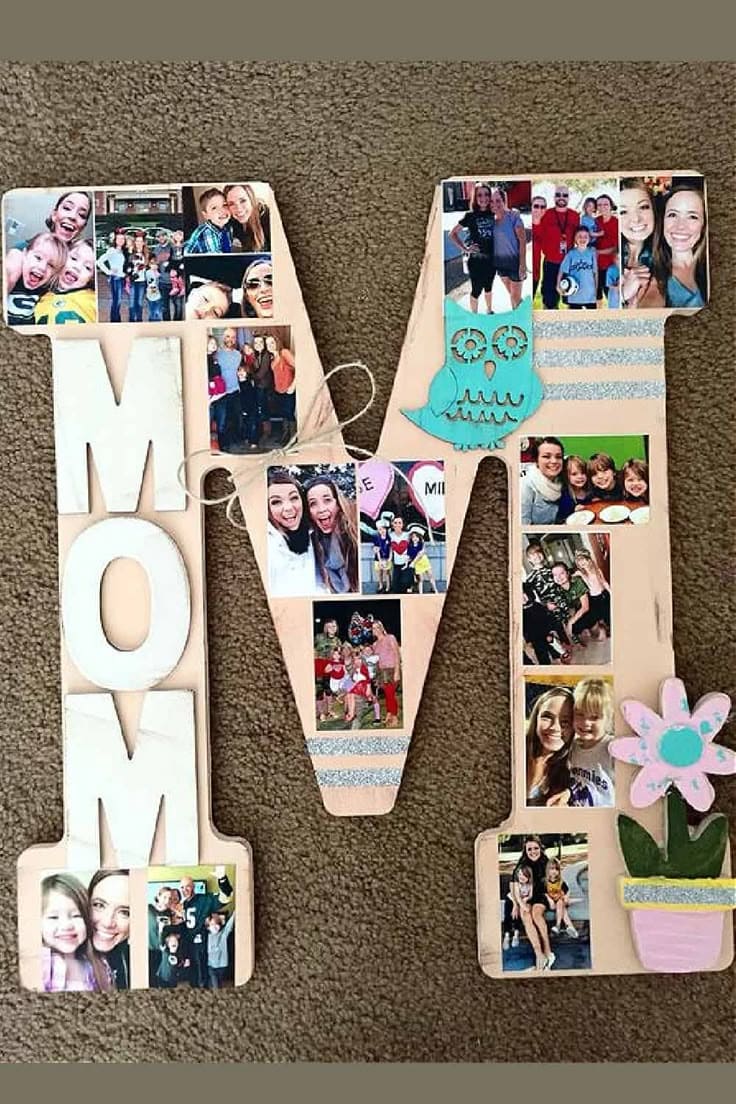
Have you ever wanted to give Mom a gift as unique as your bond? This DIY photo collage spells out “MOM” with love, featuring cherished pictures and adorable embellishments.
Materials Needed
- Wooden letters “M” and “O” (approx. 8 inches tall)
- Acrylic paint set (for base and decorative touches)
- Paintbrushes (various sizes)
- Mod Podge (8 oz)
- Printed family photos (wallet size) or printed at home
- Wooden flower embellishments or foam stickers
- Twine or ribbon (optional for hanging)
- Hot glue gun + glue sticks
- Decorative washi tape
Step-by-Step Guide
- Begin by painting each wooden letter in your preferred base color. I chose soft beige and pastel pink for a warm, cozy feel. Let dry fully.
- Print your favorite family photos in small sizes. I used a mix of wallet prints and some printed from my home printer.
- Arrange the photos creatively across the letters. Use Mod Podge to glue each one down and coat the surface for a sealed, glossy finish.
- Add decorative strips of washi tape, foam flower stickers, and cute wooden embellishments for personality.
- Glue twine to the back if you’d like to hang it on a wall. You can also prop it on a shelf or gift it inside a shadow box frame.
#30. Colorful Handprint Bouquet Keepsake for Mom
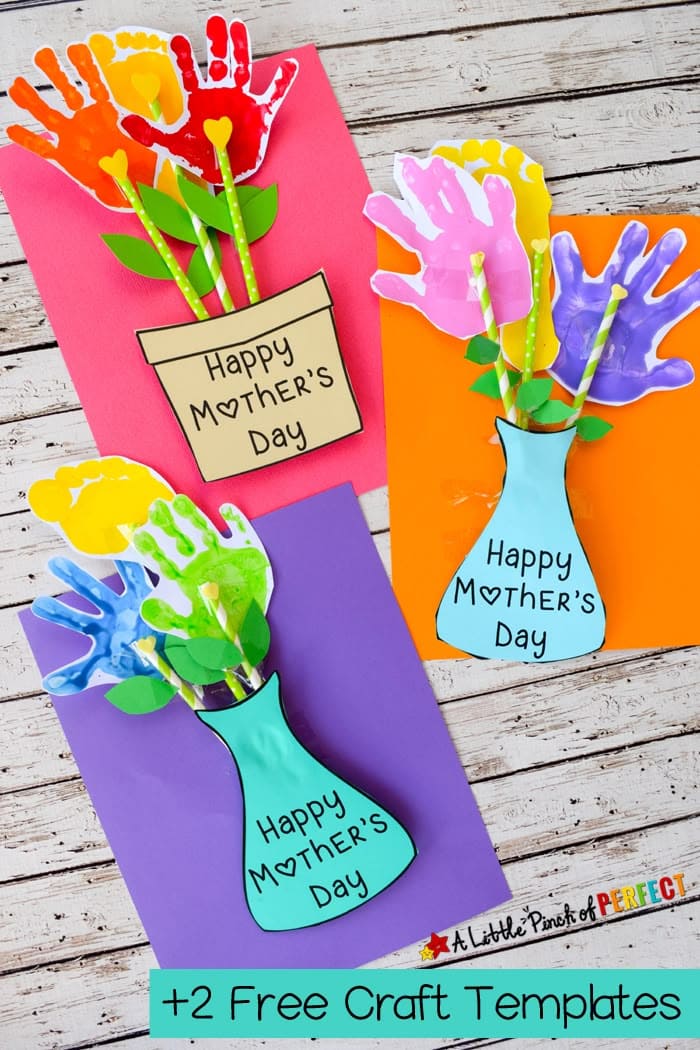
I made a few of these last spring with my niece, and every mom in the family had tears in their eyes.
Materials Needed
- Bright construction paper (9×12 inches, assorted colors)
- Colored cardstock or foam sheets
- Washable paint set
- Paper straws
- Green paper or felt
- Glue stick or craft glue
- Black marker
- Scissors
Step-by-Step Guide
- Start by painting your child’s hand and pressing it firmly onto construction paper. Repeat with 3–5 handprints in different colors and let dry.
- Carefully cut out the dried handprints. These become the “flowers.”
- Glue each handprint to the top of a paper straw to create stems, then cut green leaves and attach them below.
- Cut a flower pot or vase from cardstock or foam, write your message, and glue it at the bottom of your base sheet.
- Arrange and glue your flower stems coming out of the pot, fanning them for a full bouquet look.