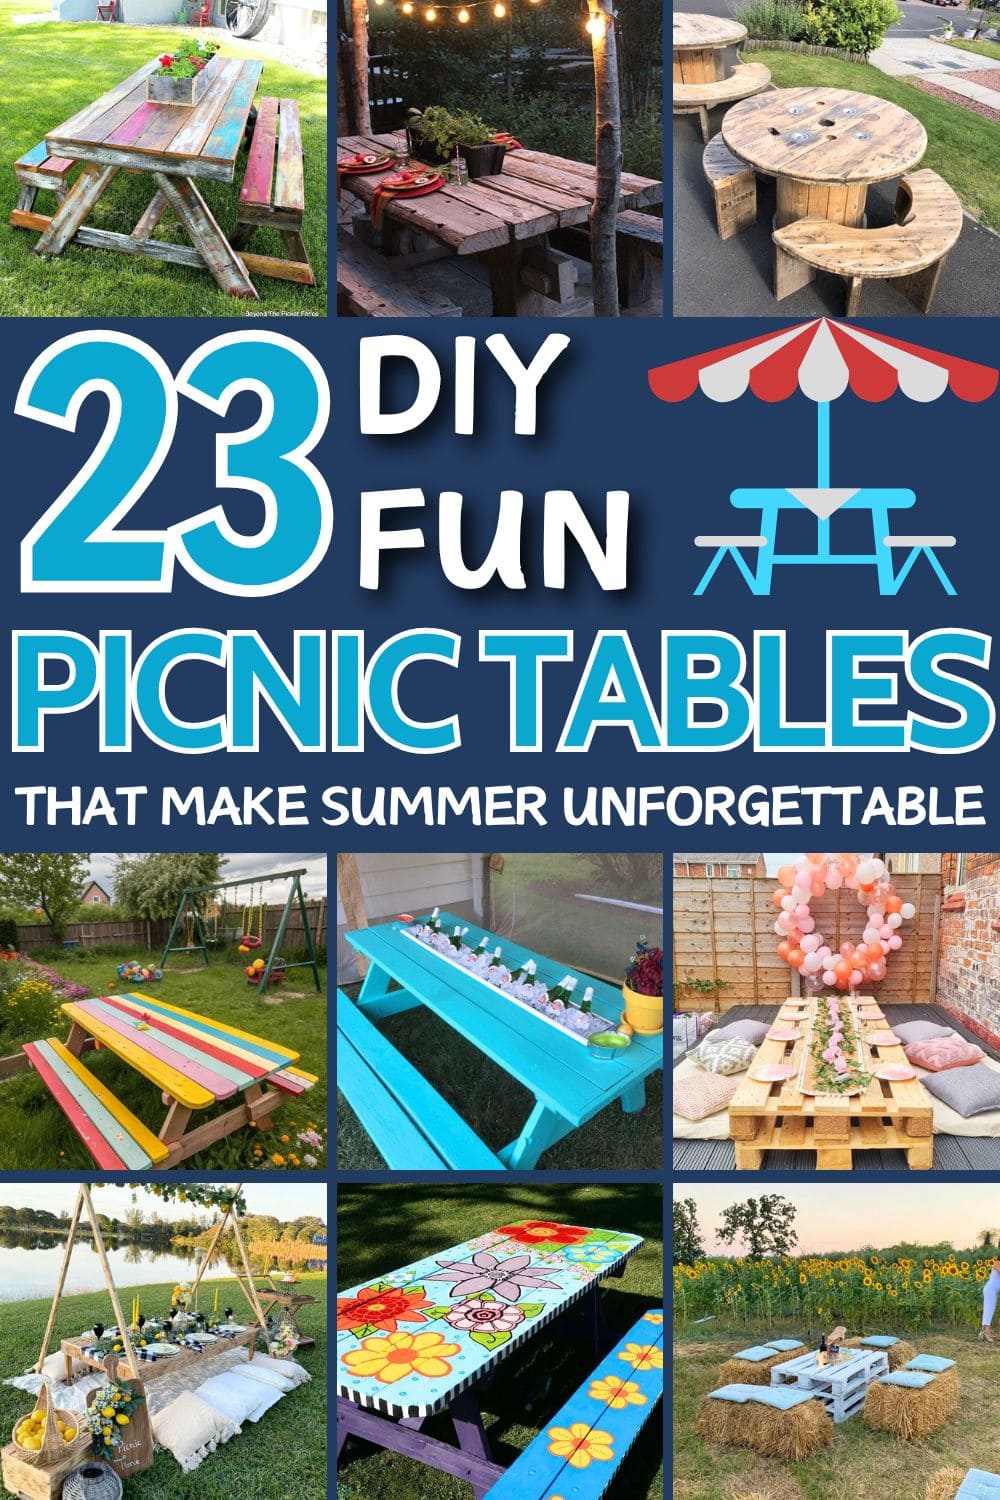
When summer rolls in and the days stretch long and golden, there’s something magical about gathering outdoors. The smell of fresh-cut grass, the laughter echoing through backyards, the clink of lemonade glasses on a sun-warmed table.
I still remember the picnic table my grandfather built one summer; splattered with paint and full of stories, it became the heart of every barbecue and birthday. That’s the thing about a picnic table, it’s more than just wood and nails. It’s where summer memories are made.
Whether you’re hosting friends or just enjoying a quiet sunset dinner, these 23 DIY picnic table ideas will help you create a space that’s functional, personal, and full of summer soul.
#1. Rustic Charm Picnic Table
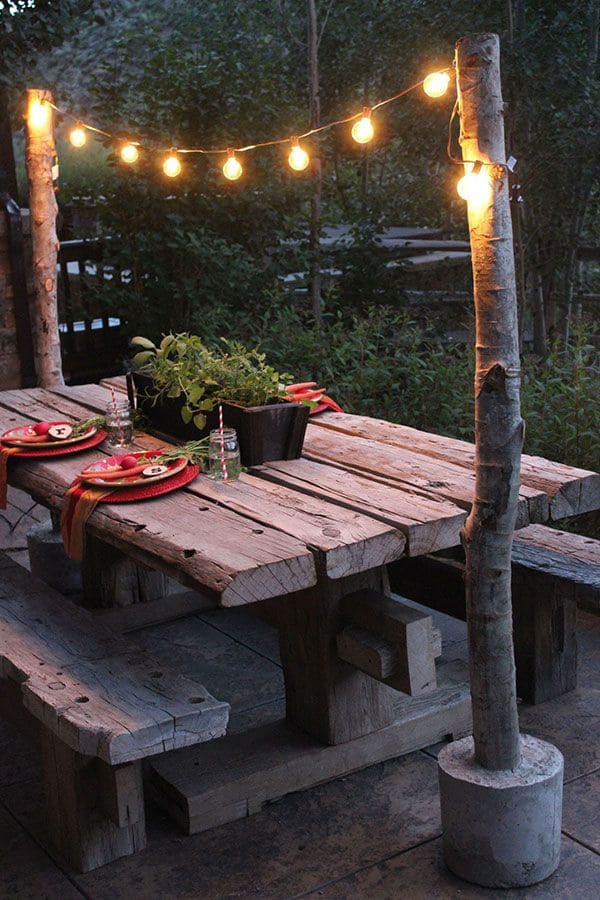
There’s something timeless about rough-hewn wood, especially when it’s softened by the warm glow of string lights at dusk.
This picnic setup brings together natural elements like weathered timber, tree-branch posts, and a simple potted herb centerpiece for an outdoor table that feels grounded, relaxed, and made for long conversations under the stars.
Materials Needed:
- 1 rustic wood picnic table and benches
- 2 sturdy tree branches (about 6 ft tall, 3–4 inches diameter)
- 2 large buckets (12–16” diameter)
- Fast-drying cement mix (approx. 50 lbs total)
- 1 string of outdoor globe lights (15–25 ft)
- Extension cord (optional)
- Centerpiece (e.g., black planter box with herbs or seasonal greens)
- Tableware: mason jars, red/earth-toned napkins, and rustic plates
Step-by-Step Guide:
Step 1: Mix your cement in each bucket and insert the log poles upright while the mix is still wet. Use supports to keep them steady until the cement fully cures.
Step 2: Once dry, place one bucket at each end of your picnic table to act as anchors for your string lights.
Step 3: Drape your string lights between the two log poles. Wrap them once or twice for stability, and let the remaining bulbs hang loosely for a relaxed vibe.
Step 4: Set your table using colorful or earth-toned plates and napkins. Add mason jar glasses and a box of herbs or flowers in the center.
#2. Classic Round Wooden Picnic Table
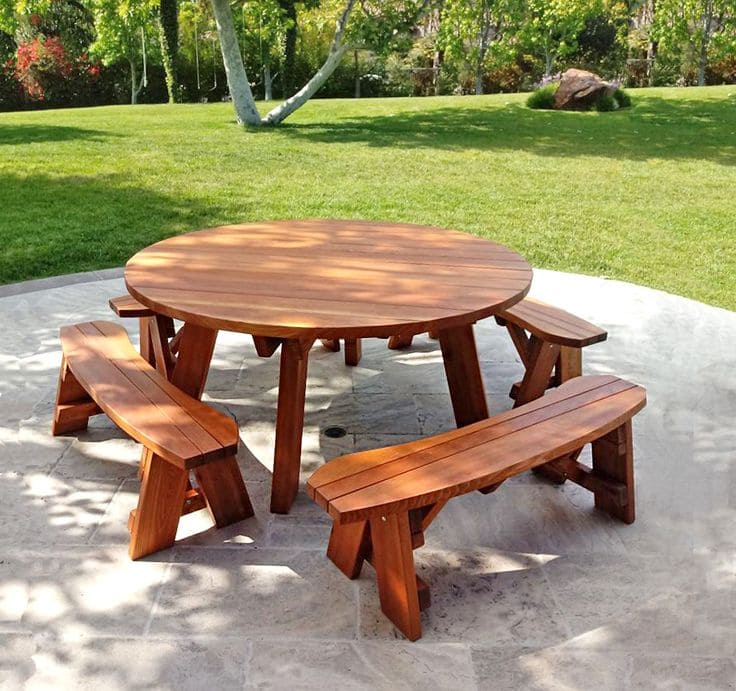
Sometimes the simplest designs are the ones that leave the deepest impression. The circular shape invites connection, while the natural wood tone feels grounded and timeless.
Perfect for family meals, friendly chats, or a quiet coffee under a tree, it balances elegance with rugged outdoor charm. You’ll love how easily it blends into the landscape, like it’s always belonged there.
Materials Needed:
- Wood planks: tabletop: 1.25” thick, cut into a 48″–60″ diameter circle and benches: 6 curved seat planks, 1.25″ x 10″ x 40″
- Table legs: 4″x4″ lumber (4 legs)
- Bench legs/support: 2″x4″ or 4″x4″ lumber
- Wood screws, bolts, and washers
- Wood glue
- Outdoor wood stain or sealer
- Sandpaper (120–220 grit)
- Circular saw
- Drill
Step-by-step Guide:
Step 1: Cut and sand your table and bench pieces. For the round table, you’ll need a jigsaw or circular saw. Smooth all edges carefully.
Step 2: Assemble the table base using 4 sturdy legs and a cross-support underneath. Center and attach the tabletop securely with wood glue and screws.
Step 3: Build the curved benches using pre-shaped planks or make your own with a jigsaw. Attach legs using cross-bracing to prevent wobbling.
Step 4: Apply a rich wood stain or sealer. This not only brings out the grain but protects against weathering.
#3. Sunny Day Painted Picnic Table
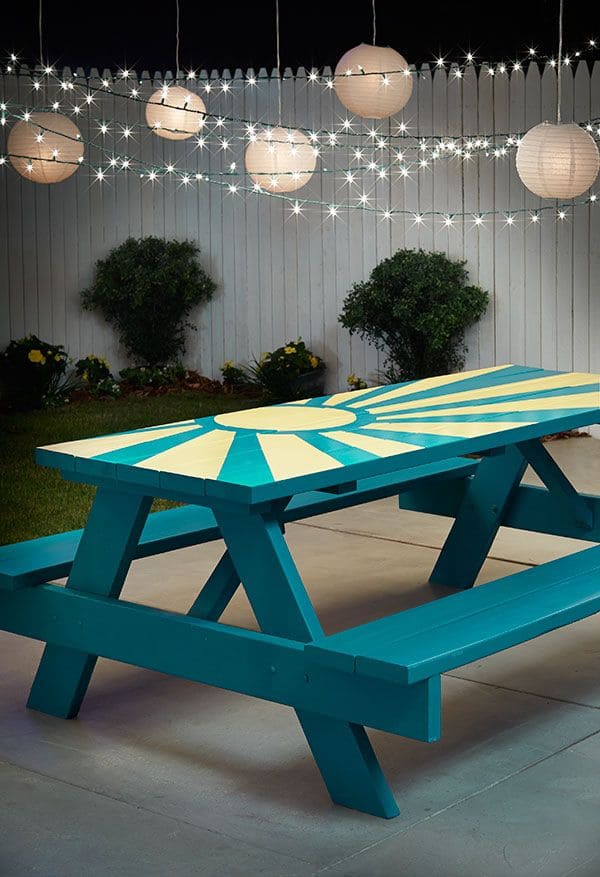
If summer had a signature table, this would be it. Bold teal wood with a radiant yellow sunburst beaming from the center, it’s playful, welcoming, and perfect for long outdoor dinners and lemonade afternoons.
You don’t need to be a professional painter to pull it off either. With a little painter’s tape and some sunny weather, this piece turns a basic picnic table into a backyard statement.
Materials Needed:
- 1 wooden picnic table
- Exterior paint (1 qt. teal + 1 qt. bright yellow)
- Painter’s tape (1–2 rolls)
- Primer
- Sandpaper (medium grit)
- Paintbrushes and/or small roller
- Drop cloth
Step-by-step Guide:
Step 1: Sand the picnic table surface until smooth. Wipe away dust and apply primer if needed, especially on untreated or weathered wood.
Step 2: Once dry, paint the entire table teal using a roller for large areas and brushes for corners and edges. Let it dry completely.
Step 3: Use painter’s tape to create the sunburst design. Start from a center circle and radiate out in triangular “rays.”
Step 4: Paint the exposed sections inside the taped areas with yellow paint. Let dry, then peel off tape carefully to reveal clean lines.
#4. Cable Spool Patio Table with Umbrella
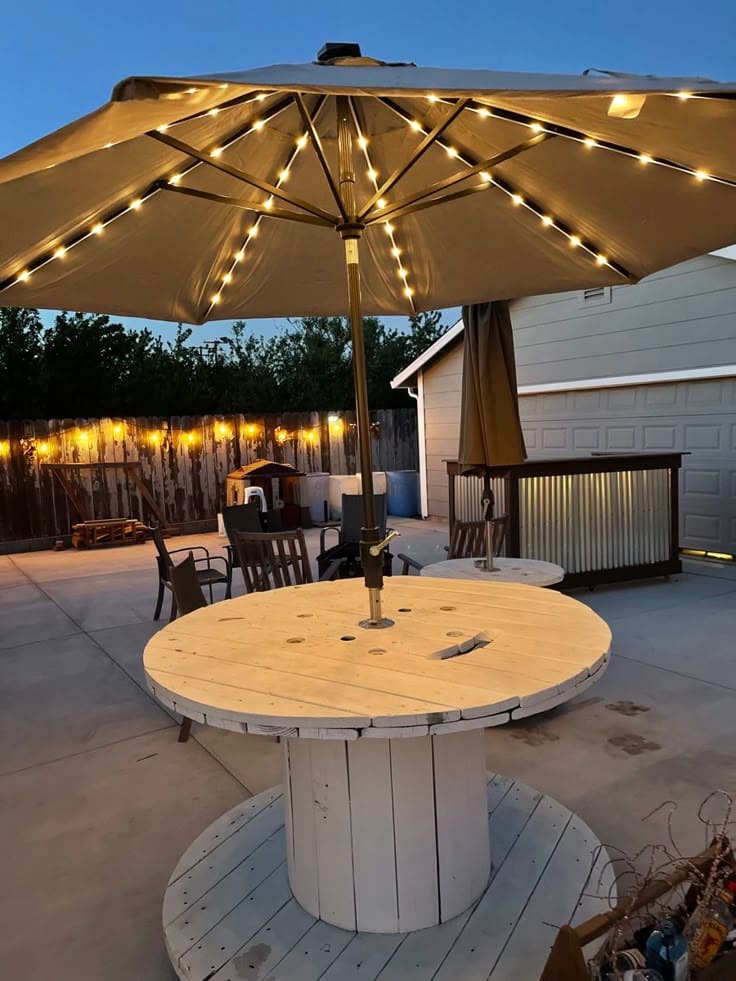
If you’ve ever spotted one of those giant wooden cable reels lying around and thought “That could be a table”, you were absolutely right.
This project brings new life to old spools and turns them into rustic, round picnic tables perfect for evening hangouts. Add an umbrella and twinkle lights, and suddenly your patio feels like a cafe.
Materials Needed:
- 1 large wooden cable spool (36″–48″ diameter is ideal)
- Outdoor paint (1 quart)
- 1 large patio umbrella
- Sandpaper
- Outdoor sealant
- Drill + hole saw
- Optional: caster wheels
Step-by-step Guide:
Step 1: Sand down the entire spool to remove splinters and rough spots. Focus especially on the table edges where hands will rest.
Step 2: If your spool doesn’t already have a center hole large enough for your umbrella pole, measure and carefully drill one with a hole saw bit.
Step 3: Apply a coat of outdoor paint or stain. Let it dry completely, then add a second coat for durability. Once dry, seal with a clear outdoor polyurethane.
Step 4: Insert the umbrella through the center hole and secure it in place with the base or a clamp below. You can also drill side hooks to hang drink holders, napkins, or string lights.
#5. Cottage Garden Table
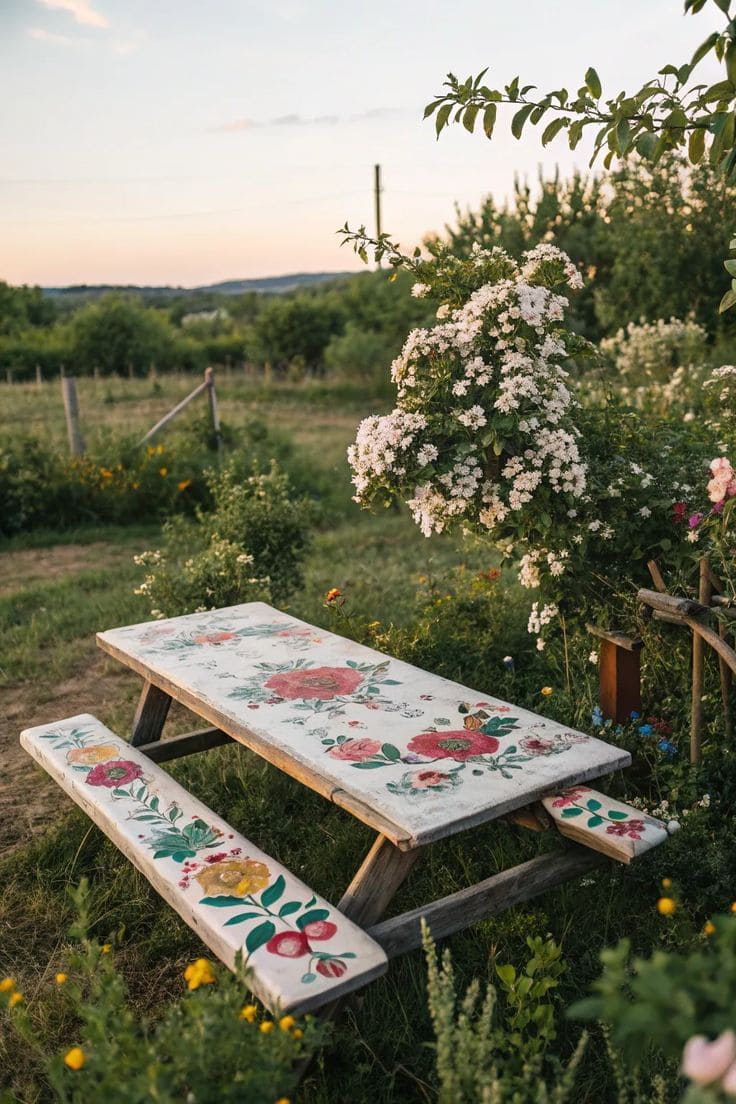
This table looks like it grew straight from the wildflowers around it. Faded white wood carries hand-placed floral art, giving the whole setup that storybook charm, quiet, calm, and beautifully imperfect.
If you’re drawn to the rustic, romantic feel of country gardens and vintage linens, this table is your soul’s happy place.
Materials Needed:
- 1 wooden picnic table
- Sandpaper (medium grit)
- White chalk or matte paint (1 qt.)
- Floral napkins, tissue paper, or printed decoupage paper
- Mod Podge
- Foam brush
- Outdoor sealer
Step-by-step Guide:
Step 1: Lightly sand your table, especially if the wood is weathered. Wipe clean and paint a coat of white over the tabletop and benches. Let dry.
Step 2: Carefully cut out your floral designs from napkins or paper. Separate layers if using napkins, only the top printed layer should remain.
Step 3: Apply a thin layer of Mod Podge where the flower will go, press the paper on gently, and smooth with your fingers or a plastic wrap. Seal over it with another layer of glue.
Step 4: Once fully dry, finish with a clear outdoor-safe sealer to protect from moisture and sunlight.
#6. Built-In Cooler Picnic Table
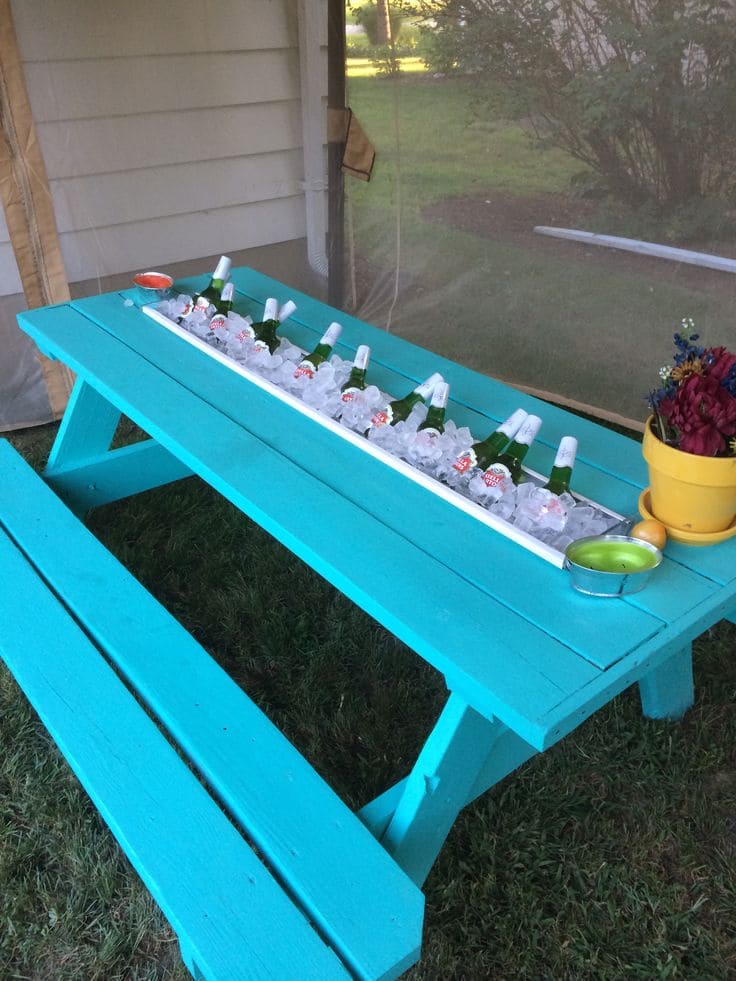
With a built-in cooler running straight through the middle, your drinks stay ice-cold while you hang out and soak up the sun.
No more walking back and forth to the fridge or lugging clunky coolers outside. Just grab a bottle, pour a drink, and relax. It’s the ultimate backyard upgrade for summer barbecues, lazy Sunday lunches, or a spontaneous happy hour with friends.
Materials Needed:
- 1 wooden picnic table
- 1 plastic or metal rain gutter (about 4 ft long, 4–5 in wide)
- Ice and drinks
- Wood sealant
- Circular saw
- Drill and screws
- Sandpaper
Step-by-step Guide:
Step 1: Measure and mark the center of the tabletop lengthwise. Cut out a rectangle wide enough to snugly fit your gutter, leave at least 2 inches clearance from each edge.
Step 2: Sand the cut edges smooth. Drop the gutter into the slot and make sure it sits flush or slightly recessed.
Step 3: Drill small holes at each end of the gutter (if you want drainage) or seal the ends tightly for a no-drip design.
Step 4: Paint or stain the table in a vibrant summer color and seal everything with weatherproof coating.
#7. Rustic Hay Bale Picnic Table
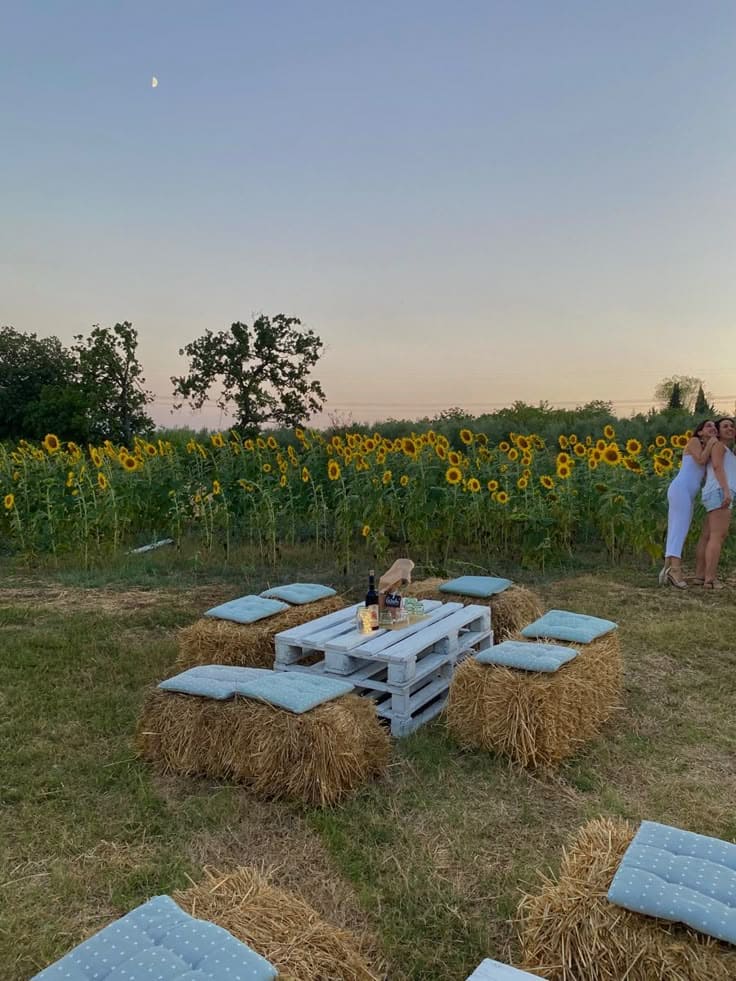
If you’ve ever dreamed of dining under a soft twilight sky with the golden faces of sunflowers watching over you, this setup brings that exact feeling to life.
It’s cozy, countryside romance at its finest, perfect for an evening picnic, a casual farm wedding, or a late-summer girls’ night out.
Materials Needed:
- 1–2 wooden pallets (standard size: approx. 40” x 48”)
- 8 hay bales (approx. 18” x 36” each)
- 8 square seat cushions (15”–18” wide)
- White chalk paint
- Sandpaper (medium grit)
- Optional: string lights
Step-by-step Guide:
Step 1: Lightly sand the pallets to remove splinters. If you want a weathered, rustic look, don’t overdo it.
Step 2: Apply a single coat of white chalk paint to the pallets. Let it dry. No need to aim for perfection as imperfections add charm.
Step 3: Arrange the pallets as a low table, stacked two-high for extra stability and height.
Step 4: Circle the pallet table with hay bales, placing one cushion on top of each for comfort. You can tie the cushions down with twine if it’s windy.
#8. Garden Bloom Picnic Table

Hand-painted flowers in playful colors turn this surface into a blooming garden that never wilts. It’s got personality, charm, and just the right amount of eccentricity to make everyone who walks by smile.
If you’ve got a spare weekend, a stash of bright paints, and a soft spot for flowers, this table is your next feel-good project.
Materials Needed:
- 1 wooden picnic table
- Acrylic or exterior paints (blue, purple, red, yellow, pink, green, black, white)
- Paintbrushes in various sizes
- Pencil or chalk
- Black and white paint pens (optional)
- Sealer or polyurethane
Step-by-step Guide:
Step 1: Clean and lightly sand your picnic table. Paint the base (legs and support) purple and the top surface sky blue. Let it dry completely.
Step 2: Use chalk or pencil to sketch large floral patterns directly on the surface.
Step 3: Fill in the flowers using bright colors. Use small brushes for detail and layering. Let each color dry before adding another.
Step 4: Add outlines, dots, or fun accents with paint pens or a fine brush for extra dimension. Don’t forget the edges, those black and white stripes are a fun surprise.
#9. Enchanted Mushroom Picnic Table
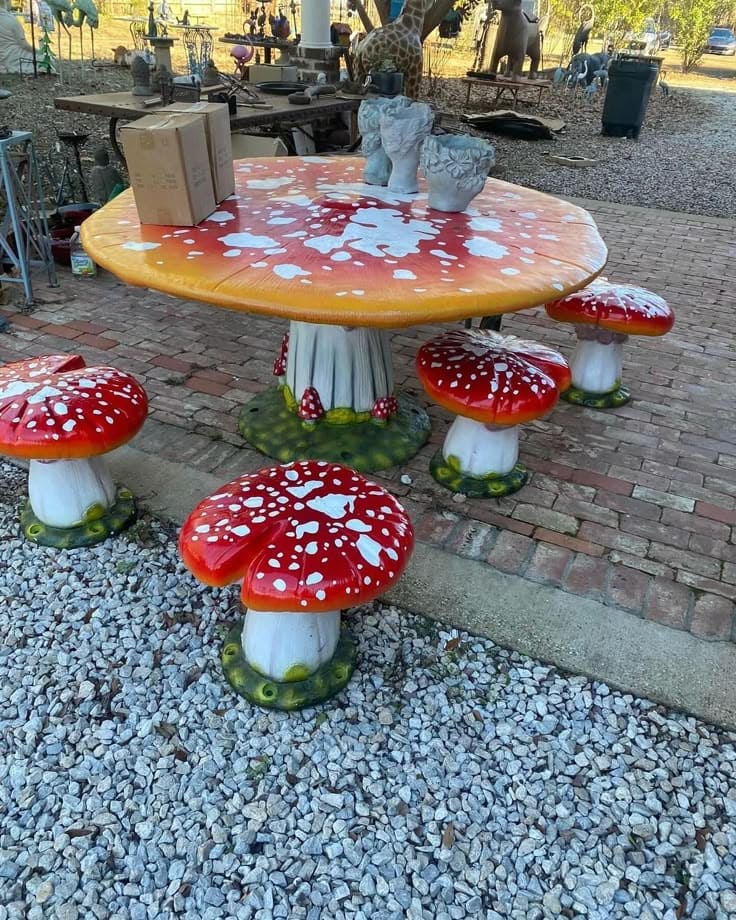
If you’ve ever dreamt of dining in a fairy tale, this mushroom-shaped picnic table might just grant your wish. Kids will be enchanted, adults will be charmed and everyone will want a seat at this storybook setting.
With a larger-than-life red-and-white toadstool tabletop and matching stools, it turns any backyard into a woodland wonderland.
Materials Needed:
- Fiberglass or resin mushroom table and stools set
- Outdoor-grade acrylic paints (red, white, green)
- UV-resistant sealant spray
- Paintbrushes
- Drop cloths or tarps
- Optional: fairy garden accessories
Step-by-step Guide:
Step 1: If you’re painting your own set, begin by priming the surface with a white outdoor primer. Let it dry completely.
Step 2: Use bold red for the tops and creamy whites for the stalks. Add whimsical white dots in various sizes for that classic toadstool look.
Step 3: For extra charm, paint moss or mini mushrooms at the base. Let all layers dry fully between coats.
Step 4: Seal everything with UV-protectant spray to help preserve the color and finish in outdoor conditions.
#10. Rustic Patio Picnic Table
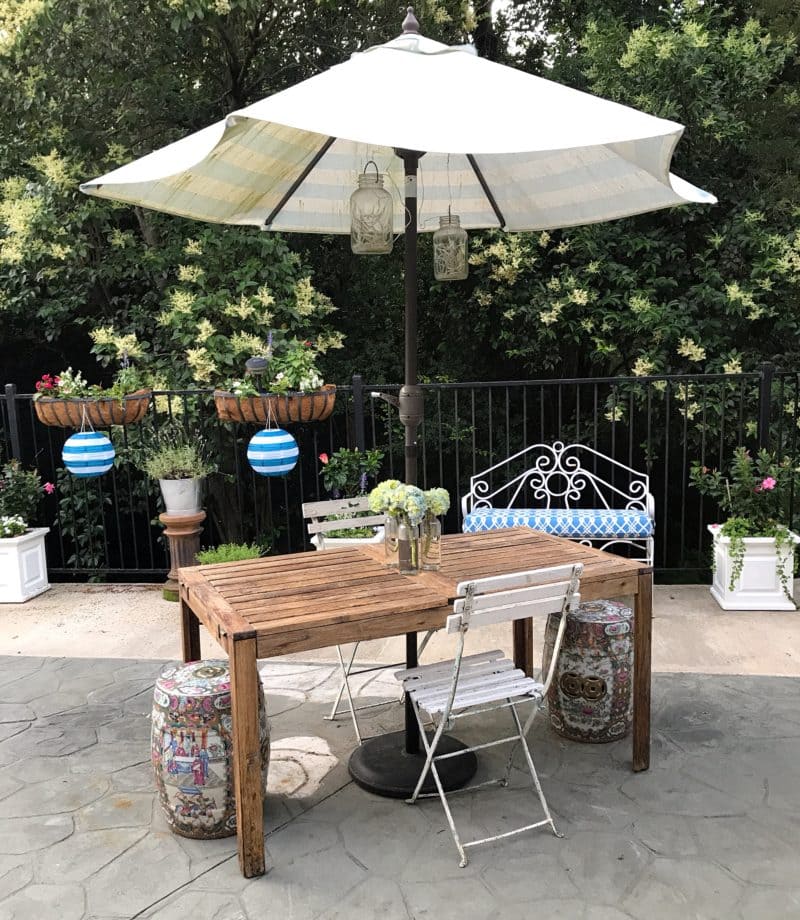
This setup feels like something you’d stumble upon at a tucked-away cottage or cozy garden café. The weathered wood, vintage metal chairs, and umbrella with hanging lanterns give it effortless charm.
It’s an easygoing blend of rustic character and laid-back elegance, perfect for lazy lunches, garden tea, or catching up over lemonade.
Materials Needed:
- 1 reclaimed wood table
- Foldable vintage-style metal chairs (2–4)
- Large patio umbrella with center pole base
- 2 ceramic garden stools
- Small lanterns
- Simple vase
Step-by-step Guide:
Step 1: Start with a wooden table, reclaimed wood works best for that natural, lived-in look. Sand and seal if needed to protect it from the elements.
Step 2: Position the umbrella through the table’s center hole and anchor it with a heavy base.
Step 3: Place a mix of seating: folding metal chairs, benches, or even an iron garden loveseat to add layers of personality.
Step 4: Hang lanterns or mason jars from the umbrella spokes using jute or twine for ambient evening light.
#11. Watermelon Slice Picnic Table
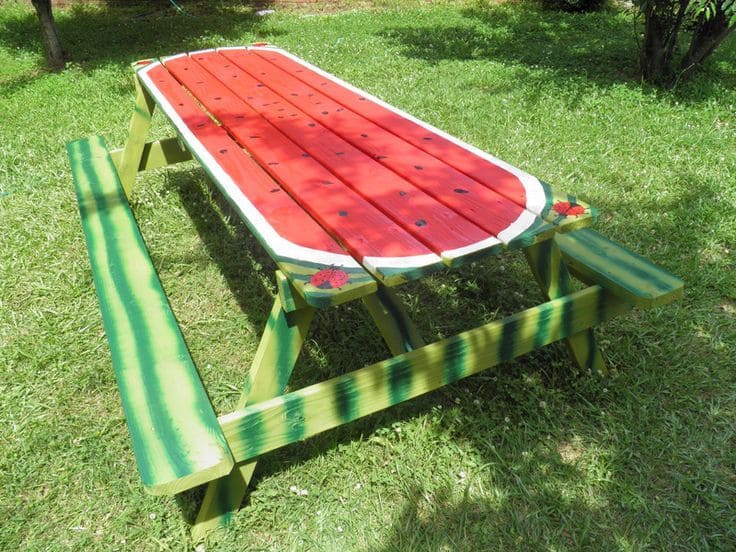
This cheerful picnic table is pure summer in furniture form. Painted to mimic a juicy slice of watermelon, it instantly lifts the mood of any backyard or garden.
The vibrant red planks dotted with black seeds and striped green benches evoke sweet nostalgia and playful charm.
Materials Needed:
- 1 wooden picnic table
- Outdoor acrylic paints (red, white and green)
- Black (for seeds)
- Sandpaper (medium + fine grit)
- Painter’s tape
- Paintbrushes (various sizes)
- Clear outdoor polyurethane sealant
Step-by-step Guide:
Step 1: Sand the entire surface until smooth, wiping away dust. This helps the paint stick better and last longer through sun and rain.
Step 2: Paint the top of the table bright red, covering the slats evenly. Let it dry, then use white paint and painter’s tape to define the curved rind edges.
Step 3: Use green paint to add stripes along the benches and table legs. For a realistic effect, blend two shades of green in loose, vertical strokes.
Step 4: Dot small black seeds onto the red tabletop. You can use the back of a brush handle for perfect seed shapes.
Step 5: After all paint is dry, apply 2–3 coats of clear outdoor sealant to protect your design and make it weather-resistant.
#12. Boho Pallet Picnic Table
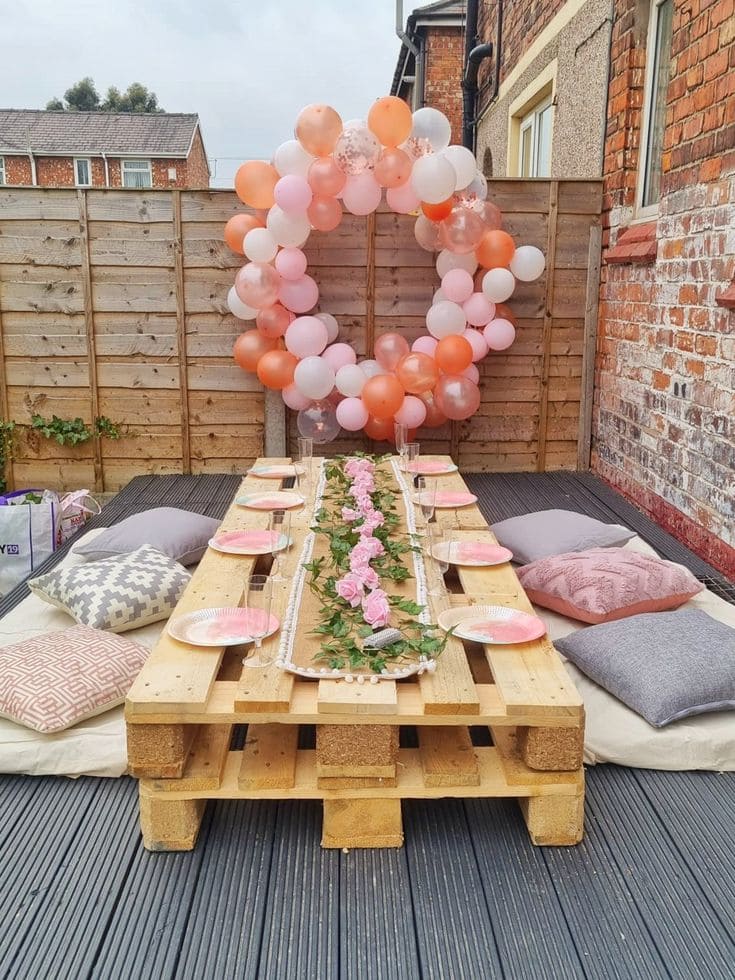
This DIY pallet picnic table brings that casual elegance to life with just a few recycled materials and some soft details.
Whether it’s for a birthday brunch, garden tea party, or a backyard baby shower, it sets the perfect scene with relaxed, charming and a little dreamy.
Materials Needed:
- 4–6 wooden pallets
- Sandpaper
- Table runner, faux greenery, or flowers
- Cushions, blankets, or yoga mats
- Optional: string lights, balloons, or backdrop
Step-by-step Guide:
Step 1: Stack the pallets two layers high to get a comfortable low table height. Sand the surfaces to remove splinters and smooth rough edges.
Step 2: Place the pallets in your chosen location like on a deck, lawn, or patio. Line them up tightly to create a long, unified table.
Step 3: Lay down a runner or garland across the center. Add faux or fresh flowers for color and charm.
Step 4: Arrange cushions or folded blankets evenly around the table. Keep extras on hand for lounging.
#13. Rainbow Stripe Picnic Table
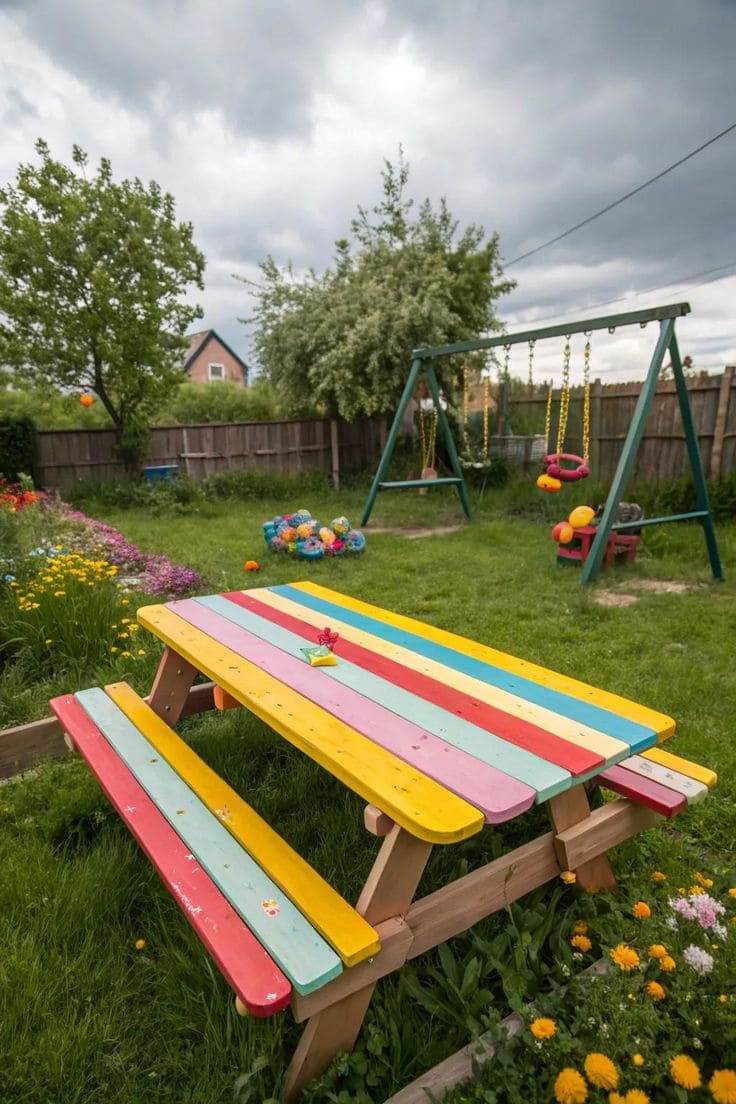
Bright, playful, and full of charm, this rainbow-striped table brings a jolt of happiness to any backyard. It feels like summer break captured in wood and paint.
Kids will love it, but honestly? You’ll find yourself sitting there too, just because it makes the day feel lighter.
Materials Needed:
- 1 wooden picnic table
- Outdoor acrylic paint in 5–6 colors (red, yellow, mint, pink, teal, blue)
- Clear outdoor polyurethane or sealant
- Painter’s tape
- Paintbrushes
- Sandpaper
Step-by-step Guide:
Step 1: Sand the picnic table to smooth the surface and help the paint adhere better. Wipe clean.
Step 2: Use painter’s tape to mark off each board (plank) individually. Paint each slat a different bright color. Alternate colors for balance.
Step 3: Once dry, carefully remove the tape and touch up any edges. Repeat on the bench seats if you like.
#14. Island Vibes Floor Table

This DIY picnic table is all about good company, sunshine, and kicking your shoes off. Inspired by beachy escapes and backyard luaus, it brings a cozy, grounded feeling to your gathering.
Floor cushions and a woven mat set the tone, while bright drinks and palm leaf decor turn any day into a celebration.
Materials Needed:
- 1 sheet of plywood (approx. 2 ft x 6 ft)
- 4 sturdy wooden legs (12″–16″ high)
- Wood screws and brackets
- Outdoor paint
- Floor cushions
- Outdoor mat
Step-by-step Guide:
Step 1: Cut your plywood to the desired tabletop size. Sand the edges and surface smooth. Paint or seal the wood to weatherproof it.
Step 2: Attach the legs securely to the underside using brackets and wood screws. Keep it low-profile for floor seating comfort.
Step 3: Place your table on a woven mat or rug. Add soft cushions around the edges for guests to sit on.
Step 4: Decorate with tropical leaves, vibrant cups, and eco-friendly plates. Add fairy lights or tiki torches if your party goes into the evening.
#15. Lemon Grove Lakeside Picnic Setup
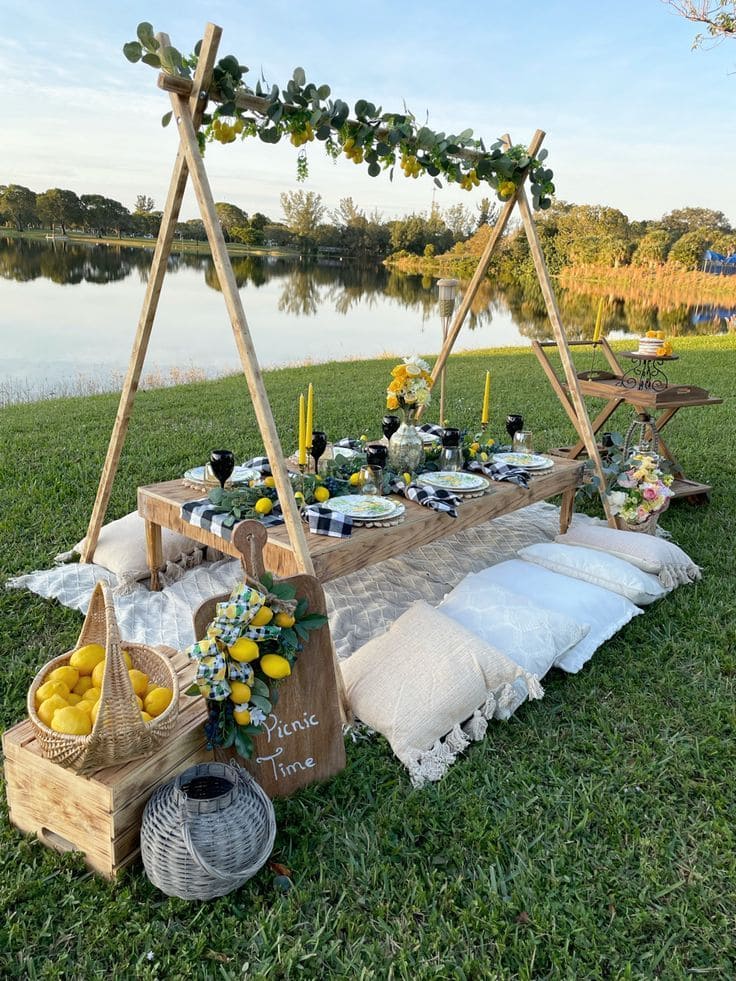
If your heart skips a beat at the idea of dining under the sky, this rustic picnic table setup was made for you.
The soft palette of pillows, the handcrafted table, and that lemon-kissed décor bring a whimsical charm that feels straight out of a storybook.
Materials Needed:
- 4 wooden boards (2″x6″x48″)
- 3 wooden boards (2″x6″x40″)
- 2″ screws or wood nails
- Wood stain
- 4 small wooden legs (approx. 10–12″ tall)
- Cotton rugs
- 8–10 assorted throw pillows
- Decorative arch poles (2 tall dowels + 1 crossbeam)
- Faux eucalyptus garland and lemons
Step-by-step Guide:
Step 1: Assemble the table frame using the long boards as the perimeter. Secure the tabletop slats across the top using screws. Attach the short legs to each corner.
Step 2: Lightly sand and stain the wood to enhance its grain and weather-resistance. Let dry fully before decorating.
Step 3: Lay out soft rugs or blankets beneath your table and arrange the pillows for comfortable floor seating.
Step 4: Construct a simple arch by tying two dowels together at each end, then attaching a crossbeam.
#16. Woodland Picnic Table
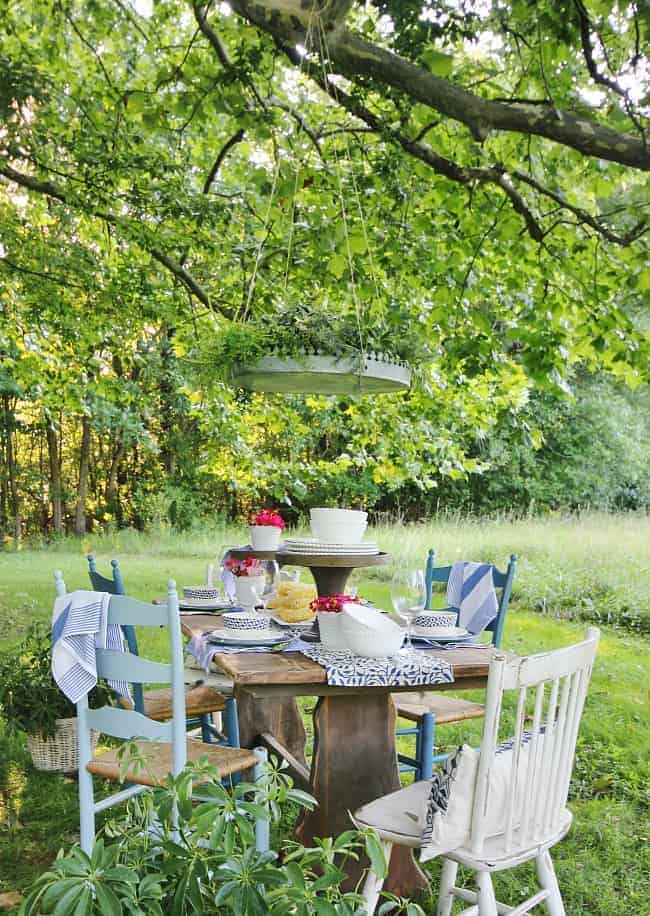
There’s something magical about gathering beneath a tree canopy with nothing but the sound of leaves whispering above.
This setup feels like a hidden nook from a storybook, mismatched chairs, soft linens, and a wooden table that looks like it’s lived through a hundred summers.
Materials Needed:
- 1 solid wood table
- 4–6 mismatched vintage chairs
- Blue and white cloth napkins
- Simple dinnerware and clear wine glasses
- Hanging planter tray with rope
- Fresh potted plants
Step-by-step Guide:
Step 1: Set your table in a shaded spot beneath a tree. Look for dappled light and level ground for comfort and stability.
Step 2: Mix and match wooden chairs like painted blues, whites, or distressed finishes all add to the charm.
Step 3: Drape striped or patterned cloth napkins over the back of each chair. You don’t need full place settings, just a few thoughtful details.
Step 4: Hang a shallow tray or vintage sifter from a tree branch using rope, then fill it with trailing greenery or herbs like thyme and lemon balm.
Step 5: Add layered bowls, pitchers, or a cake stand as your centerpiece, and tuck in small bunches of blooms for color.
#17. Twinkle-Light Backyard Picnic Table
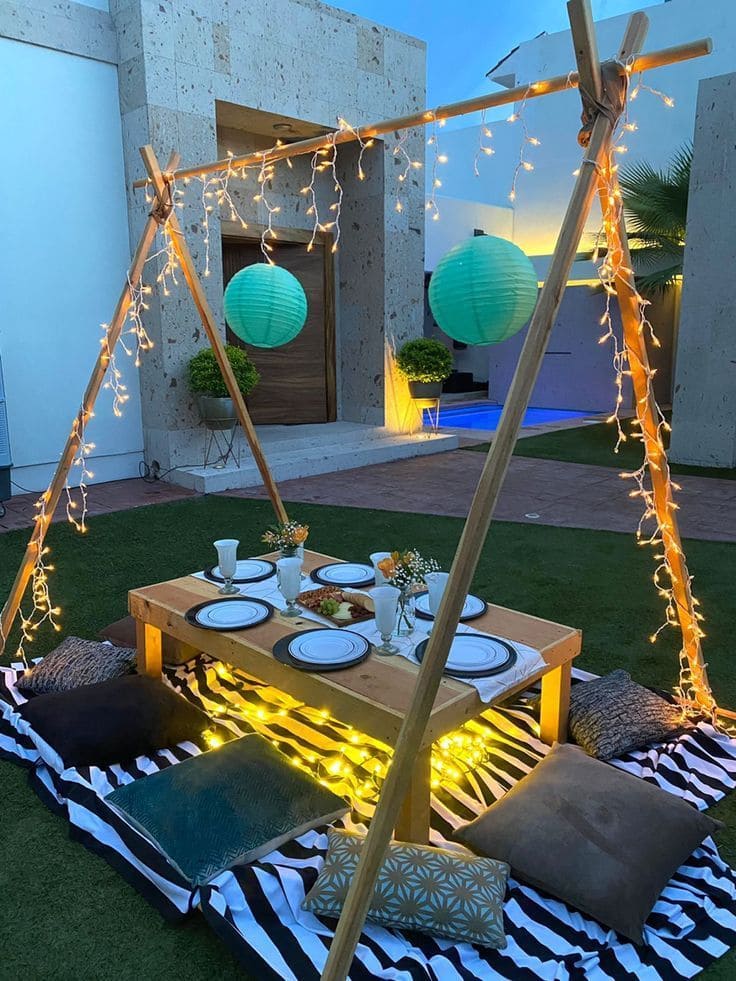
Picture this: soft pillows, gentle fairy lights, and good food on a low wooden table right under a canopy of glowing lanterns.
Whether you’re hosting a summer dinner with friends or just looking to elevate your backyard evenings, this table scene turns your lawn into a little slice of magic.
Materials Needed:
- 1 wooden table (approx. 4 ft x 2 ft)
- 2 wooden poles (6 ft each)
- 1 wooden crossbeam (around 4.5–5 ft)
- 2–3 strands of LED string lights
- 2 paper lanterns (optional, approx. 10–12”)
- 1 large picnic blanket (approx. 5 ft x 6 ft)
- 6–8 floor cushions
- Plates, cutlery, glasses, small floral vases, and a centerpiece
Step-by-Step Guide:
Step 1: Lay out your blanket or rug on a flat area of your lawn. Make sure it’s large enough to fit the table and leave space for pillows around it.
Step 2: Set your low table in the center. A DIY option is stacking two wooden crates or using a short pallet base with a top board.
Step 3: Build the A-frame using the poles and crossbeam. Lean two poles together like a teepee and secure them at the top with rope or twine. Do this on both sides, then connect the tops with your crossbeam.
Step 4: Drape and wrap your string lights along the crossbeam and down the sides of the poles. Clip or tape your lanterns to hang in the center if using.
Step 5: Place your cushions or pillows around the table. Arrange your plates, glasses, napkins, and a simple floral centerpiece to complete the scene.
#18. Boho Fiesta Table
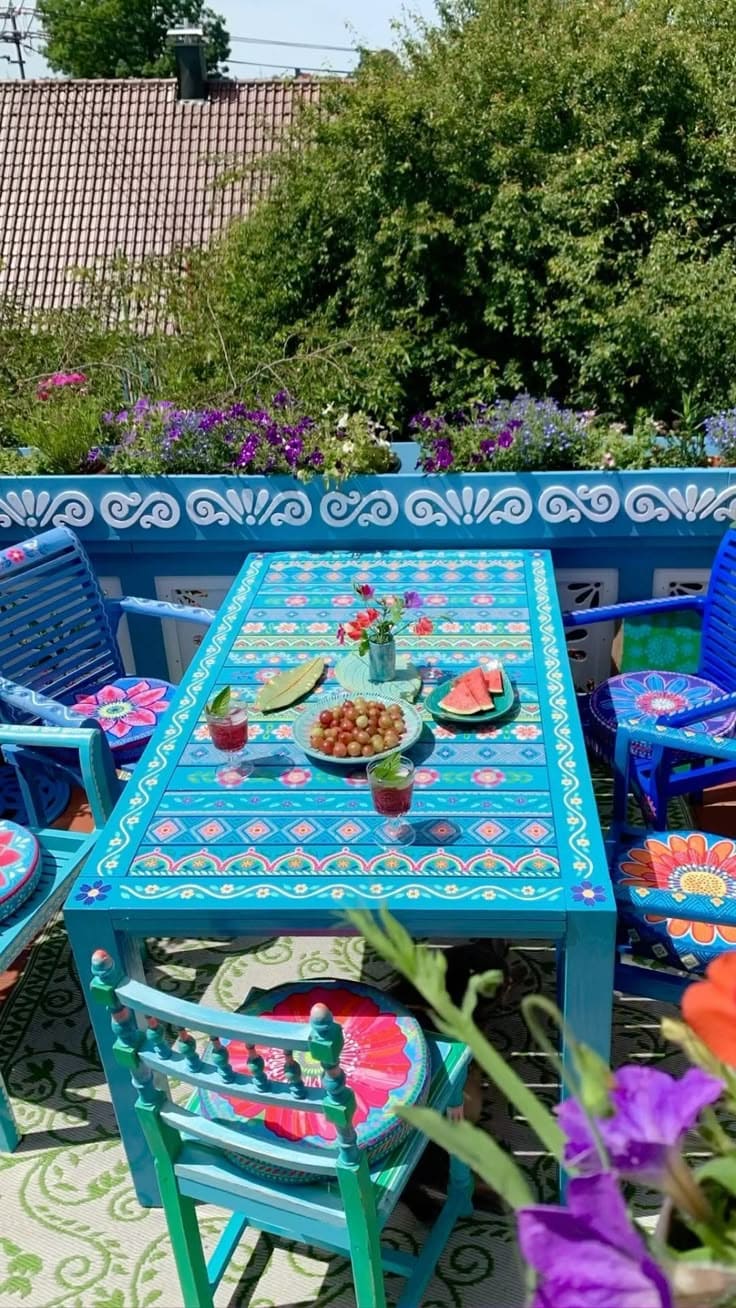
This is what happens when color meets craftsmanship. Every inch of this table celebrates summer like bright turquoises, floral bursts, and intricate hand-painted borders that feel like a party just waiting to happen.
With a little patience and a big love for pattern, you can turn your patio into a joyful escape. Think of it as your own outdoor art piece that just happens to be picnic-ready.
Materials Needed:
- 1 wooden table with chairs (smooth surface works best)
- Chalk paint or acrylic paints in turquoise, coral, pink, teal, white, navy, and lime
- Clear outdoor varnish
- Stencils or painter’s tape
- Thin detail brushes and sponges
- Sandpaper
Step-by-step Guide:
Step 1: Sand the table and chairs thoroughly, then apply a coat of base turquoise paint. Let dry and add a second coat if needed.
Step 2: Lightly sketch or stencil your border and central design. Use painter’s tape for clean edges and geometric symmetry.
Step 3: Begin layering your patterns. Use sponges for dots, detail brushes for florals, and stencils for diamonds or mandalas. Build slowly and let sections dry before adding more.
Step 4: Once finished, seal the entire piece with a clear outdoor varnish.
#19. Deckside Dining Table
This classic wooden picnic table setup is all about laid-back luxury. It strikes the perfect balance, clean lines, soft textures, and the unbeatable feel of summer shade under a wide patio umbrella.
Whether you’re sipping iced tea, sharing a casual brunch, or helping the kids with crafts, this setup turns your deck into a mini outdoor retreat.
Materials Needed:
- Wooden picnic table with matching benches
- Large patio umbrella with stand
- Outdoor rug (6×9 ft or larger)
- Wicker or rattan chairs (optional)
- Round placemats and simple dishware
- Potted plants and seasonal decor (optional)
Step-by-step Guide:
Step 1: Place your table on a clean deck or patio. Center an outdoor rug beneath it to define the space and add softness.
Step 2: Insert your patio umbrella through the table’s center opening, securing it into a weighted base below.
Step 3: Add matching benches on either side, and if desired, a couple of stylish chairs for the heads of the table.
Step 4: Set the table with woven placemats, everyday dishes, and a pitcher of iced tea or fruit water. Finish with a simple centerpiece like flowers, herbs, or fresh fruit.
#20. Rustic Rainbow Reclaimed Picnic Table
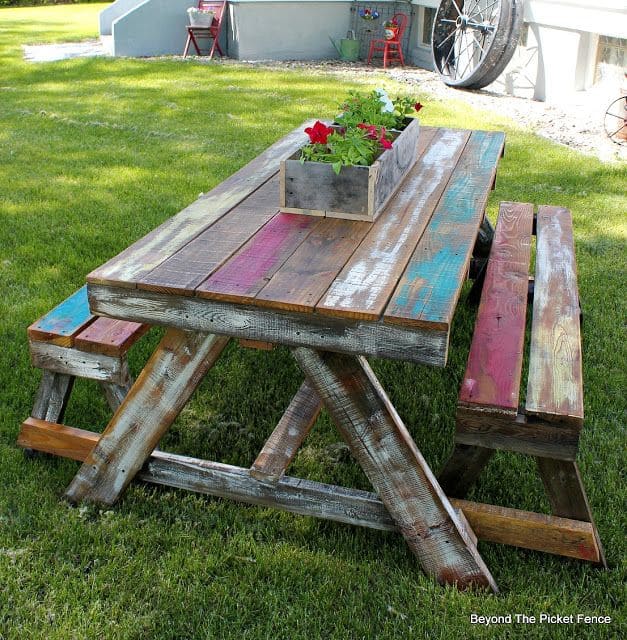
Crafted from reclaimed wood, it brings rustic texture and soul to your outdoor space while splashes of paint in faded reds, turquoise, and purples give it a playful, bohemian vibe.
It’s the kind of project that makes you feel like you built not just furniture, but character. Perfect for afternoon lemonade or late-night card games, this table invites life to unfold around it.
Materials Needed:
- Reclaimed wood planks (for tabletop: 2″x6″ or 2″x8″, approx. 6’–8′ long); (for bench seats: same type, 4–5′ long)
- 4″x4″ posts for table and bench legs
- Wood screws (3” outdoor rated)
- Wood glue
- Sandpaper (80 and 220 grit)
- Drill and saw
- Leftover paint or stain (various colors)
- Outdoor sealer
Step-by-step Guide:
Step 1: Select, clean, and sand your reclaimed wood. Keep the imperfections as they’re the charm. Lightly sand to remove grime but retain texture.
Step 2: Build the table frame and legs using sturdy 4x4s and support beams. Attach the tabletop boards across the top, mixing up the colors and widths for a mismatched look.
Step 3: Repeat the process for two benches. Secure everything with screws and use wood glue for extra hold.
Step 4: Apply random brush strokes of leftover paint to certain planks. Don’t worry about full coverage, just enough to give it that aged, worn-in look.
#21. Checkerboard Picnic Table
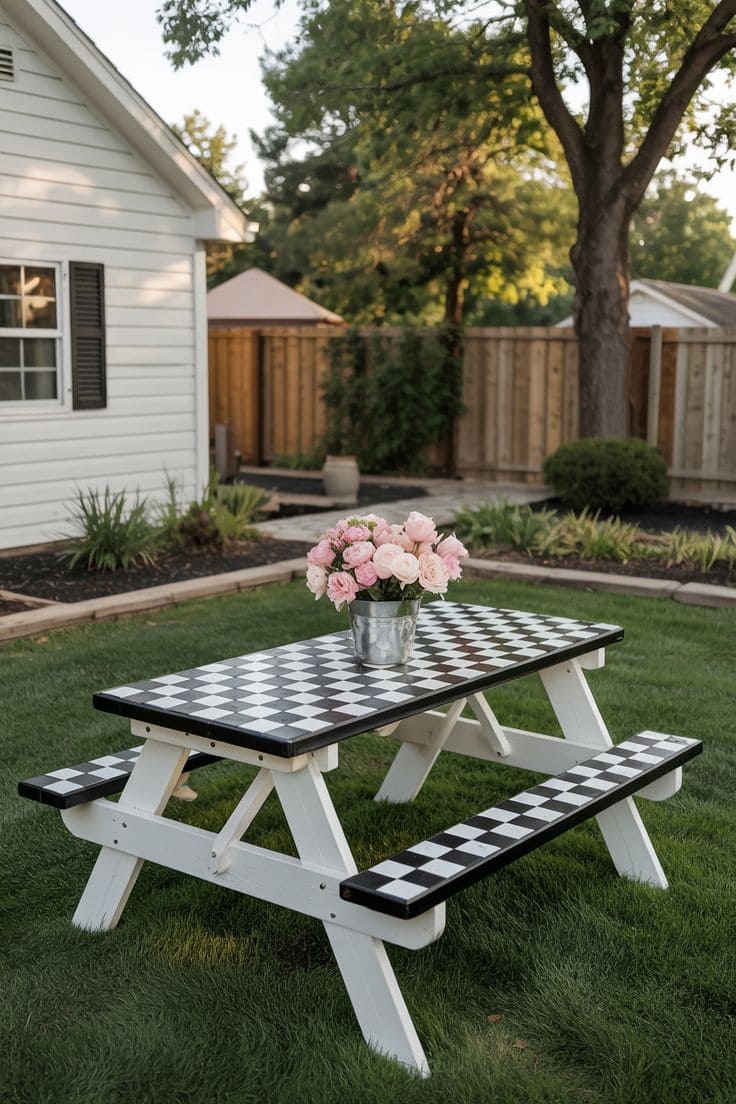
The crisp black-and-white checkerboard pattern brings a retro-cool vibe to any backyard while doubling as a built-in board game.
Whether you’re sipping iced coffee with a friend or playing an impromptu round of checkers with the kids, this table turns everyday moments into something a little more delightful. And the best part is that it looks way more complicated than it is.
Materials Needed:
- 1 wooden picnic table
- Black and white outdoor paint (1 qt. each)
- Painter’s tape or checkerboard stencil
- Ruler or measuring tape
- Clear polyurethane sealer
- Paintbrushes
Step-by-step Guide:
Step 1: Sand and clean the table thoroughly. Paint the base and legs white or another light color for contrast. Let dry.
Step 2: Measure and mark a grid of equal squares (usually 2″ or 3″) across the tabletop and bench seats using a pencil and ruler.
Step 3: Use painter’s tape or a checkerboard stencil to block off every other square. Paint the open squares black. Let dry and repeat for a second coat if needed.
Step 4: Remove the tape carefully and touch up any uneven edges. Once the design is dry, seal the entire surface with a weather-resistant clear coat.
#22. Modern Farmhouse Deck Table
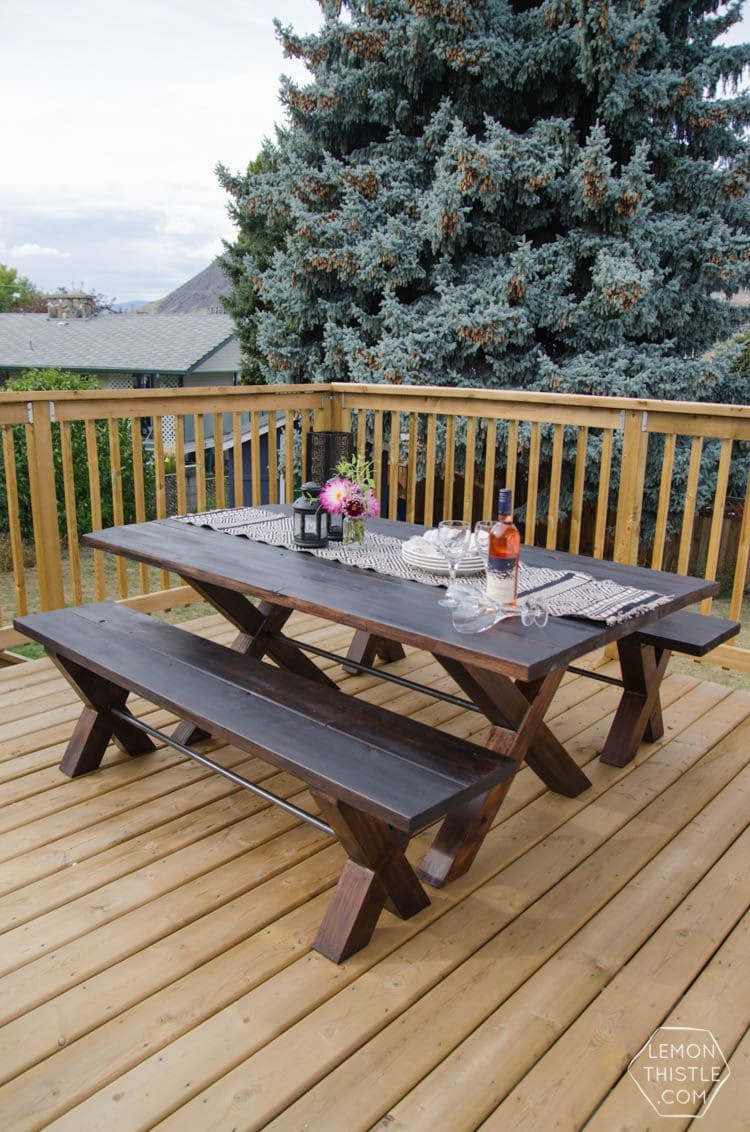
There’s something grounding about sitting around a solid, hand-built table with the scent of pine in the air and a chilled bottle of rosé ready to open.
This picnic table feels sturdy, generous, and beautifully understated perfect for both casual dinners and quiet mornings with a book. The deep espresso stain contrasts softly with the natural deck, making it a timeless focal point for any summer space.
Materials Needed:
- 2×6 cedar or pine boards (approx. 8–10 boards, 6 ft long)
- 4×4 posts (4 pieces, each 29″–30″)
- Galvanized steel pipe or black pipe (2 pieces)
- Wood screws (3″ outdoor-grade)
- Wood glue
- Dark walnut
- Matte weatherproof sealant
Step-by-step Guide:
Step 1: Cut all wood to your desired dimensions. Assemble the tabletop by lining up 2x6s side by side and screwing them into two perpendicular base slats underneath for support.
Step 2: Build the legs using 4x4s cut on a 45-degree angle to create the “X” shape. Anchor each leg with cross braces, securing tightly with wood glue and screws.
Step 3: For extra strength and a bit of industrial charm, run a metal pipe across the base of each bench using pipe flanges and screws.
Step 4: Sand the entire structure thoroughly. Apply the wood stain evenly and allow it to dry fully before sealing with a waterproof outdoor topcoat.
#23. Cable Spool Picnic Table with Semi-Circle Benches
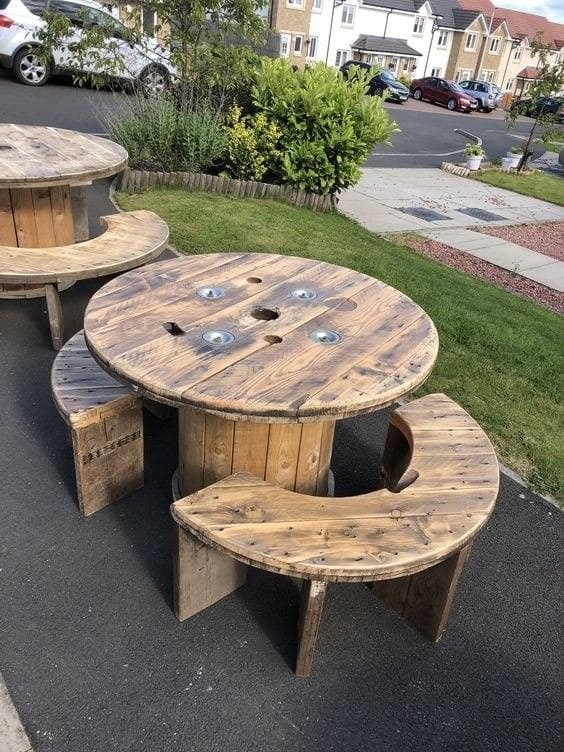
This picnic table, built from a reclaimed wooden cable spool and custom half-moon benches, adds rustic charm and functionality to any outdoor setting.
It’s sturdy, round for easy conversation, and uniquely eye-catching. Perfect for summer picnics, impromptu card games, or a quiet coffee moment in the front yard.
Materials Needed:
- 1 large wooden cable spool (approx. 4–5 ft diameter)
- 2–3 wooden planks (for reinforcing and resurfacing)
- 6–8 wooden boards (2″x6″ or similar)
- Screws and nails (outdoor-grade)
- Wood filler (optional)
- Sandpaper (coarse + fine)
- Outdoor wood stain
- Jigsaw or bandsaw
- Drill and driver
Step-by-step Guide:
Step 1: Sand down the entire cable spool thoroughly to remove splinters and rough edges. Fill in any large gaps with wood filler and let dry.
Step 2: Measure and cut the bench tops into half-moon shapes. Use the table’s diameter to trace matching curves on your boards, then cut with a jigsaw.
Step 3: Build bench frames using sturdy wood blocks or scrap lumber. Attach curved seats on top securely with screws, and test for balance.
Step 4: Stain or seal all wood surfaces to withstand the elements. You can also paint the benches for a fun contrast if you prefer more color.