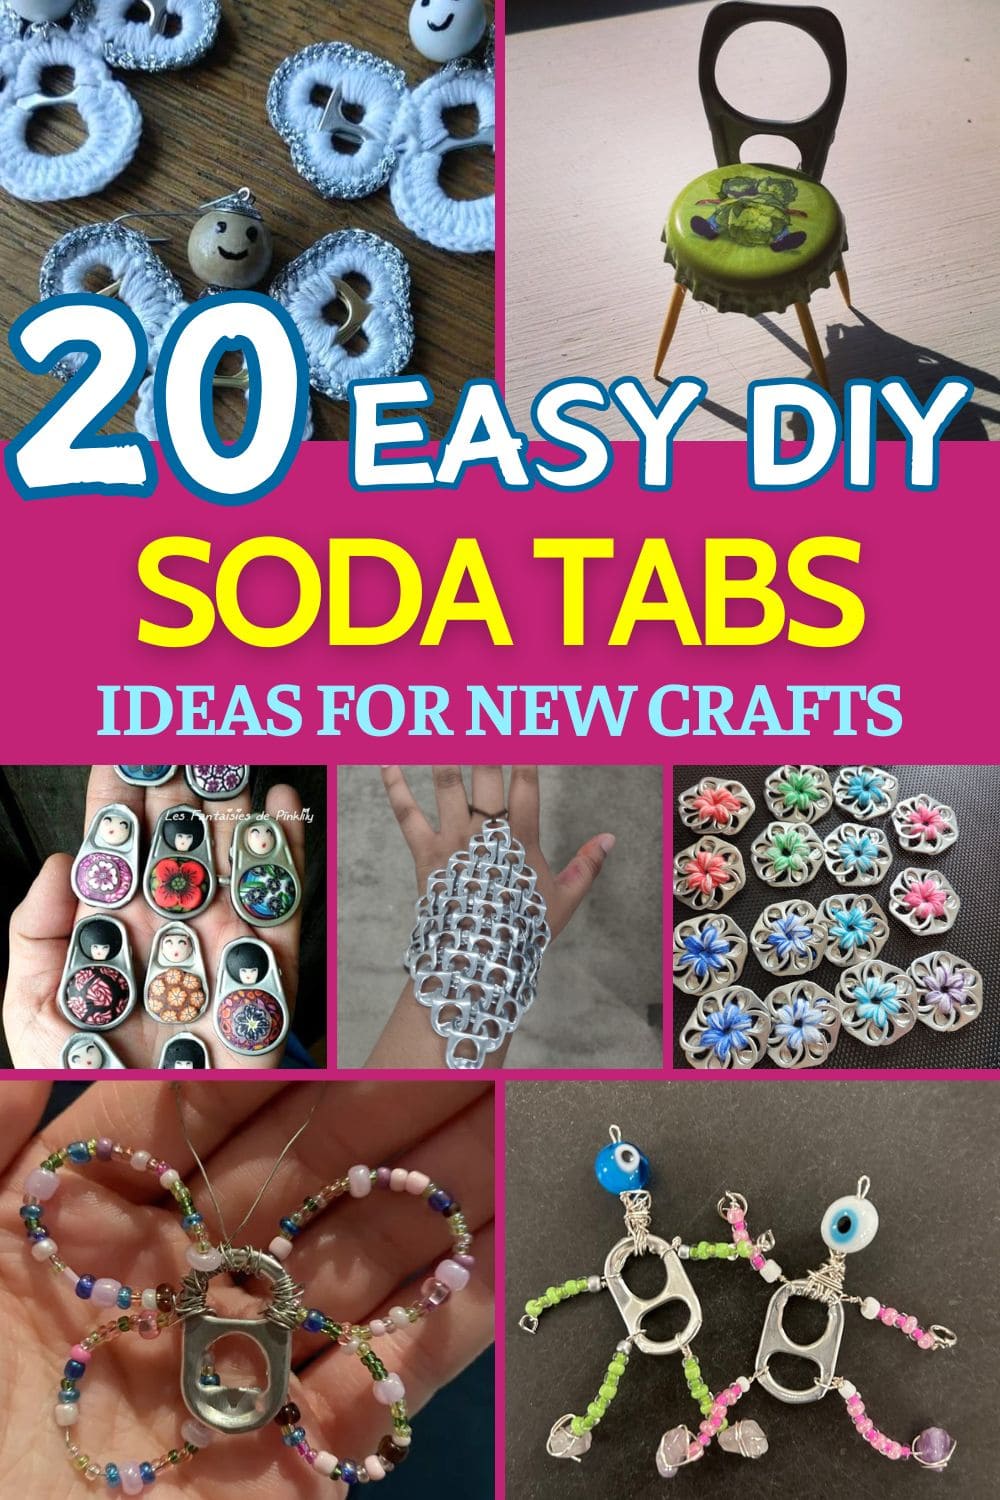
Every year, billions of soda tabs end up tossed in the trash, they are tiny pieces of metal overlooked and forgotten. But what if those little tabs had a second chance?
With just a bit of imagination, you can transform them into stunning crafts that are fun, affordable, and eco-friendly. From jewelry and keychains to ornaments and home décor, these humble tabs are surprisingly versatile.
Whether you’re a dedicated DIY-er or just looking for a weekend project, this collection proves that even the smallest items can spark creativity. So before you throw that next tab away, take a look, you might just find your next favorite craft idea right here.
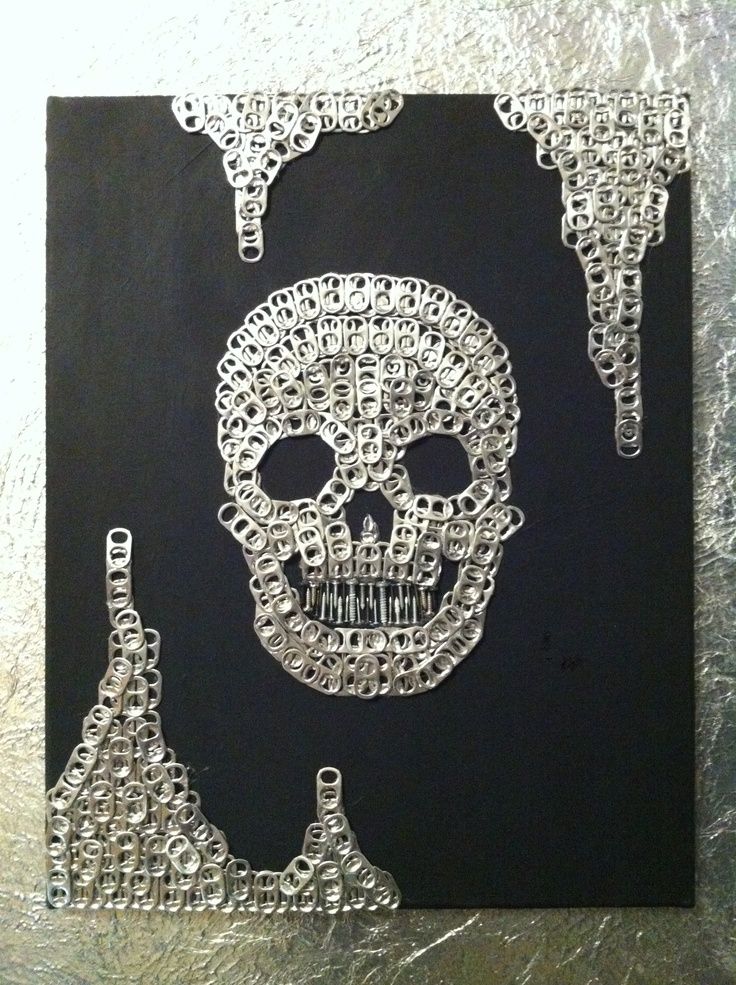
This edgy Halloween wall piece proves that even the humblest materials can be hauntingly cool. Crafted entirely from silver soda can tabs arranged on a matte black canvas, this skull design pops with texture and shine.
Specially, the contrast gives it a dramatic, almost industrial look, perfect for modern or minimalist Halloween decor. It’s a surprisingly relaxing project once you get into the rhythm of gluing down each tab, and the final result is guaranteed to spark conversation.
Materials Needed
- Canvas or wooden board (11″×14″ or larger)
- 150-200 silver soda can tabs
- Black acrylic paint
- Hot glue gun
- Pencil and chalk
Step-by-step Guide
Step 1: Paint your canvas or board black and let it dry completely. Then lightly sketch the outline of a skull and surrounding drips using chalk or pencil.
Step 2: Begin placing and gluing tabs along the outer lines, then fill in the interior details.
Step 3: Use denser layers of tabs around the teeth and eyes to add depth and definition.
Step 4: Hang the finished piece using command strips or frame it for a cleaner presentation.
Tip: You can try spraying the tabs with black or red paint for a blood-drip effect or leaving them silver for that sleek, metallic gleam.
#1. Soda Tab Wall Art
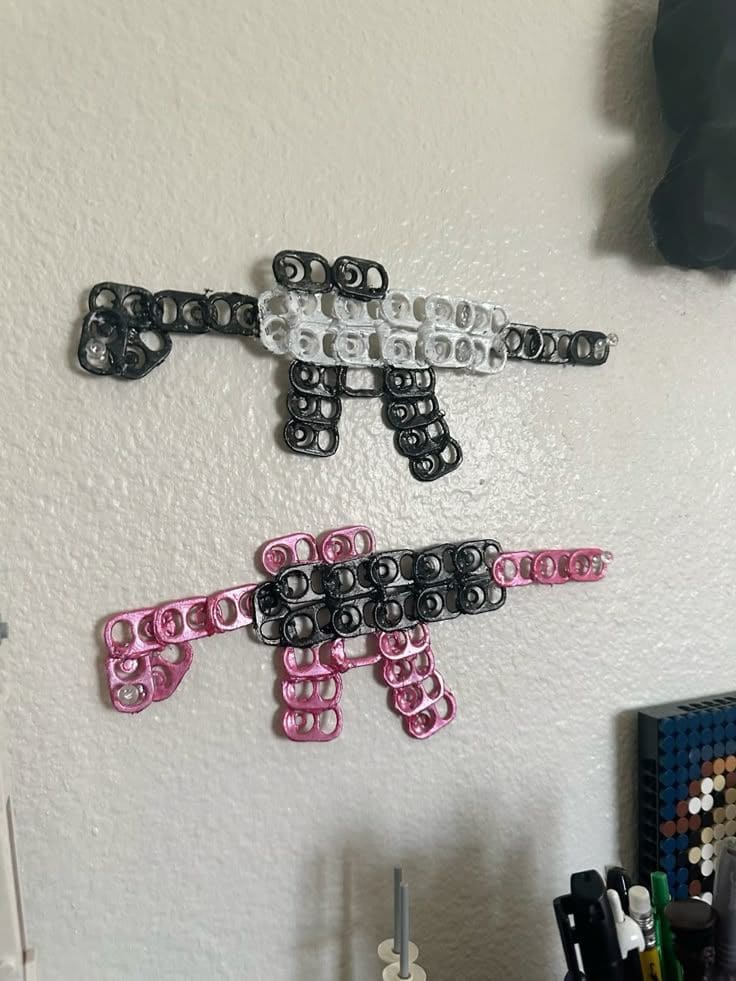
Let’s be honest, this one’s not your average “cute” soda tab craft. It’s bold, unexpected, and a little cheeky.
Shaped like pixelated rifles from retro video games, these soda tab wall pieces bring a dose of gamer energy to your room decor.
Materials Needed
- Around 40–50 soda tabs per design
- Spray paint (your choice of colors)
- Hot glue gun
- Cardboard (optional)
- Pencil
- Wall-safe mounting tape
Step-by-step Guide
Step 1: Choose your color scheme and paint your soda tabs. Let them dry completely.
Step 2: Lay out your design on a flat surface, using a reference image or pixel gun shape as a guide. Arrange your tabs in rows to mimic the squared-off game sprite look.
Step 3: Glue the tabs together where they touch, or glue them onto a thin backing board for extra strength. Let everything dry flat.
Step 4: Mount your artwork on the wall with double-sided tape.
#2. Soda Tab Beaded Butterfly
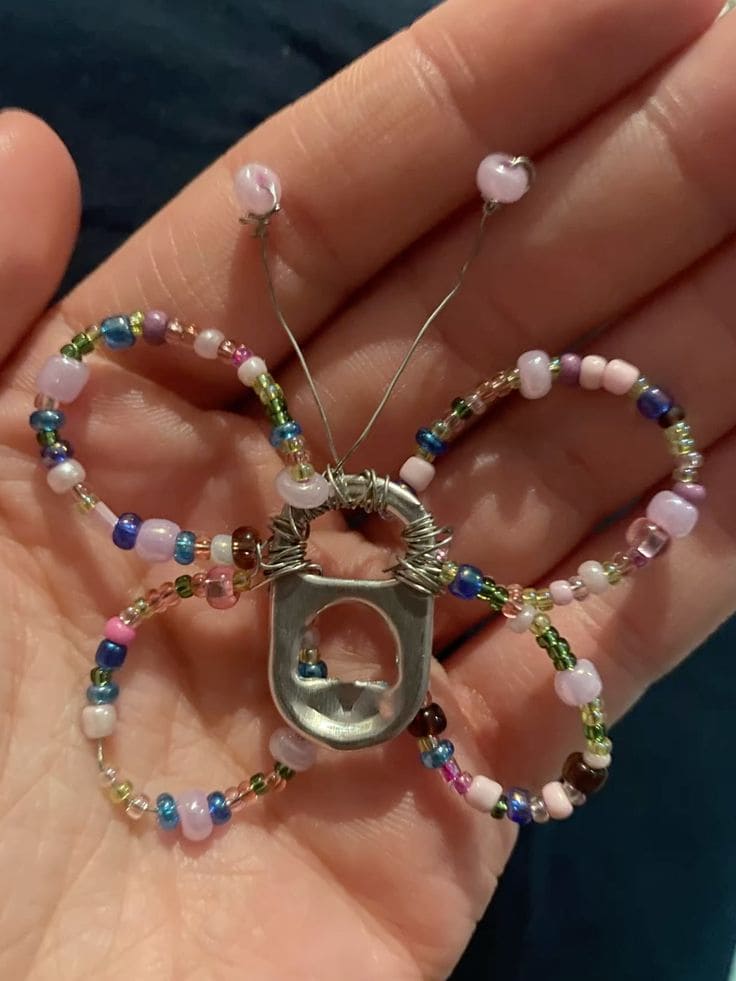
Sometimes, the smallest scraps become the most delicate creations. This sweet design makes a lovely gift topper, a window decoration, or even a spring-themed brooch.
With just a soda tab, some wire, and a sprinkle of beads, you can shape a little butterfly that looks like it’s ready to flutter off your fingers.
Materials Needed
- 1 soda tab
- 4 pieces of craft wire (22–24 gauge, about 6″ long each)
- 60-80 assorted seed beads
- 2-4 larger beads
- Wire cutters and round-nose pliers
Step-by-step Guide
Step 1: Start by wrapping two pieces of wire securely around the top and bottom sides of the soda tab.
Step 2: Thread seed beads onto one wire, shaping it into a loop to form a butterfly wing, then twist the end to secure. Repeat for the opposite side.
Step 3: Use a separate wire to create the antennae. Fold it in half, twist the base around the top of the soda tab, and add one larger bead to each tip.
Step 4: Adjust the wing loops so they’re symmetrical and gently curve them outward for dimension.
#3. Soda Tab Friendship Bracelets
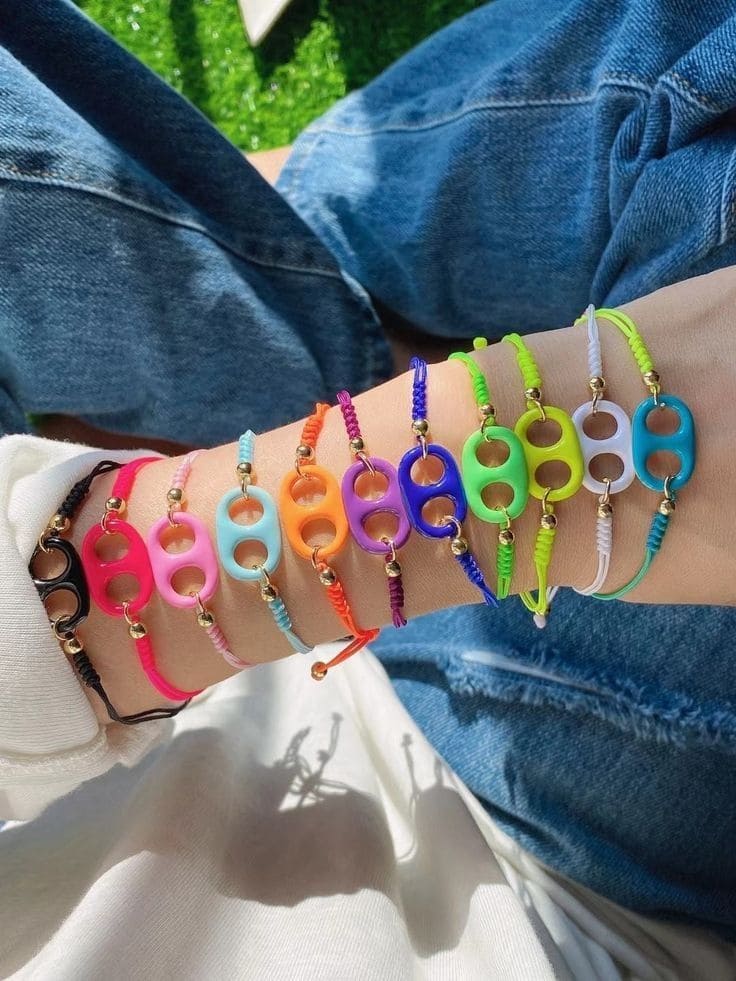
Whether you’re heading to a summer festival, planning a sleepover craft night, or just love stacking bracelets that pop, this idea is fun, fast, and budget-friendly. You can mix and match cord colors or make a full rainbow set.
Materials Needed
- 1 soda tab per bracelet
- Acrylic paint (in bright/neon shades)
- 2 lengths of waxed cord (about 10″ each)
- 4 small gold or silver beads
- Tape
Step-by-step Guide
Step 1: Start by painting the soda tabs in fun colors. Let them dry fully. Add a clear sealant if you want to protect the paint.
Step 2: Thread one cord through one hole of the tab and another through the opposite hole. Slide a bead onto each cord end and knot below it to keep it in place.
Step 3: Braid, knot, or simply tie off the cords on each side to fit your wrist.
#4. Soda Tab Heart Earrings
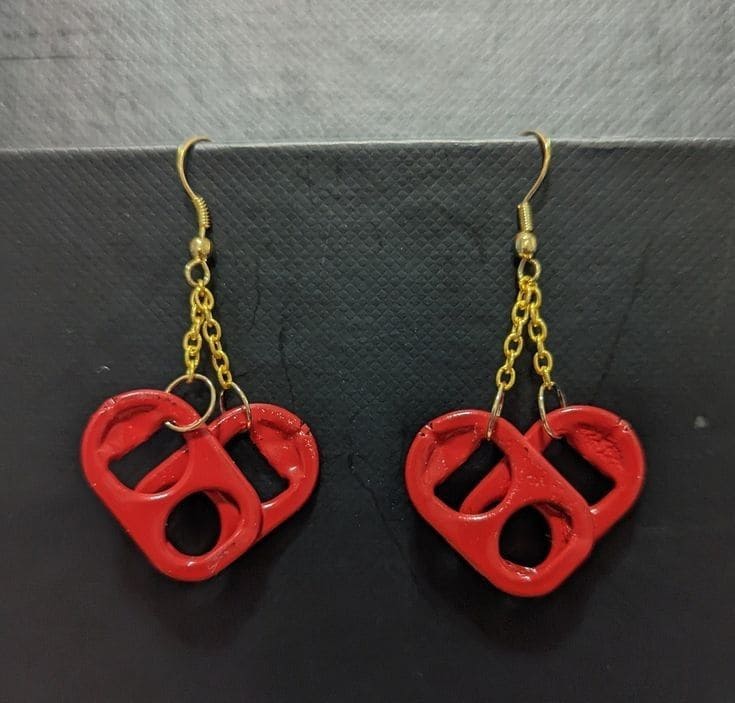
Painted a striking red and paired with gold chains, they look like something you’d spot at a street market or a pop-up jewelry stall. The best part is that you can make them in under an hour with just a few tools and a touch of creative flair.
Materials Needed
- 4 soda tabs (2 per earring)
- Red acrylic paint
- 2 jump rings
- 2 short gold chains (approx. 1.5–2″ long)
- 2 earring hooks
- Pliers (flat-nose and round-nose)
- Clear sealant (optional)
Step-by-step Guide
Step 1: Paint the soda tabs in your chosen shade, red gives a statement look, but you can also go metallic or pastel.
Step 2: Use pliers to slightly bend and overlap two tabs into a heart shape. You can glue them together at the bottom for added stability.
Step 3: Attach a short chain to each pair using jump rings, then connect the other end of the chain to an earring hook.
#5. Soda Tab Flower Suncatchers
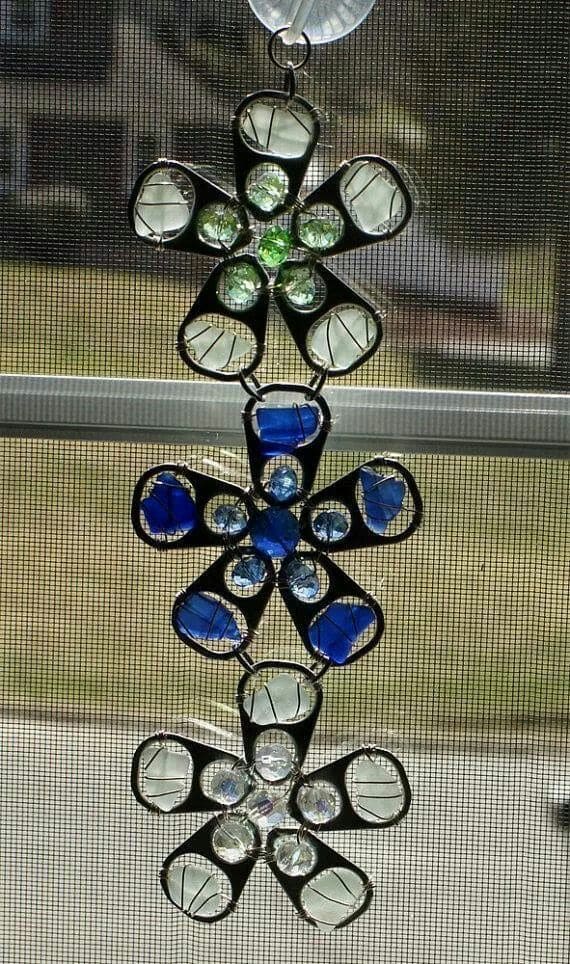
You don’t need a stained glass window to bring shimmer and glow into your space. Instead, these flower suncatchers do the trick beautifully by turning soda tabs, marbles, and a little wire into delicate light-catchers that dance in the sun.
Materials Needed
- 5 soda tabs per flower
- 5 flat glass marbles
- Super glue
- Black wire (24 gauge)
- Needle-nose pliers
- Hanging hook
Step-by-step Guide
Step 1: Clean your soda tabs and bend each one slightly into a curve, so they mimic flower petals.
Step 2: Arrange 5 tabs in a circular flower shape, flat side inward. Use a thin wire to secure them at the center, twisting tightly on the back to hold everything in place.
Step 3: Glue a marble in the center of the flower, then glue one inside each soda tab loop.
Step 4: Create a loop with wire at the top of the flower, or connect several flowers vertically like a cascading chain.
#6. Soda Tab Painted Necklaces

Believe or not, just add a chain and a few embellishments, you’ve got yourself a necklace that’s playful, wearable, and totally one-of-a-kind.
Materials Needed
- 1 soda tab per necklace
- Acrylic paint (any color you love)
- Paintbrush
- Small rhinestones, beads, or stickers
- Strong glue
- Clear sealant
- Jewelry chain + jump ring + clasp
- Small pliers
Step-by-step Guide
Step 1: Paint your soda tab with a base color. Let it dry completely, then add details like polka dots, stripes, or even tiny illustrations. You can use the back side for a smooth surface.
Step 2: Decorate with rhinestones, gems, or mini charms.
Step 3: Once everything’s dry, coat the piece with a clear sealant to protect your design and give it shine.
Step 4: Attach a jump ring through the top hole of the tab and thread your necklace chain through. Finish with a clasp.
#7. Soda Tab Beaded Buddies
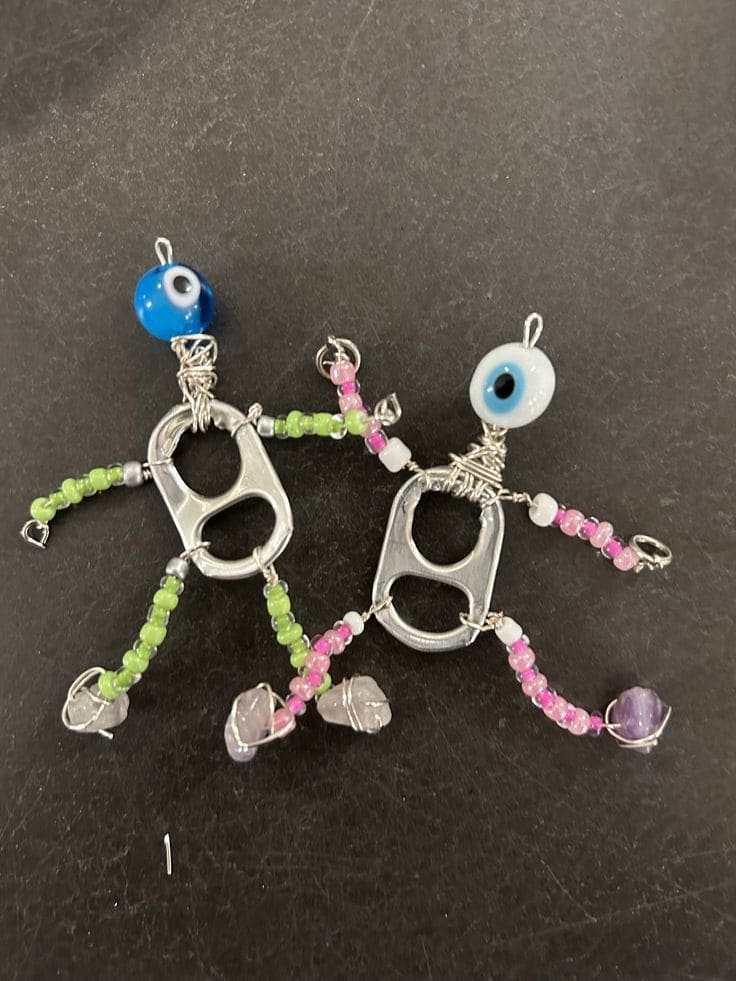
I made a pair with my niece over the weekend and couldn’t stop smiling as they jiggle, sparkle, and look like they’re about to dance off the table.
Especially, you can personalize them endlessly with different bead colors, wire shapes, or even make a whole chain of them as a mobile.
Materials Needed
- 1 soda tab per figure
- 2 glass or plastic beads (10mm
- 4 small gemstone
- 24 seed beads per figure (mix of colors)
- 4 pieces of thin craft wire (22–24 gauge, 5″ each)
- Jewelry pliers
- 1 jump ring (optional)
Step-by-step Guide
Step 1: Thread a wire through the top hole of the soda tab. Twist and wrap it around to secure, then string a large bead onto the wire to create the head.
Step 2: For the arms, take a wire and thread it through one side hole of the tab. Slide on 6–8 seed beads, add a larger bead at the end, then loop and twist the wire to secure. You repeat for the other side.
Step 3: For the legs, insert wires through the bottom hole of the soda tab. Bead each leg with 6–8 seed beads, add a gemstone bead at the tip for the foot, then finish with a small wire loop.
Step 4: Use the pliers to gently adjust the limbs so they bend naturally.
#8. Soda Tab Mini Gas Mask Pendant

This little soda tab gas mask is one of the coolest low-effort, high-impact projects you can make from upcycled materials.
Materials Needed
- 1 soda tab
- 1 small round pull tab
- 2 metal screws
- Strong adhesive (E6000 or hot glue)
- Optional: jump ring
Step-by-step Guide
Step 1: Start by placing the soda tab horizontally.
Step 2: Glue the small tab or metal ring vertically just beneath the eye holes.
Step 3: On each side of the lower tab, glue a small screw, nut, or thick bead to act as the side filters. Let everything dry completely.
#9. Soda Tab Cat Ring
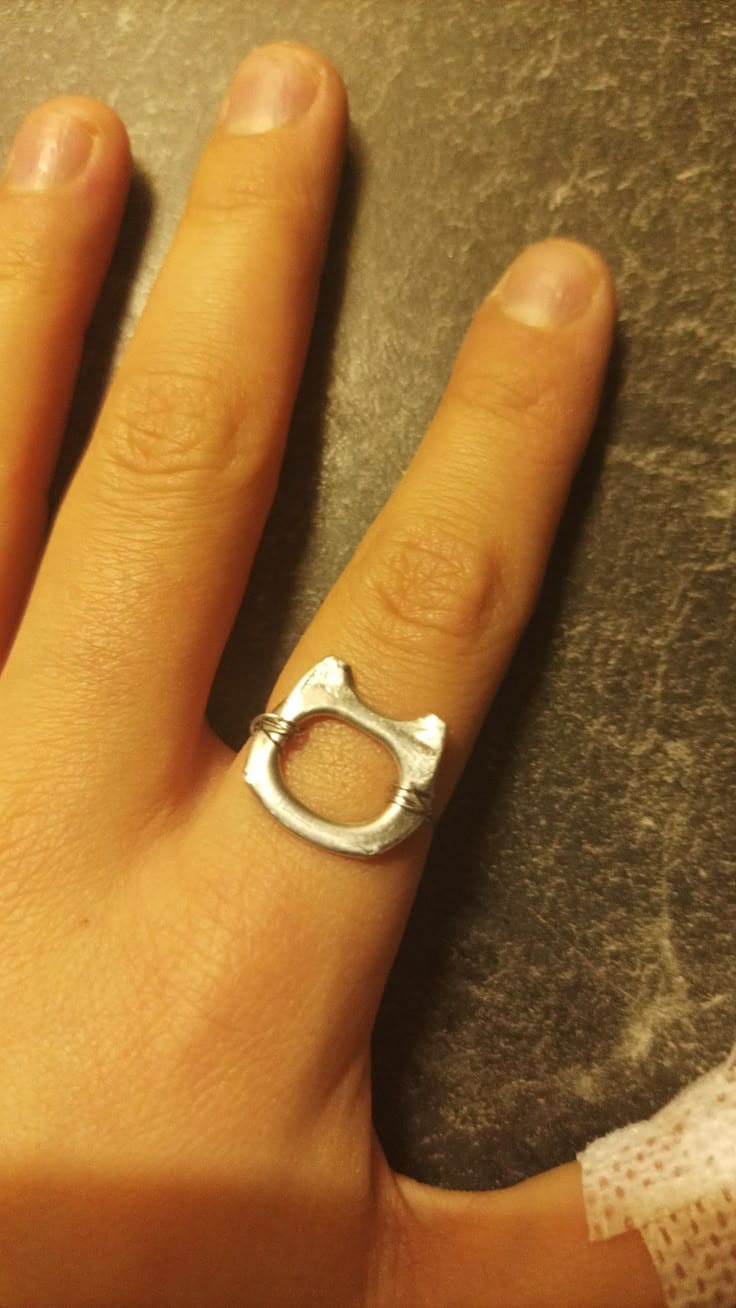
Here’s a little ring that proves less is definitely more. All it takes is one soda tab, a bit of shaping, and a sprinkle of imagination to turn scrap metal into something adorably wearable.
Materials Needed
- 1 soda tab
- Metal file or sandpaper
- Pliers
- Thin jewelry wire (around 24–26 gauge)
- Wire cutters
Step-by-step Guide
Step 1: File down the soda tab’s sharp edges. If you’re shaping cat ears, use pliers to gently pinch or snip two slight peaks at the top of the tab.
Step 2: Bend the tab slightly to fit the curve of your finger.
Step 3: Wrap a thin wire around each side of the tab to secure it snugly in place. You can adjust the ring size by how tightly the wire is pulled.
Step 4: Tuck in the wire ends and make sure everything sits flush against your skin.
#10. Bottle Cap Wind Chime
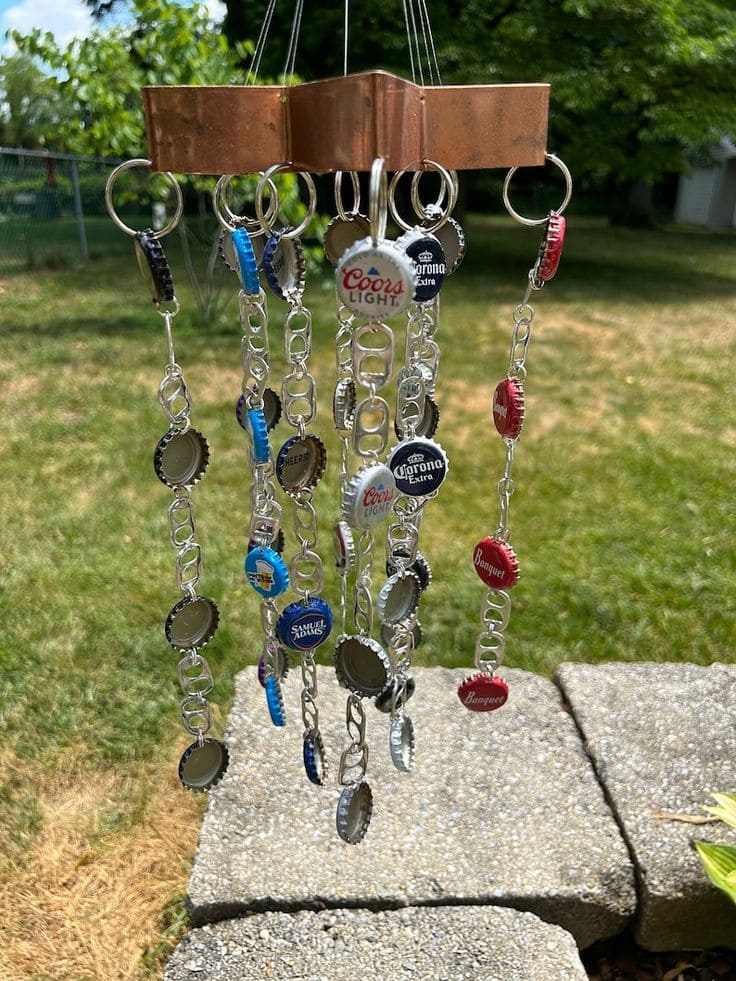
This DIY wind chime is practically begging to hang from your porch or patio. It clinks and clatters in the wind like a backyard symphony and it’s made entirely from stuff you’d normally toss out.
Materials Needed
- 25–30 bottle caps
- 20-25 soda tabs
- Jump rings (2 per bottle cap)
- Small metal chain (approx. 4 ft, cut into strands)
- Drill o
- Pliers
- Sturdy metal base
- Fishing line
Step-by-step Guide
Step 1: Drill or punch two holes in the edge of each bottle cap, opposite each other.
Step 2: Use pliers to open a jump ring and link it through each hole, then connect caps and soda tabs together with short lengths of chain.
Step 3: Attach each strand to the bottom of your wooden or metal base using more jump rings or screws.
Step 4: Add fishing line to the top for hanging.
#11. Soda Tab Flower Embellishments
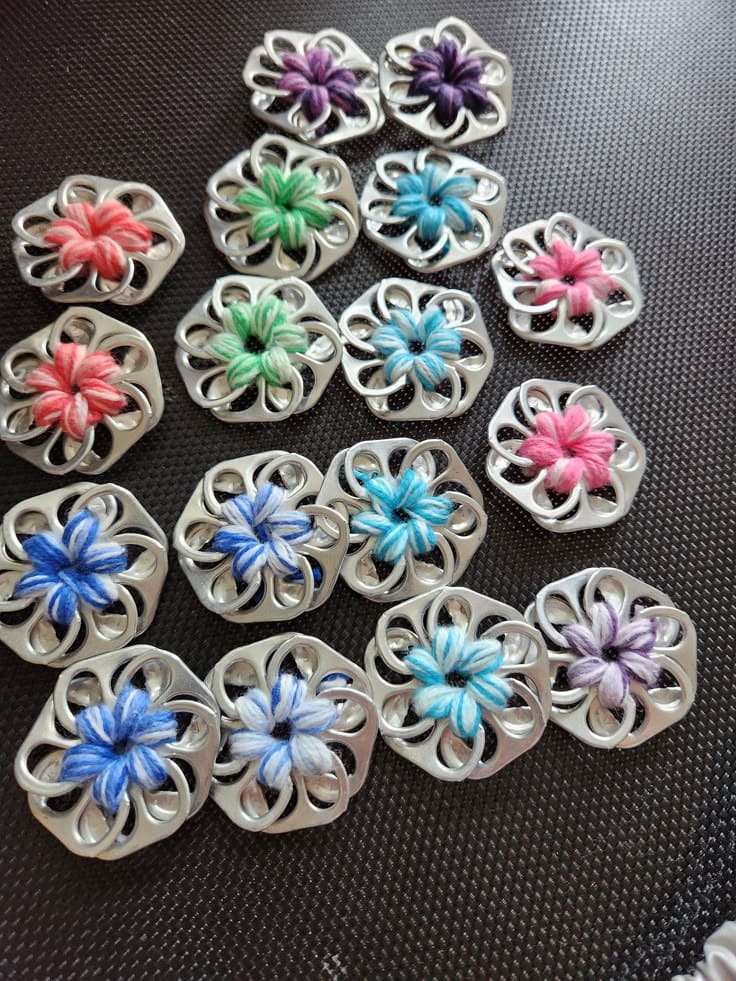
These mini blooms are perfect for decorating hair clips, headbands, scrapbooks, or even handmade greeting cards. They’re lightweight, customizable, and satisfyingly meditative to make.
Materials Needed
- 6 soda tabs per flower
- Embroidery floss
- Large-eye needle
- Scissors
- Optional: glue gun, felt backing, or accessories
Step-by-step Guide
Step 1: Clean the soda tabs and smooth any rough edges. You want the loops around the holes to stay intact.
Step 2: Thread a long piece of yarn through your needle and begin looping it in and out of the holes around the center, weaving in a circular motion to mimic flower petals.
Step 3: Keep tension even and pull snugly after each stitch.
Step 4: Once your flower looks full, tie off the end on the back of the tab.
#12. Soda Tab Troll Faces
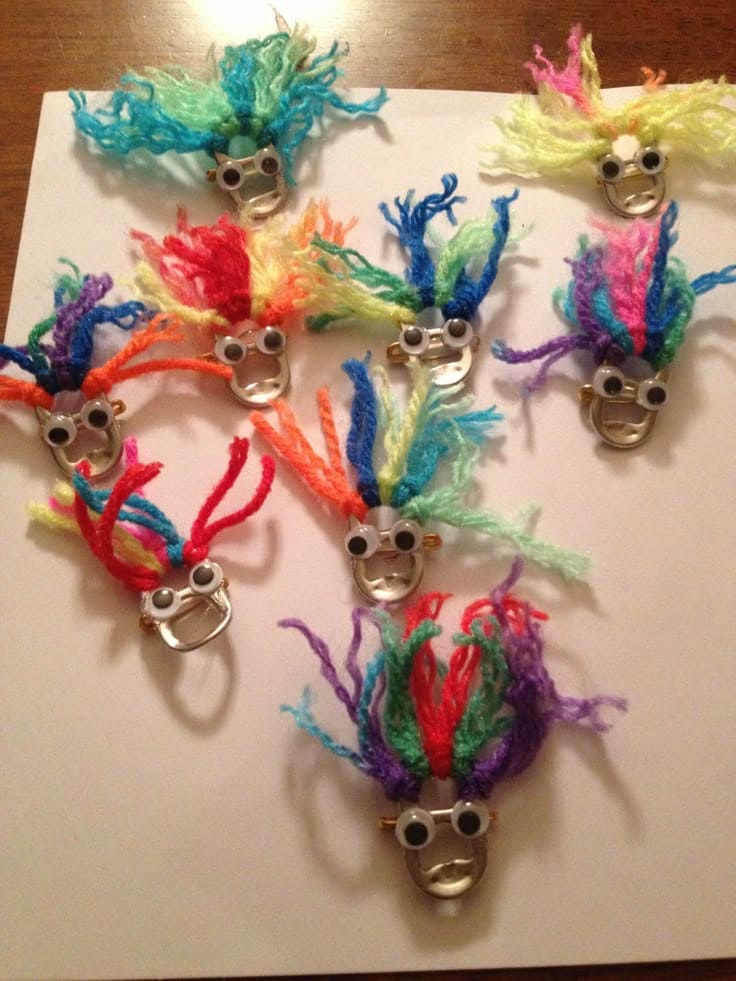
If you’re looking for a quick, cheerful craft that kids will love, these soda tab troll faces are a must-try.
With bright, wild yarn hair and goofy googly eyes, each one turns out hilariously unique. They make fantastic party favors, locker decorations, or backpack charms and best of all, you’re giving those soda tabs a second life in the most colorful way.
Materials Needed
- 1 soda tab per troll
- 2 googly eyes (8mm–12mm)
- 5–7 yarn strands (4 inches long, assorted colors)
- Hot glue gun
- Scissors
- Optional: magnet, pin, or keyring
Step-by-step Guide
Step 1: Start by cutting 5 to 7 strands of yarn, about 4 inches each. Fold each strand in half.
Step 2: Add a line of glue along the back top edge of the soda tab, then press the folded yarn pieces into the glue.
Step 3: Once dry, flip the yarn over to the front to create that iconic troll hair look.
Step 4: Glue two googly eyes above the large hole on the soda tab.
#13. Soda Tab Chainmail Handpiece

If you’re into statement accessories that feel like armor and art combined, this soda tab chainmail design is a showstopper.
Inspired by medieval gauntlets but with a modern upcycled twist, this piece drapes across your hand like silver scales and of course, you’ll stand out among the crowded.
Materials Needed
- 50-60 soda tabs (depending on size of hand)
- Thin leather cord
- Yarn
- Scissors
- Hot glue or needle
Step-by-step Guide
Step 1: Start weaving the tabs together in rows. Overlap each tab slightly and use cord to tie them through their side holes. You need to build a diamond or triangle pattern that narrows near the top and widens over the wrist.
Step 2: Once your main piece fits comfortably over the back of your hand, attach a yarn or twine loop at the top center.
Step 3: Tie off the ends around your wrist using extra cord.
#14. Soda Tab and Bottle Cap Mini Chair
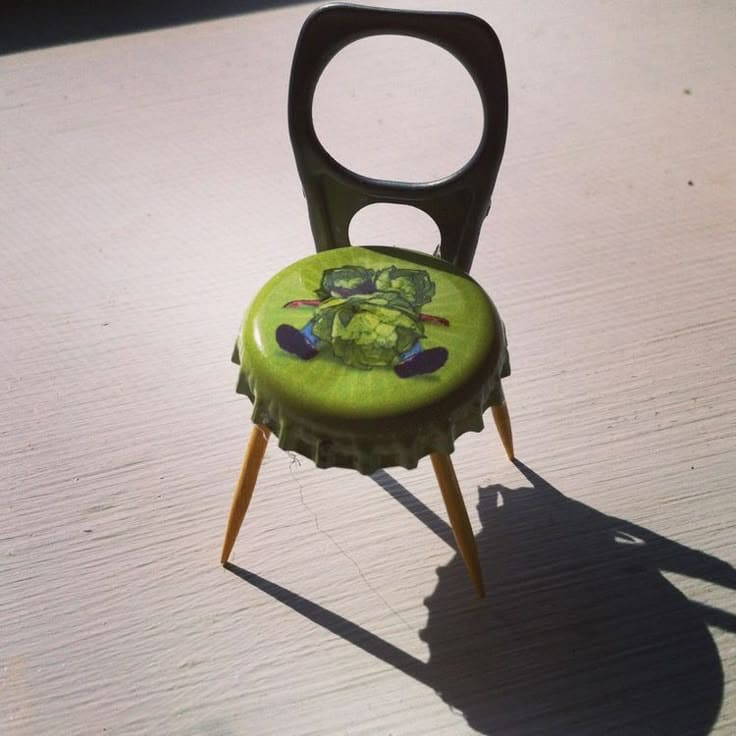
Oh my god, this mini furniture is lovely with no cost. The only things you need to gather is a soda tab and bottle cap with some simple materials to create a fairy garden.
Materials Needed
- 1 soda tab
- 1 bottle cap
- 4 toothpicks
- Strong glue (like hot glue or E6000)
- Paint or decorative stickers (optional)
- Scissors
Step-by-step Guide
Step 1: Clean and dry your bottle cap and soda tab. If desired, decorate the bottle cap with paint, paper cutouts, or stickers.
Step 2: Cut the ends of four toothpicks to make equal-length chair legs. Angle them slightly so the chair will stand securely.
Step 3: Glue the legs evenly around the underside of the bottle cap. Let dry completely before adding any pressure.
Step 4: Attach the soda tab vertically to the back of the cap to form the chair back.
#15. Soda Tab Christmas Ornament
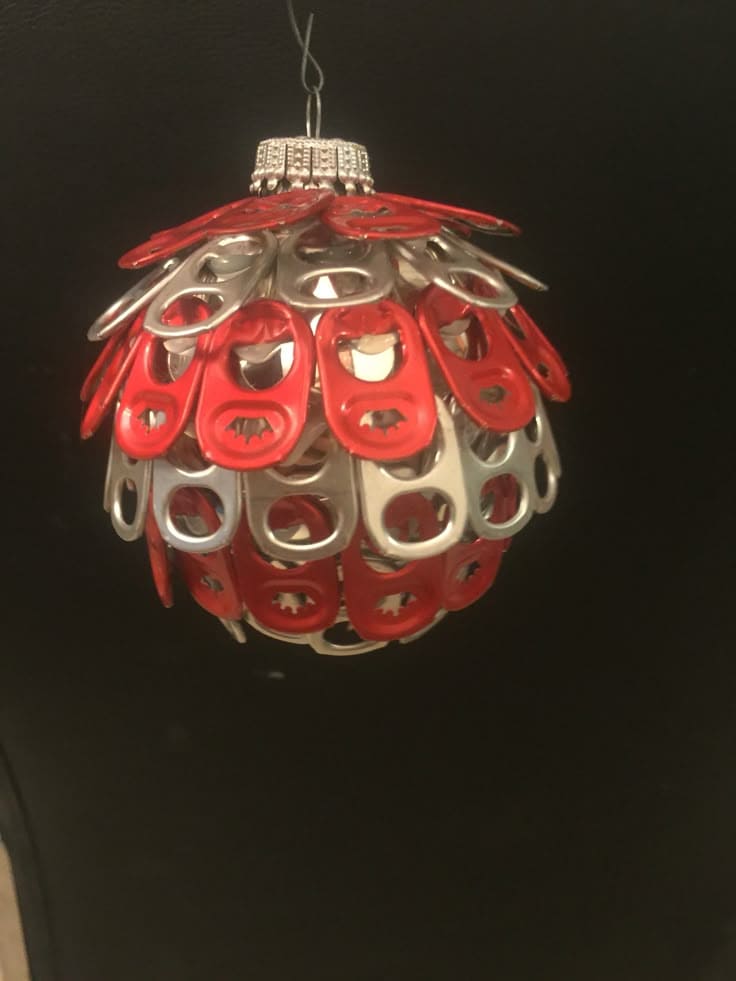
Who knew soda tabs could sparkle like this? With just a bit of layering and creativity, you can turn an old ornament ball and some colored tabs into a shimmering piece of holiday decor.
Materials Needed
- 1 foam or plastic ornament ball (3–4″ diameter)
- Approximately 60 soda tabs
- Red spray paint (optional)
- Hot glue gun and glue sticks
- Rhinestone ribbon
- Ornament hook
Step-by-step Guide
Step 1: If you don’t already have colored tabs, spray paint half of your soda tabs red and let them dry fully.
Step 2: Starting from the bottom of the ornament ball, begin hot gluing the tabs in overlapping layers. Angle each one slightly to mimic a pinecone or scale effect.
Step 3: Work your way up in rows, alternating between red and silver, then press down gently as you go to make sure each piece adheres securely.
Step 4: Once the entire ball is covered, add a rhinestone ribbon or a strip of bead trim around the top for a polished finish.
#16. Soda Tab Kokeshi Dolls
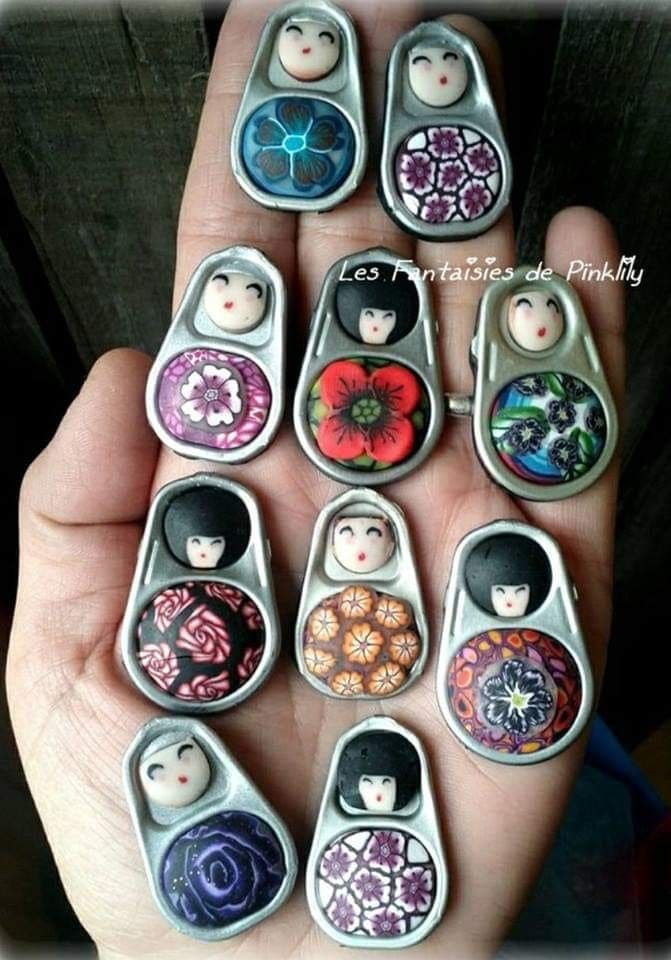
Inspired by traditional Japanese figurines, this project turns soda tabs into miniature art pieces using polymer clay and floral patterns. Each one tells its own story through color and expression, making them beautiful keepsakes or thoughtful handmade gifts.
Materials Needed
- 1 soda tab per doll
- Polymer clay: skin-tone, black, red, white, and other preferred colors
- Flower-patterned cane slices (1 per doll)
- Craft glue
- Sculpting tools
- Oven
Step-by-step Guide
Step 1: Begin by shaping a small round bead from skin-tone clay for the face. Flatten it gently and use a fine-point tool to add simple eyes and a mouth, then bake the piece according to clay package instructions and let cool.
Step 2: Roll out a small piece of dark-colored clay for the hair. Mold it around the top of the face piece and blend the edges. You can vary styles like bangs, buns, or hoods.
Step 3: Take your floral cane slice or patterned clay disc and attach it to the lower opening of the soda tab using glue.
Step 4: Glue the face and hair piece into the top section of the soda tab, above the floral body.
#17. Soda Tab Pocket Chain
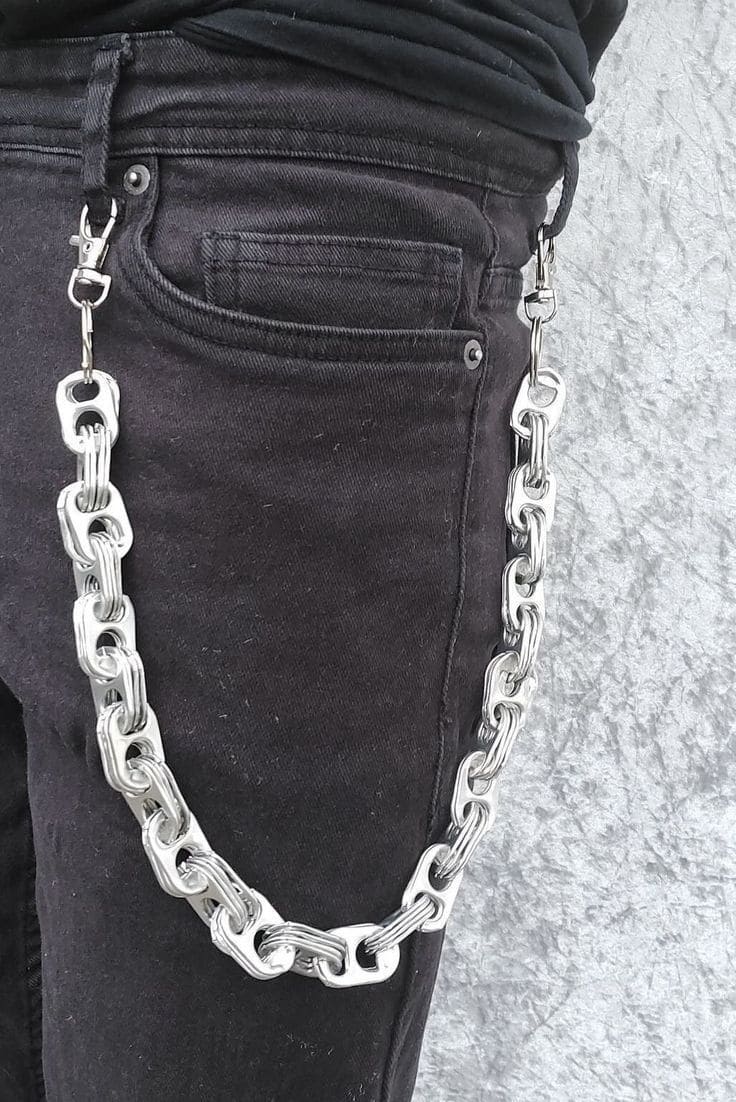
This soda tab pocket chain proves one thing that you don’t need to spend big to add edge to your outfit. Just owning this DIY chain, you can follow a grunge vibe or even streetwear look.
Materials Needed
- 20–25 soda tabs
- 2 metal swivel lobster clasps
- 2 split rings
- Needle-nose pliers
- Optional: metal polish
Step-by-step Guide
Step 1: Clean and flatten all soda tabs if needed. Smooth any rough edges using a metal file or sandpaper.
Step 2: Connect the tabs by overlapping their holes and looping one through the other, you can use pliers to bend slightly if necessary.
Step 3: Once you’ve reached your preferred chain length, attach a jump ring to each end.
Step 4: Clip a lobster clasp onto each ring.
#18. Soda Can Teapot with Soda Tab Handle
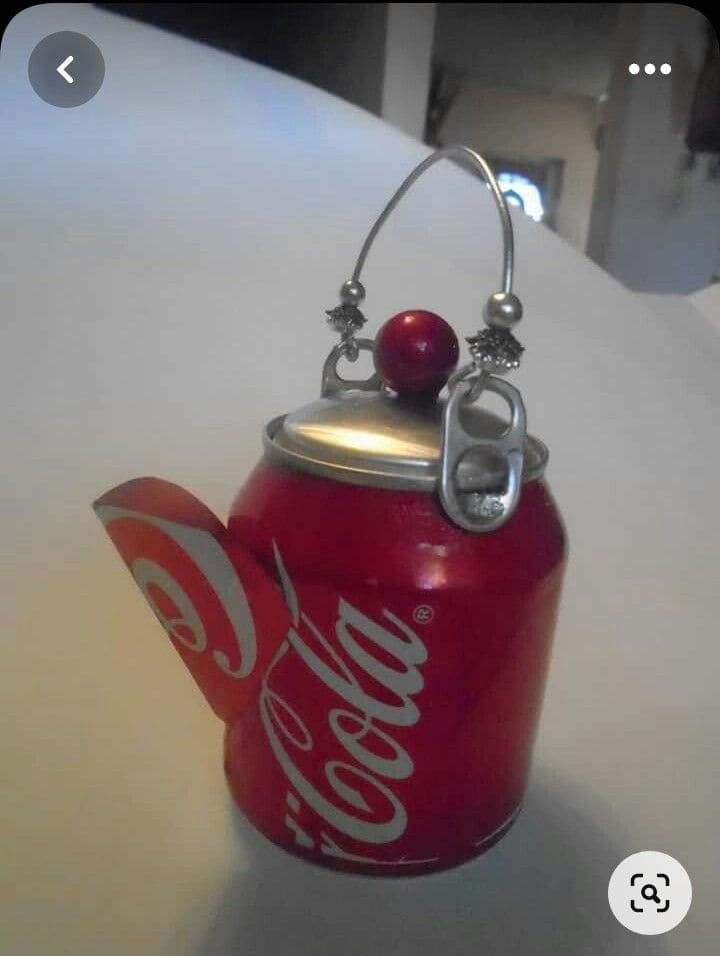
How adorable is this tiny teapot? Made from a soda can, a pull tab, and a few beads, this craft is pure upcycled charm.
Whether you’re into dollhouse accessories, fairy garden decor, or just want a fun conversation piece for your desk, this soda-can teapot brings just the right touch of creative delight.
Materials Needed
- 1 empty soda can
- 1 soda tab
- 1 large bead
- 1 sturdy wire (6–8″ long)
- 2 small decorative beads
- Hot glue
- Scissors
- Optional: pliers, nail file
Step-by-step Guide
Step 1: Carefully cut the spout shape from part of the can and bend it outward. You should smooth any sharp edges with a file or pliers.
Step 2: Use the original can top as the “lid.” Glue a soda tab to the top and add a large bead in the center for the handle.
Step 3: Thread the wire through the soda tab’s hole on each side, then add decorative beads for flair and curl the wire into a gentle arch for the teapot handle.
#19. Crochet Soda Tab Angels
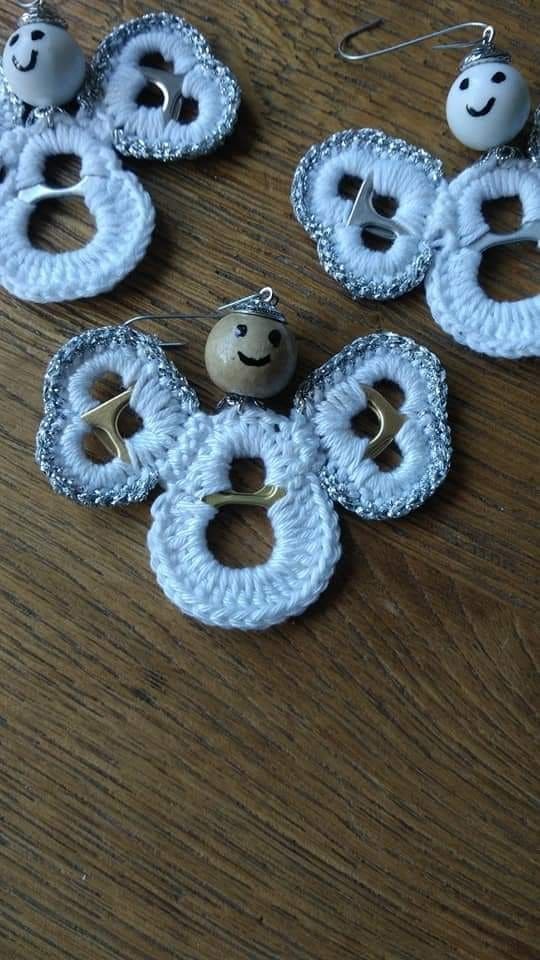
These little angels are a perfect blend of handmade warmth and creative reuse. By combining soda tabs, crochet skills, and just a few cheerful beads, you can create charming decorations that sparkle with love and tradition. Hang them on your Christmas tree, add them to gift wrap, or use them as heartfelt keepsakes. Each one feels like a quiet blessing with a big smile.
Materials Needed
- 3 soda tabs per angel
- Small wooden bead
- White yarn or crochet thread
- Optional: silver yarn
- Crochet hook
- Hot glue
- Black marker
- Small eye pin
Step-by-step Guide
Step 1: Crochet around the edges of the soda tabs using a single crochet stitch, wrapping the yarn tightly. Use white yarn for the body and wings, and silver thread to edge the wings for extra sparkle.
Step 2: Glue two wing tabs together slightly angled outward. Attach the third tab below them to form the body.
Step 3: Glue a bead on top where the wings meet to form the angel’s head, then draw a simple smiling face using a fine-tipped black marker.
Step 4: Add a small loop using an eye pin for easy hanging.
#20. Soda Tab Gothic Cross Keychain
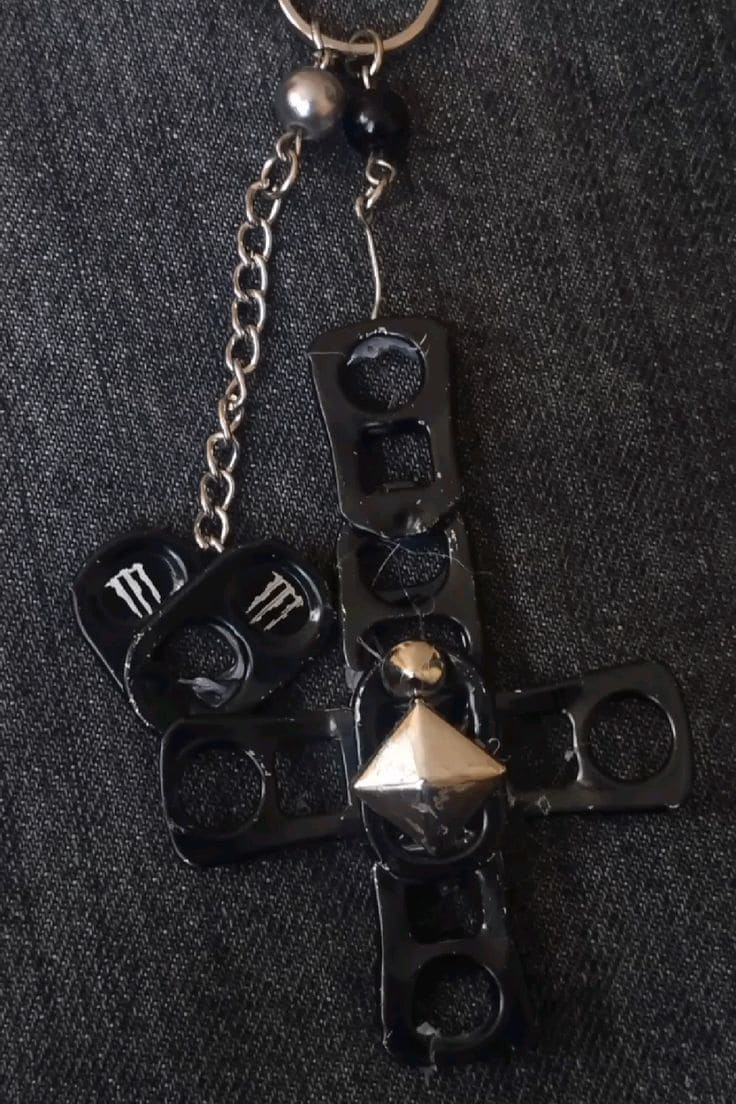
Are you looking for a DIY that doesn’t scream cute but rather growls metal? This gothic-style soda tab cross is pure punk energy.
Made with matte-black tabs, edgy embellishments, and a silver spike centerpiece, this keychain says one thing loud and clear that you don’t do basic.
Materials Needed
- 5–7 soda tabs
- Silver spike bead or pyramid stud
- Black jump rings
- Chain and keyring loop
- Glue gun
- Optional: logo tabs, black beads, metal accents
Step-by-step Guide
Step 1: Spray-paint your soda tabs black, then let them dry thoroughly.
Step 2: Arrange them into a cross shape with 3 vertical tabs for the spine, and 2 on each side for arms. Use strong jump rings to secure them at the intersections.
Step 3: Glue a spike or metal stud at the center. You can also stack Monster-logo tabs or add black beads for more detail.
Step 4: Attach the top of the cross to a chain or keyring.