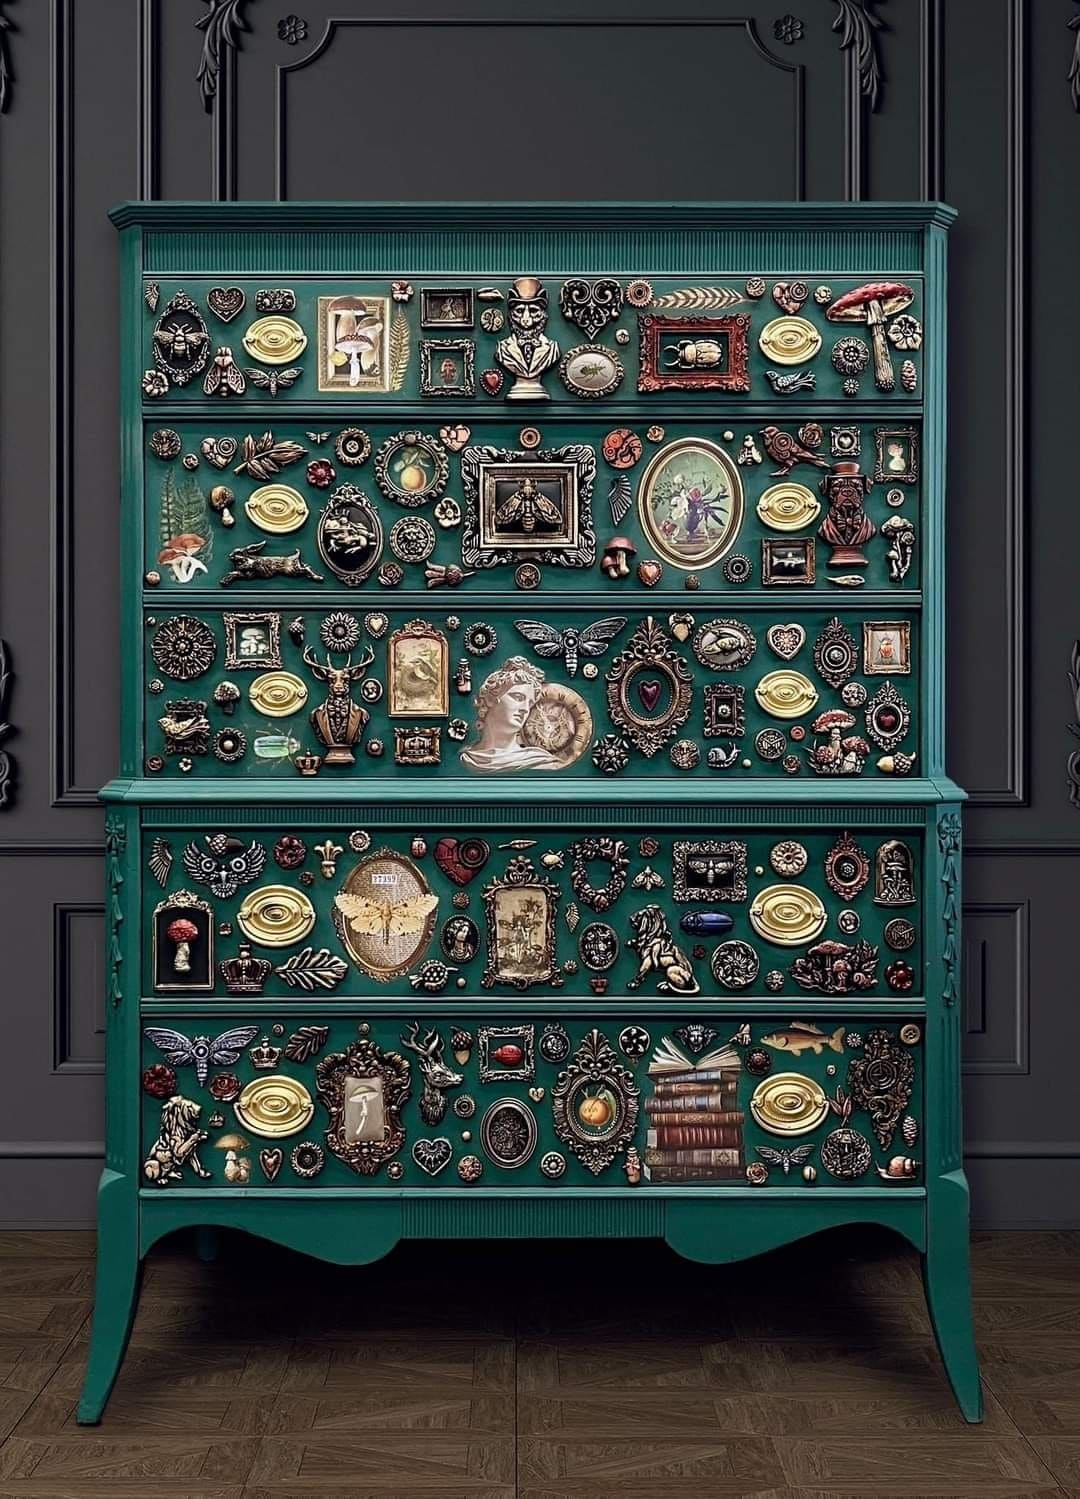
This project takes dresser makeovers to another level by combining bold paint with applied decorative hardware, resin molds, and embellishments.
Using a deep jewel tone as the base, then layering it with gilded and bronze elements, transforms an ordinary piece into a statement of eclectic design. The mix of textures and raised details creates depth and richness, while the uniform background color ties everything together.
It’s a versatile approach: you can source vintage hardware, resin molds, or even broken jewelry to decorate the fronts. With patience and creativity, you’ll end up with a dresser that feels custom, dramatic, and completely one-of-a-kind.
Materials Needed
- 1 large wooden dresser (approx. 50-60″ tall with 4–6 drawers)
- 1 sheet 120-grit sandpaper + 1 sheet 220-grit sandpaper
- 1 quart primer (water-based)
- 1 quart chalk paint or mineral paint in emerald green
- 40-60 Assorted decorative hardware, resin molds, appliqués, or vintage brooches (mixed sizes)
- Strong adhesive glue (E6000, Gorilla Glue, or wood glue, 8 oz)
- 1 metallic gilding wax or gold paint (2 oz)
- 1 foam roller (4″) and 2 artist detail brushes
- Clear matte or satin sealer (spray, 12 oz)
- Optional: replacement drawer pulls in brass or crystal
Step-by-step Guide
Step 1: Remove all knobs and handles. Lightly sand the dresser with 120-grit to remove shine, then finish with 220-grit for smoothness. Wipe clean with a damp cloth.
Step 2: Apply a coat of primer to ensure the paint adheres evenly. Let dry for at least 2 hours. You need to follow with two coats of chalk or mineral paint, using a foam roller for broad areas and a brush for edges. Then allow drying time between coats.
Step 3: While paint dries, plan your embellishment layout. Arrange decorative molds, frames, and hardware directly on the drawers without glue first.
You can also mix large pieces with small ones to create balance, think of it like curating a gallery wall on wood.
Step 4: Once satisfied with placement, attach each piece using a strong adhesive. For heavier elements, hold in place with painter’s tape until fully dry (usually overnight).
Step 5: After the glue cures, dry brush gold paint or apply gilding wax to raised details. This highlights textures and gives the dresser a vintage, luxe finish.
Step 6: Seal the entire dresser with a clear matte or satin sealer. Spray is faster for intricate pieces, but brush-on sealer works too. Let it cure for 24 hours before use.
Step 7: Reattach drawer pulls, or swap them with ornate brass or crystal knobs for extra elegance.
Step 8: Finally, pace your finished cabinet in a prominent spot—this piece deserves to be the star of the room!