In this article, we’ll explore a delightful array of fairy garden ideas that are sure to captivate the hearts of your little ones. Creating a fairy garden is a magical and interactive way to spark creativity, foster a love for nature, and provide endless hours of imaginative play.
From miniature houses nestled amidst lush greenery to charming pathways adorned with twinkling fairy lights, these ideas will inspire you to transform any outdoor space into an enchanting realm. So, let’s embark on this whimsical journey and discover the perfect fairy garden that your kids will fall in love with!
This article contains affiliate links. If you purchase through them, I may earn a small commission at no extra cost to you. Thank you for your support!
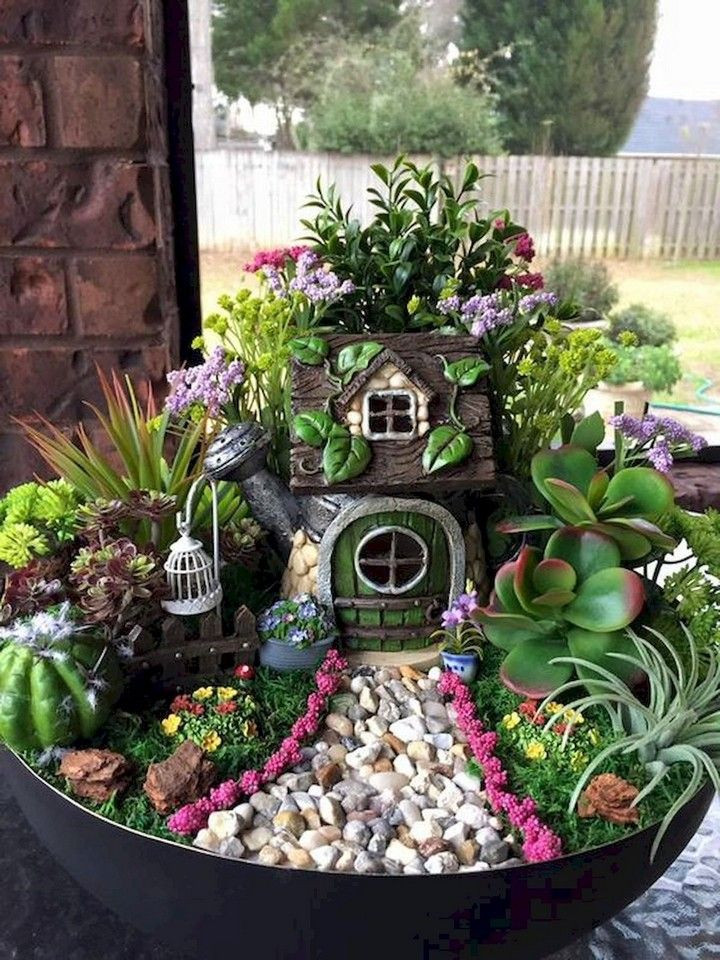
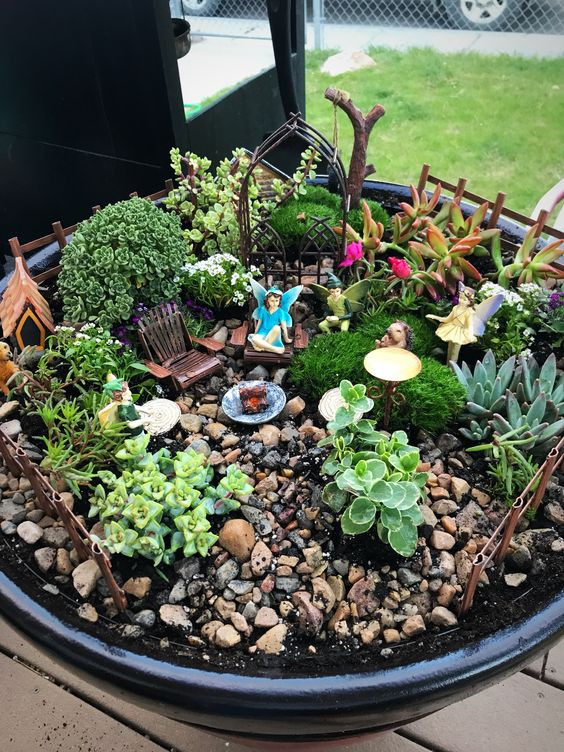
#1. Enchanted Birdbath Fairy Garden
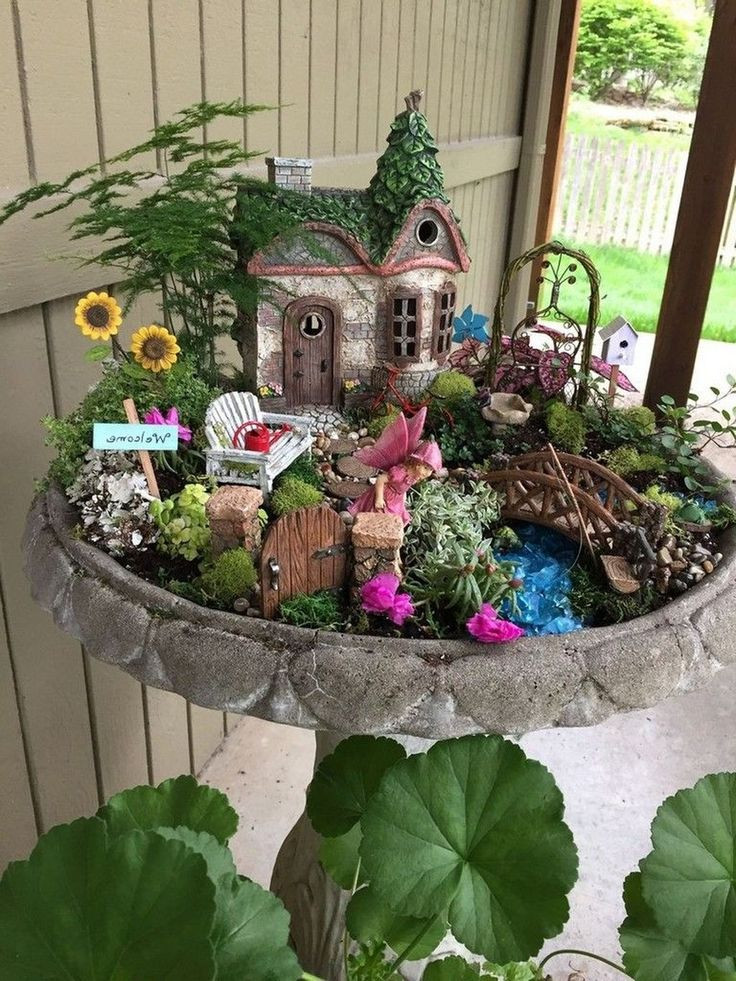
This fairy haven is overflowing with charm from a stone cottage tucked beneath a whimsical pine, to a winding pebble path that leads to a miniature arched bridge.
 SHOP VINTAGE BIRDBATH
 SHOP MINIATURE FAIRY HOUSE
 SHOP FAIRY GARDEN POND KIT
 SHOP MINI WELCOME SIGN
 SHOP FAIRY GARDEN KIT
 SHOP MOSS
 SHOP POTTING SOIL
 SHOP SMALL GRAVEL
 SHOP MINI SUCCULENTS
Materials Needed
- 1 vintage birdbath (about 20–24″ wide)
- Miniature fairy house (4–6″ tall)
- Mini fairy figurine
- Mini garden bridge
- Welcome sign
- 6–8 cups of potting soil
- Approx. 2 lbs of gravel
- Blue decorative glass pebbles
- Mini succulents, moss, and ground cover plants (3–5 types)
- Optional: tiny chair, door, twig fencing, mushroom picks,
Step-by-step Guide
Step 1: Add a layer of gravel into the base of your birdbath for drainage. Fill with potting soil, pressing it gently to create a stable surface.
Step 2: Place your fairy house near the back of the birdbath to anchor the layout. Tuck your mini bridge or arch across the middle for depth and balance.
Step 3: Add plants around the edges—use moss to fill in empty spots and succulents for texture. Shape a path with pebbles and position the blue glass stones to resemble a miniature stream.
Step 4: Add your fairy figurine, chair, welcome sign, or any other tiny accessories. Give everything a light mist of water and place the garden in a shaded or partly sunny area.
#2. Sunny Cottage Fairy Garden
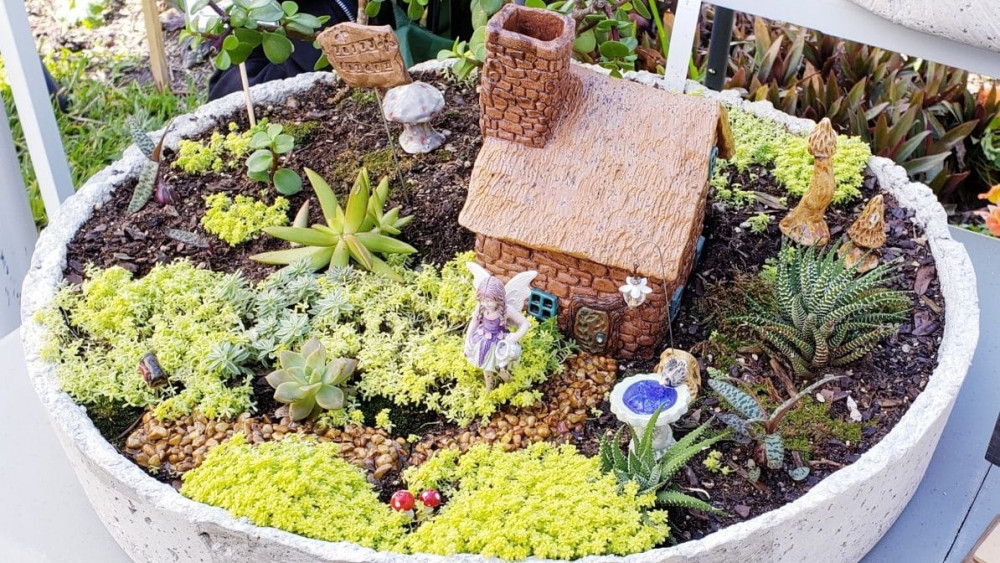
The warm color palette and simple layout make this an approachable build that still feels alive with imagination. It’s the perfect weekend project for your porch or patio table.


Materials Needed
- 1 shallow cement or hypertufa planter (16–20″ wide, at least 5″ deep)
- Miniature fairy cottage with chimney
- Miniature fairy figurine
- Small accessories: birdbath, dog figure, mushroom trio, welcome sign
- 10–12 cups of potting soil
- 1 lb gravel or small pebbles
- Ground cover plants like Golden Creeping Jenny or sedum
- 3–4 small succulents or drought-tolerant plants (e.g., echeveria, haworthia, aloe)
Step-by-step Guide
Step 1: Add a layer of gravel into the base of your planter for drainage. Fill with potting soil, pressing it gently to create a stable surface.
Step 2: Set your fairy cottage slightly off-center toward the back. This creates visual depth and makes room for surrounding scenery.
Step 3: Arrange succulents in groups, placing taller ones toward the back and spreading moss or ground cover around the front. Create a winding path with gravel or pebbles leading to the door.
Step 4: Place the fairy, birdbath, mushrooms, and any other accessories throughout the garden. Finish by watering lightly and placing it in bright, indirect sunlight.
#3. Mushroom Hut Fairy Garden
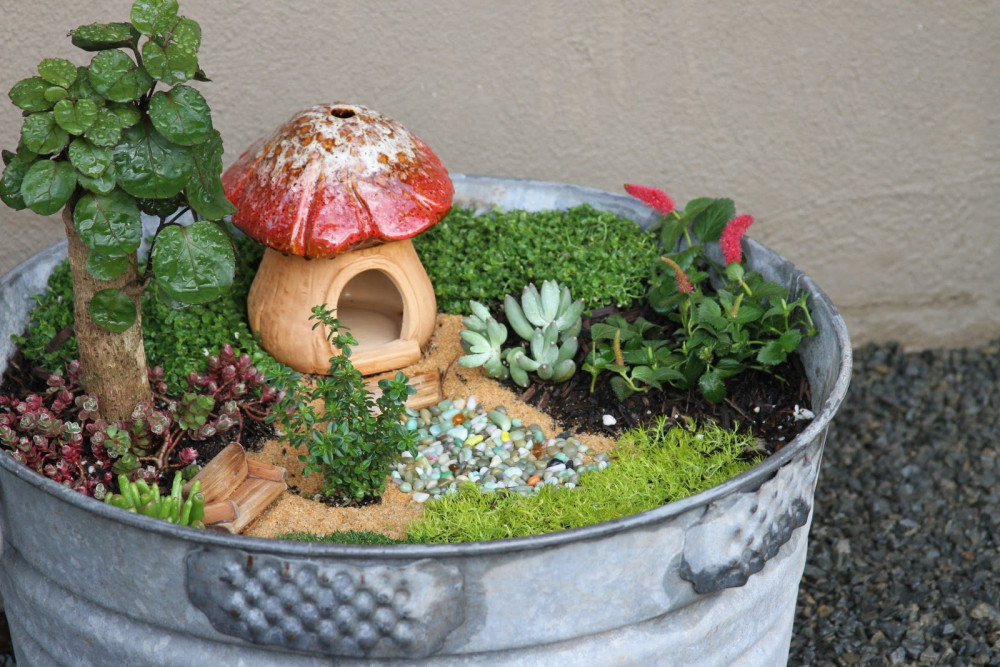
Playful and cozy, this miniature garden features a terra-cotta mushroom house nestled in a galvanized metal tub.


Materials Needed
- 1 galvanized steel tub (12–16″ diameter, with drainage holes)
- Miniature mushroom house
- Mini garden furniture
- 1 cup decorative pebbles or tiny river rocks
- 1 cup clean sand
- Approx. 8–10 cups of potting soil
- Green moss (live or preserved)
- Succulents like echeveria, sedum, and jade
- Miniature tree (e.g., small bonsai or dwarf umbrella plant)
Step-by-step Guide
Step 1: Add a layer of gravel into the base of your container for drainage. Fill with potting soil and press to level the surface.
Step 2: Position the mushroom house slightly off-center and nestle it into the soil for stability.
Step 3: Create a winding path using clean sand and scatter pebbles along the center to resemble stepping stones.
Step 4: Plant succulents and miniature shrubs around the house. Add moss to soften edges and create a forest-floor effect. Finish with a mini bench or accessory, and mist the garden lightly.
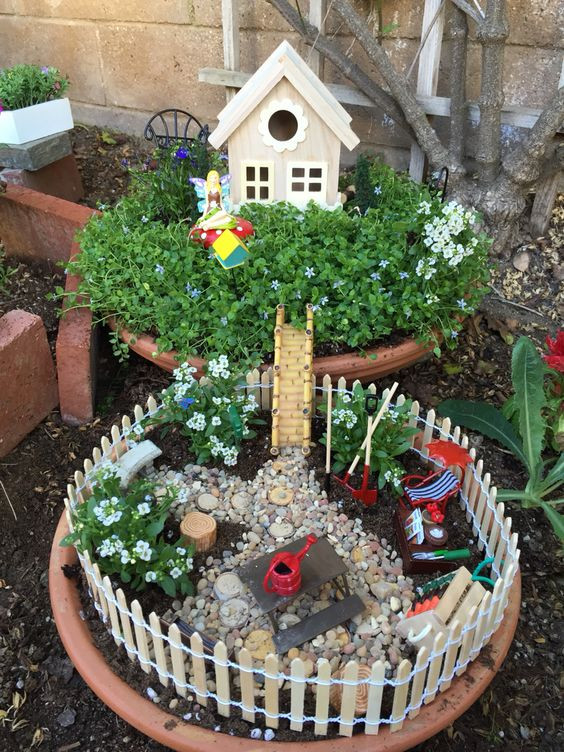
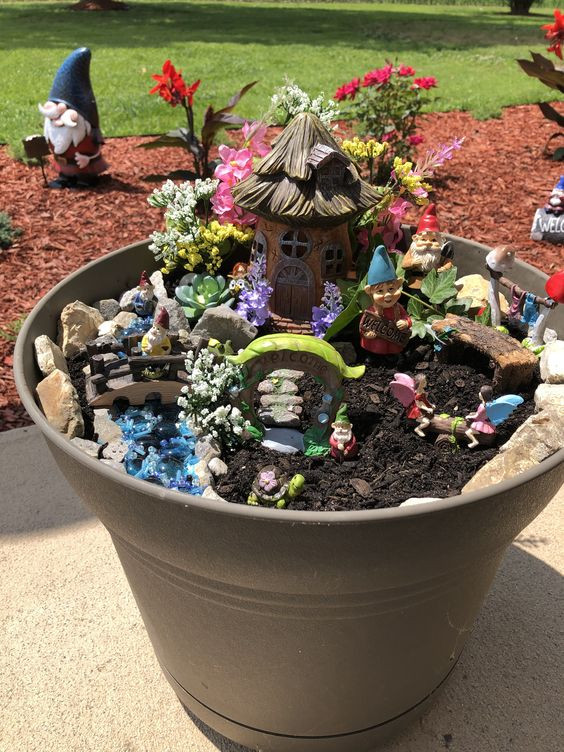
#4. Tiered Fairy Welcome Garden
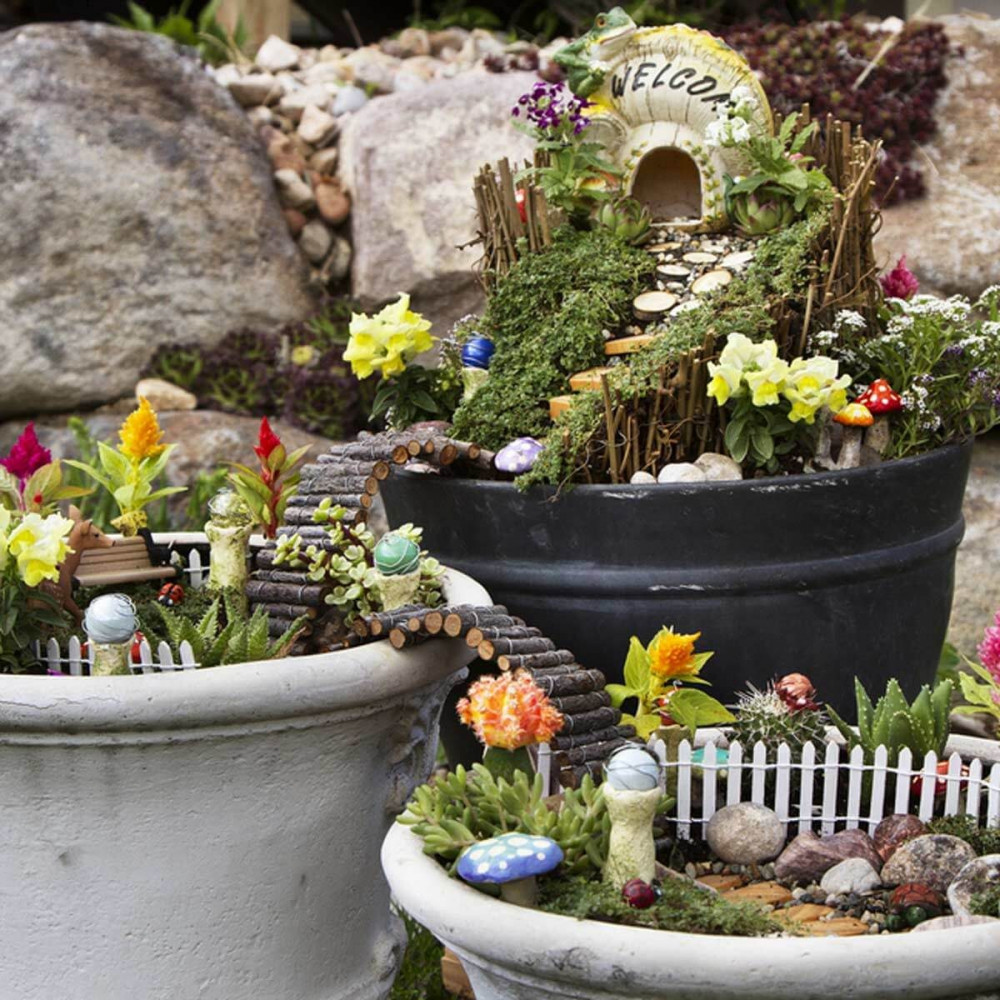
This multi-pot design adds height and story to a miniature world, making it feel like a hidden fairy hillside village.
 SHOP PLANTING POT
 SHOP MINI WHITE PICKET FENCE
 SHOP ARTIFICAL MUSHROOMS
 SHOP COLORFUL MINIATURE FLOWERS
Materials Needed
- 2 large planting pots (12–16″ diameter) of varying heights
- Mini fairy house with “Welcome” text
- Mini twig bridge
- Mini white picket fence
- Artificial mushrooms
- Garden soil (10–12 cups per pot)
- Sheet moss
- Colorful miniature flowers (e.g., celosia, violas)
- Decorative gravel
Step-by-step Guide
Step 1: Add a layer of gravel into each container for drainage. Top with potting soil, gently packing it to create a slope in the taller pot.
Step 2: Place the fairy house at the top of the slope and create a pebble path leading down with stepping stones. Nestle moss around the slope for a lush, earthy feel.
Step 3: In the lower pot, position the white fence and a mix of succulents and mini flowering plants. Use soil to build gentle mounds or valleys for interest.
Step 4: Connect the two pots using a twig bridge. Add mushrooms, garden gnomes, or other miniatures to finish the scene.
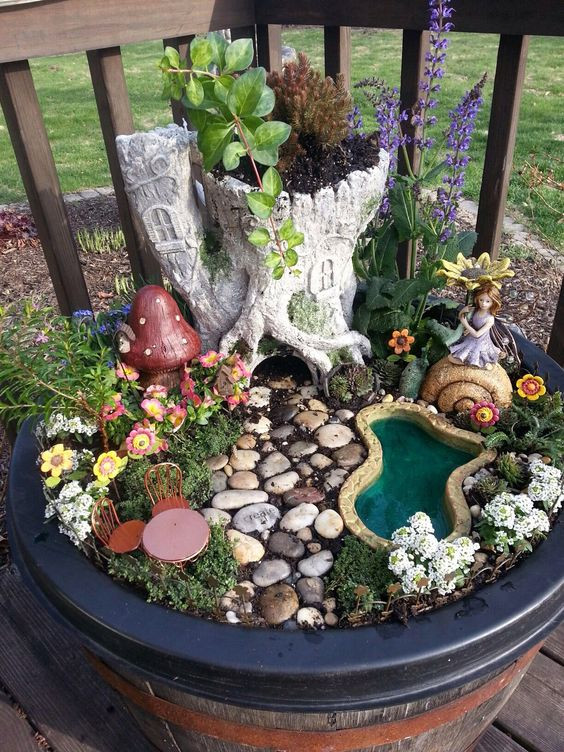
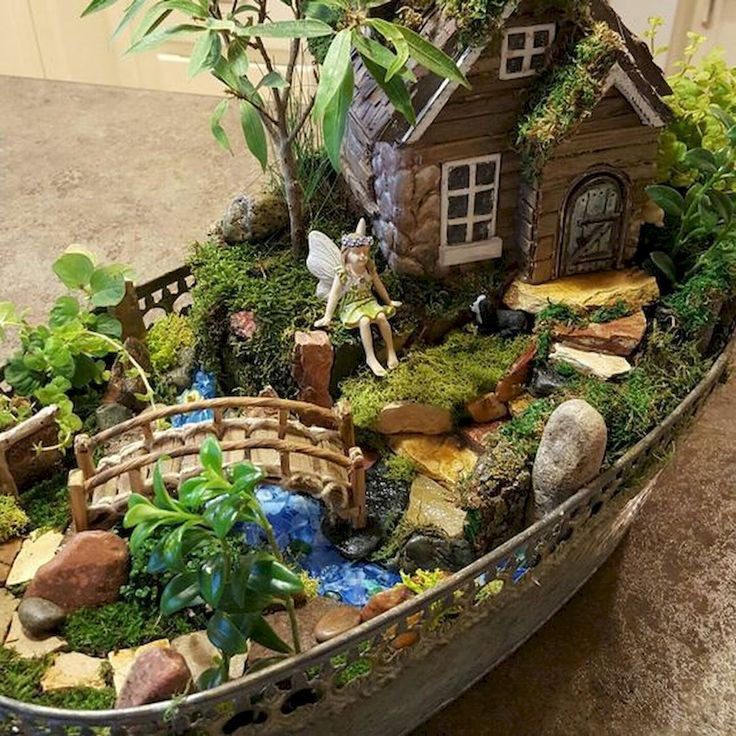
#5. Woodland Rest Stop Fairy Garden
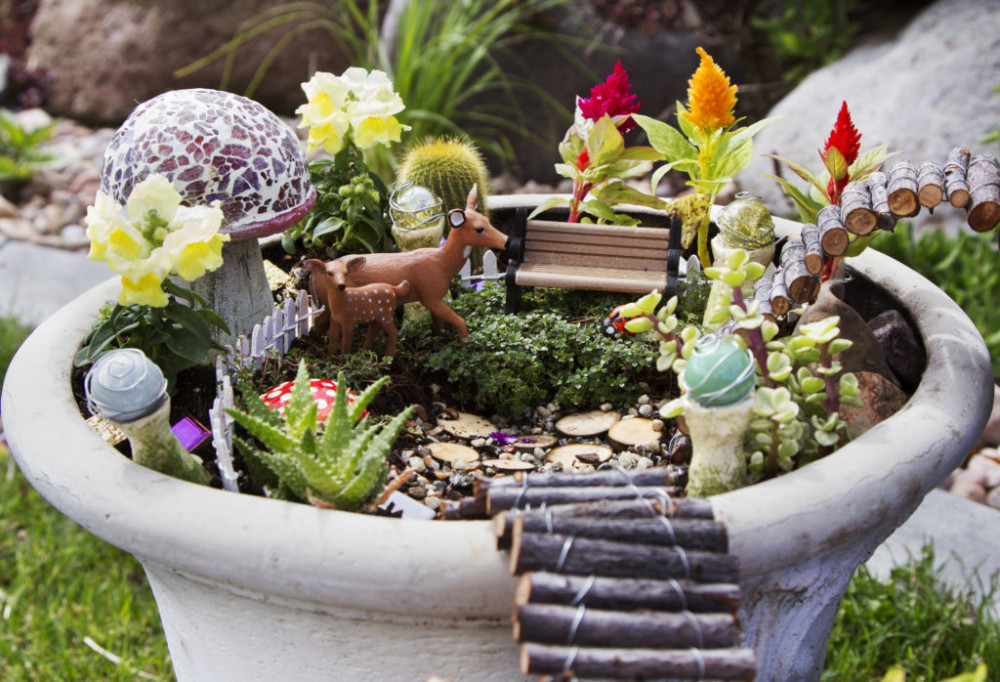
Complete with a curved twig bridge, deer figurines, and a mosaic mushroom to hide beneath, this layout radiates peaceful charm.


Materials Needed
- 1 large planter (14–16″ diameter)
- Mini twig ladder
- Miniature mosaic mushroom
- Bench and deer figurines
- Mini stepping stones
- Artificial or solar mushrooms
- Soil and gravel
- Small succulents and celosia flowers
- Decorative moss or creeping thyme
- Miniature fencing
Step-by-step Guide
Step 1: Add a layer of gravel into the base of your pot for drainage. Fill with potting soil, pressing it gently to create a level planting surface.
Step 2: Place the mosaic mushroom and deer figurines in the back area for height. Surround with taller flowers like celosia and snapdragons.
Step 3: Set up a curved twig ladder leading into the pot, then lay stepping stones to form a pathway. Add a mini bench nearby and fill the rest of the space with small succulents and moss.
Step 4: Install a mini white fence around one side and tuck in mushroom lights or painted pebbles for fun accents.
#6. Secret Garden Fairy Circle
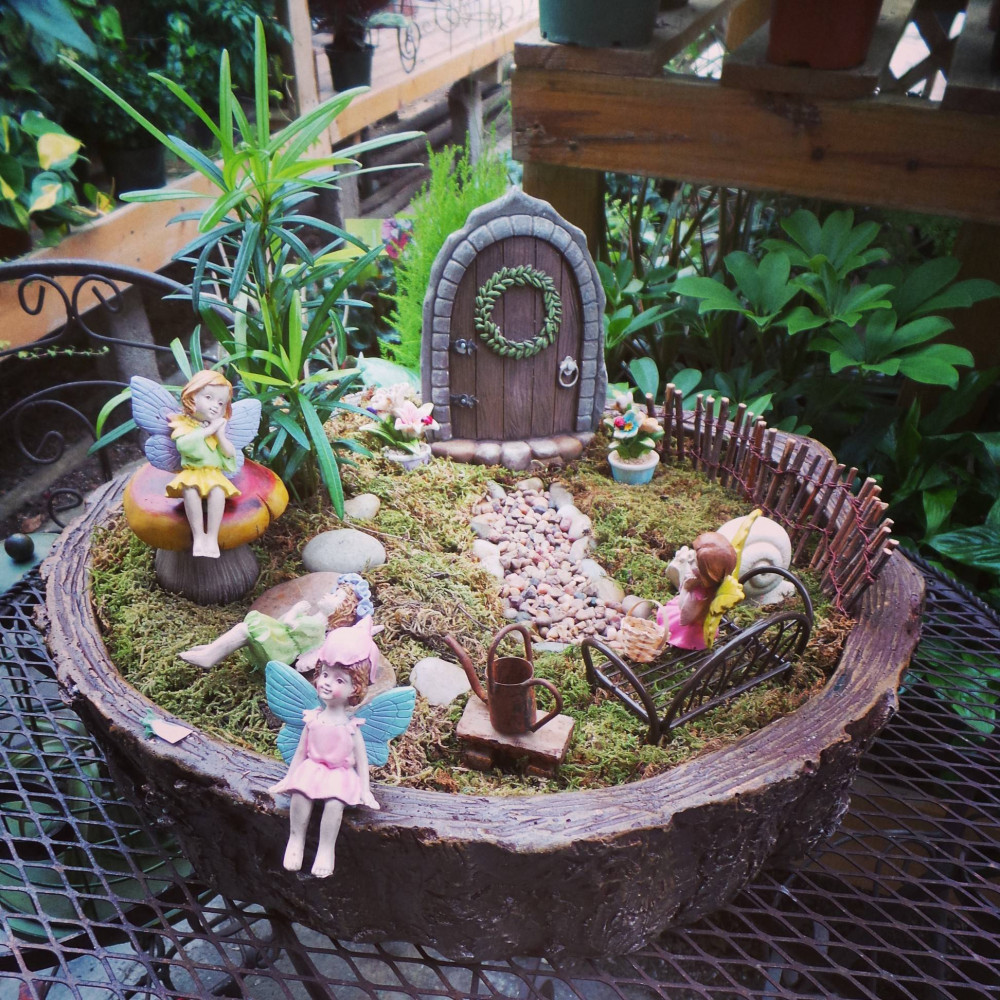
This enchanting scene looks like a hidden grove where forest fairies meet to relax and share stories.


Materials Needed
- 1 large shallow container or faux log bowl (12″–16″ diameter)
- Mini fairy door
- Fairy figurines (4–5 seated and standing fairies)
- Mini metal bench or chair
- Mini watering can
- Moss sheets or preserved moss
- Potting soil and gravel
- Mini potted plants or ferns
- Mini twig fence
Step-by-step Guide
Step 1: Add a layer of gravel into the base of your container for drainage. Fill with potting soil and press it gently to level the base.
Step 2: Cover the surface with preserved moss, cutting it to fit. Place the mini door along the back edge of the container for a “secret entrance” feel.
Step 3: Arrange a gravel path from the door to the front using small pebbles. Place fairy figurines and accessories like the bench and watering can along the edges.
Step 4: Plant small ferns or mini potted greens in the corners to add lush height. Finish with decorative stones and a mini twig fence for detail.
#7. Whimsical Tree Stump Fairy Village
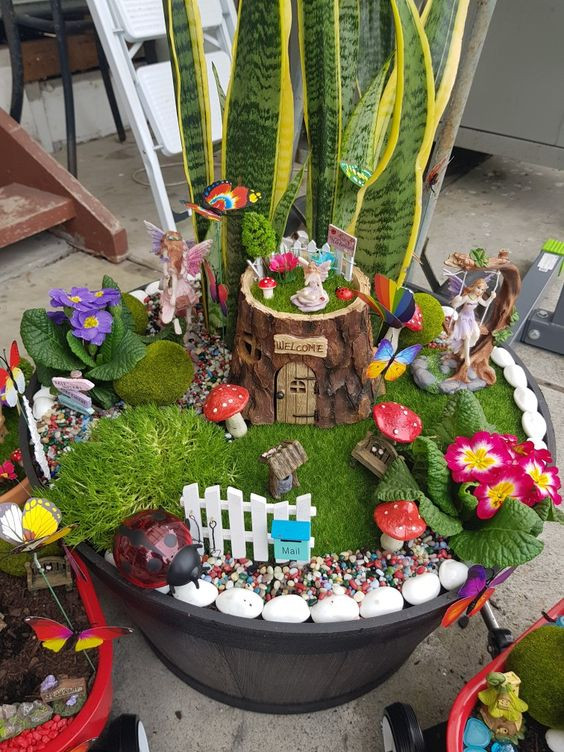
Centered around a faux tree stump house with a “Welcome” sign, it’s surrounded by fairy figurines, mushrooms, and butterflies, each one contributing to the feeling that something magical might happen any second.


Materials Needed
- 1 large plastic planter (16″–18″ diameter)
- Mini fairy stump house
- Fairy figurines (4–6 various poses)
- Plastic butterflies
- Mini mushrooms (5–6 pieces)
- Faux grass mats or preserved moss
- Potting soil and multicolored pebbles
- White mini picket fence
- Mini mailbox or signpost
- Snake plant
Step-by-step Guide
Step 1: Add a layer of gravel into the base of your planter for drainage. Fill with potting soil and pat down gently to create a firm base.
Step 2: Anchor your snake plant or similar tall foliage in the back as a natural backdrop. Then press your moss sheets or faux grass mats into place over the soil.
Step 3: Place the fairy stump house at the center. Arrange figurines, mushrooms, and butterflies around it. Add a mini bench, mailbox, and other accessories to create small scenes.
Step 4: Use multicolored pebbles to edge the container and define paths. Tuck in colorful flowers or small-leaf plants for visual interest. Finish with a tiny white picket fence along the front edge.
#8. Tiered Fairy Garden With Woodland Charm
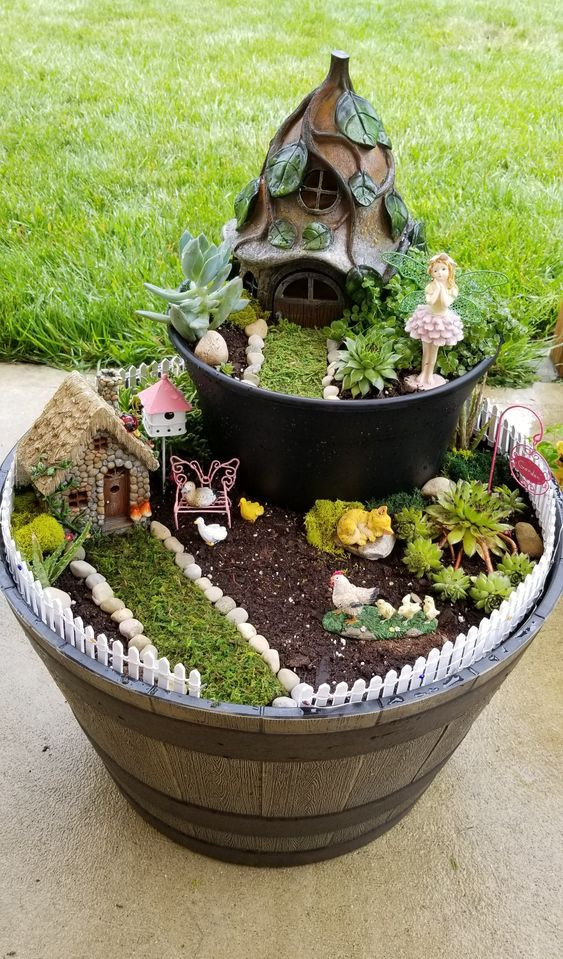
This stunning two-level fairy garden turns a wooden barrel into a magical multi-tiered sanctuary.


Materials Needed
- 1 half-barrel planter
- 1 medium round black plastic pot (10″–12″ diameter)
- Leaf-roof fairy house
- Mini stone fairy cottage
- Fairy figurines
- Plastic white picket fencing
- Chicken and animal miniatures
- Miniature butterfly stake
- Pebbles and moss mat
- Succulent plants and small annuals
- Potting soil and gravel
Step-by-step Guide
Step 1: Add a layer of gravel into the base of your wooden barrel for drainage. Fill with potting soil, leaving enough space to nest the smaller black planter off-center at the top.
Step 2: Place the leaf-roof fairy house inside the black pot and surround it with small succulents. Press moss around the house entrance and line the edge with decorative pebbles.
Step 3: In the main barrel base, arrange your stone cottage and decorate around it with fairy figurines, a chicken family, and mini decor like butterflies or animals.
Step 4: Use the moss mat to create a small path leading from the gate to the house. Line it with stones, and secure the mini picket fence along the edge of the barrel.
#9. Serene Pebble Path Fairy Garden
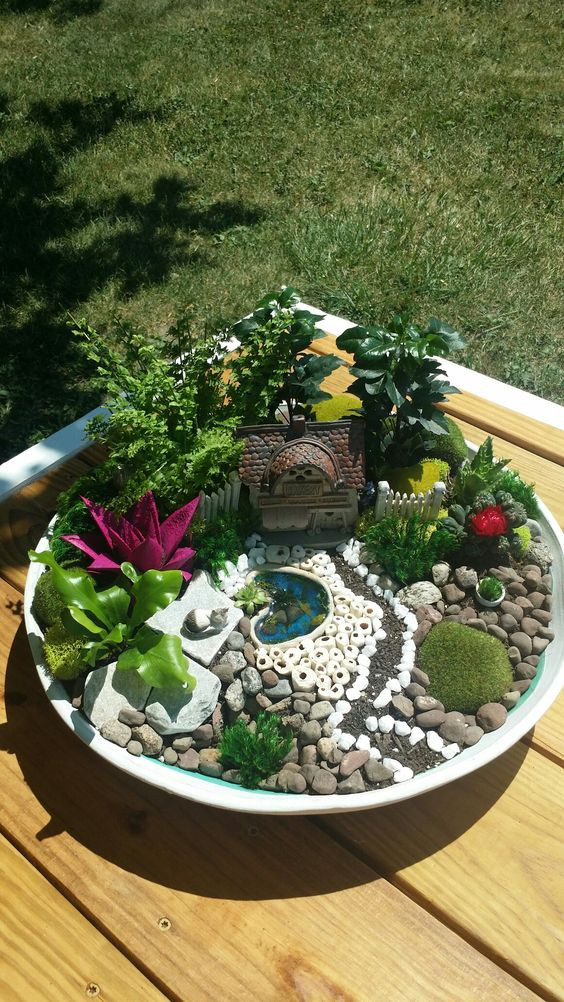
Instead of crowding the space, it breathes with clean symmetry, white gravel paths, a central mini pond, sculpted moss stones, and a cozy fairy home nestled under leafy ferns.
Materials Needed
- 1 large shallow ceramic dish (at least 16” diameter, 3–4” depth)
- Miniature fairy house
- Approx. 2 lbs mixed gravel and pebbles
- Mini decorative pond insert
- Preserved moss
- Mini fencing pieces
- Artificial or small live plants
- Potting soil
- A few larger flat stones
Step-by-step Guide
Step 1: Add a layer of gravel into the base of your shallow dish for drainage. Fill with potting soil, pressing it gently to create a level foundation.
Step 2: Nestle the fairy house toward the back of the dish. Frame it with tall leafy plants and secure a few moss balls or preserved moss to bring softness to the corners.
Step 3: In the center, place your mini pond insert or cluster blue stones to simulate water. Use white gravel to define paths leading to the pond and house.
Step 4: Add details—larger flat stones for seating, a mini white fence, small figurines or mushrooms. Finish with fine-tuning the pebbles and adding touches of green to keep the layout visually balanced.
#10. Woodland Retreat Fairy Garden
I had a blast assembling this one, especially styling the little bistro set for afternoon fairy tea.


Materials Needed
- 1 large wooden barrel-style planter (at least 18” diameter)
- Mini tree trunk fairy house (approx. 10–12” tall)
- Fairy figurines with accessories
- Mini pond resin insert
- 2 lbs of mixed natural pebbles
- Tiny wrought iron fairy table + chairs
- Colorful flowering plants
- Potting soil
- Trailing ivy, small succulents, or creeping thyme
- Mini mushroom ornaments
Step-by-step Guide
Step 1: Add a layer of gravel into the base of your barrel for drainage. Fill it with quality potting soil, pressing down lightly to even the surface.
Step 2: Position the tree trunk fairy house at the back. Plant ivy or a miniature conifer in the top for a natural “roof” effect.
Step 3: Press in the resin pond mold and lay your pathway using flat pebbles, securing them into the soil. Add moss or low ground cover around the edges.
Step 4: Arrange fairy figurines, the table and chair set, and small details like mushrooms or snails. Fill in the rest with colorful mini flowering plants and lush greenery to soften transitions and hide soil gaps.
#11. Cascading Pot Fairy Village
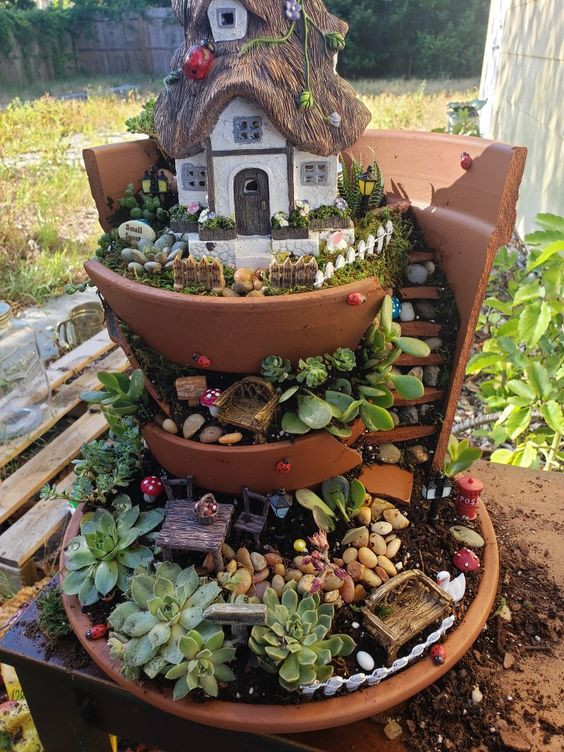
From the thatched-roof house at the top to the tiny café table nestled at the bottom, each layer tells a little story.

Materials Needed
- 1 large broken terracotta pot (at least 14–16” diameter)
- Miniature fairy house 4″ to 6″ tall
- Mini garden baskets and seating sets
- 2–3 lbs mini pebbles and polished stones
- Mini ladder, fence, and postbox accessories
- Potting soil
- Moss, small succulents (Echeveria, Sedum, Haworthia, etc.)
- Optional: Ladybug figurines
Step-by-step Guide
Step 1: Place a drainage layer (gravel or pebbles) in the base of the pot. Fill it partway with soil, then begin layering the broken terracotta pieces inside at angles to form tiers.
Step 2: Continue filling each section with soil as you go up. Be sure to gently pack it in so plants can be anchored securely.
Step 3: Position your fairy house at the top tier. Add miniature accessories like benches, baskets, and postboxes along each level to create scenes.
Step 4: Plant a variety of low-maintenance succulents throughout. Use moss and mini pebbles to cover soil gaps, and glue on a few ladybugs for a final magical touch.
#12. The Pebble Pathway Fairy Garden
The real joy is in the small touches, tiny hanging lanterns, vibrant succulents, and pops of pink florals.


Materials Needed
- 1 wide shallow planter bowl (at least 12” diameter, 4–6” depth)
- Miniature fairy house with rooftop planter (approx. 6–8” tall)
- Mini hanging lantern
- 1–2 lbs river pebbles
- Artificial moss or preserved reindeer moss
- Succulent mix
- Miniature garden accessories kit
- Organic potting mix
- Small gardening trowel
Step-by-step Guide
Step 1: Add a layer of gravel into the base of your planter bowl for drainage. Fill with potting soil, leaving about half an inch from the top.
Step 2: Nestle the fairy house toward the back of the bowl and press down gently. Surround the base with moss to blend it into the landscape.
Step 3: Use river pebbles to create a curved path leading from the house door. Line both sides of the path with pink preserved moss for a playful accent.
Step 4: Arrange your succulents around the house and path. Place taller varieties toward the back and air plants or tiny ground cover up front. Tuck decorative items like the lantern, fence, and mini garden tools into the open spaces to complete the scene.
#13. Woodland Bridge Fairy Garden
What I love most is how peaceful it looks, even indoors, it brings forest energy right to your table or windowsill.


Materials Needed
- 1 oval galvanized tray (approx. 14″ long x 8″ wide, at least 3–4″ deep)
- Miniature log-style fairy house (about 5–7″ tall)
- Small wooden fairy bridge (4–5″ long)
- 1–2 lbs blue glass pebbles
- Mixed moss
- Fairy figurine sitting
- Small river rocks and stepping stones
- Soil (1 small bag)
- Small trailing plants
- Garden glue (optional)
Step-by-step Guide
Step 1: Add a layer of gravel into the base of your tray for drainage. Fill with potting soil, gently pressing down to create some height variation, especially toward the back.
Step 2: Position your fairy house on the raised area in the back corner. Nestle it in firmly so it won’t shift. Use moss to blend it into the soil and soften the edges.
Step 3: Use blue glass pebbles to form a winding stream through the middle of the tray. Place the bridge over the “water,” ensuring both ends are resting securely on flat stones or raised soil.
Step 4: Fill in the remaining space with small succulents, moss patches, and miniature stones for a pathway. Tuck the fairy figurine near the bridge or by the house, and add finishing details like a sign, lantern, or critters.
#14. Fairy Tea Pavilion Garden
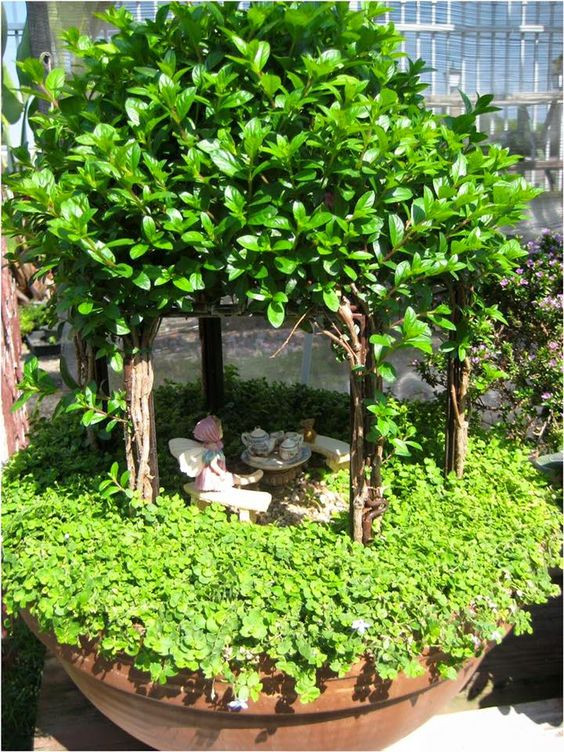
This enchanting garden is one of my favorite projects, it feels like a fairy version of a secret garden tea party.


Materials Needed
- 1 wide terracotta bowl planter (approx. 16″ diameter, 5–6″ deep)
- Miniature tea set and fairy figurine
- Mini stone garden bench set
- 5–6 thin branches (6–8″ tall)
- Leafy plant for canopy: small-leaf boxwood or dwarf myrtle
- 3–4 small pots of creeping Jenny or Baby’s Tears groundcover
- Potting soil (1 small bag, about 1–2 gallons)
- Tiny pebbles
Step-by-step Guide
Step 1: Add a layer of gravel into the base of your planter for drainage. Fill with potting soil and gently mound the center slightly where the pavilion will sit.
Step 2: Insert the branches into the soil in a square or circular formation to form the pavilion structure. Plant your leafy canopy plant in the middle and train its stems outward to drape over the branches.
Step 3: Surround the base with creeping groundcover plants. Let them spread to cover the soil completely over time.
Step 4: Create the tea area under the canopy using fine gravel as flooring. Arrange the miniature table, tea set, benches, and fairy figurine in a cozy scene beneath the shade.
#15. Woodland Welcome Garden
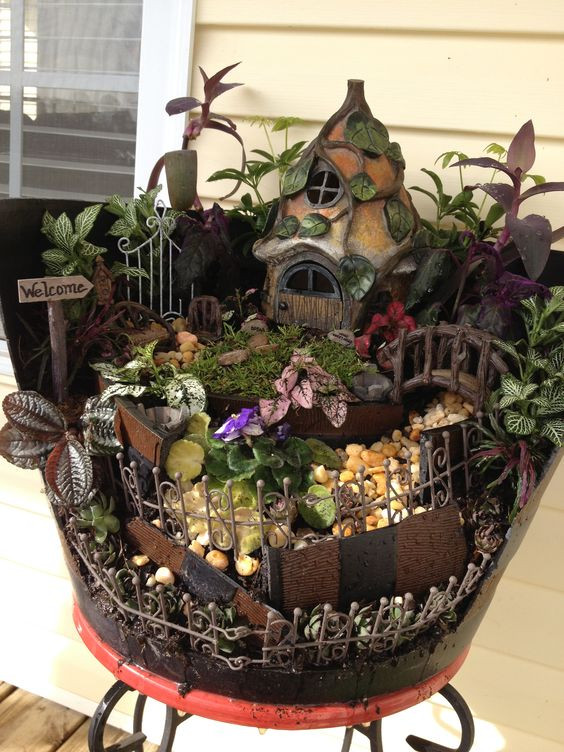
It was incredibly fun to arrange each element, especially the gate and welcome sign, they give the whole piece a warm, storybook feel.


Materials Needed
- 1 large broken terracotta planter (minimum 14–16” diameter)
- Fairy house figurine with leafy roof
- Mini arched bridge
- Mini iron garden fence set
- 4–6 small mixed low-light foliage plant pot: fittonia, purple waffle plant, hypoestes
- Miniature garden gate
- 2–3 lbs decorative river stones
- 2 gallons potting soil
- Mini welcome sign and fairy accessories
Step-by-step Guide
Step 1: Add a layer of gravel into the base of your broken planter for drainage. Fill with potting soil, shaping tiers or slopes using the broken edges as natural dividers.
Step 2: Position the fairy house on the highest tier. Use soil to anchor it and create a slight elevation around it.
Step 3: Plant small foliage varieties around each tier, allowing color variation and texture contrast. Fill open areas with decorative gravel and pebbles to create walkways.
Step 4: Add fencing around the front edge, a mini bridge leading into the upper level, and accent pieces like a gate or sign to welcome your tiny guests.
#16. Enchanted Tower Garden
This miniature fairy tower garden feels like a secret lookout perched on a forested hillside.

Materials Needed
- 1 large broken terracotta planter (minimum 14”–16” in diameter)
- 1 small intact terracotta pot
- Miniature fairy tower
- 1 small Japanese maple sapling (8″–12″ tall)
- 25–30 miniature stone pathway pieces
- Soil mix (approx. 2 gallons)
- Succulents and trailing plants like sedum, thyme, or baby’s tears
- Pebbles
- Optional: plastic base tray
Step-by-step Guide
Step 1: Add a layer of gravel into the base of your broken pot for drainage. Fill with potting soil, placing the intact pot inside to help create height for the back tier.
Step 2: Nestle the broken shards to form stepped layers. Begin adding soil behind and between each piece to stabilize and shape the tiered structure.
Step 3: Place your fairy tower at the top. Line the ‘stairs’ with miniature flat stones to create the winding path.
Step 4: Fill in open soil areas with succulents, shrubs, and your featured miniature tree. Water lightly, and place in a semi-shaded area for best visual depth.
#17. Backyard-Style Fairy Garden Playground
With a raised cottage nestled in soft green foliage and a ladder leading down to a gravel-lined yard, it creates levels of charm and space to decorate.


Materials Needed
- 2 terracotta saucer planters: one 12–14” and one 8–10”
- Miniature fairy house (4–6” tall)
- Small picket fence set (36″ total length)
- Mini bamboo ladder (approx. 6″)
- Mini garden accessories: watering can, garden bench, wheelbarrow, tools
- Small white flowering plants like lobelia or alyssum
- 2 cups of pebbles
- 1.5 gallons potting mix
- Decorative mulch or bark chips (optional)
Step-by-step Guide
Step 1: Add a layer of gravel into the base of the bottom planter for drainage. Fill with potting soil, creating a flat surface. Do the same with the smaller top planter.
Step 2: Place the smaller pot slightly behind and raised above the main planter. Nest the fairy house into the upper pot, surrounding it with greenery.
Step 3: Attach the bamboo ladder so it appears to connect both levels. Fence in the lower pot using the miniature picket fence.
Step 4: Fill the lower section with gravel to form the ground. Add plants at intervals, and arrange miniature furniture, tools, and accents for a playful, realistic touch.
#18. Repurposed Wheelbarrow Fairy Retreat
What I love most is the contrast, succulents in terra-cotta pots next to wild, blooming flowers. It cost barely anything since most of it was upcycled or taken from my plant stash.


Materials Needed
- 1 old metal wheelbarrow
- Mini fairy mushroom house (6” tall)
- Mini garden furniture set (2 chairs + table)
- Tiny mailbox
- Miniature arch (about 4” wide)
- Mixed plants: 2–3 succulents, 3–5 flowering plants, ground covers
- 20 pebbles
- Approx. 2 gallons potting soil
- Optional: “Welcome” garden sign
Step-by-step Guide
Step 1: Add a layer of gravel into the base of the wheelbarrow for drainage. Fill with potting soil, pressing it gently to create a stable surface.
Step 2: Place your mushroom fairy house slightly off-center. Lay out flat stones or pebbles to form a curved garden path leading up to the house.
Step 3: Plant your flowering plants and succulents in clusters, giving enough space around the center for features like chairs, a mailbox, and potted pieces.
Step 4: Add mini furniture, signage, and accents like an arbor over the path or tiny fences to frame it all. Water lightly and place it where sunlight can work its magic.
#19. Woodland Garden Nook in a Stone Urn
This miniature garden lives inside an old stone urn I almost discarded. Now, it’s one of my favorite little worlds.


Materials Needed
- 1 medium-to-large concrete planter (approx. 14–16” wide)
- Miniature garden scarecrow ( 3–4” tall)
- Tiny wire fencing
- Miniature watering can + tools
- 10–15 small decorative pebbles
- Plants: 1 pot Irish moss, 1–2 spring flowers, 1–2 accent plants (e.g., ornamental grass, baby’s tears)
- Approx. 1 gallon of potting soil
- Optional: Mini woven basket
Step-by-step Guide
Step 1: Add a layer of gravel into the base of your stone urn for drainage. Fill with potting soil, pressing it gently to create a stable surface.
Step 2: Plant moss or ground cover to form the base. Place accent plants and flowers toward the back or one side for visual layering.
Step 3: Lay a curving pebble path through the garden. Position the scarecrow near the center or slightly off-center for a focal point.
Step 4: Arrange the wire fence around the edge. Tuck in accessories like the watering can, mini rake, and basket. Mist lightly to keep the moss fresh and bright.
#20. Gnome Cottage Gathering Garden

This is what happens when your imagination spills into the soil. Like a party’s about to start at sunset, and the fairies are just finishing up the last touches on the cupcakes.

Materials Needed
- 1 wide shallow planter (14–18″ diameter)
- Miniature cottage (5–7″ tall)
- Gnome figurines set
- Mini mushroom stools and decor
- Garden swing or trellis set
- 12–15 stone path pieces
- Miniature fencing
- Approx. 1 gallon potting soil
- Plants: 2–3 flowering plants, 2–3 types of succulents, trailing greenery
Step-by-step Guide
Step 1: Add a layer of gravel into the base of your container for drainage. Fill with potting soil, pressing it evenly to build a base.
Step 2: Position the fairy house slightly toward the back. Nestle larger plants and succulents around the edge, leaving a center path open.
Step 3: Place the stepping stones to create a walkway. Add the swing set or pergola to one side and surround it with flowering plants for color.
Step 4: Scatter gnome figurines, mushroom stools, and accessories across the garden. Add fencing, water gently, and watch the charm unfold.
#21. Storybook Treehouse Fairy Garden
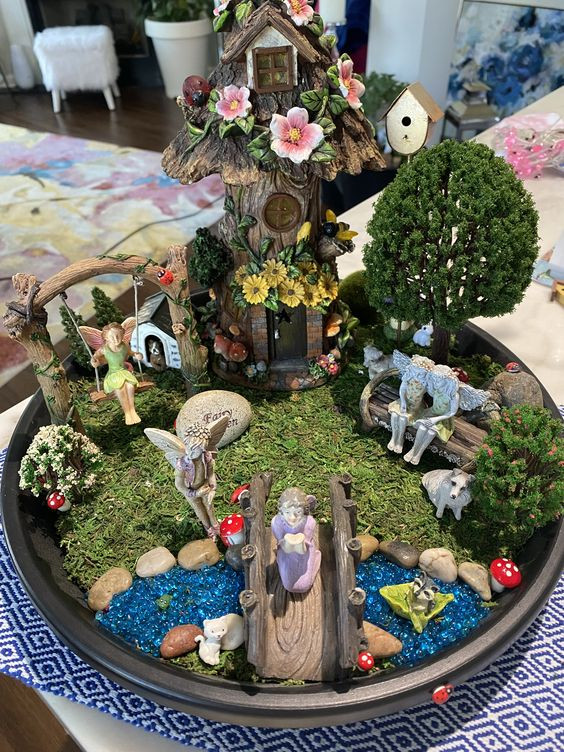
There’s something truly nostalgic about this one. It reminds me of the kind of secret garden a kid might dream up after reading a bedtime story.
Materials Needed
- 1 large round planter tray (14–16″ wide, at least 2″ deep)
- Miniature fairy house/treehouse (6–8″ tall)
- Mini fairies and animals set
- Mini swing and arch
- Mini bridge (approx. 4–5″ long)
- Artificial moss sheet
- 1 lb blue glass pebbles
- Small landscaping rocks
- Approx. 1 gallon potting soil
- Optional: faux tree, birdhouse, mushrooms, tiny flowers, ladybugs
Step-by-step Guide
Step 1: Add a layer of gravel for drainage, then fill your base with potting soil. Gently press to create a flat surface, slightly elevated in the center if you want to add dimension.
Step 2: Cover most of the surface with moss. Place your fairy house near the back center and arrange the tree on one side. Leave a clearing in front for the “yard.”
Step 3: Create a water area using blue glass pebbles and border it with rocks. Install the small bridge over the water feature, then add pathways with additional stones.
Step 4: Place the mini fairies around the space—on the bridge, swing, bench, and yard. Add finishing touches like mushrooms, critters, and floral sprigs for extra life.
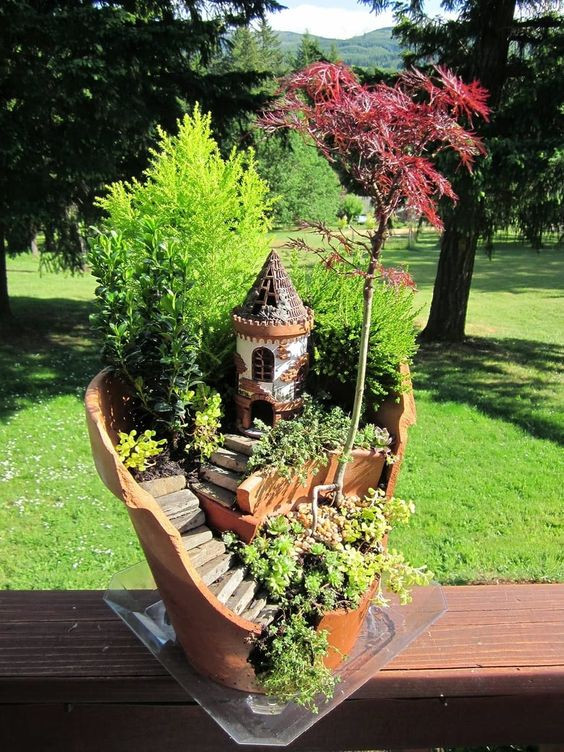
#22. Whole Magic Fairy Garden
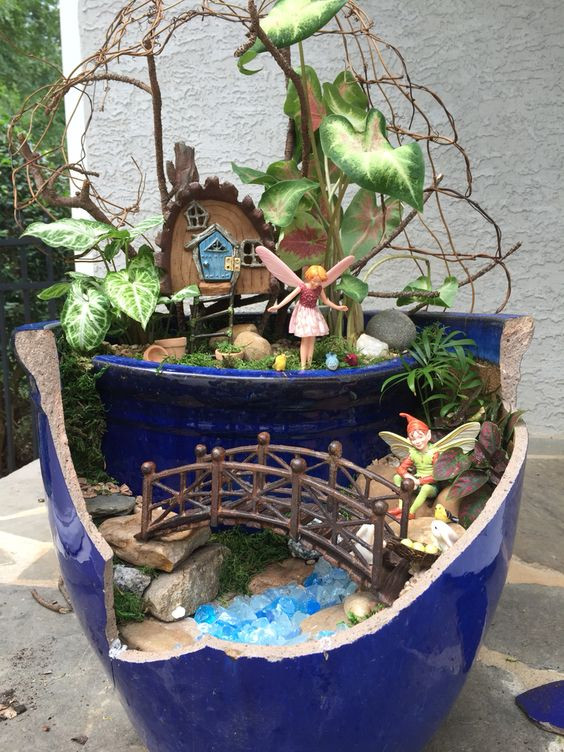
There’s a kind of poetic charm in turning something broken into something this delightful. This fairy garden, built inside a shattered ceramic pot, captures both whimsy and resilience.

Materials Needed
- 1 large broken ceramic pot (ideally 12–16″ in diameter)
- Around 1.5 gallons of potting soil
- Miniature wooden fairy door
- Miniature fairy figurines
- Mini bridge (4″–5″)
- 1 lb blue glass gems
- Decorative rocks
- Small plants: Caladium, Fittonia, and ivy
- Miniature accessories: mushrooms, animals, birdhouses
Step-by-step Guide
Step 1: Add a layer of gravel into the base of your broken pot for drainage. Fill with potting soil and press down gently. Arrange the broken pot shards like stair-stepped ledges inside the planter.
Step 2: Start at the bottom and build up: place your blue glass pebbles as a river across the base and position the miniature bridge. Use natural rocks to create a rustic edge.
Step 3: Plant Caladium and small foliage around the upper level, leaving a space for the fairy house. Tuck moss into open patches for a lush, finished look.
Step 4: Add fairy figurines, props, and finishing touches across levels—one peeking from the lower garden, another waving from near the house. It’s your tiny world—fill it with stories.
#23. Gnome Village in a Whiskey Barrel
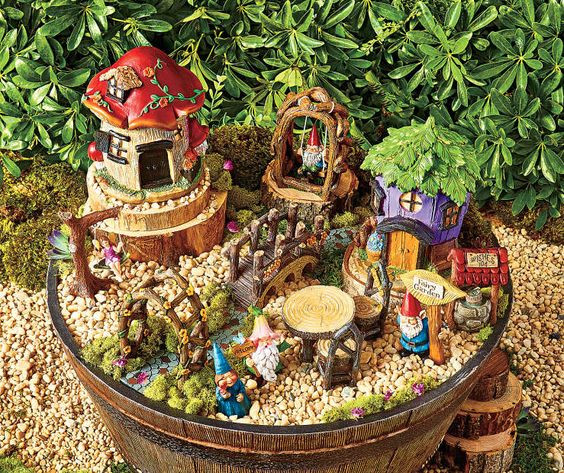
If you’ve ever imagined what a fairytale town square might look like, this setup brings it to life, on a miniature scale.

Materials Needed
- 1 half whiskey barrel planter (20–24″ diameter)
- 2 quarts of potting mix and pea gravel
- 2 miniature mushroom houses
- Miniature bridge and swing
- Fairy garden figurines
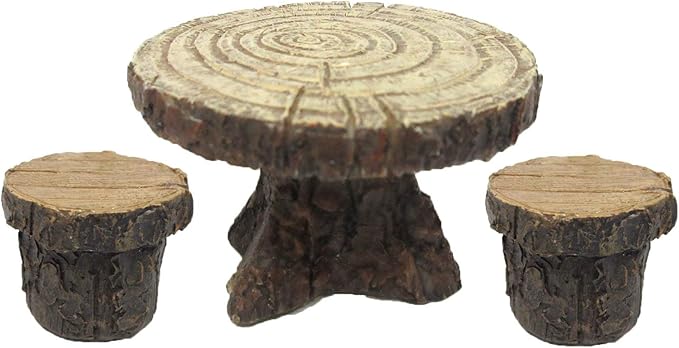
- Mini stump table and chairs set
- Preserved moss, small twigs, and wooden rounds
- Optional: LED fairy lights
Step-by-step Guide
Step 1: Add a layer of gravel into the base of your barrel for drainage. Fill halfway with potting soil, then top with pea gravel for a finished, level look.
Step 2: Position the houses at different heights using upside-down clay pots or wooden blocks underneath to create platforms. Add moss around the edges for softness.
Step 3: Arrange bridges and paths using wood slices or flat stones. Place the swing in a raised area to give it a treehouse feel.
Step 4: Add your gnome characters near their “homes,” around the table set, and by the shops. Each one adds personality. Finish by sprinkling moss in corners and layering tiny accessories for charm.
#24. Fairy Circle Campfire Retreat
This design feels like stepping into a magical late-spring evening when fairies gather for stories and stargazing.

Materials Needed
- 1 shallow wide planter (16–20″ diameter, at least 6″ deep)
- 2–3 quarts of potting soil
- 2 lbs of pea gravel
- Miniature fairy figurines
- Mini fire pit accessory
- Mini benches
- 5–7 mini succulents
- Tiny birdbath, mushrooms, or lantern
- Optional: thin twigs
Step-by-step Guide
Step 1: Add a layer of gravel into the base of your container for drainage. Fill it with potting soil and gently press to level.
Step 2: Arrange your succulents throughout the bed, spacing them to leave open “seating” zones near the center. Top exposed soil with a layer of pea gravel for texture.
Step 3: Create a gathering spot in the middle using your fire pit, mini logs, or tiny benches. Add fairies nearby as if they’re chatting around the fire.
Step 4: Add tiny accessories—birdbath, swings, or lanterns—tucked under greenery or near the edges. If you’d like, create a perimeter fence using bent wire or stick segments.
#25. Gnome Village in Bloom
This setup bursts with whimsy and storytelling. I felt like I’d walked into a gnome festival where every corner celebrates a different season.

Materials Needed
- 1 large plastic flower pot (14–18″ wide, 12″+ deep)
- Around 10 quarts of potting soil
- 1lb blue decorative stones
- 10–12 small rocks
- Miniature gnomes and fairies
- Fairy house figurine
- Mini bridge, gate, or arched sign
- 5–7 blooming plants or succulents
- Optional: artificial moss
Step-by-step Guide
Step 1: Add a layer of gravel at the base of your pot for drainage. Fill with potting soil, pressing it firmly to level the surface.
Step 2: Arrange your fairy house at the back center as the main focal point. Create a curved path leading toward it using flat stones or bark chips.
Step 3: Position the bridge over your “stream” of blue stones, using pebbles on either side to form banks. Set up a welcoming gate, mini signs, or archway near the front for depth.
Step 4: Tuck in your succulents and flowers along the rim and sides. Fill gaps with fairy figures, gnomes, and other details to complete your village scene.