Are you exhausted from endless scrubbing, only to be greeted by persistent stains and a lackluster living space? Bid farewell to the frustrations of cleaning with our incredible collection of cleaning hacks! We’re here to revolutionize your approach and unveil the secrets that will elevate your cleaning game.
Discover the game-changing tips and tricks that will make tough stains a thing of the past and turn cleaning into a breeze. Our insider knowledge will guide you towards a spotless and dazzling home, where every corner radiates cleanliness and freshness.
Get ready to embark on a journey through the ultimate guide to cleaning. With our expert advice and innovative techniques, you’ll bid farewell to the hassles and welcome a new era of cleanliness. Prepare to witness the incredible transformation as your home shines with unparalleled radiance.
Gentle Care for Your Artwork: Unveil Its True Beauty
When it comes to cleaning delicate artworks like oil paintings and watercolors, using the right approach is crucial to preserve their beauty. Instead of resorting to traditional methods that can potentially harm your precious pieces, why not turn to a surprising tool found in your kitchen—the humble bagel?

Cut a bagel in half and let its soft, doughy texture work its magic. With a gentle touch, run the bagel over the surface of your artwork. You’ll be amazed at how it effortlessly lifts dust and grime without causing any damage. The absorbent nature of the bagel ensures a safe and effective cleaning process.
Before proceeding, it’s essential to patch-test this method on a small area of your artwork to ensure it doesn’t cause any unintended effects. If you’re uncertain about cleaning your artwork, seeking the advice of an expert is always wise.
To begin, use a soft-bristled brush to remove any loose dust from the surface. Then, delicately pat the artwork’s illustration with the inside of the bagel. Take extra care to ensure the paint layers are dry and intact to prevent any potential discoloration.
Quick and Easy: A Shining Toilet for Your Guests
When guests are on their way and you need a sparkling toilet in no time, follow these simple steps:
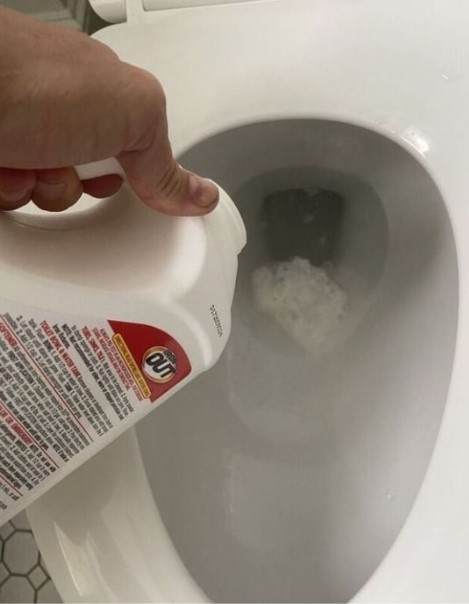
- Grab a spray bottle and mix 1/4 cup of baking soda with 1 cup of white vinegar. Shake the bottle thoroughly to ensure the ingredients are well combined.
- Spritz the solution inside the toilet bowl, making sure to cover every surface, including the underside of the rim.
- Let the solution sit for approximately 15 minutes, allowing it to work its magic.
- Armed with a toilet brush, give the inside of the bowl a good scrub, paying extra attention to any stubborn stains or buildup.
- Flush the toilet multiple times to rinse away the cleaning solution completely.
- For a final touch, add a few drops of your favorite essential oil, such as lemon or tea tree oil, to the toilet brush. Give the bowl one last scrub to leave behind a refreshing scent.
With these quick and easy steps, you’ll have a sparkling clean toilet that will impress your guests. Now you can welcome them with confidence and ensure a pleasant visit.
Bid Farewell to Scratches on Your Dishes
White dishes hold a special place on our tables, but over time, they can lose their pristine appearance due to scratches and scuffs caused by utensils. Fear not, for there’s a simple solution to restore their original beauty. Enter Bar Keeper’s Friend scouring powder, the secret weapon in your cleaning arsenal.
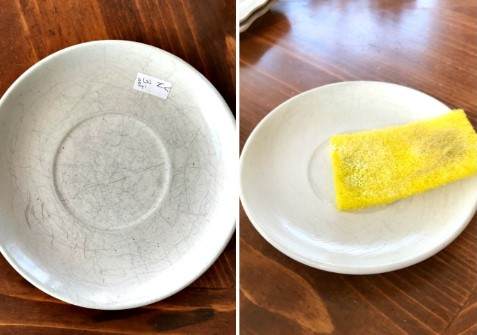
This highly acclaimed product has gained popularity as a must-have cleaning hack, making it a staple in every home. With just a gentle scrub, Bar Keeper’s Friend can effortlessly erase the visible signs of wear and tear on your white dishes, rejuvenating them to their former glory. Say goodbye to unsightly scratches and embrace the renewed elegance of your tableware.
Restore Your Microfiber Couch to Its Former Glory
Microfiber furniture offers comfort and style, but over time, it can lose its charm. Dust, dirt, and daily use can leave your couch looking dull and worn. If you’re searching for a simple and effective way to bring back its brand-new appearance, look no further than rubbing alcohol and a trusty scrub brush. This winning combination is a go-to for many who strive to maintain the beauty of their microfiber furniture.
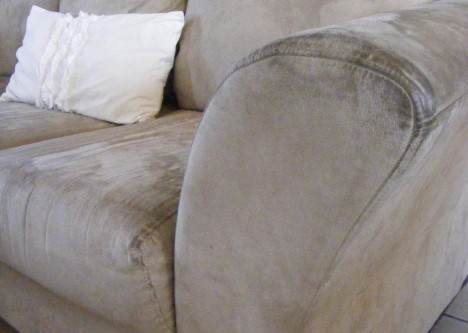
Using a scrub brush and a small amount of rubbing alcohol, you can easily lift away dirt and grime, breathing new life into your microfiber upholstery. This gentle cleaning solution is safe for most types of microfiber, ensuring you won’t damage the fabric or leave behind any harsh residues. With just a few minutes of effort, you’ll be amazed at the transformation of your couch. Whether you want to maintain the beauty of your current furniture or revitalize an older piece, this cleaning hack is a must-try.
Restore Your Bathroom Exhaust Fan to Its Full Potential
A clogged bathroom exhaust fan not only detracts from the aesthetics of your space, but it can also hinder its performance in eliminating moisture and odors. Traditional cleaning methods can be time-consuming and ineffective, leaving behind stubborn dirt and dust. That’s where a quick and efficient solution comes in: canned air.
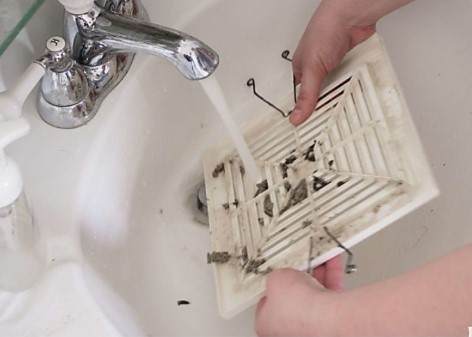
To clean your bathroom fan using canned air, start by turning on the fan. Then, give it a burst of air from the can, effectively blasting away the accumulated dust. The fan will help disperse the dust outside, ensuring a thorough cleaning in a simple and effective way. This cleaning method isn’t limited to bathroom exhaust fans; it can also be applied to the return air grilles of your central heating and cooling system. Just run the system and let the return airflow carry the dust to the filter.
Restore Flushing Power: Clean Your Sluggish Toilet
Dealing with a sluggish toilet can be a hassle, but fear not! There’s a simple solution that requires only a hand mirror and a coat hanger. Mineral deposits clogging the rinse holes under the rim could be the culprit behind slow flushing. Here’s what you need to do:
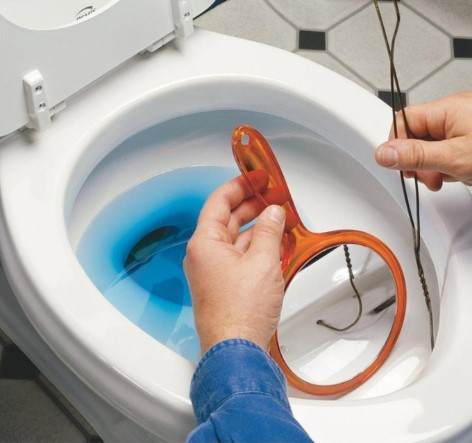
- Grab a hand mirror and use it to inspect the rinse holes under the rim of your toilet. You may need to get down on your knees for a closer look.
- Take a coat hanger and bend it into a flat shape, creating a makeshift tool for cleaning. Be sure to smooth out any sharp edges.
- Gently insert the tip of the coat hanger into each rinse hole, using a probing motion to dislodge any mineral deposits. Take care not to scratch the porcelain.
This simple yet effective cleaning method allows you to remove mineral buildup and restore the full flushing power of your toilet. By ensuring that the rinse holes are clear, waste and debris can be efficiently and effectively eliminated. No need to get your hands dirty or call a plumber!
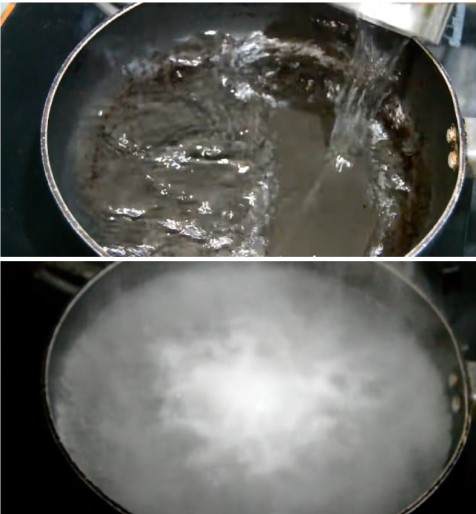
Banishing Tough Buildup: Cleaning the Bottom of Your Pans
Cooking delicious meals often comes with the downside of tough food and grease buildup on the bottom of your pans. Thankfully, there are several effective methods to tackle this cleaning challenge. Here are a few techniques to get your pans looking good as new:

- Boiling Method: Fill the pan with water and add a small amount of dish soap. Bring it to a boil and let it simmer for a few minutes. This will help loosen the buildup. After simmering, use a scrub brush or scouring pad to remove the residue. Rinse with water and dry the pan.
- Baking Soda Paste: Create a paste by mixing baking soda and water. Apply the paste to the bottom of the pan and use a scrub brush or scouring pad to scrub the area. Rinse with water and dry the pan thoroughly.
- Commercial Cleaner: Consider using a heavy-duty commercial cleaner specifically designed to tackle tough grime. Follow the instructions on the label carefully, as these cleaners may require specific usage guidelines.
Prevention is always better than cure, so remember to avoid letting food burn and stick to the bottom of the pan. Use the right cooking temperature, stir the food regularly, and consider using non-stick pans to prevent stubborn buildup.
It’s important to note that some stains may be permanent, so it’s best to address them promptly. Regular cleaning and maintenance can also help prevent stubborn buildup over time.
Bridge the Gap: Countertop Gap Filler
Are you tired of the constant hassle of cleaning the annoying gap between your countertop and refrigerator? Say goodbye to crumbs, papers, and flatware falling into the void with a simple and effective solution. Clear plastic tubing is your secret weapon to fill that gap and keep unwanted debris at bay. Available in various widths, starting at 1/8 inch, this tubing can be easily found at home centers and hardware stores.
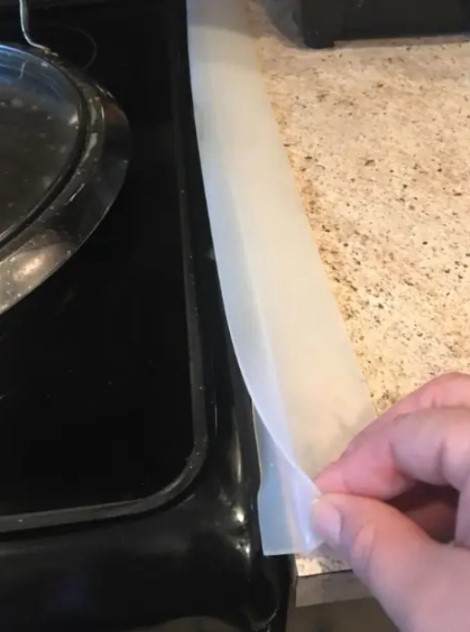
This affordable and practical solution is nearly invisible, seamlessly blending with your kitchen decor. By using plastic tubing to fill the gap, you’ll save valuable time and energy that would otherwise be spent searching for and cleaning up those pesky crumbs. Whether you’re looking to streamline your cleaning process or simply want to keep your kitchen looking its best, this countertop gap filler is a smart and effective solution.
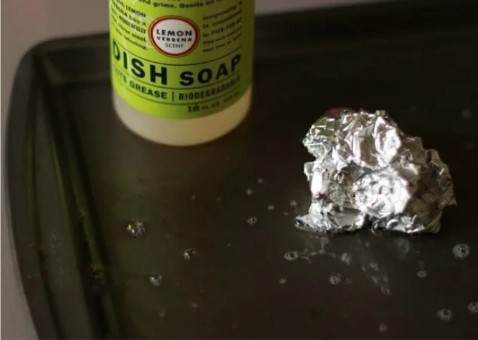
Create Your Own Aluminum Foil Scrubber
Don’t let tough, stuck-on messes on your glass baking dish leave you feeling frustrated. Instead of resorting to expensive steel wool scrubbers, why not make your own DIY aluminum foil scrubber? With just a roll of aluminum foil and a little soap, you’ll have a powerful cleaning tool at your fingertips.
Here’s how to do it:
- Take a sheet of aluminum foil from the roll and crinkle it into a ball, creating a textured surface for effective scrubbing.
- Apply a small amount of soap to the ball of foil, ensuring it’s evenly coated.
- Use the soap-covered ball of foil to gently scrub away the stubborn grime and food residue on your glass baking dish.
The aluminum foil’s abrasive nature will easily lift away the mess, restoring the shine and cleanliness of your glass baking dish. The best part? This DIY scrubber is not only effective but also affordable and environmentally friendly.
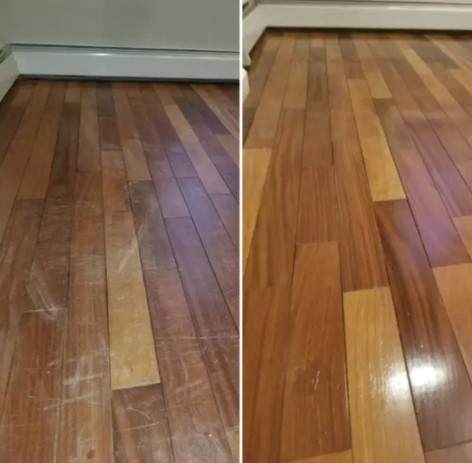
Create Your Own Natural Wood Surface Polisher
Keeping your wooden surfaces and furniture looking their best doesn’t require store-bought polishes filled with chemicals. With just two simple ingredients – lemon juice and olive oil – you can make your own effective and natural wood surface polisher.
Follow these easy steps to create your DIY polish:
- In a small bowl or container, mix 1 part lemon juice with 2 parts olive oil. The lemon juice will help clean and brighten the wood, while the olive oil will provide nourishment and add shine.
- Take a soft cloth or rag and dip it into the mixture. Make sure the cloth is lightly saturated but not dripping.
- Using gentle circular motions, apply the polish to your wooden surface. Massage it into the wood, covering the entire surface area.
- Allow the polish to sit on the wood for a few minutes, giving the natural ingredients time to penetrate and revitalize the surface.
- Using a clean, dry cloth, wipe away any excess polish. This will help remove any remaining dirt or residue and leave a beautiful, natural shine.
By using this DIY wood surface polisher, you’ll not only restore the luster of your wooden items but also provide them with a protective layer. This will help prevent future damage and keep them looking great for years to come. Enjoy the beauty and warmth of your rejuvenated wooden surfaces, knowing that you’ve used a natural and eco-friendly solution.
Harness the Power of Steam for Effective Cleaning
When it comes to tackling dirt, grime, and germs, steam is an incredibly powerful tool in your cleaning arsenal. Steam cleaning is safe to use on various sealed and waterproof surfaces, including tile, laminate, and more. However, it’s always a good idea to consult the manufacturer’s recommendations before using it on specific materials like vinyl flooring.
Equipped with the right attachments, steam cleaners can also be used to effectively clean ovens and stovetops, making them a versatile solution for your home. What makes steam cleaning even more appealing is that it offers a natural, chemical-free method of cleaning. You can achieve remarkable results without relying on traditional cleaning products, leaving your surfaces not only clean but also refreshed.
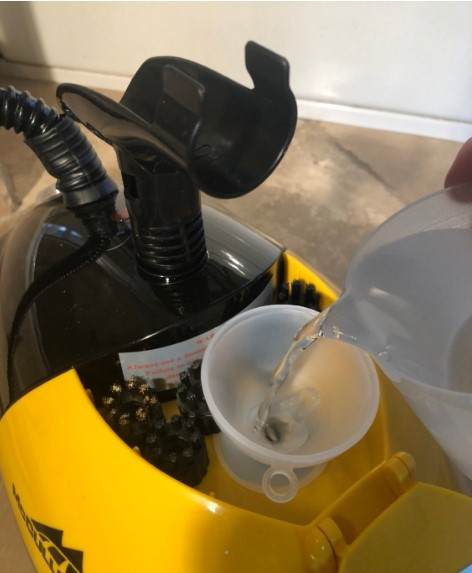
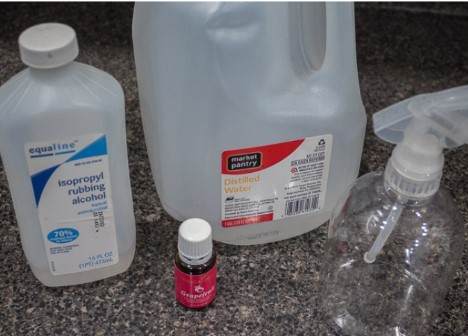
Create Your Own Refreshing Linen Spray with Rubbing Alcohol
To infuse your linens and towels with a delightful fragrance, you can easily make your own DIY linen spray using rubbing alcohol. Here’s how:
Ingredients:
- 30 drops of your favorite essential oils (a lemon-lavender combination is recommended)
- 3 oz. of rubbing alcohol
- 1.5 cups of distilled water
- Spray bottle or empty hairspray bottle with a funnel
Instructions:
- In a mixing bowl, combine the 30 drops of essential oils with the 3 oz. of rubbing alcohol.
- Stir the mixture well to ensure the oils are evenly distributed.
- Add the 1.5 cups of distilled water to the mixture and stir again.
- Use a funnel to pour the mixture into a spray bottle or an empty hairspray bottle.
Now you have your homemade linen spray ready to use! To infuse a heavenly scent into your closet, simply lightly mist your linen and towels as you fold them. This DIY linen spray is not only cost-effective but also offers a delightful fragrance that rivals store-bought alternatives.
Restore the Shine to Your Di shwasher Vents with Ease
The air vents in your ceiling and floor dishwashers may not be on your regular cleaning checklist, but they can accumulate a surprising amount of dirt and dust over time. However, cleaning these vents is a quick and effortless task. Here’s how you can make them dazzle again:
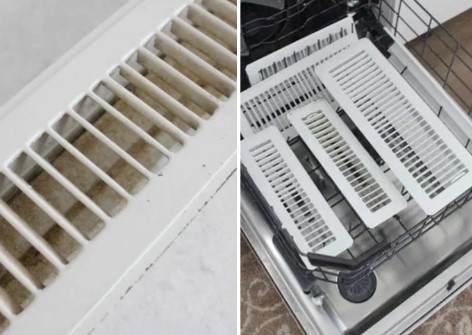
- Start by using a screwdriver to remove the vents from their positions. Before proceeding, ensure that the vents are made of metal and not plastic, as this method is specifically designed for metal vents.
- Once you’ve confirmed they are metal vents, you have two cleaning options. The first option is to place the vents in your dishwasher. Make sure not to add any soap or detergent. Run them through a regular cycle, and let the dishwasher do the work for you.
- If you prefer to wash them by hand, use a small bristle brush, such as a paintbrush, to scrub away the dirt. You can use a mixture of mild dish soap and warm water to help remove stubborn grime. Rinse them thoroughly and allow them to air dry before reattaching.
- To keep your dishwasher vents clean throughout the year, use a duster or a microfiber cloth to wipe away any dust that accumulates.
By taking a few moments to clean your dishwasher vents, you can make a significant difference, particularly for those who suffer from allergies. Enjoy a cleaner and more efficient dishwasher, ensuring fresh air circulation in your kitchen.
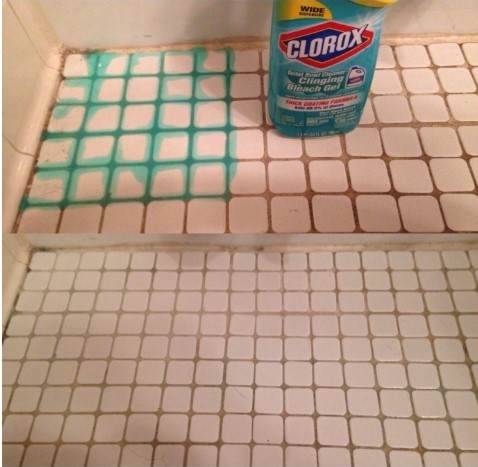
Effortlessly Eliminate Mold in Your Shower
Dealing with mold and mildew in the corners of your older tub can be a daunting task. However, there’s a simple and effective solution that doesn’t involve endless scrubbing. By using a bleaching gel specifically designed for toilets or tubs, you can easily target those stubborn mold spots in the corners and cracks.
Here’s what you need to do:
- Purchase a bleaching gel made for toilets or tubs, ensuring it is safe for the surface of your tub.
- Apply the bleaching gel directly to the affected areas, focusing on the corners and cracks where mold and mildew tend to accumulate. Be sure to follow the instructions on the product packaging for the best results.
- Allow the bleaching gel to sit for the recommended amount of time, typically a few minutes, to effectively break down and kill the mold.
- After the designated time has passed, rinse off the bleaching gel thoroughly with water. You’ll be amazed at how effective this method is in removing mold without the need for excessive scrubbing.
By using a targeted bleaching gel, you can effortlessly tackle mold and mildew in your shower, leaving it clean and fresh. Remember to follow proper ventilation practices in your bathroom to prevent future mold growth
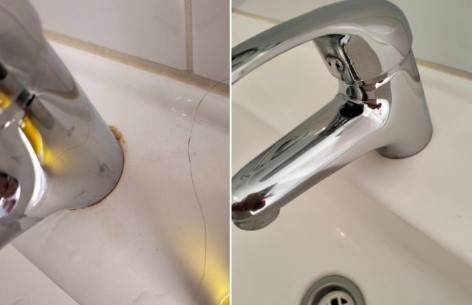
Say Goodbye to Sink Stains
Hard water stains can be a persistent nuisance, leaving unsightly orange-colored marks around your sink. Fortunately, there’s a simple and effective solution that you likely already have at home. With just a few common ingredients, you can tackle those stubborn stains and restore the shine to your sink.
Here’s what you’ll need:
- 1/4 cup liquid dish soap (Dawn is recommended)
- 1/2 cup baking soda
- 1 cup Epsom salt
Instructions:
- In a bowl, combine the liquid dish soap, baking soda, and Epsom salt. Mix them together until you have a paste-like consistency.
- Take a scrub brush and apply the mixture directly to the hard water stains on your sink. Use gentle pressure and scrub in circular motions, focusing on the areas with the most buildup.
- Continue scrubbing until the stains start to fade. You may need to apply more of the mixture and repeat the process for stubborn stains.
- Once you’ve thoroughly scrubbed the sink, rinse it with water to remove any remaining residue. You’ll notice a significant improvement in the appearance of your sink, although some stains may require additional treatments.
By using this homemade solution, you can effectively remove hard water stains and bring back the sparkle to your sink. Enjoy a cleaner and more visually appealing sink without the need for harsh chemicals or expensive cleaning products.
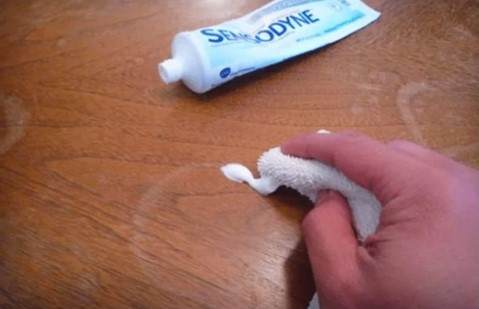
Say Goodbye to Water Stains on Wood
Accidental water stains on your beloved wood furniture can be a frustrating sight. But fear not, because there’s a simple and surprising solution right in your bathroom cabinet – toothpaste. Yes, you read that correctly. Toothpaste can work wonders in removing those unsightly water stains and restoring the beauty of your wood surfaces.
Here’s what you’ll need:
- Non-gel toothpaste (white, not colored)
- A soft cloth or sponge
Instructions:
- Squeeze a small amount of non-gel toothpaste onto the water stain on your wood surface. You don’t need a large amount; a pea-sized dab should suffice.
- Using a soft cloth or sponge, gently rub the toothpaste onto the stain in a circular motion. Be careful not to apply too much pressure, as you don’t want to damage the wood.
- Continue rubbing the toothpaste into the stain for a minute or two. You should start to see the stain gradually disappearing.
- Once you’ve treated the stain, use a clean damp cloth to wipe away any residue from the toothpaste. Make sure to thoroughly remove all traces of toothpaste from the wood surface.
- Finally, dry the area with a clean cloth, and admire the results. The water stain should be noticeably diminished or completely gone.
Toothpaste’s mild abrasive properties and gentle cleaning agents can effectively lift water stains from wood surfaces without causing further damage. This quick and cost-effective solution allows you to restore the beauty of your wood furniture and enjoy a spotless finish once again.
Remember to always test this method on a small, inconspicuous area of the wood first to ensure compatibility and avoid any potential discoloration.
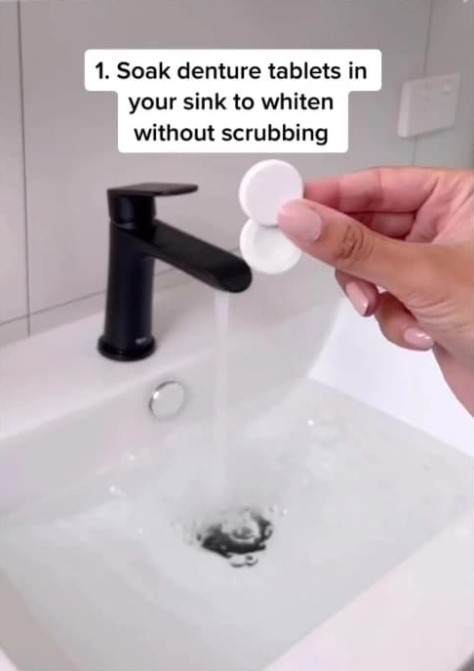
Achieve a Scum-Free Sink with Denture Tablets
If you’ve been struggling with stubborn buildup and unsightly rings around your sink drain, there’s a simple solution that you may not have considered before – denture tablets. These little tablets can work wonders in whitening and removing grime, leaving your sink looking fresh and clean.
Here’s how you can use denture tablets to achieve a scum-free sink:
- Fill your sink with hot water, ensuring that the water level is sufficient to cover the area with the buildup.
- Drop one or two denture tablets into the water, depending on the severity of the stains. Allow them to dissolve and create an effervescent solution.
- Let the denture tablets work their magic for about 15 minutes. You’ll notice the water gradually changing from clear to a bright, foamy mixture.
- Once the time is up, drain the sink and rinse the area thoroughly with clean water. Use a sponge or cloth to wipe away any remaining residue.
- For any lingering stubborn spots, you can take a paper kitchen towel and gently scrub the area to remove any remaining buildup. Be careful not to scratch the surface of your sink.
The powerful cleaning agents in denture tablets, such as citric acid and sodium bicarbonate, help to break down stains and remove grime effectively. Their effervescent action provides a gentle but effective cleaning process for your sink.
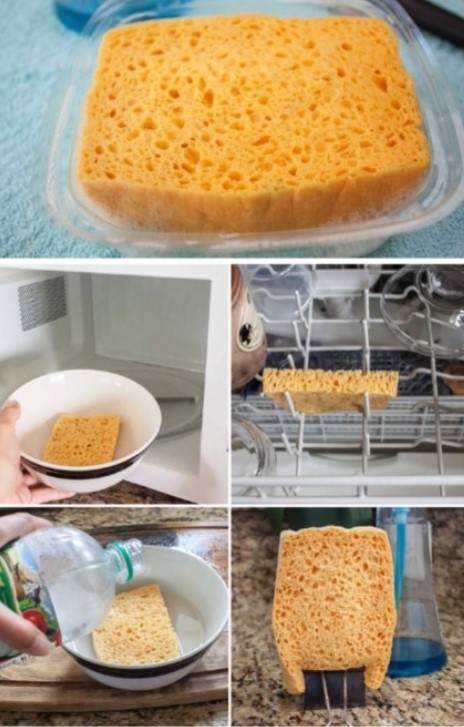
Give Your Sponges a Refreshing Soak
Sponges are a staple in the kitchen, but they can quickly accumulate bacteria and germs. To maintain a hygienic kitchen environment, it’s important to clean your sponges regularly. One effective method is to give them a simple and refreshing soak using vinegar.
Here’s how you can do it:
- Fill a bowl with vinegar, enough to fully submerge the sponge.
- Place the sponge in the bowl and let it soak for a few minutes. The vinegar’s acidic properties will help kill bacteria and germs that may have accumulated on the sponge.
- After the soak, squeeze out the excess vinegar from the sponge.
- Allow the sponge to air dry completely. You can place it in a well-ventilated area or use a sponge holder to ensure proper drying.
For an extra cleaning boost, you can add baking soda to the vinegar soak. The combination of vinegar and baking soda creates a powerful cleaning solution that helps eliminate odors and remove stubborn stains.
Additionally, you can also use the microwave to further sanitize the sponge. Make sure the sponge is damp, then heat it in the microwave for 1-2 minutes on high power. The heat will help kill any remaining bacteria and germs, leaving your sponge fresh and ready for use.
Remember to replace your sponges regularly, ideally every 2-3 weeks, to maintain their cleanliness and effectiveness. Regular cleaning and proper drying will help prolong the life of your sponges and ensure a clean and hygienic kitchen.
Cleaning Nonstick Pan Hack
Keeping your nonstick pans clean and in good condition is essential for their longevity and performance. Fortunately, there are several effective cleaning methods that won’t harm the nonstick coating. Here’s a handy hack to clean your nonstick pan:
- Start by using a sponge or cloth with mild dish soap and water. Gently scrub the pan’s surface to remove any food or grease. Avoid using abrasive materials like steel wool or rough sponges, as these can scratch the nonstick coating.
- If there are stubborn stains or residue, fill the pan with water and bring it to a boil. Add a few drops of dish soap and let it simmer for a few minutes. This will help loosen any stuck-on food. Use a plastic spatula to gently scrape away the residue.
- After simmering, use a sponge or cloth to clean the pan’s surface. The combination of heat and soap will make it easier to remove any remaining food particles. Rinse the pan with water to remove any soap residue.
- For tough stains, you can create a paste by mixing baking soda and water. Apply the paste to the stained areas and use a sponge or cloth to gently scrub the pan. Rinse thoroughly with water to remove any residue.
- Alternatively, you can use a commercial nonstick pan cleaner specifically designed for cleaning nonstick surfaces. Follow the instructions on the product label to ensure safe and effective cleaning.
- Check the manufacturer’s instructions to determine if your nonstick pan is dishwasher safe. If it is, you can place it in the dishwasher for a convenient and thorough cleaning.
Remember, regular cleaning and maintenance are key to preventing stains and keeping your nonstick pans in top condition. By following these cleaning methods, you can enjoy the benefits of nonstick cookware without worrying about damaging the coating.
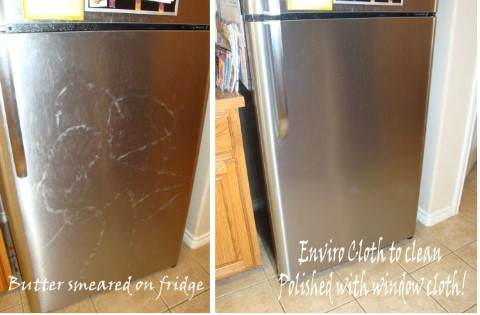
DIY Stainless Steel Cleaner & Polish
If you’re looking for an effective and budget-friendly solution to clean and polish your stainless steel appliances, try making your own DIY Stainless Steel Cleaner & Polish using just a few simple ingredients. Here’s what you’ll need:
- 1/4 cup of coconut cooking oil
- 3/4 cup of distilled water
- 1 capful (1 tsp) of Thieves Household Cleaner Concentrate
To create the cleaner, mix the coconut cooking oil, distilled water, and Thieves Household Cleaner Concentrate in a measuring cup. Once combined, pour the mixture into a glass or metal spray bottle.
To use the cleaner, spray a small amount onto a soft microfiber cloth and gently clean your stainless steel appliances along the grain. This will help remove dirt, grime, and fingerprints, leaving your appliances looking cleaner and shinier.
Keep Your Garbage Disposal Fresh and Clean with Lemons
If you want to keep your garbage disposal smelling fresh and free from bacteria, try this easy and natural cleaning hack using lemons. Here’s how to do it:
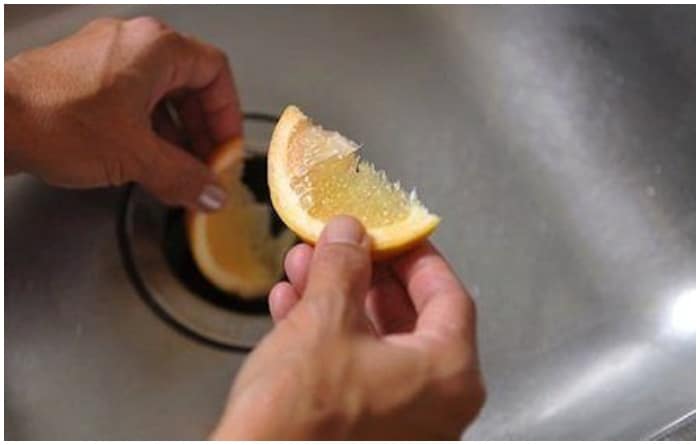
- Cut several lemons into small slices or wedges.
- Turn on your garbage disposal and slowly drop the lemon slices down the drain.
- Allow the disposal to run for a few seconds, breaking down the lemons and extracting their juice.
- The citric acid in the lemons will naturally disinfect the disposal, eliminating bacteria and unpleasant odors.
- Once the lemons have been processed, turn off the disposal and run cold water for a few seconds to flush away any remaining debris.
Not only will this simple method effectively clean and deodorize your garbage disposal, but it will also leave behind a refreshing citrus scent that will linger in your kitchen. Repeat this process regularly to maintain a clean and fresh-smelling garbage disposal.
Microwave Magic
If your microwave is in need of a thorough cleaning, follow these simple steps to make it shine like new:
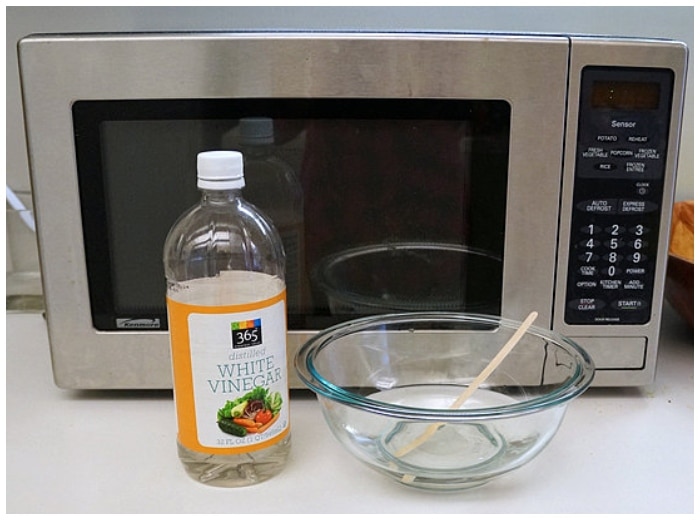
- Fill a microwave-safe bowl with two cups of water.
- Add two tablespoons of vinegar to the water. If you prefer, you can also add a few drops of essential oils to mask the vinegar smell.
- To prevent the water from boiling over, place a toothpick or a wooden skewer into the water.
- Place the bowl in the microwave and heat it on high for 5 minutes. The steam generated from the water and vinegar mixture will help loosen any stuck-on food and grime.
- After the 5 minutes, leave the bowl in the microwave for a few additional minutes to allow the steam to further penetrate and soften the gunk.
- Carefully remove the bowl from the microwave. Be cautious as it may be hot.
- Using a damp sponge or cloth, wipe down the interior of the microwave. The steam will have loosened the dirt, making it easier to clean.
- Pay extra attention to any stubborn stains or spots and give them a gentle scrub.
- Rinse and wring out the sponge or cloth as needed during the cleaning process.
- Once you have wiped down the entire interior, including the walls, ceiling, and turntable, the microwave should be clean and fresh.
By following these steps, you can easily and effectively clean your microwave using the power of steam and vinegar. Regular cleaning will help keep your microwave free from dirt and grime and ensure it functions optimally.