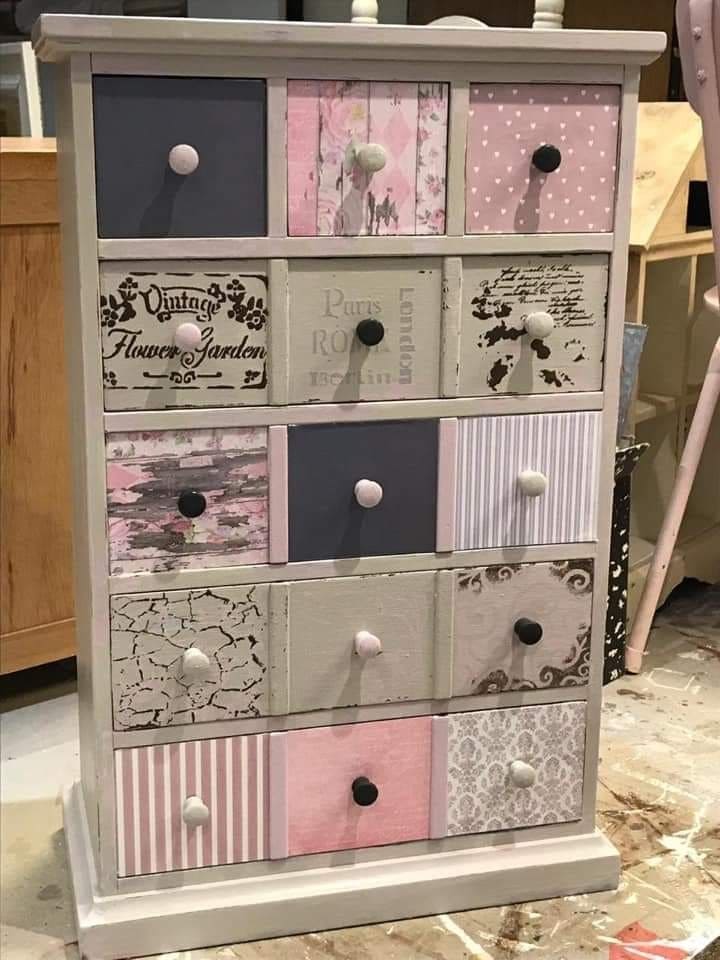
This patchwork dresser makeover is a fantastic example of how decoupage and paint can breathe new life into plain furniture.
By combining patterned papers like floral, striped, script, and textured, you can create a shabby chic design that looks both curated and spontaneous. The varied drawer fronts keep the piece visually interesting, while the soft pastel palette ties everything together.
Using chalk paint for the base and decoupage for the details ensures the finish is durable yet stylish. It’s a budget-friendly project with endless possibilities since you can tailor the colors and patterns to your own décor style.
Materials Needed
- 1 small dresser (approx. 28-34″ tall with 8-12 drawers)
- 1 sheet 120-grit sandpaper + 1 sheet 220-grit sandpaper
- 1 quart chalk paint (soft cream or antique white)
- Decorative scrapbook paper or wallpaper scraps (A4 size, 8-10 sheets in assorted patterns)
- 1 bottle decoupage glue (e.g., Mod Podge, 8 oz)
- 1 foam roller (4″) and 1 small detail brush (1″)
- 10-12 assorted drawer knobs (various colors/styles)
- Sharp scissors or craft knife
- Measuring tape and pencil
- Clear matte sealer (spray, 12 oz)
- Optional: Crackle medium (4 oz)
Step-by-step Guide
Step 1: Remove all the knobs and set them aside. Sand the dresser lightly with 120-grit to remove any sheen, then smooth with 220-grit. You wipe the entire surface with a damp cloth to clear away dust.
Step 2: Paint the frame of the dresser (excluding drawers) with two coats of chalk paint, letting each layer dry for 1-2 hours. I see chalk paint gives the base a soft matte finish that pairs perfectly with shabby chic details.
Step 3: Measure the drawer fronts and cut decorative papers to fit. For best results, leave about 1/8″ border around each edge so the paper doesn’t peel easily.
You next lay the papers out on the drawers before gluing to plan your patchwork layout.
Step 4: Apply decoupage glue directly onto the drawer surface with a foam roller. Place the paper carefully, smoothing from the center outward to remove bubbles.
Then use a clean cloth or brayer for extra smoothness. Let dry for 30 minutes.
Step 5: Brush a thin layer of glue over the top of the paper to seal. Allow this to dry fully before applying a second thin coat. If you want added texture, apply a crackle medium to a few drawers before sealing.
Step 6: Once dry, spray or brush a clear matte sealer over the entire dresser for durability. This protects the paper and keeps the colors looking vibrant.
Step 7: Reattach knobs or mix in new ones for variety. Mismatched knobs add to the shabby chic vibe, so don’t be afraid to play with color and shape.
Step 8: Step back and admire your work! You now have a dresser that feels custom, cozy, and brimming with vintage character.
Notes: For a softer look, choose pastel floral patterns; for a bolder one, add script or damask prints.