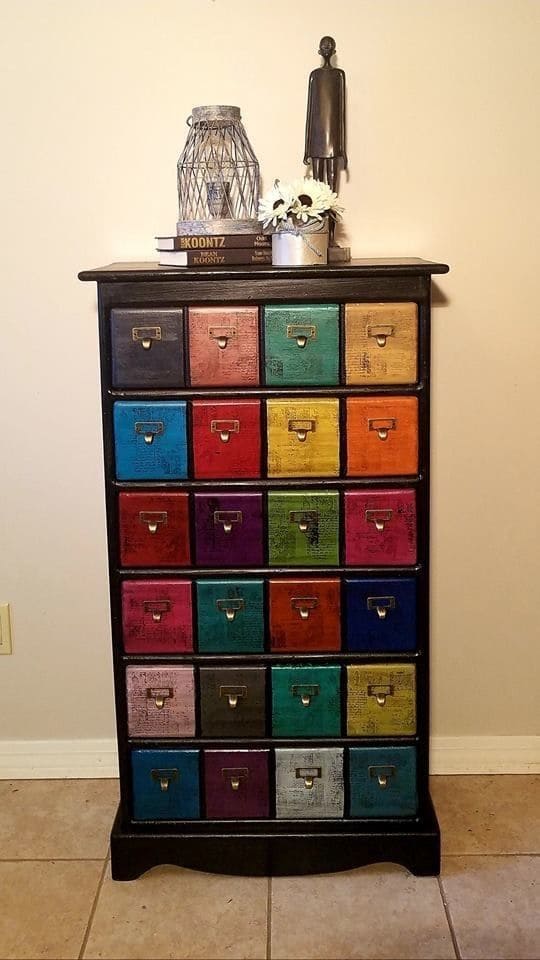
Instead of sticking to one paint color, you assign each drawer a unique shade, creating a grid of color that looks striking against the black frame.
Small label-style pulls add function and a touch of vintage utility charm, making it easy to organize. The beauty of this design is its flexibility, you can use bright rainbow shades, muted pastels, or even ombré tones depending on your style.
This rainbow apothecary dresser is a brilliant way to breathe new life into an old piece of furniture. It’s a fun project that blends organization with bold design.
Materials Needed
- 1 wooden apothecary-style dresser (approx. 40-50″ tall, 15-20 drawers)
- 1 sheet 120-grit + 1 sheet 220-grit sandpaper
- 1 quart primer (water-based)
- 1 pint black chalk paint (for frame)
- 10–12 acrylic paints in assorted bright shades (2 oz bottles each)
- Small angled brushes (1-1.5″) and detail brushes
- 1 roll painter’s tape
- 1 can matte clear sealer spray (12 oz) or brush-on polyurethane
- 15–20 small apothecary-style label pulls (brass, nickel, or black finish)
- Screwdriver + drill for hardware
- Optional: wood filler and putty knife (if repairing old drawer fronts)
Step-by-step Guide
Step 1: Remove all drawer pulls and set aside. Sand the dresser’s surface using 120-grit to remove any finish, then smooth with 220-grit. Then wipe dust off with a damp cloth.
Step 2: Apply a thin coat of primer to the entire piece, including the drawers. Let dry at least 2 hours before painting.
Step 3: Paint the dresser’s frame and edges in black chalk paint using a medium brush. Two coats will ensure a deep, even color. Let dry overnight.
Step 4: Separate the drawers and assign colors. Choose a mix of rainbow tones like red, orange, yellow, green, teal, blue, purple, and pink.
For a bolder effect, use two coats of each color. You want to use painter’s tape around drawer edges to get crisp lines.
Step 5: If you’d like, add subtle stamped or stenciled designs on top of the colors for extra character (like script, patterns, or symbols).
Step 6: Once dry, seal the entire dresser with matte clear sealer. Spray works faster, but a brush-on polyurethane adds durability if the piece will get heavy use. Then allow at least 24 hours of curing before reattaching hardware.
Step 7: Install the new apothecary-style pulls with a screwdriver or drill. These add an authentic vintage touch while making organization easier.
Step 8: Place your finished dresser in a well-lit space, this rainbow design deserves to shine like artwork.