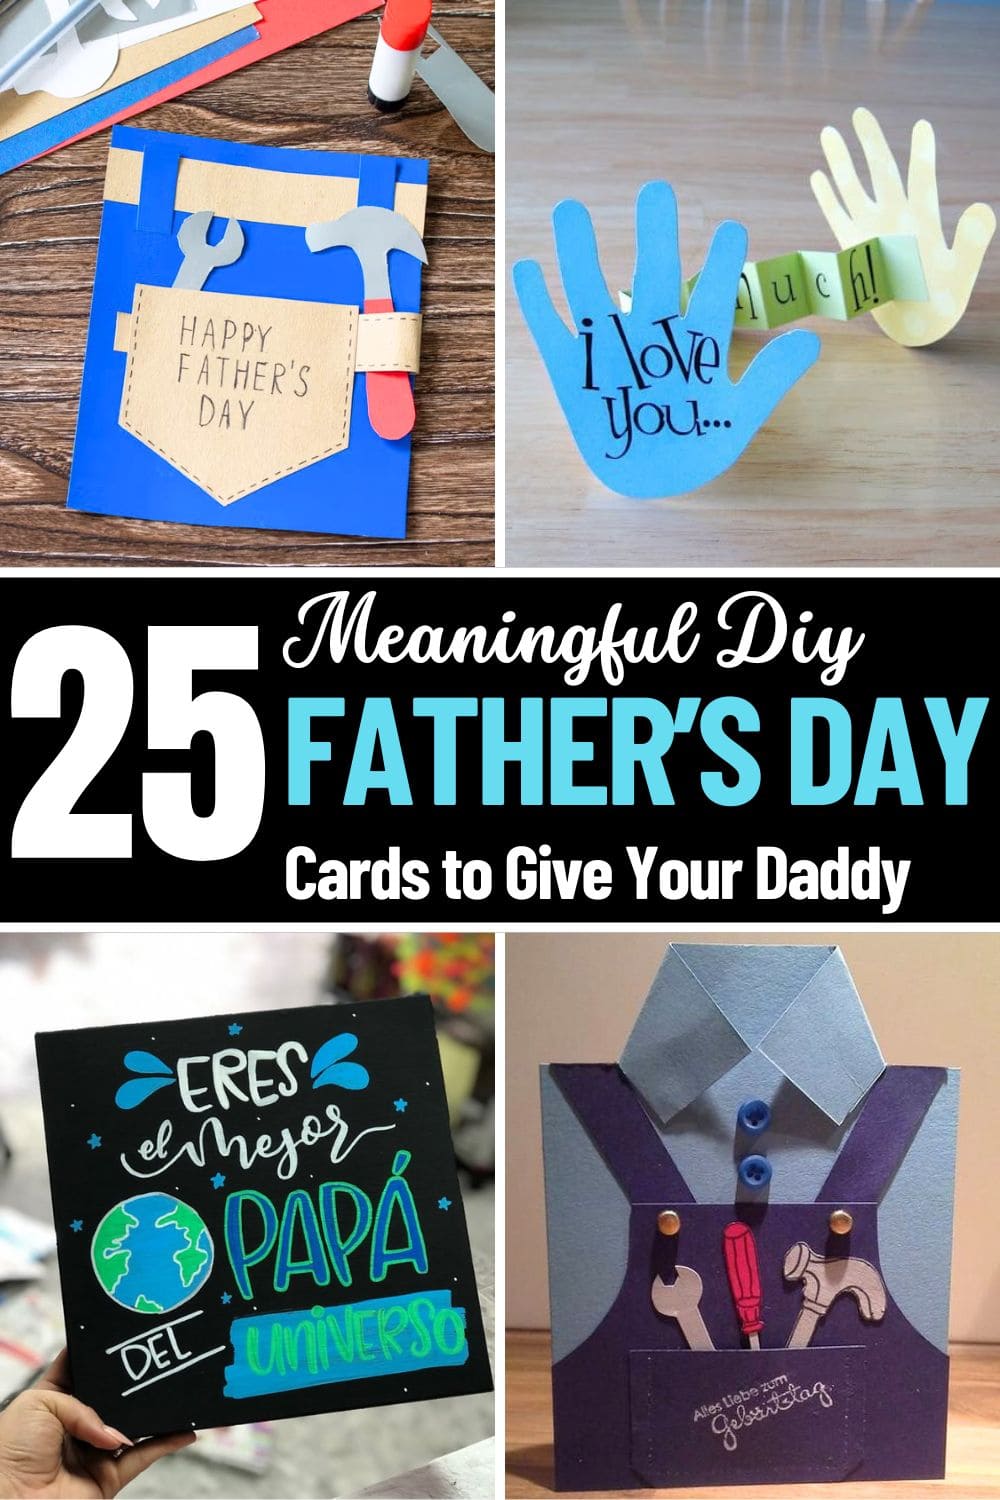
Father’s Day is more than a date on the calendar, it’s a chance to remind Dad how deeply he’s loved. And what better way than a handmade card, filled with personal touches and heartfelt charm?
Whether your dad is goofy, quiet, strong, or sensitive, the right card can speak volumes. These 25 meaningful DIY card ideas aren’t just crafts, they’re keepsakes.
From tiny handprints to playful puns, every fold and color says, “I made this for you, Dad.” You don’t need fancy supplies, just a little time, a sprinkle of creativity, and lots of love.
This article contains affiliate links. If you purchase through them, I may earn a small commission at no extra cost to you. Thank you for your support!
#1. Handyman Shirt Card
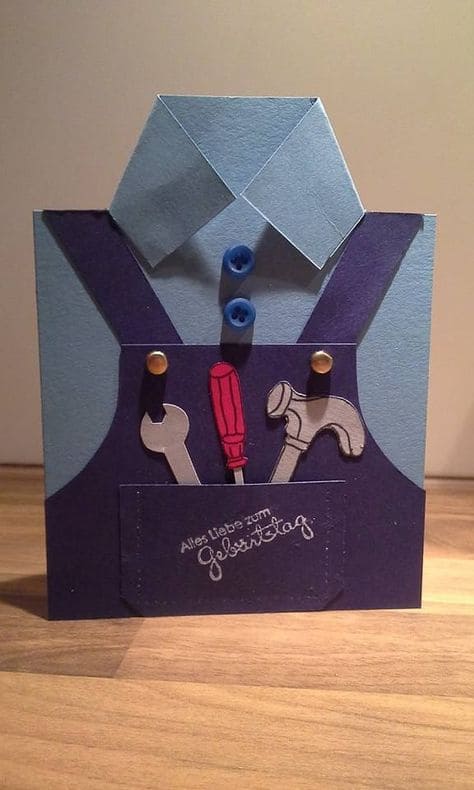
Inspired by my own dad’s endless drawer of tools and his well-worn overalls, this card looks like a work shirt complete with a chest pocket full of mini paper tools.
Materials Needed
- Light blue cardstock (1 sheet, 8.5” x 11”)
- Navy blue cardstock
- 2 Mini buttons
- Brass brads
- Printable paper tool templates or hand-drawn cutouts
- Craft glue or double-sided tape
- White gel pen
Step-by-Step Guide
- Fold the light blue cardstock in half vertically to create your card base. Then, cut a triangle flap from the top edges and fold them inward to resemble a shirt collar.
- Cut out overall straps, a rectangular body section, and a pocket from navy blue cardstock. Glue them onto the card front so it resembles a work uniform. Add mini brads at the strap ends for extra detail.
- Draw, print, or cut out small paper tools like a wrench, screwdriver, and hammer. Tuck them into the pocket and glue the bottoms to hold them in place.
- Finally, add real or faux buttons to the shirt front and write your Father’s Day message with a white gel pen.
#2. Tool Pun Fathers Day Card
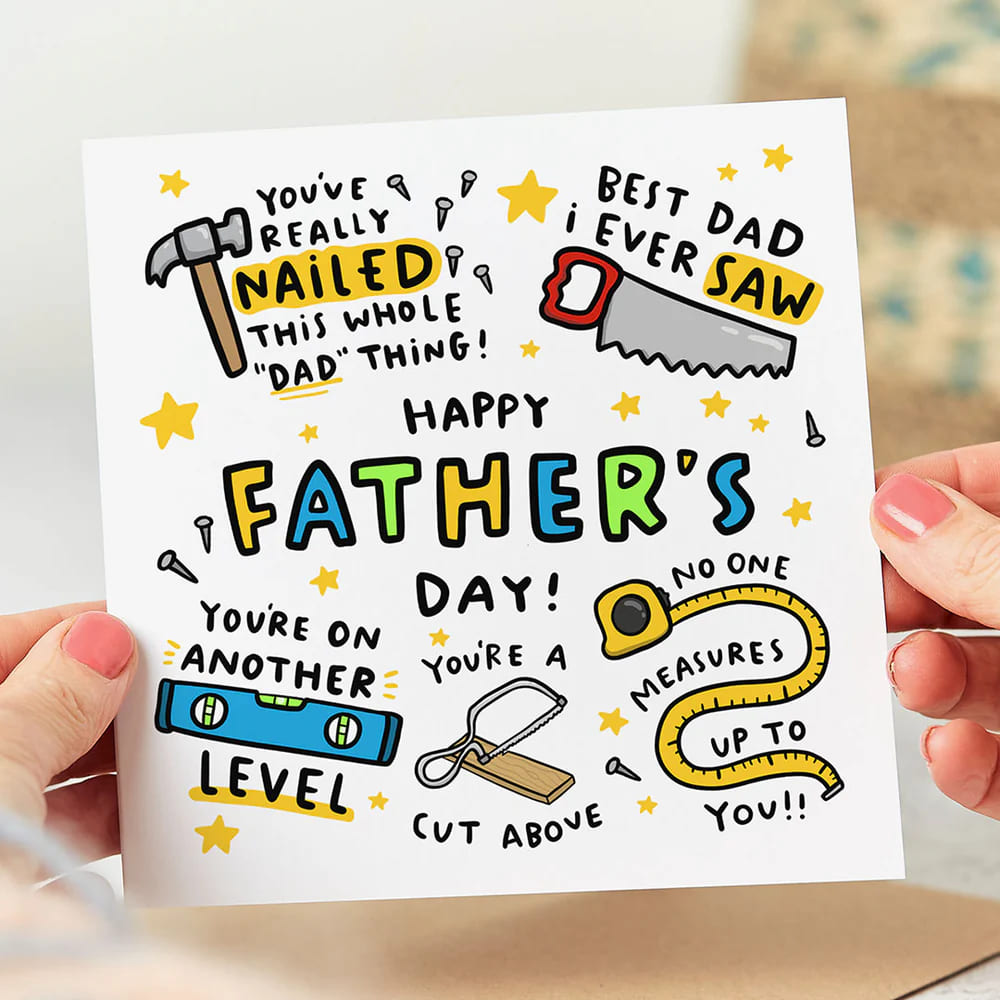
It’s packed with puns like “You’ve nailed it” and “No one measures up to you!” – the kind of dad-joke humor that’s both cringey and heartwarming.
Materials Needed
- White cardstock (1 sheet, 8.5 x 11 inches)
- Printable pun card template or hand-drawn design
- Colored markers or gel pens
- Scissors
- Glue stick (optional)
Step-by-Step Guide
- Print the design directly onto cardstock, or sketch your own using a pencil first. Keep the layout playful and don’t stress about perfection, puns steal the show!
- Use markers or pens to color each tool and word. Bright yellow, red, blue, and green add the cheerful, comic-style energy.
- Cut out the card and fold it neatly in half. Add a handwritten message inside to finish it off.
#3. Heart-shaped Fathers Day Card
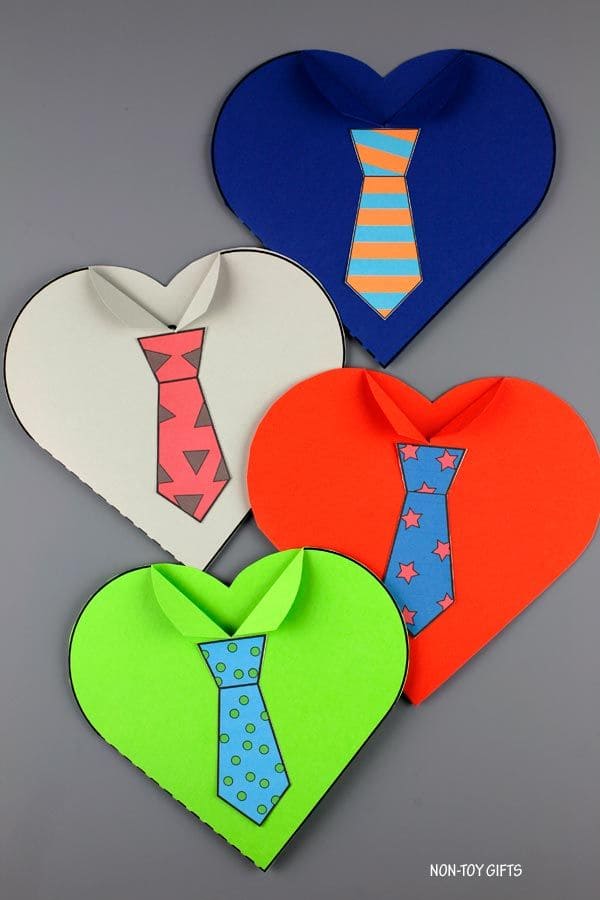
This heart-shaped Father’s Day card is a cheerful, affordable, and gives you the chance to let your kids show a little personality through their card-making.
Materials Needed
- Cardstock sheets (variety of bold colors)
- Printable or hand-drawn paper tie templates
- Glue stick
- Black marker or pen for details
- Scissors
Step-by-Step Guide
- Fold a piece of cardstock in half and cut out a symmetrical heart shape. Be sure to keep the fold at the top so the card can open.
- Snip a small slit at the top center of the heart and fold each flap outward to resemble shirt collars.
- Choose or create a colorful tie and glue it just under the collar flaps. Add your message inside the card and decorate it as wildly or neatly as you like.
#4. Quirky DIY Mustache Cards
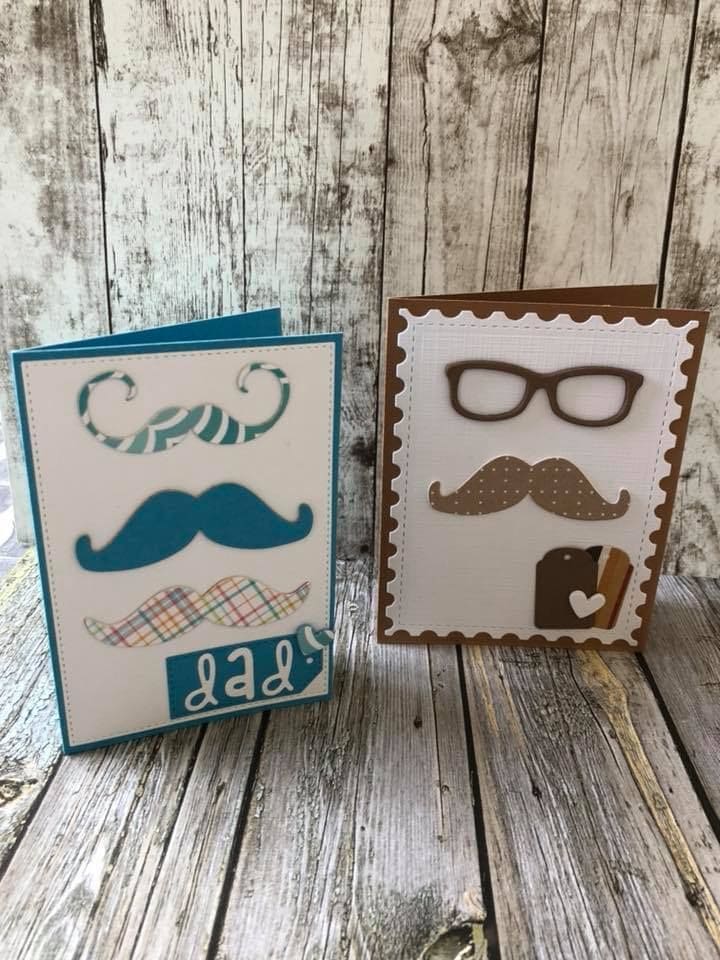
If your dad rocks a mustache or if you just love a good laugh, these quirky DIY mustache cards are the perfect blend of cool and hilarious.
Materials Needed
- 1 cardstock (5″x7″ or 4″x6″) in white or kraft brown
- Scrapbook paper in plaid, polka dot, or stripes
- Mustache and glasses die cuts or templates
- Craft glue stick
- Letter stickers or alphabet die cuts
- Optional: foam tape or adhesive dots
Step-by-Step Guide
- Cut out mustache shapes and glasses using templates or die cuts. Use patterned paper to create a fun and unique set of styles.
- Glue or tape the shapes to the card front, stacking multiple mustaches if you like. Add “Dad” at the bottom or wherever feels balanced.
- Use foam dots under some of the pieces to give a playful 3D pop. Write your message inside—maybe a joke or something heartfelt to make Dad smile.
#5. Rocket-themed Card
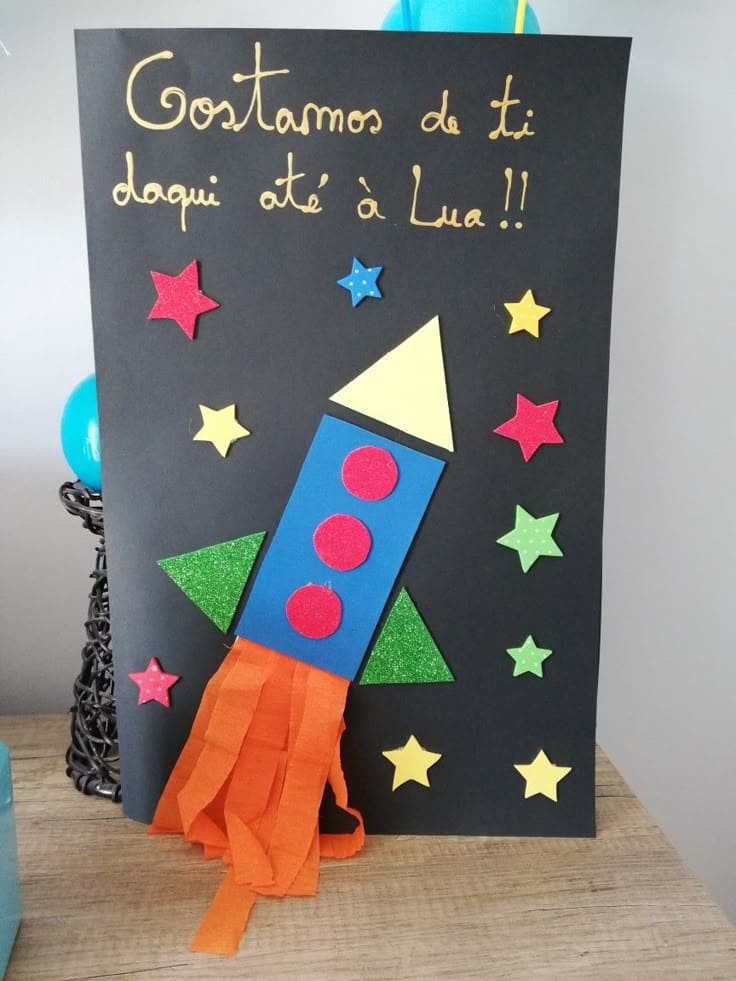
If you’re aiming for “out of this world” this Father’s Day, this rocket-themed card is perfect. It literally says “We love you to the moon!” (in Portuguese).
Materials Needed
- 1 sheet of black cardstock (8.5″x11″)
- Assorted colorful foam sheets (blue, red, green, yellow)
- Orange crepe paper or tissue
- Glue stick or tacky glue
- Scissors
- Gold paint pen or marker
Step-by-Step Guide
- Fold the black cardstock in half to form your card base. Cut out rocket parts from foam sheets: a blue rectangle body, yellow triangle tip, red circle windows, and green triangles for side fins.
- Glue down the rocket in the center. Attach strips of crepe paper under the rocket to look like flames shooting out—cut the ends unevenly for effect.
- Decorate with foam stars and write your message up top using a gold paint pen. Let everything dry before gifting with a big hug!
#6. Universal Galaxy Card
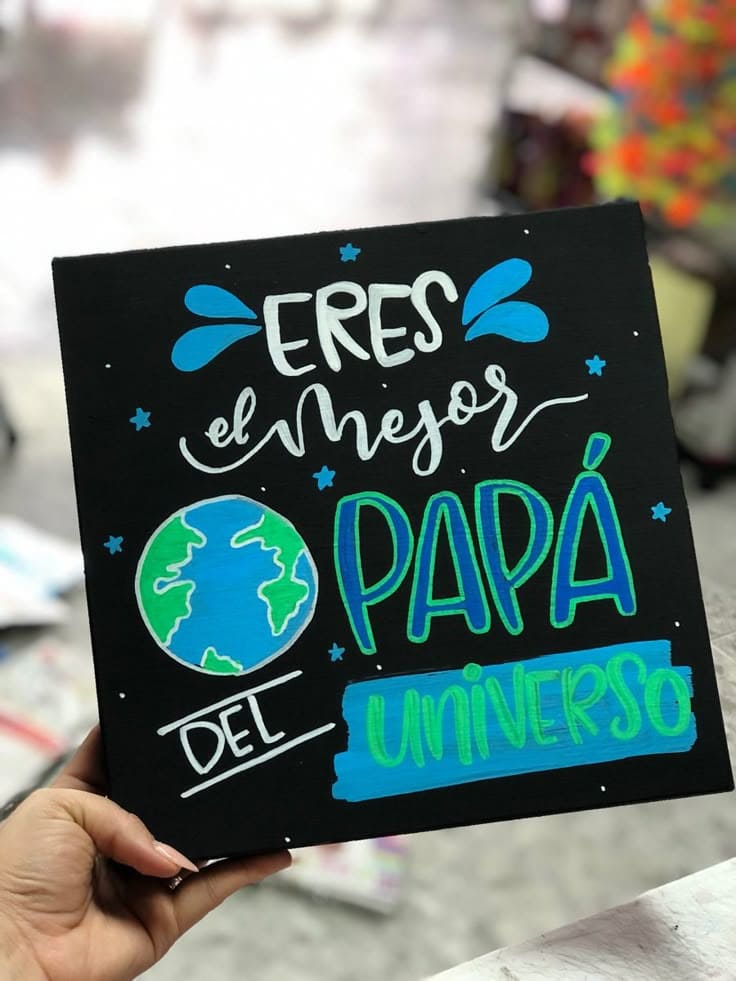
There’s something magical about giving your dad the whole universe in one card and this one absolutely delivers.
Materials Needed
- Black cardstock paper (8” x 8” or any square size)
- Acrylic markers or paint pens in blue, green, turquoise, and white
- Pencil and eraser
- Fine-tip white gel pen
Step-by-Step Guide
- Start by lightly sketching your layout with pencil: place the text in a balanced way and leave room for the globe and accents.
- Use white, blue, green, and turquoise acrylic markers to trace over the sketch. Color in the Earth and make stars and details around the words for a galactic look.
- Once everything is dry, add highlights with your white gel pen like dots, sparkles, or tiny starbursts to make the card feel like a galaxy.
#7. Heart Balloon Card for Dad
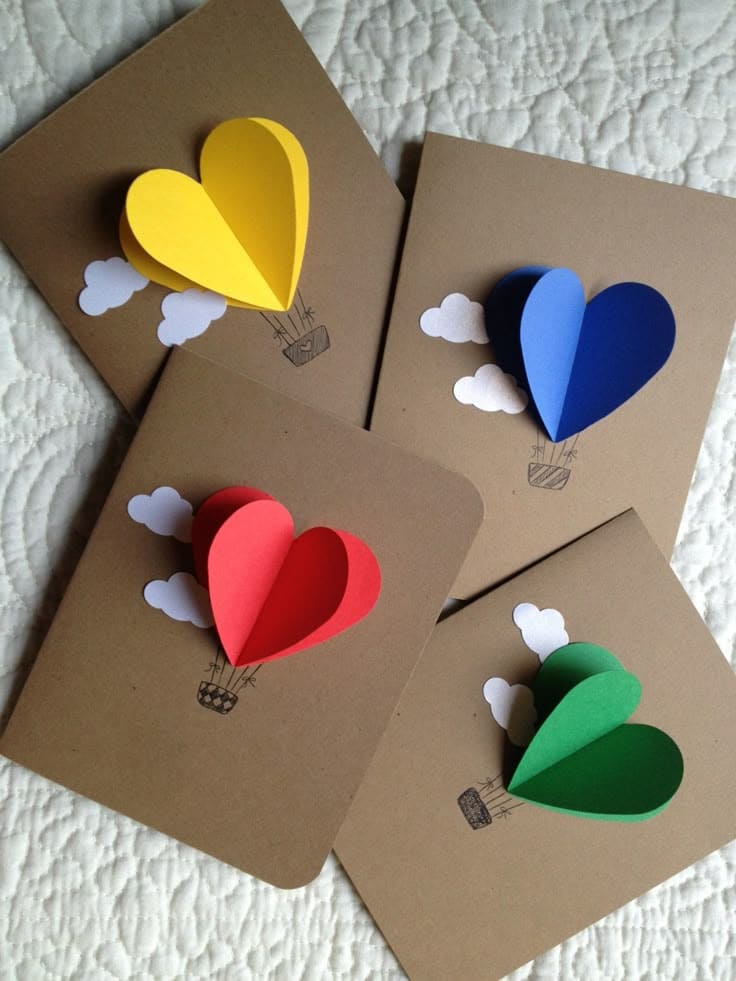
I made this card last year when my daughter said she wanted to give “a hug that floats.” That’s how the heart balloon idea was born.
Materials Needed
- Kraft cardstock (1 sheet, 8.5” x 11”)
- Colored cardstock (red, green, blue, yellow, or your choice)
- White paper or cardstock
- Black fine-tip pen or micron pen
- Scissors or heart-shaped paper punch
- Glue stick or double-sided tape
Step-by-Step Guide
- Start by folding your kraft cardstock in half to form the base of your card. Lightly sketch or directly draw a tiny hot air balloon basket and ropes in the lower center area.
- Cut out eight identical hearts from your chosen colored cardstock. Fold each one in half vertically. Glue one half of a heart to the next, forming a 3D layered heart. Attach the back of the folded heart to the card right above the basket.
- Cut simple cloud shapes from white paper and glue them around the heart balloon to give it that dreamy “floating through the sky” feel.
#8. Handprint Frames Card for Dad
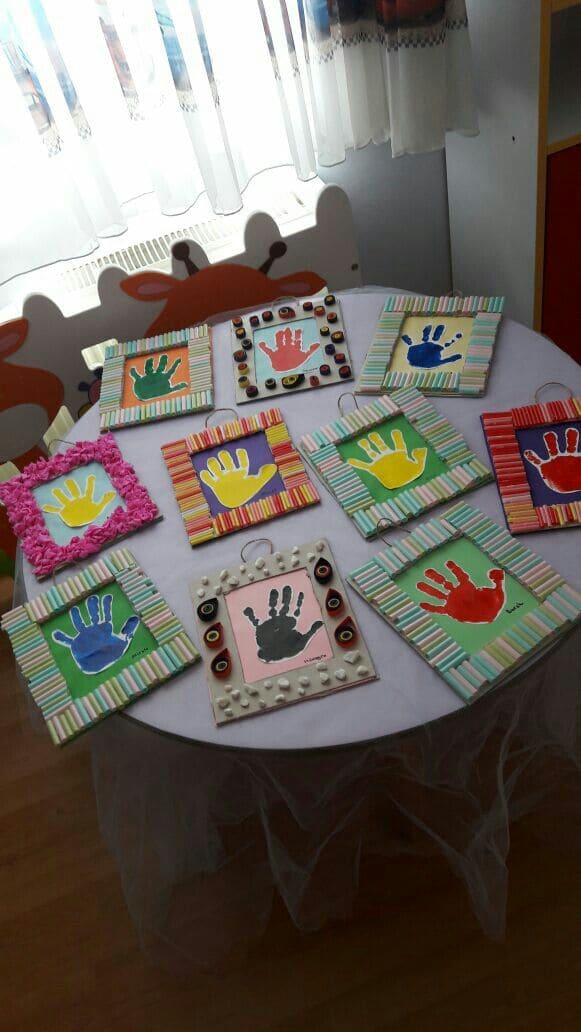
I made something similar with my niece for her dad, she dipped her hand in her favorite color, and the joy on her face when she pressed it down was unmatched.
Materials Needed
- Thick cardstock or white canvas boards (8×10 inches each)
- Washable tempera paint in various colors (1 bottle per color)
- Craft sticks or foam sheets (about 20–30 per frame)
- Liquid glue or glue gun
- Optional: pom-poms, buttons, yarn
- Paintbrush and a shallow dish
- Ribbon or twine (about 10 inches per frame)
Step-by-Step Guide
- Begin by helping the child coat their hand in paint using a brush or by dipping it into a paint-filled tray. Press the painted hand onto the center of the cardstock or canvas and let it dry completely.
- While the paint dries, create the frame border using craft sticks, foam strips, or whatever materials you like. You can arrange them in patterns or mix up the colors for a playful look. Secure them with glue.
- Add final touches like pom-poms, buttons, or rolled paper flowers around the frame for dimension. Glue a loop of ribbon on the back for hanging or place the frame into a stand.
#9. Pinecone Mustache Cards
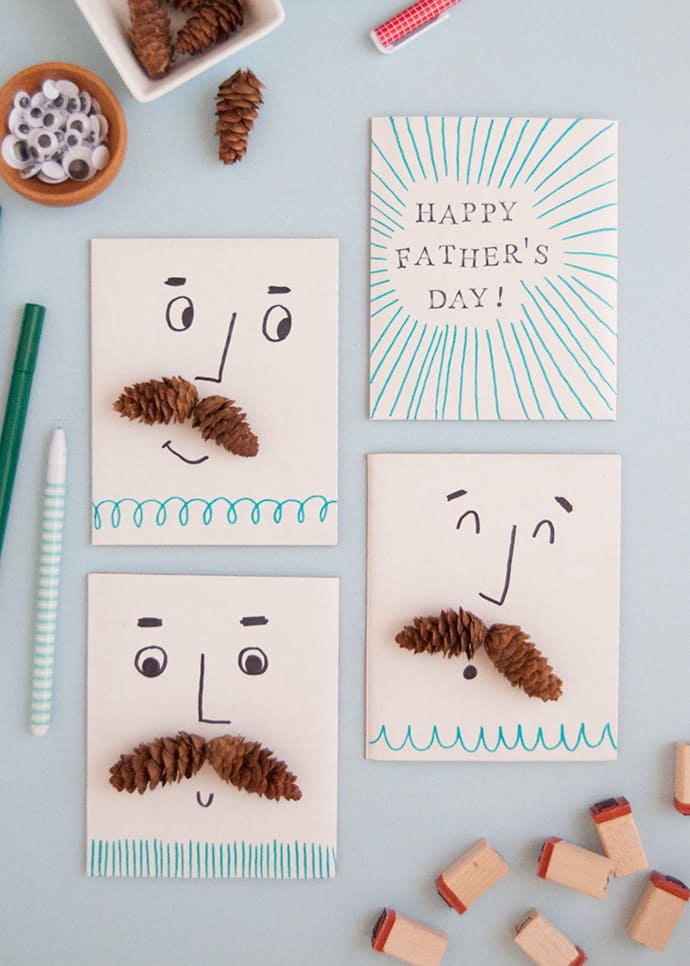
This project is quirky, rustic, and perfect if you’re looking for something kids can proudly say, “I made this from scratch!” Plus, it’s almost free if you’ve got some nature nearby and basic supplies at home.
Materials Needed
- 2-6 Mini pinecones
- White or cream cardstock (cut into 5×7 inch)
- Black marker
- Craft glue (quick-dry preferred)
- Optional: Googly eyes, colored pens
Step-by-Step Guide
- Start by folding your cardstock into a card shape. Sketch a simple face using a black marker – two eyes, a nose, and maybe a quirky smile.
- Carefully glue two mini pinecones where the mustache should go. Hold for a few seconds or let dry under a small weight for a strong hold.
- Add your finishing touches! Use a bright pen to draw some shirt collars, frames, or sunburst lines.
#10. Adorable DIY Handprint Card
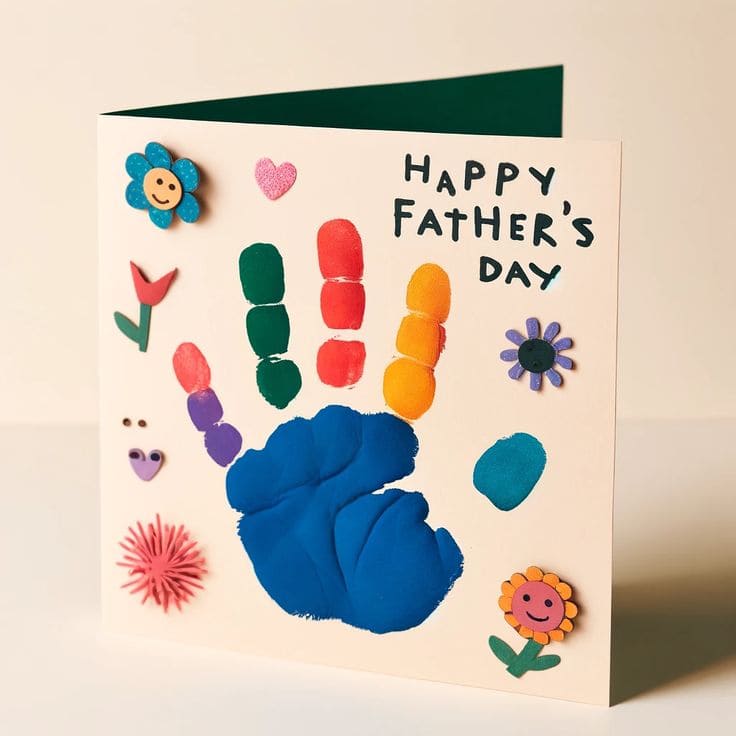
I made one of these with my nephew last year, it’s now proudly stuck on the fridge. Best part? It costs almost nothing and feels priceless.
Materials Needed
- 1 sheet of white cardstock (6″x6″)
- Non-toxic washable paints in red, yellow, blue, green, orange, and purple
- Decorative foam stickers (flowers, hearts, smileys)
- Black permanent marker
Step-by-Step Guide
- Pour a small amount of each paint onto a plate and help the child paint each finger in a different color. The palm can be one solid color like blue.
- Press the painted hand firmly onto the front of the cardstock. Let dry fully (usually 10–15 minutes depending on paint thickness).
- Decorate around the print with foam stickers and write “Happy Father’s Day” at the top. Add a sweet message inside and it’s ready to deliver with a hug.
#11. Cute Melon Card Idea
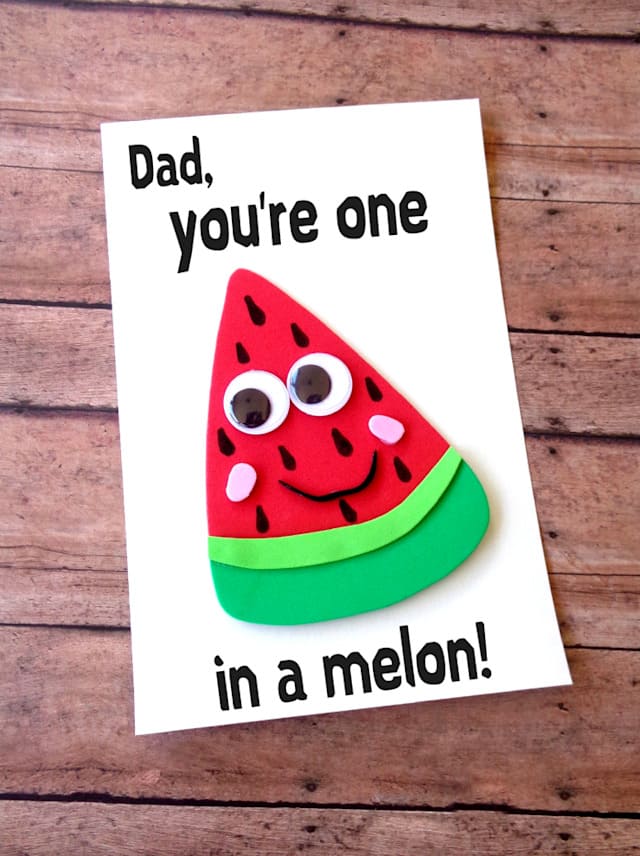
There’s nothing sweeter than pun-filled love, and this fruity foam watermelon card delivers the message with a smile (literally).
Materials Needed
- 1 White cardstock (5 x 7 inches)
- Foam sheets in pink, red, light green, and dark green
- Googly eyes (15mm) (2 pieces)
- Glue stick or tacky glue
- Black permanent marker
- Scissors
Step-by-Step Guide
- Cut a triangle shape out of red foam for the watermelon. Add curved layers from light and dark green foam at the base to resemble the rind.
- Glue on googly eyes and use a marker to draw the smile and seeds. If you like, cut two tiny pink ovals from foam to create the cheeks.
- Stick the watermelon to the center of your folded white cardstock. Use a marker or printed font to write:
“Dad, you’re one in a melon!” on the top and bottom.
#12. Rustic Newspaper DAD Card
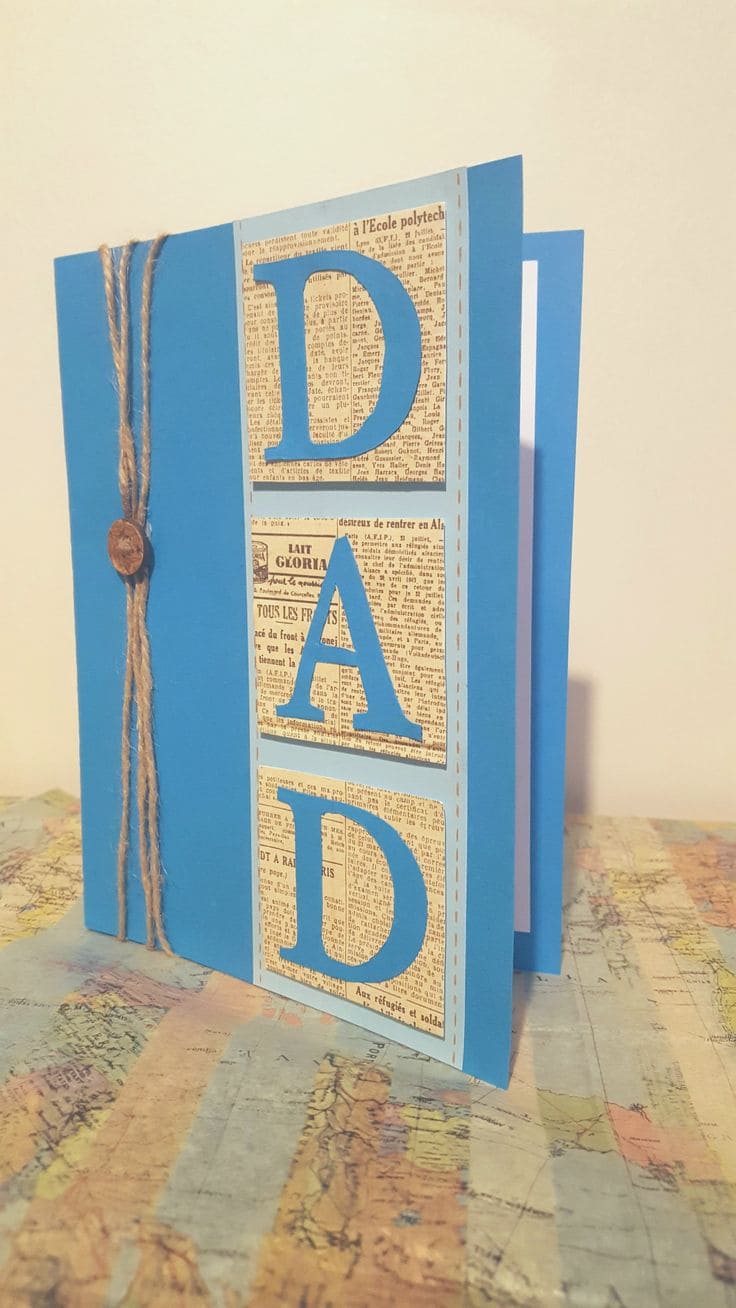
This vintage-style Father’s Day card is like a little time capsule of love. The mix of rustic newspaper prints with modern blue cardstock gives it a clean but nostalgic vibe.
Materials Needed
- 1 Blue cardstock (8.5″ x 11″)
- Old newspaper or vintage print paper – 3 pieces, each approx. 2.5” square
- Alphabet stencil or pre-cut “DAD” letters
- Jute twine 20 inches
- Wooden button
- Glue stick or tacky glue
- Scissors or paper trimmer
Step-by-Step Guide
- Fold your blue cardstock in half to form the base. Cut three small squares of newspaper and glue them vertically on the front.
- Cut out the letters D-A-D from matching blue cardstock using stencils or a cutting machine. Glue one letter onto each newspaper square.
- Wrap the left side of the card with jute twine three times, then tie a knot and glue on a wooden button for extra charm. Let everything dry flat before adding your handwritten message inside.
#13. Handwritten Hug Card with Heartfelt Quotes
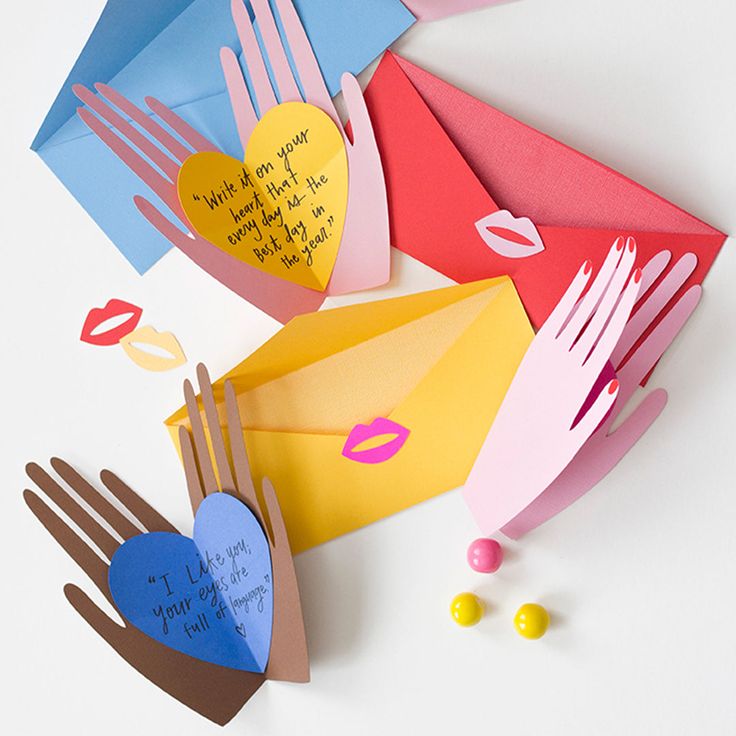
Whether it’s a note of encouragement or a silly “I love your dad jokes” tribute, these cards feel personal and deeply thoughtful.
Materials Needed
- Construction paper in assorted colors (8.5″ x 11″)
- Colored cardstock – approx. 4″ x 4″
- Glue stick
- Fine-tip black marker or pen
- Scissors
- Optional: Lipstick kiss stickers or printed lip cut-outs
Step-by-Step Guide
- Trace each child’s hand twice on different sheets of colored paper and carefully cut them out. You’ll need two hands per card, ideally in contrasting colors for layering.
- Cut out a heart shape from cardstock and glue it between the palms, forming a warm, embracing gesture. Write a message or quote on the heart – something funny, sweet, or deeply personal.
- Attach the hands to a colorful envelope or folded card base. Add extra flair with lip stickers, glitter glue, or washi tape if you’d like.
#14. Hug Hand Card
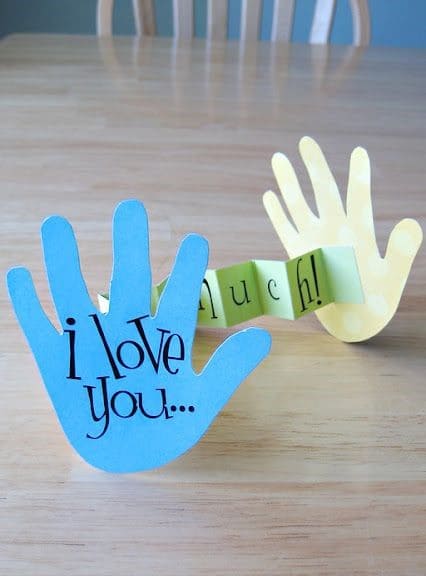
This card is a hug you can hold. It’s unbelievably heartwarming and incredibly easy to make, especially with kids. Each handprint captures a personal touch (literally), while the accordion message stretches to say “I love you THIS much!”
Materials Needed
- Construction paper (blue, yellow, green or any preferred color)
- Black marker or pen
- Scissors
- Glue stick or double-sided tape
- Optional: Letter stickers
Step-by-Step Guide
- Trace both of the child’s hands on two different colored sheets and cut them out carefully. These will be the ends of the hug.
- Cut a strip of construction paper (around 1″ wide and 12″ long) and fold it back and sixth into an accordion. Write a heartfelt message like “this much!” or “the biggest hug ever!” across the folds.
- Attach each end of the folded strip to the back of each hand with glue or tape. Write “I love you…” on the front hand. Fold it up for a sweet surprise!
#15. Layered Shirt Collar Fathers Day Card
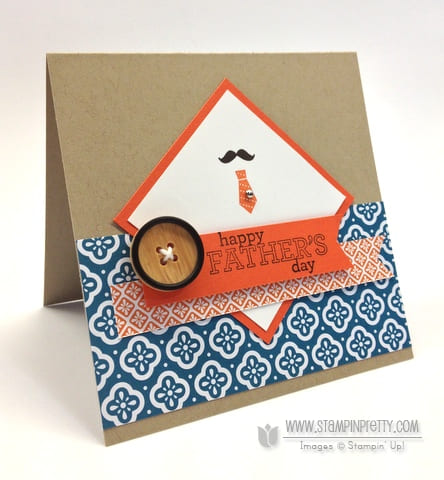
With a faux collar peek, a patterned shirt background, and a button detail, it mimics a well-dressed gentleman’s shirt in a charming handmade format.
Materials Needed
- Kraft cardstock (5″ x 10″)
- Patterned paper with geometric or floral print (approx. 5″ x 2″)
- White cardstock (2.5″ square)
- Decorative button
- Mini embellishments – mustache, tie, etc.
- Glue runner or double-sided tape
- Black ink pen
Step-by-Step Guide
- Fold the kraft cardstock into a 5″x5″ card base. Adhere the patterned paper to the bottom half of the card front to represent a shirt pattern.
- Layer the orange and white squares to form a tilted diamond shape, mimicking a collar. Add a tiny tie embellishment and a stamped or drawn mustache on the white section.
- Glue on the banner across the center with the message “Happy Father’s Day.” Use a mix of stamps or hand lettering.
- Finally, attach a decorative button off-center for a touch of vintage charm.
#16. Adorable Teddy Bear Card

This adorable teddy bear card isn’t just sweet, it literally hugs a candy treat! It’s one of those crafts that make people smile before they even read what’s inside.
Materials Needed
- Blank white cardstock (8.5″x11″)
- Beige or brown craft paper (1 sheet)
- Small circle punch or scissors
- Mini candies like chocolate truffles
- 6 inches small ribbon
- Glue stick or double-sided tape
- Black marker
- Optional: Googly eyes
Step-by-Step Guide
- Fold the cardstock into a card. Cut out a large circle (about 3″) for the bear’s face, two small circles (1″) for ears, and an oval for the muzzle. Attach them near the top center.
- Cut and glue two oval arms below the face, but only glue down one side so they can “hold” a candy inside.
- Draw or glue on facial features. Tie a small bow and glue it under the chin. Write a message like “Bear Hugs for Dad” or “Just For You” at the bottom.
#17. Best Dad in the Whole Wide World Card

This card is as heartfelt as it is universal, literally. “Best Dad in the Whole Wide World” with a bright Earth illustration and charming stars makes it a joy to make and give.
Materials Needed
- 1 sheet of white card stock (8.5″x11″)
- Colored markers or pencils
- Optional: black envelope
Step-by-Step Guide
- Draw the card design on the front side of the folded white cardstock. Make sure the layout is centered and crisp.
- Grab your coloring tools and bring the card to life. Use bright, contrasting colors to make the stars pop and the Earth stand out.
- Write a personal message inside, slide it into an envelope, and give it to Dad with a big grin.
#18. No.1 Dad Award Card
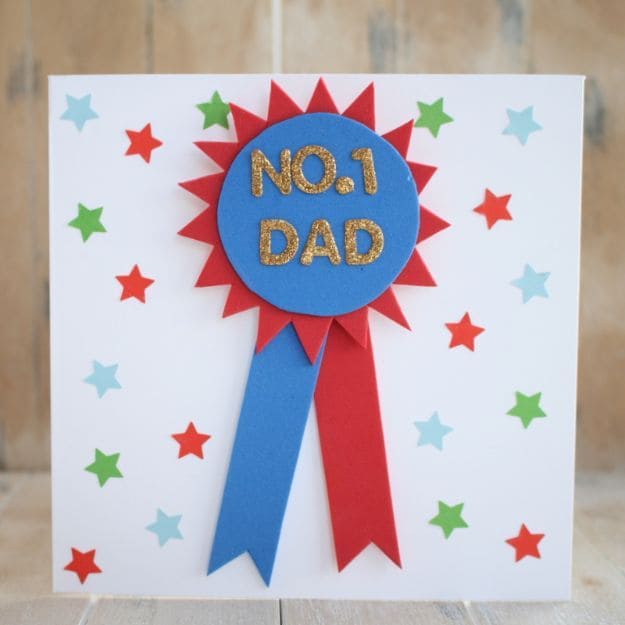
I love how playful and vibrant it feels like something your dad would actually want to keep on display.
Materials Needed
- White cardstock (8.5″x11″)
- Red foam sheet
- Blue foam sheet
- Gold glitter sticker letters
- Star stickers or stamps in red, green, and blue
- Glue gun or craft glue
Step-by-Step Guide
- Cut a red spiky sunburst circle about 3.5″ wide and a blue circle about 3″ wide. Stick the blue circle onto the red one using glue.
- Cut two ribbon tails – one from red foam and one from blue – each about 1″ wide and 4″ long. Glue them hanging down from behind the medallion.
- Use gold glitter alphabet stickers to spell “NO.1 DAD” across the blue circle. Press firmly so they stick well.
- Glue the entire badge to the center of the folded white cardstock. Decorate the surrounding card with colorful star stickers or stamp them in a scattered pattern.
- Let everything dry and write your message inside.
#19. Handymans Pocket Card
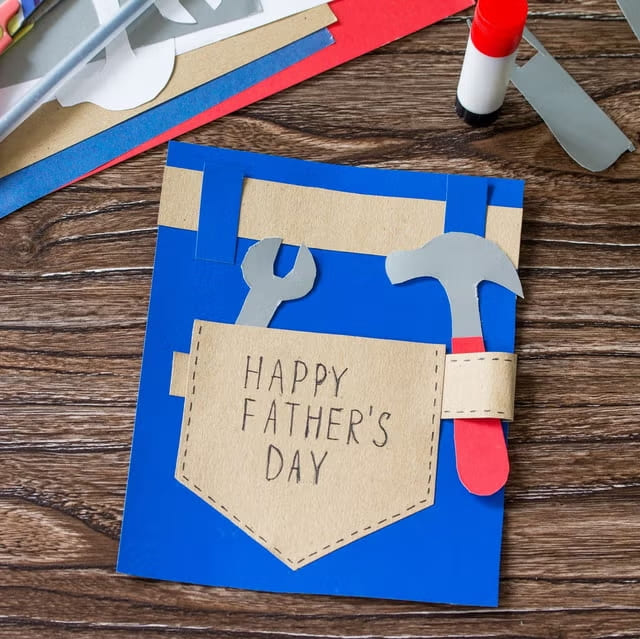
This pocket card is a heartfelt nod to every dad who’s ever fixed a squeaky door, tightened a bolt, or built a backyard treehouse with love.
Materials Needed
- Blue cardstock (1 sheet, A4 or 8.5×11 inches)
- Kraft/tan cardstock
- Gray, red, and silver paper scraps (about 3″ x 5″ total)
- Black marker or pen
- Glue stick or craft glue
- Optional: Scissors with rounded tips
Step-by-Step Guide
- Fold the blue cardstock in half to form your card base. Cut out a pocket shape from kraft cardstock and use a black pen to draw dashed lines around the edges to mimic stitching.
- Cut and glue a kraft “belt” strip across the top of the card. Attach the pocket onto the center bottom of the front with glue.
- Using gray and red paper, cut out basic tool shapes (like a wrench and hammer) and slide them behind the pocket or belt loop. Write “Happy Father’s Day” in the middle of the pocket, and you’re done!
#20. DIY Suit and Bowtie Fathers Day Cards
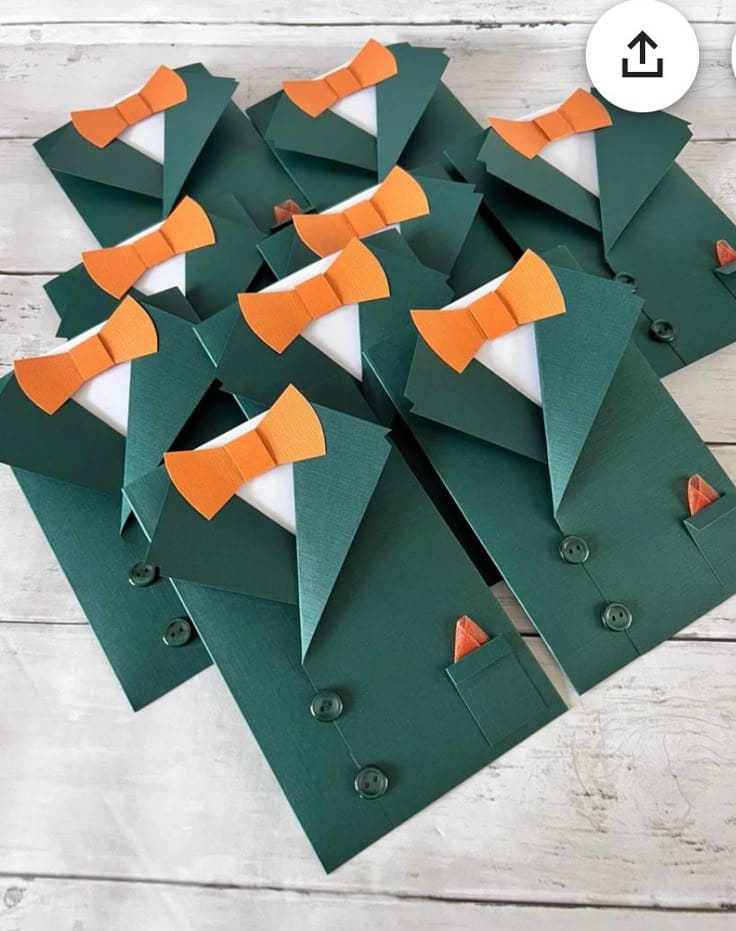
With their crisp green jacket folds, bright orange bowties, and mini pocket square details, they turn simple cardstock into a heartfelt keepsake.
Materials Needed
- 1 green cardstock (8.5”x11”), 1 white cardstock (4″x6″), 1 orange cardstock or ribbon
- Glue stick or double-sided tape
- 2 Mini sage buttons per card
- Scissors and ruler
- Optional: Bone folder tool
Step-by-Step Guide
- Cut the green cardstock in half horizontally (5.5” x 8.5”). Fold it vertically to make your card base. From the top, measure and cut two diagonal slits (around 2.5” long) inward and fold out to create lapels.
- Glue a white rectangle (shirt) inside the lapel area. Cut a small bowtie shape from orange cardstock and glue at the top of the shirt. Add a mini orange triangle to the lower right to act as a pocket square.
- Attach 2 mini buttons vertically down the front or draw them with a black pen. Let it dry and write your message inside!
#21. Dapper Gentleman Best Dad Ever Card
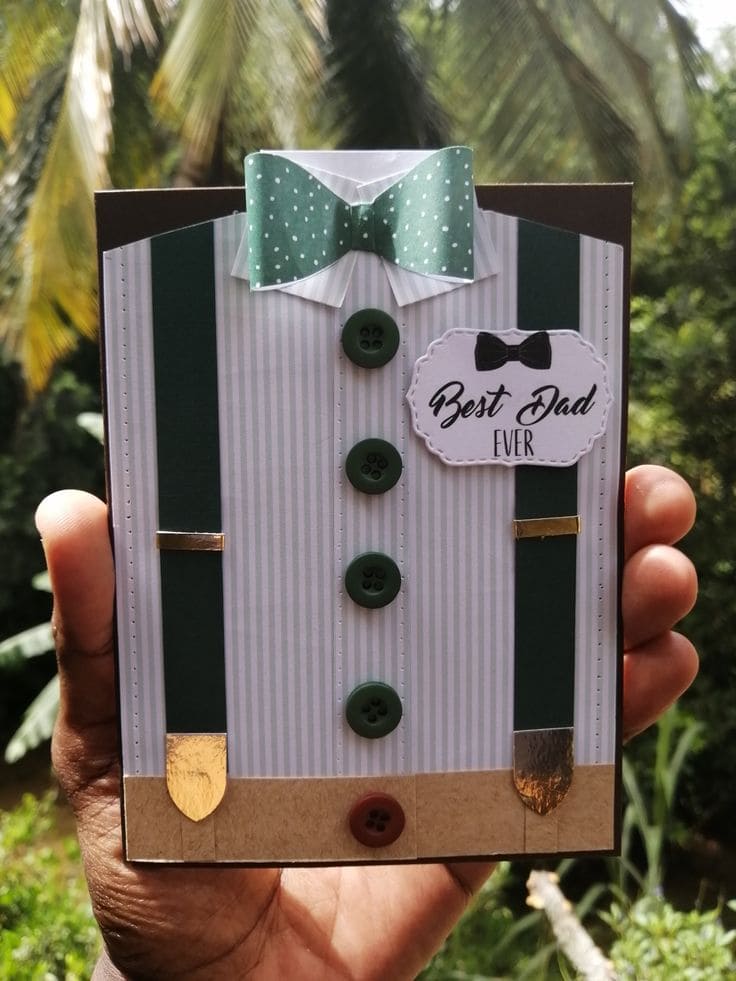
This Father’s Day card is dressed to impress, literally. It’s styled like a gentleman’s dress shirt, complete with suspenders, a polka-dot bow tie, and a stitched name tag that proudly reads “Best Dad Ever.”
Materials Needed
- 1 Patterned cardstock (5″ x 7″)
- Dark brown cardstock (5″ x 7″)
- 2 Green ribbon or paper strip 6” pieces
- 4 Green buttons (¾” size)
- Mini bow tie embellishment
- Gold foil
- Label sticker or white cardstock
- Glue, scissors, and double-sided tape
Step-by-Step Guide
- Fold your dark brown cardstock into a 5” x 7” card base. Glue the striped or light shirt-pattern cardstock onto the front, centered.
- Add two vertical strips of green ribbon/paper on each side to mimic suspenders. Cut and glue small gold foil pieces at the bottom to look like clips.
- Glue four green buttons down the middle. At the top, attach a green polka-dot bow tie (either pre-made or crafted from cardstock).
- Print or write “Best Dad Ever” on a white cardstock label, cut it with decorative scissors or a punch, and attach it to the right chest like a stitched patch.
#22. Lovely Popcorn Card Idea
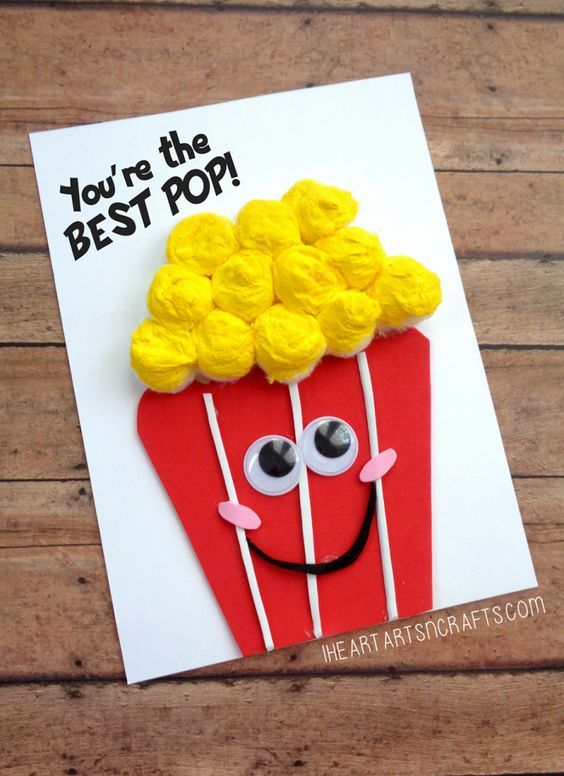
This cheeky and cheerful popcorn-themed Father’s Day card is a total show-stealer. With a pun that’ll make any dad laugh and a 3D popcorn top made from yellow cotton balls, it bursts with personality and charm.
Materials Needed
- White cardstock (8.5″x11″)
- Red craft foam (4″x3″)
- 12 Yellow cotton balls or regular cotton balls dyed yellow
- 2 Googly eyes (1”)
- Pink foam sheet
- Black pipe cleaner 2”
- 3 White paper strips (1/8” wide, 4” long)
- Glue stick or hot glue gun
- Black marker
Step-by-Step Guide
- Start by cutting the popcorn tub shape from red craft foam or cardstock, slightly tapering it at the bottom. Glue it onto the front center of your folded card.
- Glue three thin vertical white strips evenly spaced across the tub to create a classic popcorn box look.
- Hot glue or press 15–18 yellow cotton balls above the top of the tub to mimic the popcorn. Overlap them for a fuller effect.
- Attach two googly eyes to the center, followed by two small pink cheek ovals cut from foam. Shape a 2” black pipe cleaner into a smile and glue it beneath the cheeks.
- Use a black marker to write “You’re the BEST POP!” at the top. Let the card dry flat for at least 10 minutes.
#23. Tool Pocket Fathers Day Card
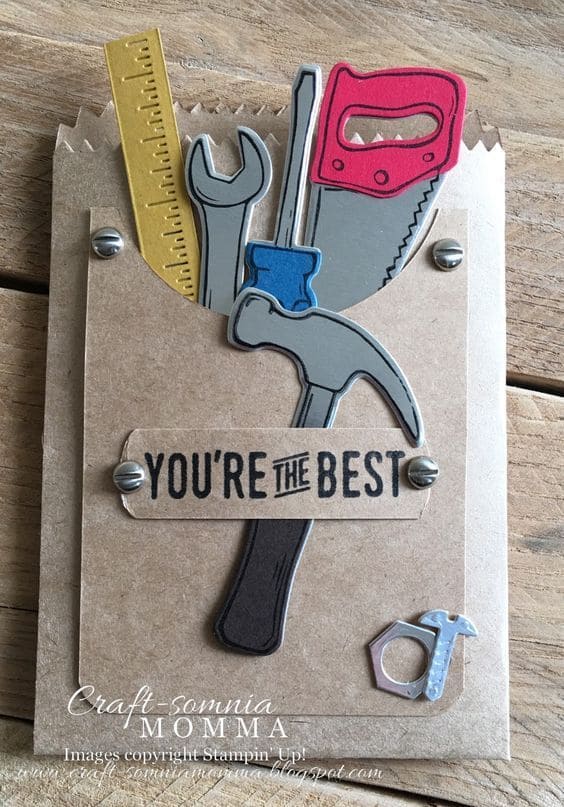
Shaped like a rugged kraft paper pocket brimming with mini tools, it brings a rustic charm and a dose of admiration.
Materials Needed
- Kraft cardstock (8.5″x11″)
- Assorted colored cardstock (gray, red, blue, yellow, silver)
- 4 Mini silver brads or metal dots
- Black ink pad or printable label for “YOU’RE THE BEST”
- Scissors or craft knife
- Glue stick or tacky glue
- Optional: Tool-themed die cuts or printable tool templates
Step-by-Step Guide
- Cut and fold the kraft cardstock in half to form the card base. Cut a smaller kraft rectangle to create the front “pocket” shape. Use zigzag scissors along the top edge for that torn paper look.
- Cut out tool shapes (hammer, wrench, saw, screwdriver, ruler) from colored cardstock. Layer them slightly inside the pocket and glue them down, letting the handles peek out.
- Attach the pocket onto the card with glue on three sides, creating a dimensional look. Secure mini silver brads to each corner of the pocket for an authentic hardware effect.
- Stamp or write “YOU’RE THE BEST” on a kraft strip and glue it across the tools. Add one or two more brads to this strip for extra detail.
- Finish with any extras like a small nut and bolt sticker or die-cut in the corner, and let it dry flat.
#24. Tool-Shaped Woodgrain Fathers Day Messages
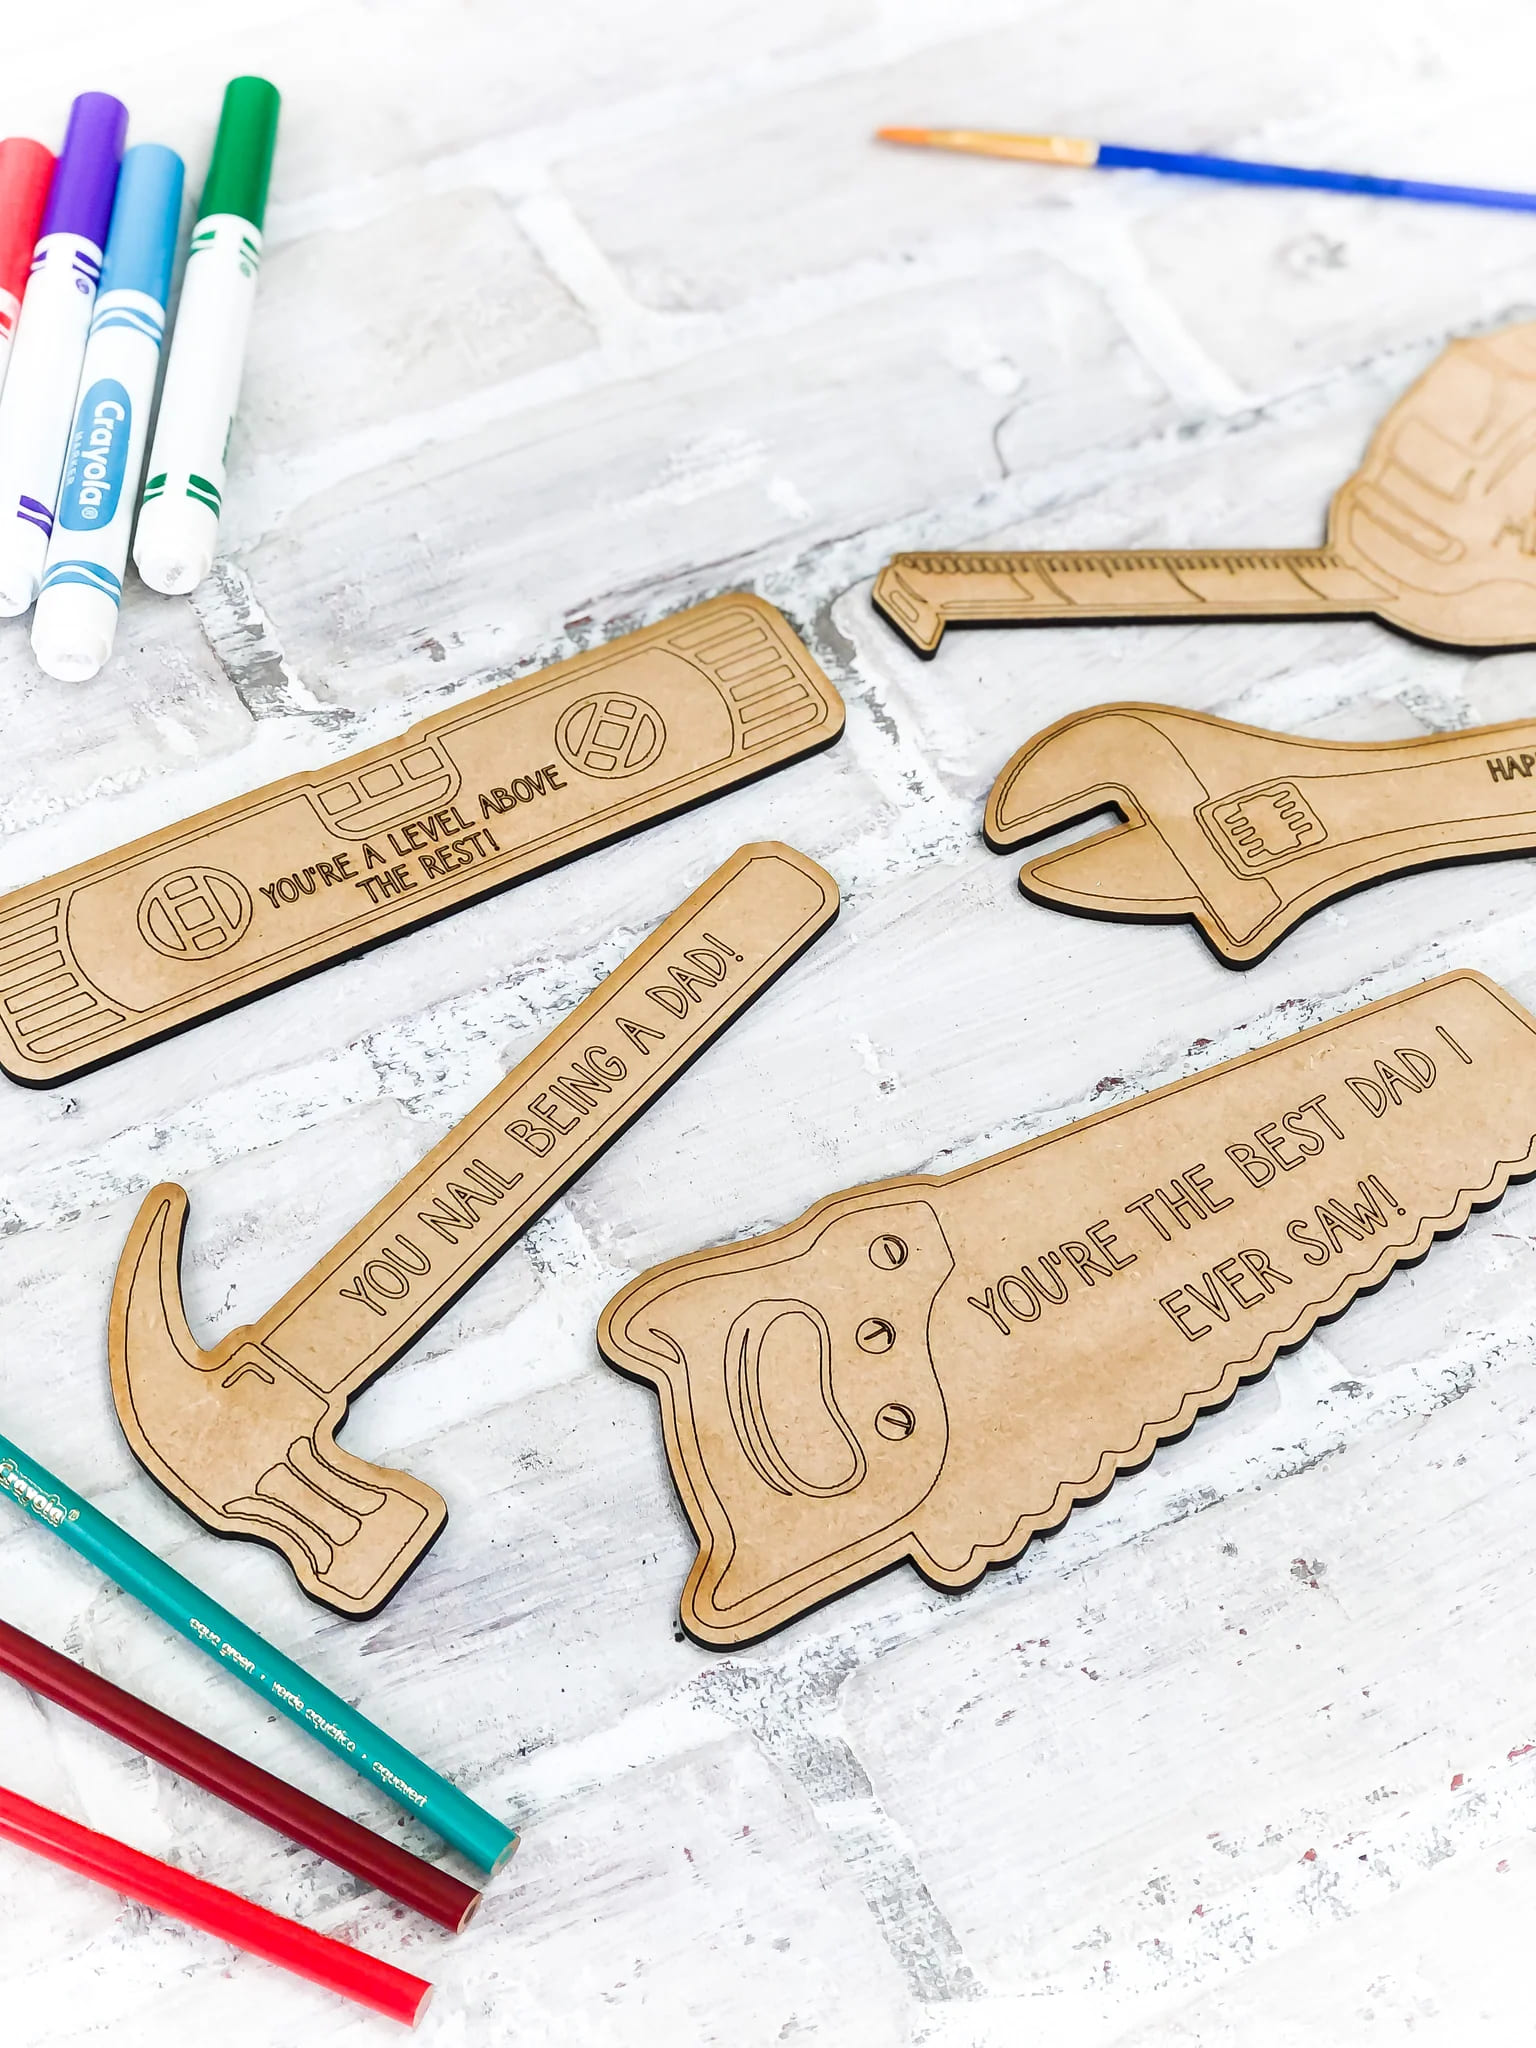
This Father’s Day project brings a workshop twist to your warm wishes – laser-cut wooden or cardboard tools, each engraved with clever puns like “You’re the best dad I ever saw!” or “You nail being a dad!”
Materials Needed
- 2-5 Woodgrain cardstock (8.5″ x 11″)
- Printable tool templates or SVGs – hammer, wrench, saw, ruler, tape
- Fine-tip black pen or laser engraver
- Scissors or cutting machine
- Markers or colored pencils
- Optional: Glue dots
Step-by-Step Guide
- Print out tool-shaped templates or cut them out using a cutting machine like Cricut. If you’re using a laser engraver, etch the pun phrases directly onto each piece (or write them manually with a fine-tip marker).
- Cut each tool shape cleanly from the woodgrain cardstock or chipboard, making sure details like handles and edges are smooth.
- Let the kids go wild with markers or colored pencils, adding color to handles, metal edges, or even personal messages on the back of each tool.
- Present the tools as a set in an envelope or gift bag, or glue one or more tools to the front of a folded card.
#25. Baseball Glove Card
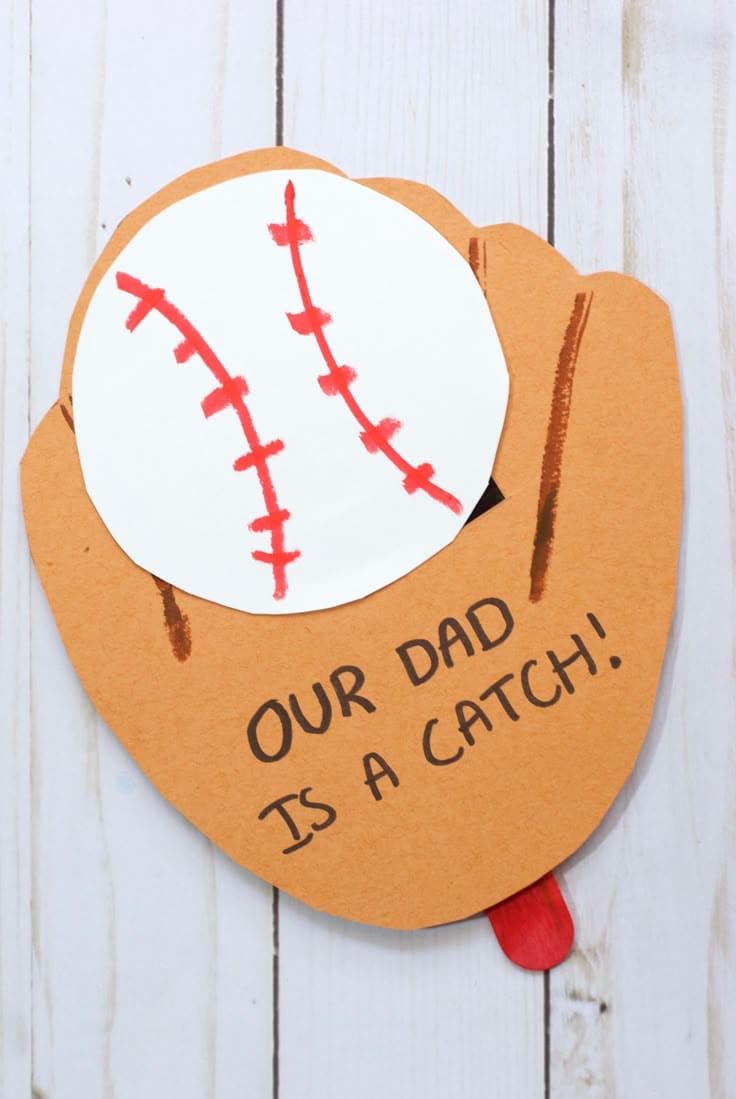
If your dad is a baseball fan, this handmade card is a total home run. Designed like a baseball glove holding a paper baseball, it’s playful, heartfelt, and personal, especially with that “Our Dad is a Catch!” pun.
Materials Needed
- 1 Brown construction paper
- 1 White cardstock
- Red and black marker
- Craft scissors
- Glue stick
- Optional: Red popsicle stick
Step-by-Step Guide
- Cut a large baseball glove shape out of brown cardstock. You can trace a child’s hand with the thumb spread or sketch a glove shape freehand. Cut a smaller oval for the palm area if you want extra dimension.
- Cut a simple circle from white cardstock for the baseball. Use the red marker to draw curved stitching lines on both sides, mimicking a real baseball.
- Use a black marker to write “OUR DAD IS A CATCH!” on the glove and draw a few stitched crease lines for realism.
- Glue the baseball onto the center of the glove so it looks like it’s being caught. Optional: Add a red popsicle stick to the bottom edge to mimic the wrist strap.
- Let kids write a message on the back of the glove.