Gardening can be a fun and rewarding hobby, but keeping your plants properly watered can sometimes be a challenge. One great solution is to use self-watering containers. These containers provide a steady supply of water to your plants, reducing the need for frequent watering.
The good news is that you can easily make your own self-watering containers at home with just a few basic materials. Let’s walk through the simple steps to build your own!
Materials Needed:
Before diving into the construction process, gather the following materials:
- Plastic storage containers (preferably with lids)
- PVC pipe or tubing
- Drainage gravel or pebbles
- Potting soil
- Wicking material (such as cotton rope or felt fabric)
- Water reservoir (could be a second container or a section within the same container)
- Drill with drill bits
- Utility knife or scissors
Step-by-Step Instructions
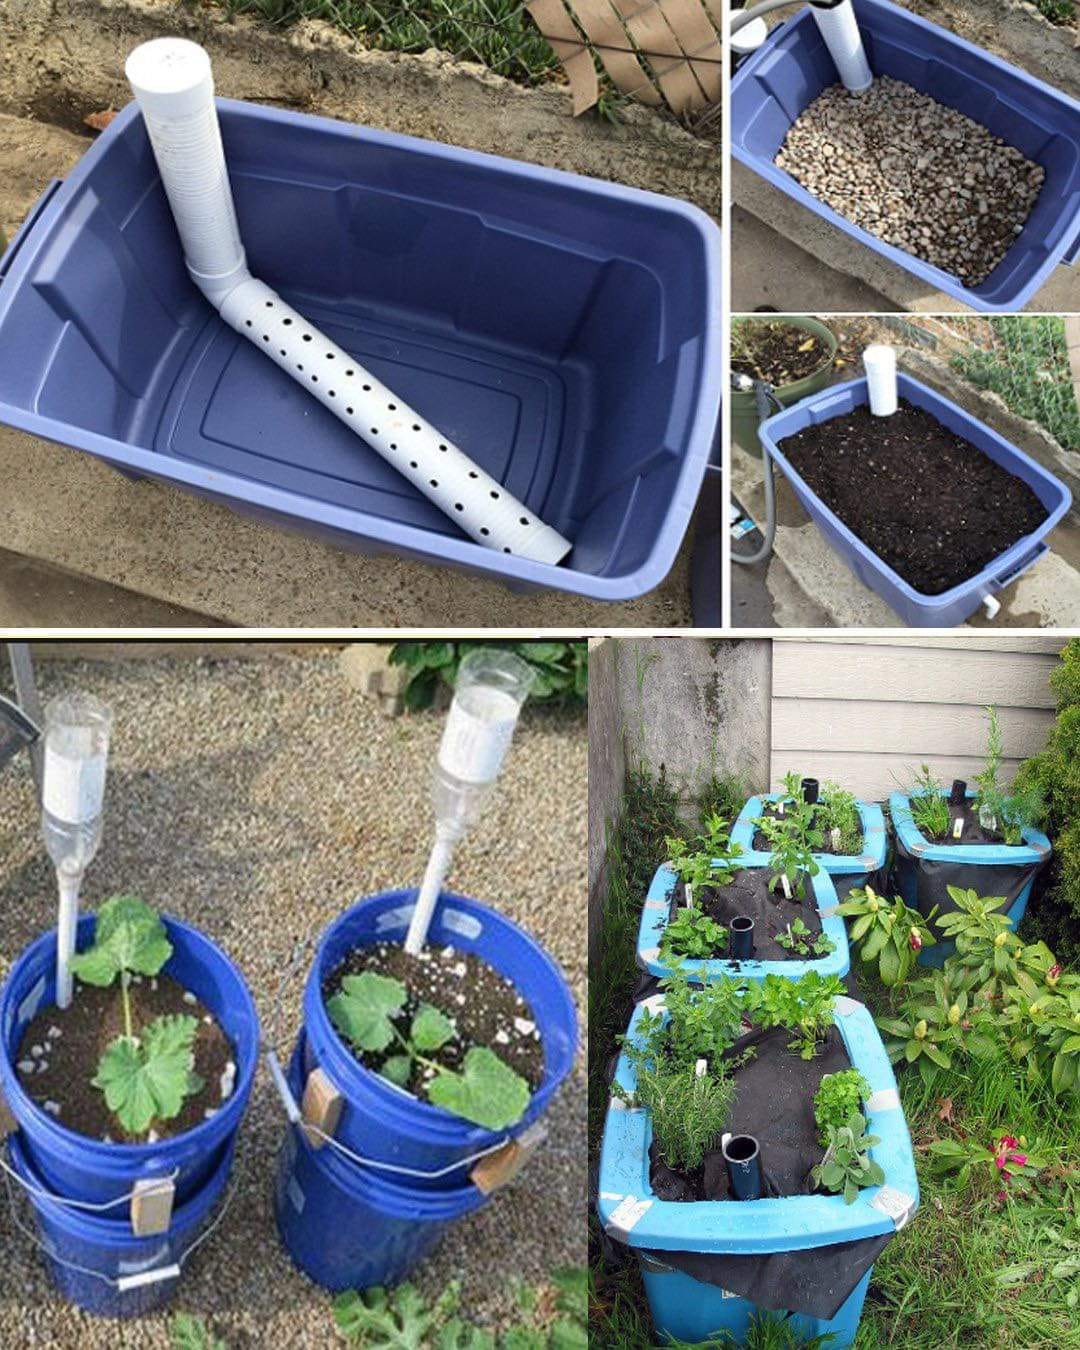
Step 1: Prepare the Containers
First, pick out two plastic storage containers. These will be the main parts of your self-watering system. Drill holes in the bottom of one container so water can drain out. The other container will hold the water, so you don’t need to drill holes in it.
Step 2: Make the Wicking System
Cut a piece of PVC pipe or tubing to match the height of your containers. This pipe will allow water to move from the reservoir up to the soil. Then, cut a piece of wicking material like cotton rope or felt fabric. Thread this material through the PVC pipe, making sure there’s enough to reach the bottom of both the soil container and the water reservoir.
Step 3: Assemble the Containers
Put a layer of gravel or small stones at the bottom of the soil container. This helps with drainage and keeps the roots from getting too wet. Place the PVC pipe with the wicking material in the middle of the container, making sure it reaches the bottom. Fill the container with potting soil, leaving some space at the top for planting.
Step 4: Set Up the Water Reservoir
Put the second container (the one without holes) under the soil container. This is your water reservoir. Fill it with water, making sure the end of the wicking material is submerged in the water. You can add a water level indicator if you want to keep an eye on how much water is left.
Step 5: Plant and Maintain
Now that your self-watering container is ready, you can plant your chosen plants. Pick plants that grow well in containers and match their water needs to the system. The self-watering setup will provide water as needed, but you should still check the soil moisture now and then and refill the reservoir when it gets low.
Tips for Using Your Self-Watering Container
1. Check the water level regularly to make sure the reservoir does not run dry. You can do this by looking down the PVC pipe.
2. Refill the water when the reservoir is low. Just pour water into the pipe until it reaches the desired level.
3. Use a soil mix that is suitable for your plants. Different plants may need different types of soil to thrive.
4. Place your container in a location that provides the right amount of sunlight for your plants.
By following these simple steps, you can build a self-watering container that makes gardening easier and more efficient. With your new container, you’ll spend less time worrying about watering and more time enjoying the beauty of your garden!