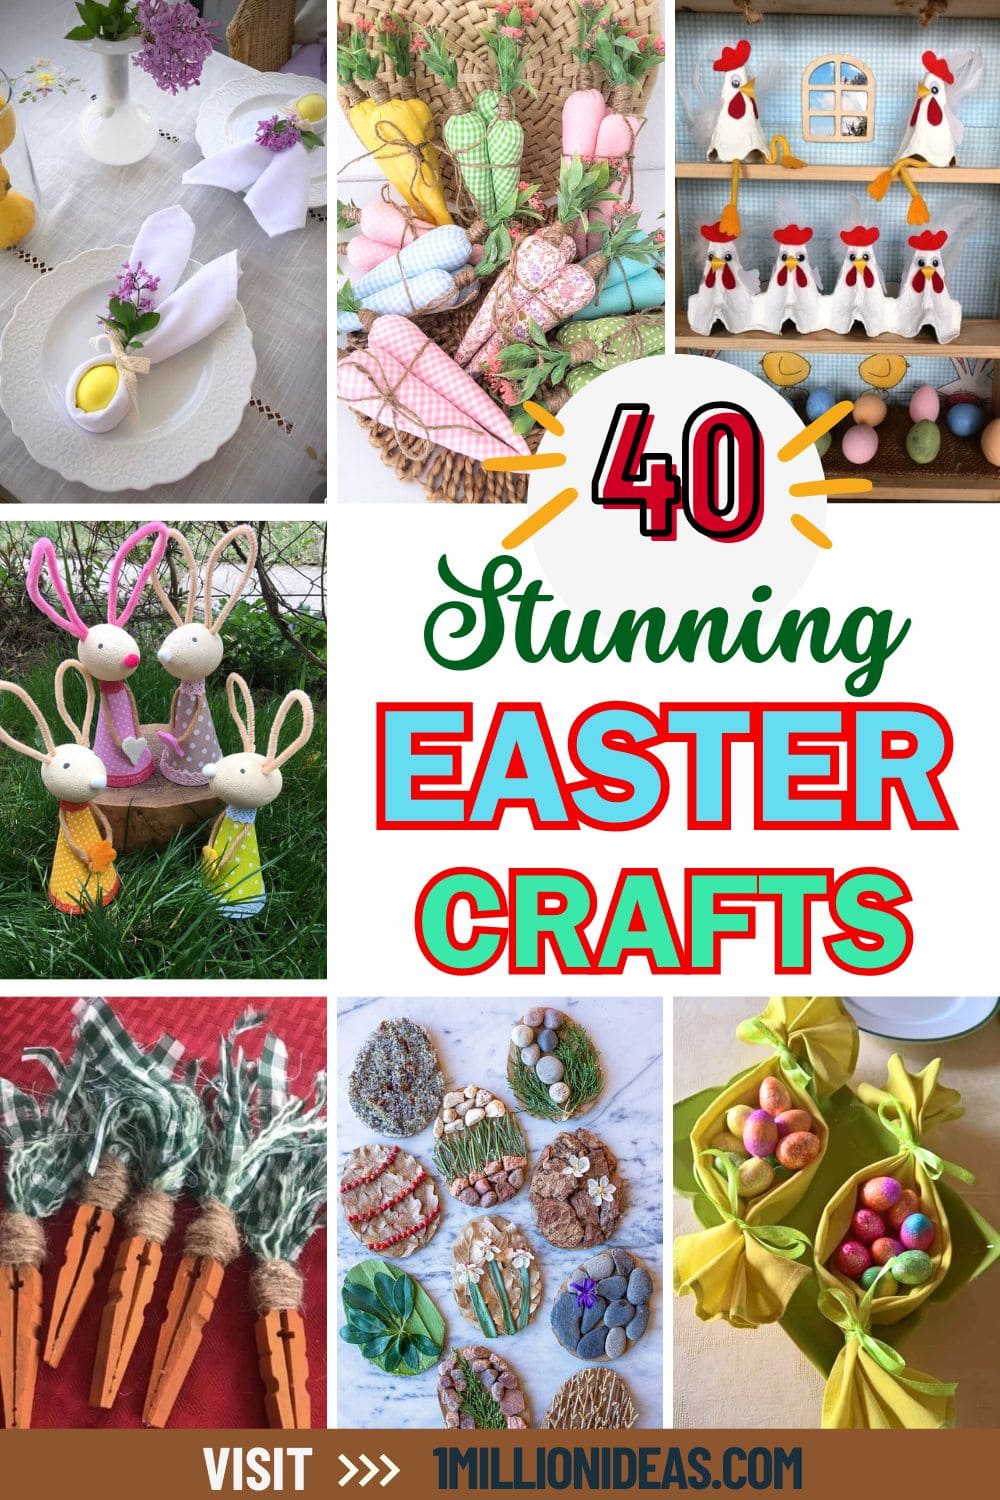
Looking for fun and unique ways to celebrate Easter this year? Whether you’re decorating your home, preparing gifts, or just want to enjoy some crafty time with loved ones, we’ve got you covered.
Easter is the perfect time to unleash your creativity with colorful decorations, adorable bunny-themed crafts, and nature-inspired projects. From simple DIYs that are easy to make with kids to more intricate designs that will impress guests, there’s something for everyone.
Ready to dive into a world of vibrant colors, fun textures, and holiday cheer? Now, explore these 40 stunning and creative Easter craft ideas that will add an extra touch of joy to your celebrations.
This article contains affiliate links. If you purchase through them, I may earn a small commission at no extra cost to you. Thank you for your support!
#1. Elegant Nature-Inspired Hand-Painted Easter Eggs
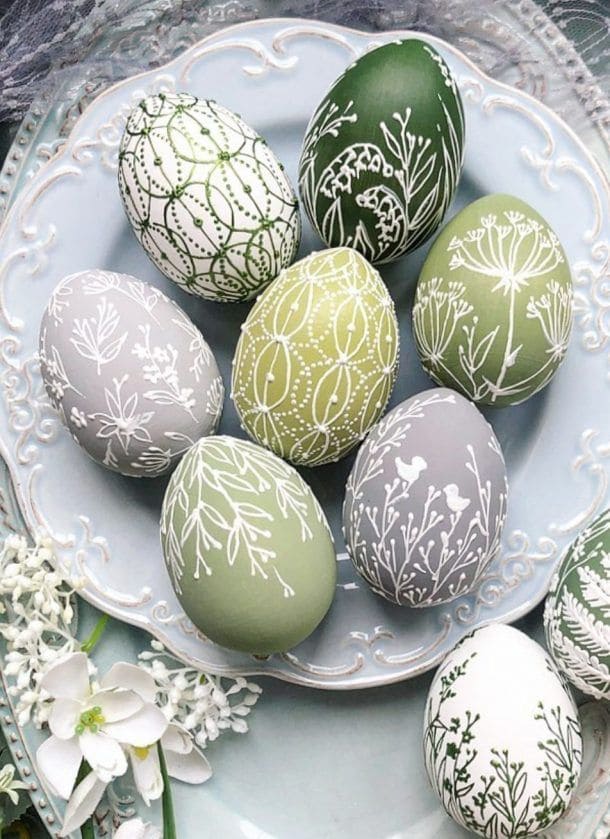
If you’re tired of the usual polka-dot and rainbow Easter eggs, these nature-inspired beauties will steal your heart.
Materials Needed
- 8 hard-boiled or wooden eggs
- Acrylic paint in sage, olive, gray, white, and dark green (1–2 oz each)
- Fine-tip white paint pen or acrylic liner brush
- Egg holder or drying rack
- Paper towels and gloves (optional)
Step-by-Step Guide
- Start by painting each egg in a different muted tone. Use soft strokes and 2 coats if needed for full coverage. Let them dry completely on a rack.
- Once dry, begin decorating with your white paint pen or brush. Draw floral outlines, leafy branches, tiny birds, or wildflowers, just keep the lines delicate and thin for that hand-drawn botanical effect.
- Add details like dots, dashes, or stems to fill the space gently. Don’t worry about symmetry.
- Let the design set fully, and if desired, seal with a matte clear spray for a soft, finished look.
#2. Rustic Book-Page Easter Eggs with Florals
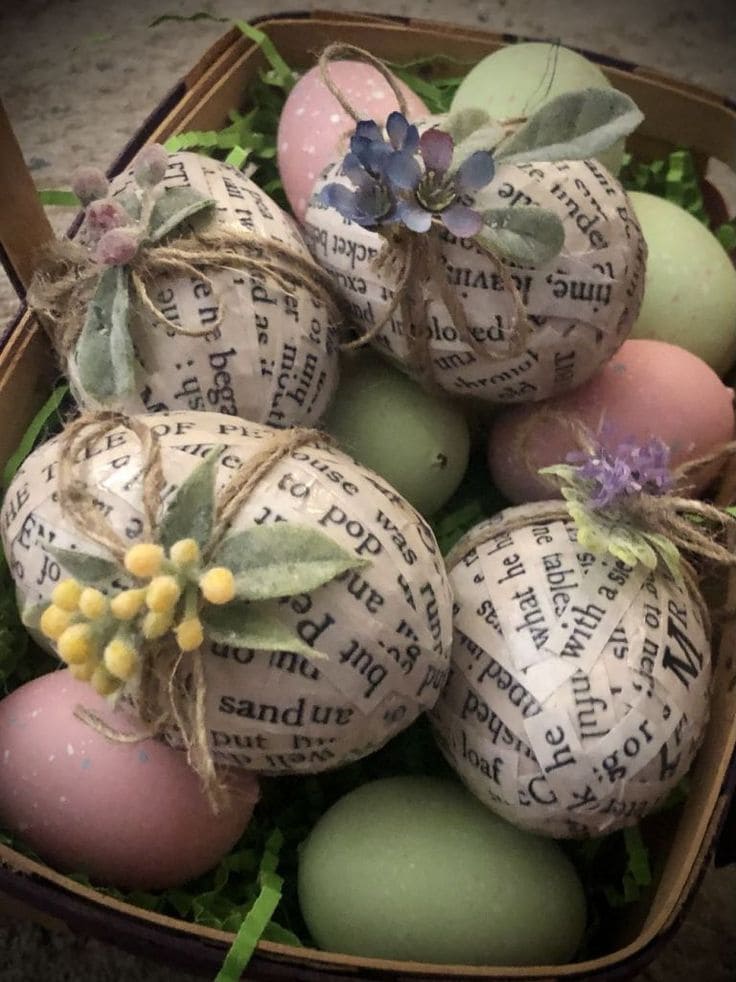
If you’re like me and can’t resist turning old book pages into something meaningful, this one’s for you. These decoupage eggs feel like spring met a cozy library, each one telling a silent story.
Materials Needed
- 5–6 plastic or wooden eggs
- 2–3 old book pages or newspaper scraps
- Matte Mod Podge or white glue
- Foam brush
- Jute twine (1 yard)
- Small faux flowers and felt leaves
- Scissors
Step-by-Step Guide
- Tear your book pages into thin strips – I like uneven edges for a natural look. Apply Mod Podge to the egg and smooth on each strip, layering and overlapping until the surface is fully covered. Let it dry.
- Cut a short piece of jute twine and tie it around the top of the egg. You can add a loop for hanging or just tie a rustic bow.
- Glue a small faux flower or a felt leaf bunch on top of each egg. Let them dry before arranging them in a basket or hanging them as ornaments.
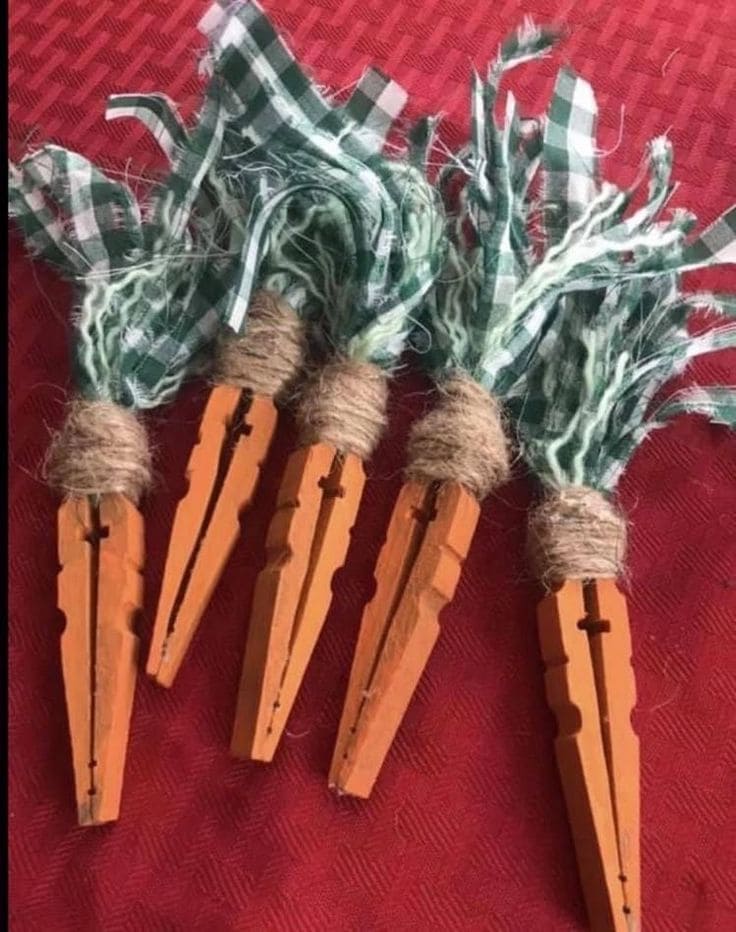
#3. Vibrant Fabric Carrot Easter Decor Delight
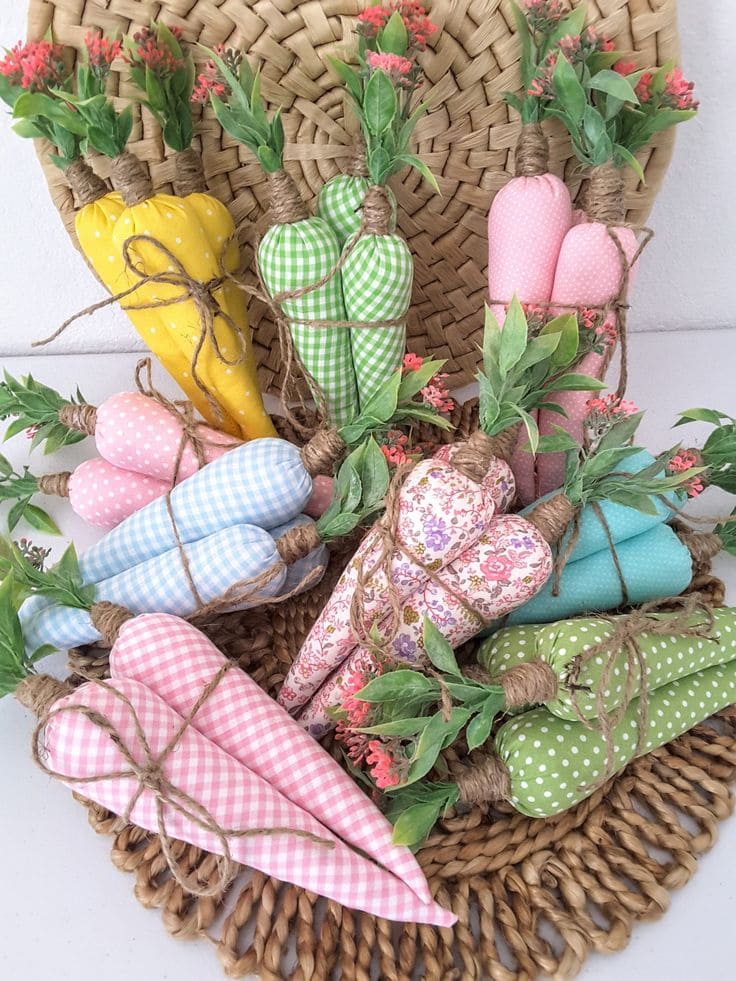
Made from pastel cotton prints, wrapped in jute, and finished with faux greenery and pink florals, they’re farmhouse-perfect and toddler-safe too.
Materials Needed
- Fabric scraps (about 10×10 inches per carrot)
- Polyfill stuffing
- Hot glue gun + glue sticks
- Jute twine (approx. 1 yard per carrot)
- Faux greenery or mini floral stems
- Scissors
- Fabric marker or pencil
- Needle and thread (optional)
Step-by-Step Guide
- Cut your fabric into a triangle (roughly 10 inches tall and 5 inches wide at the base). Fold it in half lengthwise with the pattern inside and glue or sew the long edge closed to form a cone.
- Turn it right side out and stuff it with polyfill, making sure it’s firm but still soft. Gather the top, insert some faux greens or mini florals, then tie tightly with twine to secure the top.
- Wrap the twine around the base of the greenery for a rustic finish. I made about 9 of these in a mix of colors and patterns, they look adorable nestled in a tray or basket!
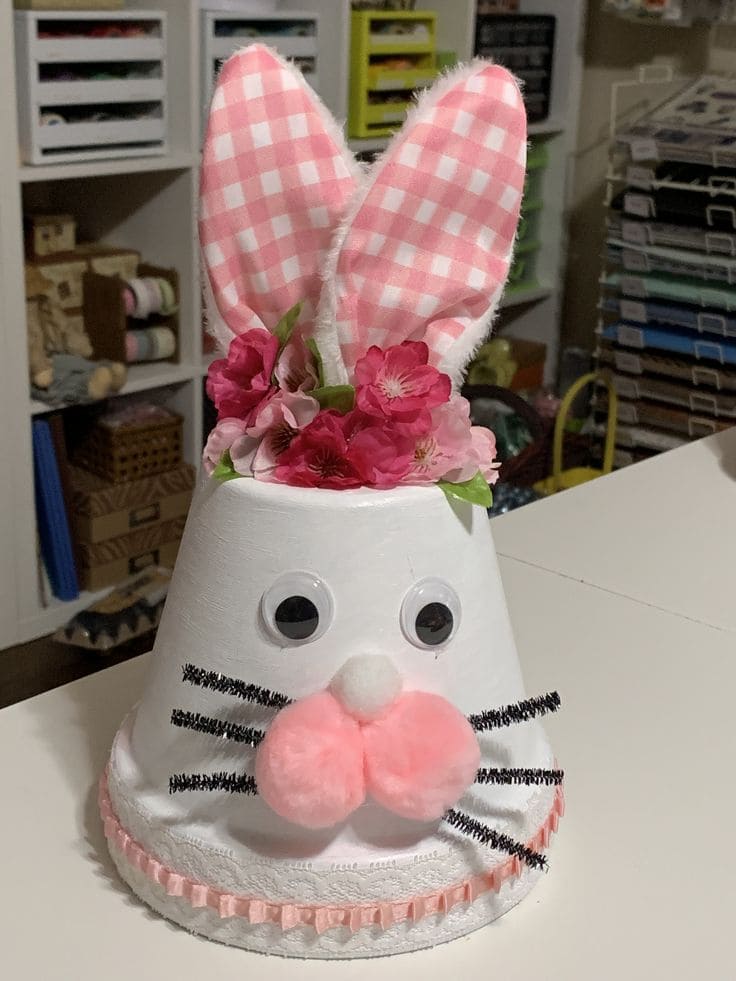
#4. Fluffy Bunny Door Hanger with Vibrant Bows
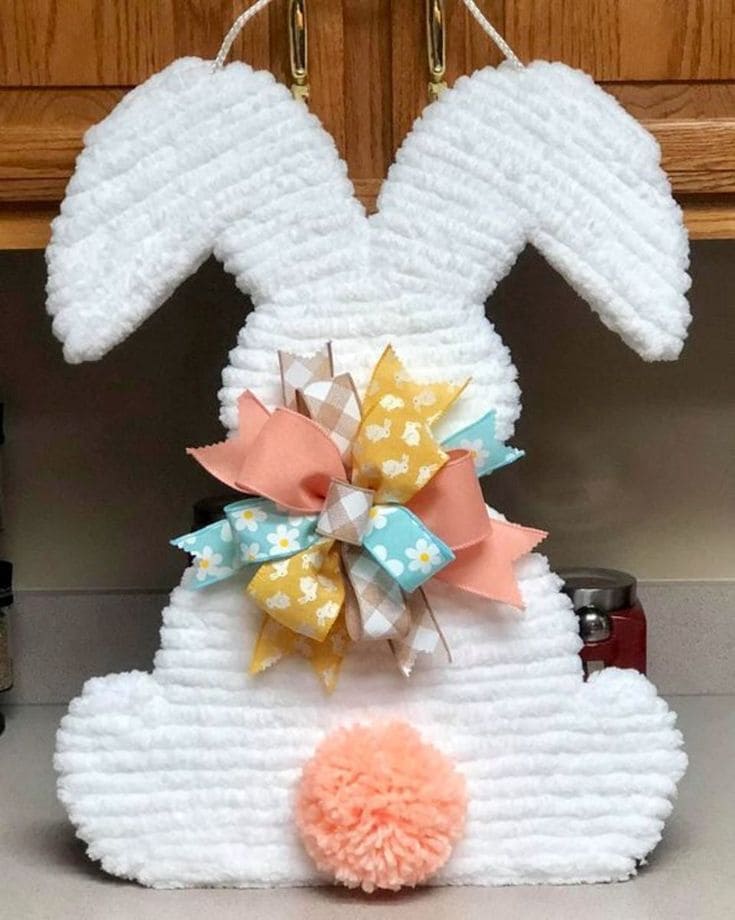
Mine took about 45 minutes total and cost under $10 because I had most of the supplies on hand. It’s a fun evening project and seriously looks like something from a boutique craft fair.
Materials Needed
- White chenille yarn (about 2 yards)
- Cardboard or foam board
- Hot glue gun + glue sticks
- Pastel ribbons (4–5 designs)
- Pom-pom
- Scissors
- Jute string or hanger cord
Step-by-Step Guide
- Start by sketching a bunny silhouette onto a sheet of foam board and cut it out with sturdy scissors. I used a simple back-facing bunny shape with floppy ears.
- Wrap the entire bunny form with white chenille yarn, gluing every few inches to keep it smooth and soft.
- Create a bow by layering 4–5 pastel ribbons in spring prints, crisscrossing and hot-gluing at the center. I added a small tail to give it even more dimension.
- Hot glue a peach pom-pom to the lower center for the bunny tail. Add a loop of jute twine behind the ears and hang your bunny wherever it makes you smile.
#5. Elegant Twine Easter Wreath with Lace Bow
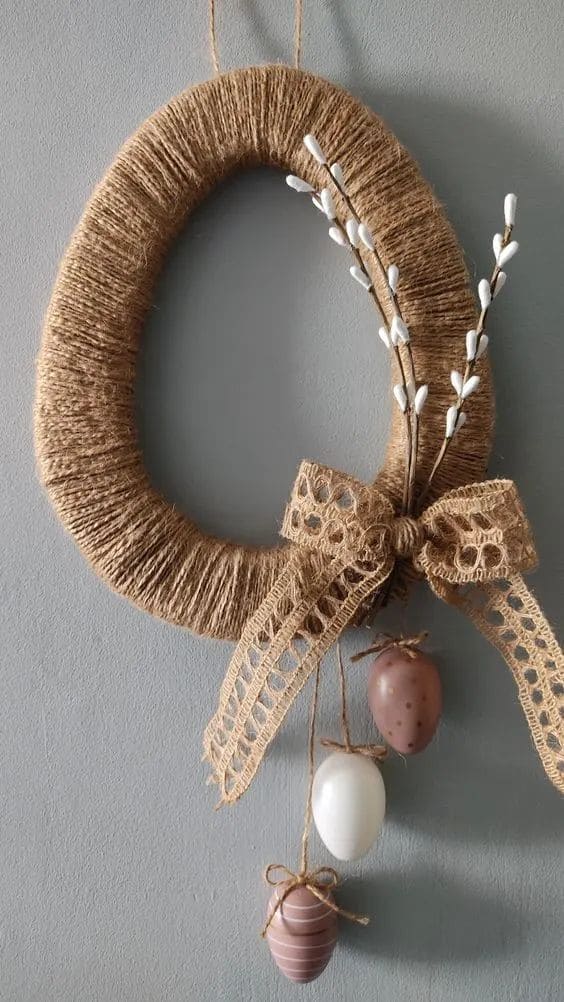
This rustic Easter egg wreath gave my entryway such a calm, earthy vibe. I kept it neutral with jute and soft tones, and it turned out surprisingly elegant.
Materials Needed
- Foam wreath form (oval shape)
- Jute twine or rope
- Hot glue gun + glue sticks
- Lace ribbon (1 yard)
- Mini decorative Easter eggs (3–4)
- Pussy willow sprigs or faux branches
- Scissors
Step-by-Step Guide
- Wrap your entire foam wreath form with jute twine, gluing every few inches to keep it snug and neat.
- Tie a long loop of lace ribbon into a bow and glue it to the bottom corner. Then tuck in a couple of faux pussy willow stems behind the bow.
- Use twine to suspend your decorative Easter eggs from the center or base of the wreath. Vary the lengths for a layered effect and glue each string in place at the back.
- Let it hang naturally, mine sways a little with the breeze, and it feels alive in the best way.
#6. Nature-Inspired Easter Egg Collage Creations
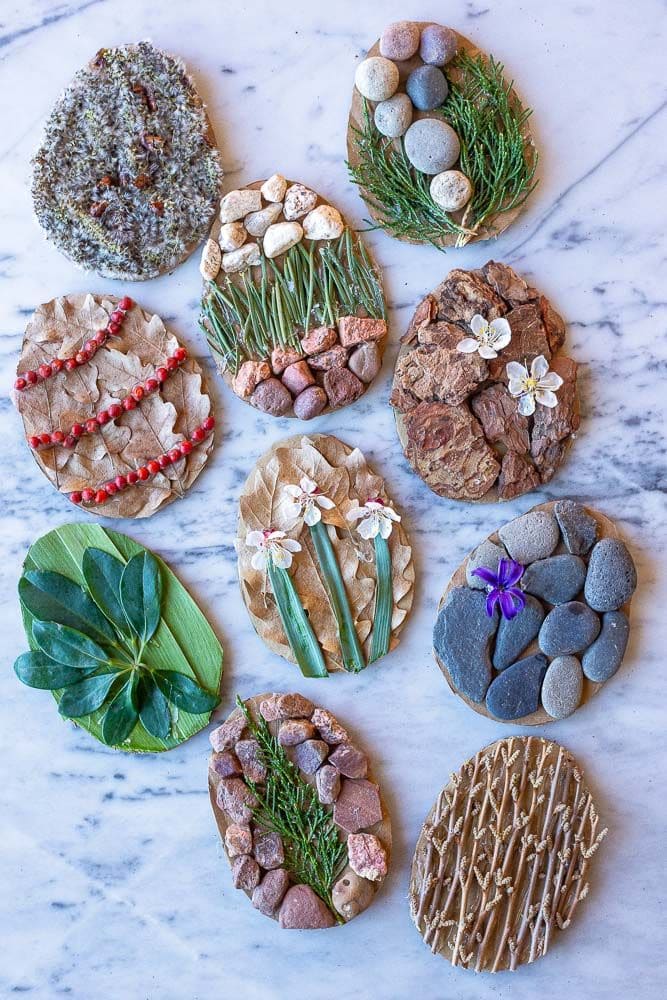
These nature-inspired Easter eggs were a hit with the kids and surprisingly meditative for me. Each one turned out like a tiny earthy canvas, perfect for reconnecting with spring.
Materials Needed
- Cardboards (cut into 10 egg shapes)
- Natural materials (leaves, twigs, pebbles, flower petals, pine bark, grass, etc.)
- Hot glue gun or craft glue
- Scissors
- Optional: hole punch + string
Step-by-Step Guide
- Cut several pieces of cardboard into 10 egg shapes – mine were about 4 inches tall.
- Go outside with a basket and gather small items like stones, flower petals, twigs, bark, or leaves.
- Start gluing the natural pieces directly onto the cardboard in layers or patterns.
- Each egg became a celebration of texture as some had pebbled mosaics, others had leafy stripes or wildflower blooms.
#7. Rustic Wooden Bunny Sign with Burlap Accents
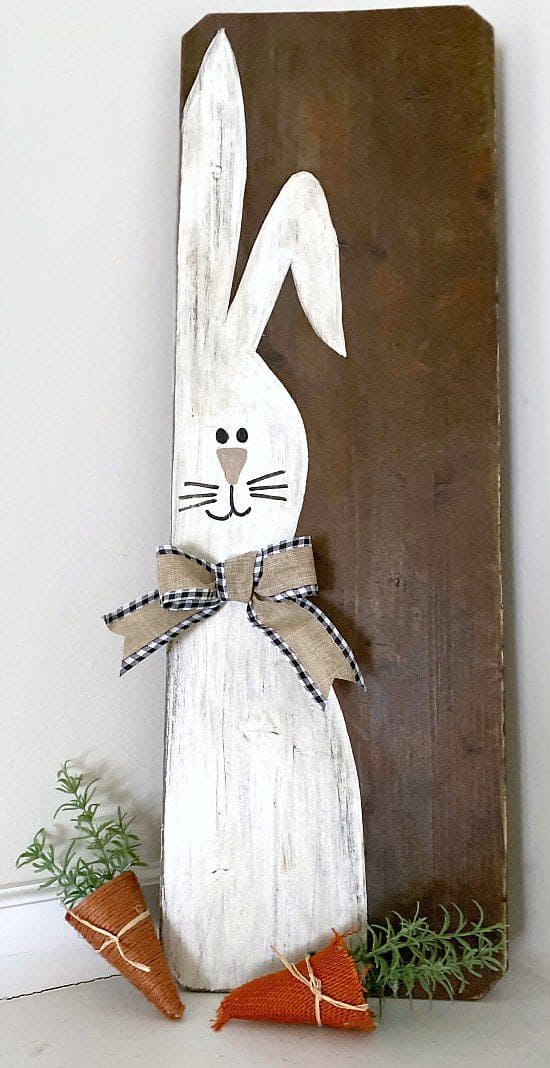
This sweet bunny door sign was the perfect rustic accent for my Easter porch this year. I repurposed an old wooden board and added a touch of charm with a hand-painted bunny and a simple burlap bow.
Materials Needed
- Wooden board (approx. 30” tall)
- White acrylic paint
- Paintbrush
- Black paint pen or marker
- Burlap ribbon and plaid ribbon
- Hot glue gun + glue sticks
- Sandpaper
- Pencil
Step-by-Step Guide
- Lightly sand the board to remove rough edges. Sketch the shape of a bunny onto the board using a pencil, I did a tall, vertical style to match my entryway vibe.
- Fill in the shape with white acrylic paint, using a dry-brush technique if you want that rustic streaked look.
- Let it dry completely before adding eyes, whiskers, and a nose using a black paint pen and a bit of tan paint for the nose.
- Create a burlap and ribbon bow and hot glue it where the neck would be.
#8. Elegant Pearl Nest Easter Decoration Idea
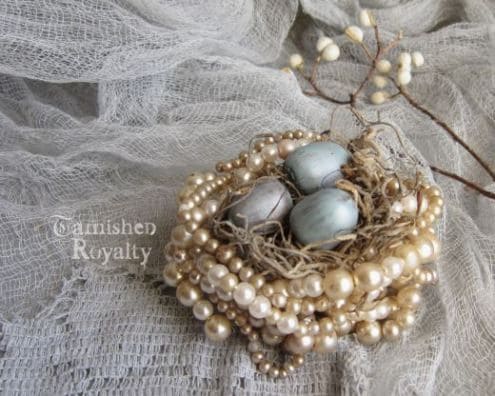
This vintage-inspired pearl bird nest came together like a tiny treasure from a forgotten jewelry box.
Materials Needed
- Loose pearl strands or your old pearl necklaces
- Small grapevine wreath or nest base
- Spanish moss or natural raffia
- Mini plastic eggs (3–4)
- Metallic spray paint or craft paint (silver, blue, or gold)
- Hot glue gun + glue sticks
- Scissors
Step-by-Step Guide
- Paint your mini eggs with metallic craft paint and let them dry completely.
- Take a small grapevine wreath or premade nest and start gluing your pearl strands around the base in loops. Tuck in Spanish moss inside the center to create a soft cushion.
- Once everything is secured, gently nestle your eggs into the center and hot glue them in place.
#9. Adorable Pom-Pom Bunny Easter Ornaments
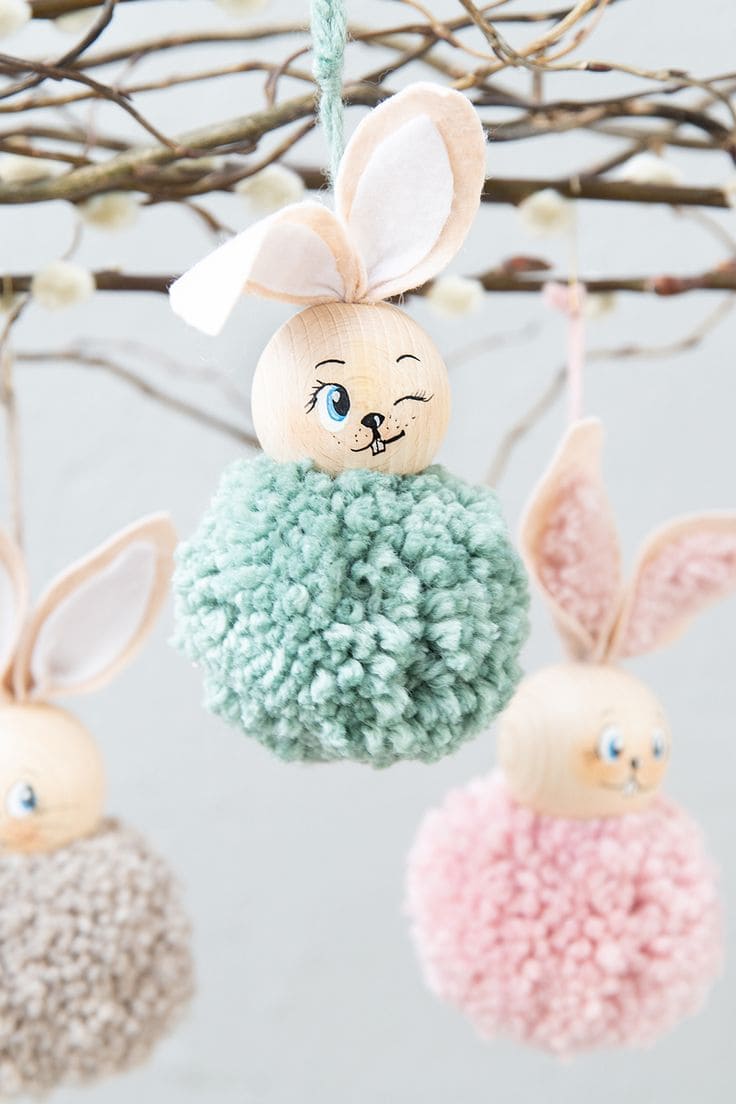
I couldn’t help but smile while making these pom-pom bunnies as they’re soft, quirky, and full of charm! Perfect for spring branches, Easter trees, or even as little gift toppers.
Materials Needed
- Yarn (any pastel shade, approx. 10 yards)
- Large wooden beads (1 per bunny)
- Pom-pom maker
- Felt (white + pink for ears)
- Black fine-tip marker
- Hot glue gun + glue sticks
- String for hanging
- Scissors
Step-by-Step Guide
- Wrap yarn around your pom-pom maker, tie it off, and fluff it into a tight round shape. Trim the edges for a neat finish.
- Draw a sweet bunny face on the wooden bead using a marker. You can keep it classic, or get creative, I gave mine a little wink and buck teeth.
- Cut small ear shapes from felt, layering pink inside white. Glue them to the top of the bead, then glue the bead onto the pom-pom.
- Add a hanging loop by tying string through the pom-pom center.
#10. Rustic Bunny Easter Wooden Hoop Ornaments
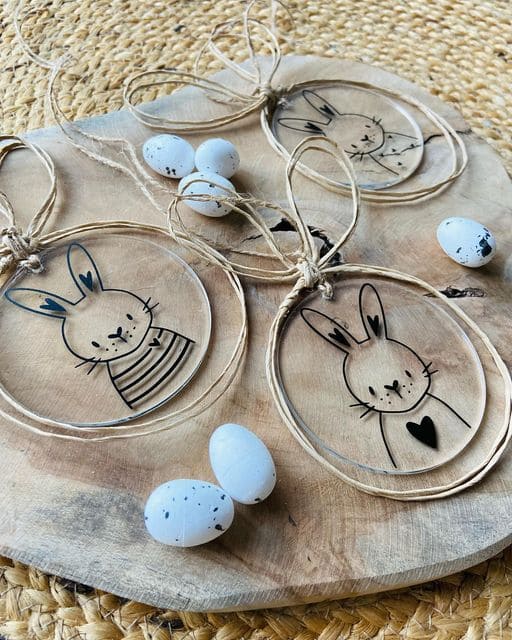
These transparent bunny ornaments stole my heart the moment I hung them up! They’re light, whimsical, and perfect for adding a modern rustic touch to Easter branches or window displays.
Materials Needed
- Clear plastic or acrylic oval blanks
- Permanent black marker or paint pen
- Twine or natural jute string
- Hole punch
- Ribbon (optional)
Step-by-Step Guide
- Draw your bunny design freehand or trace it onto the acrylic blank using a black paint pen. Add stripes, hearts, or even funny expressions!
- Let the ink dry completely to avoid smudging. If your blank doesn’t have a hole, gently punch one using a precision hole drill.
- Thread twine through the top and tie it into a loop for hanging.
- You can add a mini bow if you’re feeling fancy. I made a full set of these with different bunny faces, and they sparkle beautifully in sunlight.
#11. Charming Felt Easter Decorations with Feathery Touches
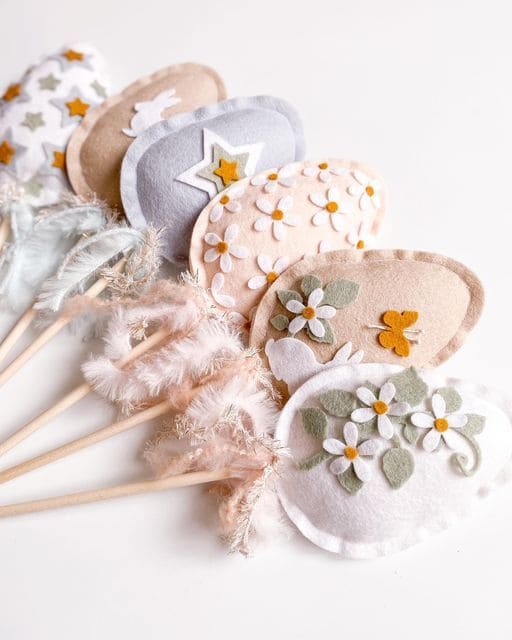
These felt Easter egg wands turned out dreamy. I mixed and matched floral motifs with stars and butterflies to keep each one unique.
Materials Needed
- Colored felt sheets (4–5 pastel tones)
- Wooden dowels (8–10 inches)
- Hot glue gun + glue sticks
- Cotton stuffing or felt scraps
- Scissors
- Mini feathers
- Needle and thread (optional)
Step-by-Step Guide
- Cut two identical egg shapes from your chosen felt sheets for each wand.
- Decorate one side with flowers, stars, or bunny shapes using smaller felt cutouts. You can either glue or stitch these for more texture.
- Glue the decorated side onto a plain back piece, leaving a gap at the bottom. Lightly stuff the inside to give it a plush look. Insert the wooden dowel stick and seal the base with glue.
- Finish by tying a fluffy feather around the stick base. I made a whole bunch in different themes and poked them into mason jars!
#12. Adorable Wood Slice Easter Chick Ornaments

These wooden slice chicks might be my cutest Easter discovery yet. Their dangly legs and tiny bows made them a favorite at our craft table and they look adorable hanging from doorknobs or baskets.
Materials Needed
- Wooden slices (3–4 inches diameter)
- Acrylic paint (light yellow, black, orange)
- Paintbrush
- Twine
- White felt
- Scissors
- Hot glue gun + glue sticks
- Black marker
- Small ribbon for bows
- Drill (optional)
Step-by-Step Guide
- Start by painting the front of each wooden slice a soft yellow. Once dry, draw tiny eyes or use black paint with a fine-tip brush.
- Cut out little wings and beaks from white and orange felt, and glue them in place.
- Drill or poke small holes for the legs and top hanger. Thread baker’s twine through the holes for both, I added a little knot at the bottom of each leg to mimic feet.
- Add a tiny bow just under the face to finish it off.
#13. Charming Vintage Paper Cone Easter Basket
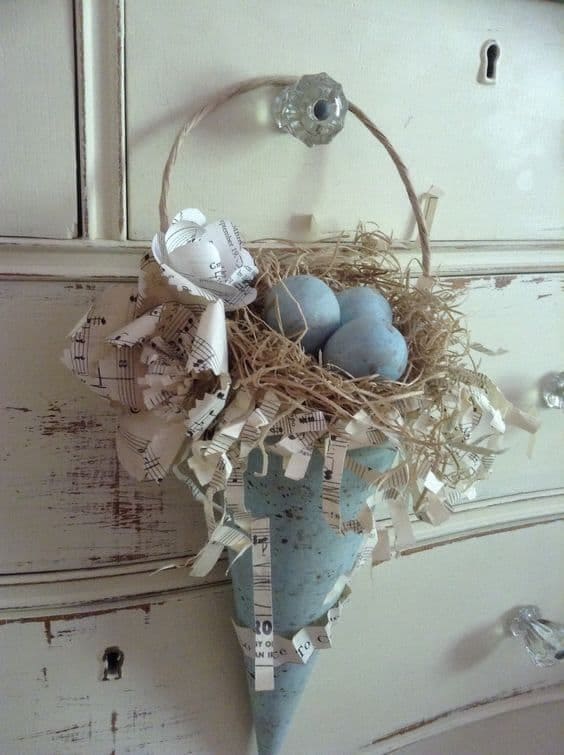
This vintage-style paper cone nest has that old-world charm I can never resist. I hung mine from a dresser knob, and it instantly gave the space a warm, handmade touch.
Materials Needed
- Decorative paper or scrapbook paper
- Vintage sheet music or printed music pages
- Shredded kraft paper or straw filler
- Plastic eggs (3–4)
- Blue acrylic paint (optional)
- Paintbrush
- Hot glue gun + glue sticks
- Twine
- Scissors
Step-by-Step Guide
- Cut your decorative scrapbook paper into a large triangle with rounded sides, then roll it into a cone and secure with glue. Glue on a piece of twine at the top for a handle.
- Paint your plastic eggs a soft robin’s-egg blue and set them aside to dry. Fill the cone with a handful of shredded paper or straw to create the nest base.
- Cut and curl strips of sheet music, then glue them along the cone’s top edge for a frilly finish. Nestle the eggs inside and glue them gently so they stay put.
#14. Elegant Cherry Blossom Yarn-Wrapped Eggs
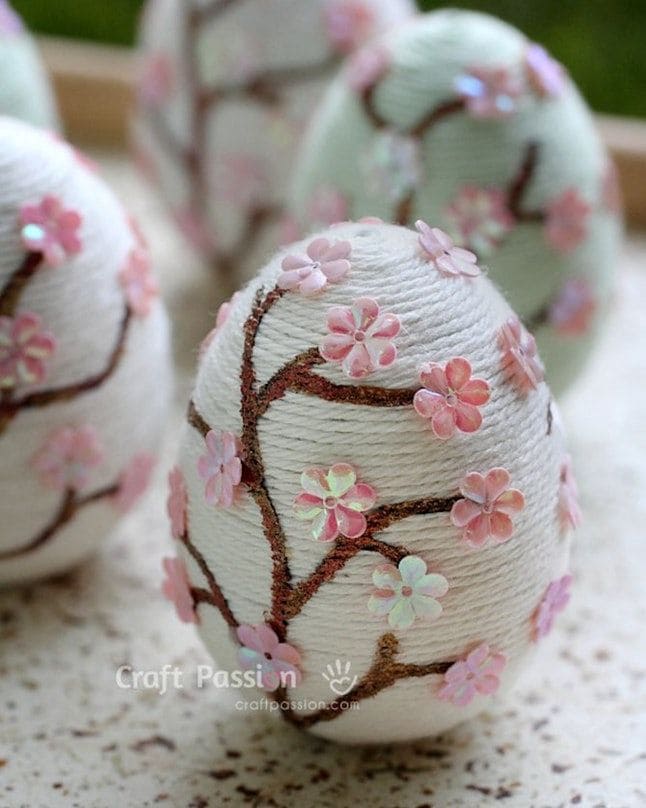
I remember the first time I made these cherry blossom eggs, they reminded me of spring afternoons in my grandma’s garden. Now, these eggs carry that memory to my Easter table.
Materials Needed
- Plastic eggs or foam eggs
- White yarn or cotton twine
- Hot glue gun + glue sticks
- Brown fabric paint or dimensional paint
- Mini flower sequins
- Craft glue
- Toothpick or fine brush
Step-by-Step Guide
- Start by wrapping your egg in white cotton twine, applying dots of hot glue as you go to keep it tight and smooth. Work from the top down in a spiral until fully covered.
- Next, use dimensional paint to draw winding tree branches over the surface. Let that set fully, it usually takes about 30 minutes.
- Finally, dot mini flower sequins along the branches with a tiny dab of craft glue. A toothpick works best for precision. I added a few iridescent ones for a soft sparkle.
#15. Rustic Twine Bunny Easter Decorations with Lace
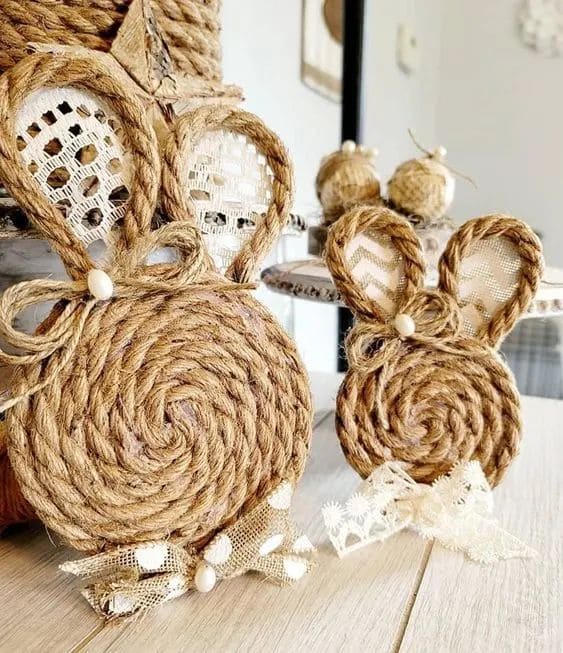
These rustic jute bunnies were one of my favorite last-minute Easter crafts, all I needed was rope, hot glue, and a few scraps of lace.
Materials Needed
- Jute rope (6–8 mm thick)
- Hot glue gun + glue sticks
- Cardboard backing (optional)
- Decorative lace or burlap ribbon
- Mini wooden beads or buttons
- Scissors
Step-by-Step Guide
- Begin by coiling the jute rope into a flat spiral, gluing it down as you go to form the bunny’s body. Continue with two smaller coils for the ears, shaping them into ovals.
- Add lace or burlap ribbon inside the ears and tie a bow near the neck area. You can glue a tiny wooden bead in the center of the bow or as the nose.
- To finish, glue the bunny onto cardboard for stability or leave it freestanding for shelf decor. I made a few sizes to group them together, they look adorable on trays!
#16. Charming Paper Bird Easter Ornament Craft
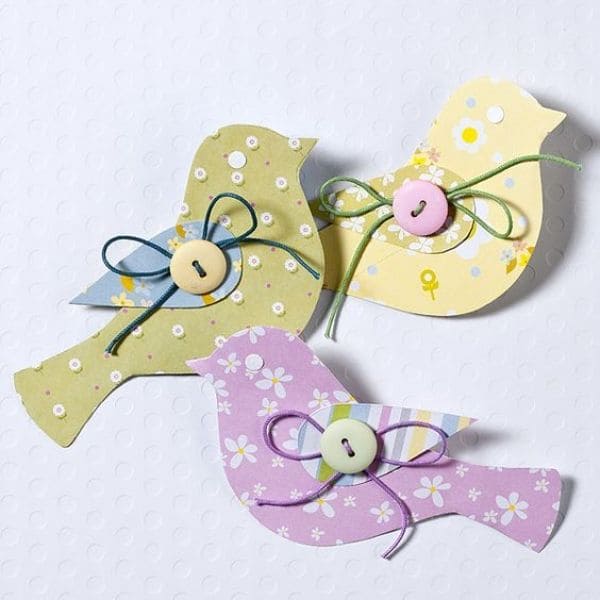
These paper birds were such a joy to make . I used leftover pastel cardstock and a few spare buttons I had tucked away in my sewing box.
Materials Needed
- Pastel cardstock or patterned scrapbook paper
- Bird template (hand-drawn or printed)
- Buttons (1 per bird)
- Colored twine
- Glue or double-sided tape
- Scissors
- Hole punch (optional)
Step-by-Step Guide
- Trace and cut out your bird shapes using patterned paper. I used a few soft florals and polka dots to give them a spring vibe.
- Next, glue a small button near the chest area and loop a thin string or baker’s twine through the holes to create a tiny bow.
- Add dots with a hole punch or stickers for extra detail, and you’re done! These make lovely accents on Easter baskets, cards, or window displays.
#17. Wooden Bunny Figurines with Wire Details
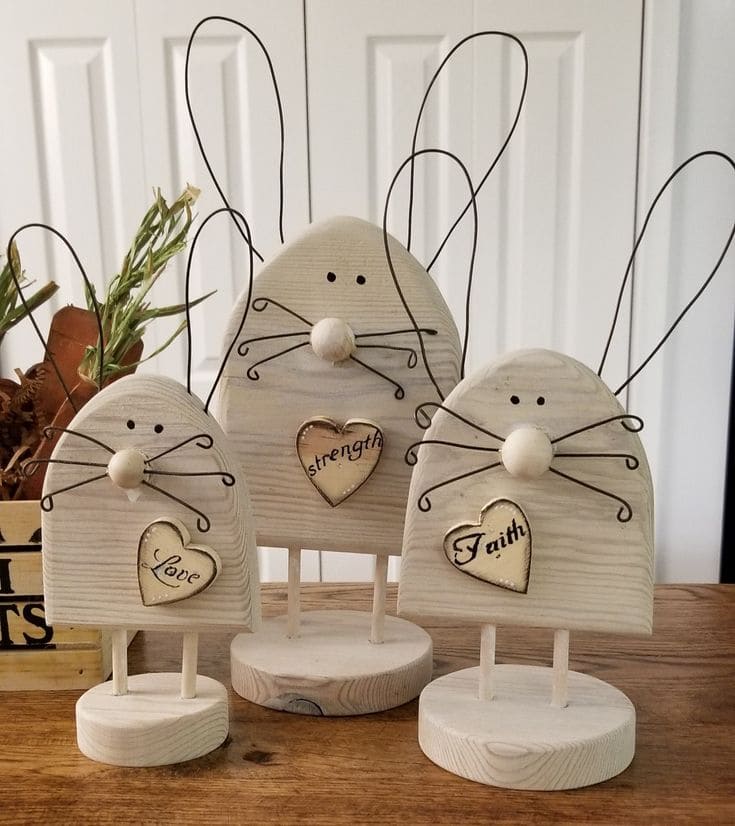
These wooden bunny sculptures are the kind of rustic charm I live for during Easter.
Materials Needed
- Wood blocks
- Wooden circles
- Small wooden hearts
- Black wire
- Drill and small drill bit
- Wood glue or hot glue gun
- Black marker
- Sandpaper
- Wood stain (optional)
Step-by-Step Guide
- Sand your wooden pieces until smooth, then whitewash or leave them natural depending on the look you’re going for.
- Drill small holes where the whiskers and ears will go, then bend and insert black craft wire to shape them.
- Glue the wooden nose to the center, and use a fine-tip marker to draw eyes just above it.
- Personalize the heart plaque with your chosen word like paint, stamp, or burn it in and glue it near the base.
- Finally, glue the bunny onto a sturdy base for standing.
#18. Rustic Burlap Bunny Pot Decor Crafts
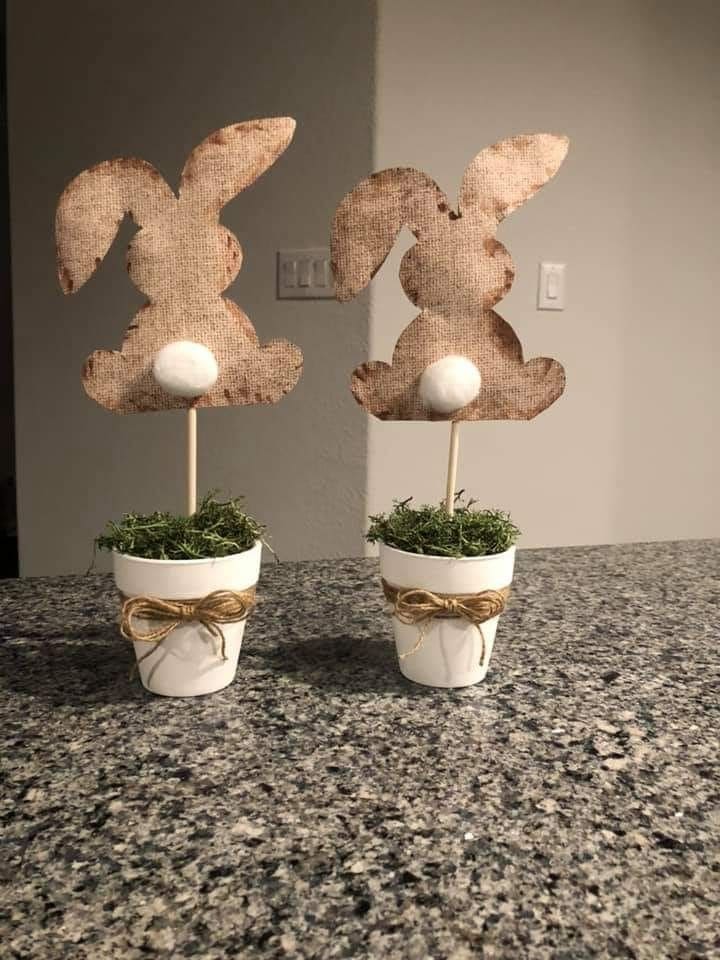
The fluffy tails and burlap texture scream farmhouse Easter, and they were so easy to make, I finished a pair during a rainy afternoon with tea.
Materials Needed
- Mini flower pots (ceramic or terracotta)
- Burlap fabric
- White pom-poms (1 per bunny)
- Wooden skewers
- Green moss
- Foam blocks
- Hot glue gun + glue sticks
- Jute twine
- Scissors
Step-by-Step Guide
- Start by cutting bunny shapes out of burlap fabric, then hot glue a white pom-pom on each for the tail. Insert a skewer between two layers of burlap and glue to secure.
- Place a foam block inside the pot and poke the skewer through it to hold the bunny upright. Cover the foam with green moss and press gently to secure.
- Eventually, tie a jute twine bow around the pot’s rim for a sweet finishing touch.
#19. Vintage Sheet Music Bunny Decor Crafts
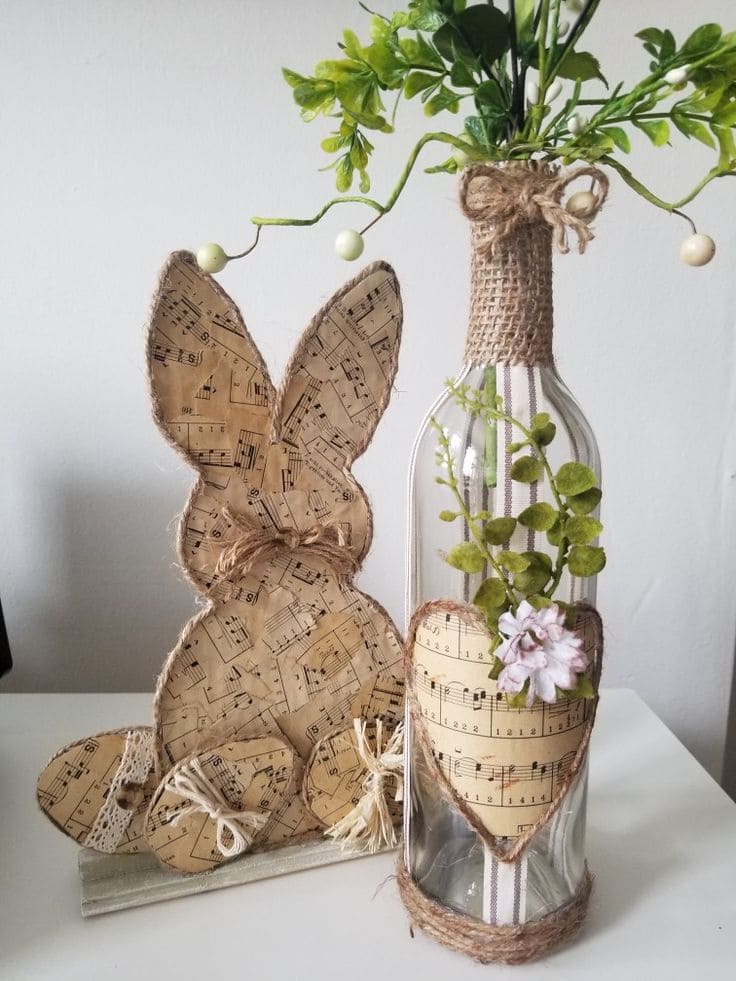
This bunny and bottle set is one of my favorite Easter shelf accents, it feels vintage, poetic, and full of charm.
Materials Needed
- Empty wine bottle (cleaned and label removed)
- Cardboard bunny cutout
- Vintage sheet music paper
- Jute twine
- Mod Podge or clear-drying craft glue
- Hot glue gun + glue sticks
- Lace, ribbon, or mini flowers
- Scissors
- Faux greenery or spring florals
Step-by-Step Guide
- Cut the sheet music into small torn pieces and decoupage them onto your bunny cutout with Mod Podge. Smooth out the paper gently and let it dry fully. Wrap some jute twine around the bunny’s neck like a bowtie, then glue down lace or ribbon on the egg bases for extra flair.
- For the bottle, wrap the neck with twine and glue a sheet music heart on the front. Add a faux flower and some greenery inside. You can also tuck in a ribbon to match the bunny.
- Display these together for a soft, romantic spring vignette.
#20. Charming Floral Wire Bunny Wreath Designs
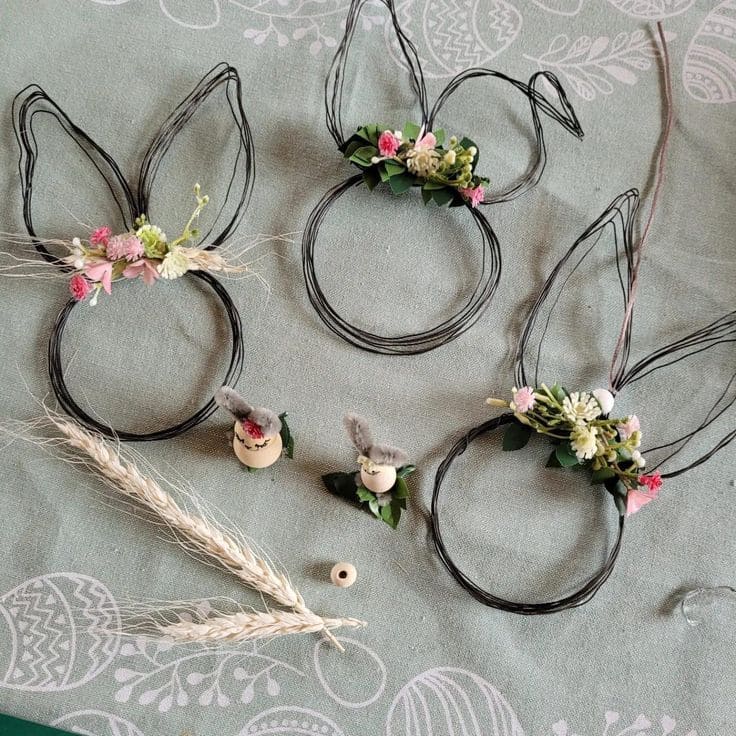
I made a trio to hang in my kitchen window, and the light floral accents brought just the right spring touch without going over the top.
Materials Needed
- Floral wire (dark brown or black preferred)
- Wire cutters
- Mini faux flowers and greenery
- Jute twine
- Mini wooden beads (optional)
- Glue gun + glue sticks
Step-by-Step Guide
- Cut floral wire and form it into a circle for the face, then shape two bunny ears above. Twist and secure the ends tightly.
- Repeat for additional bunnies if you’re doing a set. Wrap the joints with a bit of jute twine for extra stability and a rustic touch.
- Hot glue your faux flowers and greenery at the base of the ears where they meet the circle.
- Then, add optional mini wood beads for a cute bow-tie detail or a little face.
#21. Rustic Farmhouse Easter Bunny Decor Craft
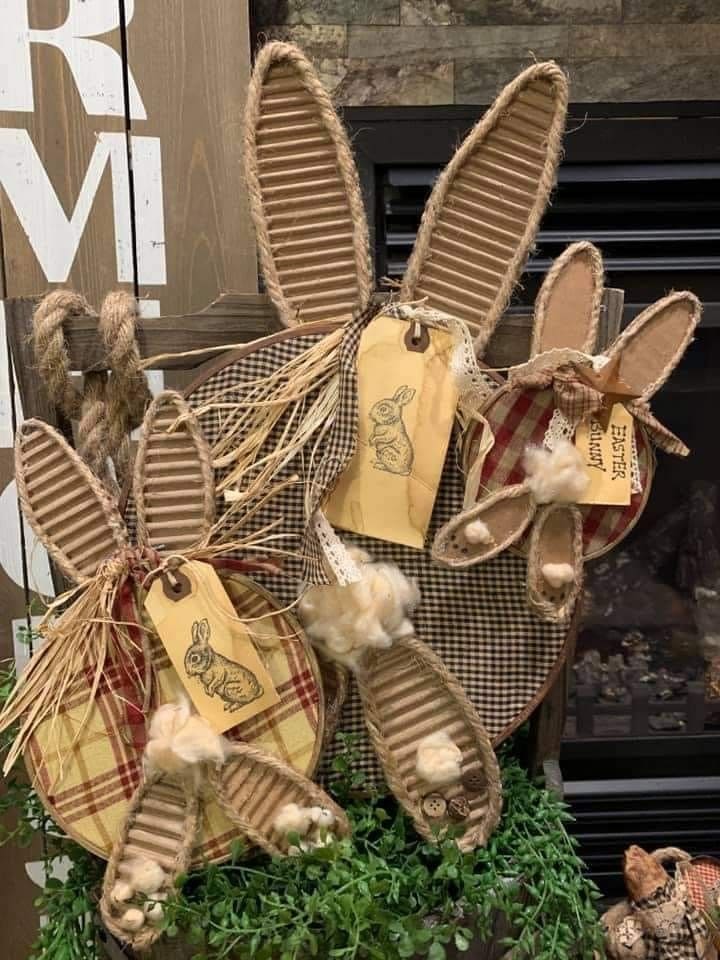
These gingham and corrugated cardboard bunnies turned out to be the coziest corner display I’ve ever crafted.
Materials Needed
- Corrugated cardboard sheets
- Gingham fabric or plaid scraps
- Cardstock tags
- Burlap ribbon or twine
- Hot glue gun + glue sticks
- Cotton balls
- Buttons and raffia
- Scissors
Step-by-Step Guide
- Cut out large ovals from cardboard for the bunny bodies, then smaller shapes for ears and paws. Cover each piece with gingham fabric using hot glue, folding the edges behind for a clean finish.
- Glue two ears onto each body and edge them with jute twine to add dimension. Add a few cotton balls for tails and paws, then tie on a piece of raffia at the neck as a rustic bow.
- Create little tags using kraft paper tags and rubber stamp them with bunny or “Happy Easter” motifs. Attach the tags with twine and finish off with button embellishments on the paws.
#22. Whimsical Recycled Bunny Portrait Craft Idea
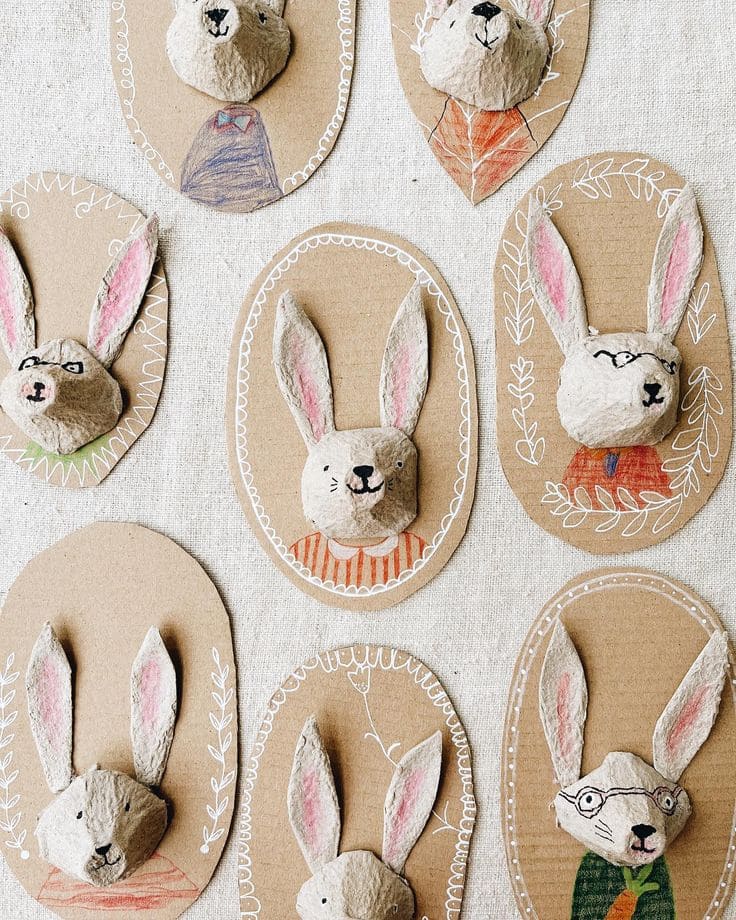
These quirky bunny portraits are the kind of project that turns recycled materials into wall-worthy woodland charm, each face with its own personality and paper suit!
Materials Needed
- 1 empty egg carton
- 1 large piece of cardboard
- Scissors
- Hot glue gun + 3–4 glue sticks
- 6–8 colored pencils or crayons (include pink, orange, green, blue, etc.)
- Fine liner or black marker
- White paint pen
Step-by-Step Guide
- Cut out 6–8 egg cups from an empty egg carton. Trim and shape each one into a rounded bunny head. Use the edges of the carton to cut 2 ears per head and glue them in place.
- Cut 6–8 oval or rectangular shapes from kraft cardboard sheets, each about 5×7 inches.
- Glue the bunny heads to the center of each cardboard cutout using your hot glue gun.
- Draw faces with a fine black pen: eyes, whiskers, and little smiles. Use crayons or colored pencils to give them rosy cheeks, painted ears, or tiny outfits.
- For the final touch, grab a white paint pen to doodle frames, vines, or dots around the edges.
#23. Elegant Floral Egg Carton Gift Packaging
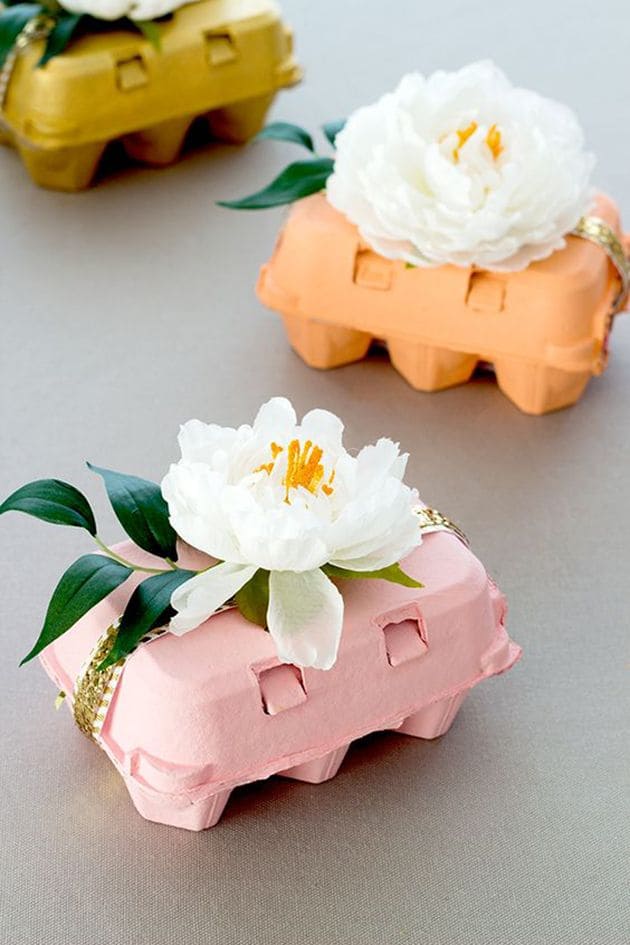
I made a few for Easter brunch favors and now I want to use them for weddings, too. They’re classy, simple, and budget-friendly.
Materials Needed
- 3 empty 6-count egg cartons
- 3 acrylic paint colors (light pink, peach, gold)
- 3 large faux peony flowers
- 3–6 artificial leaves
- 1 roll of gold ribbon or sequin trim (1 yard)
- Hot glue gun + 3 glue sticks
- Scissors
Step-by-Step Guide
- Paint the outside of each clean egg carton with one of your chosen acrylic paints. Let them dry completely, usually takes 20–30 minutes.
- Wrap a piece of gold sequin ribbon around the carton like a gift box and secure it in place using your hot glue gun.
- Take one faux peony and glue it onto the top of each carton, slightly off-center. Add 1–2 artificial leaves beside the flower to make it look fuller.
- Use them as favor boxes, Easter baskets, or even luxe handmade gift packaging.
#24. Adorable Jute Bunny Easter Treat Crates
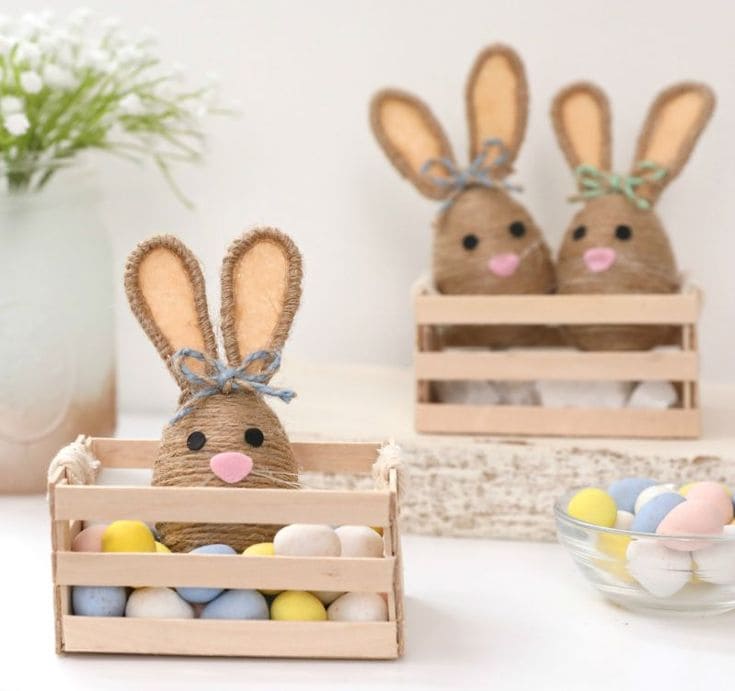
I made this twine bunny using a foam egg I had leftover from last year, and it turned out so charming I had to make two more!
Materials Needed
- 1 foam egg (approx. 3.5 inches tall)
- Twine (about 3–4 yards)
- Hot glue gun + 2 glue sticks
- Felt scraps (light pink for nose, beige and peach for ears)
- 2 small black felt dots
- Blue twine
- 1 small wooden crate (approx. 4×3 inches)
- Mini pastel candy eggs or faux eggs
Step-by-Step Guide
- Wrap your foam egg tightly in twine, securing the end with hot glue at the base.
- Cut two tall ear shapes out of stiff felt sheets, about 3.5 inches tall and 1 inch wide. Layer with a smaller peach inner ear, glue together, then attach to the back of the twine egg using hot glue.
- Add two black felt dots for eyes and a little pink felt triangle for the nose. Tie a bow from blue twine and glue under the face.
- Place your bunny in a mini crate and fill it with candy-coated eggs.
#25. Charming Clothespin Carrot Easter Decorations
These rustic carrots came together in under 30 minutes using old clothespins and some frayed fabric scraps.
Materials Needed
- 5 wooden clothespins (standard size 3.25 inches)
- Orange acrylic paint
- Green gingham (cut into strips about ½ inch wide, 6–7 inches long)
- Jute twine (about 20 inches total)
- Hot glue gun + 1 glue stick
- Paintbrush
- Scissors
Step-by-Step Guide
- Start by disassembling each clothespin and removing the metal spring. Paint both halves in a rich orange hue and let them dry completely.
- Once dry, glue the flat sides of each pair back together so the carved edges face out.
- Tear your green fabric into narrow strips and bunch about 6–7 of them per carrot. Use hot glue to secure them into the top opening of the clothespin.
- Wrap the base of the greens tightly with jute twine, gluing the ends as you go.
#26. Adorable Pinecone Chick Easter Centerpieces
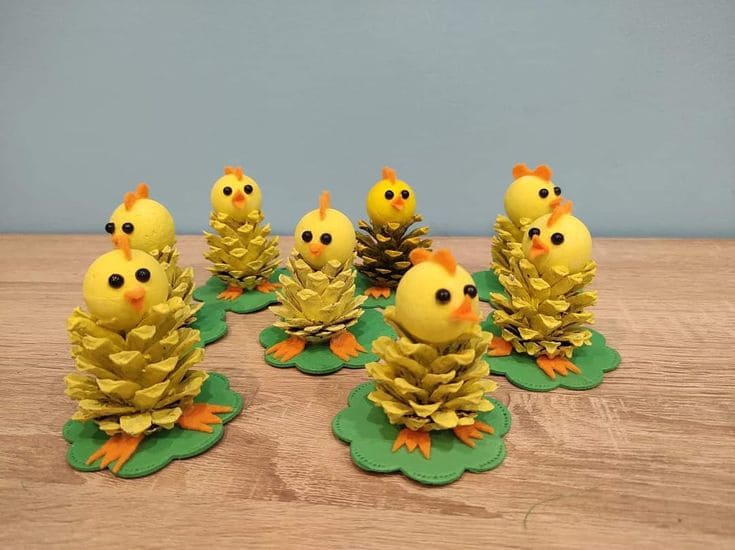
Perfect for place settings, classroom gifts, or spring displays, each one took about 10 minutes to assemble!
Materials Needed
- 8 small pinecones (about 2.5 inches tall)
- 8 yellow foam balls (1.5 inches in diameter)
- Acrylic paint – yellow and orange
- Small black beads (16 pieces)
- Orange foam sheet
- Green craft foam
- Hot glue gun + 2 glue sticks
- Paintbrush
- Scissors
Step-by-Step Guide
- Start by painting all your pinecones a bright yellow, one coat is usually enough with acrylic craft paint.
- Glue a foam ball to the top of each pinecone to create the chick’s head.
- Cut tiny triangular beaks and small feet shapes out of your orange foam. I glued the beaks directly under the center of each foam ball and added the feet to the bottom.
- Attach a pair of black beads, then mount each chick on a green scalloped foam flower shape.
- Optional: Add a tiny orange feather tuft or pipe cleaner “comb” to the top for a bit of character.
#27. Charming LED Bunny Easter Decorations
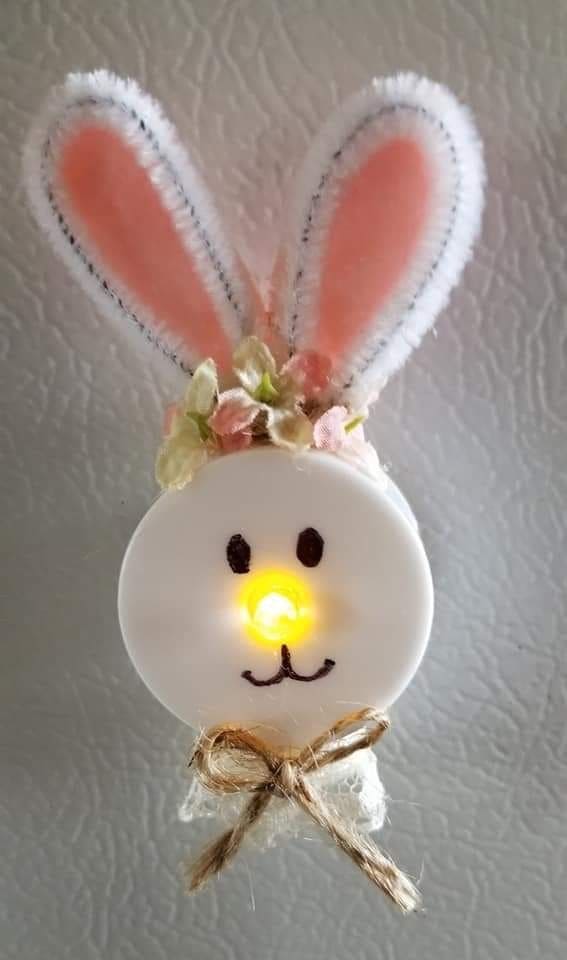
I made this little guy to brighten up my fridge, and it’s been getting so many smiles from guests.
Materials Needed
- 1 battery-operated tea light
- 2 pink-and-white pipe cleaners
- Small faux flowers (3–4 blooms)
- Black permanent marker
- Mini magnet disc
- Hot glue gun + glue stick
- Burlap twine (about 12 inches)
- Scissors
Step-by-Step Guide
- First, make the bunny ears by shaping two pipe cleaners into tall loops and twisting the ends together. Hot glue them to the back of your tea light candle with the “flame” facing out.
- Draw eyes and a mouth using a black marker. I kept it simple, just two ovals and a little smiling curve beneath the “nose.”
- Glue a few tiny blossoms at the base of the ears to give it a sweet spring vibe, then tie a bow with burlap twine and glue it just under the face.
- Finally, attach a small magnet to the back and stick it on your fridge or metal surface. Flip the tea light on and boom, your bunny glows with cheer!
#28. Lovely DIY Cardboard Bunny Easter Decorations
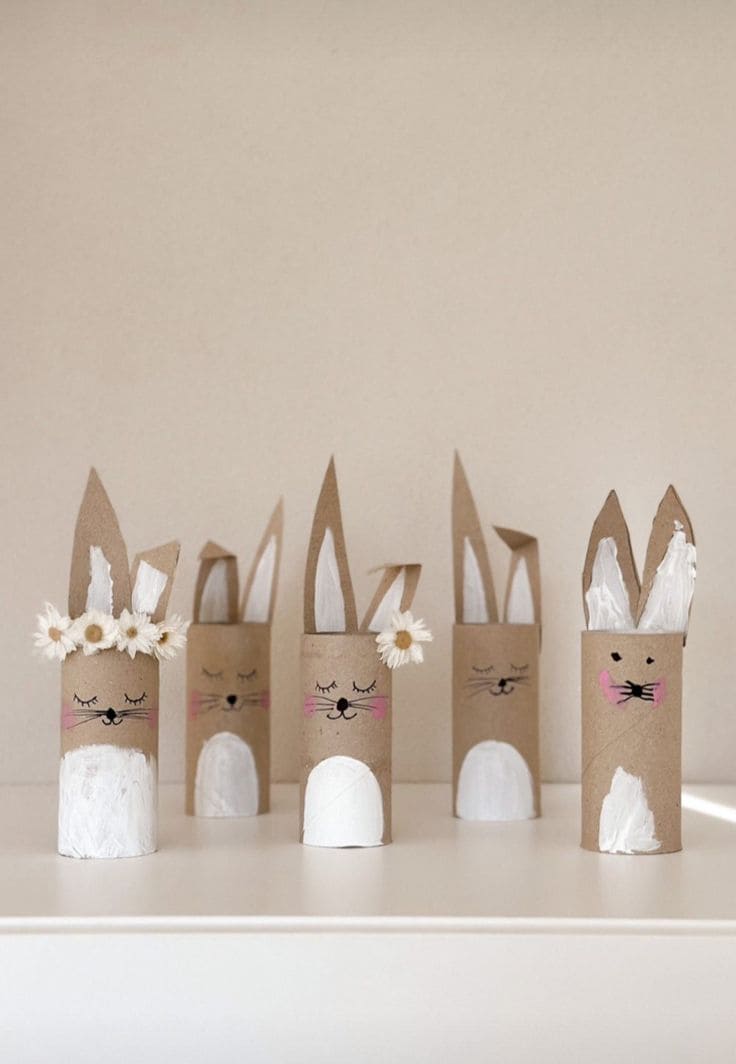
This is one of the easiest, most affordable crafts you can do with kids. I made a whole bunny family in under an hour using recycled toilet paper rolls!
Materials Needed
- 5 toilet paper rolls
- White acrylic paint
- Pink paint or crayon
- Black marker
- Scissors
- Small faux flowers (optional)
- Paintbrush
Step-by-Step Guide
- Start by gently pressing the top of each toilet roll to form a pair of pointed “ears,” then cut along the creases to shape them.
- Paint a white oval belly near the bottom and a small patch inside the ears using acrylic paint.
- Once the paint dries, use a black marker to draw on eyes, whiskers, and a tiny smile. You can add a little pink blush to the cheeks or even a heart-shaped nose with pink paint or crayon.
- Glue on mini faux flowers or bows between the ears to give each bunny personality. I even added some with tiny daisies for a floral crown effect.
#29. Elegant Bunny Napkin Easter Table Decor
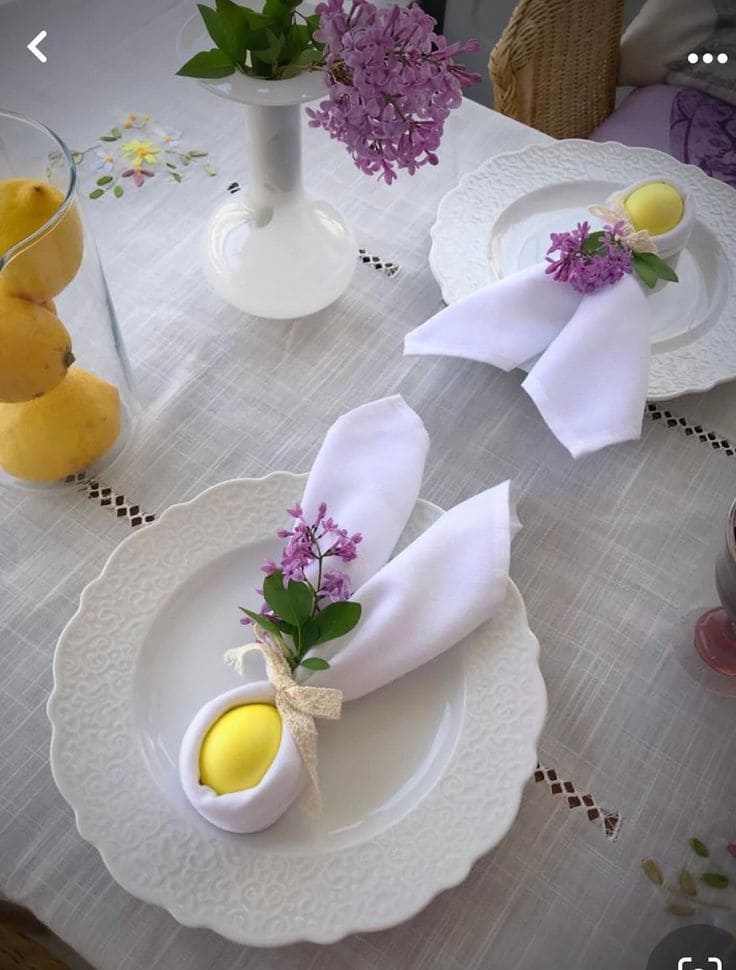
This bunny napkin wrap is one of my go-to ideas for dressing up the Easter table – sweet, minimal, and super quick to make.
Materials Needed
- 1 white cloth napkin (per setting)
- 1 plastic or wooden egg (standard size)
- Small fresh flowers (like lilac) or faux floral sprigs
- 8–10 inch ribbon (lace or satin)
- Plate and table setting
Step-by-Step Guide
- Fold the napkin diagonally into a triangle, then roll it from the long side into a rope shape. Place your egg in the center of the rolled napkin and bring both ends up to form bunny ears.
- Tie a bow just above the egg using a piece of lace ribbon, securing the “ears” in place. Slip in a small floral stem behind the bow for that beautiful blooming detail.
- Lay the finished bunny napkin on each plate. It only takes a few minutes per setting but makes your table feel thoughtfully festive.
#30. Charming Bunny Flowerpot Easter Craft Idea
I had a spare terra cotta pot and decided to turn it into a bunny… and I’m so glad I did!
Materials Needed
- 1 small terra cotta pot (approx. 4–6 inches tall)
- White acrylic paint
- 2 pink pompoms (1 inches)
- 1 white pompom (0.5 inch)
- 2 large googly eyes
- 3 black pipe cleaners
- Ribbon or lace trim
- Faux flowers
- Gingham fabric (approx. 6×6 inches)
- Hot glue gun
- Scissors
- Cardboard
Step-by-Step Guide
- Paint the entire terra cotta pot white.
- While it’s drying, cut two bunny ear shapes from cardboard and cover them with gingham fabric. Use pink felt or fleece for the inner ear sections.
- Hot glue the ears inside the rim of the pot so they stick up tall. Next, glue on your googly eyes, the pink pompoms for cheeks, and a smaller white one for the nose.
- Trim the pipe cleaners to create six equal whiskers and glue them in place behind the cheeks.
- Add a ring of lace ribbon or trim along the base and top it off with a bunch of faux blooms for an extra spring flourish.
#31. Cute Egg Carton Chickens Easter Craft
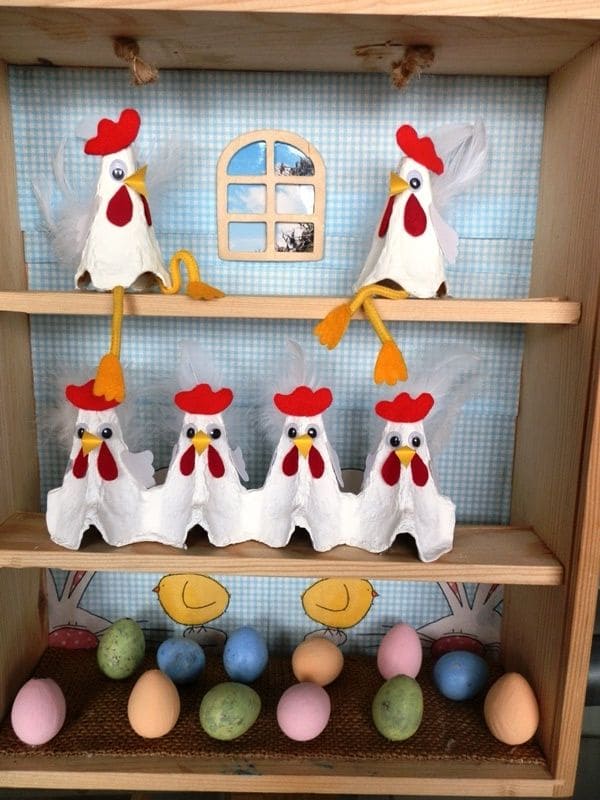
I used a single egg carton and turned it into a flock full of feathered fun. They’ve got big googly eyes, silly felt combs, and a whole lot of personality!
Materials Needed
- 1 cardboard egg carton (12-egg size)
- White acrylic paint
- Red, yellow, and orange felt sheets
- Googly eyes (10–12 mm)
- Small white feathers
- Yellow pipe cleaners
- Scissors
- Craft glue or hot glue gun
- Paintbrush
- Black marker
Step-by-Step Guide
- Cut apart the egg carton into individual and grouped sections – 4 cups for the body row, and two singles for the sitting hens. Paint all the pieces white and allow them to dry completely.
- Cut tiny combs, wattles, and beaks from felt sheets, then glue them to the heads.
- Attach a pair of googly eyes to each chicken, and don’t forget to glue white feathers to the back for a fluffy tail effect.
- For the seated hens, bend yellow pipe cleaners into legs and glue them to the inside base.
- Line up your carton flock in a display box, on a shelf, or windowsill, they look like they’re gossiping about the latest henhouse drama!
#32. Charming Burlap Bunny and Chick Blocks Craft
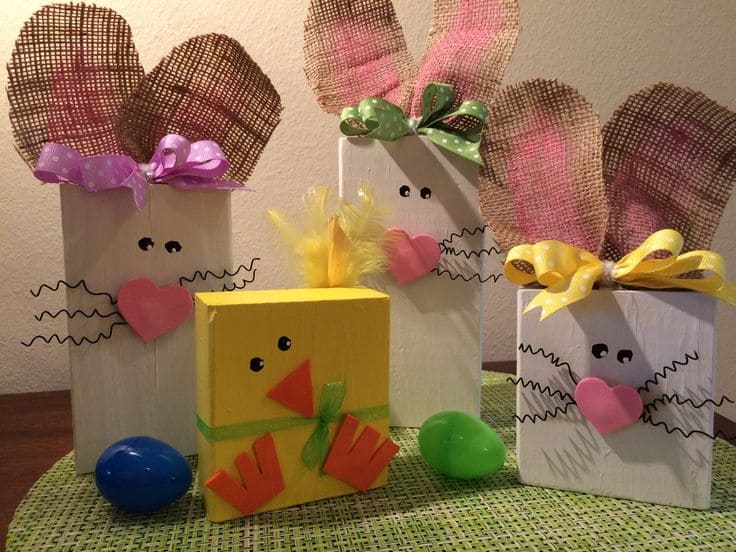
This wood bunny trio and their little chick pal were such a sweet addition to my spring mantel.
Materials Needed
- 3 wood blocks (bunny size: 3×6″, 4×7″, 5×8″)
- 1 small wood block (about 3.5×3.5″)
- White and yellow acrylic paint
- Pink and orange foam sheets
- Googly eyes (5 mm–8 mm)
- Burlap ribbon
- Pastel ribbon bows
- Feathers (yellow)
- Hot glue gun + glue sticks
- Black paint pen
Step-by-Step Guide
- Paint the three bunny blocks white and the small chick block yellow using acrylic paint. Let dry completely.
- Cut pink foam into hearts (for bunny noses) and orange foam into a triangle beak and feet for the chick. Attach all foam pieces using a hot glue gun.
- Glue on googly eyes for each face. Use a paint pen to draw on the bunnies’ whiskers and little smiles.
- Cut two long ears from burlap ribbon per bunny, pinch and glue at the base, then attach them to the back of each block. You can also add pink felt inside for extra charm.
- Glue a colorful bow under each bunny ear set. For the chick, add a few yellow feathers on top for a fluffy tuft.
#33. Vibrant Napkin-Wrapped Easter Egg Displays
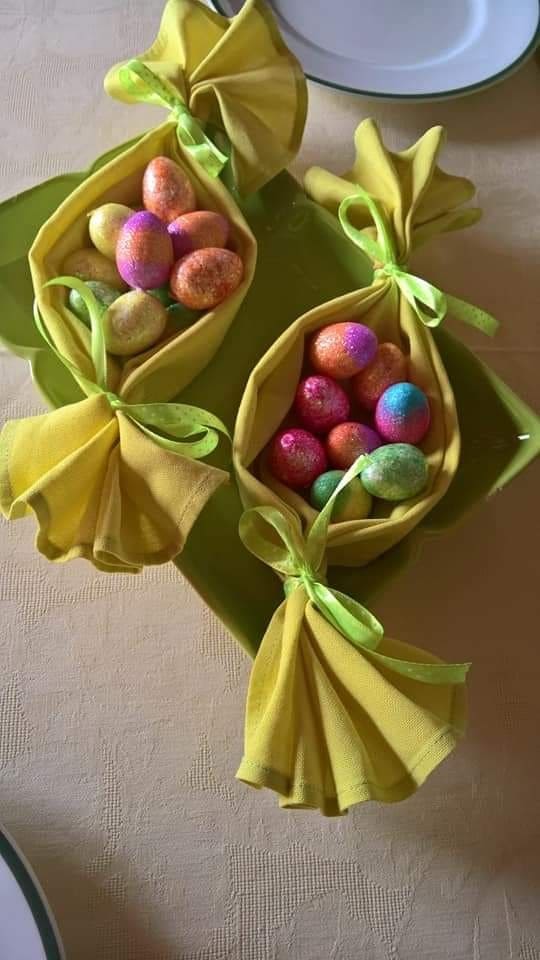
I folded these clever carrot-shaped napkins for last year’s brunch, and they absolutely wowed the guests.
Materials Needed
- 3 yellow napkins (about 18×18 in)
- 3 green satin ribbons (18 inches each)
- 30–40 mini chocolate eggs
- Optional: green tissue paper
Step-by-Step Guide
- Lay out each yellow napkin flat on a table. Place a handful of mini eggs in the center (around 8–12 pieces per napkin).
- Bring the bottom corner of the napkin up over the candy and fold both sides inward to form a carrot-shaped pouch.
- Twist the top of the napkin to resemble a carrot’s stem. Tie it off tightly with a green satin ribbon.
- Fluff the twisted napkin ends to give it a leafy, natural look. You can also tuck in a little green tissue paper to boost the “carrot top” effect.
#34. Wooden Bunny and Paper Crafts
These sweet bunnies added the perfect Nordic-style charm to my spring table. With their clean lines and neutral palette, they make lovely Easter gifts or place settings.
Materials Needed
- 2 wooden balls (2–2.5 inches diameter)
- 2 printed napkins or soft fabric squares (approx. 12×12 inches)
- 2 black fine-tip markers or permanent pens
- Small elastic bands or twine
- Optional: chocolate eggs or notes
Step-by-Step Guide
- Fold each napkin into a square and gently bundle it around a few mini chocolates or a little note. Gather it at the top and tie off with twine or a small elastic band.
- Take a wooden ball and use a fine-tip marker to draw a sweet bunny face, or personalize with names or a short message like “Frohe Ostern.”
- Attach the ball to the top of the napkin bundle so the “ears” stick out above the head. You can glue it in place or just nest it snugly.
- Adjust the fabric ears to stand upright and fluff the bottom for a rounded bunny look.
#35. Delightful Spring Bunny Wreath with Flowers and Ribbon
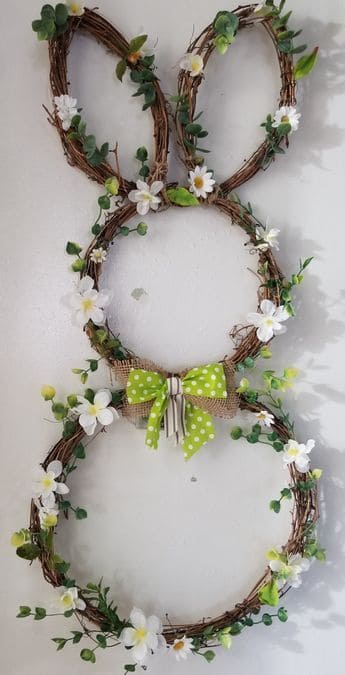
The florals gave triple-circle grapevine wreath that burst of spring I was craving, and the bright green polka-dot bow made the whole piece pop right off the door.
Materials Needed
- 3 small grapevine wreaths (approx. 8 inches)
- 1 medium grapevine wreath (approx. 10–12 inches)
- Faux floral stems (white daisies, mini greens)
- Floral wire or hot glue gun
- Decorative spring ribbon (around 24 inches)
- Twine or sturdy string
- Optional: Mini burlap bow kit
Step-by-Step Guide
- Arrange your grapevine wreaths into a bunny shape – two smaller ones for the ears and one large one for the body.
- Use floral wire or hot glue to securely attach the ears to the top of the body wreath. Reinforce any loose points with extra twine for support.
- Tuck in and glue your faux greenery and small florals around the perimeter of each wreath, spacing them out for a light, airy look.
- Tie a decorative bow using a spring-colored ribbon and attach it to the “neck” where the ears meet the body. I used a lime green polka dot for a pop of playful color.
- Add a loop of twine at the back of the top ear for easy hanging. Hang it on your front door or porch wall for an instant Easter charm.
#36. Felt Bunny and Carrot Garland for Easter
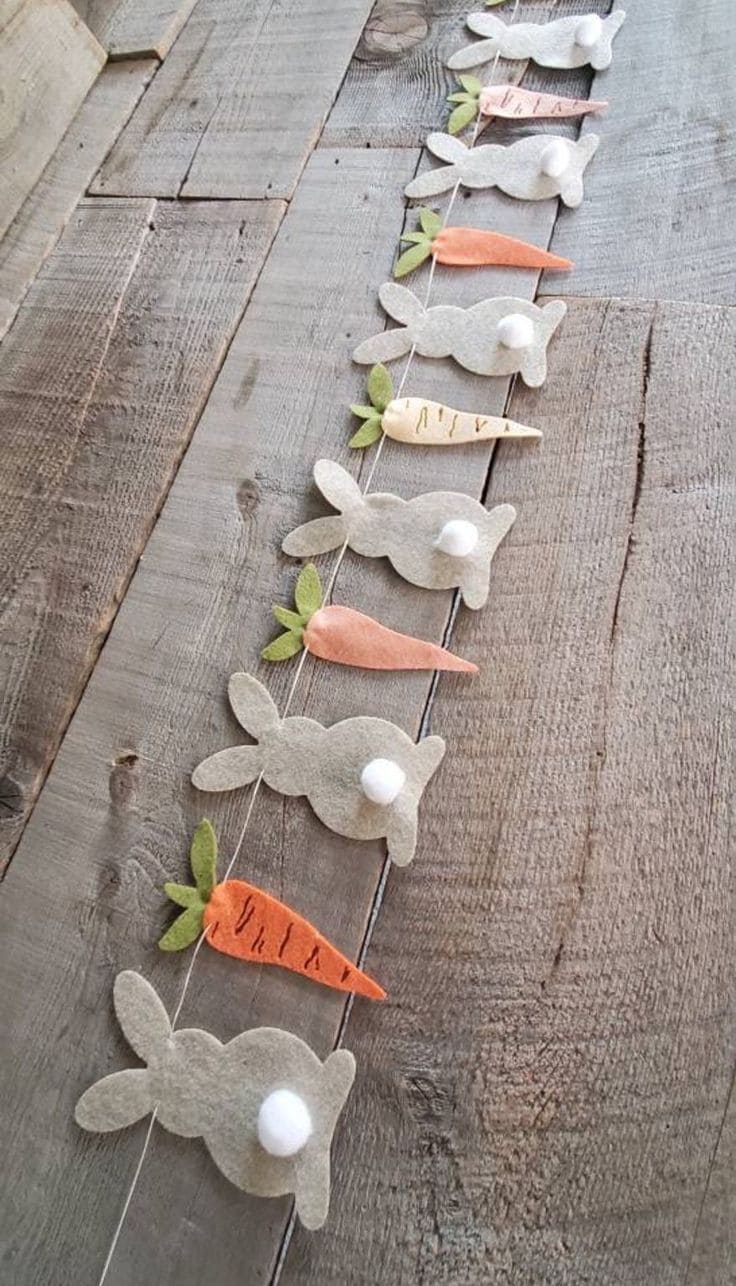
The neutral bunnies with their fluffy pom tails balance perfectly with the pop of orange carrots, and the best part? It took me just under 1 hour to stitch everything together.
Materials Needed
- Beige felt sheets (2 for 6–8 bunnies)
- Orange and white felt (1 sheet each)
- Green felt (1 sheet for carrot leaves)
- Small white pom-poms (1 per bunny)
- Twine or cotton string (about 5–6 ft)
- Fabric scissors
- Fabric glue or hot glue
- Printable bunny and carrot templates
- Embroidery thread and needle (optional)
Step-by-Step Guide
- Print or trace a simple bunny and carrot template onto your felt sheets. Cut out around 7–8 bunnies and 4–5 carrots depending on your garland length.
- Attach one white pom-pom to each bunny’s tail end using fabric glue. For the carrots, glue on a leafy top using cut green felt.
- Optional: Add stitch-like lines on your carrots using embroidery thread or fabric markers to create that hand-sewn, rustic detail.
- Lay everything out in your desired pattern. Then glue or stitch each piece to a long piece of twine or cotton string, spacing them about 4–5 inches apart.
- Once dry and secure, hang across a mantle, shelf, or doorway for an instantly festive Easter look.
#37. Elegant Easter Tree with Hanging Egg Vases and Flowers
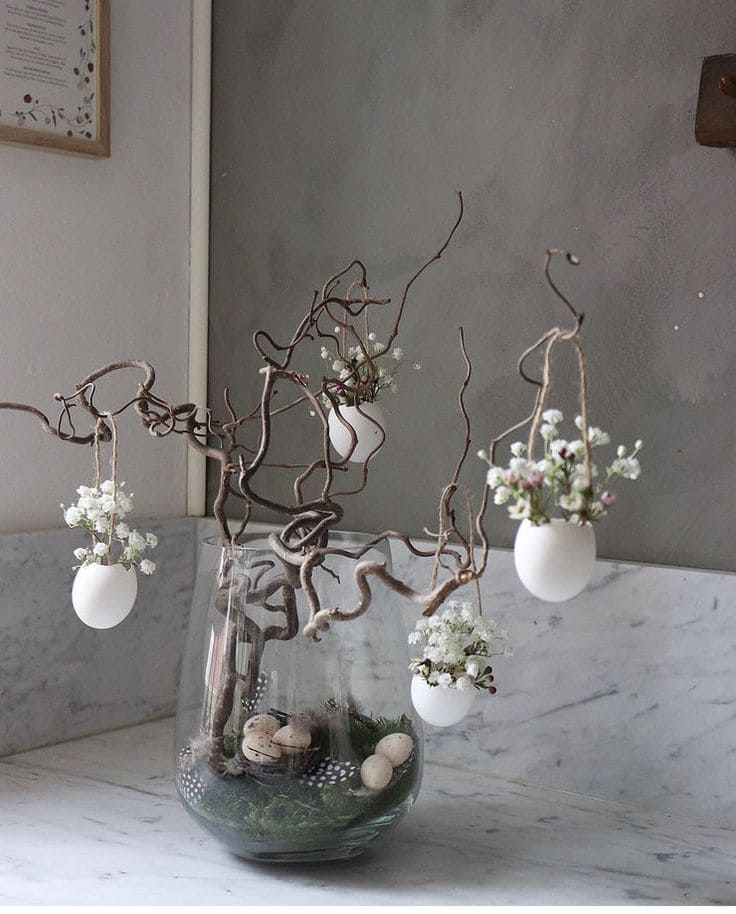
This delicate arrangement stole my heart the moment I finished it. Suspended eggshell vases holding soft blooms give this piece a poetic, floating charm that feels like spring whispering indoors.
Materials Needed
- Curly willow or foraged branches (about 20–24 inches long)
- Clean, halved eggshells (rinsed and dried)
- Twine
- Small flowers (e.g., baby’s breath, waxflower)
- Clear vase (10″–12″ tall)
- Moss, faux grass, or feathers
- Faux bird eggs
- Hot glue gun or floral wire
Step-by-Step Guide
- Start by gently poking two holes near the rim of each eggshell half. Thread a piece of twine through the holes and tie to create a loop for hanging.
- Fill each shell with a few sprigs of baby’s breath or any other lightweight bloom. You can anchor them with a dot of floral glue if needed.
- Place moss and speckled faux eggs into the bottom of a clear glass vase. Position the curly willow branches upright inside the vase, letting them rest firmly on the bottom.
- Hang your floral eggshells at different heights for movement and natural flow.
- Optional: Tuck in a small feather or tiny bird figurine among the moss for an extra woodland Easter feel.
#38. Easter Bunny Fence Craft with Popsicle Sticks
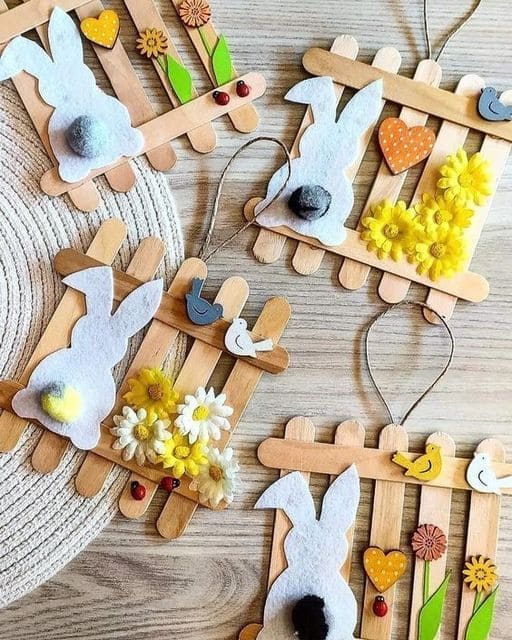
These little bunny butts peeking through tiny fences made me smile the entire time I was crafting. They’re playful, full of texture, and perfect for hanging along a window during Easter week.
Materials Needed
- Jumbo craft sticks (8 per panel)
- Hot glue gun + glue sticks
- White felt sheets
- Pom poms (gray, yellow, white, or black 1″ size)
- Mini artificial flowers and leaves
- Mini bird embellishments
- Small heart buttons or stickers
- Twine
- Scissors + pencil
Step-by-Step Guide
- Lay out five craft sticks vertically and glue two horizontal sticks across the top and bottom to form your “fence.” Let it dry completely.
- Cut out simple bunny silhouettes (about 4–5 inches tall) from white felt using a pencil-traced template. Glue one bunny to the center of each fence.
- Attach a pom pom for the tail and glue on some artificial flowers or heart buttons around the edges for decoration. Add tiny birds or ladybugs as cute extras.
- Repeat to make 4–6 panels, then attach each with twine or ribbon to form a cheerful garland. Keep spacing even and let it dangle with a little whimsy.
#39. Easter Egg Mobile with Feathers and Fresh Greens
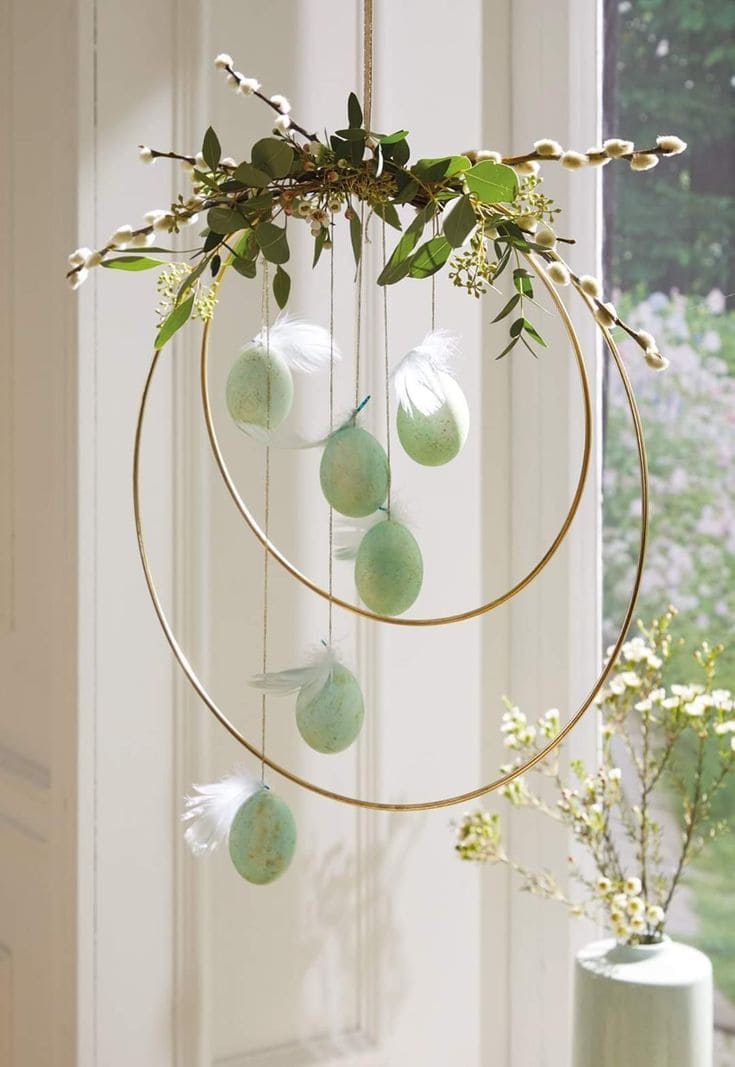
There’s something quietly magical about this Easter mobile. Every time the breeze passed by, those soft feathers and pastel eggs danced like spring was whispering through the room.
Materials Needed
- 2 gold metal hoops (sizes: 8″ and 10″)
- Faux speckled eggs
- Fishing line or clear nylon thread
- White craft feathers
- Hot glue gun + glue sticks
- Greenery stems or faux pussy willow branches
- Florist tape
- Twine
Step-by-Step Guide
- Glue feathers to the top of each egg. Add a small dot of glue and gently press the feather down to hold it in place. Let dry for 2–3 minutes.
- Cut various lengths of fishing line (between 6–12 inches) and tie one end to the tops of the eggs.
- Hang the eggs from each gold ring, spacing them out and varying the heights for visual depth. Tie the other end of the fishing line securely to each hoop.
- Connect the two hoops together vertically using fishing line or twine, largest on top, smallest on the bottom.
- Wrap floral stems or greenery across the top hoop using floral wire. You can weave in faux pussy willow or small blossoms for added charm.
- Attach a loop of twine to the top hoop for hanging.
#40. Adorable Polka-Dot Easter Bunny Decorations for Spring
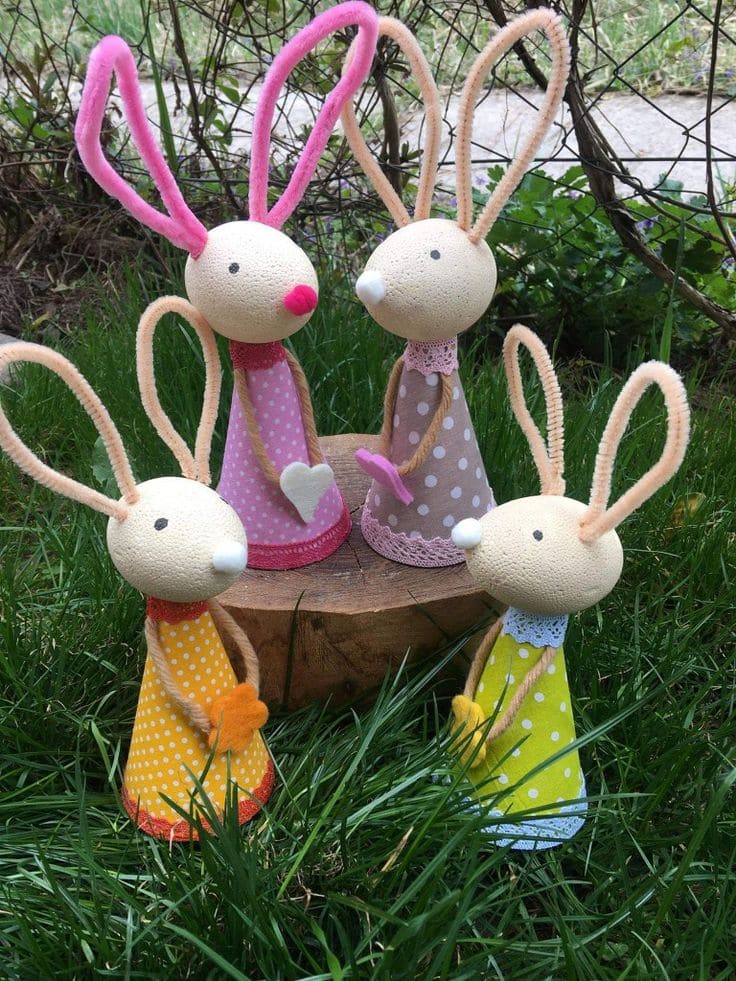
With their quirky wire ears and colorful outfits, they brought the yard to life like a scene straight from a children’s storybook.
Materials Needed
- Foam balls (2″ size for heads)
- Pipe cleaners in soft pastel colors
- Polka dot cotton fabric (approx. 6×6″ per dress)
- Paper cones
- Acrylic paint
- Mini felt pieces
- Craft glue or hot glue gun
- A fine marker
- Scissors, lace, and ribbon
Step-by-Step Guide
- Shape the ears using pipe cleaners. Twist each into an elongated loop (around 5 inches long), then twist together at the base to create a V-shape. Glue or poke them securely into the foam ball.
- Draw or glue the face onto the foam ball – black dots for eyes, a pink pompom or felt circle for the nose.
- Wrap a paper cone with polka dot fabric and secure with glue.
- Attach the head to the top of the cone. Use hot glue or a wooden skewer for sturdiness.
- Glue tiny felt pieces as hands, bows, or hearts. Add lace or ribbon around the neckline for a dressy touch.
- Place them in pairs or groups for an adorable gathering scene.