Ever stared at a broken plate and felt that twinge of guilt before tossing it away? I have. One afternoon, after dropping my favorite floral dish, I couldn’t bring myself to throw the pieces out.
The colors were too pretty, the memories too strong. That’s when I discovered the charm of turning shattered china into something entirely new.
With a little creativity, those sharp fragments can become colorful mosaics, whimsical garden art, or even one-of-a-kind home décor. It’s like giving the plate a second life, one that tells a different story.
Here are 25 gorgeous DIY projects that will make you see broken plates in a whole new way.
#1. Rooster Mosaic Wall Art
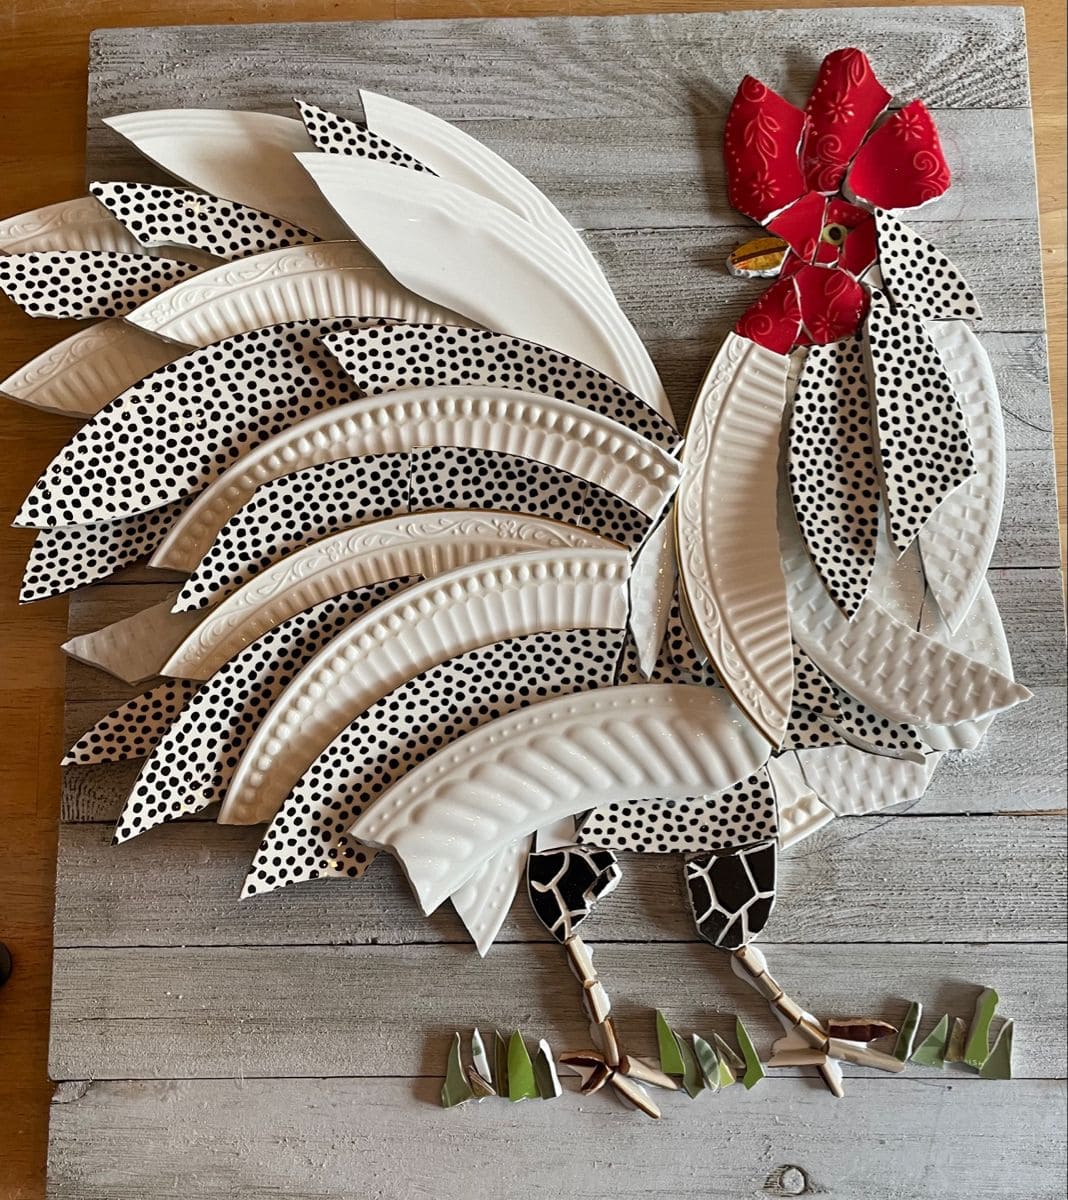
There’s something charming about giving old plates a second life, especially when they come together to form something as spirited as this rooster.
With its bold feathers and bright red comb, this piece practically struts across your wall. Each curve of the plate becomes a plume, and those speckled pieces feel like they were always meant to mimic a rooster’s proud tail.
It’s a satisfying blend of rustic farmhouse style and creative recycling, perfect for a kitchen, patio, or any space that could use a little personality.
Materials Needed
- 5-6 broken ceramic plates (varied textures and patterns, approx. 10-12″ diameter)
- 1-2 red-patterned plate pieces for comb and wattles
- 1 wooden board (16″×20″)
- Tile adhesive (1 tube)
- Grout (1 lb, color of choice)
- Protective gloves
- Safety goggles
Step-by-step Guide
Step 1: Arrange your plate pieces loosely on the wooden board, starting with the rooster’s body and tail.
Step 2: Add the comb and wattles using the red-patterned pieces, adjusting for symmetry.
Step 3: Apply tile adhesive to the back of each piece, pressing firmly into place. Then fill in small details like legs and grass using thin, broken shards.
Step 4: Once dry, grout the gaps for a finished, unified look.
#2. Broken Plate Mosaic Swallow Birds
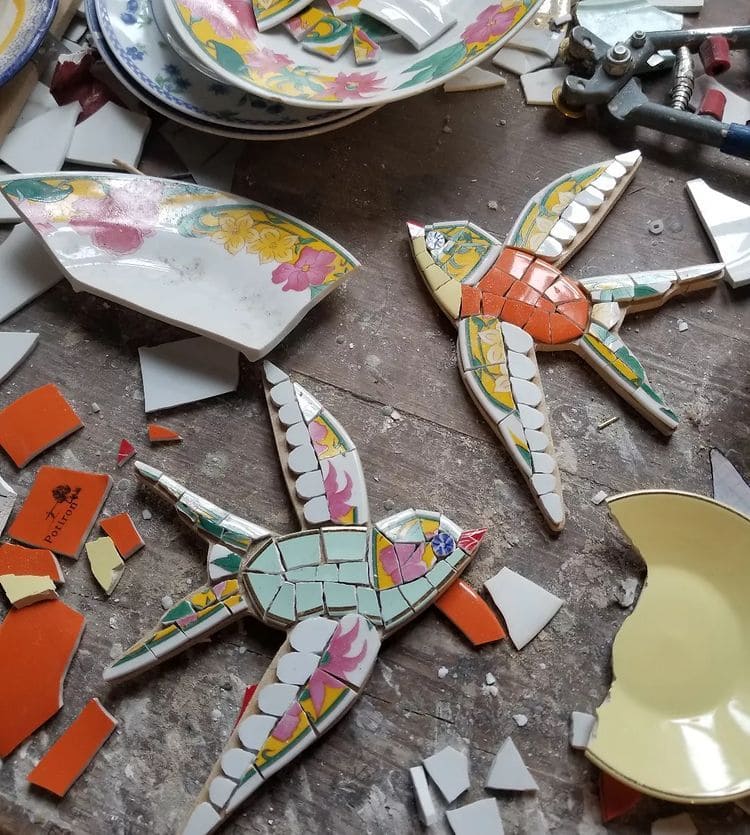
These colorful mosaic swallows bring a touch of vintage charm to any wall or garden.
Each bird is carefully shaped from broken floral plates, making every piece unique. They look stunning hung as a set or individually, catching the light and adding a burst of color wherever they perch.
Materials Needed
- 2 wooden swallow cutouts (length: 6-7 inches, wingspan: 8-9 inches, thickness: 0.25-0.5 inch)
- Broken floral ceramic plate pieces (sizes: 0.5-1 inch)
- Small orange and green ceramic tile pieces (0.5 inch squares)
- Strong ceramic adhesive (approx. 1-2 oz)
- White grout (0.25 cup)
- Small grout spreader or craft stick
- Sandpaper (fine grit)
- Protective gloves and safety glasses
- Soft cloth and sponge
- Hanging hardware (sawtooth hanger or D-ring)
Step-by-step Guide
Step 1: Lightly sand the wooden bird bases for better glue adhesion and wipe away dust.
Step 2: Arrange plate pieces on each bird, starting with the body and then working outward to the wings and tail.
Step 3: Glue each piece in place, ensuring consistent spacing for grout lines.
Step 4: Add orange tile for the chest and colored pieces for extra detail. Let the adhesive dry for 12 hours.
Step 5: Spread grout over the entire surface, pressing it into the gaps with the spreader.
Step 6: Wipe off excess grout with a damp sponge, being careful not to move the tiles.
Step 7: Allow the grout to cure for 24 hours, then buff with a soft cloth. Now you can attach hanging hardware to the back of each bird.
Tip: Using floral plates with bold colors will give the swallows a more striking, eye-catching appearance.
#3. Broken Plate Mosaic Christmas Tree
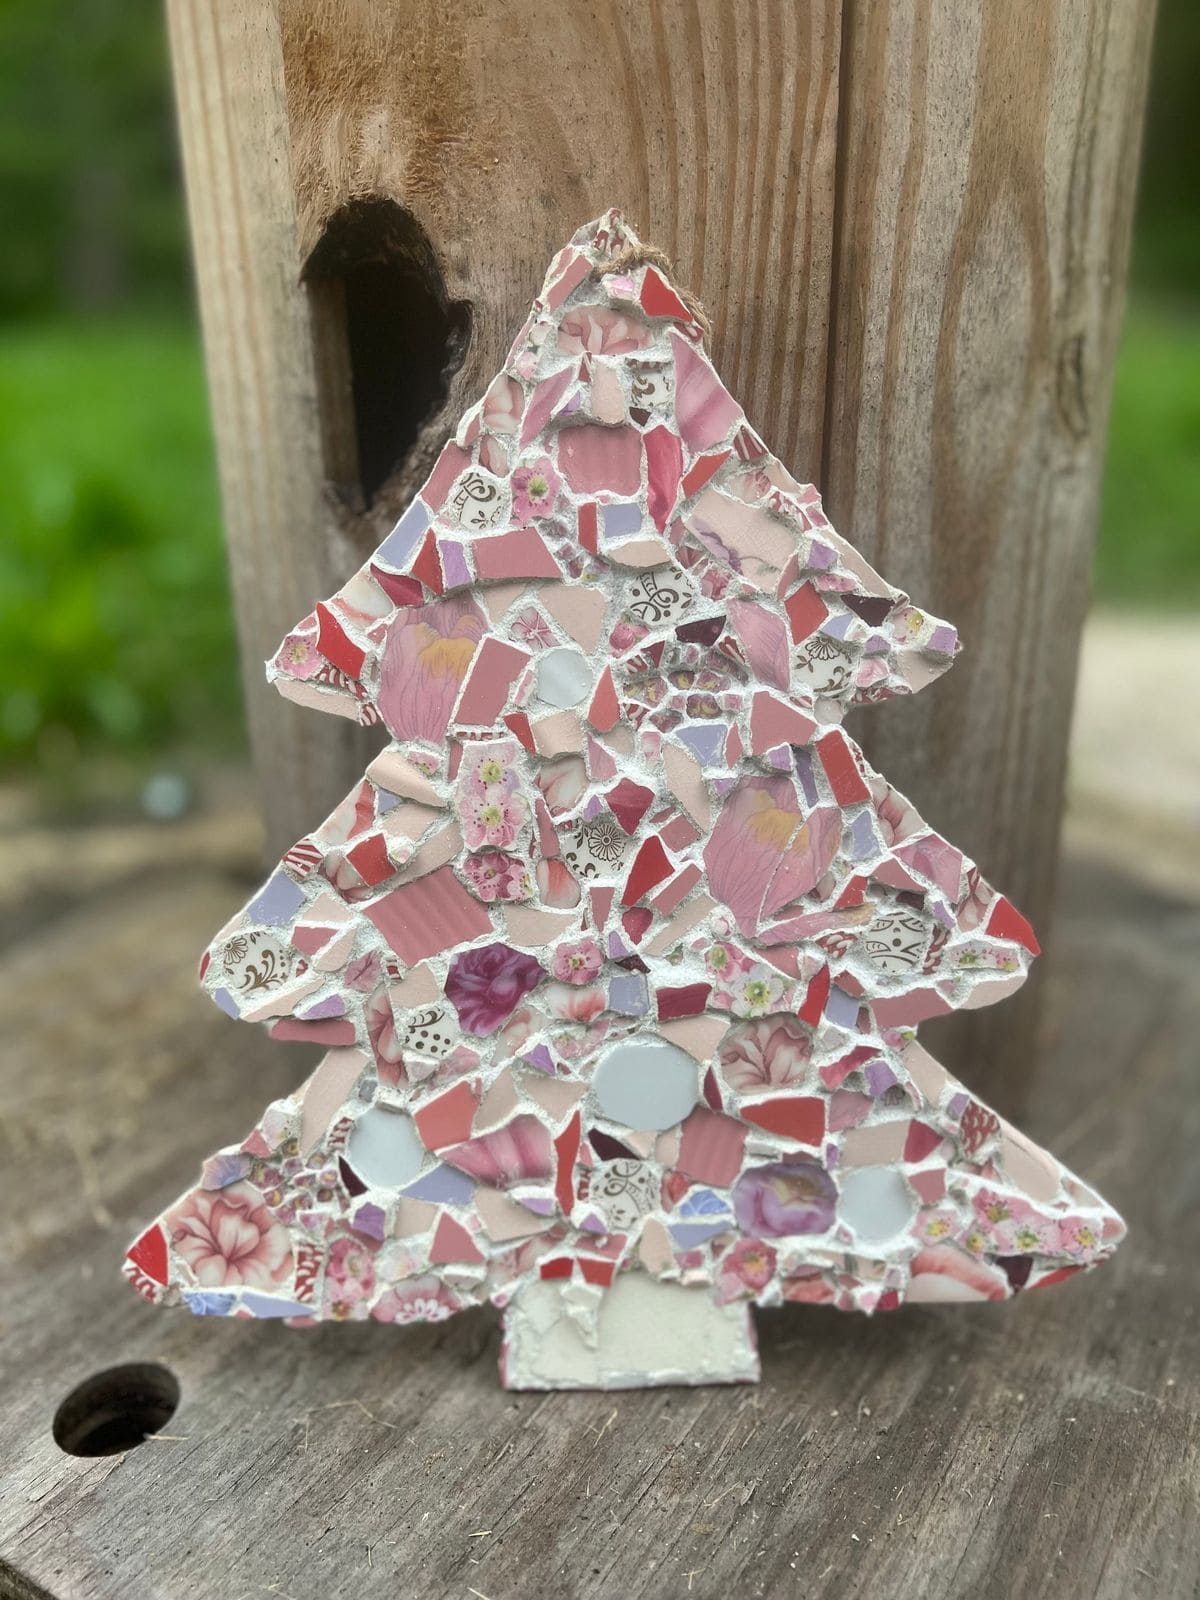
Wow, this festive Christmas tree is brought to life with shimmering pink, red, and floral-patterned plate fragments, giving it a charming and nostalgic look.
Perfect for holiday displays, mantle decor, or as a handmade gift, it’s a joyful way to upcycle broken crockery into something magical.
Materials Needed
- 1 wooden Christmas tree cutout (height: 12-15 inches, thickness: 0.5 inch)
- 30-40 broken plate pieces (sizes: 0.5-2 inches, mixed floral & pink/red tones)
- Strong craft adhesive (approx. 2–3 oz)
- White or light-colored sanded grout (1 cup)
- Grout spreader or old credit card (2-3 inches wide)
- Small sponge or soft cloth
- Protective gloves and safety glasses
- Optional: clear sealant spray
Step-by-step Guide
Step 1: Lightly sand the wooden tree to ensure a smooth, clean surface.
Step 2: Arrange your plate pieces on the tree shape without glue, balancing colors and patterns for an even look.
Step 3: Glue the pieces in place, starting from the edges and working inward. You should leave small gaps between pieces for grout.
Step 4: Let the adhesive dry for 12-24 hours before moving to the next step.
Step 5: Mix grout according to package instructions and spread it evenly, pressing it into all gaps.
Step 6: Wipe away excess grout with a damp sponge, being careful not to dislodge the plate pieces.
Step 7: Allow grout to dry for 24 hours, then polish the surface with a soft cloth to remove haze.
Step 8: Finally, spray with clear sealant if you want extra durability, especially for outdoor use.
#4. Broken Plate Kitchen Backsplash
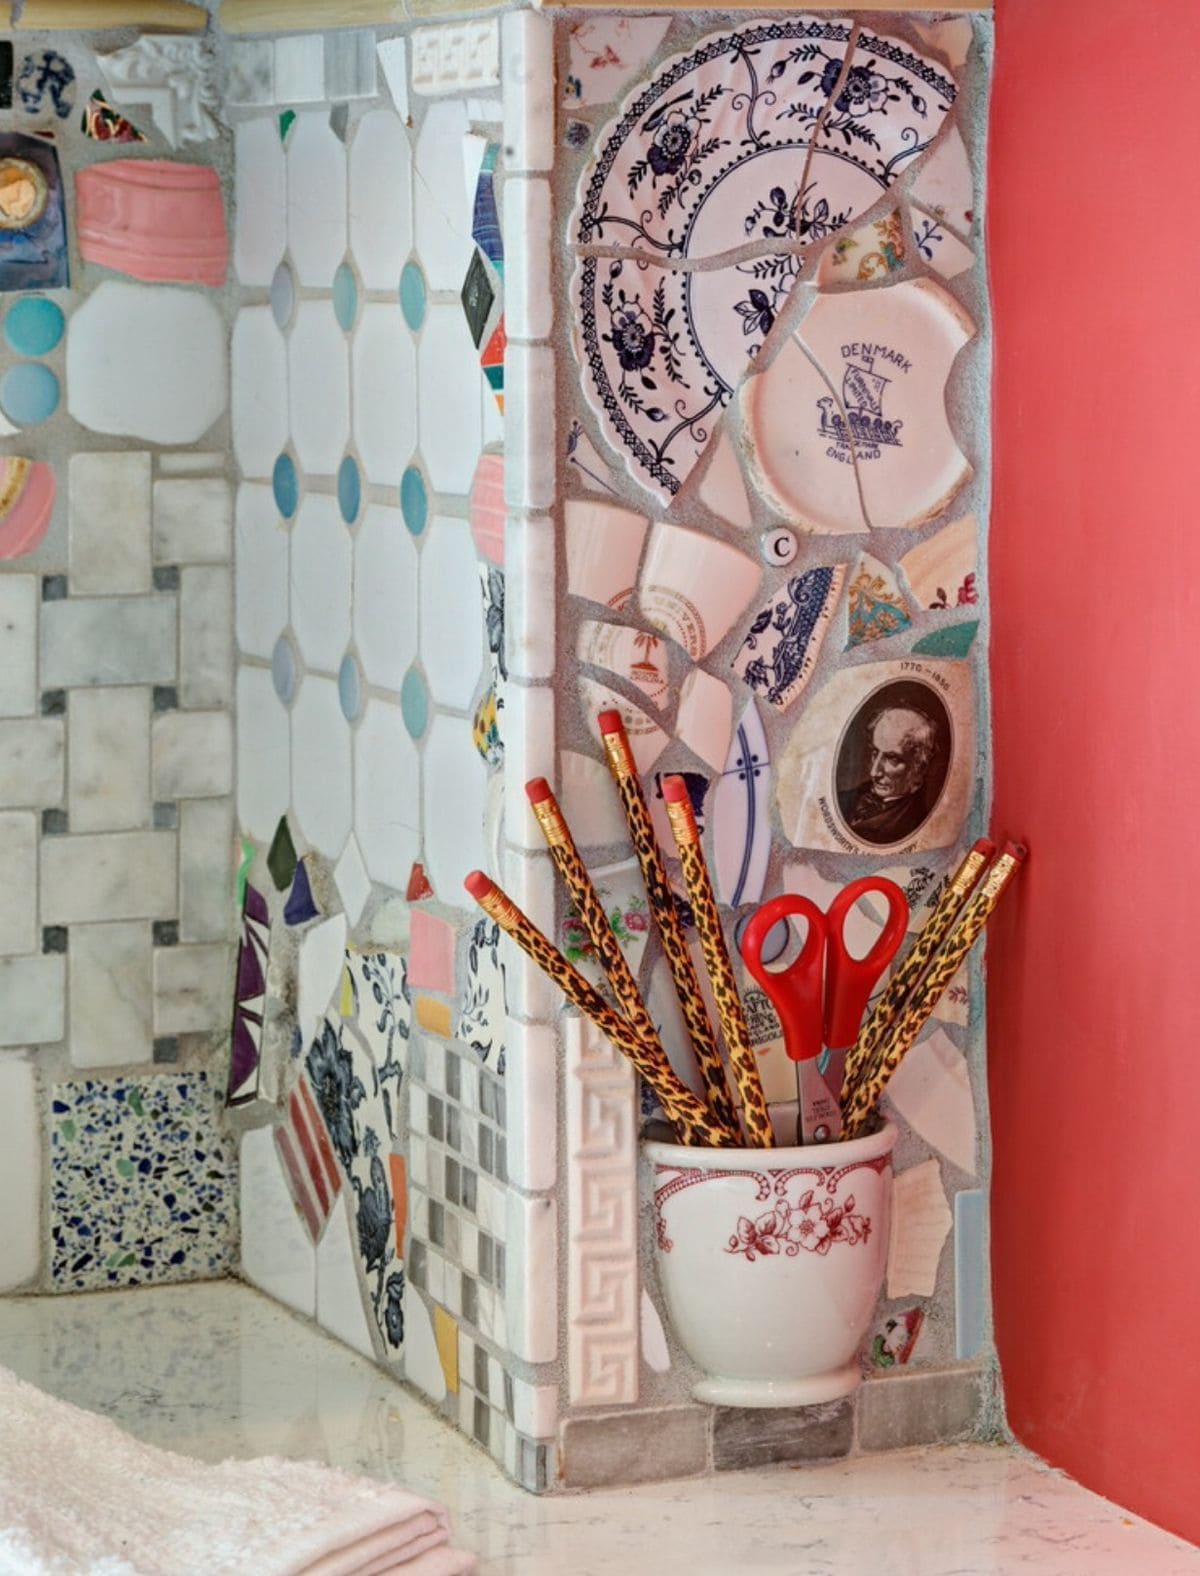
How about giving your kitchen a vibrant, story-filled makeover with a broken plate backsplash?
This design blends colorful ceramics, patterned china, and unique plate fragments to create a patchwork of memories. Each piece brings its own history and charm, making the backsplash both a functional surface and a conversation starter.
Materials Needed
- Broken plate pieces in assorted colors and patterns (sizes: 0.5-5 inches)
- Tile adhesive or mastic (approx. 1 lb per 10 sq ft)
- Grout in a color of your choice (1 lb per 10 sq ft)
- Grout float or spreader
- Bucket and sponge
- Tile nippers
- Protective gloves and safety glasses
Step-by-step Guide
Step 1: Prepare and clean the backsplash area, removing grease or dust.
Step 2: Arrange plate fragments on the surface to plan your design before gluing.
Step 3: Apply tile adhesive and press each piece firmly into place. Let adhesive set for 24 hours before grouting.
Step 4: Spread grout over the surface, ensuring all gaps are filled. Then wipe away excess grout with a damp sponge, rinsing often.
Step 5: Allow grout to cure for 24 hours, then buff tiles to restore shine.
#5. Broken China Pig Wall Art
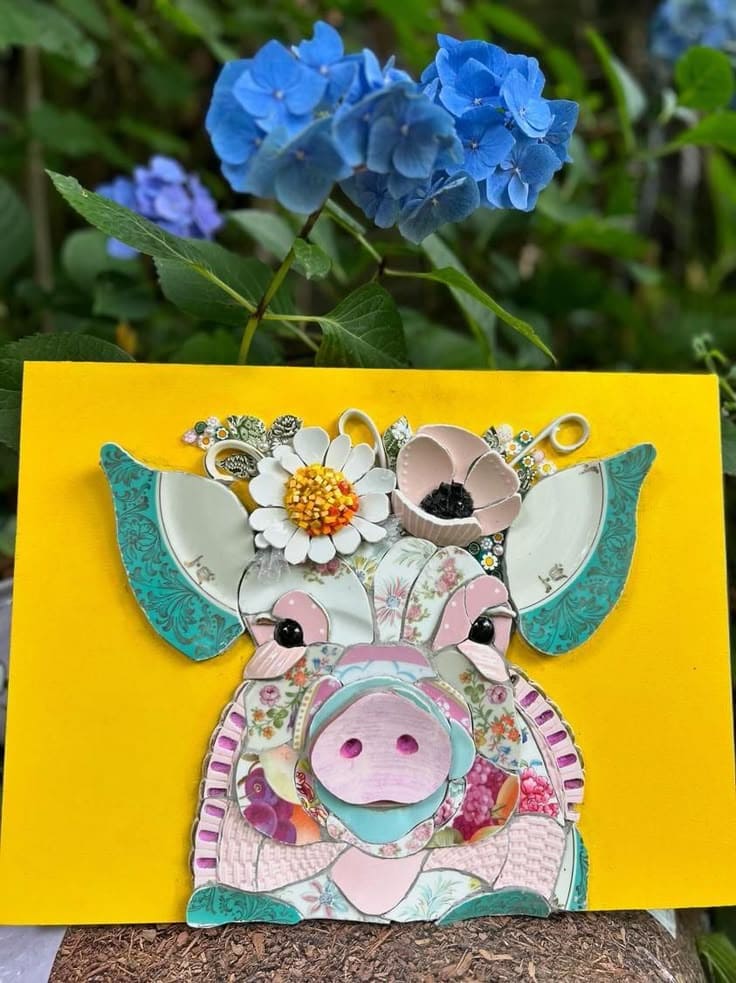
Wow, this vibrant pig mosaic blends playful charm with artistic detail, using pastel and floral-patterned china pieces arranged into a cheerful farmyard friend.
Plus, the bright yellow background makes the design pop, while the flower crown adds a touch of whimsy perfect for kitchens, patios, or garden walls.
Materials Needed
- 1 wooden board or canvas (size: approx. 12 × 16 inches)
- 25-35 pieces of broken china (various sizes: 1-3 inches, pastel & floral patterns)
- 1-2 ceramic flower embellishments (optional for crown)
- Strong craft adhesive (approx. 2-3 oz)
- Sanded grout (1 cup)
- Grout spreader or old credit card (2-3 inches wide)
- Small sponge or soft cloth
- Acrylic paint (yellow or preferred background color, 2-3 oz)
- Paintbrush (1-2 inches wide)
- Protective gloves and safety glasses
Step-by-step Guide
Step 1: Paint the wooden board with your chosen background color and let it dry completely.
Step 2: Sketch a pig outline on the board, marking key features like the snout, ears, and flower crown.
Step 3: Arrange the broken china pieces within the outline, grouping similar colors and patterns for each section.
Step 4: Once satisfied with the layout, glue the pieces down and let the adhesive cure for 12-24 hours.
Step 5: Prepare grout according to package instructions and spread it over the surface, pressing it into gaps between pieces.
Step 6: Wipe away excess grout with a damp sponge, taking care not to disturb the china placement.
Step 7: Let the grout dry for 24 hours, then polish the surface with a soft cloth to remove haze.
Step 8: Attach hanging hardware if you plan to display it on a wall.
#6. Hand-Painted Snail and Mushroom Broken Plate Art
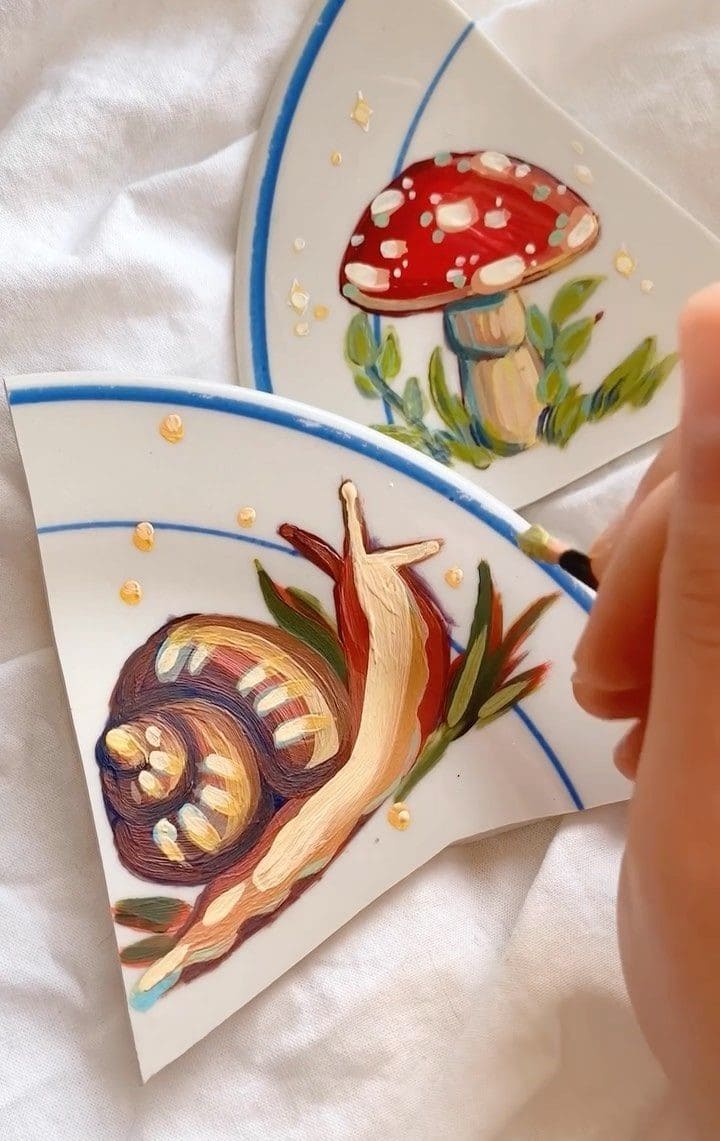
Sometimes, a broken plate can hold more magic than a perfect one. These shards become tiny canvases for whimsical nature scenes, a snail with a spiraled shell in earthy tones, and a red toadstool straight out of a fairy tale.
The hand-painted strokes give them life, making each piece feel like it’s been plucked from a woodland storybook.
Bonus, you can display them on a shelf, frame them, or even turn them into part of a larger mosaic. This is a craft that celebrates both imperfection and imagination.
Materials Needed
- 2–3 broken ceramic plate pieces (about 4″-6″ each)
- Acrylic paints (red, green, brown, beige, white, and yellow)
- Fine-tip paintbrushes (sizes 0-4)
- Clear acrylic sealer spray
- Soft cloth for cleaning
- Gloves
Step-by-step Guide
Step 1: Clean the plate pieces thoroughly and dry them.
Step 2: Sketch your snail and mushroom design lightly with a pencil.
Step 3: Apply base colors first, then layer details like shell spirals and mushroom spots.
Step 4: Let the paint dry fully before sealing with a clear acrylic spray.
Step 5: Display them as art pieces or incorporate them into a mixed mosaic.
#7. Broken China Cow Scene Hanging Plaque
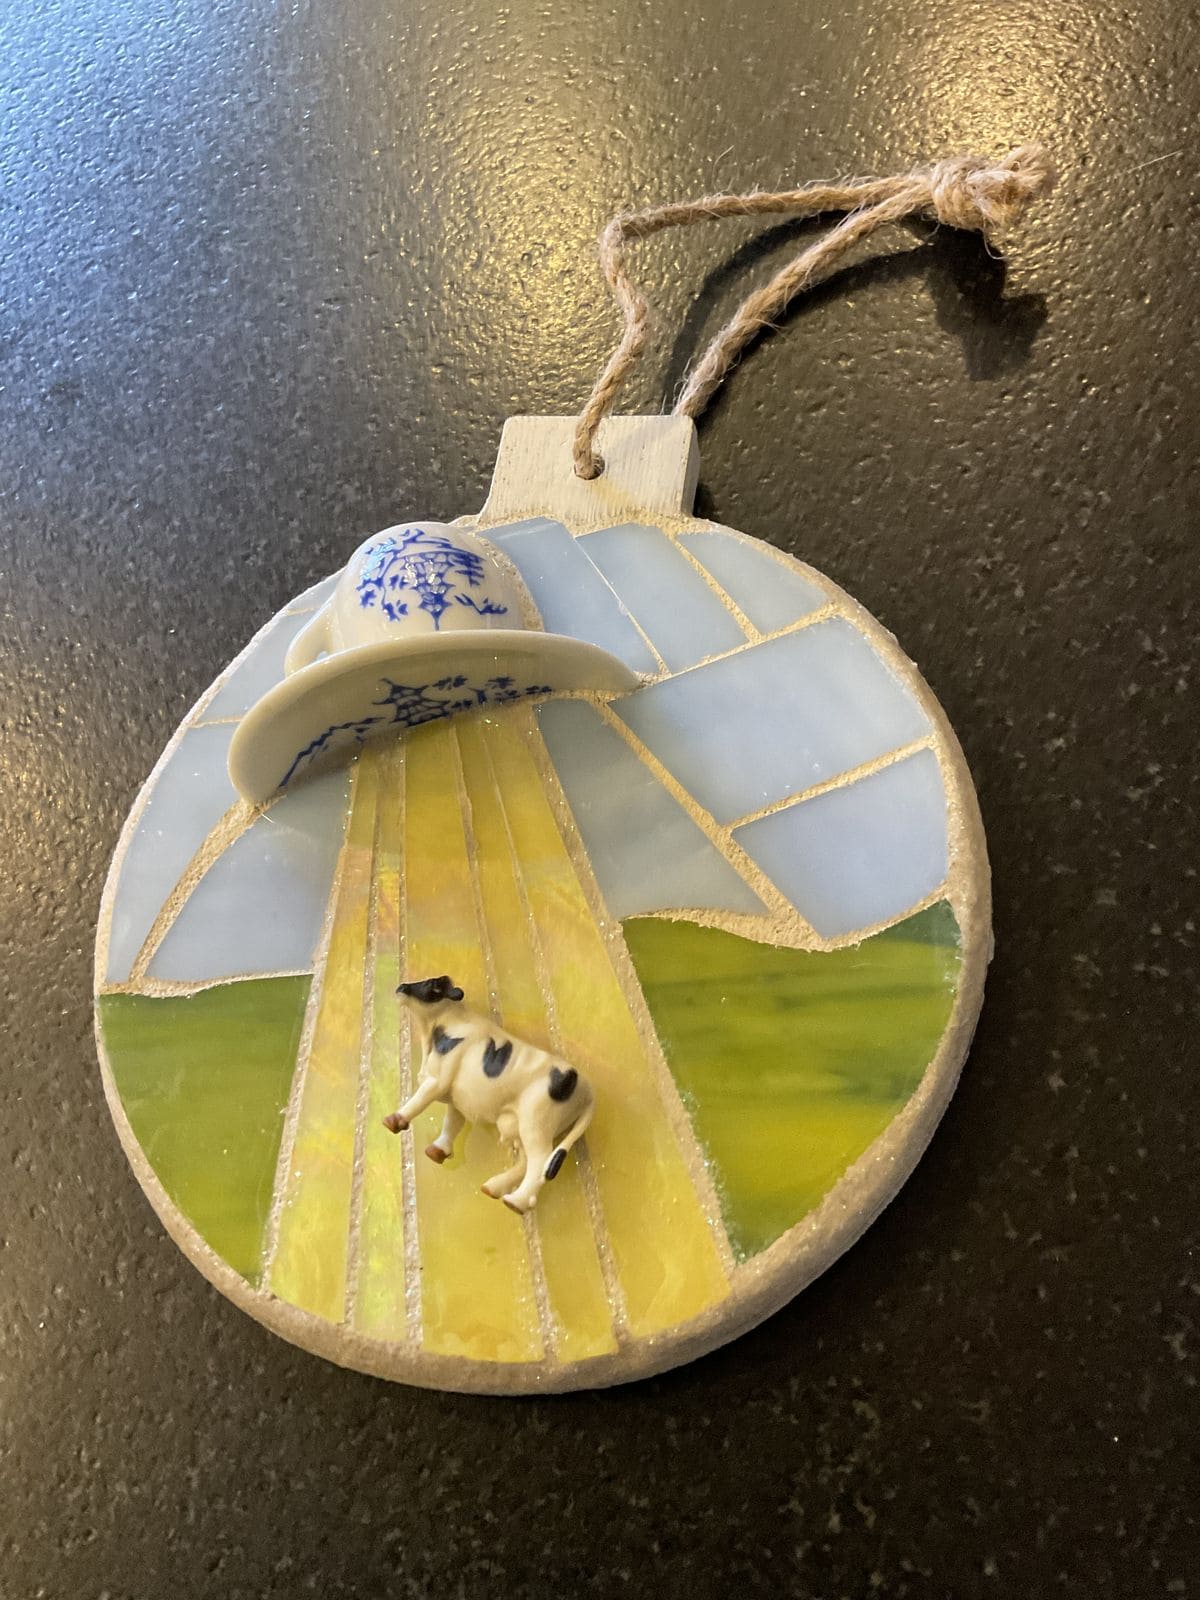
This whimsical plaque turns broken china into a fun, story-like scene. Featuring a miniature cow grazing in a sunlit meadow with a china teacup spilling golden rays, it’s a conversation starter for any kitchen, patio, or farmhouse-style space.
Specially, the mix of stained glass, china, and tiny figurines makes it both artistic and playful.
Materials Needed
- 1 round wooden plaque (6-8 inches diameter, with pre-drilled hanging hole)
- 6-8 pieces of broken china (1-3 inches)
- 6-8 stained glass pieces (cut to fit sky and meadow shapes)
- 1 miniature cow figurine (approx. 1-1.5 inches long)
- Waterproof craft adhesive (2-3 oz)
- Sanded grout (1 cup)
- Protective gloves
- Grout spreader (3-4 inches wide)
- Small paintbrush (optional, for adhesive application)
- Outdoor sealant (2-4 oz)
- Twine or jute string (8-10 inches)
Step-by-step Guide
Step 1: Prepare the plaque by cleaning and lightly sanding its surface for better adhesion.
Step 2: Arrange the stained glass pieces to create a background including blue for sky, yellow for sunbeams, green for the meadow. Then dry-fit them before gluing.
Step 3: Glue the stained glass pieces in place, starting from the top (sky) and working downward to the meadow. You should leave small grout gaps between pieces.
Step 4: Attach the broken china teacup piece at the top, tilted so the yellow sunbeam glass appears to flow from it.
Step 5: Secure the miniature cow in the meadow area with adhesive. Then allow all glued pieces to set for 24 hours.
Step 6: Mix grout and carefully spread it over the design, filling the gaps between glass and china. Avoid covering the cow figurine.
Step 7: Wipe away excess grout with a damp sponge and let it cure for another 24 hours. Then apply a thin coat of outdoor sealant for weather protection. Let dry completely.
Step 8: Thread twine through the hole and tie securely for hanging.
#8. Broken Plate Mosaic Santa & Christmas Tree Figures

These tall, whimsical mosaic figures bring holiday cheer with their colorful charm.
Santa is dressed in red and white broken plate pieces with a cheerful belt detail, while the Christmas tree sparkles in shades of green with circular ornament accents. Perfect for table displays, mantels, or entryways, these pieces are a joyful way to transform old crockery into festive art.
Materials Needed
- 2 wooden or MDF cone shapes (height: 14-16 inches, base width: 4 inches)
- 50-60 broken plate pieces for Santa (sizes: 0.5-2 inches, red & white patterns)
- 50-60 broken plate pieces for the tree (sizes: 0.5-2 inches, green patterns)
- 6-8 small round mirror or glass gems
- 2 googly eyes (diameter: 0.5 inch) for Santa
- Strong craft adhesive (approx. 3-4 oz)
- White, black, and green sanded grout (1 cup each)
- Grout spreader or old credit card (2-3 inches wide)
- Small sponge and soft cloth
- Protective gloves and safety glasses
Step-by-step Guide
Step 1: Lightly sand the cone shapes to prepare the surface, then wipe off dust.
Step 2: Lay out your broken plate pieces for each figure, organizing by color to make the design process easier.
Step 3: For Santa, start gluing red pieces for the coat, white pieces for the beard and trim, and a black strip for the belt area. Add googly eyes near the top.
Step 4: For the tree, glue green pieces in a random but balanced pattern, adding mirror or glass gems as ornaments.
Step 5: Let the adhesive dry for at least 12–24 hours before grouting.
Step 6: Apply the grout, pressing it into all gaps. Use white grout for Santa’s beard section, black for the belt, and green or dark grout for the tree to make colors pop.
Step 7: Wipe away excess grout with a damp sponge, then let it cure for 24 hours.
Step 8: Buff the surface with a soft cloth to remove haze, and display your festive creations proudly.
#9. Framed Broken China Art
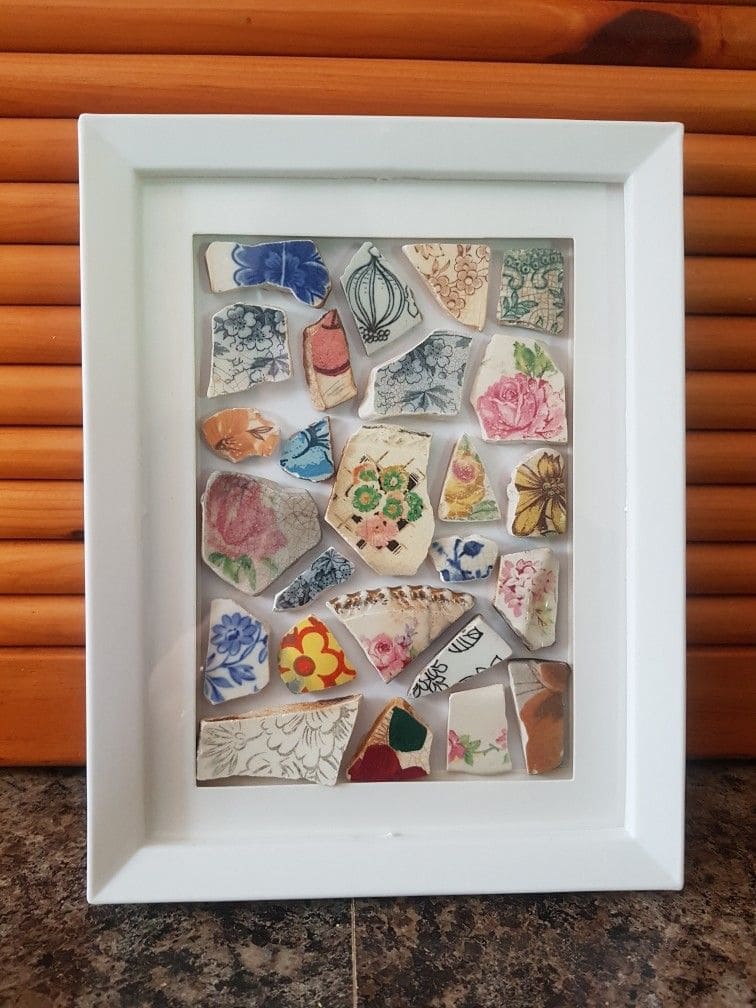
This project not only preserves sentimental pieces but also transforms them into a striking wall display. By arranging shards in a balanced, artistic way, you create a piece of decor that blends color, texture, and nostalgia effortlessly.
Materials Needed
- Assorted broken china pieces
- Shadow box or deep-set picture frame (size of your choice)
- Strong craft adhesive
- Protective gloves
- Optional: grout and spreader
- Cardboard or backing board to fit frame
Step-by-step Guide
Step 1: Select broken china pieces with varied colors and patterns to create visual interest.
Step 2: Arrange the shards on the backing board inside your frame until you find a pleasing layout.
Step 3: Glue each piece securely to the board, leaving small gaps between them for a mosaic effect.
Step 4: If desired, fill the gaps with grout for a more unified finish, then wipe away excess with a damp cloth.
Step 5: Allow adhesive to dry completely before sealing the frame. Now you can display your new artwork in a favorite room to add character and charm.
#10. Broken China Angels
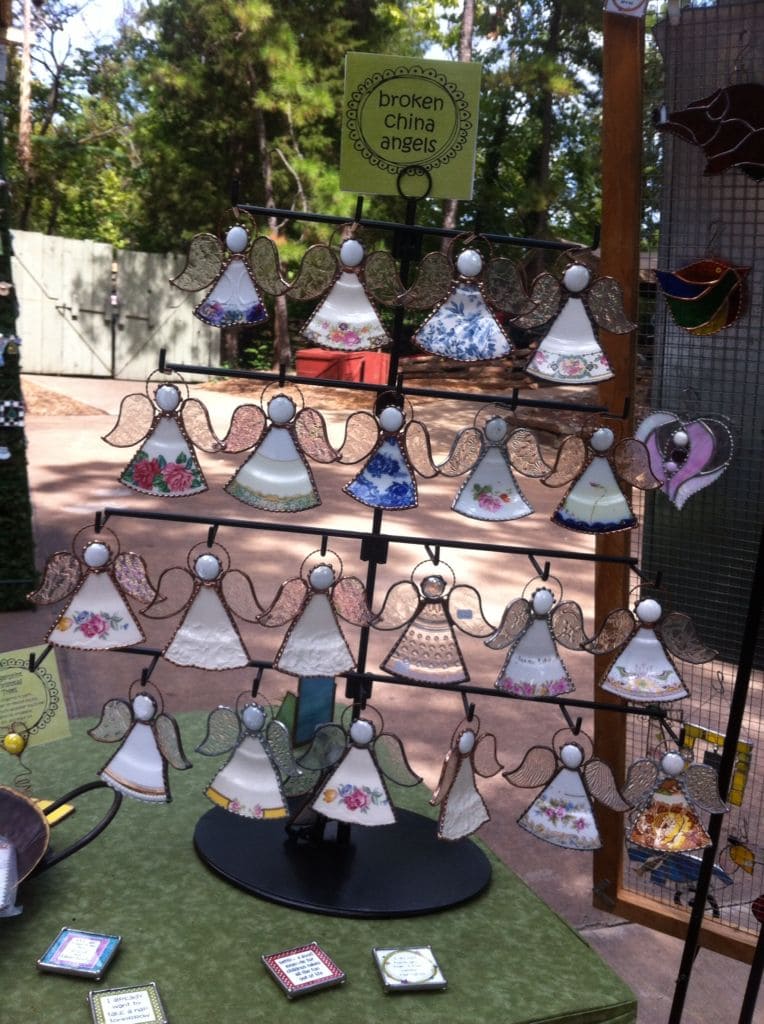
How about turning treasured but chipped china into charming angel ornaments that radiate nostalgia and grace?
Each angel is formed using pieces of patterned china for the dress, delicate wire or metal for the wings, and a bead or smooth ceramic piece for the head.
These make heartfelt gifts, Christmas tree decorations, or year-round reminders of love and memory. You can match patterns for a refined look or mix and match shards for a more whimsical style.
Materials Needed
- Broken china pieces with floral or decorative patterns
- Glass cutter or tile nippers
- Protective gloves and goggles
- Metal wire or soldering supplies
- Round bead or marble
- Strong adhesive
- Small metal loop or hook
- Optional: copper foil tape (if soldering)
Step-by-step Guide
Step 1: Select a piece of china with a pattern you love for the angel’s dress, then cut it into a triangular dress shape.
Step 2: Cut or form the wings from thin metal wire, copper foil, or other decorative material, shaping them evenly on both sides.
Step 3: Attach the wings to the top of the dress piece using adhesive or by soldering if you’re experienced with stained glass techniques.
Step 4: Glue a round bead, button, or marble above the wings to serve as the angel’s head.
Step 5: Add a hanging loop at the back so it can be displayed on a tree, wall, or hook. Then allow the piece to dry or cure fully before handling.
Tip: If you want a polished stained-glass look, wrap the china edges in copper foil and solder for a beautiful metallic finish.
#11. Broken Plate & Bead Embellished Cross
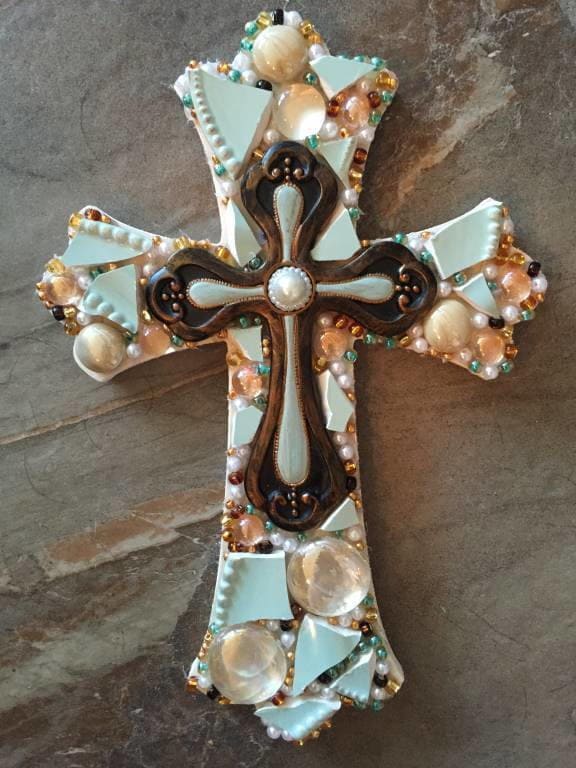
There’s something deeply comforting about a handmade cross that blends faith with artistry. This piece turns simple shards of soft aqua plates into a luminous backdrop, accented by seashells, pearls, and glistening beads.
At its heart rests an ornate metal cross, grounding the design with vintage charm. It’s a project that feels both peaceful and joyful, perfect for honoring a loved one, decorating a prayer space, or gifting to someone dear.
Materials Needed
- 1 wooden or MDF cross base (12″ tall)
- 10-12 broken plate pieces in soft pastel tones
- 8-10 decorative beads and faux pearls
- 4-5 small seashells
- 1 ornate metal cross embellishment (6″ tall)
- Tile adhesive or strong craft glue
- Clear sealant spray
- Protective gloves
Step-by-step Guide
Step 1: Arrange the broken plate pieces over the cross base, leaving room for the metal embellishment in the center.
Step 2: Glue each plate shard in place, working outward from the center to the edges.
Step 3: Add seashells, beads, and pearls into the remaining gaps for a layered, textured look.
Step 4: Secure the ornate metal cross on top, ensuring it’s centered and flush.
Step 5: Once dry, apply a clear sealant to protect the surface and give it a soft sheen.
#12. Broken China Mosaic Light Switch Cover
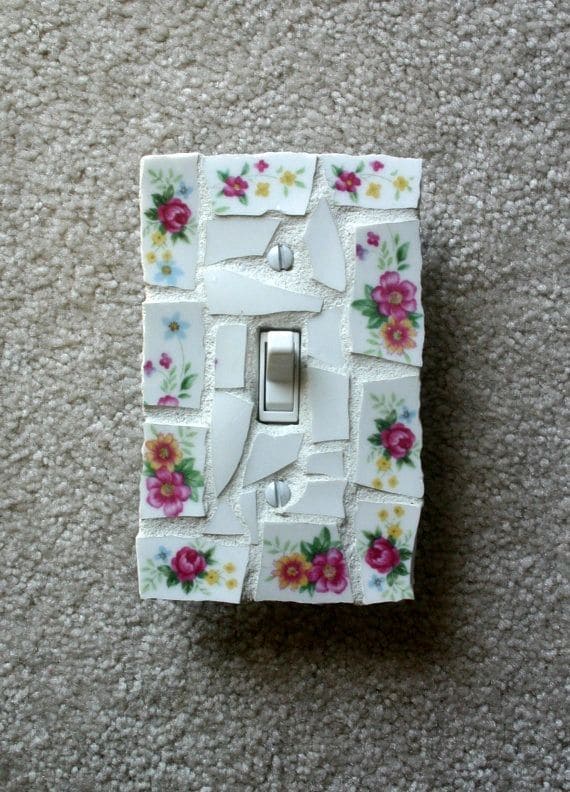
This charming project transforms a plain light switch cover into a vintage-inspired focal point using broken china pieces. The floral patterns add a touch of cottagecore elegance, making any room feel warmer and more personalized.
Materials Needed
- 1 plastic or metal light switch cover (standard size: 2.75 × 4.5 inches)
- 8-12 pieces of broken china (1-2 inches each, floral or patterned)
- Strong craft adhesive (approx. 1-2 oz)
- Sanded grout (½ cup)
- Grout spreader or old credit card (2-3 inches wide)
- Small sponge
- Protective gloves
- Fine-grit sandpaper (optional)
- Small flathead screwdriver
Step-by-step Guide
Step 1: Remove the switch cover using a flathead screwdriver and place it on a flat work surface. If your china pieces have sharp edges, lightly sand them for safety.
Step 2: Arrange the china pieces around the switch opening, leaving small gaps for grout. Adjust until you like the layout.
Step 3: Glue each piece onto the cover and let the adhesive cure for at least 12 hours.
Step 4: Mix grout according to package instructions and spread it evenly over the surface, pressing it into the gaps.
Step 5: Wipe away excess grout with a damp sponge, being careful not to disturb the china placement.
Step 6: Let the grout set for 24 hours, then buff any haze off the china with a soft cloth.
#13. Mosaic Garden Trowel
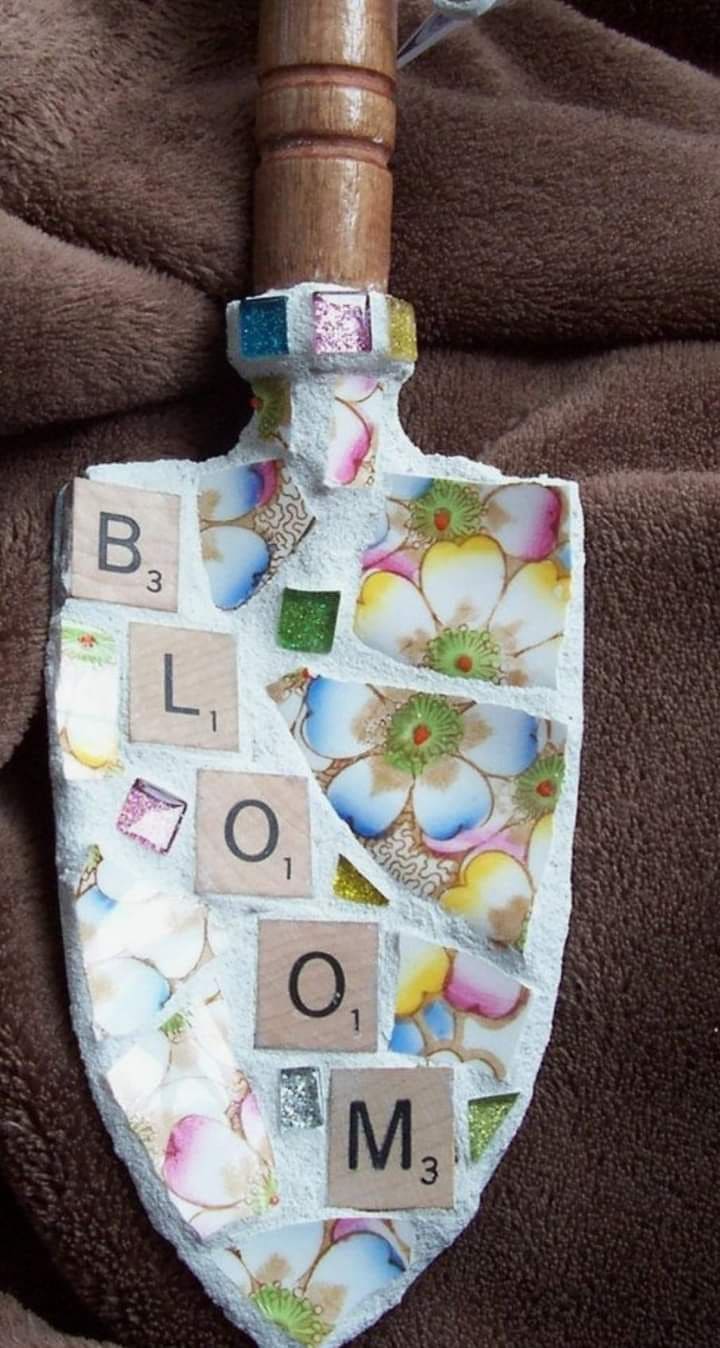
It’s great to give an old garden trowel a second life by turning it into a cheerful piece of garden art. This design uses floral china shards, glittery glass tiles, and Scrabble-style letter tiles spelling “BLOOM” for a playful touch.
Perfect for hanging on a fence, shed door, or as a whimsical gift for a garden lover, this piece celebrates creativity and sustainability.
Materials Needed
- Old garden trowel (cleaned and rust-free)
- Broken plate pieces with floral designs
- Scrabble tiles or wooden letter tiles (B, L, O, O, M)
- Small glass tiles or beads
- Tile adhesive
- Tile nippers
- Protective gloves and goggles
- Grout (white or light color)
- Damp sponge
Step-by-step Guide
Step 1: Clean the trowel thoroughly, sanding lightly if needed to create a surface the adhesive can grip.
Step 2: Arrange your floral china shards on the blade, leaving space for the letter tiles spelling “BLOOM.”
Step 3: Use tile nippers to shape the plate pieces so they fit snugly and evenly along the curved blade.
Step 4: Glue down the china pieces first, then add the letter tiles and glass accents. Let the adhesive dry fully before applying grout over the design, pressing it into all gaps.
Step 5: Wipe away excess grout with a damp sponge, revealing the bright, colorful details underneath.
Step 6: Allow to cure completely, then hang or display your trowel in a decorative garden spot.
#14. Mixed-Media Broken Plate and Teacup Wall Art
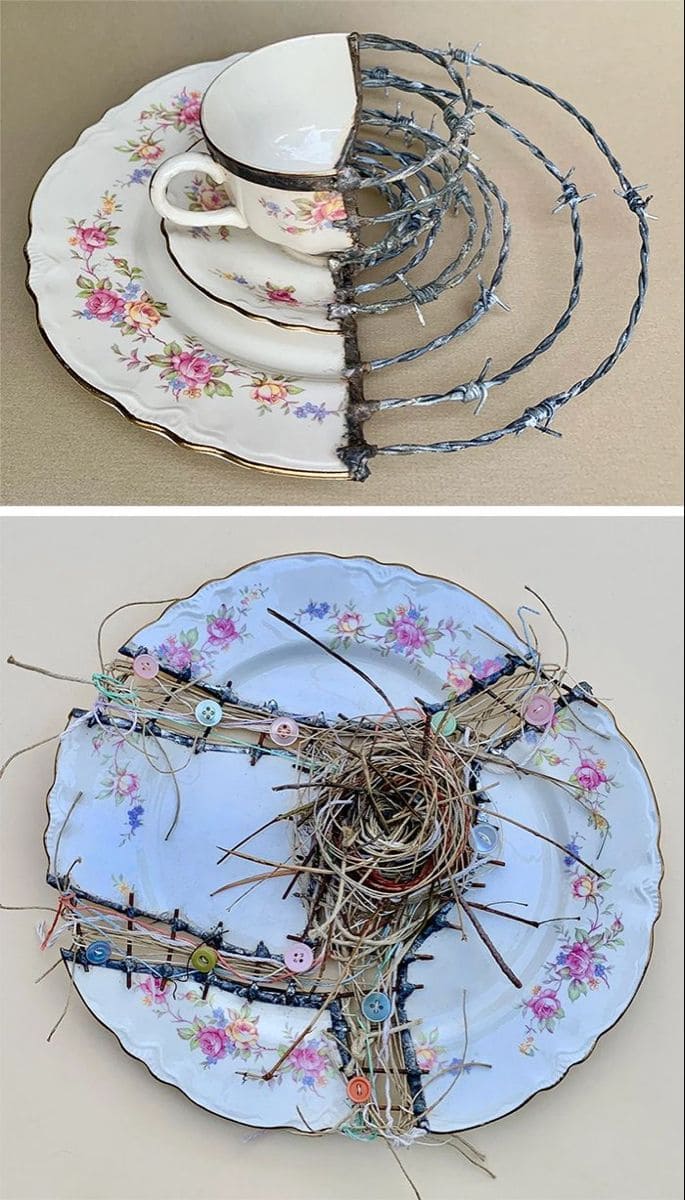
This project transforms delicate china into an unexpected piece of wall art that tells a story.
The first design uses a half-cut teacup and plates, joined by arcs of barbed wire, giving a contrast between fragility and strength. The second features a plate with a twig cross adorned with pastel buttons, leading to a central bird’s nest.
Both pieces blend softness and rugged texture, making them as much about emotion as decoration. They’re perfect for gallery walls or as statement conversation starters.
Materials Needed
- 1 floral china plate (10″-12″)
- 1 matching teacup and saucer (cut in half)
- 12″-18″ barbed wire or rustic wire
- 12 small twigs (6″-8″ long)
- 12 assorted buttons (0.3″-0.5″)
- Natural raffia or thin vine for nest (about 12″ length)
- Heavy-duty epoxy adhesive
- Protective gloves
- Wire cutters and pliers
Step-by-step Guide
Step 1: Put on gloves to safely handle all sharp edges. If your teacup and saucer aren’t already cut, use a tile saw or ask a local ceramics artist for assistance.
Step 2: For the first design, arrange the teacup and saucer halves on one side of the plate. Then position arcs of barbed wire to extend outward, marking where they’ll attach.
Step 3: Use pliers to shape and trim the barbed wire. Glue each arc firmly in place, letting them curve gently for a layered effect. Hold in place with masking tape until dry.
Step 4: For the second design, lay twigs in a cross shape over the floral plate. Now secure them with thin wire, then wrap with raffia for a natural look.
Step 5: Glue a small bird’s nest at the center of the twig cross, tucking in loose ends to keep it tidy. You can add pastel buttons along the twigs for a charming, whimsical touch.
Step 6: Allow everything to dry for at least 24 hours before hanging.
#15. Broken China Mosaic Birdhouse
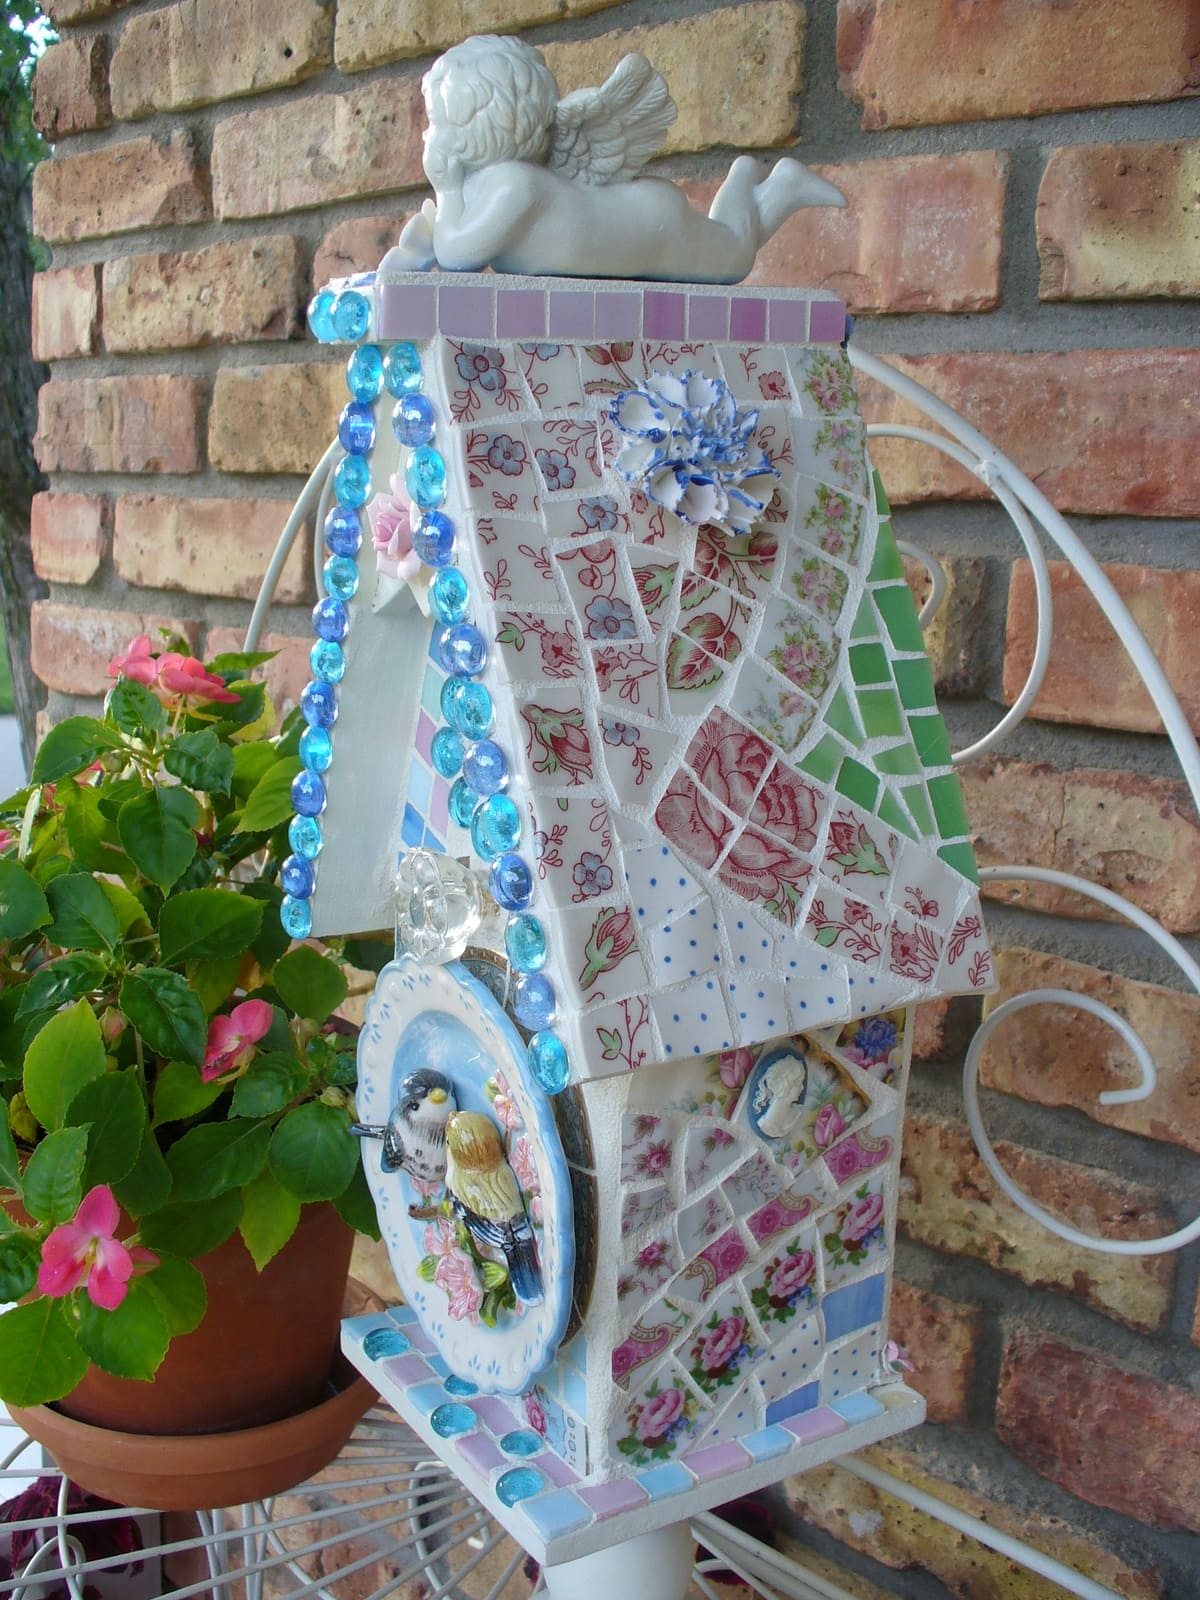
What about giving an old birdhouse a whimsical makeover with a patchwork of broken china?
This project blends art and function, creating a charming outdoor accent that doubles as a cozy shelter for birds. The combination of floral shards, glass beads, and 3D embellishments like figurines or medallions adds layers of character, turning a plain structure into a unique garden focal point.
Materials Needed
- Wooden birdhouse
- Assorted broken china pieces
- Glass beads or cabochons (optional)
- Tile adhesive
- Grout and spreader
- Protective gloves
- Small decorative figurines or medallions (optional)
- Clear outdoor sealant
Step-by-step Guide
Step 1: Clean the birdhouse thoroughly and lightly sand the surface for better adhesion.
Step 2: Arrange broken china pieces on each panel, mixing colors, patterns, and shapes for visual interest.
Step 3: Glue each piece in place, pressing gently to secure. Once adhesive sets, apply grout between the pieces, smoothing with a spreader.
Step 4: Wipe away excess grout with a damp cloth before it fully hardens.
Step 5: Add beads, medallions, or figurines for extra charm, then seal the entire birdhouse with a clear outdoor sealant to protect it from the weather.
#16. Broken Plate Wall Planter Board
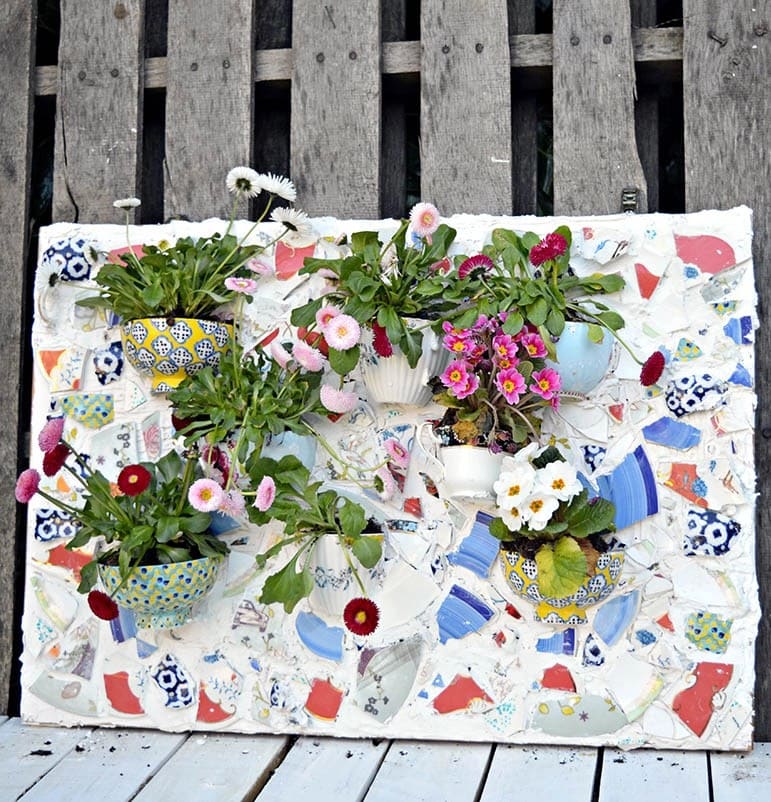
There’s something irresistibly charming about this planter board as it feels like a little patch of a secret garden you can hang on your wall.
The shards of colorful plates form a lively mosaic backdrop, and the upturned bowls become cheerful cradles for blooms. Each vessel tells a different story, holding daisies, primroses, or whatever flowers you choose.
Materials Needed
- 1 sturdy wooden board (24″×18″)
- 20-25 broken ceramic plate pieces in assorted colors
- 5-6 deep bowls or teacups (about 4-5″ diameter)
- Strong outdoor adhesive or tile adhesive
- 1 lb white grout
- Protective gloves
- Safety goggles
- Potting soil
- Small flowering plants or herbs
Step-by-step Guide
Step 1: Arrange your broken plate shards across the board to create a colorful mosaic pattern.
Step 2: Position the bowls or cups in spaced intervals, tilting slightly outward for easy planting.
Step 3: Attach all pieces with strong outdoor adhesive, letting them dry completely. Then spread grout between the shards, wiping away excess with a damp sponge.
Step 4: Once the grout is dry, fill each bowl with potting soil and your chosen plants.
#17. Mosaic Mirror Frame with Words
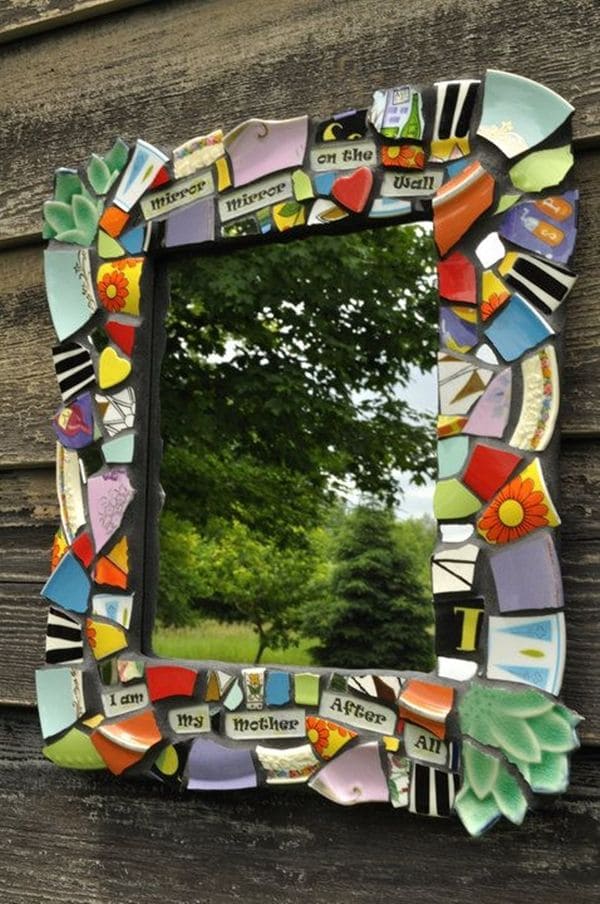
This piece feels like a story told around the edges of a reflection. The playful mix of colors, patterns, and hand-picked phrases turns a simple mirror into something personal and whimsical.
Every shard feels like it holds a memory like florals from a favorite mug, stripes from a dish long gone, and pops of vibrant green and red that pull the eye in.
Plus, the scattered words add warmth and character. Hang it where the light can dance across the glossy surfaces, and you’ll catch yourself smiling every time you pass by.
Materials Needed
- 1 plain mirror with wooden frame (12″×16″)
- 15-20 broken ceramic plate pieces in assorted colors and patterns
- 10 lettered tile or ceramic fragments
- Tile adhesive (1 tube)
- Grout (1 lb, neutral or dark)
- Protective gloves
- Safety goggles
Step-by-step Guide
Step 1: Lay out the broken plate pieces around the frame to find a pleasing balance of color and pattern.
Step 2: Position the lettered pieces so the words read smoothly around the mirror.
Step 3: Apply tile adhesive to each shard and press firmly into place on the frame.
Step 4: Let the adhesive set, then spread grout between the pieces, wiping away excess with a damp sponge.
Step 5: Once dry, polish the surface with a soft cloth to bring out the shine.
#18. Broken Plate Mosaic Garden Pavers

Why not transform plain concrete pavers into colorful art with this broken plate mosaic project?
Perfect for brightening up your garden pathways or planter bases, these pavers combine floral and patterned plate shards with bold, solid-colored pieces. The result is a playful, weather-resistant surface that adds charm and personality to your outdoor space.
Materials Needed
- 4 concrete pavers (size: 12 x 12 inches, thickness: 1.5 inches)
- Broken ceramic plate pieces in assorted colors and patterns (sizes: 0.5-2 inches)
- Outdoor-grade tile adhesive (approx. 4-5 oz per paver)
- Outdoor-grade grout (0.5 cup per paver)
- Grout float or spreader
- Bucket and sponge
- Protective gloves and safety glasses
- Soft cloth
Step-by-step Guide
Step 1: Clean the surface of the pavers to remove dust or debris. Then arrange the broken plate pieces on each paver, leaving small gaps for grout.
Step 2: Apply adhesive to the back of each piece and press it firmly onto the paver. Let the adhesive dry for 24 hours to ensure a secure bond.
Step 3: Spread grout over the entire surface, pressing it into all gaps.
Step 4: Wipe away excess grout with a damp sponge, rinsing frequently.
Step 5: After the grout cures (about 24 hours), buff the surface with a soft cloth.
#19. Mosaic Initial Letter with Broken Plates
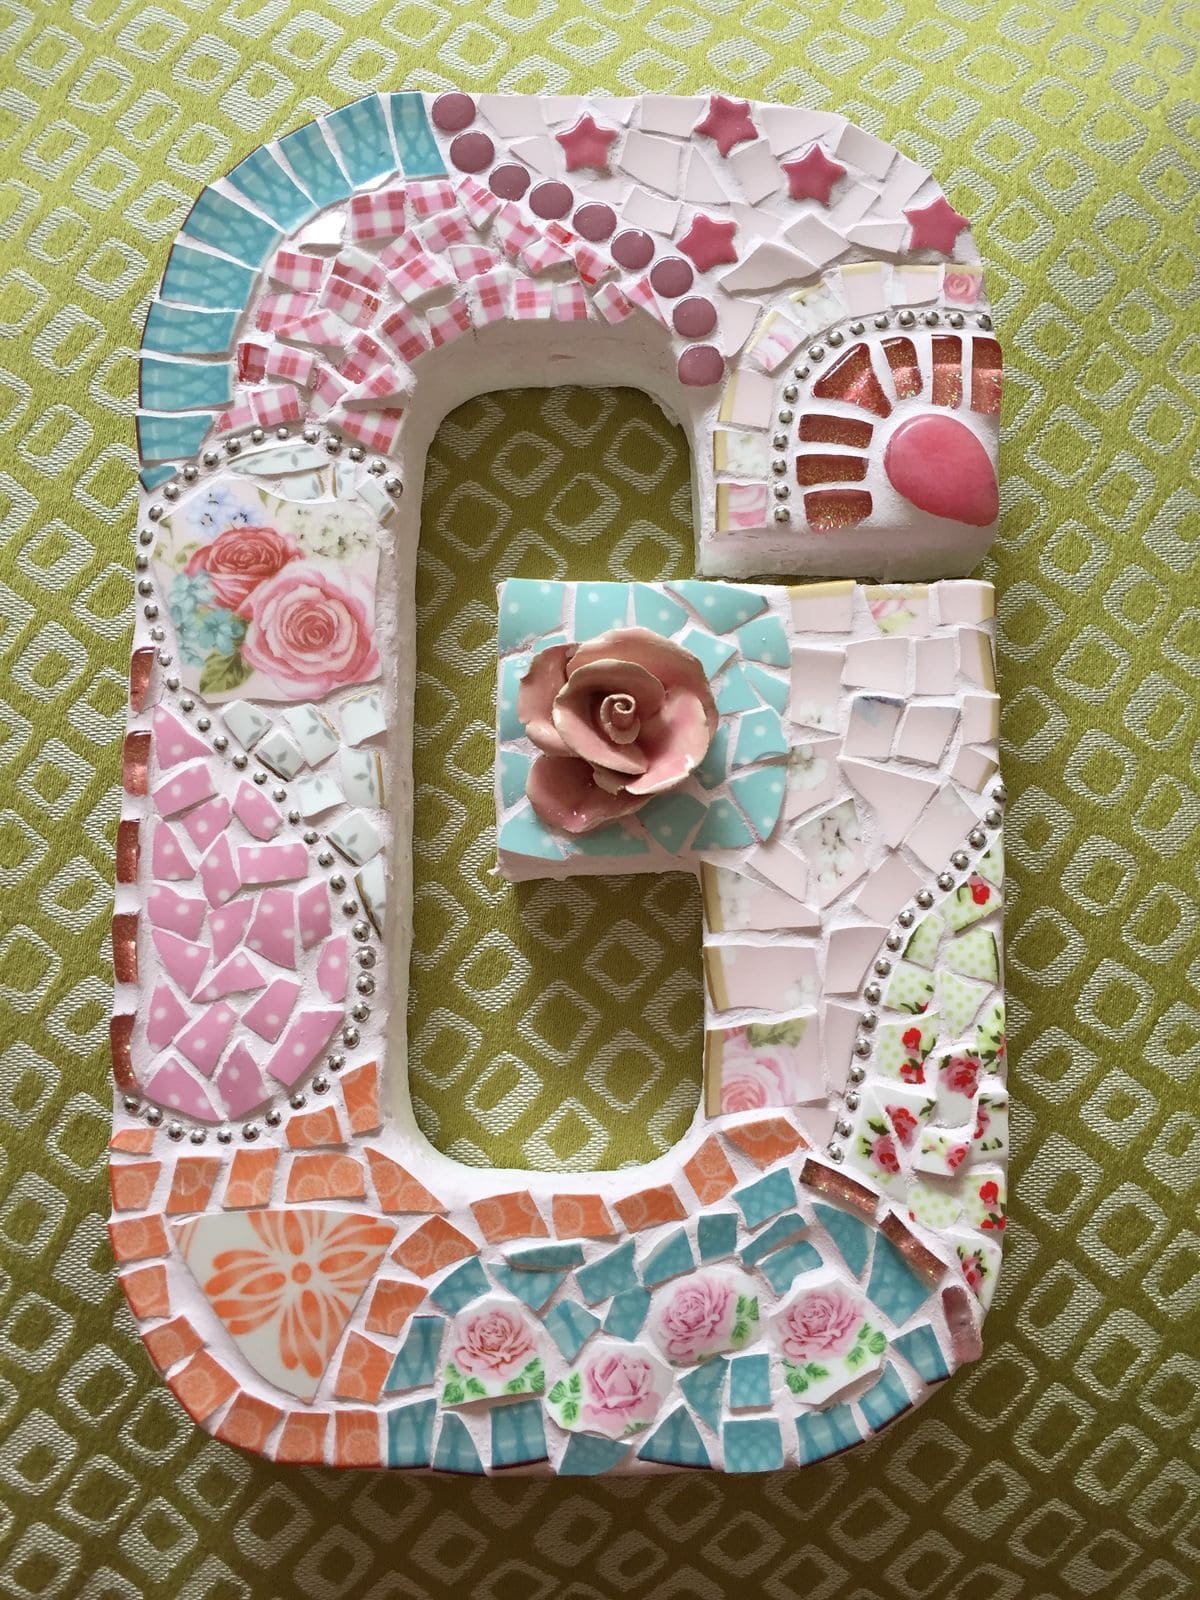
By combining floral china shards, patterned tiles, and tiny embellishments, you can turn a plain wooden or MDF letter into a vibrant piece of wall art.
Perfect for weddings, nursery decor, or as a unique gift, this project lets you recycle broken dishes while telling a story through each pattern and color.
Materials Needed
- Large wooden or MDF letter
- Assorted broken plate pieces (floral, patterned, and solid colors)
- Tile adhesive or strong craft glue
- Tile nippers
- Protective gloves and goggles
- Grout (white or tinted)
- Small decorative accents (ceramic flowers, beads, stars, etc.)
- Grout spreader or spatula
- Damp sponge
Step-by-step Guide
Step 1: Choose your letter base and plan your design layout, grouping similar colors and patterns together for a balanced look.
Step 2: Use tile nippers to trim plate pieces to fit your design areas, rounding off sharp corners when needed.
Step 3: Wearing gloves, arrange the shards on the letter without glue first to test your layout. Once satisfied, attach each piece using tile adhesive, pressing them firmly onto the surface.
Step 4: Add decorative accents like ceramic roses, beads, or small tiles to highlight certain areas.
Step 5: Let the adhesive dry fully before applying grout over the entire surface, filling all gaps.
Step 6: Wipe away excess grout with a damp sponge, revealing the bright patterns underneath. Then allow to dry and display your mosaic letter on a wall or shelf.
#20. Broken Plate Photo Heart Keepsake
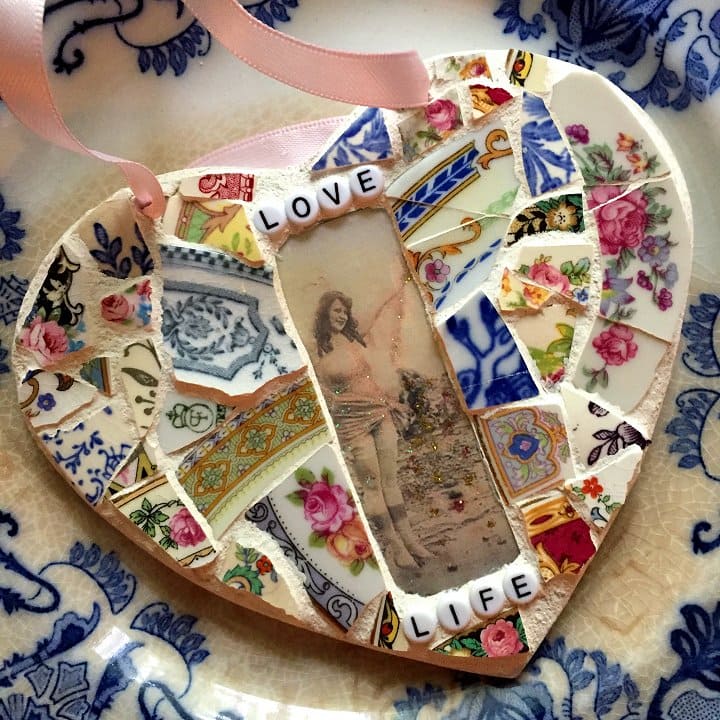
This handmade heart feels like a hug wrapped in memories. It combines delicate china shards like florals, ornate borders, and vintage patterns with a treasured photograph at its center.
The small letter beads spelling “LOVE LIFE” give it an extra personal touch, turning it into more than just decor. It’s a keepsake you can hang by a ribbon, perfect for commemorating someone special, celebrating love, or marking a meaningful moment.
Materials Needed
- 1 wooden heart base (6″-8″ wide)
- 15-20 small broken plate shards with varied colors and patterns
- 1 printed photo (cut to fit the center)
- 6-8 alphabet beads
- Tile adhesive or strong craft glue
- Clear-drying sealant
- 1 satin ribbon (12″ long)
- Protective gloves
Step-by-step Guide
Step 1: Position the photo in the heart’s center, securing it with glue. Then arrange the broken plate pieces around the photo, mixing colors and patterns for balance.
Step 2: Add alphabet beads to form a short word or phrase that holds meaning for you.
Step 3: Glue each piece in place and let it dry completely.
Step 4: Attach the ribbon to the top for hanging, then seal the surface for protection.
#21. Broken Plate Floral Earrings
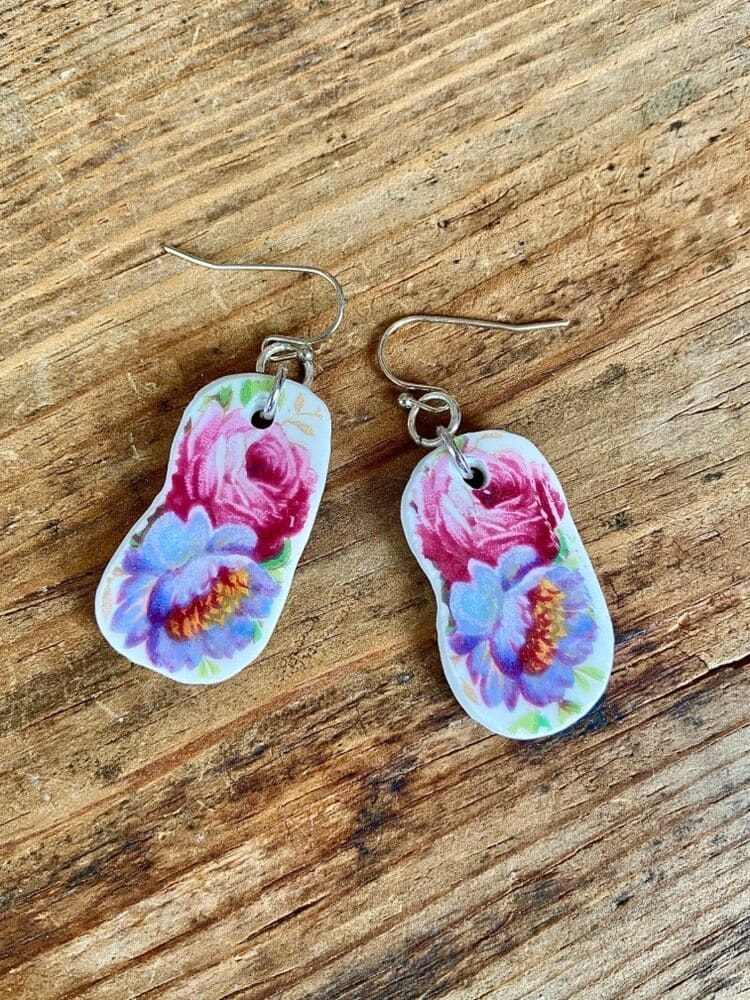
These unique earrings transform delicate fragments of vintage china into wearable art. The floral patterns bring a romantic charm, while the irregular shapes make each pair one-of-a-kind.
Lightweight yet eye-catching, they’re perfect for adding a touch of nostalgia to your style or gifting to someone who appreciates handmade jewelry.
Materials Needed
- 2 broken china plates with floral patterns (medium shards)
- Jewelry pliers
- Small drill or rotary tool with diamond bit
- Sandpaper or ceramic file
- 2 jump rings (2)
- 2 fishhook earring findings
- Safety goggles and gloves
Step-by-step Guide
Step 1: Select two shards with similar sizes and designs. If needed, gently shape them using a ceramic file so they match better.
Step 2: Sand the edges until they’re smooth to prevent sharpness against the skin.
Step 3: Wearing goggles, drill a small hole near the top of each shard using a diamond drill bit. Keep the drill slow and steady, and use water to reduce dust and heat.
Step 4: Thread a jump ring through each drilled hole, securing it with jewelry pliers. Next, attach a fishhook earring finding to each jump ring and close it tightly with the pliers.
Step 5: Wipe the pieces clean and enjoy your one-of-a-kind, upcycled jewelry.
Tip: For a polished look, you can coat the surface with a thin layer of clear jewelry resin to enhance the colors and add durability.
#22. Broken Plate Mosaic Fish on Driftwood
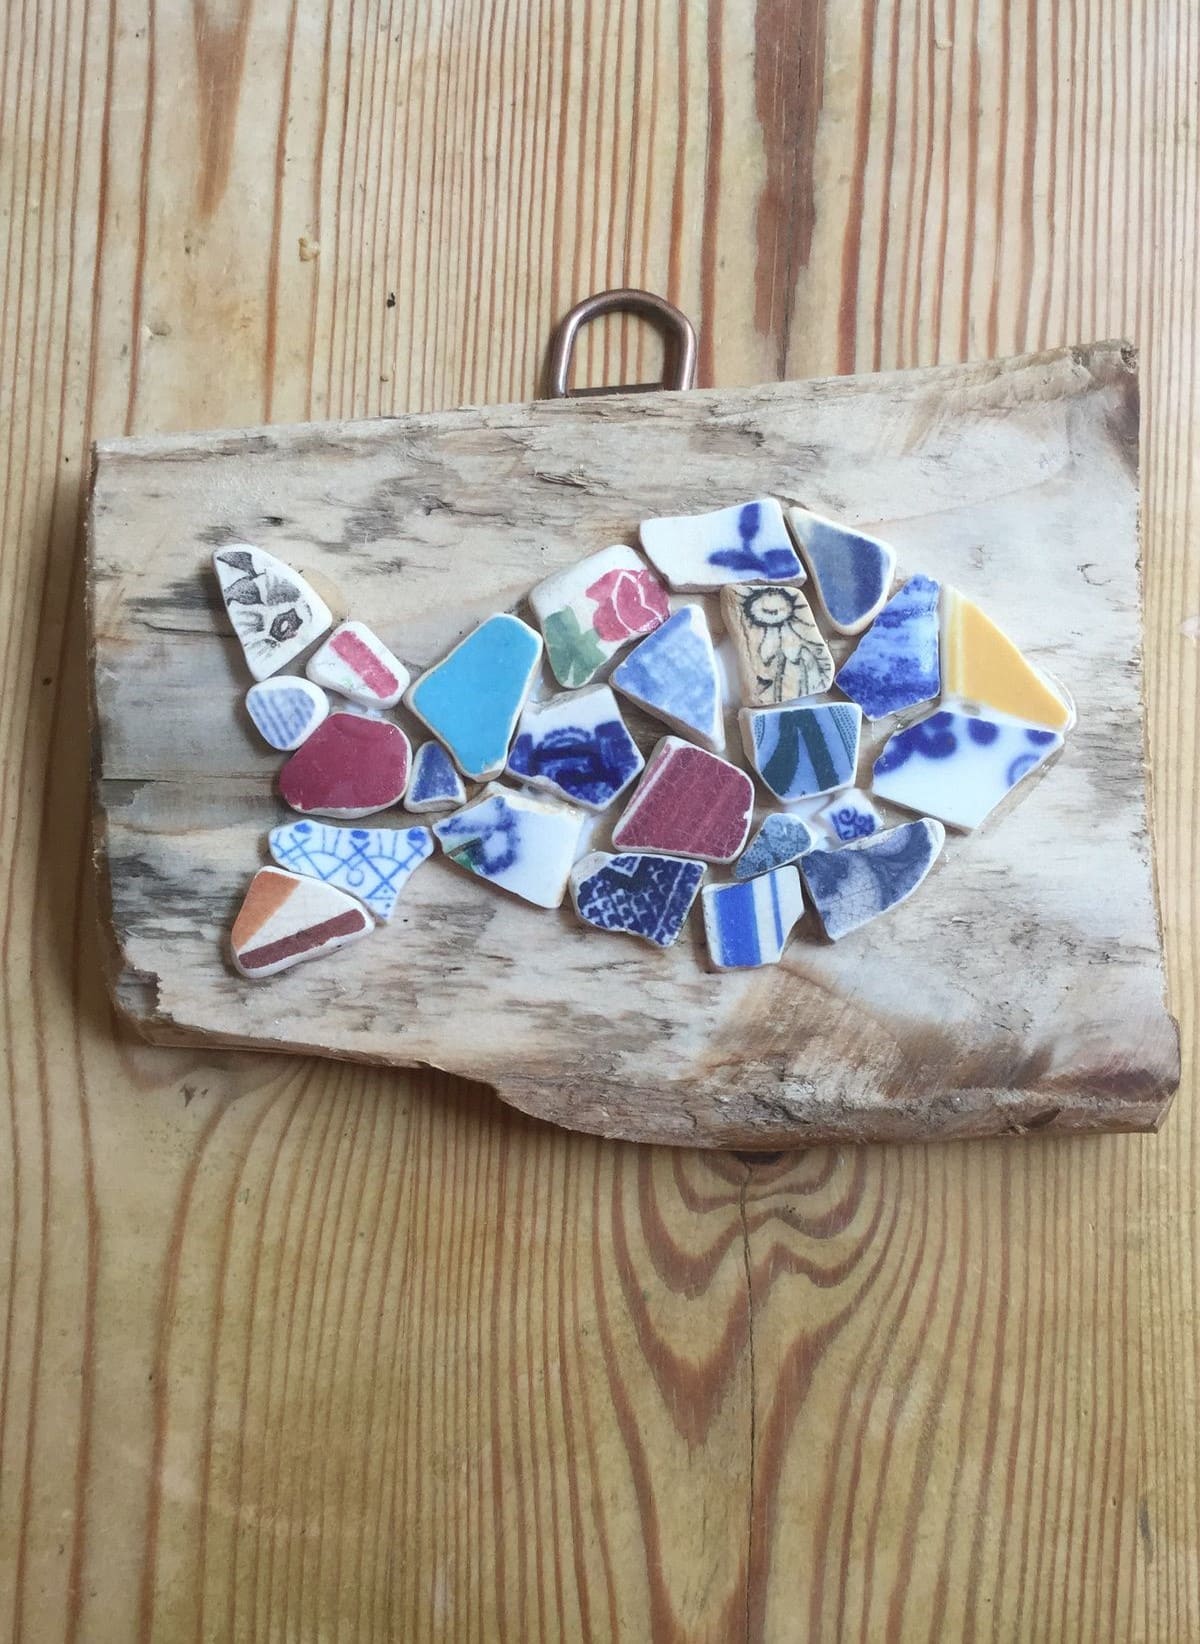
Look at this charming coastal-inspired mosaic! It combines colorful broken plate pieces arranged into a playful fish silhouette on a rustic driftwood base.
The natural wood grain complements the vibrant ceramic patterns, making it perfect for beach houses, nautical décor, or as a cheerful wall hanging in any home.
Materials Needed
- Driftwood board (length: 10-12 inches, width: 5-6 inches, thickness: 0.5-0.75 inch)
- 15-20 broken plate pieces (sizes: 0.5-1.5 inches, assorted colors & patterns)
- Strong ceramic adhesive (approx. 2 oz)
- White or light-colored sanded grout (0.5 cup)
- Small grout spreader or old credit card (2-3 inches wide)
- D-ring or sawtooth hanger
- Soft cloth and sponge
- Protective gloves and safety glasses
Step-by-step Guide
Step 1: Lightly sand the driftwood surface to remove rough patches, then wipe away dust.
Step 2: Arrange broken plate pieces into a fish shape, starting with the tail and working toward the head. You can adjust until the shape looks balanced.
Step 3: Glue each piece in place, leaving small gaps for grout lines. Then allow adhesive to dry for at least 12 hours before grouting.
Step 4: Apply grout over the mosaic, pressing it into gaps with your spreader.
Step 5: Wipe off excess grout using a damp sponge, then let it cure for 24 hours.
Step 6: Buff the plate surfaces with a soft cloth to restore their shine.
Step 7: Finally, attach a D-ring or sawtooth hanger to the back for easy wall display.
#23. Broken Plate Mosaic Side Table
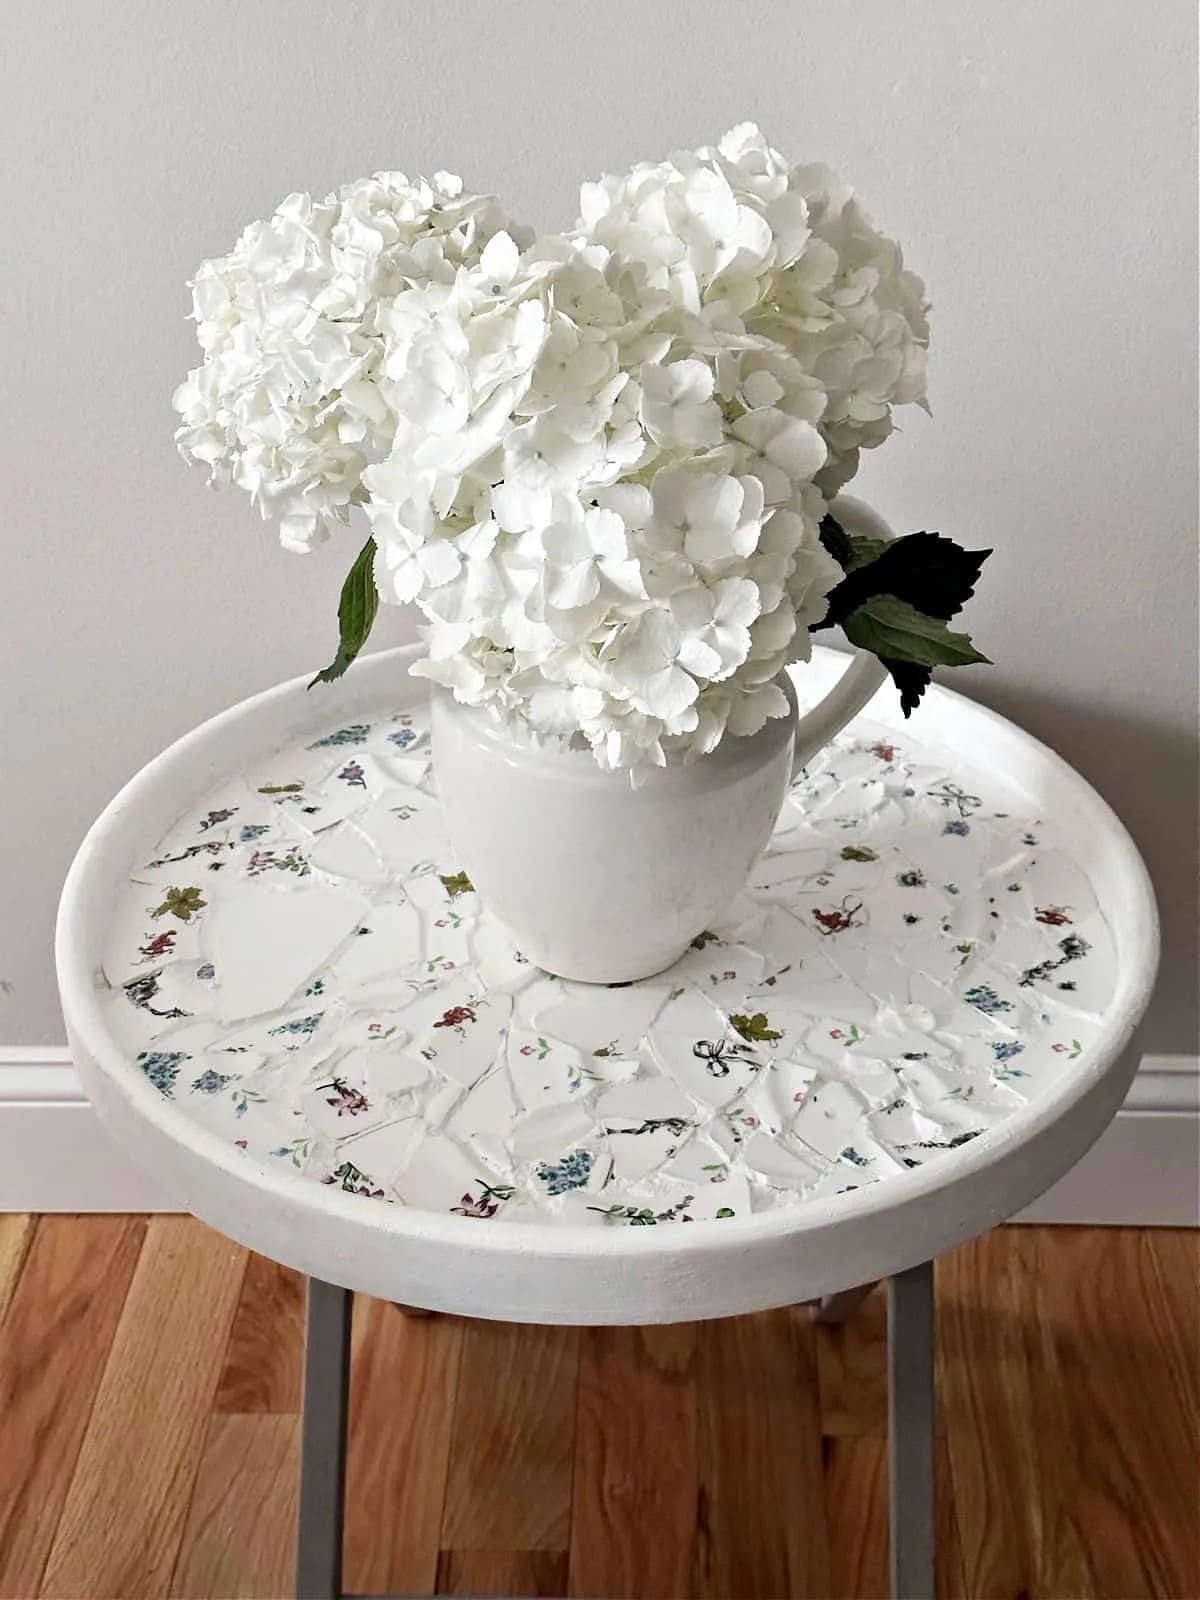
This charming side table gives broken china a fresh life as a smooth mosaic tabletop. The subtle floral patterns in the shattered pieces add delicate visual texture while keeping the overall look light and bright.
Perfect for holding a vase of fresh blooms, a stack of books, or your morning coffee, this project turns an ordinary table into a conversation piece with vintage appeal.
Materials Needed
- Small round side table (16″-20″ diameter)
- Assorted broken china pieces (enough to cover the tabletop)
- Tile adhesive or strong craft glue (about 1/4 cup)
- White grout (about 1 cup)
- Grout spreader or spatula
- Safety goggles and gloves
- Soft cloth or sponge
- Small hammer and towel
Step-by-step Guide
Step 1: Place your plates inside a thick towel and gently tap with a hammer to break them into various-sized pieces. You should wear goggles and gloves to protect yourself from sharp edges.
Step 2: Lay out the china shards on the table surface, experimenting with different arrangements until you like the overall pattern. Also, leave small gaps between pieces for the grout.
Step 3: Apply tile adhesive to a small section of the tabletop using a spreader. Then press each shard firmly into the adhesive, working outward until the surface is covered.
Step 4: Let the adhesive dry according to the package instructions, usually 12-24 hours before moving to the grouting step.
Step 5: Spread grout over the entire surface, pushing it into the gaps between shards. Use a damp sponge to wipe away excess grout, rinsing the sponge frequently for a clean finish.
Step 6: Allow the grout to set completely, then buff the surface with a soft cloth to bring out the shine of the china.
#24. Vibrant Broken Plate Outdoor Countertop
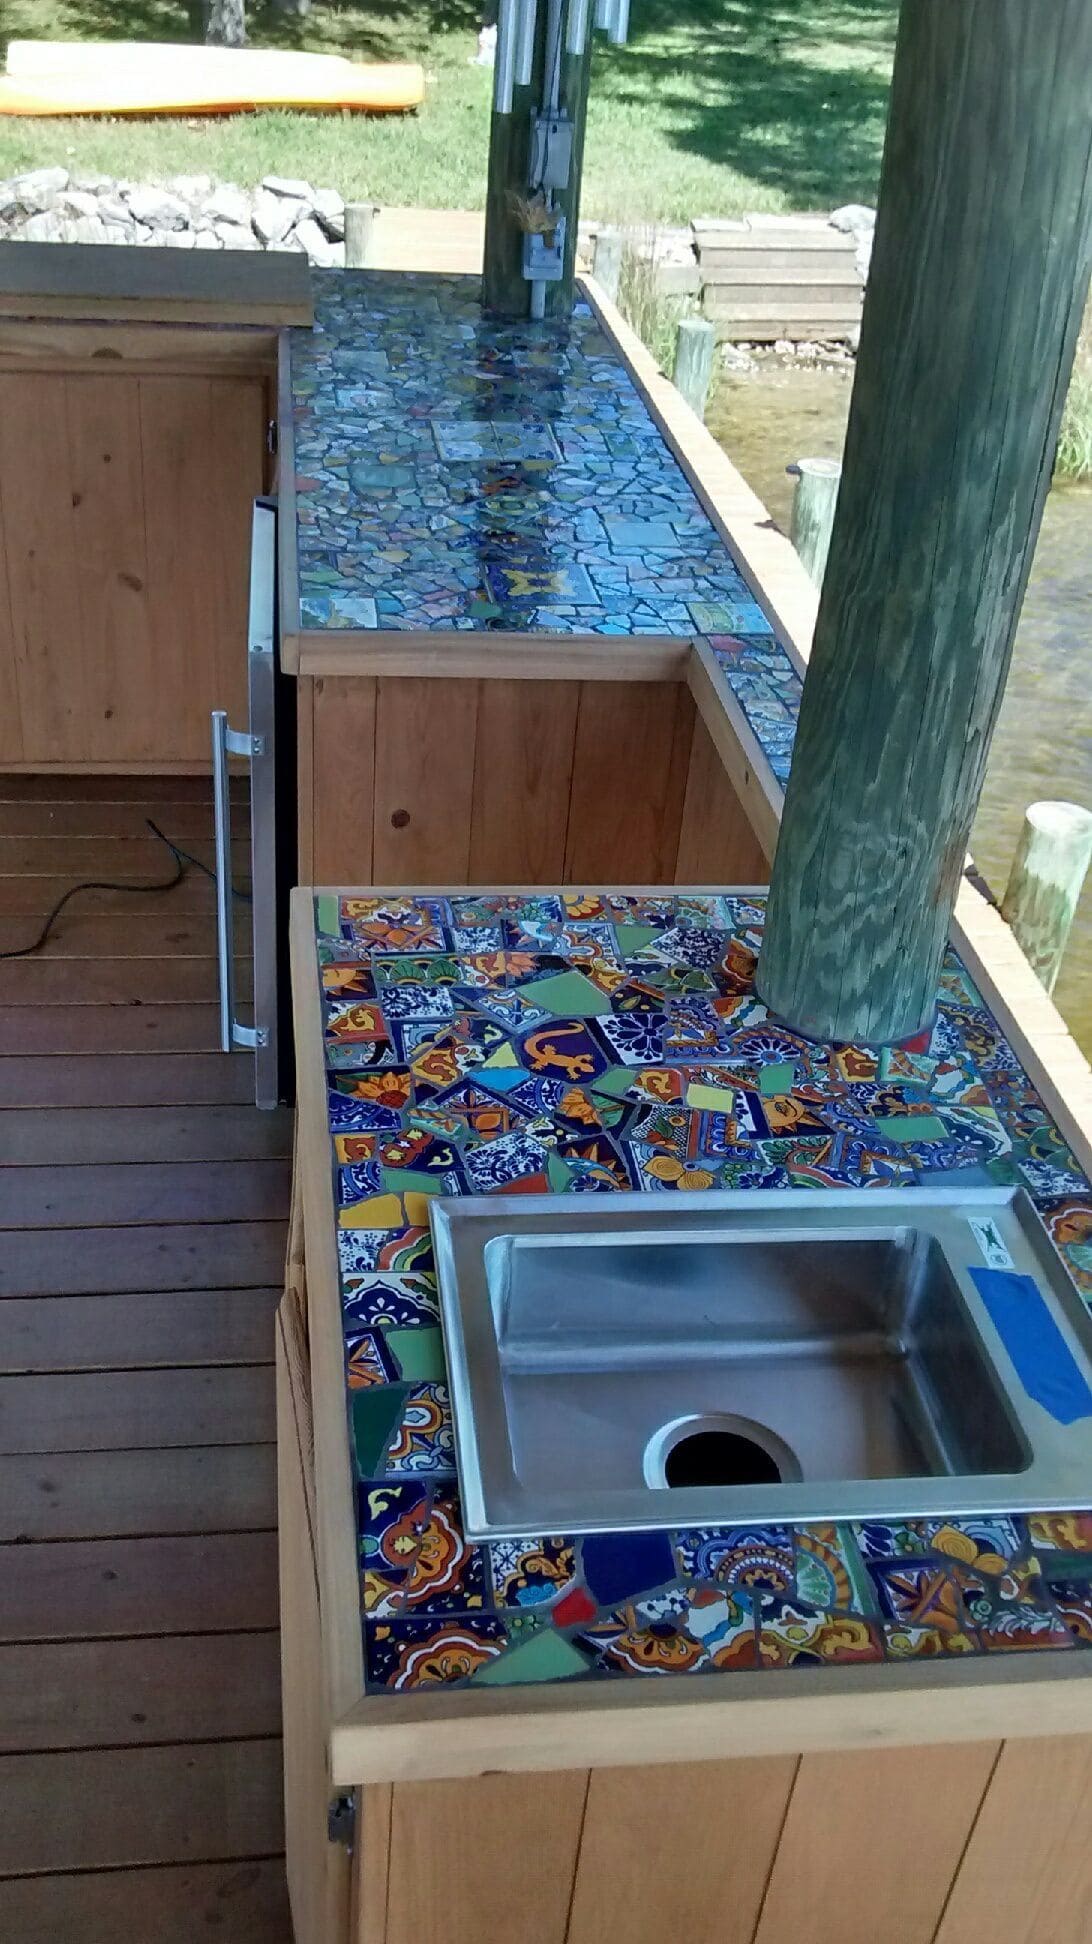
Imagine prepping fresh herbs for dinner or pouring drinks for friends while leaning on a surface that’s practically a work of art.
This mosaic countertop transforms mismatched, broken plates into a bold and colorful statement piece. The mix of patterns such as florals, geometrics, and bright solids brings warmth and personality to an outdoor kitchen space.
Also, sunlight bounces off the glossy shards, making every meal prep feel like a celebration. Strong enough for daily use yet beautiful enough to be a conversation starter, this is a project where function meets unforgettable style.
Materials Needed
- Countertop base (existing or 48″×24″ plywood sheet)
- 50-60 pieces of broken ceramic plates in assorted colors and patterns
- Outdoor tile adhesive (1 quart)
- 1 lb sanded grout (color of choice)
- Grout sealer
- Rubber grout float
- Sponge and clean cloth
- Protective gloves and goggles
Step-by-step Guide
Step 1: Lay out your broken plate pieces on the countertop to test your arrangement. You can mix large and small shards for visual interest.
Step 2: Apply tile adhesive in small sections, pressing each piece firmly in place.
Step 3: Once set, spread grout over the surface with a rubber float, ensuring it fills all gaps.
Step 4: Wipe away excess grout with a damp sponge and let it cure according to the package instructions.
Step 5: Finish with a coat of grout sealer for durability, especially in outdoor settings.
#25. Blue Willow Broken Plate Christmas Tree Ornament
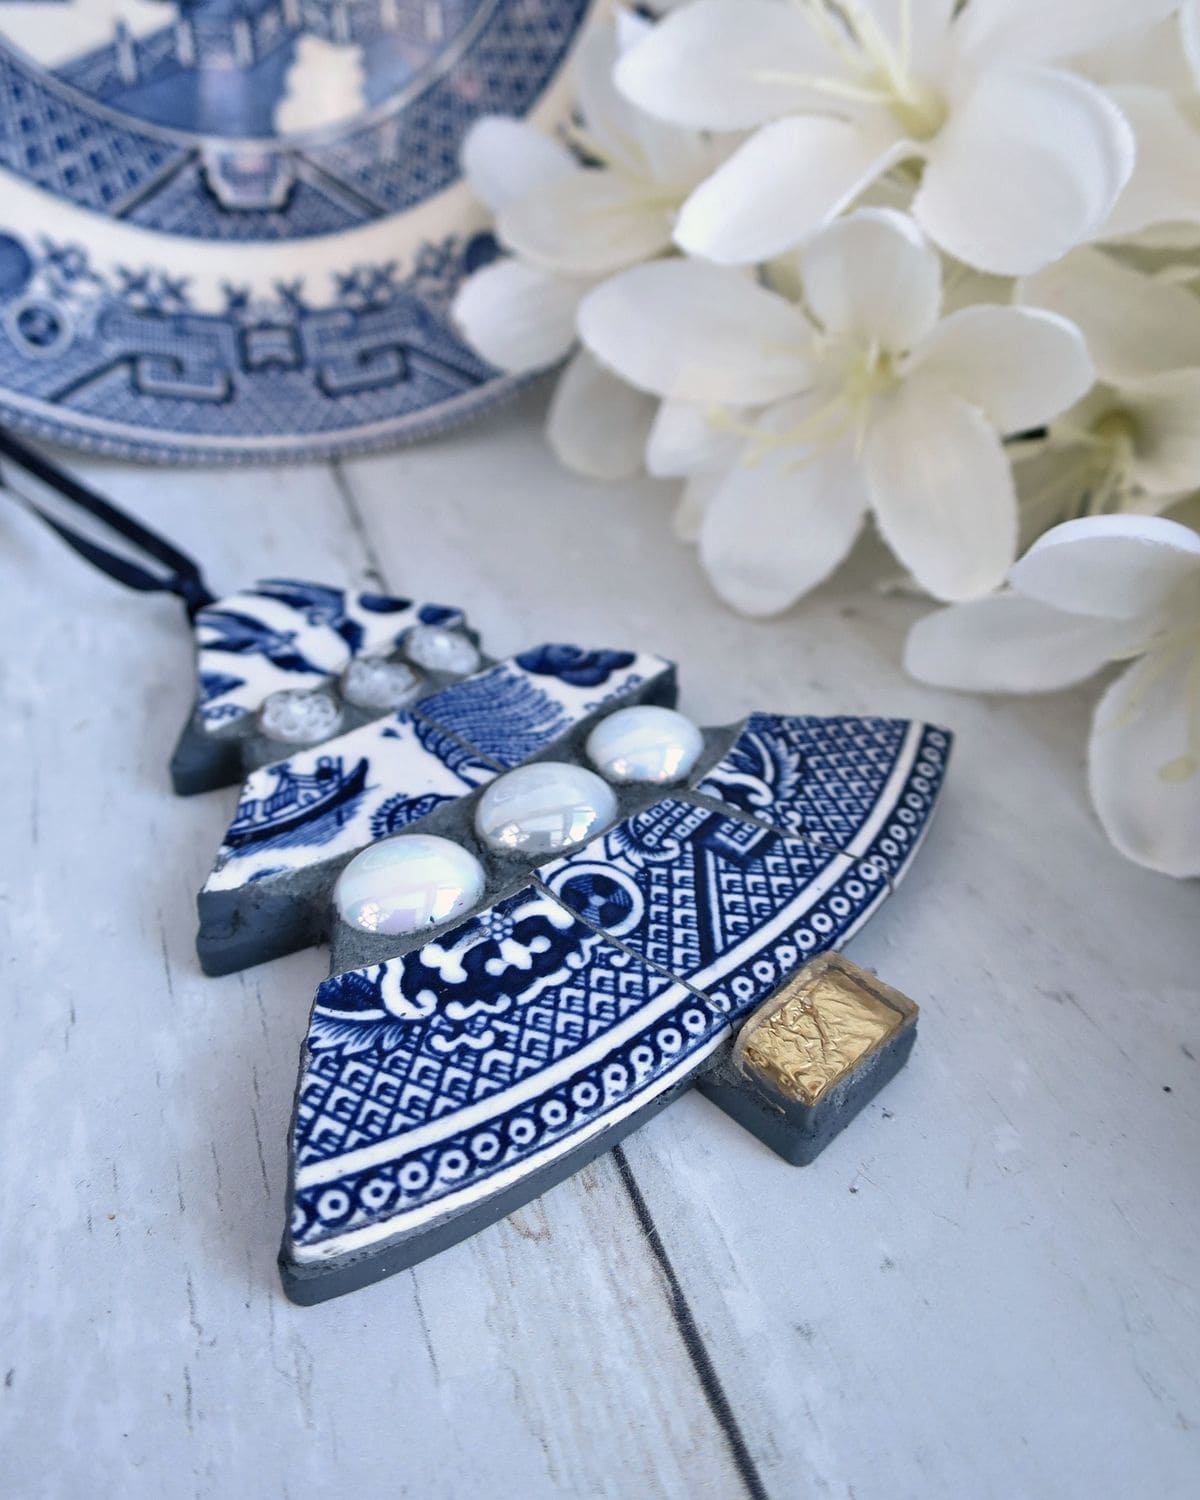
You can also transform broken Blue Willow china into a timeless holiday keepsake.
The rich cobalt blue patterns pop against the soft grout, while added glass gems bring a frosty sparkle. Lightweight yet sturdy, it makes a meaningful tree decoration or gift for anyone who loves vintage charm.
Materials Needed
- Wooden or MDF Christmas tree base (height: 4-5 inches, width: 3-3.5 inches, thickness: 0.25-0.5 inch)
- Broken Blue Willow plate pieces (sizes: 0.5-1 inch)
- 4-5 flat-back glass gems (diameter: 0.5 inch)
- 1 small metallic tile for the trunk (0.5 × 0.5 inch)
- Strong ceramic adhesive (approx. 1 oz)
- Dark gray or charcoal grout (0.25 cup)
- Ribbon or twine (length: 8-10 inches)
- Small grout spreader or craft stick
- Soft cloth and sponge
- Protective gloves and safety glasses
Step-by-step Guide
Step 1: Lightly sand the ornament base for better adhesion and wipe clean.
Step 2: Arrange Blue Willow plate pieces on the base, starting from the bottom and working upward to create a tree shape.
Step 3: Glue each piece in place, fitting them closely while leaving thin grout lines.
Step 4: Add glass gems in the center row for ornaments and the metallic tile at the bottom for the tree trunk.
Step 5: Allow adhesive to dry for at least 8-12 hours. Then apply grout over the surface, pressing it into the gaps with your spreader.
Step 6: Gently wipe away excess grout with a damp sponge, being careful not to dislodge pieces.
Step 7: Let grout cure for 24 hours, then buff the surfaces to restore shine. Now you can attach the ribbon or twine to the top for hanging.
Refer to: 25 Breathtaking Ways to Upcycle Broken Mosaic Tiles for Stunning Artistic Projects