Mixed media crafts are taking over creative spaces everywhere and honestly, it’s easy to see the appeal.
There’s something magical about layering textures, mixing colors, and combining the unexpected. Old book pages, scraps of fabric, vintage buttons, paint splashes, rusty gears when they come together, the result feels raw, expressive, and deeply personal.
This trend isn’t just about making something pretty, it’s about experimenting, playing, and letting your imagination lead the way. No strict rules, no perfect lines, just pure, joyful creativity.
If you’ve been itching to make art that feels a little more layered and alive, these 22 mixed media crafts might be exactly what you need. They’re bold, beautiful, and guaranteed to stir up your inner artist.
#1. Vintage Mixed Media Story Cards

Wow, this vintage collage trio feels like a quiet afternoon spent inside a memory box. Using soft, weathered textures and found objects like feathers, twine, and typewritten scraps, these pieces evoke curiosity and nostalgia.
Materials Needed:
- 3 pieces of heavy cardstock (3×5)
- Pages from old books
- 1-2 feathers
- 6-8 small buttons
- Bits of yarn, string, twine, or lace (15-30 cm lengths)
- 1-2 vintage-style photos
- Glue stick and/or craft glue
- Scissors and hole punch (optional)
Step-by-step Guide:
Step 1: Cover your card bases with torn or cut book pages, decorative paper, or old maps. Layer as you go, letting the edges overlap and curl.
Step 2: Arrange your focal elements. One card might feature a bold number or quote, another a vintage photo or printed postcard.
Step 3: Add texture by gluing on yarn, feathers, or threads. Then weave or wrap string around the top like a journal tag.
Step 4: Finish each card with buttons, mini embellishments, and personal flourishes.
#2. Mixed Media Portrait with Jewelry Collage

This captivating artwork blends classic portrait painting with a bold infusion of real-world textures like vintage jewelry, beads, and metal chains forming a cascading hairstyle you can almost hear swishing.
If you’ve ever held onto broken necklaces or single earrings with too much sentimental value to toss, this is your excuse to turn them into something spectacular. It’s a portrait, yes but also a shrine to color, memory, and glam.
Materials Needed:
- 1 canvas (16×20 inches recommended)
- Acrylic paints (skin tones, red, black, beige)
- Paintbrushes
- 15-25 assorted beads, chains, vintage brooches, old earrings
- Heavy-duty craft glue
- Pencil
- Optional: palette knife
Step-by-step Guide:
Step 1: Lightly sketch your portrait outline on the canvas. You should focus on a side profile or tilted angle to give space for the hair area.
Step 2: Paint the face and background using acrylics.
Step 3: Arrange your jewelry on the head area to form a hair shape. Mix textures, lengths, and colors for maximum visual richness.
#3. Sea-Inspired Mermaid Wall Hanging

This enchanting mermaid wall art feels like it was plucked straight from a beachside dream. With her flowing raffia hair, pearl necklace, and tail made of shimmering shell discs, she brings a touch of ocean magic wherever she’s placed.
Materials Needed:
- Wood cutout of a mermaid silhouette (approx. 18-24 inches tall)
- 1 natural sand dollar (3-4 inches wide)
- Bleached raffia strands
- 25-35 capiz shell discs
- Small faux pearls (about 6-8 mm)
- Acrylic paints (skin tone, teal, and shading tones)
- Hot glue gun and glue sticks
- Small bead
Step-by-step Guide:
Step 1: Begin by painting the wood base. You can use a light skin tone for the body and a vibrant teal or aqua for the tail.
Step 2: Attach the raffia for the hair. Bundle strands together and hot glue them to the top of the head.
Step 3: Glue the capiz shell discs one by one along the tail area. You should start at the bottom and overlap upward in rows like fish scales to create texture and shimmer.
Step 4: Glue a row of pearls around the neck area to mimic a necklace.
Step 5: Add the sand dollar to the top, held aloft by the mermaid’s hands. Then finish with a small embellishment where the hair begins.
#4. Rustic Wood Block Mixed Media Dolls

There’s something magical about turning scraps into characters. These rustic wood block dolls feel like little spirits from the past, whispering stories through old photos, worn fabrics, and faded paper. Each one is different. Some wear a bit of lace, others dangle charms or antique thimbles. They’re not polished—and that’s the point. If you’ve ever saved a broken earring or torn a beautiful book page and thought, “I’ll use that someday,” this is your someday. It’s scrap meets soul.
Materials Needed:
- 8-10 small wood scraps (varied sizes: 1″x1″, 1″x3″, 1″x6″)
- 8-10 printed vintage portraits (1″-2″ square)
- Torn book paper, vintage fabric scraps, twine, burlap
- Old jewelry, beads, buttons, keys, thimbles
- Eye screws
- Hot glue gun
- Mod Podge
Step-by-step Guide:
Step 1: Wipe down the wood blocks and lightly sand if needed, then use Mod Podge to glue a vintage portrait to the top of the block
Step 2: Now, you glue on a charm, attach a tiny spool, wrap fabric like a scarf. Next, use eye screws and wire to dangle beads or other curios from the bottom.
Step 3: Screw a small eye hook into the top and tie string or twine for hanging. Hang a group of them together like a gallery of memory keepers.
#5. Layered Felt Botanical Wall Art

Believe or not, instead of paint, you’re using soft felt in every shade under the sun to build depth and movement. Each leaf, petal, and shape is cut with care, layered with love, and brought to life on a vibrant backdrop.
And the best part is that you don’t need to be a painter to create something frame-worthy. Just scissors, glue, and a vision as loud as your color palette.
Materials Needed:
- Assorted felt sheets (10-15 colors, standard 9″×12″)
- A2 or A3 canvas board
- Fabric scissors
- Fabric glue
- Black shadow box
- Optional: chalk pencil
Step-by-step Guide:
Step 1: Start with a deep blue or black felt sheet as your background.
Step 2: Sketch your floral arrangement. Then, start cutting out flowers, leaves, and abstract shapes from the colorful felt.
Step 3: Begin assembling your design directly onto the background. Don’t glue anything until you’re happy with the layout. Layer pieces so they overlap slightly, creating movement and visual depth.
Step 4: Once satisfied, glue everything down piece by piece. You can use a tiny dab of hot glue at the center or edges and avoid oversaturating to keep the felt clean and crisp.
Step 5: Let it dry completely before sliding your finished piece into the shadow box or frame.
#6. Whimsical Painted Animal Cutouts

Painted with bright colors and patterned clothes, each piece carries a story, maybe it’s the dog in red polka dots who thinks he’s the boss, or the cat with the turquoise stripes who’s clearly seen some things.
Plus, you can prop them up in crates, frame them for a gallery wall, or let them parade along a windowsill.
Materials Needed:
- Wooden boards (5″-10″ tall, ½” thick)
- Acrylic paints in assorted colors
- Small detail brushes and foam brushes
- Pencil
- Paint pens
- Medium and fine-grit sandpaper
- Clear spray varnish (optional)
Step-by-step Guide:
Step 1: Sand the wooden pieces to remove splinters and round off the edges.
Step 2: Lightly draw your animal shapes with a pencil. Dogs, cats, and chickens are great starters, so you go for long legs, oversized heads, and simple features.
Step 3: Paint the base colors first (fur, feathers, etc.), then layer on clothes and accents.
Step 4: Finally, outline eyes, mouths, and limbs using a fine brush.
#7. Expressive Paper Mache Mask

If drama had a face, this would be it. This mask blends bold emotion with recycled flair, bringing texture and movement through sculpted paper features and wild paper-twist hair.
No matter how you’re making props, wearable art, or just something that stares back at you from the wall, this mask doesn’t shy away from expression.
Materials Needed:
- 15 newspaper sheets
- Flour or white glue for paper mache paste (½ cup flour to 1 cup water)
- White acrylic gesso
- Acrylic paints (rose, red, burnt umber, peach, white, and black)
- Sculpting base (balloon, cardboard, or mask mold)
- Paintbrushes
- Varnish (optional)
Step-by-step Guide:
Step 1: Start by creating your mask base. You should layer torn newspaper strips dipped in paste over a mold, then apply 4-5 layers, allowing each to dry before adding the next.
Step 2: Sculpt facial features by layering and shaping small wads of paper, then build the nose, lips, and brows with slow care.
Step 3: Once dry, paint the entire surface with white gesso to give a neutral base for painting.
Step 4: Mix skin tones and layer paint gradually for realism. Now you use rosy shades for cheeks and lips, darker tones for shadows and nose depth, and white to highlight around the eyes.
Step 5: For the hair, twist long strips of newspaper tightly and glue or tape them to the crown area. You can leave them wild or paint them later.
#8. Winter Memories Collage on Rustic Wood

You can see this mixed media piece likes a silent snowfall caught between memory and imagination.
Mounted on an old piece of barn wood, the layered elements pull you into a quiet winter’s day. Plus, each texture speaks its own language of nostalgia, warmth, and serenity.
Materials Needed:
- Wooden board (approx. 10″ x 14″)
- Vintage-style photo print (3” x 6”)
- Corrugated cardboard
- Scrap lace (4” diameter)
- Brown kraft paper
- Old music sheet
- Metal corners, brads, or antique buttons
- Wooden snowflake cutouts (2-4” sizes)
- Craft glue, hot glue gun, and scissors
Step-by-step Guide:
Step 1: Glue the kraft paper and torn music sheet onto your wood base, overlapping slightly.
Step 2: Add the doily behind your photo area. Then rumple and flatten the brown paper slightly to give it a weathered look and layer it beneath the photo.
Step 3: Mount your photo on the corrugated cardboard and glue it to the center of the board. You now add fabric behind for soft texture.
Step 4: Next, you position snowflake cutouts, vintage buttons, and metal corners naturally, like how snow might fall.
Step 5: Finish by adding a small meaningful phrase on one of the snowflakes or directly onto the wood.
#9. Leaf and Fabric Collage

Nothing beats the simple joy of mixing textures from nature and fabric scraps you might find in an old sewing box. This project captures the playful spirit of autumn afternoons and hands-on creativity.
Whether you’re working with kids or just exploring your inner artist, this activity feels a bit like stitching a storybook from woodland treasures.
Materials Needed:
- 6-8 dried leaves
- Fabric scraps (floral, stripes, vintage, about 10 cm² each)
- Cardboard (~A4 size)
- Craft glue
- Paintbrush
- Optional: scissors, washi tape
Step-by-step Guide:
Step 1: First, lay down your fabric pieces like a puzzle, you can try overlapping, flipping, or rotating them for contrast.
Step 2: Use a brush to apply glue to the base, then gently press each fabric piece in place.
Step 3: Choose your favorite leaves and begin layering them on top of the fabric. Then press them down carefully, especially if they’re fragile.
Step 4: Add a top coat of glue if you want a sealed, glossy finish or leave it raw and rustic.
#10. Vacation-Inspired Eyeglass Dioramas

Each pair of these glasses holds more than lenses. One moment you’re staring into a beachside escape, the next you’re galloping across a tiny pasture.
Furthermore, this mixed media craft is a charming blend of vintage eyewear and tiny-world diorama art. You’ll find yourself lost in the little details and all it takes is a little patience, a touch of whimsy, and a lot of imagination.
Materials Needed:
- Pairs of old eyeglasses
- Model railroad scenery materials: fake grass, sand, snow
- Mini figures: horses, people, cars, trees, tents (scale: 1:87)
- Craft glue
- Toothpicks, tweezers
- Decorative extras (mini baubles, beads, string, mini wreaths)
Step-by-step Guide:
Step 1: Start by thoroughly cleaning each eyeglass frame and removing any stickers or smudges. You can choose frames that speak to you and retro shapes work best.
Step 2: Select a theme for each pair: beach, camping, horseback riding, Christmas, etc.
Step 3: Using glue, begin building each scene inside the lens area. You should start with your base (sand, grass, snow), then carefully layer in your figures and props.
#11. Professor Recyclestein Junk Portrait

This project is pure joy in motion, a portrait made of bottle caps, old combs, buttons, string, and paper, all woven together to form a charming Einstein-esque face.
The best part is that you can make it entirely from what you already have lying around and it’s also great for a family afternoon, a classroom project, or just a fun break from routine.
Materials Needed:
- Cardboard backing (approx. 8”x10”)
- White paper shreds
- Old comb
- Various found objects (buttons, washers, puzzle pieces, fabric scraps, caps)
- Colored paper
- Hot glue gun
- Scissors and black marker
Step-by-step Guide:
Step 1: Cut a sturdy piece of cardboard for the base. Then start with the face shape and a large oval or rectangle works great, now glue it down in the center.
Step 2: Build the hair using paper shreds, white yarn, or even stuffing from an old pillow.
Step 3: Create facial features from whatever you can find: a comb for the mustache, old buttons or washers for eyes, maybe a paper triangle for a nose.
Step 4: Layer in clothing with textured paper or fabric. Then add a bow tie, a collar, even a chalkboard if you want to lean into the professor vibe.
#12. Industrial Frog Garden Mosaic Plate
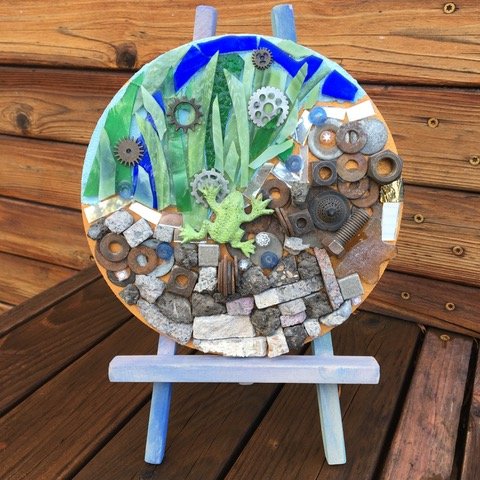
This imaginative piece is what happens when Mother Nature meets the scrapyard and they become best friends.
With its bold textures and whimsical subject, it feels like a secret garden built from forgotten treasures. Plus, the standout frog at the center makes it feel playful, while the steely mechanical bits add weight and story.
Materials Needed:
- Round wood base (10-12 inches)
- Assorted stained glass scraps (greens, blues, and clear)
- Small metal gears, washers, screws, and rusty bits
- Mosaic stones, bricks, or broken tiles
- Small ceramic frog figure
- Tile adhesive
- Grout (optional)
- Mini easel
Step-by-step Guide:
Step 1: Start by sketching your basic layout onto the wood base, you can outline the grassy background, industrial side, and frog location.
Step 2:Next, glue down green glass shards vertically to mimic blades of grass. You should mix in blues at the top to suggest sky.
Step 3: Build the rocky, mechanical half: alternate layers of metal washers, bolts, and stone pieces.
Step 4: Place your frog in the center where green meets metal, creating contrast and visual focus. If desired, apply grout to fill in gaps between pieces.
#13. Magazine Cutout Fish Collage

The energy in this piece lies in its bold, overlapping textures, unexpected typography, and creative eye for detail. It’s more than a collage, it’s a paper mosaic that feels alive.
Materials Needed:
- 1 printed outline of a fish
- Old magazines, catalogs, junk mail
- Glue stick
- Scissors
- Thick backing paper (A4 or larger)
- Optional: fine marker
Step-by-step Guide:
Step 1: Begin with a simple pencil outline of a fish on your base paper. You don’t need to follow it strictly as it just helps you visualize the shape.
Step 2: Sort through magazines and start tearing or cutting shapes. You can look for colors that mimic scales, fins, or reflections in water.
Step 3: Work from back to front, now you start with the background layers like the outer edge or fin tips, and build forward toward the eye and face.
Step 4: Glue down each piece, overlapping slightly. Feel free to mix bold colors with printed text for a splash of fun.
#14. Affirmation Strips Bowl

These mixed media affirmation strips are like tiny love notes to yourself. They’re perfect for tucking into a journal, handing out to friends, or drawing from a bowl whenever life feels a bit heavy.
If you’ve got a stash of scrap paper, ribbon, or old textiles, this is the feel-good project that transforms your leftovers into mini moments of healing.
Materials Needed:
- Thick scrapbook paper (cut into 1” x 4” strips)
- Acrylic paint (optional)
- Typed affirmations (20-30 phrases)
- Scraps of fabric, ribbon, or lace (about 1-2” pieces)
- Glue stick
- Scissors and hole punch
Step-by-step Guide:
Step 1: Paint or color your paper strips with warm tones, pastels, or anything that brings joy.
Step 2: Type affirmations on paper, cut them to size, and glue them onto the strips.
Step 3: Add fabric or ribbon scraps as accents. Then fray the edges for extra texture and character. You can glue them flat or stitch them on for a rustic look.
Step 4: Store your finished strips in a bowl, gift box, or tuck them into daily spots like planners or pockets.
#15. Mixed Media Textile Collage

In the next project, try this textile collage. It’s something you’d find tucked in a drawer of an old cedar chest, soft with time and full of meaning.
In addition, you don’t need to be a pro. You just need scraps, your hands, and a willingness to play.
Materials Needed:
- Canvas panel or thick linen fabric (approx. 6”x12”)
- Assorted fabric scraps (cotton, lace, gauze in muted)
- Vintage photo print or transfer (2”x4”)
- Large button
- Hand embroidery thread (brown, ivory, ochre)
- Sewing needle and fabric scissors
- Fabric glue
- Optional: tea
Step-by-step Guide:
Step 1: Prepare your base by stretching linen over a panel or using a pre-stretched canvas. If desired, lightly stain your fabric scraps using steeped tea for an aged effect and let dry.
Step 2: Arrange strips of fabric horizontally, layering textures and patterns. Don’t be afraid of raw edges as imperfections add soul.
Step 3: Choose a small vintage photo or transfer and place it near the top corner. Then stitch it in place, maybe add a border with zigzag stitches or raw lace trim.
Step 4: Now, you sew on a button, loop a thread like a breeze in hair, or stitch small botanical patterns using running stitch or lazy daisy.
#16. Puzzle Piece Assemblage Boards

This quirky, colorful mixed media project proves that even forgotten puzzle pieces can be reborn into something wonderfully abstract.
Moreover, what began as a messy tabletop filled with glue jars, pastel smudges, and old wooden blocks has turned into a delightfully tactile set of mini sculptures.
And the most interesting is that you don’t need a plan, just gather your scraps, grab some glue, and let instinct take the wheel.
Materials Needed:
- Scrap wood blocks (approx. 4″x4″ and 4″x8″)
- 40 loose puzzle pieces
- Acrylic paint
- Mod Podge
- Sand or glitter (optional)
- Small beads, pins, scraps of paper
- Paintbrushes and glue brushes
- Old photo
Step-by-step Guide:
Step 1: Pick a block of wood as your base. Then paint it freely or leave the wood natural for a more rustic feel.
Step 2: Arrange puzzle pieces on the board. You can try overlapping, stacking, or tilting them for added dimension. Then glue them in place once you like the layout.
Step 3: Add texture. Sprinkle a little sand or glitter over wet glue. Then press beads, buttons, paper scraps, or painted details into the nooks between the puzzle pieces.
Step 4: For extra flair, include a focal point like a torn-out photo, mini sculpture, or quote nestled in the composition.
#17. Miniature Diorama Glasses
These whimsical glasses are windows into tiny, dreamy worlds. From sandy beaches to horse paddocks, every frame holds a story frozen in time.
Additionally, each lens becomes a tiny stage, and suddenly, you’re looking through someone else’s memories or maybe your own daydreams.
Materials Needed:
- Pairs of vintage eyeglasses
- Miniature figures: people, boats, horses, tents (approx. 1:87 scale)
- Faux moss, tiny plants, mini trees
- Fine sand, pebbles, model grass, or mini snow
- Hot glue gun + precision glue tips
- Craft tweezers, toothpicks
- Optional: small beads, string lights, themed objects (e.g., holiday ornaments)
Step-by-step Guide:
Step 1: Clean the lenses and frame thoroughly. If the lenses are missing, you can use clear acetate or leave them open for a more dramatic look.
Step 2: Plan your scene for each lens. A beach on the left, a sailboat on the right or a tiny jungle in one and a red car trip in the other.
Step 3: Use hot glue or tacky glue to secure miniature elements inside the concave lens space. You should start with base materials like moss or sand, then layer in your figurines and accents.
Step 4: Allow glue to dry completely, then display the glasses in a shadowbox, on a shelf, or hang them like surreal ornaments.
#18. Whimsical Watch Doll Art

These quirky little canvases are bursting with charm, humor, and vintage flair. Each figure is crafted from old watches, beads, jewelry bits, and scrap fabrics.
Also, one skates freely in a yellow bee-inspired outfit while the other, dressed in glittery purples and butterfly wings, gently reminds you that “you are capable of becoming more than you realize.”
Materials Needed:
- 2 mini stretched canvases (approx. 4×10 inches each)
- 2-4 vintage wristwatches
- Costume jewelry scraps (gears, beads, chains, brooches, rhinestones)
- Bits of ribbon, glitter, tulle, and colorful paper
- Acrylic paint and Mod Podge
- Hot glue gun
- Label maker
Step-by-step Guide:
Step 1: Paint each canvas with a dreamy, layered background using sponged or blended acrylics.
Step 2: Sketch a basic silhouette of your character onto the canvas to help with placement.
Step 3: Attach the watch face as the head. Then use bits of jewelry to form hair, hats, and eyes.
Step 4: Design the body with broken earrings, fabric petals, or painted paper. You continue to add limbs using beads, wire, or painted details.
Step 5: Finish with encouraging quotes glued to the bottom.
#19. Vintage Handkerchief Fashion Frame Art

A touch of old Hollywood glam meets grandma’s handkerchief drawer and the result you can see is surprisingly delightful.
Using vintage buttons, layered florals, and bold folds of printed cloth, it captures the spirit of mid-century couture in a truly one-of-a-kind way and also perfect for anyone who loves retro vibes.
Materials Needed:
- Vintage sewing pattern page (Size 12 / 1950s or 60s style)
- Ornate frame (8×10)
- 2 floral handkerchiefs
- 2-3 assorted buttons
- Hot glue gun and glue sticks
- Faux flower
- Decorative backing paper
Step-by-step Guide:
Step 1: Remove the glass from the frame and add a vintage-style paper as your background. Then secure it to the frame’s backing with glue.
Step 2: Center your sewing pattern or retro fashion illustration on the background. You can angle it slightly for that collage-style effect.
Step 3: Fold or gather two handkerchiefs and glue them at the waistline of the illustrated figures so they appear like dimensional dresses.
Step 4: Add decorative buttons at the waist to mimic belts or brooches.
Step 5: Finally, embellish the corners or edges with paper flowers, ribbon rosettes, or more buttons for a curated, balanced look.
#20. Memory Box Diorama with Antique Viewfinder

If you are looking for something to decorate your wall, this idea maybe what you need. It connects the past and present and of course, you can add the portrait of your children inside a viewfinder.
Specially, the contrast of warm wood, old paper, and cold glass makes the whole piece hum with timeworn mystery.
Materials Needed:
- 1 small vintage wooden crate (approx. 8 x 10 x 4 inches)
- Antique cigar box
- 1 antique-style photo
- Mini opera glasses
- A small paper map
- Craft glue, clear thread, and matte sealant (optional)
Step-by-step Guide:
Step 1: Line the interior of the crate with pages from a vintage cigar box or old ephemera. You can use glue to adhere and smooth the surfaces.
Step 2: Place the paper map as the background, slightly overlapping the cigar labels to create a layered, archival look.
Step 3: Mount the antique photo inside a small frame or viewfinder, then attach this to the center of the box using glue or wire for a secure hold.
Step 4: Add the opera glasses at the bottom of the frame, so they sit right below the photo, creating the illusion of a built-in magnifier.
#21. Garden Daydream Collage Face

Made from a playful mix of cardboard, fabric, bottle caps, painted textures, and hand-drawn florals, this portrait captures that curious moment when imagination takes over.
Additionally, the head shape, mounted on a triangular background, gives it the charm of a character mid-thought .
Materials Needed:
- Sturdy cardboard base
- Magazine clippings
- Corrugated cardboard strips
- Bottle caps and fabric scraps (buttons, ribbon, netting)
- Acrylic paint pens
- Craft glue and Mod Podge
- Optional: pins, yarn, safety pins, handwritten quotes
Step-by-step Guide:
Step 1: Cut out your main face shape from lightweight cardboard and decorate it with soft pink tones, blush circles, and quirky features using fabric, caps, and paper.
Step 2: Layer the background with painted flowers and doodles. You can try using a sponge to add playful textures and petals.
Step 3: Create the hair from corrugated cardboard, then embellish it with yarn or fabric to give it more texture.
Step 4: Add 3D elements like buttons, ribbon, or quotes on scrap paper. If desired, tuck in a handwritten message or attach a charm to make it feel like a secret garden.
Step 5: Glue everything in place and seal with Mod Podge to keep it vibrant.
#22. Mixed Media Explorers Secret Journal

This piece looks like a relic pulled from an adventurer’s satchel. It’s bursting with visual storytelling: antique anatomy prints, aged paper, curious dice, natural elements like beads and feathers, even a tiny dinosaur skeleton.
The result is a beautifully chaotic mashup of science, curiosity, and wanderlust like the physical memory of a collector’s life told through objects.
Materials Needed:
- Old leather belt
- Vintage-style paper
- 2 small glass bottles and tubes
- Fossil miniatures (e.g., dino or lizard)
- Wooden dice, beads, buttons, and natural twine
- Magazine or dictionary clippings (insects, anatomy, maps)
- Thumbtacks
- Glue gun
- Small found objects: shells, fabric scraps, coins, etc.
- Optional: feather, rusted keys, burned paper edges
Step-by-step Guide:
Step 1: Start with a firm cardboard or repurposed book base. Now you arrange and glue down the largest items first like bottles, leather straps, and rolled paper tubes.
Step 2: Layer on pages from old encyclopedias or insect anatomy books. You can crumple or distress them to give an aged effect.
Step 3: Wrap twine around grouped items like beads, bones, and pins to mimic an explorer’s bundled keepsakes.
Step 4: Add intrigue with tiny pins, red strings, or wax seals, then finish with details like a splash of red wax, a feather tucked into a seam.
