You won’t believe your empty mason jars or newspapers could be useful in the garden until you see the list of garden hacks below. After reading the article, you can take advantage of your old items lying in mess around your kitchen or garage, and then turn them into helpful things for your garden. Now, instead of throwing them out, let’s save them and give them new missions, they promise to keep you amazed.
They are ready to lie into the trash but they have gardening powers if you know the ways to use them. They also are easy to make at home with a few steps, and little effort. They can be a small greenhouse, utility fruit picker, vegetable markers, or a self-watering planter…, all are great ideas for your garden. Save them and try some for your garden right now. Here we go!
#1 Temporary Vegetable Protection
 Source: Good Spirits
As any gardener knows, nature can be unpredictable. From sudden temperature drops to hungry critters, our precious harvest can face various threats. If you need one simple yet ingenious solution that stands out for protecting the bountiful harvest of your gardens, enter the humble mason jar.
These iconic glass containers have been a staple in kitchens for generations, but their versatility goes far beyond just canning.
And here are some useful that these glass guardians play a vital role in ensuring your vegetables thrive such as Frost Fighters, Pest-Proof Shields, Mini Greenhouses, Micro-Climate Managers, Reusable and Eco-Friendly.
Simply, you just place Mason jars over individual plants in your garden. Ensure the jars completely cover the plant, and gently press them into the soil to create a seal.
Remove the jars in the morning when the temperature rises to prevent overheating the plants., at the same time, allow sunlight and rain to reach the plants.
#2 Zero Dollar Trellis
 Source: Thedeliberateagrarian
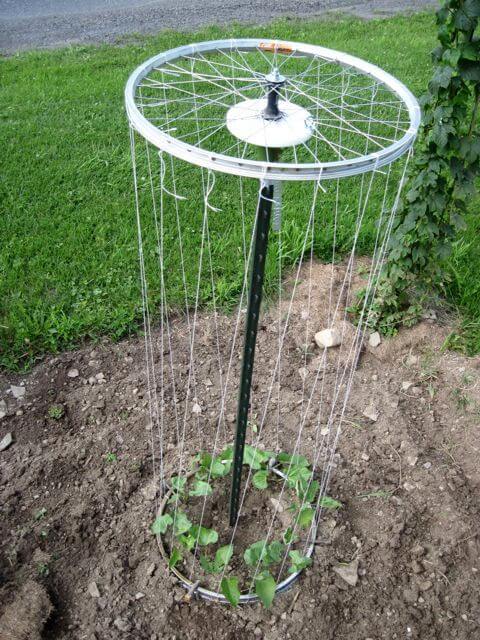
If you are looking for creative and cost-effective gardening solutions, consider repurposing old bicycle wheels to craft a zero-dollar trellis for your garden. This ingenious DIY project not only adds a touch of whimsy to your outdoor space but also provides valuable support for climbing plants, transforming your garden into a lush and green paradise.
Materials needed: Old bicycle wheel(s), paint (optional), brushes (if painting), screws and anchors (for mounting), garden twine or wire (for plant support).
How to make:
- Step 1: Clean the old bicycle wheel(s) thoroughly, removing any dirt or rust. If desired, paint the wheels with your chosen color. Allow them to dry completely.
- Step 2: Select a suitable location in your garden where you want to install the trellis. Ensure it’s near the climbing plants you intend to support.
- Step 3: Attach the bicycle wheel(s) securely to a fence, wall, or sturdy wooden posts using screws and anchors. Make sure they are at a height that allows your plants to climb freely.
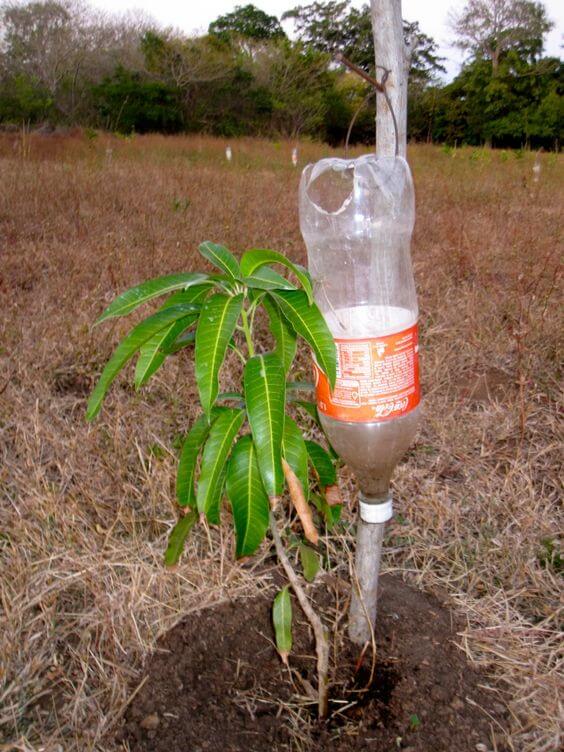
#3 A Low-Tech Gravity Fed Drip Irrigation
 Source: Sustainablenicafarming
This system is an efficient and cost-effective way to water your plants, especially in areas with limited access to electricity or pressurized water sources. This system relies on the force of gravity to deliver a slow, consistent supply of water directly to the root zones of your plants. It’s particularly useful in areas with limited water access or where electricity is unavailable.
Materials needed: Plastic bottles (2-liter or similar size), a sharp tool (scissors, utility knife, or drill), garden hose or tubing, garden stakes or supports, ưater source (elevated, like a raised surface or hanger).
How to make:
- Step 1: Using a sharp tool (scissors, utility knife, or drill), create small holes in the bottom of each bottle. These holes will allow water to drip out.
- Step 2: Attach hanging hooks or brackets to a suitable structure, such as a wall, fence, or trellis, near the plants you want to water. Hang the plastic bottles upside-down from the hooks or brackets so that the neck of each bottle points downward.
- Step 3: Attach a length of garden hose or tubing to the neck of each bottle. This will serve as the main water delivery system. Position the other end of the hose/tubing at an elevated point or attach it to a hanger, ensuring that it’s higher than the bottles. This elevation creates gravity-fed water pressure.
- Step 4: Fill the plastic bottles with water and observe how the water drips from the holes. Adjust the flow rate by making the holes larger or smaller as needed. Monitor the water distribution to ensure it’s sufficient for your plants.
- Step 5: Use garden stakes or supports to keep the hose/tubing in place and prevent it from moving or kinking.
#4 Plastic Bottle Fruit Picker
 It is a simple and DIY (do-it-yourself) tool used for harvesting fruits from trees, especially those that are out of reach. It is made by attaching a plastic bottle to the end of a long pole or stick, creating a makeshift basket or receptacle to collect fruit.
It’s a useful tool for home gardeners and can help reduce the risk of injury from climbing trees or using ladders to reach high branches. Additionally, it allows you to collect fruit gently to avoid bruising or damaging the produce.
Materials needed: A plastic bottle with a screw-on cap (2-liter or similar size), a sturdy wooden or metal pole (approximately 4-6 feet long), a sharp knife or scissors, a screwdriver or drill, strong adhesive or epoxy (optional).
How to make:
- Step 1: Using a sharp knife or scissors, carefully cut a hole near the top of the plastic bottle, leaving enough space to insert the pole through. Make sure the hole is large enough to fit the pole snugly.
- Step 2: Attach the bottle to the pole, and insert the pole through the hole in the plastic bottle. The bottle should slide down the pole, with the cap end facing upward. If the bottle is loose on the pole, you can use strong adhesive or epoxy to secure it in place, ensuring it won’t slide off during use.
To use your plastic bottle fruit picker, simply position the bottle beneath a fruit on a high branch. Reach up and gently twist or tap the fruit with the bottle’s opening, causing it to drop into the bottle.
#5 Seed Starting in Mini Greenhouses
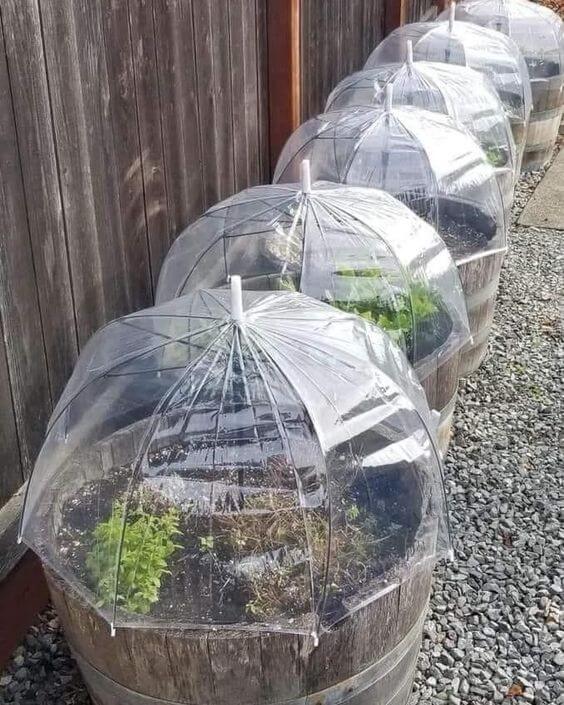 Creating mini greenhouses is a practical way to protect young vegetables from harsh weather conditions. They also known as seedling trays or seed starting trays with transparent lids, create a controlled environment that encourages seed germination and early seedling growth. It allows you to control the early stages of plant growth and extend your growing season.
Materials needed: Small steel frames (shaped like small umbrellas), nylons or clear plastic sheeting, garden stakes or small wooden stakes, twine, or zip ties.
How to make:
- Step 1: Place the steel frames over the young vegetables you want to protect. Make sure the frames provide enough space and height for the vegetables to grow within.
- Step 2: Use garden stakes or small wooden stakes to secure the steel frames in the ground. Position the stakes around the perimeter of each frame and drive them firmly into the soil to prevent the frames from shifting or falling over.
- Step 3: Cover with nylons, drape nylons, or clear plastic sheeting over the steel frames to create a transparent enclosure. Ensure that the material completely covers the frames and reaches the ground on all sides.
- Step 4: Secure the covering by using twine or zip ties to secure the nylon or plastic sheeting to the steel frames. Make sure the covering is taut and snugly attached to the frames to prevent it from blowing away in the wind.
To provide ventilation and access to your plants, you can partially open or lift the covering during the day when the weather is mild. In the evening or during adverse conditions, close the covering to protect the plants.
#6 Natural Garden Pest Control
 Source: Pakovska
In some cases, cabbages look so mighty strong, but there is a cabbage fly that can easily destroy all your crops. That is the reason why it’s advised that you put insect nets around the cabbages and some collars around their stem. You can make these collars from some old thick plastic mixed with fabric sheets.
Besides, you can make them from just about anything that’s a bit thick and will keep in place and will be able to face rain showers and wind.
It’s very simple to make, you cut a circle from some sturdy material, and you cut the circle through halfway. When you reach the middle, you start cutting some small cuts in a circle shape. You do this so that the cabbage can grow during the period that the collar is still on, but at the same time, it will keep the collar closed off against the egg-laying flies during periods when the stem is still thin.
After you have placed them around the stem, you should press them onto the soil firmly so that there is no air between the collar and the cabbage.
This method manages and reduces pests in your garden without relying on synthetic chemicals. It is not only safer for the environment and beneficial insects but also promotes healthier and more sustainable gardening practices.
#7 Way to Get Rid of Cutworms
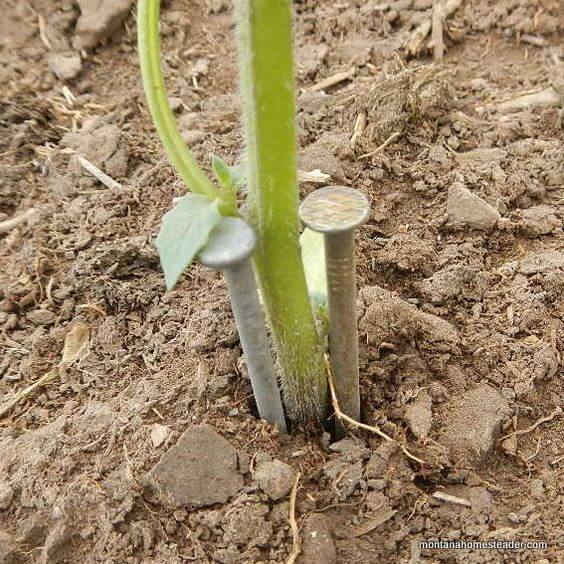 Source: Montanahomesteader
Cutworms are common garden pests that can damage or kill young seedlings and transplants by chewing through their stems at or near ground level. These caterpillars are active at night and can be a frustrating problem for gardeners. So, to organically protect garden plants from cutworms, here is one of the easiest and most effective ways to get rid of them.
For larger plant starts, like tomatoes and tomatillos, you can use nails for stem protectors. In addition, you also use toothpicks or plastic drinking straws cut into shorter pieces. Basically, the idea is to put something tall around the stem of the plant to prevent the cutworm from wrapping around and cutting it.
#8 DIY Slug Collars
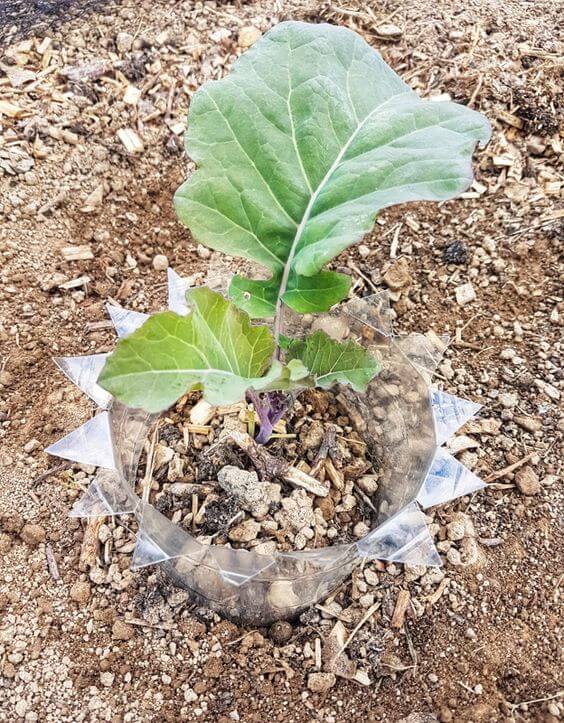 Source: Beginnergardenertips
It also known as slug barriers or slug rings, are simple yet effective devices used to protect plants from slug damage in your garden. They create a physical barrier that slugs have difficulty crossing, helping to keep your plants safe. You can make DIY slug collars using various materials. But in the article, we want to share this really simple method we use to make DIY slug collars.
Materials needed: A plastic bottle, scissors.
How to make:
- Step 1: Cut around your bottle so that you have 2 or 3 rings, each around 10-20cm).
- Step 2: Cut spikes onto one side of each plastic ring.
- Step 3: Fold each of the spikes down sideways so that they stick out horizontally.
- Step 4: Place your DIY slug collar over your seedling and make sure it’s pushed down into the ground.
#9 Another Way To Prevent Young Plants From Cutworm Damage
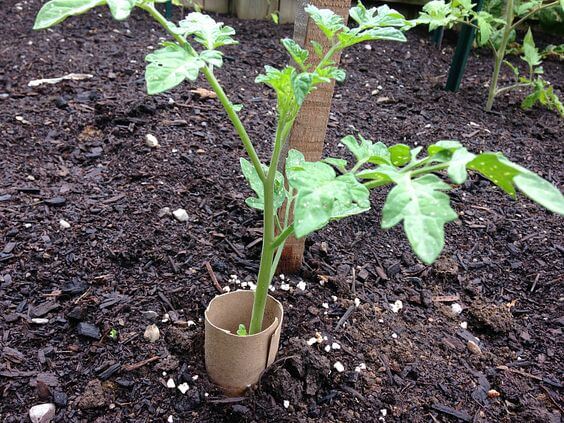 Source: Hobbyfarms
As soon as you’ve planted tomato, pepper, sunflower, or other young plants in the ground, use a 3-inch piece of cardboard from a toilet paper or paper towel roll to create a protective barrier. Simply cut the cardboard tube into sections and split them open lengthwise.
Gently wrap one of these cardboard sections around each plant, ensuring that the bottom of the tube is pushed into the soil by about an inch. Cutworms tend to move just below the surface of the soil, so this method keeps them away from the plant’s stem.
In addition to using physical barriers like collars or barriers made of materials like copper tape. By implementing one or more of these methods, you can effectively prevent cutworm damage to young plants in your garden and promote healthy growth.
#10 Goodbye Weed
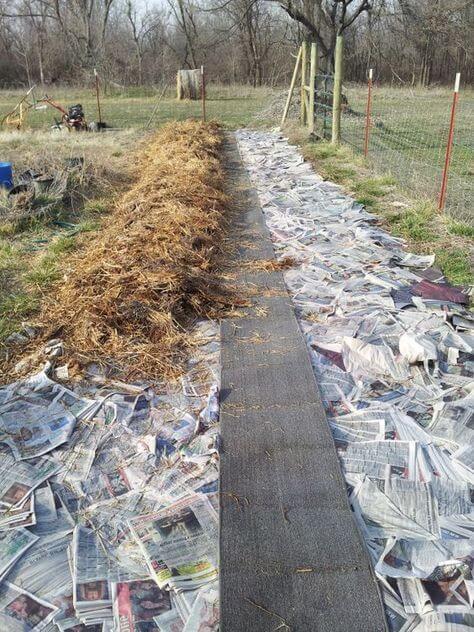 Source: Gentlysustainable
Getting rid of weeds in your garden or yard can be a persistent challenge, but with the right strategies and persistence, you can effectively control and minimize weed growth. Using newspapers to protect plants from weeds is an effective and environmentally friendly method while also helping to retain moisture in the soil.
Materials needed: Newspapers (black and white pages without colored ink), mulch (optional).
How to make:
- Step 1: Remove any existing weeds or grass around your plants
- Step 2: Collect old newspapers with black and white pages and without colored ink. Avoid using glossy or colored pages, as they may contain chemicals that can be harmful to plants.
- Step 3: Spread a layer of newspapers around the base of your plants. Overlap the newspaper sheets to ensure thorough coverage. The newspaper layer should be about 2-3 sheets thick. This thickness helps prevent weeds from growing through.
- Step 4: Lightly moisten the newspaper layer with water to help it conform to the ground and stay in place.
- Step 5: For added weed suppression and a more polished look, you can cover the newspaper layer with a 2-3 inch thick mulch such as wood chips, straw, or compost.
#11 An Easy Way to Edge a Lawn
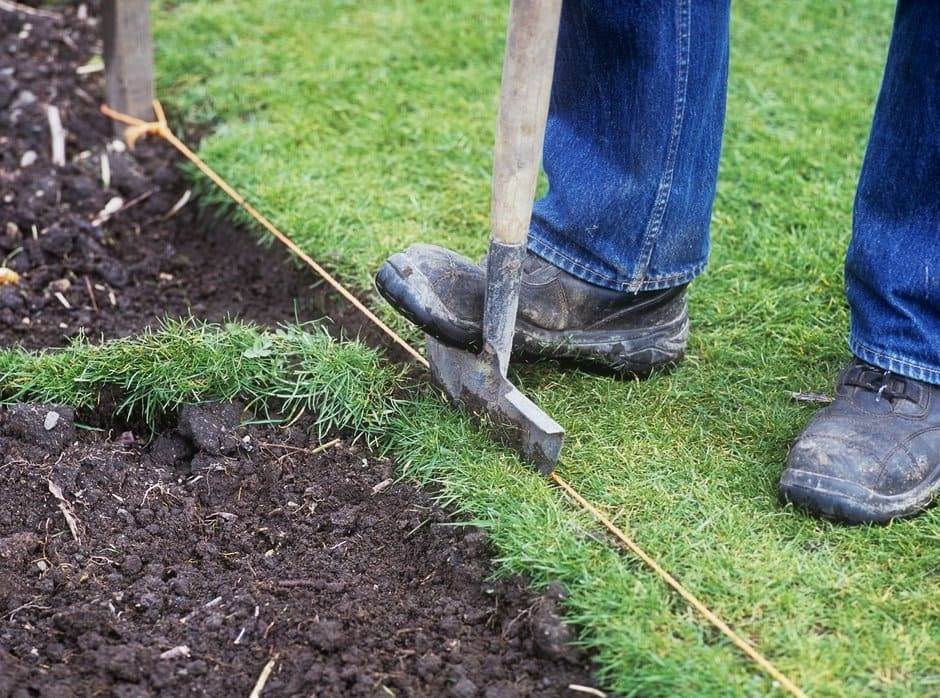
This way not only enhances its appearance but also helps maintain its shape and prevents grass from encroaching into flower beds, pathways, or other areas. It prevents grass from invading other areas and keeps your garden beds and pathways well-defined. Regularly edging your lawn can become a satisfying and relatively easy part of your garden maintenance routine.
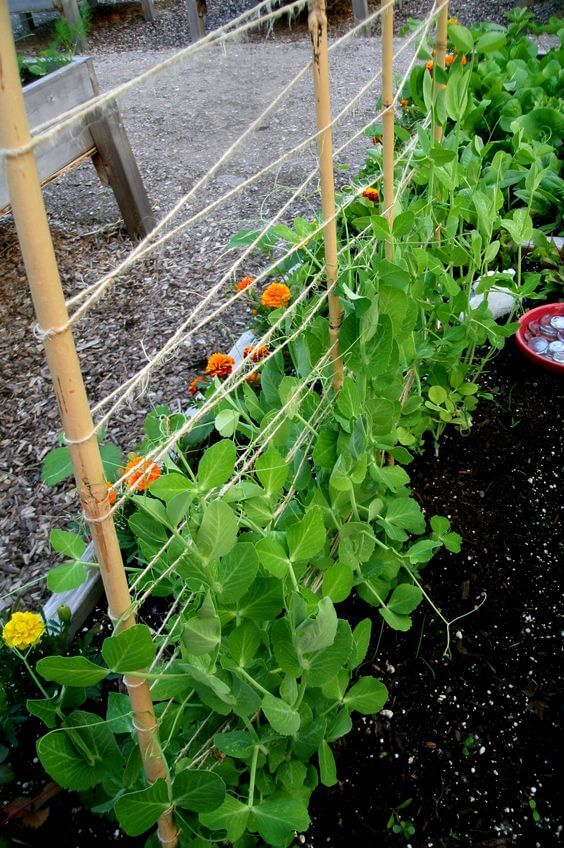
#12 Simple Pea Trellis
Creating a simple trellis for your pea plants is a great way to support their growth, keep the peas off the ground, and make harvesting easier. It provides the support needed for your pea plants to grow vertically, which helps save space in your garden and keeps the peas off the ground, reducing the risk of pests and diseases. It also makes harvesting peas more convenient.
 Source: Kristine Newhouse
Materials needed: Sturdy tree branches (long and straight), rope or twine, pruning shears, or a saw (if needed).
How to make:
- Step 1: Choose long and straight tree branches that are strong enough to support the weight of your pea plants as they grow. The branches should be at least 6-8 feet long, prune or trim branches (if necessary).
- Step 2: Position two or more tree branches in the ground at an angle, creating an A-frame shape, or vertically or horizontally.
- Step 3: Dig holes in the ground deep enough to firmly anchor the tree branches. Place the base of each branch in a hole and fill it with soil to secure it in an upright position. Tamp down the soil to ensure stability.
- Step 4: Create a Support framework by tying the top ends of the tree branches together securely using rope or twine. You can attach shorter tree branches horizontally across the framework at various heights.
As your pea plants grow, you can continue to add more horizontal twine supports to accommodate their height. These crossbars will provide more surface area for your bean plants to climb. This method not only provides support for your beans but also adds a rustic and natural touch to your garden.
#13 Blanching Leeks From Toilet Rolls
 Source: Gapphotos
This is a gardening technique used to produce long, tender, and pale green or white edible stems. While toilet rolls are not typically used for this purpose, you can use a similar method to blanch leeks using other materials such as cardboard or PVC pipe.
Using cardboard tubes or similar materials helps create the desired tender, pale stems that are popular for culinary use. This method also provides some protection from pests and makes harvesting leeks more convenient.
Materials needed: Toilet paper rolls (empty), garden twine, or rubber bands.
How to make: Collect empty toilet paper rolls and Make sure they are clean and free of any residual paper. Gently wrap each leek plant with a toilet paper roll. Slide the roll over the leek’s stem to cover the exposed part, leaving the green foliage sticking out at the top. To keep the toilet paper roll in place, use your hands to press them into the ground.
As the leeks grow, continue to add more toilet paper rolls to extend the blanching process. Ensure that the rolls cover the exposed stem to prevent sunlight from reaching it.
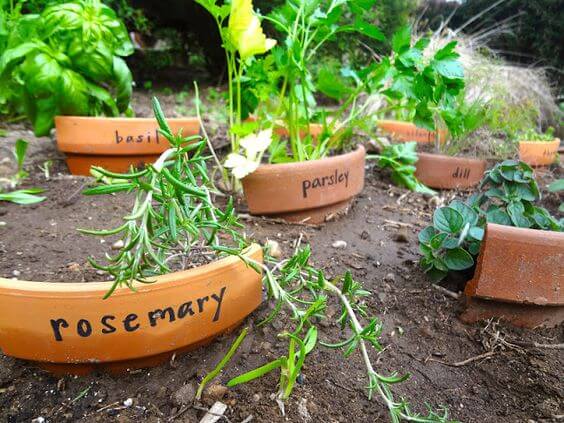
#14 DIY Plant Markers From Broken Pots
 Source: Chickenscratchny
Creating DIY plant markers from broken pots is an inventive way to repurpose materials and help you easily identify your plants in the garden.
Using broken pot pieces as plant markers not only helps you identify your plants but also reduces waste by repurposing materials that might have otherwise been discarded. Plus, the natural terra cotta color adds a rustic and charming touch to your garden.
#15 The Fastest Way to Clean Garden Tools
 Source: Gardenbetty
Cleaning your garden tools is essential to prevent the spread of diseases, maintain the tools’ effectiveness, and extend their lifespan. The fastest way to clean garden tools depends on how dirty they are, but here’s a quick method for routine cleaning.
Regularly cleaning your garden tools after use not only prolongs their life but also ensures that they work effectively and reduce the risk of spreading diseases from one plant to another. This quick cleaning method is suitable for routine maintenance, but for tools in extremely poor condition or with significant rust, you may need more extensive cleaning and restoration.
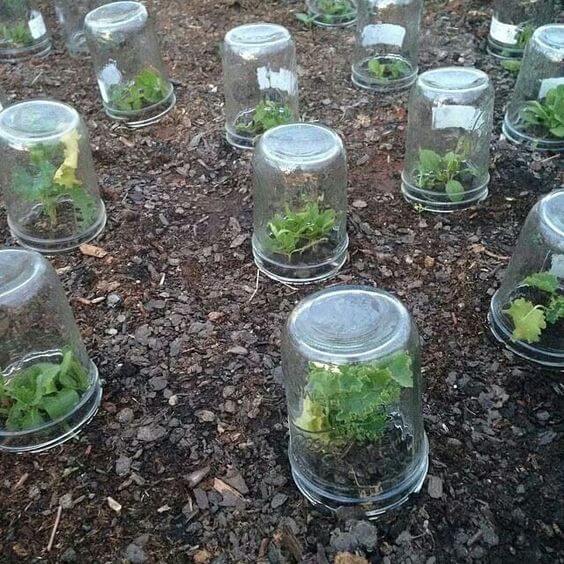
#16 Lettuce in Cloches
 Source: Tumblr
This method can help protect your plants from adverse weather conditions, pests, and extend the growing season. It allows you to control the environment and protect your plants from various challenges. It’s especially useful for early spring and late fall planting when temperatures are cooler and less favorable for lettuce. Just remember to monitor the temperature and provide adequate ventilation to prevent overheating on sunny days.
#17 Recycled Garden Edging
 Source: Flickr
Using recycled materials for garden edging is an eco-friendly and creative way to define garden borders, pathways, and landscape features while reducing waste.
When using recycled materials for garden edging, be sure to prepare the area by digging a shallow trench to accommodate the edging materials. Secure the materials in place, and consider using a level to ensure they are even and provide a stable edge. With a bit of creativity and resourcefulness, you can give your garden a distinctive and environmentally friendly edge.
#18 Protect Green Bean Seedlings
 Source: Caroljmichel
If you have animals like chickens, dogs, and cats, this is a great tip to prevent them from “damaging” your vegetable garden. Placing old forks into the vegetable bed will help protect your vegetable garden when you grow vegetables at home.