If you are looking for something new and special to spice up your garden, here we show you some wonderful artistic pebble projects for you. Pebbles are a great gift by Natural Mother, all pebbles are the sense of closeness to Mother Earth that they evoke. This is the reason why they are excellent for unique garden landscaping ideas, and low-maintenance, budget-friendly alternatives.
Owning a beautiful garden pebbles art isn’t difficult! You don’t need to be artistic, or even particularly creative because these ideas are easy and fun pebbles. Also, tiny pebbles are easy materials to obtain for crafts, then you can use these pebbles to create yard art.
Add the sturdiness of these buddies, and you get a pebble garden that surely looks more beautiful and attractive than your usual garden. Have fun!
This article contains affiliate links. If you purchase through them, I may earn a small commission at no extra cost to you. Thank you for your support!
#1. DIY Tic-tac-toe Painted Rocks
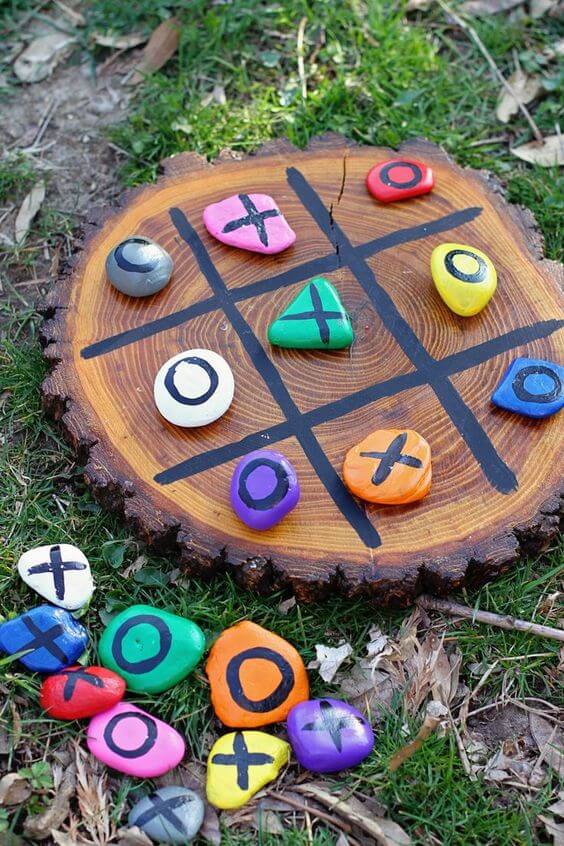
Whether you’re looking for a unique gift idea or a delightful outdoor game for all ages, DIY Tic-tac-toe Painted Rocks is an enjoyable and customizable option that brings a touch of whimsy to your leisure time.
 SHOP RIVER ROCK 2-3 INCHES
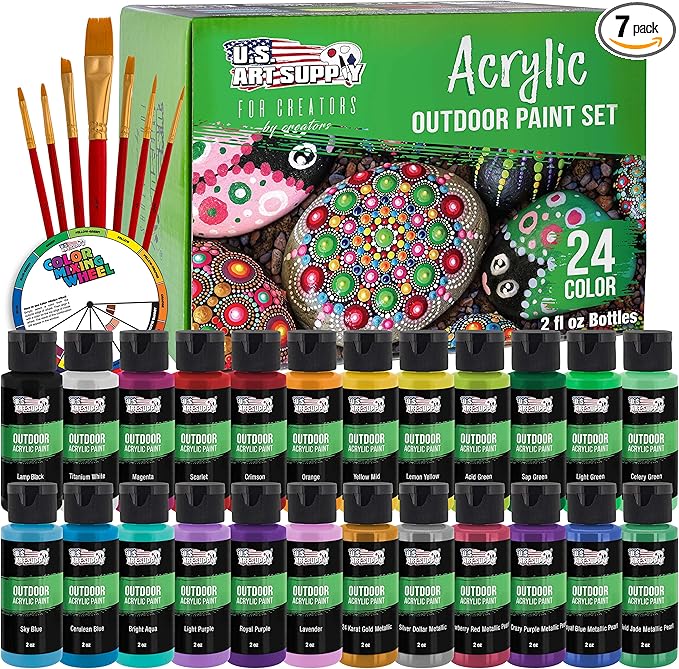 SHOP ACRYLIC PAINT AND PAINTBRUSH SET
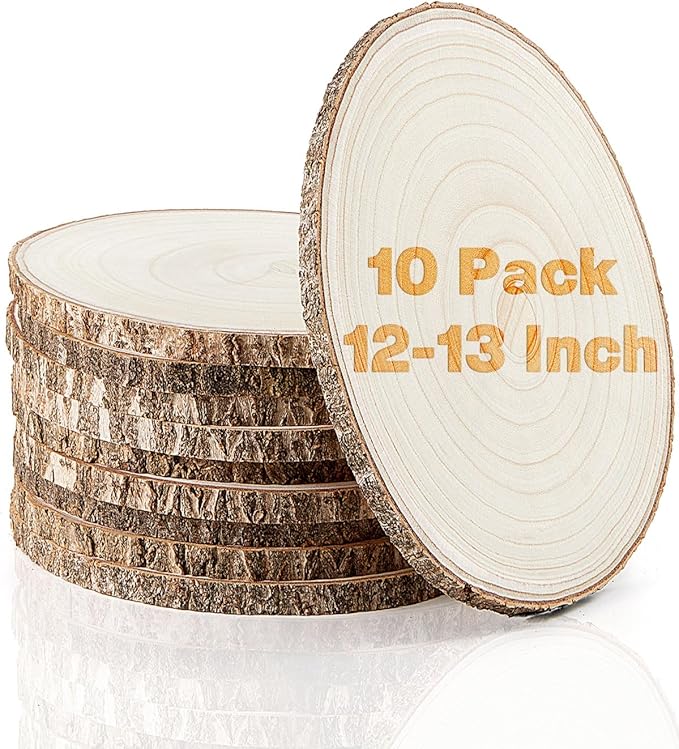 SHOP TREE SLICE
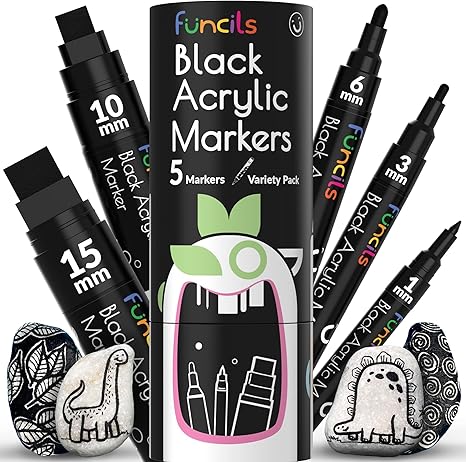 SHOP BLACK ACRYLIC PAINT PEN
Materials Needed
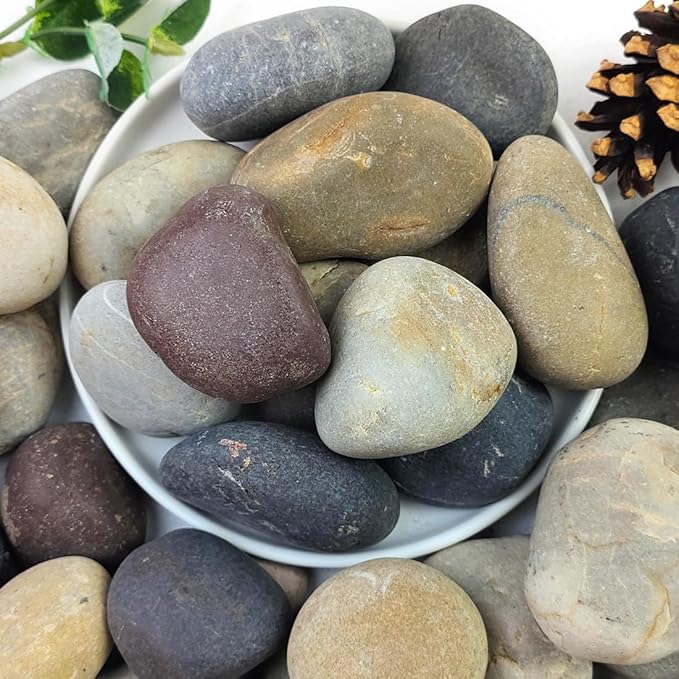
- 18 flat river rocks (about 2–3 inches wide)
- Acrylic craft paint and paintbrush set
- Black acrylic paint pen
- Tree slice (approx. 12–15 inches diameter)
- Outdoor sealant spray
Step-by-step Guide
Step 1: Wash and dry the pebbles to remove any dust or dirt, then paint each one with a bright acrylic base color. Let them dry completely.
Step 2: Use a black paint pen or fine brush and black paint to draw Xs on half the rocks and Os on the others.
Step 3: While your pebbles dry, paint a tic-tac-toe grid (two vertical and two horizontal lines) on your wood slice using black acrylic paint.
Step 4: Once everything is dry, spray both the board and the stones with outdoor sealant to protect from weather and fading. Let it cure overnight before setting up outside.
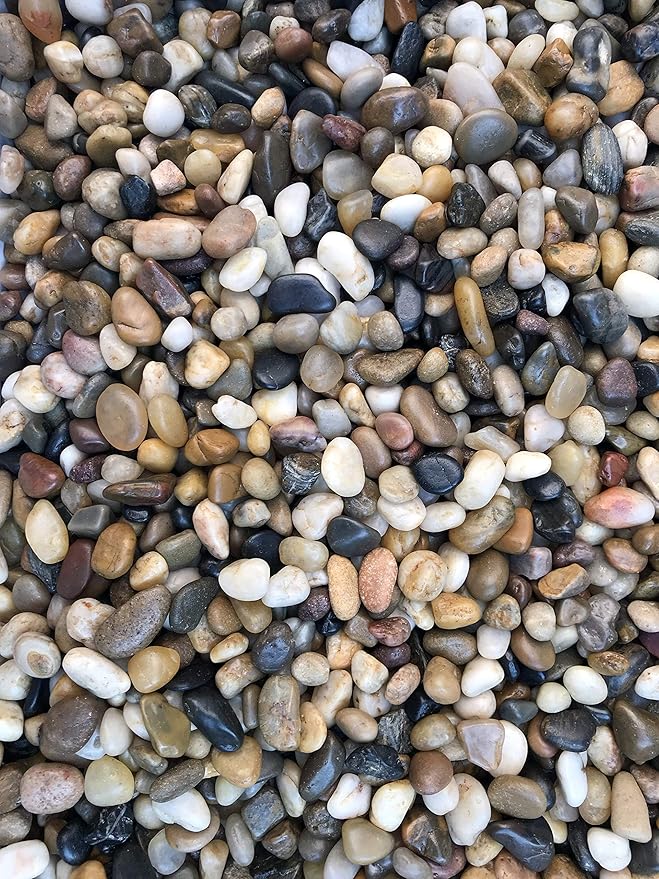
#2. DIY Dry Creek Bed
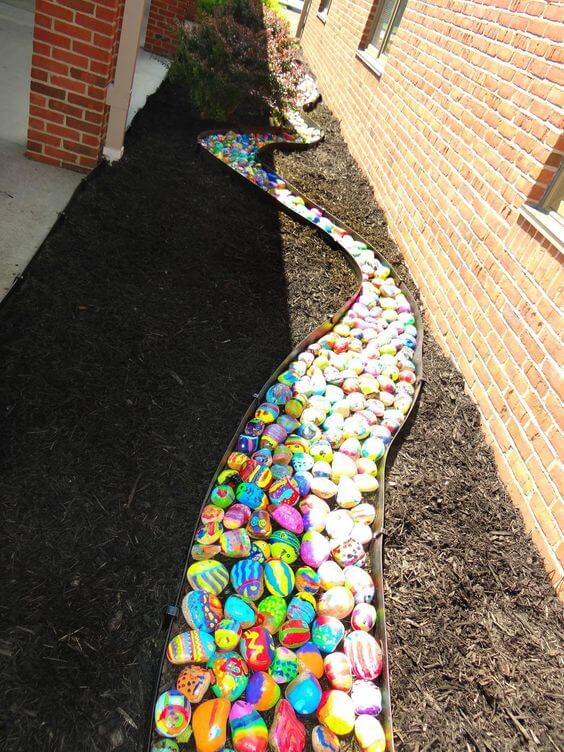
This natural meandering streambed without the water flow is a creative and practical way to add beauty and functionality to your outdoor space.
Materials Needed
- 500 smooth river pebbles (2–4 inches in size)
- Acrylic paint set and paintbrush set
- Outdoor acrylic sealant spray
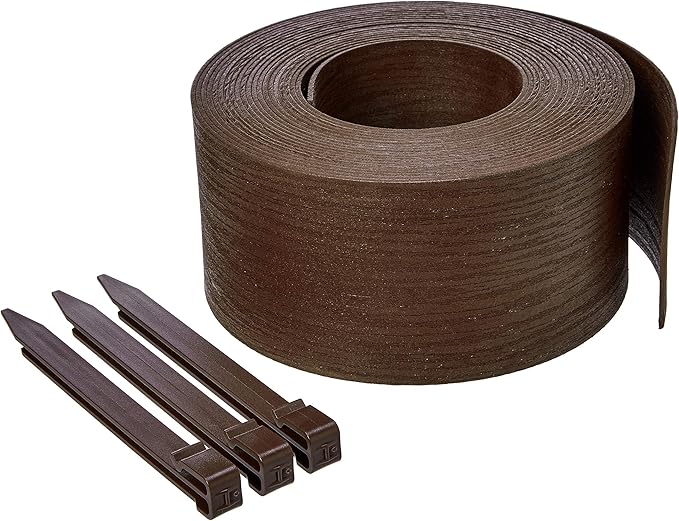
- Garden edging material (approx. 20–30 feet)
Step-by-step Guide
Step 1: Paint each rock in a unique design or solid color using acrylic paint. You can do stripes, dots, zigzags, patterns, or anything that makes you smile. Let them dry thoroughly.
Step 2: Once dry, spray each pebble with a clear outdoor acrylic sealant to protect the colors from rain and UV damage.
Step 3: Outline your river path in the garden using flexible edging to guide the curve. Clear any grass or debris from the strip where you’ll place the rocks.
#3. A Green Frog!
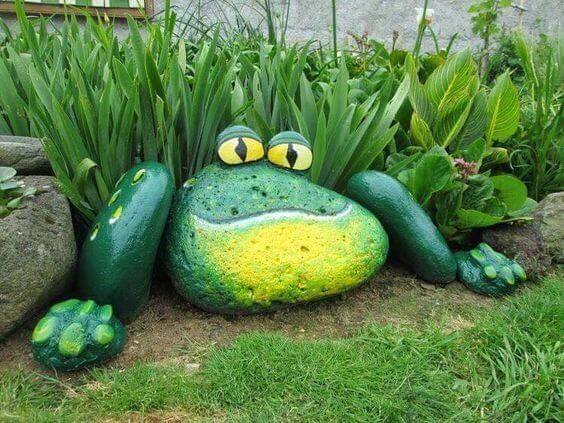
By carefully selecting and painting small, smooth pebbles, you can create a charming miniature frog figurine.
Materials Needed
- Large smooth garden stones (6 pieces: 1 large oval for body, 2 for legs, 2 smaller round for eyes, 1 for the head)
- Outdoor acrylic paint set and paintbrush set
- Clear outdoor sealer spray
- Heavy-duty outdoor adhesive (optional)
Step-by-step Guide
Step 1: Clean and dry all stones thoroughly. Use green paint for the body, legs, and arms, then add yellow on the belly and toe spots. Let dry completely.
Step 2: Paint the eyes using white for the base, yellow for the iris, and black for the pupils. Add a white dot for that cartoonish sparkle.
Step 3: Use a fine brush to outline details like the mouth, nostrils, and finger/toe lines. Be creative as it’s a frog, not a blueprint.
Step 4: Spray each painted rock with outdoor sealer to make it weather-resistant.
Step 5: Arrange the rocks in a frog pose at the edge of your flowerbed. If you want to make it permanent, use heavy-duty outdoor adhesive to glue them to one another and to the ground.
#4 Painted Rock Bumble Bee
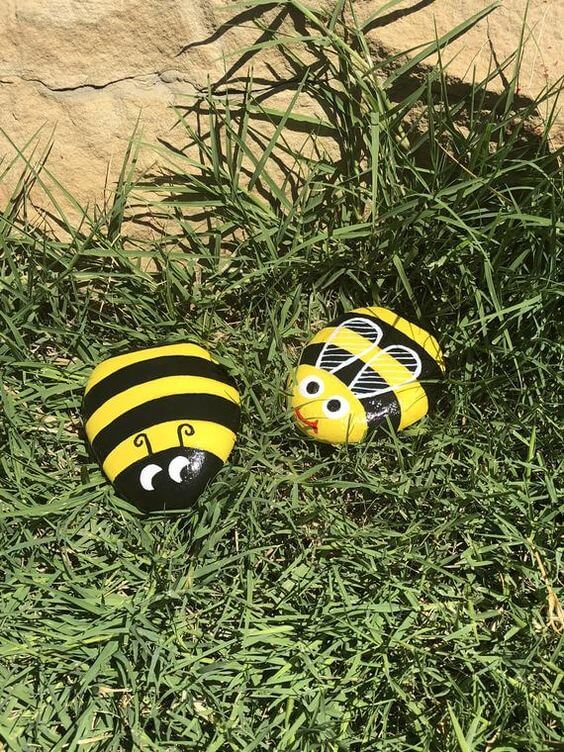
Do you want to invite bees in your garden all year round? By trying to make the idea, wildlife guests will go to visit your garden.
Materials Needed
- 2 smooth flat pebbles
- Acrylic paint set (yellow, black, white, red)
- Paint pens or detail brushes
- Outdoor sealer spray
Step-by-step Guide
Step 1: Paint each pebble yellow and let dry completely. You may need two coats for even coverage.
Step 2: Add black stripes across the pebble horizontally to mimic the bee’s body. Use a fine brush or paint pen to create neat lines.
Step 3: Paint large white circles for the eyes, add black dots for pupils, and draw on antennae or tiny smiles with a fine-tipped brush. Optional: add white wings with a heart or swirl design.
Step 4: Once dry, spray the whole pebble with clear outdoor sealant to protect the paint from weather and wear.
#5. A Flowering Cacti Pot
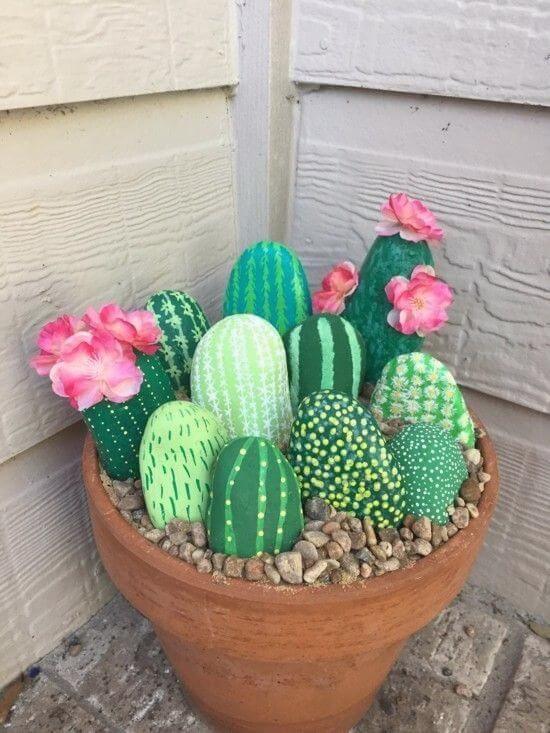
The flowering cacti pot is a unique and eye-catching piece of decor that brings a touch of the arid landscape into your home or garden.

Materials Needed
- 10 smooth oval pebbles (about 3-6 inches tall)
- Acrylic paint set and paintbrushes
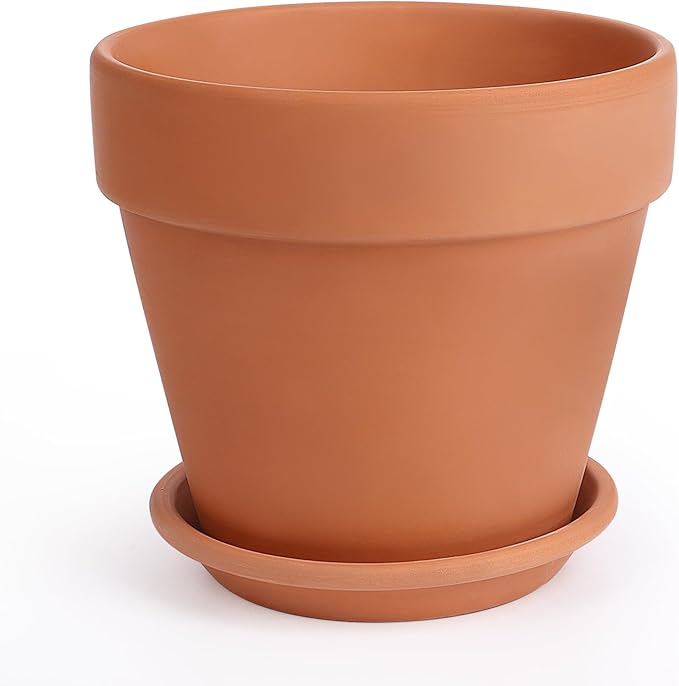
- Terracotta pot
- Gravel
- Faux flowers
- Outdoor sealer spray
Step-by-step Guide
Step 1: Paint each rock in different shades of green and let them dry completely. Use light greens, dark greens, and even a bit of turquoise for variety.
Step 2: Use a fine brush or paint pen to add cactus patterns like lines, dots, X-shapes, and spines in white or yellow.
Step 3: Spray all the rocks with a clear sealer to lock in the color and protect them from chipping.
Step 4: Fill the terracotta pot with gravel or decorative pebbles and arrange your painted rocks like growing cacti.
Step 5: Glue or stick faux flowers on top of a few “cacti” to give them a blooming effect and extra flair.
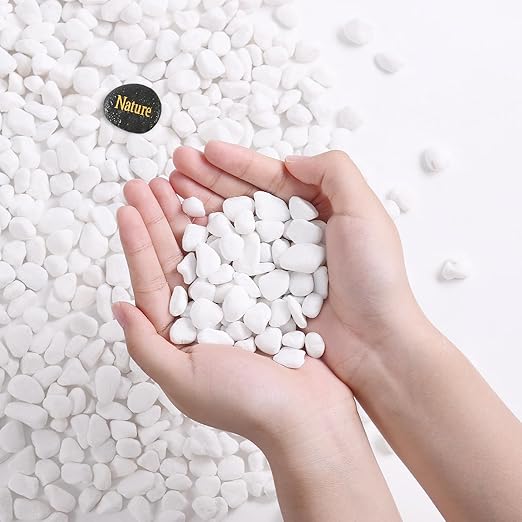
#6. Yard Pebble Landscaping Idea
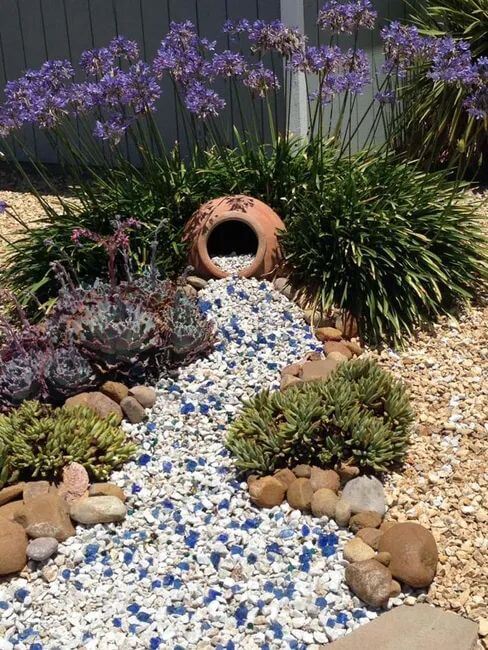
The arrangement of pebbles can be combined with carefully chosen plants, shrubs, or other landscaping elements to create a harmonious and visually captivating outdoor space.

Materials Needed
- 20 lbs small white pebbles
- 5 lbs blue painted pebbles
- Terracotta pot
- Outdoor sealant spray
Step-by-step Guide
Step 1: Prepare your painted blue pebbles by coating them in outdoor acrylic sealant for durability.
Step 2: Outline the stream path in your garden with flexible edging material, creating a natural flowing shape.
Step 3: Place the terracotta pot at the start of the stream, tipping slightly forward as if water is flowing out.
Step 4: Fill the outlined path with a mix of white and blue pebbles, scattering the blue ones unevenly to mimic the sparkle of water.
#7. Painted Pebble World
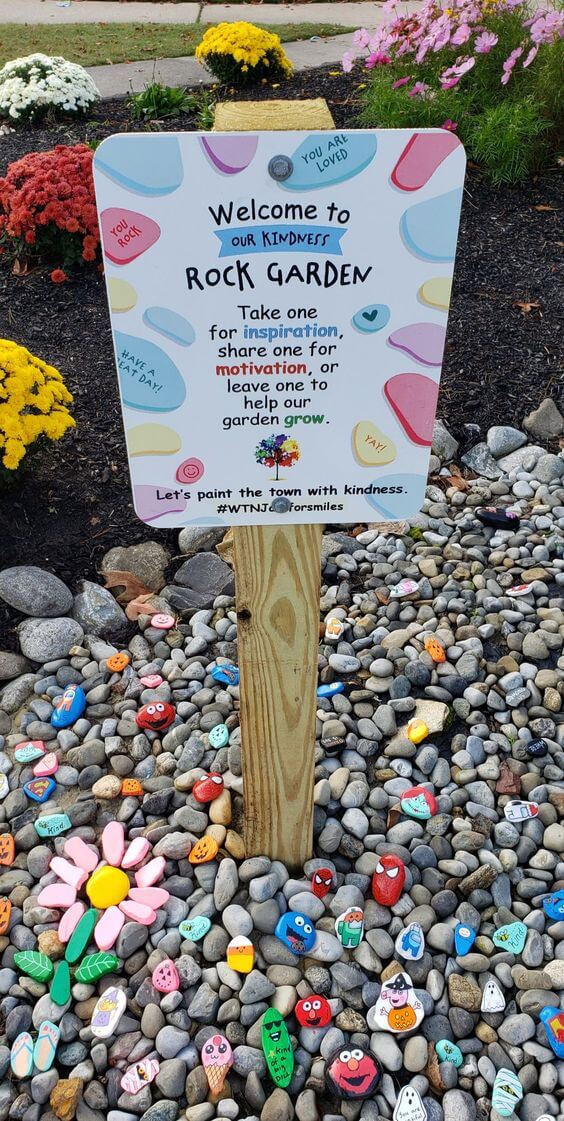
These painted pebbles can be used to adorn gardens, walkways, or even kept as collectibles, creating a vibrant and imaginative world of colorful and expressive stones.
Materials Needed
- 100+ small garden pebbles (various sizes about 2–3 inches)
- Acrylic paint set
- Paintbrushes and paint pens
- Outdoor sealant spray
- Signpost (optional)
Step-by-step Guide
Step 1: Paint encouraging words, cute characters, or inspirational designs on the garden pebbles. Use multiple coats if needed and allow drying between layers.
Step 2: Spray the painted pebbles with outdoor sealant to protect the artwork from weathering.
Step 3: Arrange the painted rocks on a gravel bed or garden area, encouraging others to take or add their own painted stones.
Step 4: Optional: Create and place a sign explaining the kindness rock garden concept to invite community participation.
#8. Colorful Garden Mulch

This decorative mulch goes beyond the traditional brown or natural tones, adding a burst of color to your flower beds, pathways, or garden borders.
Materials Needed
- 200 smooth garden pebbles (3-5 inches)
- Acrylic paint set and fine-tip paint pens
- Outdoor sealant spray
- Mulch
- Optional: Large feature stone
Step-by-step Guide
Step 1: Paint meaningful words, names, or inspiring symbols on each pebble using acrylic paints and fine-tipped pens. Multiple coats may be necessary for vibrancy.
Step 2: Seal each painted stone with outdoor spray sealant to protect the artwork from weathering.
Step 3: Clear and refresh the garden bed around the tree, removing debris and adding mulch or fresh soil.
Step 4: Arrange the painted pebbles neatly around the tree base, placing a larger, special painted stone as the focal point.
#9. Garden Markers
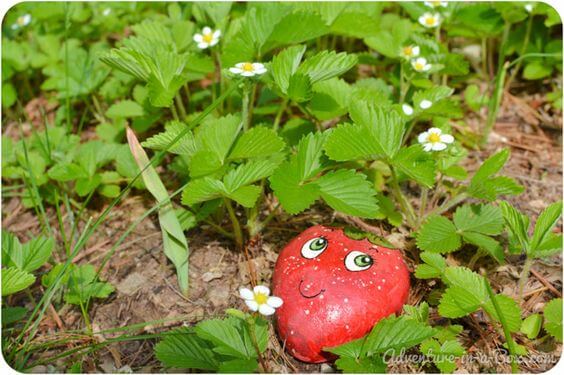
Once completed, these personalized pebble markers are placed next to the corresponding plants, serving as an attractive and informative way to keep track of your garden’s different varieties.
Materials Needed
- Smooth, heart-shaped pebble (1 piece, approx. 3-4 inches wide)
- Acrylic paint set and paintbrush
- Clear outdoor sealant spray
Step-by-step Guide
Step 1: Paint the entire pebble bright red and allow it to dry completely. Apply a second coat if needed for solid coverage.
Step 2: Use white and black paint or pens to create big, expressive eyes with highlights for a lively effect.
Step 3: Paint a cute smiling mouth with pink or black and add tiny seeds or dots with black or green for a realistic strawberry look.
Step 4: Seal the painted pebble with clear outdoor sealant to protect the artwork.
#10. Free Rock Flower Garden
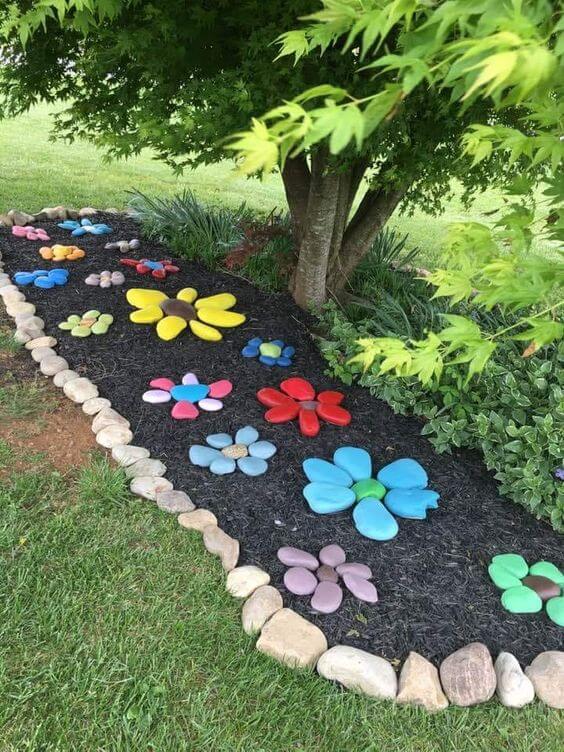
The free flower garden made from pebbles is a unique and imaginative landscaping idea that combines the natural beauty of flowers with the creative use of smooth, painted pebbles.
Materials Needed
- 60 smooth oval and round garden pebbles (varying sizes 3–6 inches)
- Acrylic paint set and paintbrushes
- Black garden mulch
- Natural stones
- Outdoor sealant spray
Step-by-step Guide
Step 1: Paint the pebbles in flower petal and center shapes with bright colors. Let dry completely, applying multiple coats if needed.
Step 2: Seal each stone with outdoor spray to protect against weather damage.
Step 3: Clear and prepare your garden bed, adding black mulch or soil for a clean backdrop.
Step 4: Arrange painted pebbles in flower shapes with larger stones as petals, smaller ones as centers, spacing them evenly for a natural look.
Step 5: Edge the flower bed with natural stones or river rocks to define the area and enhance the display.
#11. Painted Pebble Flower
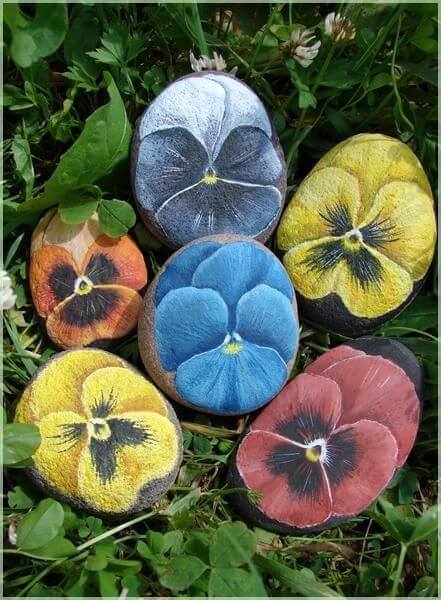
By using various paints and creative designs, you can bring these stones to life, creating a charming and eye-catching decorative item.
Materials Needed
- 6 smooth, flat garden pebbles (approx. 3–4 inches wide)
- Acrylic paint set and fine detail brushes
- Clear outdoor sealant spray
Step-by-step Guide
Step 1: Paint each pebble with the base color of the pansy petal, using multiple coats if needed for opacity.
Step 2: Add detailed petal veins, shading, and center markings with fine brushes to mimic real pansy flowers.
Step 3: Let the paint dry completely, then spray each pebble with outdoor sealant to protect the delicate artwork.
#12. Footprints Made From Pebbles
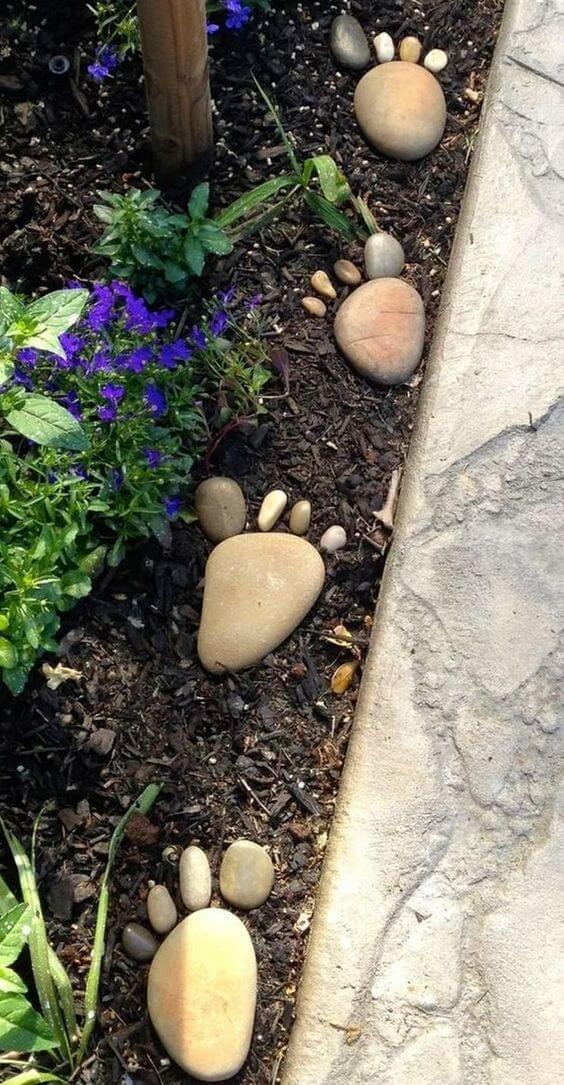
The pebbles are carefully arranged to resemble footprints, and this charming feature can serve both as a decorative element and a conversation piece in your outdoor area.
Materials Needed
- 6 large flat garden pebbles (approx. 5–7 inches wide)
- 24 small smooth pebbles (about 1–2 inches for toes)
- Garden mulch
Step-by-step Guide
Step 1: Position the large flat pebbles spaced to represent the soles of the feet.
Step 2: Arrange smaller pebbles as toes around the top edge of each large pebble to mimic footprints.
Step 3: Press stones lightly into the soil or mulch to ensure they stay in place and are stable underfoot.
#13. Stone Spiral on Stand
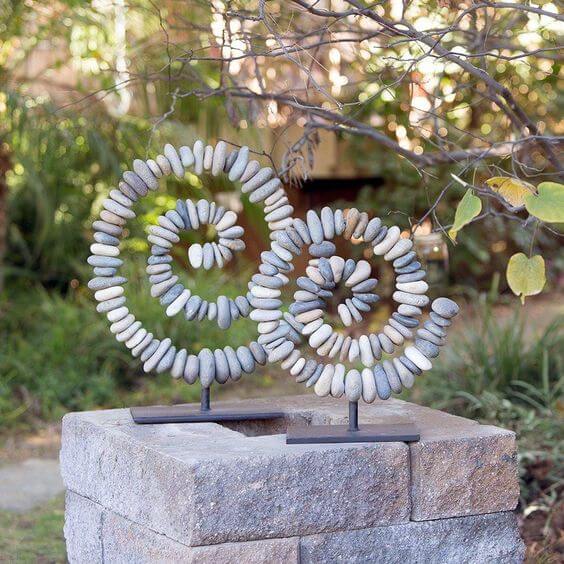
Typically, this artwork features an arrangement of small, polished stones in a spiral pattern, often affixed to a sturdy stand or base.
Materials Needed
- Approx. 100 smooth flat pebbles (1-2 inches wide)
- 2 metal spiral stands frame
- Strong outdoor adhesive
- Gloves and safety goggles
Step-by-step Guide
Step 1: Starting from the innermost part of the spiral frame, glue each pebble carefully along the metal spiral or wire, working outward and upward.
Step 2: Continue stacking and gluing stones until the entire spiral is covered, ensuring each pebble is securely attached.
Step 3: Allow the glue to dry completely according to the manufacturer’s instructions.
#14. A Focal Point On Lawn
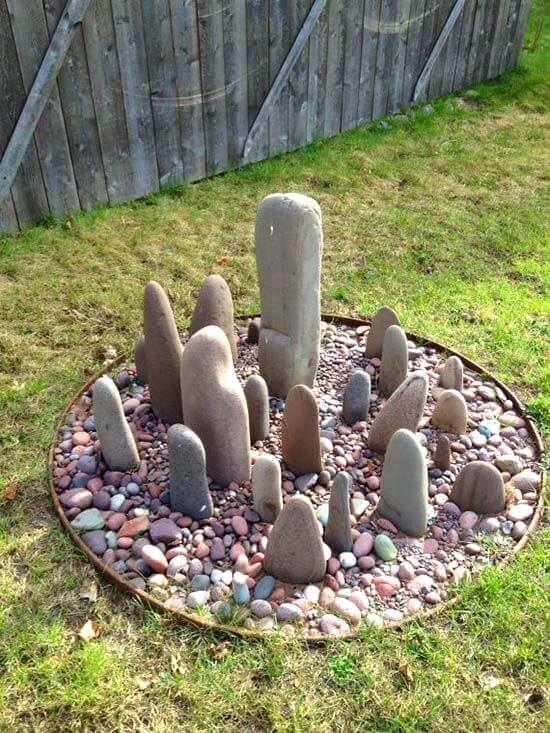
Whether used as a standalone decoration or as a gathering spot for outdoor activities, this artistic and low-maintenance addition can transform your lawn into a place of aesthetic beauty and relaxation.

Materials Needed
- 20 large, smooth standing pebbles(varying heights from 1 to 3 feet)
- Approx. 2 cubic feet of small colorful gravel or pebbles
- Circular metal (approx. 6 feet diameter)
- Shovel and garden trowel
- Gravel stabilizer (optional)
Step-by-step Guide
Step 1: Lay landscape fabric or gravel stabilizer to prevent weed growth and stabilize pebbles if desired.
Step 2: Arrange the large standing pebbles upright in the circle, varying their heights and spacing for a natural, balanced look.
Step 3: Fill the base with colorful smaller gravel or pebbles, covering the ground evenly around the standing stones.
#15. A Dragonfly
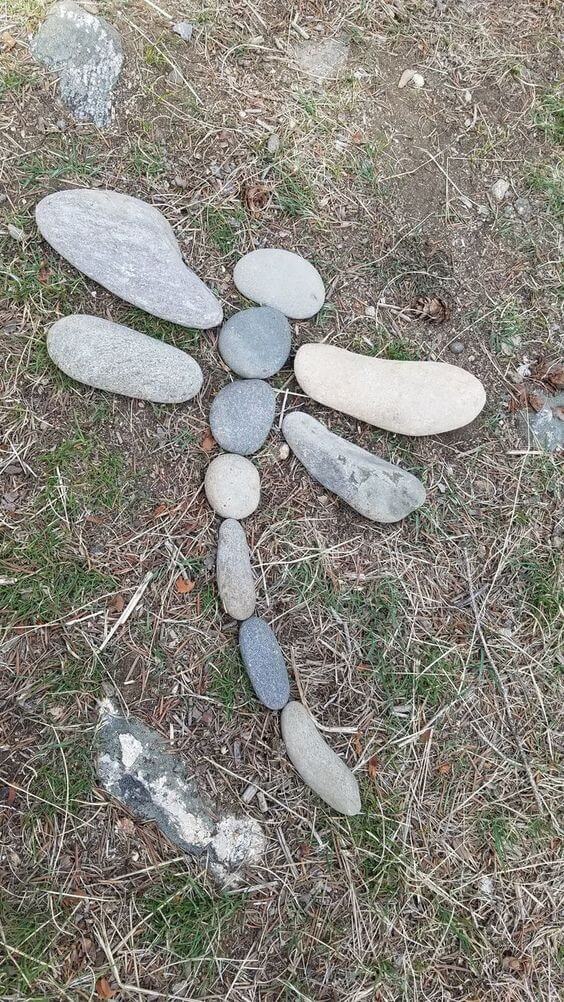
This unique and eye-catching art piece not only adds a touch of whimsy and natural beauty to your landscape but also serves as a symbolic representation of transformation and change, as the dragonfly symbolizes.
Materials Needed
- 10 smooth river pebbles (various sizes)
Step-by-step Guide
Step 1: Select a flat area in your garden or yard for the design. Clear the surface of debris and level the ground if necessary.
Step 2: Arrange the pebbles to form the dragonfly shape: two large pebbles for wings, a few smaller ones for the body, and one small pebble for the head.
Step 3: Adjust spacing and orientation of the pebbles until the dragonfly shape looks balanced and natural.
Step 4: Press the pebbles lightly into the soil or mulch to keep them from shifting.
#16. DIY Plant Stand
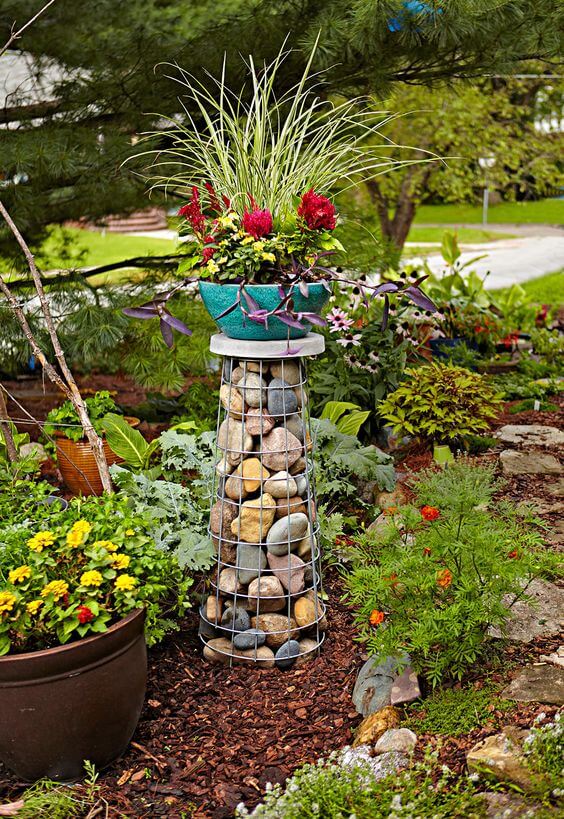
In this creative project, these gabion baskets are repurposed as plant stands and filled with colorful pebbles to provide both stability and a decorative element.
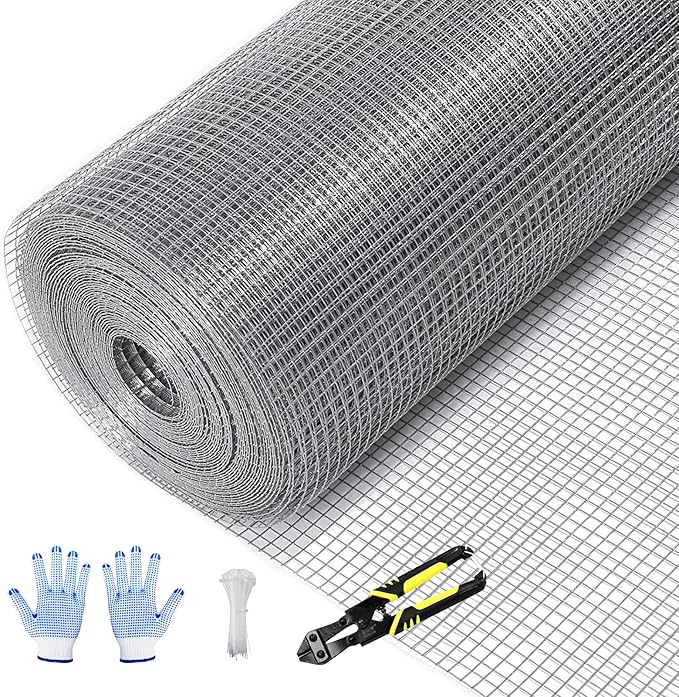
Materials Needed
- Wire mesh garden cage (approx. 3 feet tall, 1-foot diameter)
- 70 lbs assorted smooth garden pebbles
- Large planter pot
- Potting soil and plants
- Shovel
Step-by-step Guide
Step 1: Position the wire mesh cage where you want the tower to stand in your garden.
Step 2: Fill the cage tightly with assorted pebbles, shaking it occasionally to settle stones evenly.
Step 3: Place the planter pot on top of the filled cage, ensuring it sits stable and secure.
Step 4: Fill the planter with potting soil and arrange your favorite plants or flowers.
#17. DIY Rain Chain

When it rains, the water flows down the chain, creating a mesmerizing cascade effect and a soothing sound as it descends into a designated catchment area or garden feature.

Materials Needed
- 8 smooth garden pebbles (medium-sized and flat preferred)
- 16-18 gauge rusty garden wire (approx. 5-6 feet)
- Wire cutters and pliers
- Twine
- Optional: small metal rings
Step-by-step Guide
Step 1: Cut lengths of wire and wrap each pebble securely, leaving extra wire to connect to the next stone.
Step 2: Use pliers to twist wire loops between each stone to create chain links, then attach all wire-wrapped pebbles in a vertical chain, ensuring they hang evenly.
Step 4: Tie a loop of twine at the top , then hang your pebble mobile where it can catch the breeze, enjoying the natural charm and soothing movement.
#18. Ladybug Painted Rocks
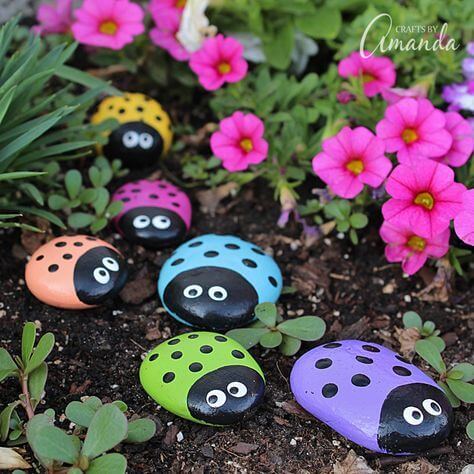
These ladybug-painted pebbles can serve as decorative elements for gardens, flower beds, or potted plants, adding a whimsical and natural touch to your outdoor or indoor decor.
Materials Needed
- 6 smooth, flat pebbles (approx. 3-4 inches wide)
- Acrylic paint set and fine paintbrushes
- Outdoor clear sealant spray
Step-by-step Guide
Step 1: Paint the majority of each pebble in the chosen ladybug color and let dry. Apply a second coat if needed.
Step 2: Paint the head area black and add white circles for eyes with black pupils using a fine brush or paint pen, then add black spots on the body with a detail brush.
Step 4: Once dry, spray the ladybugs with outdoor sealant to protect the paint from weather and fading.